Hey! This is not a Photoshop book with tons of screen grabs and step-by-step instructions. Still, I wanted to share some of my favorite creative techniques for digital darkroom fun. Good fast food for thought here. Enjoy!
Digital photography is partially image capture and partially digital darkroom work/fun. When I am shooting, I am always thinking about the end result. I try to envision the possibilities that are available in the digital darkroom – using Adobe's Photoshop, Adobe Photoshop Lightroom or Apple's Aperture – the latter being the application I use most often. I recommend that you think this way, too, as it will expand your creative horizons when you are looking through your camera's viewfinder.
Here is just one example of "thinking ahead." Knowing the kind of digital magic that's available in Aperture, I took the bottom snapshot of the Golden Gate Bridge during an early morning walk in a nearby park. Using the Crop and Straighten tools, and then using the Levels, Contrast, Black Point and Saturation adjustments, I was able to create the end-result that I had envisioned during my nice peaceful walk.
Envision the end-result, and you'll be able to turn your snapshots into great shots – even favorite shots from a trip, as is the case with the top photo.
That little delete button on the back of your camera sure is easy to use – and it's often quite tempting to press. However, before you trash a picture forever, think about how you can save it and possibly enhance it in the digital darkroom.
Check out this before-and-after pair of images. I agree the image on the left has a boring sky, or at least it appears that way in the original image. In Aperture, by simply pulling down the Curve line from the center to the bottom right in the Curves panel, and then boosting the blue tones in the Color Balance panel, I was able to create a beautiful sunset sky from that dull sky.
The message here is to think before you delete!
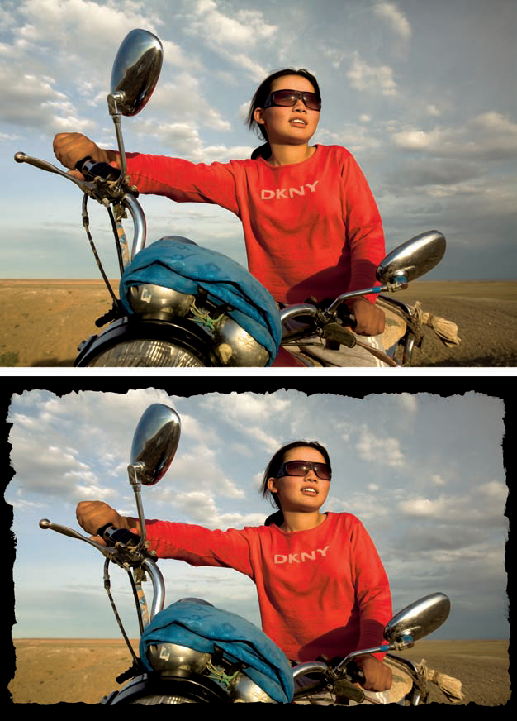
There is a good reason why frame stores make money: People like to see their images in a frame because a frame dresses up the image and helps to draw more attention to it.
We can quickly and easily add a frame to an image in the digital darkroom. Here I used a brush frame in PhotoFrame 3, a Photoshop plug-in from onOne Software (www.ononesoftware.com). With these frames you have dozens and dozens from which to choose. You can change the color of the background and foreground and the size and shape of the frame – resulting in an unlimited number of digital frames.
Digital frames are also found in Photoshop under Actions. Check 'em out. I like Photo Corners and the Brushed Aluminum Frame.
We like pictures taken in the early morning and late afternoon because they have warmer colors (deeper shades of red, orange and yellow) than pictures taken during midday (which have a blue cast).
Slide film photographers used to use a warming filter to "change the time of day" of noontime shots, making them look as though they were taken during the golden hours.
In the digital darkroom, we can create that presto-change-o technique by boosting the red and yellow tones in the Color Balance adjustments panel.
Photoshop offers warming filters as one of its Adjustments (Image > Adjustments > Photo Filter). By varying the filters' sliders, you can vary the effect.
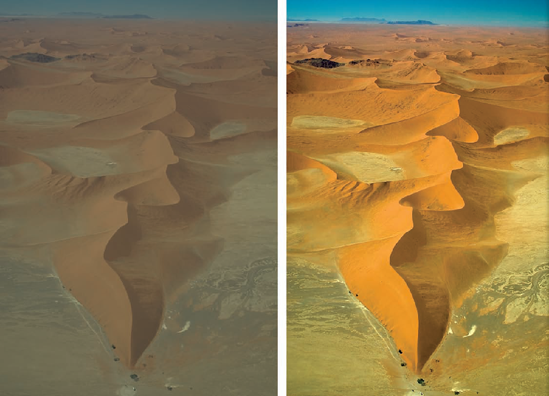
Hey, it doesn't get much easier than this. Take a dull image and boost the contrast, saturation and sharpness in your digital darkroom application.
That's all I did for this photo of a Namibia sand dune that I took through a dirty, Plexiglas window of a small plane.
The resulting image looks as though I had taken it with the plane's window or door removed for clear shooting!
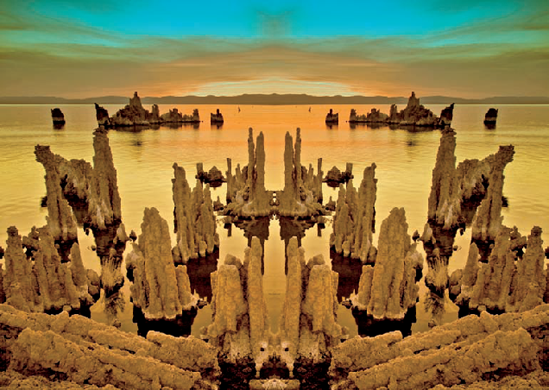
Mirror, mirror on the wall, who has the fairest image of them all?
You do!
Well, at least you can have one of them when you create the mirror effect in Photoshop. Here's the technique (to create a horizontally mirrored image).
Open an image in Photoshop.
Duplicate it. Now you should have two images on your monitor.
Flip the duplicated image. (Image > Image Rotation > Flip Horizontal).
Now, on the same image, double the canvas size to the left of the image (Image > Canvas Size).
Finally, using the Move tool, drag the original image into the open area in the duplicated image.
Line up the images using the Move tool.
There you go! You have a beautiful mirrored image like this one, created from the Mono Lake image that's in the Landscape and Scenic Photography chapter.
Oh yeah, I added the blue sky with the Blue Graduated filter in Color Efex Pro 3 from Nik Software (www.niksoftware.com).
Great fun!
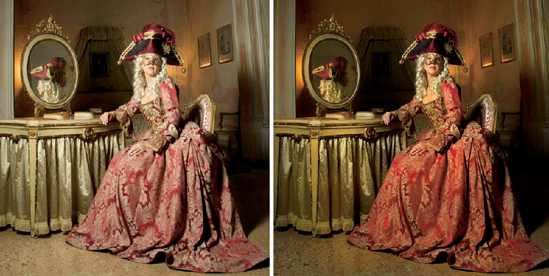
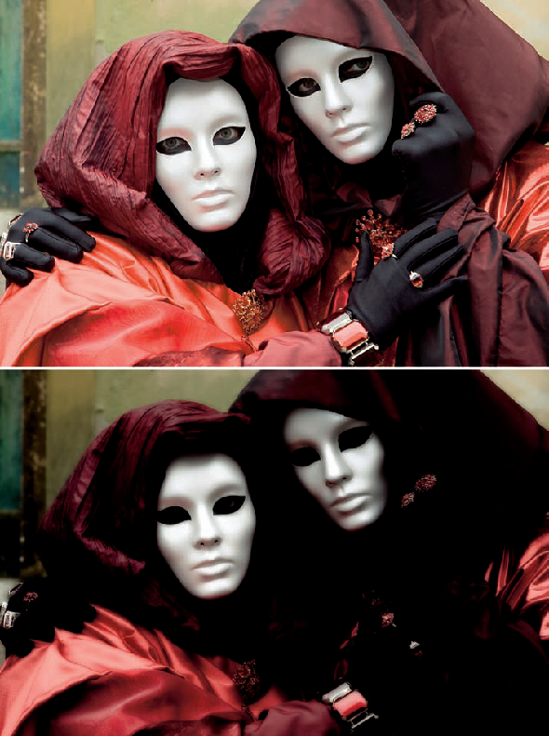
This might be my most important digital darkroom tip: Think selectively, not globally.
When you think selectively, you think about the individual parts of an image that need enhancement. When you think globally, you are thinking about making enhancements to the entire image – which is sometimes not necessary and often not the best idea.
Adjustment layers and Smart Filters in Photoshop, and plug-ins for Aperture and Lightroom, make thinking/working selectively possible.
For this image, I increased the saturation of the woman's dress and her reflection in the mirror. I then used the Burn tool to darken the floor, background and part of her skin and face. As a final step, I sharpened the woman and the dresser and mirror – leaving the background a bit soft so that the main subject was prominent in the scene.

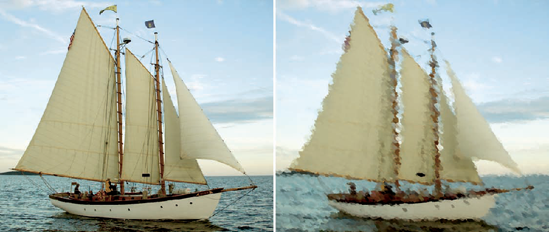
How many times have you attempted to create the panning effect in-camera and have had great results on your first attempt? Uh, I think I know the answer: rarely – that is, unless you were very lucky. I know, because it's difficult to get it right the first time!
In Photoshop, it's easy to create the panning effect – on your first try.
Here's an easy way to explain the process.
Make a duplicate layer (Layer > Duplicate) or copy of your image, because you never want to work on an original and lose the original file.
On the top layer, apply the Motion Blur filter (Filter > Blur > Motion Blur).
While still on the top layer, use the Eraser tool (with a soft-edge brush) and erase the blur over the subject. That reveals the sharp area of the image on the bottom, original layer.
Attention all Photoshop experts: I know that erasing pixels is a no-no! But as I said, this is just an easy way to explain the process. Converting an image to Smart Filters (available in Photoshop CS3), applying the Motion Blur filter, and then masking out the blur over the subject is the pro way to go.
Before reading this tip, please read the previous page.
Thank you!
The technique for this effect is the same as on the previous page, only to simulate the effect of using a long telephoto lens set at a wide aperture, which keeps the subject sharp but blurs the background and foreground, use the Gaussian Blur filter (Filter > Blur > Gaussian Blur).
When using the Gaussian Blur and Motion Blur filters, play around with the slider for different degrees of blur. Sometimes just a touch is nice, while at other times a more intense effect is cool.
Sure, it's cool to have the latest and greatest digital camera to give you the cleanest possible image – one with relatively low digital noise even at high ISO settings. And it's great to shoot with a high-quality SLR lens for the sharpest possible shot.
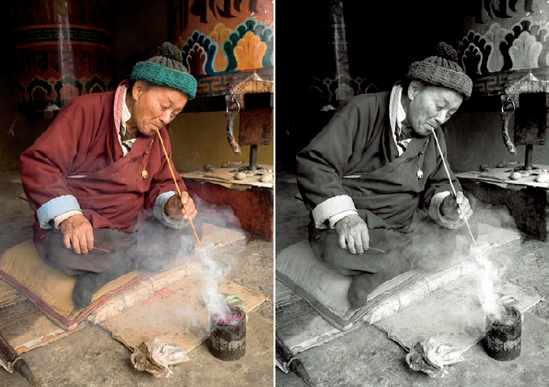
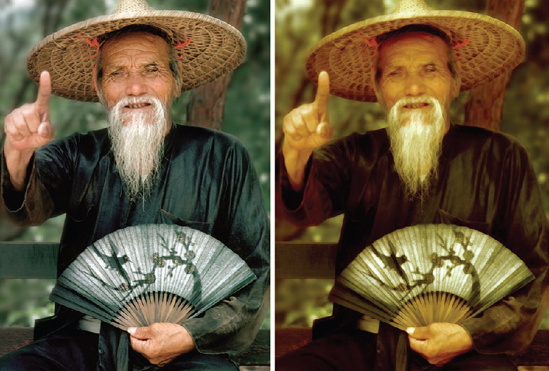
Sometimes, however, it's fun to go back in time and simulate the effect of an old-time photo. The fastest and easiest way I know of doing that is to apply the Aged Photo Action (Actions > Aged Photo) in Photoshop, which is what I did for this picture I took of a man in Hong Kong.
You can also turn new photos into old-looking photos in Photoshop by slightly desaturating them, adding film grain, applying Dust & Scratches, applying a bit of Gaussian Blur and/or by applying the sepia filter.
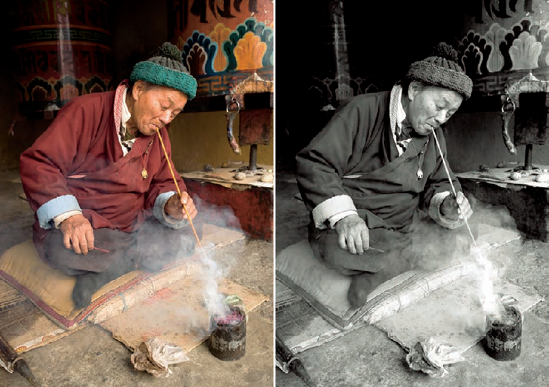
When we remove the color from a scene, we remove some of the reality. And when we remove some of the reality, a picture becomes more artistic. In the digital darkroom, there are many ways to create beautiful black-and-white images. Here are just a few.
Alien Skin Software (www.alienskin.com) offers a Photoshop plug-in called Exposure that simulates dozens of different types of black-and-white film effects. Other plug-ins for creating black-and-white images include Color Efex Pro from Nik Software (www.niksoftware.com) and PhotoTools from onOne Software (www.ononesoftware.com).
You can also create and fine-tune black-and-white images using many of the controls that are built into Aperture, Lightroom and Photoshop.
If you want to make great black-and-white prints, make sure you get a printer that accepts the special monochrome inks that are required for fine-art printing, such as matte black, photo black, grey and photo grey – which optimize the black ink density for monochrome photo-quality output.
When I first started in photography, I used a graduated filter (which is dark on the top and gradually becomes clear on the bottom) over my lens to compress the brightness range in a scene. The result was that the exposure for the brighter sky was more closely matched to the exposure for the landscape – making getting a good exposure relatively easy.
Neutral density graduated filters have no effect on the color of the sky. Color filters are available to add different colors to the sky, such as light blue, dark blue, orange, red and so on.
Today, I use the digital graduated filters in Color Efex Pro from Nik Software (www.niksoftware.com). Literally hundreds of different color filters are available. In the plug-in's control panel, you can place the filter anywhere you like – so that its placement matches the horizon line in your image.
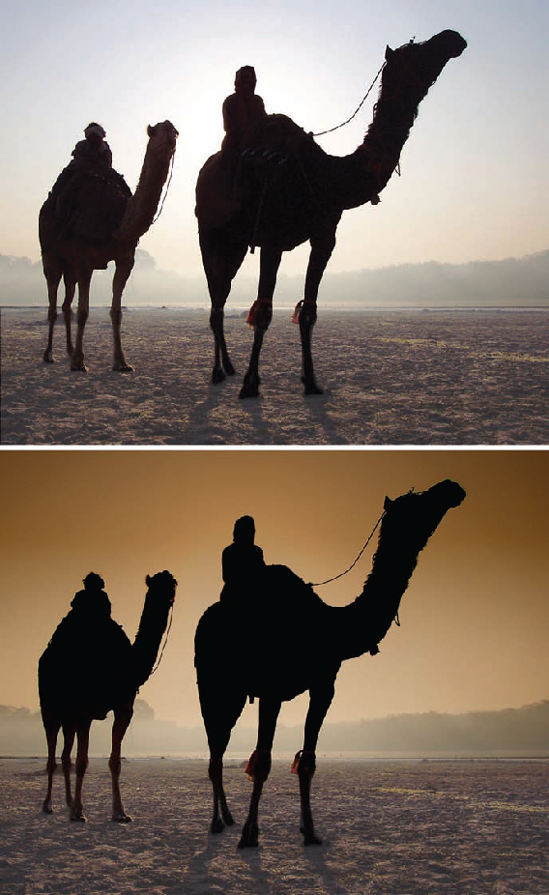
I applied the coffee graduated filter to this photo to add some color to a lack luster image of two camels I took behind the Taj Mahal.
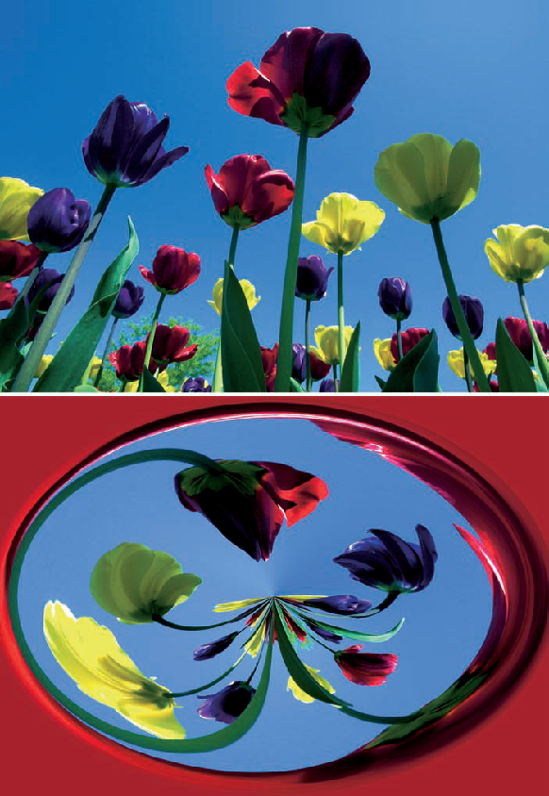
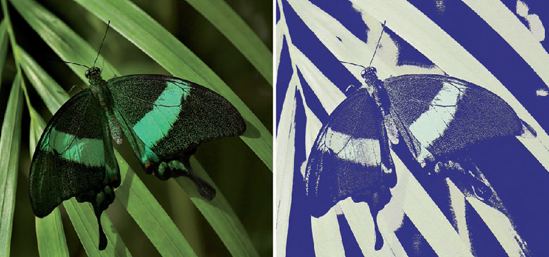
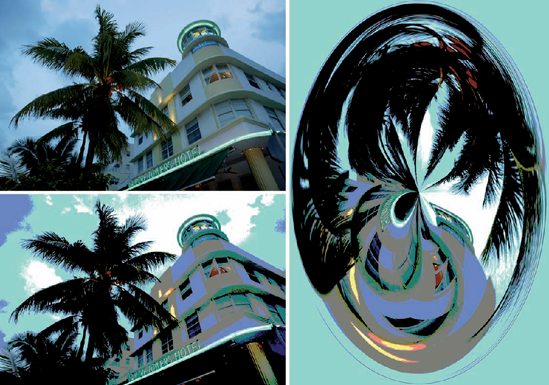
At my seminars, this is the most popular Photoshop special effect. Here's how to do it.
Open an image with a strong graphic element.
Go to Filter > Distort > Polar Coordinates > Polar to Rectangular.
Then go to Image > Rotate Canvass > Flip Vertically.
Go back to Filter > Distort > Polar Coordinates, but now choose Rectangular to Polar.
This effect does not work for every image, but when it works, it really works!
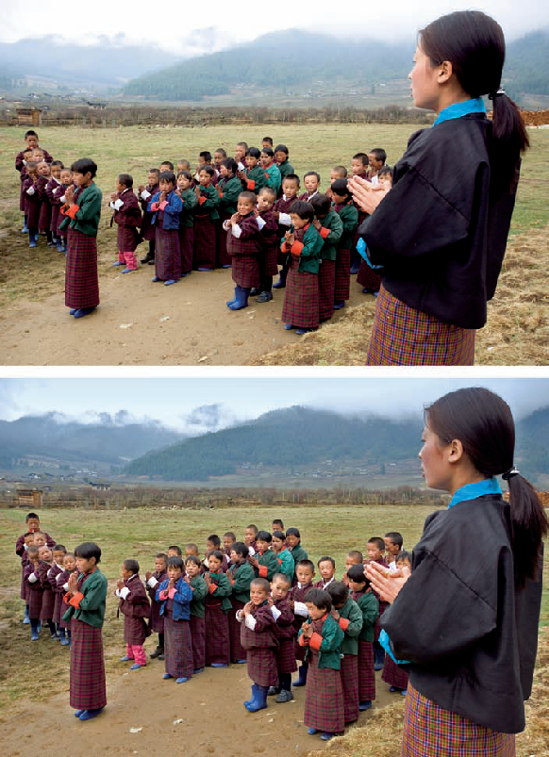
When you photograph a subject close-up with a wide-angle lens, the lens can distort the subject, as it did here, creating the effect that this schoolteacher in a remote village in Bhutan was leaning over backward.
Photoshop to the rescue, once again. Here's what to do in a case like this.
Go to Select > All.
Next go to Edit > Transform > Perspective.
Now pull out the anchor points at the top left or right of the frame until the distortion effect is corrected.
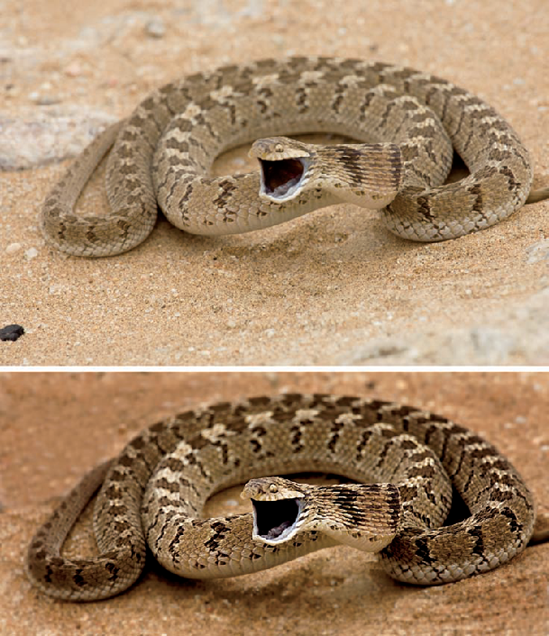
Pictures in which the subject stands out from the background have more impact than those in which the subject blends into the background (unless the point of the picture, perhaps, is to illustrate a camouflage technique of an animal in nature or a similar point).
Here are the techniques I used in Photohop to make the snake stand out in this photograph.
I cropped the image so the snake almost filled the frame. That eliminated the dead space around it.
I used the Burn tool to darken the sand around the animal. I also blurred it using the Gaussian Blur filter.
Then I used Unsharp Mask (Filter > Sharpen >Unsharp Mask) to sharpen the snake, and I selectively increased its contrast.
Take the time to make your subject stand out in a photograph, and you'll have an outstanding picture.
Feel artistic? Check out this effect.
In Photoshop, go to Filter > Sketch > Note Paper. Play around with the slider (Image Balance, Graininess and Relief) to create a one-of-a-kind image.
Keep in mind that when you apply this filter, the foreground color, which was set to blue in this case, is applied to the image. Had I selected red, for example, the image would have had a red tint.
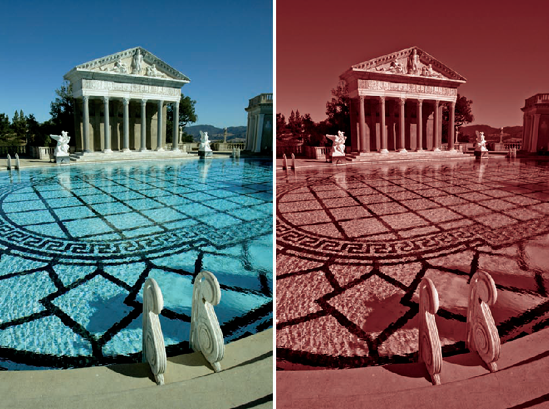
Want to add an interesting tone to an image? Check out Duotone (which is grouped with Tritone and Quadtone) in Photoshop.
To find Duotone in Photoshop, go to Image > Mode and convert an RGB image to a Grayscale image. After doing that, you'll see Duotone in the Image > Mode pull-down menu.
When you select Duotone, you can combine two colors of ink to create an image. When you select Tritone and Quadtone, you combine three and four different inks, respectively, to create an image.
To add some color to this picture of the swimming pool at the Hearst Castle in California, I combined an orange ink and a pink ink.

Photoshop has some fantastic filters. Play around with the sliders in the filters' windows, and you can create one-of-a-kind effects.
Want even more unique effects? Try fading a filter. Here's how to do it.
Immediately after applying a filter, go to Edit > Fade Filter. You'll see the name of the filter you just applied to your image. In the dialog box that pops up, move the slider to the left to fade the filter. Play around with the different fade modes for even more effects.
I applied the Graphic Pen filter to my lifeguard stand photo and then faded it to about 20 percent.
With the Graphic Pen filter, as with some of the other filters in Photoshop, the foreground color affects the filter's effect. Here I chose a light blue as my foreground color.
I can't paint to save my life – with a paintbrush that is. I can, however, use Photoshop's Art History brush (which is nested with the History Brush) in the tool panel to creatively paint over every pixel in an image for an artistic image.
The key to this technique is to use a small brush. And when choosing a brush, load a Dry Media Brush, Wet Media Brush, or Faux Finish Brush.
For more info on this cool technique, just type "Art History Brush" in Photoshop's Help window.
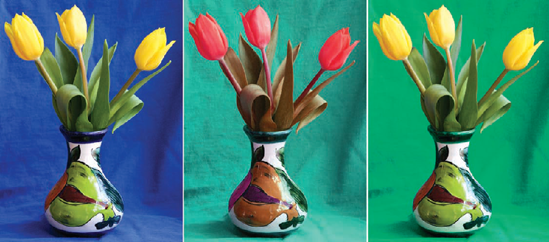
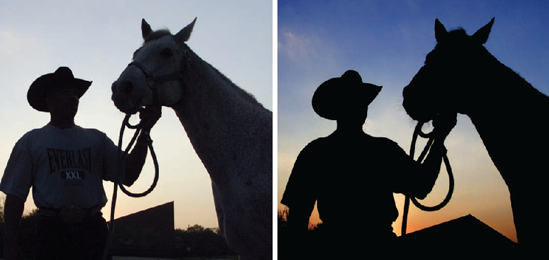
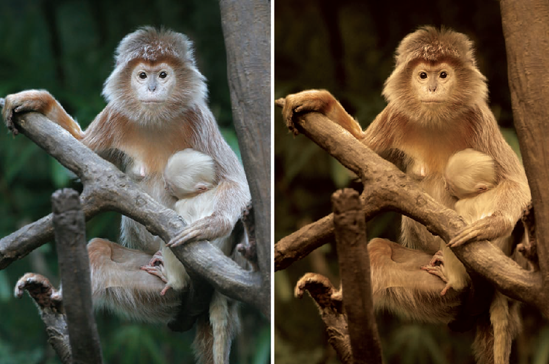
Here's another fun-filled digital darkroom quickie. Play around with the Hue sliders in your image-editing program to change the color or colors in an image.
I say color or colors because if you adjust the hue with Master selected, you change all the colors in a scene, which is how I created the middle image from the original image on the left.
When, however, you choose to change the hue of just one of the colors, you only change the hue of that color in an image. To create the image on the right, I chose Blue rather than Master to change only the blue tones in the image.
See. It really is all about hue!
If you come on one of my photography workshops or attend one of my seminars, you'll hear me say that one of my favorite expressions is: You snooze, you lose. It's true. If you are serious about your photography, you need to get up early and stay up late – sometimes until midnight – to get great shots. It's all about the light.
Well, if you are tired after a hard day's work and fall asleep early, there is a digital darkroom technique for getting a midnight-looking shot.
Nik Software (www.niksoftware.com) offers the Midnight filter in its Photoshop plug-in, Color Efex Pro. I used it on one of the images I took in Venice, Italy during Carnevale. Basically the filter darkens shadows, softens the details and adds a nice overall glow to the image.
In the 1960s, pop art and posterized images were, well, groovy.
Today, thanks to Photoshop, creating a posterized image is quick and easy.
Go to Image > Adjustments > Posterize. Use the slider in the dialog box to vary the effect from slight to intense.
Hey man, combine it with the Swirl Effect that you read about earlier in this chapter, and you have a really far out photo, as illustrated by the image on the right.
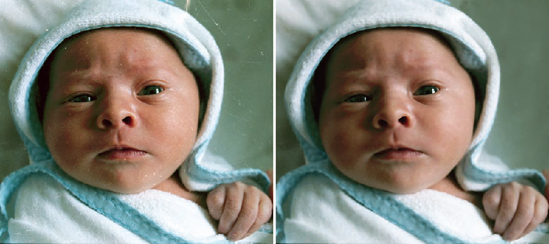
My second tip in this chapter was about not being so quick to delete an image. Well, when it comes to old, scratched prints, don't be so quick to toss them either. Thanks to Photoshop, you can make them look almost brand new.
The badly scratched photo of my son, Marco, is a good example of Photoshop's magic. To retouch the photo, I first applied the Dust & Scratches filter (Filter > Noise > Dust & Scratches), which did a pretty good job cleaning up the image. Yes, this filter does soften an image, but for portraits, that could be (and it was in this case) a good thing.
To remove the really bad scratches and spots, I used Photoshop's Healing Brush.
If you really want to get into photo retouching, I recommend you check out Katrin Eisemann's DVDs, books, seminars and workshops. See www.katrineismann.com.
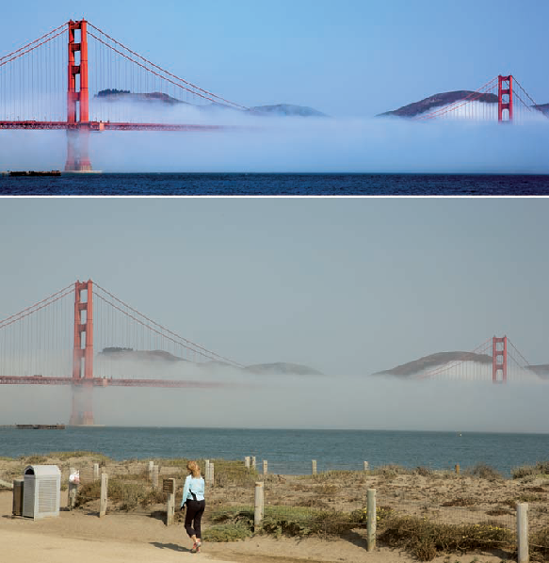
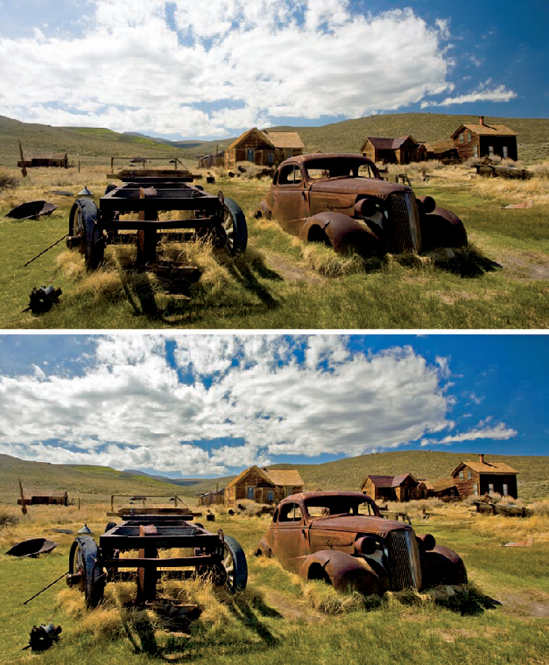
Check out the top image on this page, which I took at Bodie Historical State Park in California. As you can see, I was shooting into the sun – which resulted in an image with a wide contrast range. The highlights are a bit washed out and the shadows are a bit too dark. No problem!
In Aperture, Lightroom and Photoshop, there is a wonderful adjustment called Shadow/Highlight that lets you adjust the shadows and highlights somewhat independently.
I used that easy-to-use adjustment to create the bottom image. I also boosted the saturation just a bit to add more color to the scene.
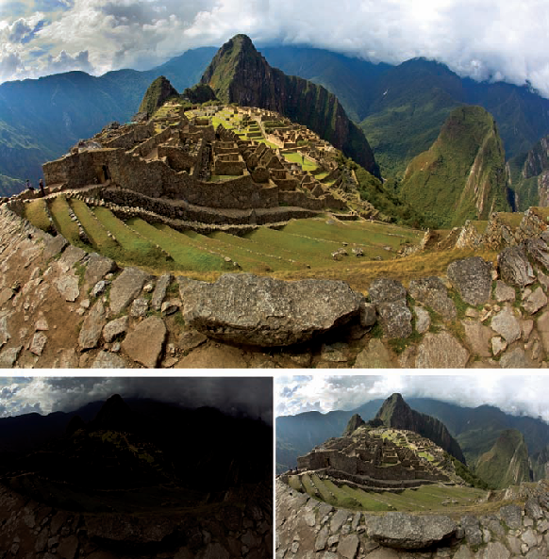
Here is an easy technique in Photoshop for getting a well-exposed image in a high-contrast situation – as long as the contrast range is no more than three f-stops.
Open a file (of course, you should be shooting RAW) and process it so the highlights look great. Don't worry about the shadows, which will be blocked up after your highlight processing – as illustrated in the bottom left image.
Now, open the image again and process it for the shadows. That's right! Don't worry about how the highlights look, which will be overexposed – as illustrated by the bottom right image.
With both images open on your monitor, drag one image over the other. If you hold down the Shift key (on either a Mac or a PC) during the dragging process, the images will be perfectly aligned.
Now, select a soft edge brush and use the Eraser tool to erase the part of the image that is either washed out or blocked up. The result, after adding some standard Adjustments such as Contrast and Saturation, should look like the top image of Machu Picchu you see here: a beautifully exposed image.
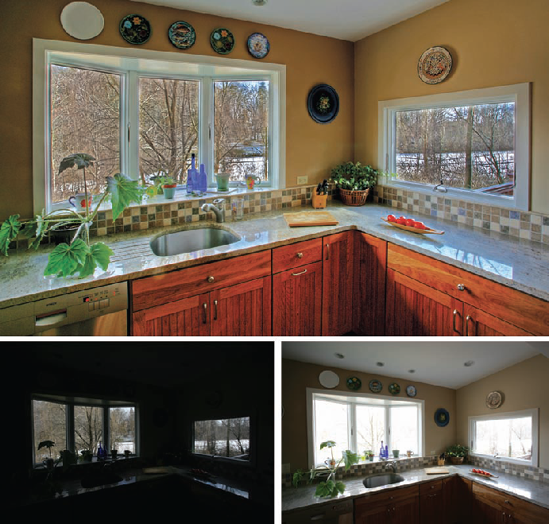
In very high contrast situations, you'll need to utilize a digital darkroom technique called High Dynamic Range.
Here's the process in Photoshop (one of several options). Place your camera on a tripod and set it to the aperture priority mode. Take several exposures over and under the recommended exposure, with the goal of capturing the entire brightness range – from the brightest highlight to the deepest shadow.
In Photoshop, go to File > Automate > Merge to HDR. Follow the on-screen prompts and your images will be merged together to produce an image with a tremendous shadow to highlight range.
For the end-result photograph of my kitchen that you see here, I took six photographs, only two of which are shown.
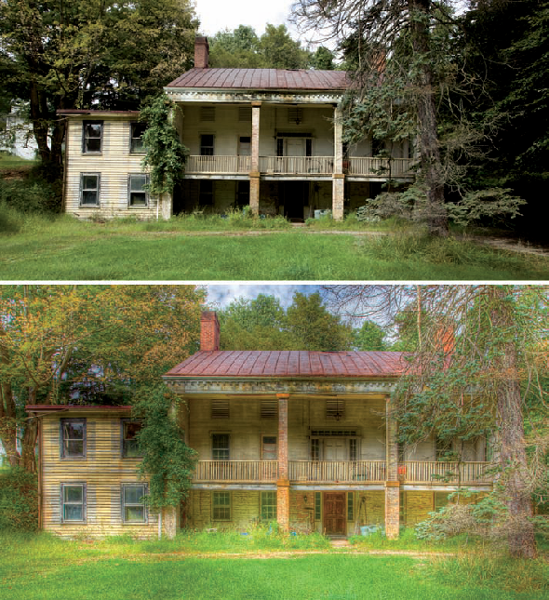
A very cool option for creating HDR images is to use a program called Photomatix Pro (www.hdrsoft.com).
This program can accomplish the same effect as Merge to HDR in Photoshop, but it also opens a whole new world of creativity for you.
In the program, you have two modes: Tone Compressor and Detail Enhancer.
It's in the Detail Enhancer mode where your imagination can run wild, as mine did when I was working on this picture of an abandoned house.
Play with the sliders in the Detail Enhancer panel, boosting the Color Saturation, Luminance and Strength all the way up! Set the Micro-smoothing setting to Zero and boost the Micro-contrast setting.
Go wild!
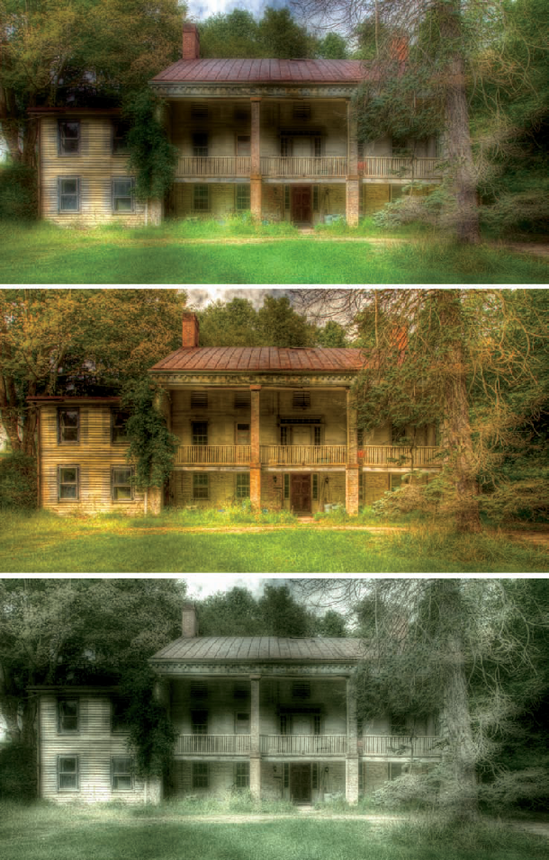
Here are some more Photomatix Detail Enhancer effects – with the help of some plug-in filter effects. I'm sharing them with you to illustrate that a photograph is really never finished. You can always go back and experiment for new, creative images.
Here are the plug-in filters I used.
Top: Midnight filter in Color Efex Pro 3 (www.niksoftware.com).
Middle: Autumn in Photo Tools (www.ononesoftware.com).
Bottom: Monday Morning in Color Efex Pro 3 (www.niksoftware.com).

Here is the quickest tip in this book: Never stop playing with your images in HDR, Photomatix in this case.
While playing with one of my Mono Lake photographs, I came up with a variation that was just perfect for the cover of a magazine. The variation was totally unexpected – which I enhanced by adding a sepia tone filter.
Now all I have to do is find a magazine that wants my image for its cover. The good news is that I have a good example to show the art director. If you have an image you think would make a good cover, make a mock-up, like this, and give it a try.
Good luck!
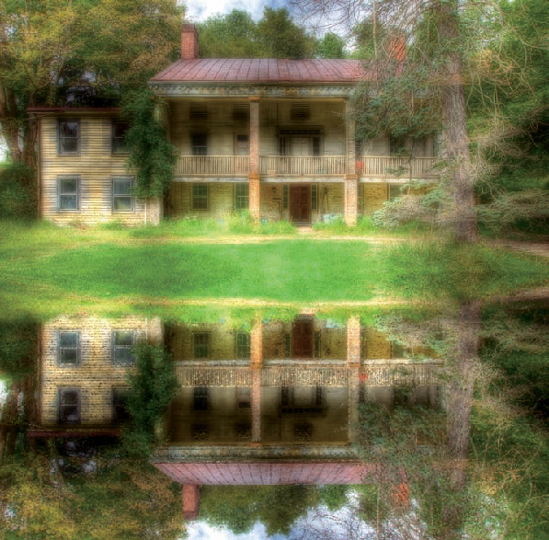
We all enjoy looking at scenes in which a subject is perfectly reflected in a pond or lake. Here's how to create that type of image in Photoshop. As an illustration, I'll use one of my Photomechanix shots.
First, you need a photograph that lends itself to a reflection image.
Second, copy the image and flip it vertically (Image > Rotate Image > Flip Vertical).
Third, go back to your original image and double the canvas size (Image > Canvas Size).
Fourth, drag the upside image into the open area of your right side up image. Line up the images.
With the upside-down image layer activated, add the Ocean Ripple filter (Filter > Distort > Ocean Ripple). Then use Levels (Image > Adjustment > Levels) to darken the image. You are adding the ripples and darkening the "reflection" because that effect happens naturally in a pond or lake.