
If you want to photograph animals that fly, run, walk or swim in the wild and in zoos or wildlife parks – you've come to the right place. In this chapter, I share my favorite photos from the Arctic to Antarctica, and many places in between.
One of the cool things about digital SLR cameras (and top of the line compact digital cameras) is that you can control the shutter speed to either stop or blur action.
When I photograph fast-moving animals, and even slow-moving ones, I often choose to freeze the action because I want a sharp shot.
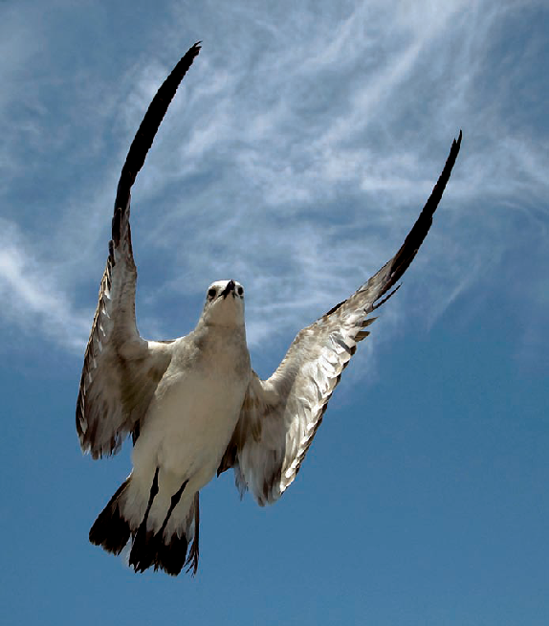
A shutter speed of 1/500th of a second is usually fast enough to freeze most fast-moving animal action, but when the animal is moving extremely fast, as was this seagull in flight, I had to use a 1/2000th of a second shutter speed. I learned that through magnifying the previous images on my camera's LCD monitor, and seeing that in the pictures taken at 1/500th of a second the bird was a bit blurred.
When photographing fast-moving animals, I recommend setting your camera's frame advance to the highest frame-per-second rate possible. Doing so will help ensure a nice photograph of the animal; in this case, one in which one of the seagull's wings was not covering its face.
In addition, you want to set your auto focus mode to the focus-tracking mode, which is covered on the next page.
One more tip. When composing your pictures, try to leave a fair amount of space around the animal. That way, if it moves up, down, left or right, you'll have a better chance of framing the entire animal, and not cutting off any of its body parts with the edge of your frame. This picture is cropped. In the original picture, the bird, which now fills the frame, comprised only about 50 percent of the image.
If you want to a blur subject movement, see the lesson on Panning to Create a Sense of Action in the People Photography chapter.
One of the advantages of getting a high-end digital SLR is that it focuses faster than an entry-level digital SLR. That's important when photographing moving subjects, especially when the subjects are moving toward you.
To get sharp shots of rapidly approaching subjects, digital SLR cameras offer what is called a focus-tracking mode (called AI Servo on Canon cameras and Continue Focus on Nikon cameras) that actually tracks a moving subject right up until the moment of exposure.
On entry-end digital SLRs, focus tracking may not work with all telephoto lenses, and some telephoto lenses may not auto focus. Before you buy a camera, make sure it will perform to your expectations.
Combine focus tracking with the tips on the preceding page and you should get sharp shots of fast-paced action.

By the way, I am sure you noticed this artistic digital frame I added to frame my pelican photograph. I added it in a Photoshop plug-in called Photo Frame Pro 3 from onOne Software (www.ononesoftware.com). The frame has nothing to do with focus or the camera, but I wanted to share the idea of using digital frames in this book, and this seemed as good a place as any.
I am the first to admit that I am not a fine-art photographer. However, I do like to photograph the art I see in nature.
Art is about many things, including highlights and shadows, and the subtle differences between them. Few works of art look flat and lack contrast.
Here's something I learned long ago about light that helps me "see the light," which, in turn, has helped me pick out artistic subjects and scenes in nature: "Light illuminates, shadows define." In other words, light lights the scene. No light, no photograph. When it comes to shadows, if there are no shadows, a scene or subject looks flat – having little contrast. It's the shadows that add contrast and detail – and define the subjects in an image.
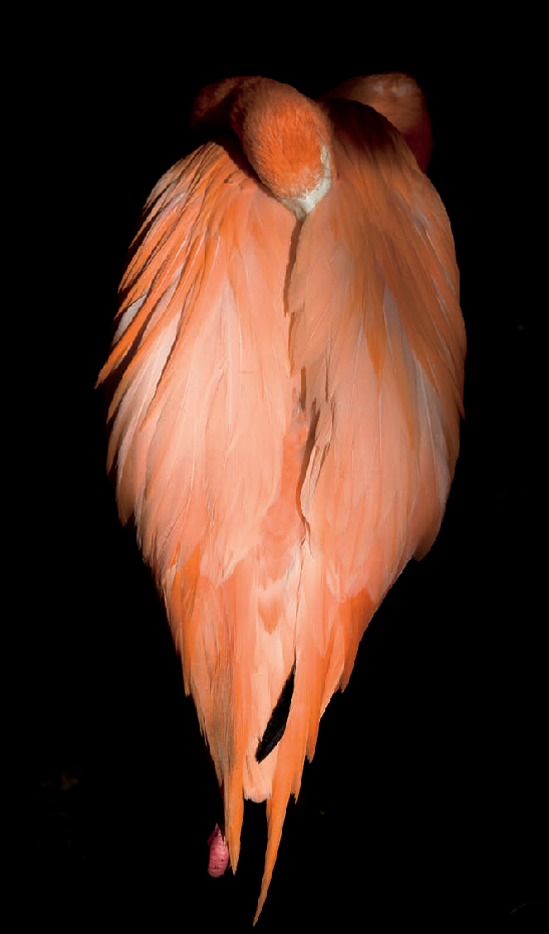
If we learn how to see the highlights and shadows in a scene, and especially when we are on the lookout for dramatic lighting, as illustrated in this natural-light photograph of a flamingo, we are on our way to artistic images.
Art, of course, is also about the subject – the flamingo in an artistic position in this example. I doubt that a picture of one of my old running shoes in the exact same lighting conditions would be considered art by anyone . . . but who knows? Art is in the eye and mind of the beholder.
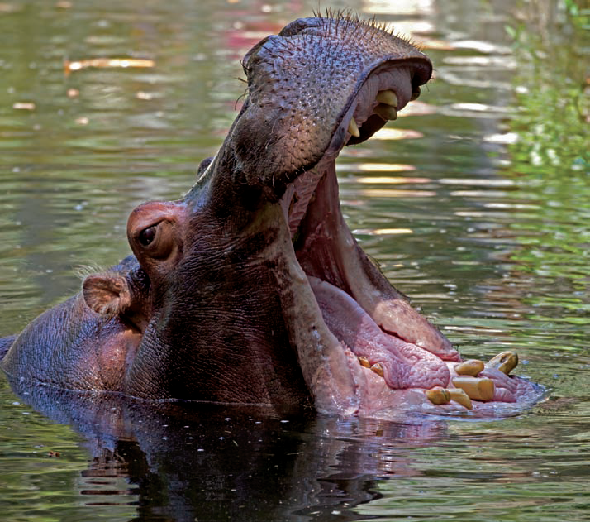
Here is my favorite shot from a sequence of pictures I took of a hippo at Homosassa Springs Wildlife State Park in Florida. It's my favorite because it shows the hippo with its mouth wide open (in anticipation of a feeding session). The other shots in the sequence are certainly not as dramatic, and some, like the shots of the hippo with just its eyes above the water, are boring.
To capture the peak of action when photographing any animal, I first take a test shot of the scene to check my exposure. Then, when the animal moves into the scene, I set my camera on rapid frame advance and begin shooting.
One of the advantages of a high-end digital SLR is that the maximum frame-per-second rate is faster than that of a low-end digital SLR. For example, my Canon EOS 1D Mark III shoots up to 10 frames per second. My Canon EOS Digital Rebel XTi shoots up to three frames per second.
When shooting action sequences, you should keep in mind that RAW files write slower to a camera's buffer than JPEG files because RAW files are larger. Therefore, if you are into shooting an action sequence with your image quality set on RAW, your camera may "lock up" at the peak of action as the camera's internal buffer fills faster with fewer larger files. The same thing can happen when shooting JPEG files, but because of their smaller size they write faster and you'll have less chance of the camera locking up. For example, with my Canon EOS 1D Mark III, I can shoot up to 110 continuous frames in the JPEG mode, but only up to 30 continuous frames in the RAW mode.
I am sure you have heard about "fast" memory cards that let the camera write to them faster than standard memory cards. If you have a high-end camera and shoot action sequences, they can be beneficial. However, on an entry-end camera, you will probably not see any difference in write speed.

When I give a presentation, one of the most frequently asked questions is, "Do you bracket your exposures?"
For those of you new to photography, bracketing is taking additional exposures of a scene at over and under the recommended setting – thereby ensuring that one of the exposures will be correct. Most digital SLR cameras offer manual bracketing, where you adjust the exposure after taking a picture using the camera's +/− minus control (in automatic mode). Some SLRs also offer automatic bracketing, a feature in which you set the camera to automatically take additional exposures over and under the recommended setting.
When I used to shoot slide film, I bracketed my exposures, because when shooting slide film, the exposure had to be right on. I sometimes bracketed over and under the recommended exposure by ¼ and ½ of an f-stop in both directions.
If you shoot JPEG files, you really should bracket your exposures because, like slide film, your exposures must be right on target, as your ability to adjust the exposure on JPEG files is limited. RAW files, on the other hand, have wider exposure latitude, so your exposures don't have to be perfect in the original image. What's more, you can rescue overexposed highlight areas and underexposed shadow areas more effectively from a RAW file.
Because I only shoot RAW files, I don't bracket my exposures. If you shoot JPEGs in tricky lighting situations, such as this flamingo partially illuminated by sunlight, then I suggest bracketing to get the best in-camera exposure.
I photographed this cheetah at a wonderful wildlife park, Fossil Rim Wildlife Center (www.fossilrim.com.) It's about an hour south of Dallas, Texas.
The cute cheetah cub was behind a chain link fence, but as you can see, it looks as though I photographed the animal in the wild. That's because I used a simple technique to make the fence disappear. Here goes.
Use a long telephoto lens in the 200 – 400mm range. In this situation, the longer the lens the better your photograph will be.
Set the aperture as wide (lowest number) as it goes.
Remove the lens hood and place the lens right up against an opening in the fence (or as close as possible).
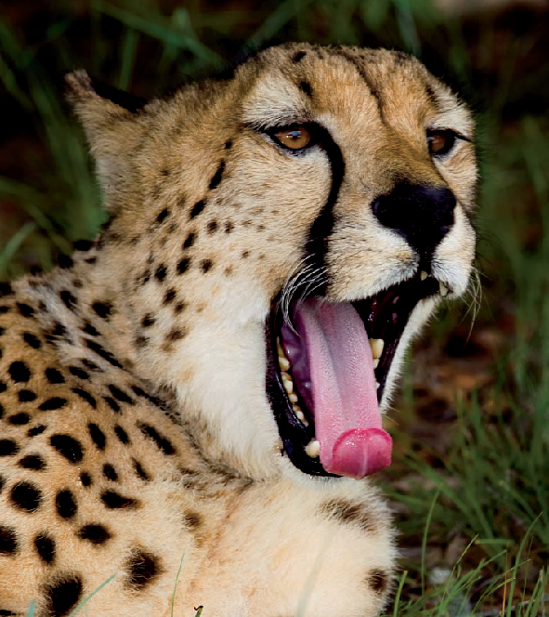
Focus carefully on the subject.
Shoot. The long-lens/wide f/stop combination will blur the fence to the point where it becomes invisible in most cases.
If possible, it's best to pick a part of the fence that is not in bright sunlight, because sunlight falling on the fence may create bright light streaks in your photographs.
Here is another photograph I took at Fossil Rim Wildlife Center. I'm using it here to illustrate a basic composition technique: placing the subject off-center. When you place the subject off-center, you give the viewer of the photograph the opportunity to look around the frame to see what else may be of interest – rather than having him or her get stuck on the subject in the dead center of the frame.
Another popular composition technique is to imagine a tic-tac-toe grid over the scene in your viewfinder and place the subject where the lateral and horizontal lines intersect.
Let's talk shutter speeds. The shutter speed you choose can freeze or blur action – and make the difference between capturing a sharp shot or a blurry shot. For now, let's just focus on getting sharp shots.
A shutter speed of 1/125th of a second sounds fast enough to prevent a blurry handheld picture caused by camera shake. That is, if you are using a 100mm or shorter focal length lens or a 200mm Image Stabilization (IS) lens. However, if you are using a 400mm or longer lens, even an IS lens, you may get a shaky shot. Here's the deal – and some general guidelines to follow for handheld pictures.
When using a non-IS lens, don't shoot at a shutter speed below the focal length of the lens. For example, when shooting with a 400mm lens, don't use a shutter speed below 1/400th of a second.
Image Stabilization lenses let you shoot at slower shutter speeds, usually three stops but sometimes four stops below the traditional focal length/shutter speed rule. For example, with my Canon 70–200mm f/4 lens, which features four stops of image stabilization, I can handhold the camera set at 200mm and get sharp pictures at a shutter speed of 1/50th of a second.
To help steady your shots, tote a tripod, monopod, beanbag, camera clamp – or just brace yourself against a wall or tree.
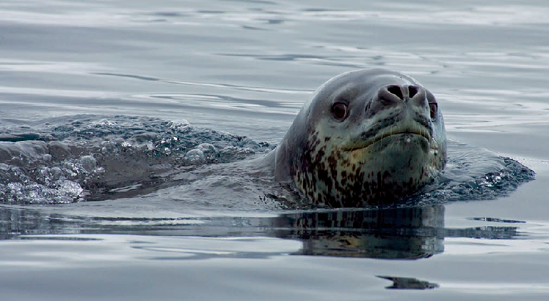
I photographed this leopard seal in Antarctica with my 100–400mm IS lens set at 400mm. My shutter speed was 1/250th – and I still got a tack sharp shot using the techniques I outlined above.

I enjoy taking wildlife pictures, but I am not a full-time professional wildlife photographer. Most of those folks use fast and expensive fixed focal length lenses to get them up close and personal with their subjects.
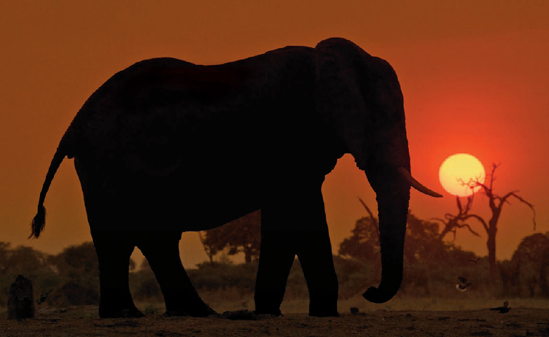
Technically speaking, fixed focal length lenses are sharper than zoom lenses. For folks like us, however, zoom lenses in my opinion are a better choice. They are more affordable for one thing. For another, when you are locked into a shooting position, as I was when photographing this sunset scene in Botswana, you can zoom in and out of the scene, fine-tuning your composition in camera. Also, we can always sharpen our pictures in the digital darkroom for our enlargements.
Fixed focal length lenses are usually faster (having a wider maximum f-stop) than zoom lenses, making them better suited for low-light photography. That's also not a big deal for us, because we can easily boost the ISO in low light and reduce the digital noise associated with higher ISO settings either in-camera or in the digital darkroom.
Having said all that, my favorite zoom lens for photography is my Canon 100–400mm f/4 Image Stabilization lens for two reasons. One, it can get me "close" to a subject. Two, it gives me the flexibility of zooming in and out so I can get the best possible in-camera composition. I used this lens for my picture that I took in Botswana of an elephant at sunset.
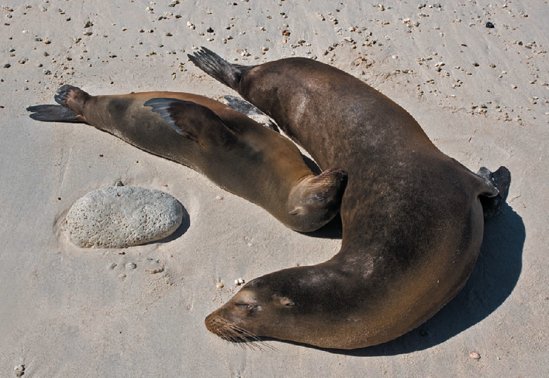
My favorite zoom lens for wildlife photography used to be the Canon 16-35mm f/2.8 zoom lens. However, when Canon introduced the 17–40mm f/4 lens for about half the cost, I sold my 16-35mm lens on eBay® and picked up the 17–40mm lens – which is the lens I used for this picture that I took in the Galapagos of a sea lion and its pup.
The lens is super sharp at f/8, which is the f-stop at which most lenses are the sharpest. At either end of the f-stop range, the pictures are not tack sharp – but still very acceptable. But again, I sharpen them in the digital darkroom.
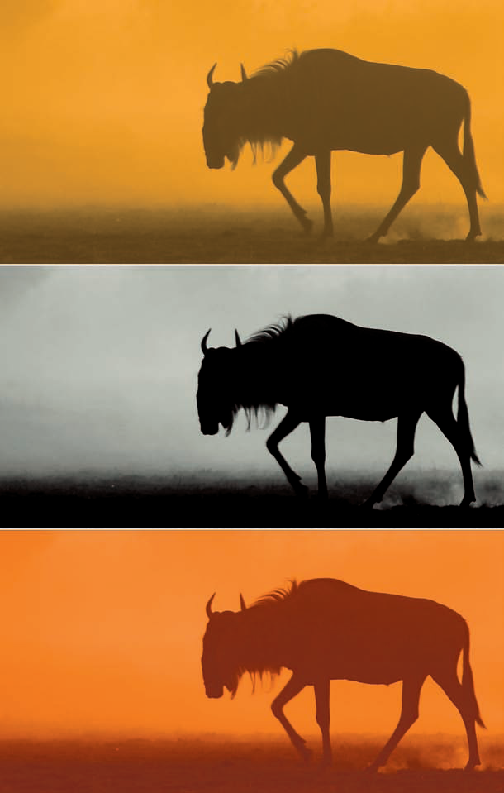
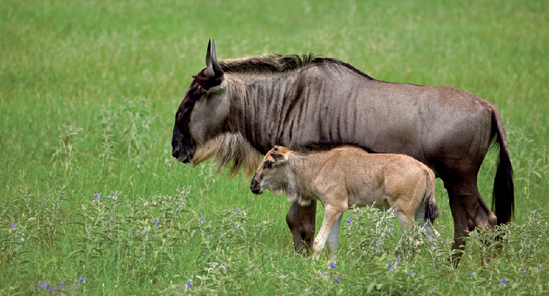
When we shoot a silhouette, we remove some of the reality of the scene, which was my goal when I photographed this wildebeest in Kenya. That's because in reality, we can see more in the shadow areas of a scene than our cameras can record. Thus when we shoot a silhouette and remove some of the "reality" of the scene, our pictures become more artistic and creative – and eye-catching, too.
The key to getting a dramatic silhouette is to have the subject strongly backlit, as was the case when I photographed this wildebeest at sunrise.
To add to the drama of the scene and to intensity the silhouette, I set my exposure compensation to −1 ½. Usually the stronger the silhouette is, the more dramatic the photograph.
In the digital darkroom (using Apple's Aperture in this case), I increased the saturation and contrast, which also added to the drama of the image.
Hey, since I have the space, here are two more digital darkroom tips: One, desaturate the image to create a nice black-and-white image. Two, play with color balance as I did on the bottom image, adding a red-hot sunlight cast to my original orange-tone image.
Oftentimes, to shoot silhouettes, you need to follow one of my photo philosophies: You snooze, you lose! In other words, get up early and stay out late to capture scenes like this, scenes that sleeping photographers miss.
Want an easy and affordable way to get close to distant animals without spending a fortune on expensive super telephoto lenses? Rather than spending big bucks on lenses that I would use only once in a while, I use a Canon 1.4x tele-converter on my 100–400mm zoom lens. With the converter mounted between my lens and the camera, my 100–400mm zoom becomes a 140–560mm zoom.
The Canon 1.4x tele-converter costs about $300, which is much less than a longer zoom.
You may be wondering why I don't use a Canon 2x converter. Well, traditionally, 2x converters produce images that are a bit softer than those made with 1.4x tele-converters and you only lose one stop of maximum aperture compared to two with a 2x converter. Therefore, I use the 1.4x tele-converter and crop and enlarge my pictures in the digital darkroom.
One more thought on tele-converters: You absolutely get what you pay for. I have led more than a few Africa workshops where some of the participants used inexpensive tele-converters. Most wound up in the trash bins at the camps after the participants reviewed their results on their laptops.
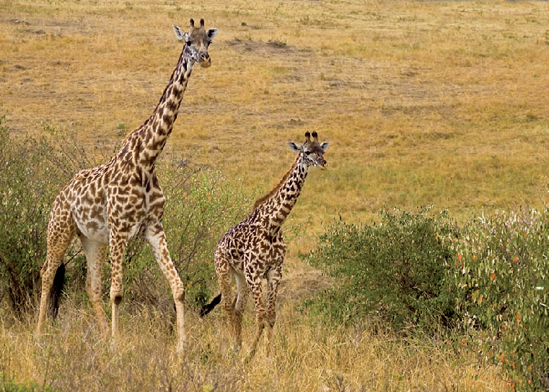
It may not look like it, but I photographed these giraffes in low light with my ISO set at 1000 – a potentially digitally noisy (what we used to call grainy with film cameras) situation.
I applied in-camera high ISO noise reduction to the image. Before I tell you why, here's the scoop on noise.
There are two types of noise in digital images: luminance noise (grey-black specks) and chromatic noise (pastel-colored specks). Noise shows up more in the shadow areas than in bright areas, and it also shows up more on plain areas (like the sky) than in detailed areas. Noise in a digital file (the captured in-camera image) increases as the ISO setting is increased. And as the price of the digital camera increases, which means a better image sensor, the noise decreases, which is a big advantage when shooting at high ISO settings.
In the digital darkroom, we can reduce both the chromatic and luminance noise. But luminance noise adds to the sharpness of and detail in an image, so reducing luminance noise in the digital darkroom may not be the best idea.
When I choose to reduce the noise in-camera, I only reduce the chromatic noise – and maintain the sharpness and detail of the image.
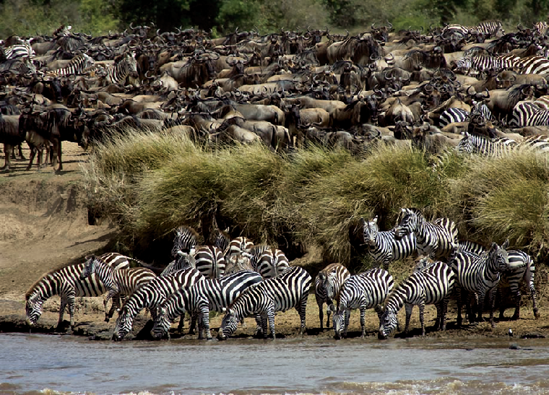
Looking at this picture, you can't see any chromatic aberrations where the zebra's white stripes meet the black skin (or vice versa if you adhere to the opposite notion). That's because I used a moderately priced telephoto zoom lens (Canon 100–400mm IS) that does not produce any chromatic aberrations, and also because the image is relatively small on this page.
"What the heck is a chromatic aberration?" you ask. Well, when all the light rays entering your camera are not focused on the image sensor properly, chromatic aberrations – red/cyan or blue/yellow fringes, can show up where light and dark areas meet.
Had I gone the cheap route and shot with an inexpensive lens, you still may not have seen the chromatic aberrations because the picture, again, is relatively small on the page, and because chromatic aberrations don't always show up. However, they are more prevalent with low-end lenses, and in any enlargements, chromatic aberrations will become more apparent.
You can reduce chromatic aberrations in the digital darkroom, to a point. If you are serious about your photography, I highly suggest investing in the best lenses (and tele-converter) you can afford.

If you were to take a picture of this posing cheetah (or even of a friend) with a telephoto lens in low light, you might not think that for a handheld shot, shooting at a high frame rate would be necessary. You might be right! But to be on the safe side, I often do just that. Here's why.
When shooting with telephoto lenses (which exaggerate camera shake) at slow shutter speeds in low light, there is a chance of camera shake. When you set your camera at a high frame rate (3 to 5 frames per second), you only have to press the shutter release button once. So at slow shutter speeds, there is a chance that the second or third picture may be sharper than the first.
Image stabilization lenses (Canon) and vibration reduction lenses (Nikon) can also help reduce camera shake at slow shutter speeds. But hey, why not do everything possible to get the sharpest possible in-camera image?
Setting a high frame rate also achieves something else. It gives you a better chance of getting a picture of the animal with its eyes open. Animals blink, too, you know.

Here's a good example of what happens when you don't expose for the highlights – and when you do. I took the picture of a penguin on the left with the exposure set for the highlights, and I took the picture on the right with the exposure set on automatic.
In the picture on the right, the highlights (white feathers on the penguin's breast) are washed out and lack detail. That's because the dark water fooled the camera's exposure meter into thinking the scene was darker than it really was, causing it to increase the exposure, thereby overexposing the white feathers.
To get a much better exposure, I set the exposure compensation feature on my camera to − 1. Now, that may sound as though I would be underexposing the scene, but in reality, I was properly exposing the highlights.

On an important related note to exposing for the highlights, keep in mind that you can rescue overexposed highlights up to one stop in the digital darkroom if you have shot a RAW file. However, if the camera has not captured the detail, such as when you've shot in a JPEG file format, there is no hope for rescuing the detail within these overexposed highlights.
Shooting RAW files is especially important when there is a wide contrast range in the scene – a big difference between the dark and light areas, as in the picture of a seal that I photographed in Antarctica. If there is not a lot of contrast, you might get the same results with a large JPEG file, but why chance it – especially when you have a once-in-a-lifetime chance at a great photo opportunity.

When I photograph an animal, unless I am shooting a silhouette, I feel if the subject's eyes are not well lit and in sharp focus, I have missed the shot.
To get the eyes in focus, I use the focus lock on my camera to lock in the focus on the subject's eye, recompose my shot, and then shoot.
To lighten the eye or eyes, I try to wait until the animal looks up toward the sky or at least has its eyes well lit from some other light source. I also use a flash to add some light to the subject's eyes, and if the animal is far away, I use a flash extender, which fits on the flash and extends its range. Do a Web search for Better Beamer and you'll find several places that sell this useful flash accessory.
When using a flash, I don't want my pictures to look like flash pictures. Rather, I just want to add some light to fill in the shadows and to add some catch light to the animal's eyes. (More on fill flash in the Daylight Fill-In Flash Photography lesson in the Photographing People chapter.)
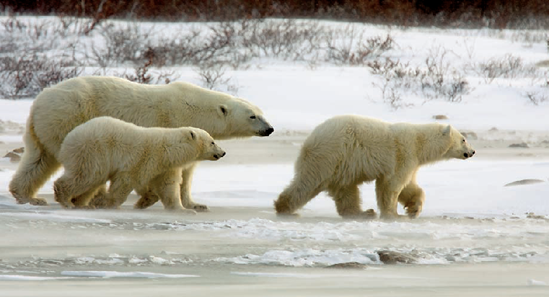
Brrrrrrr. I hate the cold! I do, however, enjoy taking pictures in snowy locations. This shot of a polar bear mom and her cubs, which I took in the Canadian sub-Arctic when it was −35°F, is one of my favorites. No! I was not outside, freezing my buns off. I was in a heated vehicle shooting with the window open. Still, it was near freezing – because all the windows in the vehicle were open so all the other photographers could also shoot.
When you shoot in the snow, here are some quick tips to help you get good shots – and to keep warm.
Dress appropriately, from head to toe. I highly recommend using hand warmers (which fit inside gloves) and feet warmers (which fit in your shoes) to keep your fingers and toes toasty. You can find these products at just about any camping or outdoor store.
Check out a few pairs of gloves to find the ones that let you adjust your camera's controls while wearing them.
When it comes to exposure, I suggest setting your exposure compensation to + 1. (More on that in the Brightness Values and the +/− Exposure Compensation Control lesson in the Digital SLR Must-Know Info chapter in this book.)
Keep your camera and extra batteries as warm as possible, because cold sucks the life out of batteries quickly.
Use a lens hood to shield the front element of the lens from direct sunlight, as well as from snowflakes.
Use a camera protector as added protection against snow. (See the Photo Gear that Rocks chapter of this book for more info.)
I also highly recommend drinking hot chocolate before you go outside.
When you compose an animal picture, which eye do you close, and which eye do you keep open? Think about this before you read on.
When I shoot, I always keep both eyes open. The reason is that with both eyes open, I can see what's around my subject. I can see other animals that might come into the frame, and where my subject may move – or run.
Sports photographers also shoot with both eyes open because they need to see if other players may come into the frame, and they need to see where the players may move.
In this picture, taken in Botswana, the leopard was looking at a warthog, eyeing a potential meal. Nothing happened, fortunately for the warthog, but I was ready to capture the action because I used the "both eyes open" shooting technique.


Take a white piece of paper and cover the top pair of pictures on this page, and then do the same for the bottom pair of pictures. My guess is you like the top pair better – because the animals are looking inward and not outward. In other words, the pictures act like a pair, and not two individual prints.
When you display a pair of prints or multiple prints, the direction in which the animals or subjects are looking is important in your print display.
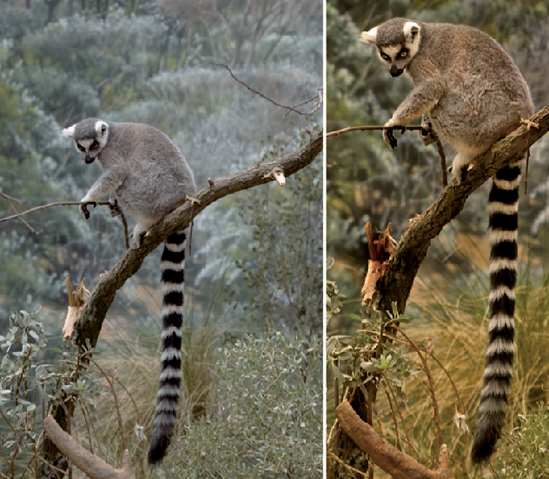
As always, when we look at one of our pictures, it's important to visualize the enhancements that are available to us in the digital darkroom. I do that for every picture I take. Here is just one example. The adjustments I used are available in Photoshop, Aperture and Lightroom.
I took this picture of a ringtail lemur at New York's Bronx Zoo. The picture lacked contrast and was cool (in color), due to the lighting conditions. So, I increased the contrast a bit and warmed up the picture by increasing the yellow tones. I also boosted the color saturation a bit for more vivid colors.
The animal was too far away for a tight shot. A simple crop brought the animal "closer."
The white part of the broken tree was a distraction, so I used the Burn tool to darken it. I also used the Burn tool to darken parts of the painted background. I then used the Dodge tool to brighten the animal's eyes.
As a final step, I sharpened the image.
A good way to envision the end result is to ask yourself what you don't like about a picture – and to be familiar with the tools and adjustments that are available in the digital darkroom to help you create your vision of what you like.
On the previous page I touched on some very basic digital enhancements that are available in Photoshop, Lightroom and Aperture.
You can expand your creative horizons in these applications by adding plug-ins, some of which I cover in the Cool Web Sites chapter.
Here is just one example of how one of my favorite plug-ins, Silver Efex Pro from Nik Software (www.niksoftware.com), helped me transform a modern-day looking photograph into a photo that looks as though it was taken "yesteryear." To create this effect, I used the Antique Plate 1 filter.
Play with plug-ins. Your workflow may become your fun flow!