The previous chapter discussed the basics of the Robot Operating System, and in this chapter, you are going to program using ROS. The main programming languages that we are going to use are C++ and Python. We already discussed the basics of C++ and Python in Chapter 2 and Chapter 3. Those fundamental concepts can be applied here to start working with ROS. You will see examples in Python and in C++, so you get a fundamental idea about both languages.
The chapter covers creating a ROS workspace, ROS package and ROS nodes. After creating the package and basic ROS nodes, you will see how to program the turtlesim simulator from the previous chapter. Next, you are introduced to the Gazebo simulator and TurtleBot robot simulation, creating basic ROS nodes to move the TurtleBot in the simulation. Afterward, you learn how to interface and program an Arduino and Tiva-C Launchpad using ROS. These tutorials are very useful for when we create our own robot. At the end of the chapter, you see how to set up ROS and program it in the Raspberry Pi 3.
Programming Using ROS
We have already covered basic programming using C++ and Python. What does programming with ROS mean? It means that ROS provides some built-in functions to implement ROS capabilities. For example, if we want to implement a new ROS topic, or a new ROS message, or a ROS service, we can simply call these ROS built-in functions to create it. We don’t need to implement ROS features from scratch. The programs that use ROS built-in functions/APIs (application program interface) are called ROS nodes.
In this chapter, we create ROS nodes for different applications. The ROS wiki provides extensive documentation on creating ROS nodes. As a beginner, it may be difficult to understand most of the topics mentioned on the ROS wiki. This chapter gives you a brief look at them to get started with ROS programming.
There are some steps that we need to take before proceeding to ROS programming. The first step is to create a ROS workspace. The next section discusses the ROS workspace and how to create it.
Creating a ROS Workspace and Package
The first step in ROS development is the creation of the ROS workspace, which is where ROS packages are kept. We can create new packages, install existing packages, build and create new executables.
You must first create a ROS workspace folder. You can give it any name, and you can create it in any location. Normally, this is in the Ubuntu home folder.
At a new terminal, enter the following command. This creates a folder called catkin_ws, inside of which is another folder called src. The ROS workspace is also called the catkin workspace. You see more of catkin in the next section.
$ mkdir -p ~/catkin_ws/srcThe name of the src folder shouldn’t be changed. You can change the workspace folder name, however.
After entering the command, switch to the src folder by using the cd command.
$ cd catkin_ws/srcThe following command initializes a new ROS workspace. If you are not initializing a workspace, you cannot create and build the packages properly.
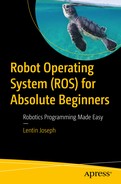
$ catkin_init_workspaceAfter this command, you should see the message in Figure 5-1 on your terminal.
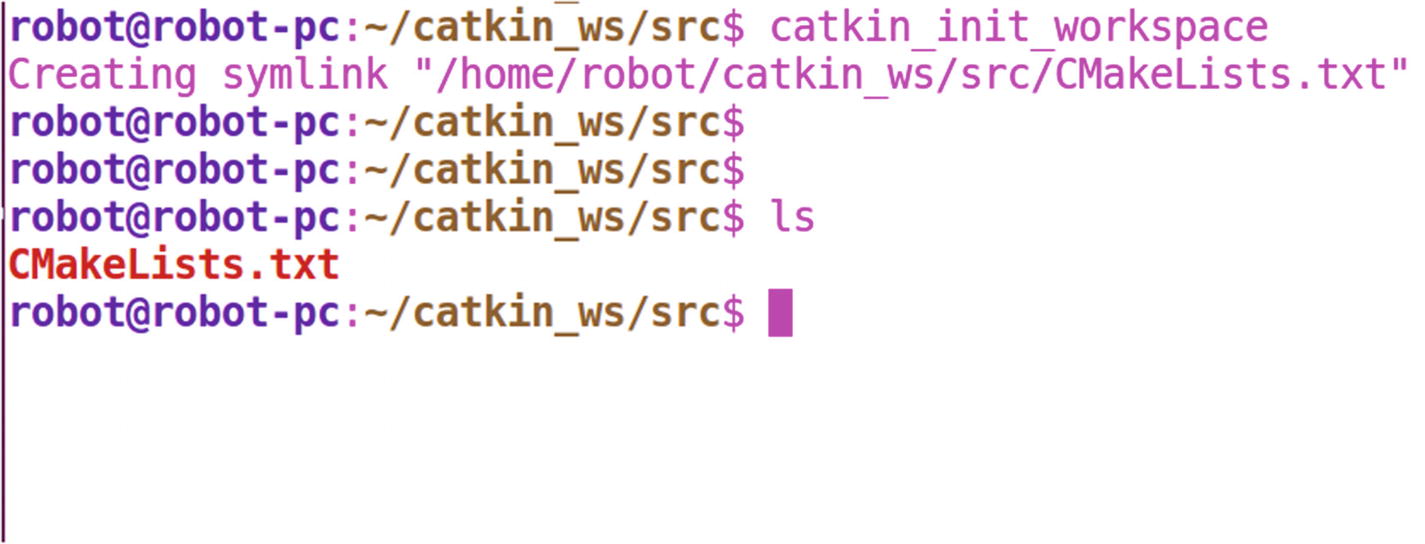
Figure 5-1 The output of catkin_init_workspace
There is a CMakeLists.txt inside the src folder.
After initializing the catkin workspace, you can build the workspace. You can able it to build the workspace without any packages. To build the workspace, switch from the catkin_ws/src folder to the catkin_ws folder.
$ ~/catkin_ws/src$ cd ..The command to build the catkin workspace is catkin_make.
$ ~/catkin_ws$ catkin_makeYou get the following output after entering this command (see Figure 5-2).
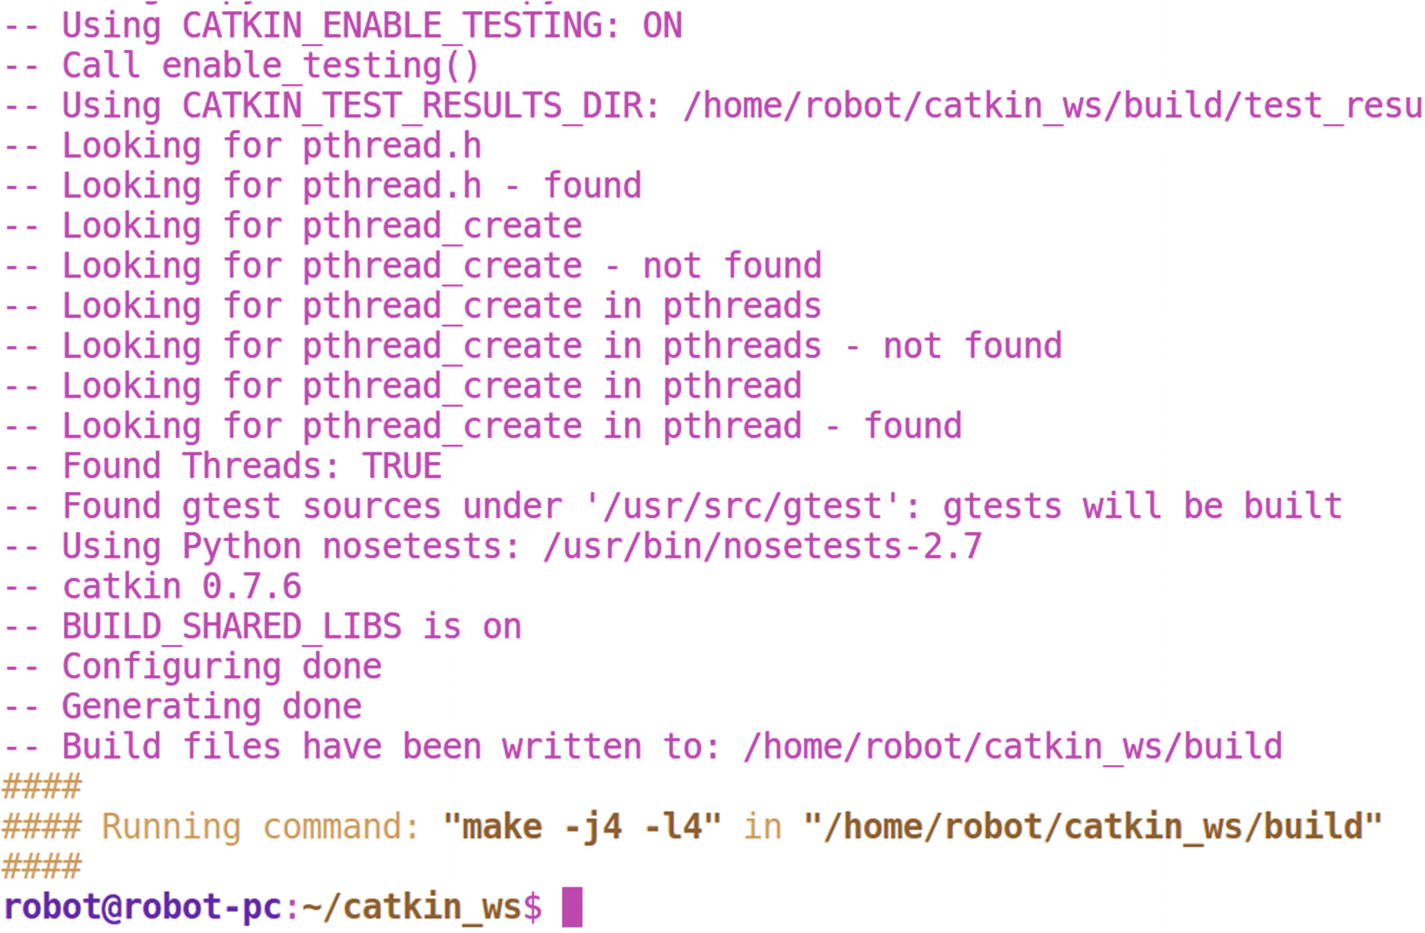
Figure 5-2 The catkin_make output
Now you can see a few folders in addition to the src folder (see Figure 5-3).
Figure 5-3 The catkin_ws folder after catkin_make command
More information about the building process is in the next section.
The src folder is where our packages are kept. If you want to create or build a package, you have to copy those packages to the src folder.
After creating the workspace, it is important thing to add the workspace environment. This means you have to set the workspace path so that the packages inside the workspace become accessible and visible. To do this, you have to do the following steps.
Open the .bashrc file in the home folder and add the following line at the end of the file.
At a terminal, switch to the home folder and select the .bashrc file.
$ gedit .bashrcAdd the following line at the end of .bashrc (see Figure 5-4).
source ~/catkin_ws/devel/setup.bash
Figure 5-4 Adding catkin_ws to .bashrc file
As you already know, the .bashrc script in the home folder executes when a new terminal session starts. So, the command inserted in the .bashrc file also executes.
setup.bash in the following command has variables to add to the Linux environment.
source ~/catkin_ws/devel/setup.bashWhen we source this file, the workspace path is added in the current terminal session. Now when we use any terminal, we can access the packages inside this workspace.
Before discussing the creation of packages, we need to discuss the catkin build system in ROS. You get a better idea about the building process when you are aware of the catkin build system.
ROS Build System
Chapters 2 and 3 discussed the build system, which is nothing but tools to compile a set of source code and create target executables from it. The target can be an executable or a library. In ROS, there is a build system for compiling ROS packages. The name of the build system that we are using is catkin ( http://wiki.ros.org/catkin ). catkin is a custom build system made from the CMake build system and Python scripting. So why not directly use CMake? The answer is simple: building a set of ROS packages is complicated. The complexity increases with the number of packages and package dependencies. The catkin build system take cares of all these things.
You can read more about the catkin build system at http://wiki.ros.org/catkin/conceptual_overview .
ROS Catkin Workspace
We have created a catkin workspace, but didn’t discuss how it works. The workspace has several folders. Let’s look at the function of each folder.
src Folder
The src folder inside the catkin workspace folder is the place where you can create, or clone, new packages from repositories. ROS packages only build and create an executable when it is in the src folder. When we execute the catkin_make command from the workspace folder, it checks inside the src folder and build each packages.
build Folder
When we run the catkin_make command from the ROS workspace, the catkin tool creates some build files and intermediate cache CMake files inside the build folder. These cache files help prevent from rebuilding all the packages when running the catkin_make command; for example, if you build five packages, and then add a new package to the src folder, only the new package builds during the next catkin_make command. This is because of those cache files inside the build folder. If you delete the build folder, all the packages build again.
devel Folder
When we run the catkin_make command, each package is built, and if the build process is successful, the target executable is created. The executable is stored inside the devel folder, which has shell script files to add the current workspace to the ROS workspace path. We can access the current workspace packages only if we run this script. Generally, the following command is used to do this.
source ~/<workspace_name>/devel/setup.bashWe are adding this command in the .bashrc file, so that we can access the workspace packages in all terminal sessions. If you go through the procedures to set up the catkin workspace, you see these steps.
install Folder
After building the target executable locally, run the following command to install the executable.
$ catkin_make installIt has to execute from the ROS workspace folder. If you do this, you see the install folder in the workspace. This folder keeps the install target files. When we run the executable, it executes from the install folder.
There is more information about the catkin workspace at http://wiki.ros.org/catkin/workspaces#Catkin_Workspaces .
Creating a ROS Package
We are done creating the ROS workspace. Next, let’s look at how to create a ROS package. The ROS package is where ROS nodes are organized—libraries and so forth. We can create a catkin ROS package by using the following command.
Synatx:$ catkin_create_pkg ros_package_name package_dependencies
The command that we use to create the package is catkin_create_pkg. The first parameter for this command is the package name, and the dependencies of the package follow it; for example, we are going to create a package called hello_world with dependencies. We discuss more about the dependencies in the next section.
You have to execute the command from the src folder in the catkin workspace.
$ /catkin_ws/src$ catkin_create_pkg hello_world roscpp rospy std_msgsThe output of this command is shown in Figure 5-5. This is how we create ROS packages.
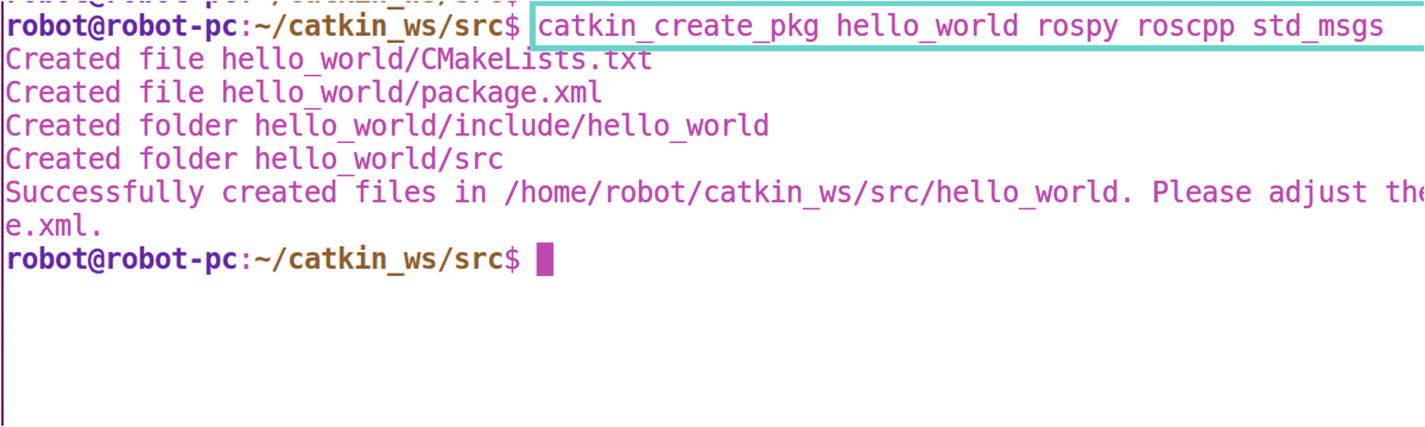
Figure 5-5 Output of catkin_create_pkg command
The structure of a ROS package is shown in Figure 5-6.
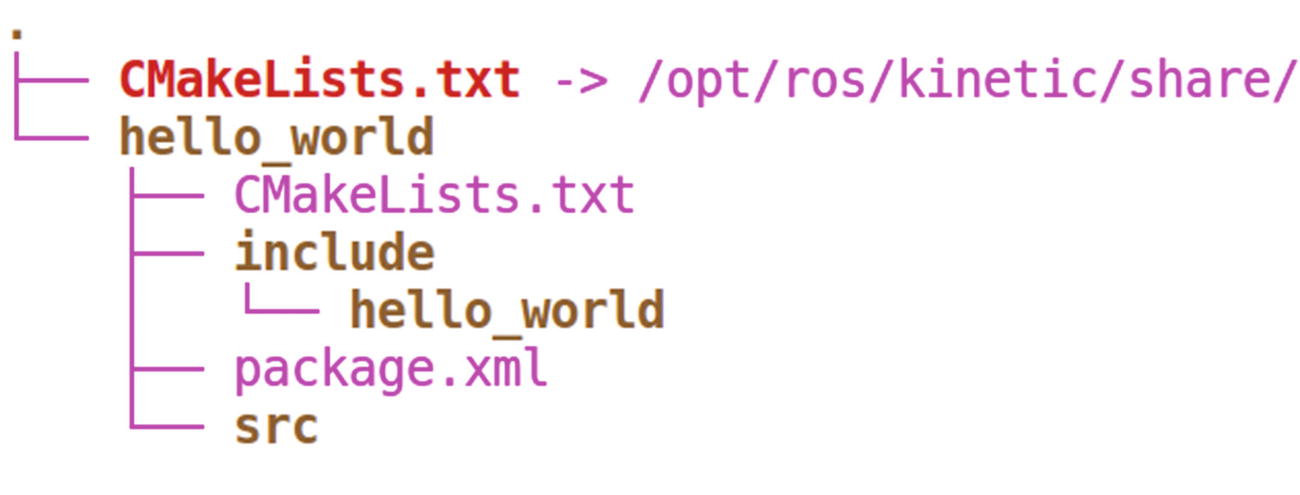
Figure 5-6 Output of catkin_create_pkg command
Inside the package is the src folder, package.xml, CMakeLists.txt, and the include folder.
CMakeLists.txt: This file has all the commands to build the ROS source code inside the package and create the executable.
package.xml: This is basically an XML file. It mainly contains the package dependencies, information, and so forth.
src: The source code of ROS packages are kept in this folder. Normally, C++ files are kept in the src folder. If you want to keep Python scripts, you can create another folder called scripts inside the package folder.
include: This folder contains the package header files. It can be automatically generated, or third-party library files go in it.
The next section discusses ROS client libraries, which are used to create ROS nodes.
Using ROS Client Libraries
We have covered various ROS concepts like topics, services, messages, and so forth. How do we implement these concepts? The answer is by using ROS client libraries. The ROS client libraries are a collection of code with functions to implement ROS concepts. We can simply include these library functions in our code to make it a ROS node. The client library saves development time because it provides the built-in functions to make a ROS application.
We can write ROS nodes in any programming language. If there is any ROS client for that programming language, it is easier to create ROS nodes; otherwise, we may need to implement our own ROS concepts.
The following are the main ROS client libraries.
roscpp: This is the ROS client library for C++. It is widely used for developing ROS applications because of its high performance.
rospy: This is the ROS client library for Python ( http://wiki.ros.org/rospy ). Its advantage is saving development time. We can create a ROS node in less time than with roscpp. It is ideal for quick prototyping applications, but performance is weaker than with roscpp. Most of the command line tools in ROS are coded using rospy such as roslaunch, roscore and so forth.
roslisp: This is the ROS client library of the Lisp language. It is mainly used in motion planning libraries on ROS, but it is not as popular as roscpp and rospy.
There are also experimental client libraries, including rosjava, rosnodejs, and roslua. The complete list of ROS client libraries is at http://wiki.ros.org/Client%20Libraries .
We will mainly work with roscpp and rospy. The next section shows a basic example of ROS nodes created using roscpp and rospy.
roscpp and rospy
This section discusses the various aspects of writing a node using client libraries such as roscpp and rospy. This includes the header files and modules used in ROS nodes, initializing a ROS node, publishing and subscribing a topic, and so forth.
Header Files and ROS Modules
When you write code in C++, the first section includes the header files. Similarly, when you write Python code, the first section imports Python modules. In this section, we look at the important headers files, and modules that we need to import into a ROS node.
To create a ROS C++ node, we have to include the following header files.
#include "ros/ros.h"The ros. h has all the headers required to implement ROS functionalities. We can’t create a ROS node without including this header file.
The next type of header file used in ROS nodes is a ROS message header. If we want to use a specific message type in our node, we have to include the message header file. ROS has some built-in message definition, and the user can also create a new message definition. There is a built-in message package in ROS called std_msgs that has a message definition of standard data types, such as int, float, string, and so forth. For example, if we want to include a string message in our code, we can use the following line of code.
#include "std_msgs/String.h"Here, the first part is the package name and the next part is the message type name. If there is a custom message type, we can call it with the following syntax.
# include "msg_pkg_name/message_name.h"The following are some of the messages in the std_msgs package.
# include "std_msgs/Int32.h"# include "std_msgs/Int64.h"
The complete list of message types inside the std_msgs package is at http://wiki.ros.org/std_msgs .
In Python, we have to import modules to create a ROS node. The ROS module that we need to import is
import rospyrospy has all the important ROS functions. To import a message type, we have to import the specific modules, like we did in C++.
The following is an example of importing a string message type in Python.
from std_msgs.msg import StringWe have to use package_name. msg and import the required message type.
Initializing a ROS Node
Before starting any ROS node, the first function called initializes the node. This is a mandatory step in any ROS node.
In C++, we initialize using the following line of code.
int main(int argc, char **argv){ros::init(argc, argv, "name_of_node").....................}
After the int main() function, we have to include ros::init(), which initializes the ROS node. We can pass the argc,argv command-line arguments to the init() function and the name of the node. This is the ROS node name, and we can retrieve its list by using rosnode list.
In Python, we use the following line of code.
rospy.init_node('name_of_node', anonymous=True);The first argument is the name of the node, and the second argument is anonymous=True, which means the node can run on multiple instances.
Printing Messages in a ROS Node
ROS provides APIs to log messages. These messages are readable string that convey the status of the node.
In C++, the following functions log the node’s messages.
ROS_INFO(string_msg,args): Logging the information of nodeROS_WARN(string_msg,args): Logging warning of the nodeROS_DEBUG(string_msg ,args): Logging debug messagesROS_ERROR(string_msg ,args): Logging error messagesROS_FATAL(string_msg ,args): Logging Fatal messagesEg: ROS_DEBUG("Hello %s","World");
In Python, there are different functions for the logging operations.
rospy.logdebug(msg, *args)rospy.logerr(msg, *args)rospy.logfatal(msg, *args)rospy.loginfo(msg, *args)rospy.logwarn(msg, *args)
Creating a Node Handle
After initializing the node, we have to create a NodeHandle instance that starts the ROS node and other operations, like publishing/subscribing a topic. We are using the ros::NodeHandle instance to create those operations.
In C++, the following shows how to create an instance of ros::NodeHandle.
ros::NodeHandle nh;The rest of the operations in the node use the nh instance. In Python, we don’t need to create a handle; the rospy module internally handles it.
Creating a ROS Message Definition
Before publishing a topic, we have to create a ROS message definition. The message definition is created by using the following methods.
In C++, we can create an instance of a ROS message with the following line of code; for example, this is how we create an instance of std_msgs/String.
std_msgs::String msg;After creating the instance of the ROS message, we can add the data by using the following line of code.
msg.data = "String data"In Python, we use the following line of code to add data to the string message.
msg = String()msg.data = "string data"
Publishing a Topic in ROS Node
This section shows how to publish a topic in a ROS node.
In C++, we use the following syntax.
ros::Publisher publisher_object = node_handle.advertise<ROS message type >("topic_name",1000)After creating the publisher object, the publish() command sends the ROS message through the topic.
publisher_object.publish(message)Example:ros::Publisher chatter_pub = nh.advertise<std_msgs::String>("chatter", 1000);chatter_pub.publish(msg);
In this example, chatter_pub is the ROS publisher instance, and it is going to publishing a topic with message type std_msgs/String and chatter as the topic name. The queue size is 1000.
In Python, the publishing syntax is as follows.
Syntax:publisher_instance = rospy.Publisher('topic_name', message_type, queue_size)Example:pub = rospy.Publisher('chatter', String, queue_size=10)pub.publish(hello_str)
This example publishes a topic called chatter with a std_msgs/String message type and a queue_size of 10.
Subscribing a Topic in ROS Node
When publishing a topic, we have to create a message type and need to send through the topic. When subscribing a topic, the message is received from the topic.
In C++, the following is the syntax of subscribing a topic.
ros::Subscriber subscriber_obj = nodehandle.subscribe("topic_name", 1000, callback function)When subscribing a topic, we don’t need to mention the topic message type, but we do need to mention the topic name and a callback function. The callback function is a user-defined function that executes once a ROS message is received over the topic. Inside the callback, we can manipulate the ROS message—print it or make a decision based on the message data. (Callback is discussed in the next section.)
The following is a subscription example of the "chatter" topic with the "chatterCallback" callback function.
ros::Subscriber sub = n.subscribe("chatter", 1000, chatterCallback);The following shows how to subscribe a topic in Python.
rospy.Subscriber("topic_name",message_type,callback funtion name")The following shows how to subscribe the "chatter" topic with the message type as string, and a callback function. In Python, we have to mention the message type along with the Subscriber() function.
rospy.Subscriber("chatter", String, callback) Writing the Callback Function in ROS Node
When we subscribe a ROS topic and a message arrives in that topic, the callback function is triggered. You may have seen the mention of a callback function in the subscriber function. The following is the syntax and an example of callback function in C++.
void callback_name(const ros_message_const_pointer &pointer){// Access datapointer->data}
The following shows how to handle a ROS string message and print the data.
void chatterCallback(const std_msgs::String::ConstPtr& msg){ROS_INFO("I heard: [%s]", msg->data.c_str());}
The following shows how to write a callback in Python. It’s very similar to a Python function, which has an argument that holds the message data.
def callback(data):rospy.loginfo(rospy.get_caller_id() + "I heard %s", data.data)
The ROS Spin Function in ROS Node
After starting the subscription or publishing, we may have to call a function to process the request to subscribe and publish. In a C++ node, the ros::spinOnce() function should be called after publishing a topic, and the ros::spin() function should be called if you are only subscribing a topic. If you are doing both, use the spinOnce() function.
In Python, there is no spin() function, but you can use the rospy.sleep() function after publishing, or the rospy.spin() function if there is only subscription of the topic.
The ROS Sleep Function in ROS Node
If we want to make a constant rate inside a loop that is inside a node, we can use ros::Rate. We can create an instance of ros::Rate and mention the desired rate that we want. After creating the instance, we have to call the sleep() function inside it to get the rate in effect.
The following is an example of getting 10 Hz in C++.
ros::Rate r(10); // 10 hzr.sleep();
The following is how to do it in Python.
rate = rospy.Rate(10) # 10hzrate.sleep()
Setting and Getting a ROS Parameter
In C++, we use the following line of code to access a parameter in our code. Basically, we have to declare a variable and use the getParam() function inside the node_handle to access the desired parameter.
std::string global_name;if (nh.getParam("/global_name", global_name)){...}
The following shows how to set a ROS parameter. The name and the value should be mentioned inside the setParam() function.
nh.setParam("/global_param", 5);In Python, we can do the same thing using the following line of code.
global_name = rospy.get_param("/global_name")rospy.set_param('~private_int', '2')
The Hello World Example Using ROS
In this section, you are going to create a basic package called hello_world,and a publisher node and a subscriber node to send a “Hello World” stringmessage. You also learn how to write a node in C++ and Python.
Creating a hello_world Package
In ROS, the programs organized as packages. So we have to create a ROS package before writing any program.
To create a ROS package, we have to give a name of the package, then the dependent packages which help to compile the programs inside the package. For example, if your package has C++ program, you have to add 'roscpp' as dependency and if it is python, you have to add 'rospy' as dependency.
Before creating the package, first switch to the src folder.
$ catkin_ws/src$ catkin_create_pkg hello_world roscpp rospy std_msgsFigure 5-7 shows the output when we execute this command.

Figure 5-7 The output of catkin_create_pkg
Now we can explore the different files created. The first important file is package.xml. As discussed, this file has information about the package and its dependencies.
The package.xml file definition is shown in Figure 5-8. Actually, when we create the package, it also has some commented code. All comments have been removed here to make it cleaner.
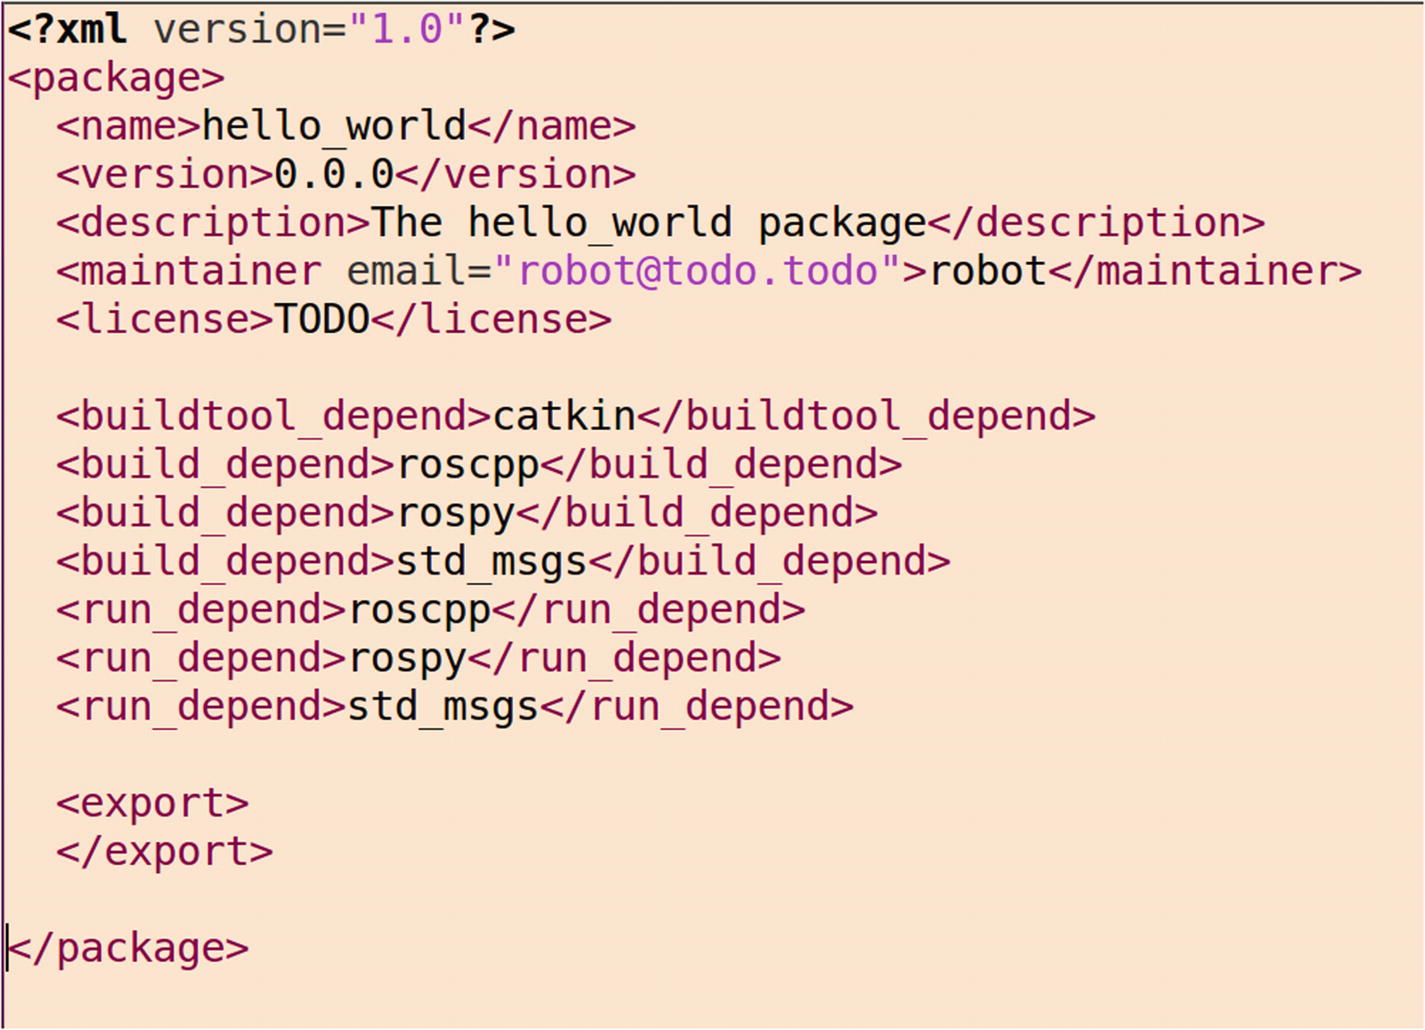
Figure 5-8 The package.xml definition
You can edit this file and add dependencies, package information, and other information to the package. You can learn more about package.xml at http://wiki.ros.org/catkin/package.xml .
Figure 5-9 shows what the CMakeLists.txt file looks like.

Figure 5-9 The CMakeLists.txt definition
In this file, the minimum version of CMake required to build the package and the project name is at the top of the file.
The find_package() finds the necessary dependencies of this package. If these packages are not available, we can’t able to build this package. The catkin_package() is a catkin-provide CMake macro used for specifying catkin-specific information to the build system.
You can learn more about CMakeLists.txt at http://wiki.ros.org/catkin/CMakeLists.txt .
A good reference for creating a ROS package is at http://wiki.ros.org/ROS/Tutorials/catkin/CreatingPackage .
Creating a ROS C++ Node
After creating the package, the next step is to create the ROS nodes. The C++ code is kept in the src folder.
The following is the first ROS node. It’s a C++ node to publish a “Hello World” string message. You can save it under src/talker.cpp.
#include "ros/ros.h"#include "std_msgs/String.h"#include <sstream>int main(int argc, char **argv){ros::init(argc, argv, "talker");ros::NodeHandle n;ros::Publisher chatter_pub = n.advertise<std_msgs::String>("chatter", 1000);ros::Rate loop_rate(10);int count = 0;while (ros::ok()){std_msgs::String msg;std::stringstream ss;ss << "hello world " << count;msg.data = ss.str();ROS_INFO("%s", msg.data.c_str());chatter_pub.publish(msg);ros::spinOnce();loop_rate.sleep();++count;}return 0;}
The code is self-explanatory. Basically, it creates a new string message instance and a publisher instance. After creating both, it adds data to the string message along with a count. After adding the data, it publishes the topic, "/chatter. You can also see the usage of the ros::spinOnce() function here. The code executes until you press Ctrl+C.
Next, you see the listener.cpp, which subscribes the topic published by talker.cpp. After getting data from the topic, it prints that message.
#include "ros/ros.h"#include "std_msgs/String.h"void chatterCallback(const std_msgs::String::ConstPtr& msg){ROS_INFO("I heard: [%s]", msg->data.c_str());}int main(int argc, char **argv){ros::init(argc, argv, "listener");ros::NodeHandle n;ros::Subscriber sub = n.subscribe("chatter", 1000, chatterCallback);ros::spin();return 0;}
In listener.cpp, the "chatter" topic is subscribing and registering a callback function for the topic, which is chatterCallback. The callback is defined at the beginning of the code. Whenever a message comes to the "chatter" topic, this callback is executed. Inside the callback, the data in the message is printed.
ros::spin() executes the subscribe callbacks and helps the node remain in a wait state, so it won’t quit until you press Ctrl+C.
Editing the CMakeLists.txt File
After saving the two files in the hello_world/src folder, the nodes need to be compiled to create the executable. To do this, we have to edit the CMakeLists.txt file, which is not too complicated. We need to add four lines of code to CMakeLists.txt. Figure 5-10 shows the additional lines of code to insert.

Figure 5-10 Adding building instructions inside CMakeLists.txt
You can see that we are adding add_executable() and target_link_libraries() to CMakeLists.txt. add_executable() creates the executable from the source code. The first parameter is the executable name, which links with the libraries. If these two processes are successful, we get executable nodes.
Building C++ Nodes
After saving CMakeLists.txt, we can build the source code. The command to build the nodes is catkin_make. Just switch to the workspace folder and execute the catkin_make command.
To switch to the catkin_ws folder, assume that the workspace is in the home folder.
$ cd ~/catkin_wsExecuting the catkin_make command to build the nodes$ catkin_make
If everything is correct, you get a message saying that the build was successful (see Figure 5-11).

Figure 5-11 Building messages in the terminal
So we have successfully built the nodes. Now what? We can execute these nodes, right? That is covered in the next section.
Executing C++ Nodes
After building the nodes, the executables are generated inside the catkin_ws/devel/lib/hello_world/ folder (see Figure 5-12).
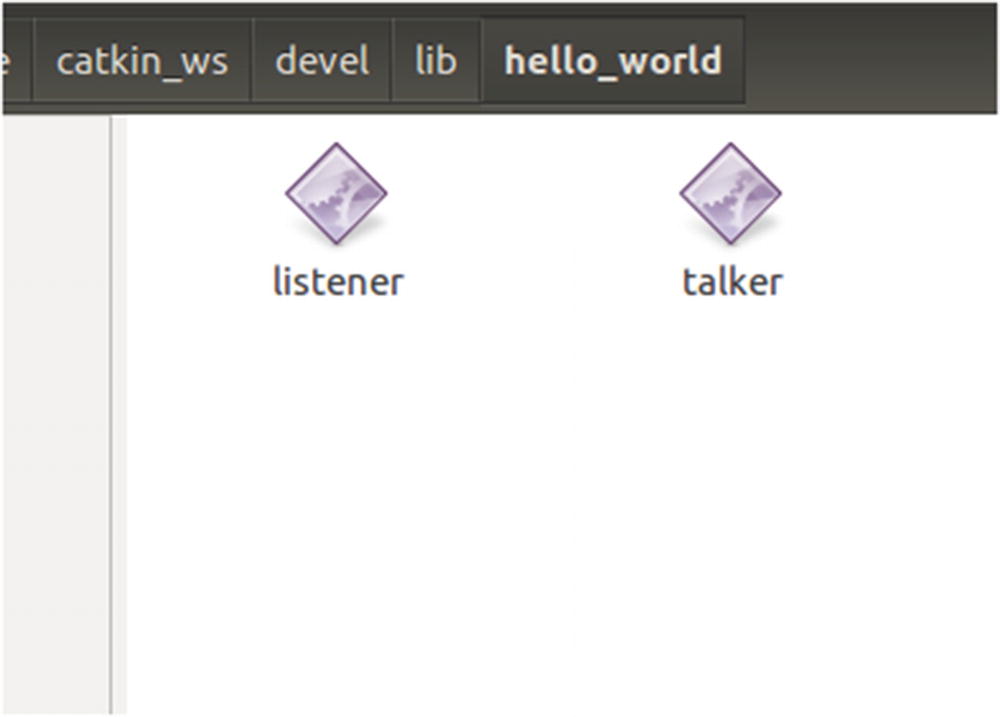
Figure 5-12 Generated executable
After creating the executable, we can run it on a Linux terminal.
Open three terminals, and execute each command one by one.
Starting roscore$ roscore
The following command starts the talker node. We can use the rosrun command to start the node.
$ rosrun hello_world talkerThe node prints messages on the terminal. Check the list of ROS topics in the system by using the following command.
$ rostopic listYou see the following topics.
/chatter/rosout/rosout_agg
'chatter is the topic published by the talker node. The /rosout topics are for logging purposes. It start publishing when we execute the roscore command.
The listener node can start in another terminal.
$ rosrun hello_world listenerFigure 5-13 shows the message data from the /chatter topic.
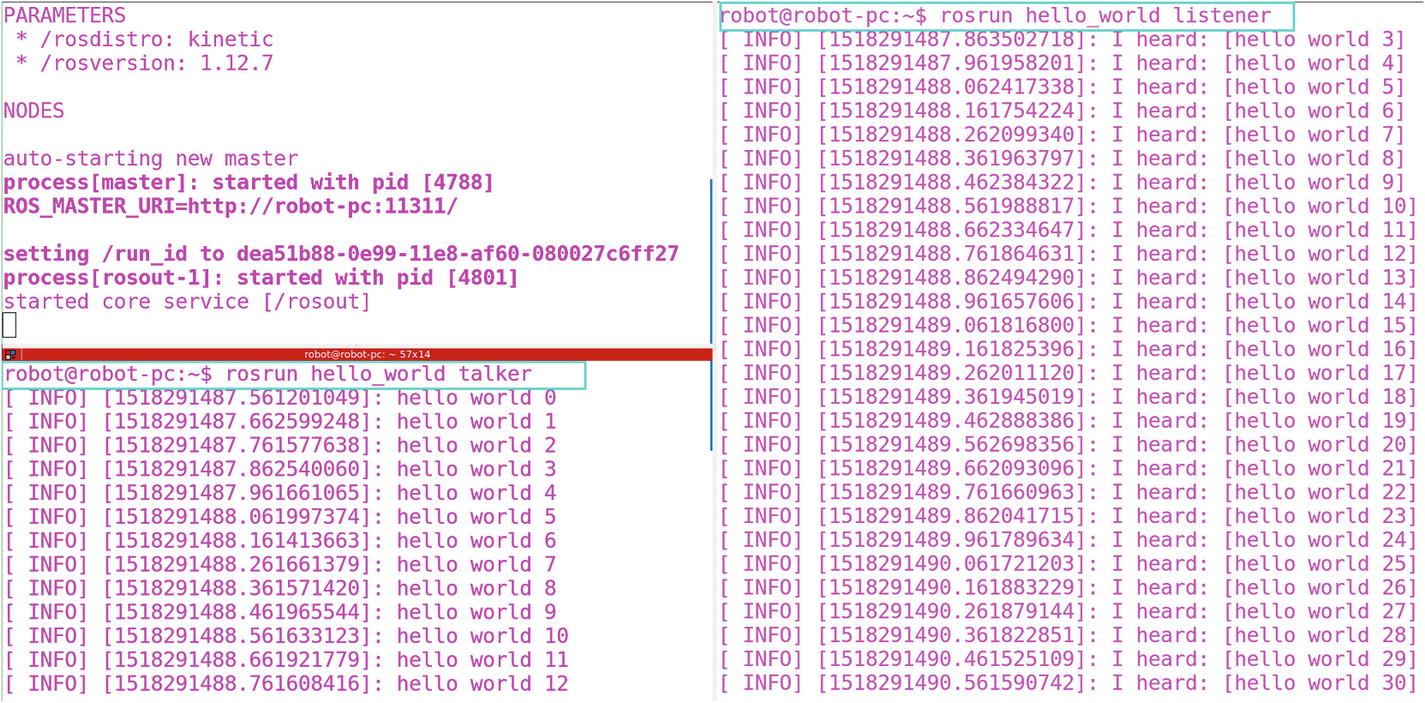
Figure 5-13 Output of talker and listener C++ nodes
You can close each terminal by pressing the Ctrl+C key combination.
Next, we look at the talker and listener nodes in Python.
Creating Python Nodes
We can make a folder called script inside the package, and we can keep the Python scripts inside this folder (scripts/talker.py). The first program that we are going to discuss is talker.py.
import rospyfrom std_msgs.msg import Stringdef talker():rospy.init_node('talker', anonymous=True)pub = rospy.Publisher('chatter', String, queue_size=10)rate = rospy.Rate(10) # 10hzwhile not rospy.is_shutdown():hello_str = "hello world %s" % rospy.get_time()rospy.loginfo(hello_str)pub.publish(hello_str)rate.sleep()if __name__ == '__main__':try:talker()except rospy.ROSInterruptException:pass
In the talker.py code, in the beginning, we can see, we are importing the rospy module and ros message modules. In the talker() function, we can see the initialization of ROS node, the creation of a new ROS publisher. After initializing the node, we are using a while loop to publish a string message called “Hello World” to the /chatter topic. The working of this node is same as talker.cpp that we already discussed.
The subscribing node, called listener.py, should be kept inside scripts/listener.py.
import rospyfrom std_msgs.msg import Stringdef callback(data):rospy.loginfo(rospy.get_caller_id() + "I heard %s", data.data)def listener():# In ROS, nodes are uniquely named. If two nodes with the same# node are launched, the previous one is kicked off. The# anonymous=True flag means that rospy will choose a unique# name for our 'talker' node so that multiple talkers can# run simultaneously.rospy.init_node('listener', anonymous=True)rospy.Subscriber("chatter", String, callback)# spin() simply keeps python from exiting until this node is stoppedrospy.spin()if __name__ == '__main__':listener()
The node is similar to listener.cpp. We are initializing the node and creating a subscriber on the /chatter topic. After subscribing the topic, it waits for ROS messages. The waiting is done with the rospy.spin() function. Inside the callback() function, the message is printed.
Executing Python Nodes
In this section, we see how to execute the nodes. There is no need to compile the Python nodes. We can just execute it using the following commands. You can see the output of the commands from Figure 5-14.
Start the roscore$ roscoreStart the talker.py$ rosrun hello_world talker.pyStart the listener.py$ rosrun hello_world listener.py

Figure 5-14 Output of talker and listener Python nodes
Creating Launch Files
This section discusses how to write launch files for C++ and Python nodes. The advantage of ROS launch files is that we can run any number of nodes in a single command.
We can create a folder called launch inside the package and keep the launch files in that folder.
The following is talker_listener.launch, which can run C++ executables.
<launch><node name="listener_node" pkg="hello_world" type="listener" output="screen"/><node name="talker_node" pkg="hello_world" type="talker" output="screen"/></launch>
This launch file can run the talker and listener nodes in one shot. The package name of the node is in the pkg= field and the name of the executable is in the type= field. You can assign any name to the node. It is better if it is similar to the executable name.
After saving the launch file inside the launch folder, you may have to change the permission of the executable.
The following shows how to do that.
$ hello_world/launch$ sudo chmod +x talker_listener.launchThe following is the command to execute this launch file. We can execute it from any terminal path.
$ roslaunch hello_world talker_listener.launchAfter the roslaunch command, use the package name and then the launch file name.
Figure 5-15 shows the output.

Figure 5-15 Output of talker_listener.launch file
To launch the Python nodes, use the following launch file. You can save it as launch/talker_listener_python.launch.
<launch><node name="listener_node" pkg="hello_world" type="listener.py" output="screen"/><node name="talker_node" pkg="hello_world" type="talker.py" output="screen"/></launch>
After saving it, change the permissions of the file too.
$ hello_world/launch$ sudo chmod +x talker_listener_python.launchThen execute the launch file using the roslaunch command.
$ roslaunch hello_world talker_listener_python.launchThe output is the same as with the C++ nodes. We can stop the launch file by pressing Ctrl+C in the terminal in which the launch file is running.
Visualizing a Computing Graph
Do you want to see what’s happening when the launch files are executing? The rqt_graph GUI tool visualizes the ROS computation graph.
Use any of the launch files that we created in the previous section.
$ roslaunch hello_world talker_listener.launchAnd in another terminal, run the following.
$ rqt_graphFigure 5-16 shows the output of this GUI tool.

Figure 5-16 Output of rqt_graph tool
In the graph, you see talker_node, which is the name given to talker in the launch file. listener_node is the name of the listener node. /chatter is the topic published by the talker_node. It is subscribed by the listener_node.
All the debug messages from these two nodes are going to /rosout. The debug messages are message that we printed using ROS debug functions ( http://wiki.ros.org/roscpp/Over view/Logging). We have already discussed those functions. The /rqt_gui node is also sending debug statements to /rosout.
This is how the ROS computation graph works.
Programming turtlesim Using rospy
We are done with the “Hello World” ROS example in C++ and Python. In this section, we use a more interesting application. We saw the turtlesim application in ROS. Now we look at how to program turtlesim using rospy Py. We are using rospy for the demo because it is very simple to prototype. In turtlesim, there is a turtle that we can move around the workspace.
Moving turtlesim
This section discusses how to program turtlesim to move around its workspace.
You already know how to start the turtlesim application. The following is the list of commands to run.
Starting roscore$ roscoreRunning turtlesim node in another terminal$ rosrun turtlesim turtlesim_nodeHere is the list of topics which is publishing by turtlesim_node$ rostopic list/rosout/rosout_agg/turtle1/cmd_vel/turtle1/color_sensor/turtle1/pose
To move the turtle inside the turtlesim application, publish the linear and angular velocity to the /turtle1/cmd_vel topic.
Check the type of the /turtle1/cmd_vel topic by using the following command.
$ rostopic type /turtle1/cmd_velgeometry_msgs/Twist
This means that the /cmd_vel topic has the geometry_msgs/Twist message type, so we have to publish the same message type to this topic to move the robot.
To see the geometry_msgs/Twist definition, use the following command.
$ rosmsg show geometry_msgs/TwistThe output of the command is shown in Figure 5-17.
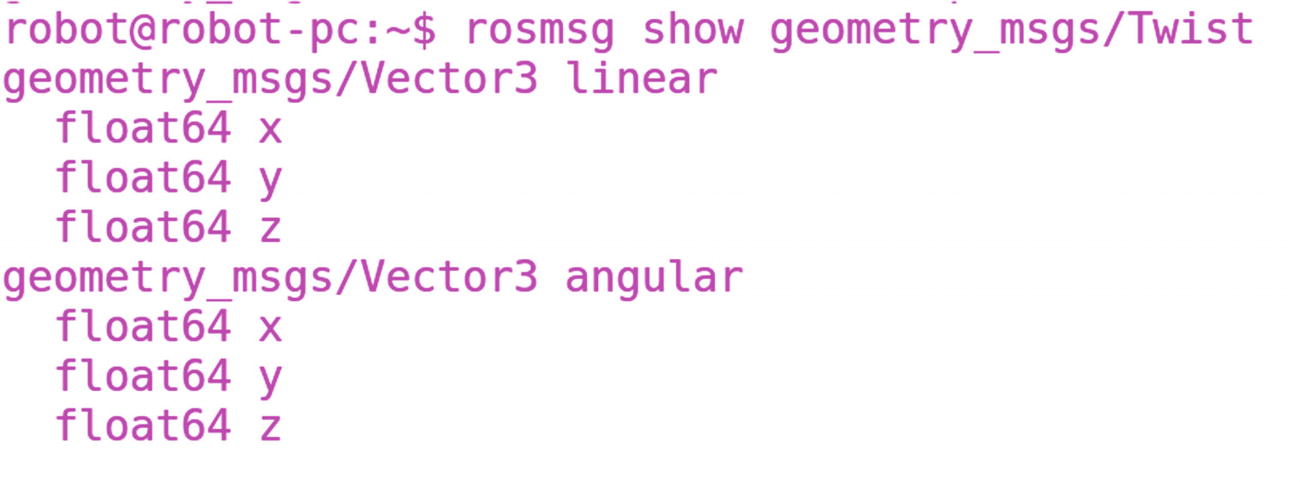
Figure 5-17 Definition of geometry_msgs/Twist message
The twist message has two subsections: linear velocity and angular velocity.
If we set the robot’s linear velocity component, it moves forward or backward. In turtlesim, we can only set the linear.x component because it can move only in x direction; there is no motion along y and z. Also, we can set angular.z components to rotate the robot on its axis. There is no effect to other components.
More information about this message is at http://docs.ros.org/api/geometry_msgs/html/msg/Twist.html .
How can we move the topic through the command line? By using rostopic. The following command publishes the linear.x = 0.1 velocity to the turtlesim node.
Note
You don’t need to enter the complete command. Use the Tab key to autocomplete the command. Just type rostopic pub /turtle1/cmd_vel, and use the Tab key to autocomplete other fields.
$ rostopic pub /turtle1/cmd_vel geometry_msgs/Twist "linear:x:0.1y:0z:0angular:x:0y:0z:0"
How do we move the turtle in a Python node?
We are going to create a new node called move_turtle and publish a twist message to the turtlesim node. Figure 5-18 shows the communication between the two nodes.

Figure 5-18 Computation graph of move_turtle node and turtlesim node
The following is the code for the move_turtle.py node. You can read the comments in the code to get a better idea about each line of code.
#!/usr/bin/env pythonimport rospy#Importing Twist message: Used to send velocity to Turtlesimfrom geometry_msgs.msg import Twist#Handling command line argumentsimport sys#Function to move turtle: Linear and angular velocities are argumentsdef move_turtle(lin_vel,ang_vel):rospy.init_node('move_turtle', anonymous=False)#The /turtle1/cmd_vel is the topic in which we have to send Twist messagespub = rospy.Publisher('/turtle1/cmd_vel', Twist, queue_size=10)rate = rospy.Rate(10) # 10hz#Creating Twist message instancevel = Twist()while not rospy.is_shutdown():#Adding linear and angular velocity to the messagevel.linear.x = lin_velvel.linear.y = 0vel.linear.z = 0vel.angular.x = 0vel.angular.y = 0vel.angular.z = ang_velrospy.loginfo("Linear Vel = %f: Angular Vel = %f",lin_vel,ang_vel)#Publishing Twist messagepub.publish(vel)rate.sleep()if __name__ == '__main__':try:#Providing linear and angular velocity through command linemove_turtle(float(sys.argv[1]),float(sys.argv[2]))except rospy.ROSInterruptException:pass
This code takes the linear and the angular velocity through a command line. We can use the Python sys module to get the command-line arguments inside our code. Once it has the linear velocity and the angular velocity, it calls the move_turtle() function, which inserts both velocities into a twist message and publishes it.
You can save the code as move_turtle.py, and change the permission to executable.
The following shows how to run it.
Start roscore$ roscoreStart the turtlesim node$ rosrun turtlesim turtlesim_node
Run the move_turtle.py node along with the command-line arguments, which are 0.2 and 0.1. That is, linear velocity = 0.2 m/s and angular velocity = 0.1 rad/s.
$ rosrun hello_world move_turtle.py 0.2 0.1You get the output shown in Figure 5-19 if you run this code. It creates a circle.

Figure 5-19 Output of move_turtle.py
Printing the Robot’s Position
You have seen how to publish the turtle’s velocity. Now you are going to learn how to get the turtle’s current position from the /turtle1/pose topic.
Restart turtlesim_node and close move_turtle.py. Echo the /turtle1/pose topic using rostopic. The turtle’s current position is shown in Figure 5-20.
$ rostopic echo /turtle1/pose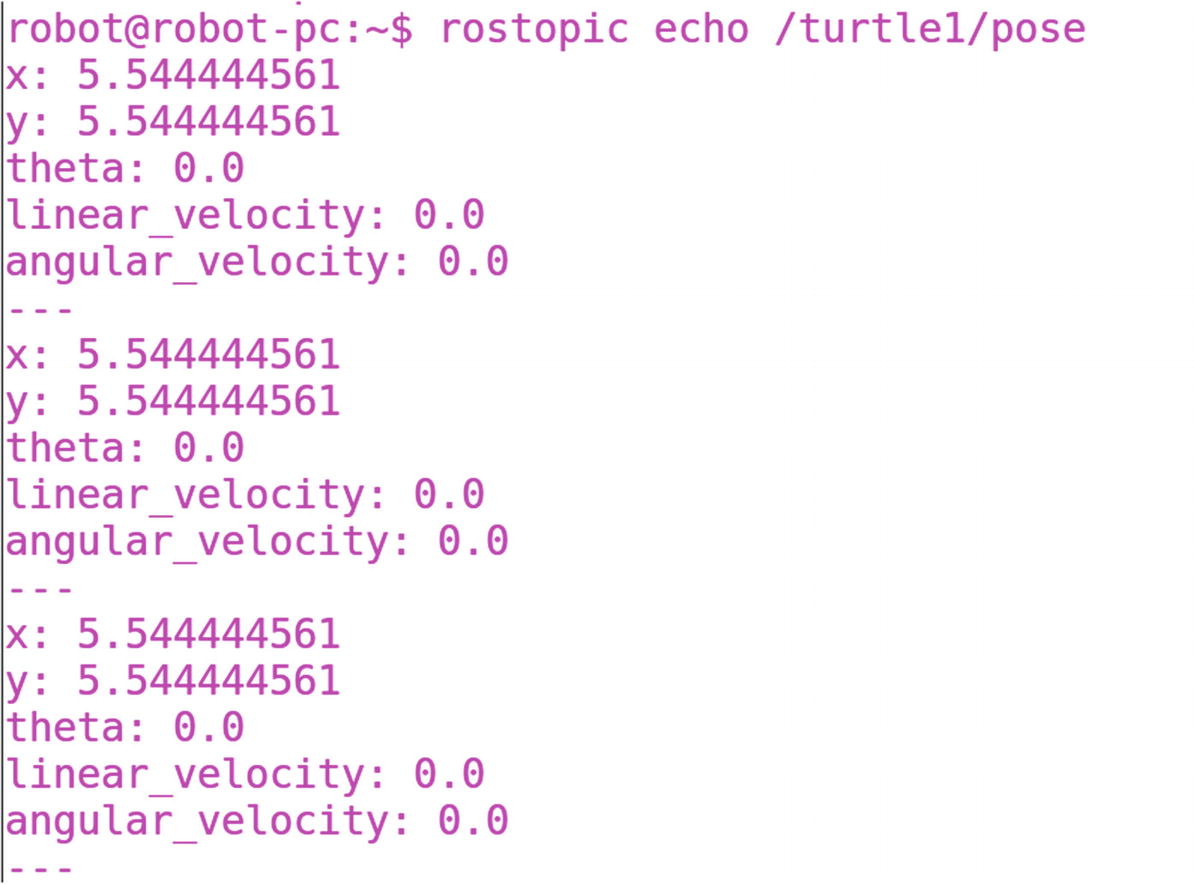
Figure 5-20 Turtle pose from topic /turtle1/pose
You see the current (x,y,theta) value of the robot and the turtle’s current linear and angular velocities.
If you want to get this position in a Python node, you have to subscribe the called /turtle1/pose topic. To do that and get the data from the message, you have to know the ROS message type. The following finds the message type.
$ rostopic type /turtle1/poseturtlsim/Pose
If you want to know the message definition, use the following command.
$ rosmsg show turtlesim/PoseAs shown in Figure 5-21, there are five terms inside the message: x, y, theta, linear velocity, and angular velocity.
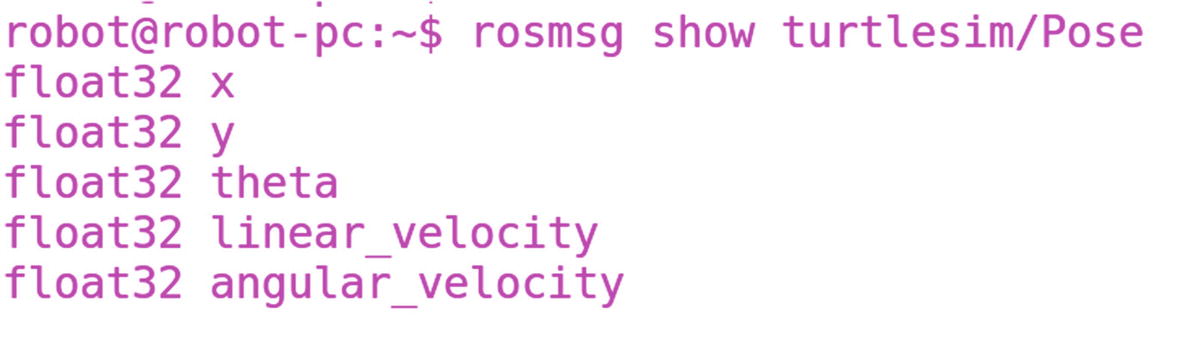
Figure 5-21 ROS message definition of turtlesim/Pose
To learn more about this message, refer to http://docs.ros.org/api/turtlesim/html/msg/Pose.html .
Let’s modify the existing move_turtle.py and add the option to subscribe the /turtle1/pose topic. Save this code as move_turtle_get_pose.py.
Figure 5-22 shows how the program works. It is feeding velocity and subscribing the position from the turtlesim node at the same time.

Figure 5-22 move_turtle_get_pose.py code
#!/usr/bin/env pythonimport rospyfrom geometry_msgs.msg import Twistfrom turtlesim.msg import Poseimport sys#/turtle1/Pose topic callbackdef pose_callback(pose):rospy.loginfo("Robot X = %f : Y=%f : Z=%f ",pose.x,pose.y,pose.theta)def move_turtle(lin_vel,ang_vel):rospy.init_node('move_turtle', anonymous=True)pub = rospy.Publisher('/turtle1/cmd_vel', Twist, queue_size=10)#Creating new subscriber: Topic name= /turtle1/pose: Callback name: pose_callbackrospy.Subscriber('/turtle1/pose',Pose, pose_callback)rate = rospy.Rate(10) # 10hzvel = Twist()while not rospy.is_shutdown():vel.linear.x = lin_velvel.linear.y = 0vel.linear.z = 0vel.angular.x = 0vel.angular.y = 0vel.angular.z = ang_velrospy.loginfo("Linear Vel = %f: Angular Vel = %f",lin_vel,ang_vel)pub.publish(vel)rate.sleep()if __name__ == '__main__':try:move_turtle(float(sys.argv[1]),float(sys.argv[2]))except rospy.ROSInterruptException:pass
This code is self-explanatory. You can see comments where the code for subscribing the /turtle1/pose topic is added.
Run the code by using the following commands. Figure 5-23 shows that the code is printing the robot’s positon and velocity.
Starting roscore$ roscoreRestarting the turtlesim node$ rosrun turtlesim turtlesim_nodeRunning move_turtle_get_pose.py code$ rosrun hello_world move_turtle_get_pose.py 0.2 0.1

Figure 5-23 Output of move_turtle_get_pose.py code
If we are getting both position and velocity, we can simply command the robot to move to a specific distance, right? The next example is moving the robot with distance feedback.
The code is a modification of the move_turtle_get_pose.py code.
Moving the Robot with Position Feedback
We can save this code as move_distance.py. The communication between this node and turtlesim is shown in Figure 5-24.

Figure 5-24 Communication of move_distance.py to turtlesim
This node is simple. We can give linear velocity, angular velocity, and distance (global distance) to it as a command-line argument.
Along with publishing velocity to the turtle, it checks the distance moved. When it reaches its destination, the turtle or robot stops. You can read the comments inside the code to understand what's happening inside the code.
#!/usr/bin/env pythonimport rospyfrom geometry_msgs.msg import Twistfrom turtlesim.msg import Poseimport sysrobot_x = 0def pose_callback(pose):global robot_xrospy.loginfo("Robot X = %f ",pose.x)robot_x = pose.xdef move_turtle(lin_vel,ang_vel,distance):global robot_xrospy.init_node('move_turtle', anonymous=True)pub = rospy.Publisher('/turtle1/cmd_vel', Twist, queue_size=10)rospy.Subscriber('/turtle1/pose',Pose, pose_callback)rate = rospy.Rate(10) # 10hzvel = Twist()while not rospy.is_shutdown():vel.linear.x = lin_velvel.linear.y = 0vel.linear.z = 0vel.angular.x = 0vel.angular.y = 0vel.angular.z = ang_vel#rospy.loginfo("Linear Vel = %f: Angular Vel = %f",lin_vel,ang_vel)#Checking the robot distance is greater than the commanded distance# If it is greater, stop the nodeif(robot_x >= distance):rospy.loginfo("Robot Reached destination")rospy.logwarn("Stopping robot")breakpub.publish(vel)rate.sleep()if __name__ == '__main__':try:move_turtle(float(sys.argv[1]),float(sys.argv[2]),float(sys.argv[3]))except rospy.ROSInterruptException:pass
We can run the code by using the following commands. You can Figure 5-25 for seeing the output
Start roscore$ roscoreStart turtlesim node$ rosrun turtlesim turtlesim_nodeRun the move_distance.py. Mention linear, angular velocity and the global distance the robot should travel.$ rosrun hello_world move_distance.py 0.2 0.0 8.0

Figure 5-25 Output of move_distance.py
We have played with lot of things in turtlesim using ROS topic. Now, we can work with ROS service and a ROS parameter. The next example simply resets the turtlesim workspace, and randomly changes the background color. The workspace reset is accomplished using ROS services, and the color changing is done using ROS parameter. When the workspace resets, the robot’s position resets to the home position and the turtle model changes.
Reset and Change the Background Color
This code shows how to call a service and a parameter from a Python code.
The following gets the list of services in the turtlesim node (see Figure 5-26).
$ rosservice list
Figure 5-26 List of turtlesim node services
There are several services, but we want the /reset service. When we call this service, the workspace resets.
We can retrieve the type of service from the following topic.
$ rosservice type /resetstd_srvs/Empty
std_srvs/Empty is a built-in service from ROS. It has no fields.
The following command shows the field of the corresponding topic.
$ rossrv show std_srvs/Empty---
We can also list the ROS parameters. You can see the turtlesim background color in three parameters. If we change these parameters, we change the color. After setting the color, we have to reset the workspace to show the new color (see Figure 5-27).
$ rosparam list
Figure 5-27 List of parameters from turtlesim node
The following gets the value from each parameter.
$ rosparam get /background_b255

Figure 5-28 Topic publishing the color
The following topic publishes the background color (see Figure 5-28).
$ rostopic echo /turtle1/color_sensorThe following code sets the parameter for the background color and resets the workspace by calling /reset service.
#!/usr/bin/env pythonimport rospyimport randomfrom std_srvs.srv import Emptydef change_color():rospy.init_node('change_color', anonymous=True)#Setting random values from 0-255 in the color parametersrospy.set_param('/background_b',random.randint(0,255))rospy.set_param('/background_g',random.randint(0,255))rospy.set_param('/background_r',random.randint(0,255))#Waiting for service /resetrospy.wait_for_service('/reset')#Calling /reset servicetry:serv = rospy.ServiceProxy('/reset',Empty)resp = serv()rospy.loginfo("Executed service")except rospy.ServiceException, e:rospy.loginfo("Service call failed: %s" %e)rospy.spin()if __name__ == '__main__':try:change_color()except rospy.ROSInterruptException:pass
We can save the code as turtle_service_param.py. The following commands starts the ROS node (see Figure 5-29).
Starting roscore$ roscoreStarting turtlesim_node$ rosrun turtlesim turtlesim_nodeExecute the turtle_service_param.py code$ rosrun hello_world turtle_service_param.py

Figure 5-29 Resetting workspace and changing colors
You have successfully done the turtlesim exercise. The turtle is actually a robot. You can do all of the operations that you did with the turtle with a physical robot too. The next section explains how to do this operation with an actual robot. It is only a simulation but uses the same procedure as with real hardware.
Programming TurtleBot Simulation Using rospy
There are several robots available on the market that run completely on ROS and Ubuntu. The TurtleBot series are a low-cost robots that are used for education and research. You can learn more about the TurtleBot 2 robot at www.turtlebot.com/turtlebot2/ . If you want to check out the latest version of a TurtleBot, go to http://emanual.robotis.com/docs/en/platform/turtlebot3/overview/ .
In this section, we program TurtleBot 2. We look at the installation of TurtleBot 2 packages and how to start the simulation in Gazebo. The code that we developed for turtlesim works on the TurtleBot 2 and 3 robots. The first step is to install the TurtleBot 2 packages.
Installing TurtleBot 2 Packages
The TurtleBot packages are already available in the ROS repository, so we just need to install them.
The first step is to update the list of packages by using the following command.
$ sudo apt-get updateInstalling turtlebot simulation packages$ sudo apt-get install ros-kinetic-turtlebot-gazebo ros-kinetic-turtlebot-simulator ros-kinetic-turtlebot-description ros-kinetic-turtlebot-teleop
These packages install the TurtleBot simulation environment in Ubuntu 16.04 LTS.
Launching the TurtleBot Simulation
After installing the TurtleBot packages, launch the simulation of TurtleBot 2 by using the following command.
Note
It may take time to load the environment in Gazebo. Initially, the Gazebo window may be black because some 3D mesh files are downloading. The time it takes to complete the download depends on your Internet speed. If you feel that Gazebo is stuck, just cancel by pressing Ctrl+C, and launch it again.
$ roslaunch turtlebot_gazebo turtlebot_world.launchThis command launches a ROS launch file from the turtlebot_gazebo package. If the simulation loads successfully, you get a window like the one shown in Figure 5-30.

Figure 5-30 TurtleBot 2 Gazebo simulation
If you want to move the robot around the environment, start a new terminal and launch the following command.
$ roslaunch turtlebot_teleop keyboard_teleop.launchWhen you run this command, you get the following messages on the terminal. Click the terminal using a mouse, and press the keys mentioned on the terminal. You can move the robot using I, J, and L keys (see Figure 5-31).
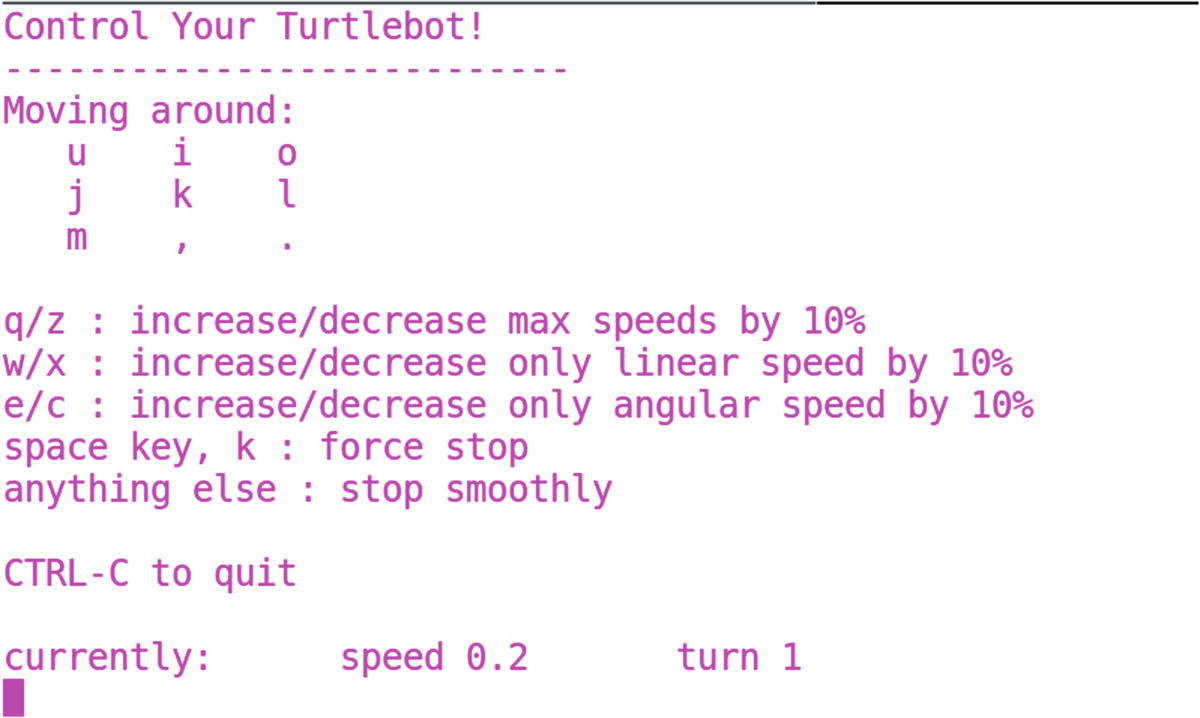
Figure 5-31 TurtleBot 2 teleop application
If you want to stop the robot, press Space bar, if you want to stop the simulation or teleoperation, just press Ctrl+C.
Moving a Fixed Distance Using a Python Node
In this section, we move the robot to a fixed distance using the node that we used for turtlesim. We can modify the move_distance.py node.
For turtlebot the velocity Twist message topic is: /cmd_vel_mux/input/teleop: Message type: geometry_msgs/TwistRobot position feedback topic: /odom : Message type: nav_msgs/Odometry
We get the definition of odometry from the following command.
$ rosmsg show nav_msgs/OdometryIt is a built-in message type in ROS.
We have to import the modules for these messages. The logic of the robot movement is the same as in turtlesim. The distance is global distance. The initial origin of the robot is 0,0,0.
#!/usr/bin/env pythonimport rospyfrom geometry_msgs.msg import Twistfrom nav_msgs.msg import Odometryimport sysrobot_x = 0def pose_callback(msg):global robot_x#Reading x position from the Odometry messagerobot_x = msg.pose.pose.position.xrospy.loginfo("Robot X = %f ",robot_x)def move_turtle(lin_vel,ang_vel,distance):global robot_xrospy.init_node('move_turtlebot', anonymous=False)#The Twist topic is /cmd_vel_muc/input/teleoppub = rospy.Publisher('/cmd_vel_mux/input/teleop', Twist, queue_size=10)#Position topic is /odomrospy.Subscriber('/odom',Odometry, pose_callback)rate = rospy.Rate(10) # 10hzvel = Twist()while not rospy.is_shutdown():vel.linear.x = lin_velvel.linear.y = 0vel.linear.z = 0vel.angular.x = 0vel.angular.y = 0vel.angular.z = ang_vel#rospy.loginfo("Linear Vel = %f: Angular Vel = %f",lin_vel,ang_vel)if(robot_x >= distance):rospy.loginfo("Robot Reached destination")rospy.logwarn("Stopping robot")breakpub.publish(vel)rate.sleep()if __name__ == '__main__':try:move_turtle(float(sys.argv[1]),float(sys.argv[2]),float(sys.argv[3]))except rospy.ROSInterruptException:pass
We can run this code by using the following command.
$ roslaunch turtlebot_gazebo turtlebot_world.launchStart the TurtleBot simulation. If you are launching a file, you don’t need to start roscore because roslaunch already runs roscore.
Run the move distance node with command-line arguments (see Figure 5-32).
$ rosrun hello_world move_turtlebot.py 0.2 0 3
Figure 5-32 TurtleBot 2 moving 3 meters from its origin
Finding Obstacles
Using the same logic, we can find obstacles around TurtleBot. You can subscribe the laser scan topic from TurtleBot, which gives the obstacle range around the robot.
Topic: /scanMessage Type: sensor_msgs/LaserScan
Also, you get all the fields inside this message by using the following command.
$ rosmsg show sensor_msgs/LaserScanA good exercise is to create an obstacle avoidance application in ROS.
Programming Embedded Boards Using ROS
You have seen how to program a robot in ROS, and you have seen robot simulation. Now let’s discuss how to create robot hardware and program using ROS.
One of the core ingredients of a robot is the microcontroller platform. A microcontroller is basically a chip on which we can write our own code. We can also configure the chip’s pins. Microcontrollers are used for various applications. In robotics, controllers are used to interface sensors, such as ultrasonic distance sensors, IR sensors, and so forth, and for adjusting the speed of a robot’s motors. Microcontrollers can also communicate with a PC via serial communication.
In this section, you look at some basic interfacing with popular microcontroller platforms, such as the Arduino ( www.arduino.cc ) and the Tiva-C Launchpad ( www.ti.com/tool/EK-TM4C123GXL ), and with single-board computers, such as Raspberry Pi 3 board ( www.raspberrypi.org ).
Let’s start with the Arduino board.
Interfacing Arduino with ROS
Arduino boards are on a microcontroller-based platform that program using a C++–like programming language. There are a variety of Arduino boards available ( www.arduino.cc/en/Main/Products ). We are going to use the Arduino Mega, which is available at https://store.arduino.cc/usa/arduino-mega-2560-rev3 .
Figure 5-33 shows the Arduino Mega 2560 Rev3 board.
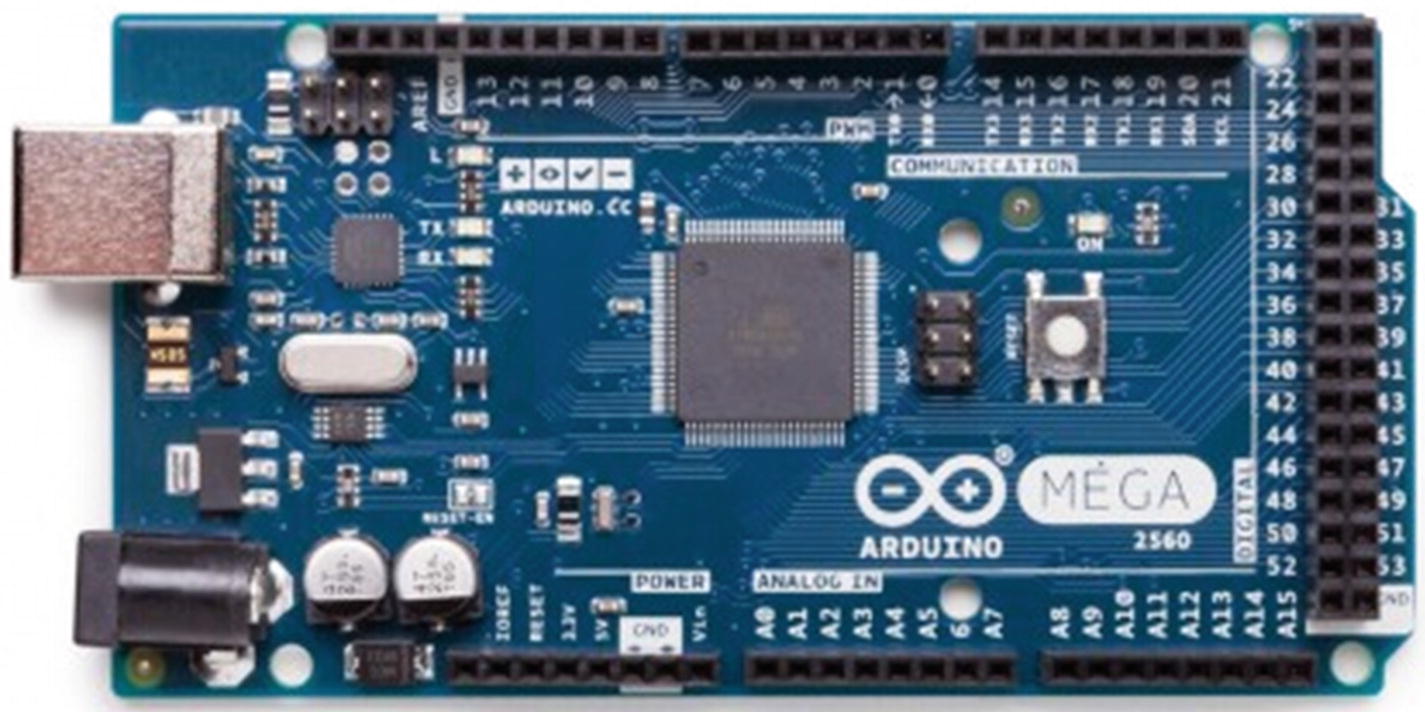
Figure 5-33 Arduino Mega 2560 board
You can program the Arduino board by connecting to your PC. You can download the Arduino IDE from www.arduino.cc/en/Main/Software .
When you launch the IDE, you first see the window shown in Figure 5-34.
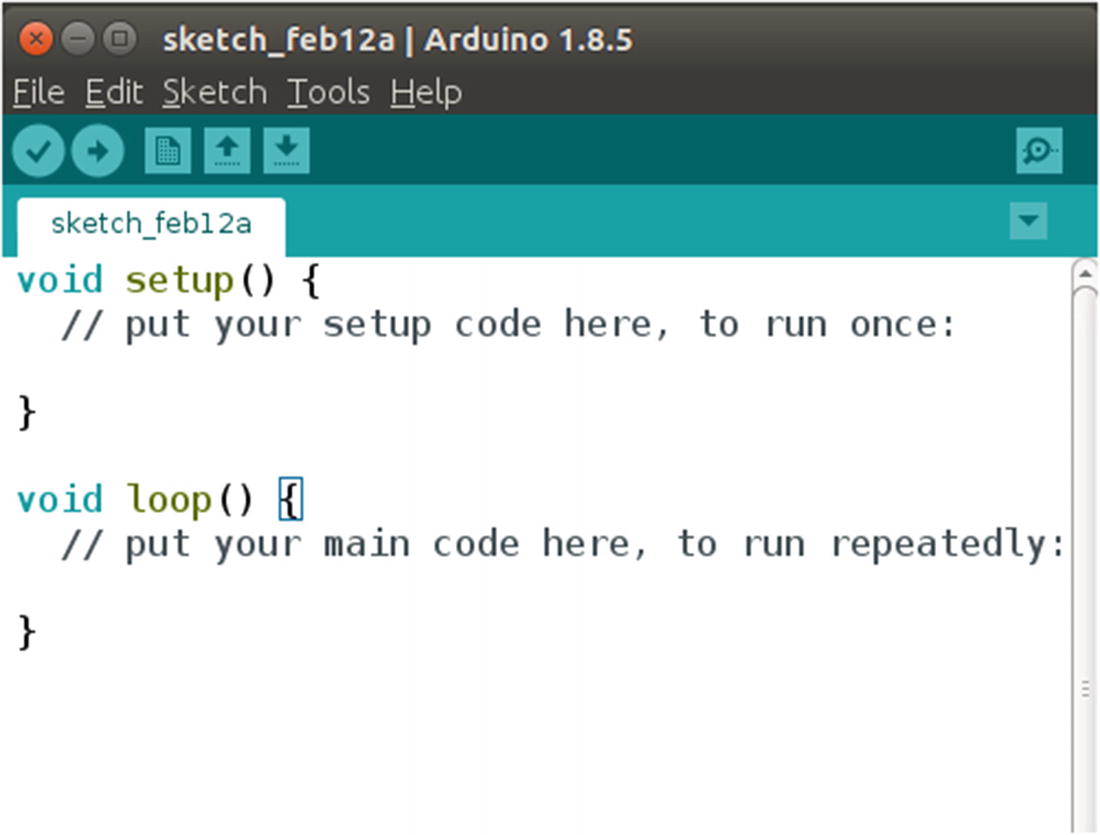
Figure 5-34 Arduino IDE
In the Arduino programming language, similar to C++, there are a lot of libraries available for simplifying tasks. For example, there are libraries for communicating with a PC, sending speed commands to motor drivers, and so forth.
There is also a library for interfacing with ROS. Using this library, the Arduino can send/receive messages to the PC. These messages are converted to topics on the PC side. Arduino can publish data and subscribe data, similar to a ROS node. Actually, Arduino acts like the ROS hardware node.
First, let’s learn how to create an Arduino library for communicating with the ROS system.
We have to install a ROS package to create this library. The following is the command.
$ sudo apt-get install ros-kinetic-rosserial-arduinoThis installs the necessary packages to interface Arduino with ROS.
The next step is to open the Arduino IDE. Select File Menu ➤ Preference. You get the window shown in Figure 5-35.
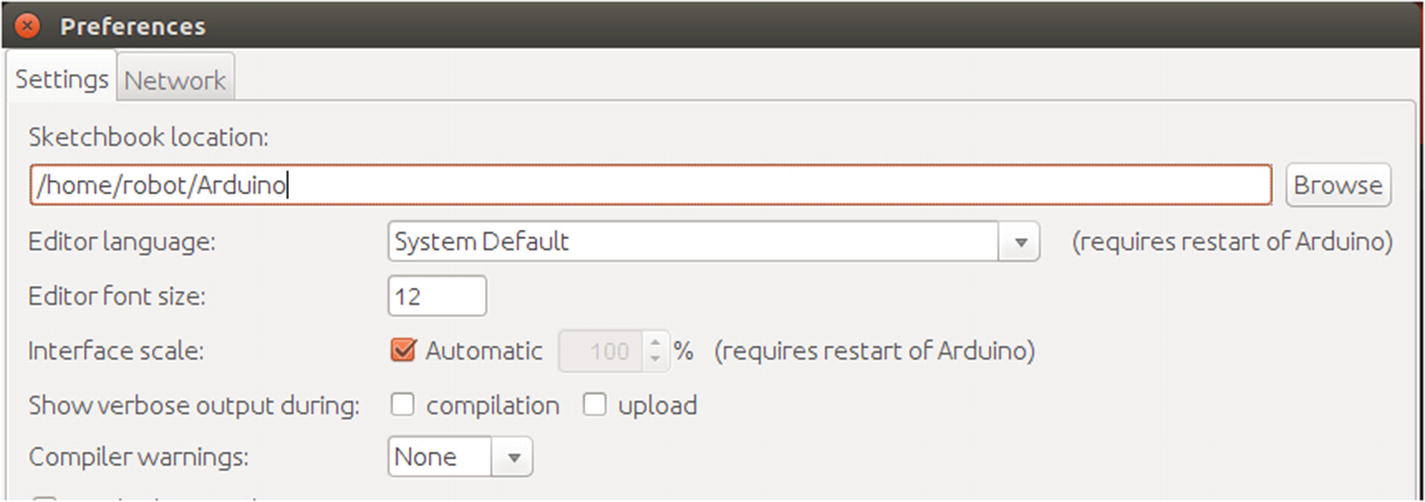
Figure 5-35 Arduino Preference window
Take a new terminal and switch to sketchbook folder path mentioned in the Preference Window. When you switch to this folder, you can find another folder called libraries. You can then switch to the libraries folder and execute the following command (see Figure 5-36).
$ rosrun rosserial_arduino make_libraries.py .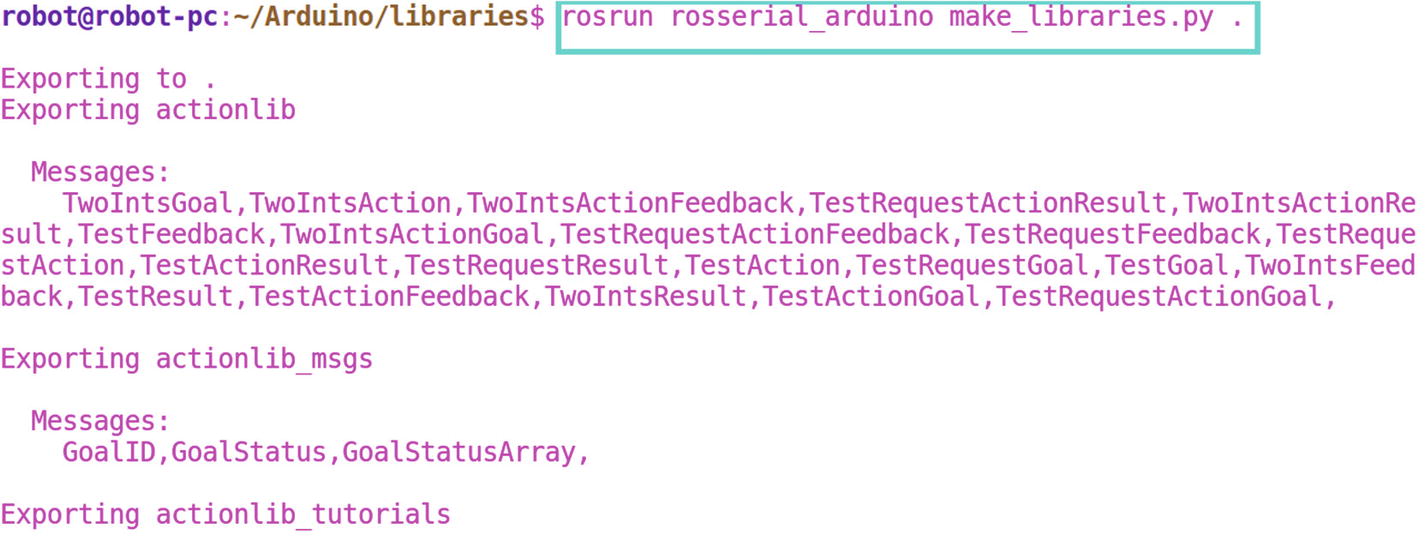
Figure 5-36 Creating a ROS library for Arduino
When you run the preceding command, you can see messages print on the terminal. This is actually creating the Arduino library for ROS.
After finishing the process, check the libraries folder. The ros_lib folder is the Arduino library for ROS.
Close the Arduino IDE and restart. Then go to File ➤ Examples ➤ ros_lib. You see a list of examples using Arduino and ROS. Let’s discuss a basic example: Blink.
Blink is basically a Hello World example for the Arduino. When the Arduino interfaces with ROS, we get a topic. When we publish to a topic, it turns on, and when we publish again, its turns off. It is like LED toggling.
Figure 5-37 shows the Blink example.

Figure 5-37 The Arduino Blink example
The workings of the code is self-explanatory. We create a node and subscribe a topic called /toggle_led. When a message comes to the topic, the LED turns on, and when next data comes to topic, the LED turns off.
Let’s upload the code to Arduino. To do that, plug the Arduino to a laptop.
Find the Arduino serial port by using the dmesg commmand (see Figure 5-38).
$ dmesg
Figure 5-38 The output of dmesg command
The Arduino serial device is /dev/ttyACM0.
Change the device’s permission by using the following command.
$ sudo chmod 777 /dev/ttyACM0After that, select this serial device from the Arduino IDE.
Goto Tools->Port->ttyACM0We can now compile this example and upload the code to the board.
After uploading the code, we have to execute the following commands to see the topics from the Arduino. Execute each command in separate terminals.
Starting roscore$ roscore
Start the ROS serial server on the PC. The node does the conversion of topics to and from the Arduino.
$ rosrun rosserial_python serial_node.py /dev/ttyACM0Publish a value to the /toggle_led topic.
$ rostopic pub toggle_led std_msgs/Empty --onceThis turns on the LED on the board. If we do it again, it turns off.
Figure 5-39 shows the output.

Figure 5-39 The LED toggling command
There are more examples of ROS/Arduino interfacing at http://wiki.ros.org/rosserial_arduino/Tutorials .
Installing ROS on a Raspberry Pi
The Raspberry Pi computer is a popular board for DIY projects and robotics. The cost of the board is low, and its specifications are best for DIY projects. The latest Raspberry Pi 3 board has the following specs.
Name of SoC: Broadcom BCM2837.CPU: 4× ARM Cortex-A53, 1.2GHz.GPU: Broadcom VideoCore IV.RAM: 1GB LPDDR2 (900 MHz)Networking: 10/100 Ethernet, 2.4GHz 802.11n wireless.Bluetooth: Bluetooth 4.1 Classic, Bluetooth Low Energy.Storage: microSD.GPIO: 40-pin header, populated.
The Raspberry Pi 3 is shown in Figure 5-40.

Figure 5-40 The Raspberry Pi 3 board
So how do you install an OS on this board and then install ROS onto it?
The next section explains the procedures for installing an operating system and ROS.
Burning an Ubuntu Mate Image to a Micro SD Card
To install an OS on the Raspberry Pi 3, you need to buy a micro SD card that is greater than 16 GB. A micro SD card with class 10 is a great choice for the Pi.
There is a micro SD card that you can buy at http://a.co/1HyY8qr .
You also need to buy a micro SD card reader or an SD card adapter to plug into your laptop.
You can install the OS using the following GUI tool.
$ sudo apt-get install gnome-disk-utilityWe are going to install Ubuntu Mate on the Raspberry Pi 3. You can download Ubuntu Mate OS from https://ubuntu-mate.org/download/ .
Choose the Raspberry Pi option from the list. Download the image and open gnome-disk-utility. Select the SD card drive, and select the Restore image option. You can browse the downloaded image path here. A tutorial is available on YouTube at https://youtu.be/V_6GNyL6Dac .
After completing the restoring process, you can unmount the SD card and plug in to the Raspberry Pi 3.
Booting to Ubuntu
After plugging in the SD card, plug a 5V, 2A supply to the Raspberry Pi 3, and connect Pi to an HDMI monitor. Also, connect a keyboard and a mouse via USB.
The system boots up, and you see the Ubuntu Mate desktop.
Installing ROS on a Raspberry Pi
You can follow the ROS installation instructions at http://wiki.ros.org/kinetic/Installation/Ubuntu . These instructions are the same for the armhf platform, so it works well in Raspberry Pi 3.
Summary
This chapter discussed programming with ROS. We started the chapter by discussing creating a ROS workspace. We saw how to create a workspace and how to create a ROS package. After creating a package, we saw how to write ROS nodes using C++ and Python. We wrote a sample ROS node using C++ and Python. We discussed ROS launch files and how to include our nodes in a launch file. We created a set of examples to work with turtlesim in ROS, and we worked with a Gazebo simulation of TurtleBot. At the end of the chapter, we saw how to program embedded boards such as the Arduino and the Raspberry Pi using ROS, which is very useful when creating robots.
The next chapter discusses how to create wheeled robot hardware and software using ROS.