
You know how to make your beats now, which is a huge step toward our goal of making a song on the iPad. Now, what’s the next step in the progression? You need to learn to record some vocals, or audio. Because now that you have a beat, don’t you want to sing a little?
GarageBand allows you to record using your iPad’s built-in microphone. But, here’s another secret: You can also use the iPhone headphones’ built-in microphone. By the way, I highly recommend using the headphones. Even if you have non-Apple headphones, I would still use these over recording along with the iPad’s built-in speaker.
Why? Because the microphone will pick up the audio coming from the iPad as well. Not only can this cause feedback, but also you will have your drum beat recording in with your vocals. This won’t sound very good later in your recording; trust me.
There are some third-party devices that can make recording much easier and better-sounding as well. One device you might consider is the iRig Mic from IK Multimedia (see Figure 2.1). You get a microphone and the headphone adapter/interface all in one shot. This will allow you to hear what you’re doing and get a direct input, and it requires little setup.

Okay, let’s lay down some vocals. If you’re going to use headphones (which I recommend), you can plug them in now. If not—well, we’re doing this for practice first, right? I’m going to pick up from the last chapter, so I have some drums and so on. However, if you’d like to start from scratch, simply create a new song!
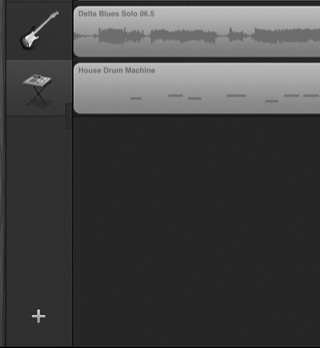
In the lower-left corner of the Arrangement page, you’ll see a + sign (see Figure 2.2). Tap it.
In the Instruments menu, scroll to the Audio Recorder (see Figure 2.3).
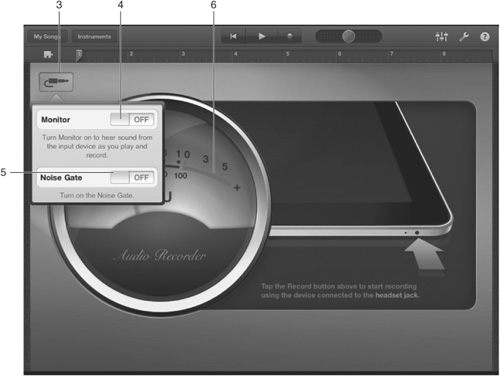
You’ll be instantly greeted with the Audio Recorder screen (see Figure 2.4). There’s not a ton to know about this screen, but there’s enough. Press the small plug button in the corner. This brings up the Monitor and Noise Gate functions.
The Monitor function allows you to hear what the mic is hearing. Note: This option appears only when the headphones are on. This prevents a phenomenon known as feedback that is high, screechy, and unpleasant to the ear.
The Noise Gate is really, really cool. When this is on, GarageBand will actively turn off any background noise that you don’t want. But you have to raise the Sensitivity slider to tell it how aggressive to be. Note: When you trigger past the sensitivity and there’s background noise, that sound can still get through. So, try to record in quiet places.
The big VU meter allows you to see how much signal is coming in from your microphone. If your needle is going all the way into the red, you may want to move a little bit away from the mic. But, if you land in the red somewhat, don’t worry; GarageBand is pretty forgiving.

How about some FX for your vocals? Maybe a little reverb, maybe a little echo so that your fans can hear the stark desolation surrounding your lonely voice in the night? It’s all here! Press the Audio Recorder Preferences button in the upper-right corner of the screen (see Figure 2.5).
The Audio Recorder Preferences screen allows you to adjust how loud your vocals will be with the Track Volume. I suggest turning it down a hair so your voice doesn’t blow your own eardrums!
The Track Pan knob allows you to put your voice either slightly to the left or slightly to the right in terms of speakers, or headphone plugs.
The Echo slider allows you to add a little cavernous echo to your track. This makes it sound as if you are somewhere other than a living room when recording, and it adds some depth to your recordings. Use it sparingly, though! In other words, don’t raise it too high, or it will wash out your vocals, and people may have a hard time understanding you.
Reverb is a cousin of Echo. Essentially, Reverb adds a long or short decay on your voice, making it sound as if you’re in a church, garage, or sewer. It all depends on how it’s set up.
Master Effects allow you to adjust how the Echo and Reverb sound. Press this now, and you’ll see what’s shown in Figure 2.6.
Once you press the Master Effects button, you get an Echo > Default button and a Reverb > Default button. These buttons allow you to choose different variations of Echo and Reverb. Try different types until you find one that you like.


When you find effects (or no effects) that you like, press the Record button at the top (see Figure 2.7) and sing to your heart’s content. If you picked up from the previous chapter, you should be able to hear your music, too. If not, you’ll hear a click track to sing along with.
After your first recording, you’ll get the option for even more vocal effects. These are really fun! You get options such as Monster, Robot, Chipmunk, and more (see Figure 2.8). You can always change these effects before and after, so don’t worry about being committed. Select the Robot effect and then press the Play button to listen to what it sounds like.
If you decide you want to re-record, simply reposition the arrow at the top to the far left and start again.
When you’re ready to go back to the Arrangement page, press the Arrangement Page button at the top.
Once on the Arrangement page, you’ll see the waveform of your vocal recording. You also have the option to click and drag your recording to other parts of the song. But don’t worry much about this; we’ll get into it more in Chapter 8, “The Arrangement Page.”


Okay, you now know how to record a vocal track! Even if you’re not a singer, I’d encourage you to jump all over this, because it’s a blast! It’s a way to feel like a star in your own bedroom. And, you have all the effects to make you sound like a pro.
In the next chapter, we’ll get into recording guitar. See you then....