
Guitars are so much fun. Whether you’re playing a real one or strumming a virtual guitar, they make you feel like a rock star. Well, maybe not everyone. Actually, keyboards, synthesizers, and organs do it a little more for me, especially piano. Why? Because they are so versatile, so haunting, and so expressive all at once. And, I’m a keyboardist. There ya go!
With that in mind, I’m going to instruct you on the beauty of enabling and using the pianos, organs, synthesizers, and so on that are available in GarageBand for iPad.
Let’s start off with the Smart Keyboard. It’s a really fun instrument that takes all the hard work out of playing keyboards.
In the Arrangement page, press the + symbol in the lower-left corner (see Figure 5.1). If you’re starting a new song, proceed to the next step.
Flick to the icon titled Smart Keyboard (see Figure 5.2).
You’ll be greeted with a screen that looks like a classic piano at the top, but not so much like one at the bottom (see Figure 5.3). Where are the regular piano keys? They just look like lines? Simplifying the keyboard is part of what makes the Smart Keyboard easier, or “smarter.” Instead of worrying about pressing the white or black keys, you simply choose the chord that you want to play—just like in virtual guitar. Try pressing a letter now.
You’ll notice one thing different about the chord buttons in the Smart Keyboard, as opposed to the Smart Guitar. The Keyboard has lines going all the way up and down, as shown in Figure 5.4. These lines indicate octaves—or how high or low the chord plays, in terms of pitch. Pressing the highest line would be like playing all the way to the right of the piano, where everything is really high. Playing lower lines would be like playing all the way to the left, where the notes are really low and “bassy.” Try playing some of the different lines now.
You’ll also notice that the notes are kind of choppy when you play them. Maybe there’s a way to make the notes sustain a little longer? Sure! Use the Sustain slider (see Figure 5.5). When you slide it all the way to the right, it’s like you’re holding down the sustain pedal with your foot. Try it now. It’s just like being in a concert hall, right?
At the lower section of the key lanes, you’ll notice darker lines (see Figure 5.6). These indicate individual notes played in the bass section of the piano—for example, playing the keys all the way to the left on the piano. These particular keys play only single notes. This is good, because these are intended to be bass notes. You can use two fingers on one key lane; this allows you to play bass and high keys (or treble) at the same time. Try it!
Now, if you aren’t having much fun with the letters, lines, or black lines, perhaps it’s time for a little computer assistance. Let’s try out some AutoPlay! Turn the knob to 1 and press in one of the key lanes (see Figure 5.7).
There are several different AutoPlay grooves from which to choose—up to five total. These grooves automatically scale in pitch to the note you choose. Just match the key with what’s being played already or experiment. Notes and chords are meant to be combined!
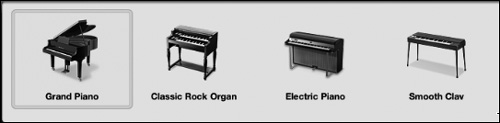
What if you decide you don’t want a piano, though? Let’s change it up. Press the Grand Piano button (see Figure 5.8).
In the menu shown in Figure 5.9, you can choose whether you want an organ, a piano, and so on. Choose Classic Rock Organ.
When the organ appears, you’ll notice that it has a few more buttons that were not available on the piano (see Figure 5.10). You have a Rotation switch that adjusts how fast the organ appears to vibrate when you sustain a note. You also have the Distortion. This knob determines how jagged, or noisy, the organ is when played. Also, the AutoPlay is now working in a way that matches how an organist would play. Try playing with the Distortion, Tremolo, and AutoPlay.


Pretty much anytime you switch to a different keyboard in GarageBand, you’ll get not only new graphics, but also new knobs and switches that go along with the type of instrument you choose. The best bet is to experiment with new knobs as you see them. This will help you learn and customize the keyboards in ways that sound good to you.
Now that we’ve covered the Smart Keyboard, let’s take a look at the regular keyboard. You know, the one that you actually have to play? Oh, come on—it’s not that scary!
See you in the next chapter!