
In this chapter, you will continue development of the Book Shelf application that you started in Chapter 6. At this point you should have a Rails application started, with a complete user model and user authentication implemented. In this chapter, you will take the first steps toward making the application useful for sharing information about a collection of books. You will implement integration with the Amazon Web Service to look up information about books that a user wants to add to the book shelf. You will also implement the ability to add and remove books from a user's book shelf. With that functionality in place, you'll add a display of the books on a user's shelf to his home page. The last task of this chapter will be to implement a detail view for a selected book. Later chapters will build upon the detail view to add reviews and ratings.
To follow along with the development in this chapter, continue working with the code that you started in Chapter 6.
The tasks of this chapter all relate to the ability to add books to a user's book shelf. By the end of this chapter, a user will be able to search this application for books based on keywords, add selected books to a book shelf, view books contained on the user's book shelf, delete books from a book shelf, and view a book's detail page.
The Book Shelf application gathers information about books from the Amazon catalog of books. When a user searches for a book by keyword, it is actually the Amazon catalog that is searched. The results from an Amazon search go back to the user, and the user is able to select from those books the ones that he wants to add to his shelf. If a book returned from the search is already on a user's shelf, then that is also indicated. Ten search results display at a time. If a search returns more than ten books, the user is able to page through the results.
The user's home page shows a paged view of all the books on his shelf. A user can select any book from their shelf and open up a detailed view of that book that contains information about the book. You will be adding reviews and ratings to the book detail view in the next chapter.
Just as the user support was broken down into a series of tasks for implementation, the goals of this chapter are broken down into a series of tasks that you will complete as you read through. Implementing the covered features is broken down into the following tasks:
Refactoring the sidebar code
Integrating with Amazon
Implementing search capability to book shelf
Implementing book addition and deletion to book shelf
Displaying a user's books on their homepage
Implementing the book detail page
As you write the code in this chapter, feel free to stop and try things out in the Rails console anytime you come across a piece of code that you don't quite understand. I've done my best to try to explain most of the code, but seeing output yourself never hurts.
At the end of Chapter 6, the code contained in the sidebar view looked like this:
<div id="sidebar">
<div id="menu">
<ul id="home_menu">
<% if !session[:user] %>
<li><%= link_to 'Join Now',
:controller=>'user',
:action=>'signup' %>
</li>
<% end %>
<li><%= link_to 'View the Books',
:controller=>'book',
:action=>'list' %>
</li>
</ul>
</div>
<div style="clear:both;"> </div>
</div>With this implementation, if there is not a user logged into the site the visitor will see two links, one to Join Now, and one to View the Books. If there is a user logged in, that user will only see one link, to View the Books. The View the Books link will show all of the books known by the application. For logged in users, we want to add an additional link that will allow the user to see only the books that are on his or her shelf.
Listing 7.1 shows the addition of the My Books link for logged in users. You'll also notice that the code has been slightly refactored into a more readable form. Update your sidebar code contained in app/views/shared/_sidebar.html.erb to match the code listing.
Example 7.1. Refactored _sidebar.html.erb
<div id="sidebar">
<div id="menu">
<ul id="user_nav_menu">
<% if logged_in %>
<li>
<%= link_to 'My Books',:controller=>'user',
:action=>'home',
:user_id=>session[:user].id
%>
</li>
<li>
<%= link_to 'All Books',:controller=>'book',
:action=>'list' %>
</li>
<% else %>
<ul id="home_menu">
<li>
<%= link_to 'Join Now',:controller=>'user',
:action=>'signup' %>
</li>
<li>
<%= link_to 'View the Books',
:controller=>'book',
:action=>'list' %>
</li>
</ul>
<% end %>
</ul>
</div>
<div style="clear:both;"> </div>
</div>If you looked at Listing 7.1 closely, you probably noticed one other significant difference that was sneaked in. At the end of Chapter 6 the sidebar was using this line to see if a user was logged in:
<% if session[:user] %>
This checks the session to see if a :user variable is set. While this works, it is a bit too closely tied to the implementation. It would be better if we had a helper method that we could use to see if a user is logged in or not. You can create that helper method now. Open up the file app/helpers/application_helper.rb. This methods contained in this file will be available to all of your view templates. Add the following method to this helper class:
def logged_in
    session[:user]?true:false
end
Now you have a helper method that your views can use instead of directly checking the session to see if a user is logged in. In the future, if the way you implement the user logged in status changes, you can just update this method and not worry about any checks that you have in the view templates.
Now that the sidebar contains the links you'll need to support users, let's look at how to integrate with Amazon to populate the book shelf.
There is a wealth of information available to an application through the Amazon Web Service (AWS). The AWS consists of a set of services that Amazon provides to Web developers. The Amazon Associates Service (A2S) is one of those services. The A2S provides an API into Amazon's huge database of information about the books and other products that it sells.
The Book Shelf application uses an open source Ruby library that encapsulates and simplifies access to the AWS. This library is called Ruby/AWS and was written by Ian MacDonald. The Ruby/AWS library hides most of the details that you need to know to use the A2S. You can read more about this library at its home page, www.caliban.org/ruby/ruby-aws/.
The A2S provides both a REST and a SOAP interface; Ruby/AWS uses the REST interface. Ruby/AWS uses the REXML library to parse XML responses from Amazon. You shouldn't have to do anything to install REXML, as it is included with Ruby 1.8.x or later, which is also the minimum version of Ruby that you need to use Ruby/AWS. Complete RDOC documentation for Ruby/Amazon is available at library's home page.
For the Book Shelf application, you'll create a thin class that will be put into the application's lib directory to encapsulate access to the Ruby/AWS library. This strategy will be used rather than making calls to Ruby/AWS directly from the Book Shelf controller or model classes. The main reasons for taking this approach are as follows:
If you embed the Ruby/AWS code into your model classes, they become more difficult to test independently from the Amazon interface.
While Ruby/AWS seems like a good choice today to provide support for accessing the AWS, you may prefer to use a different library or plug-in in the future.
Therefore, if you encapsulate all Amazon interfacing into a single component class, it becomes easier to replace the Ruby/AWS plug-in in the future.
Now that you know how you are going to integrate the Book Shelf application with Amazon, let's get down to business by installing the Ruby/AWS library in your application directory.
Download the Ruby/Amazon library. Go to
www.caliban.org/ruby/ruby-aws/to download the library. The library is available as a tarred and gzipped file.Download the version with the
.tar.gzextension. Depending on the version you get, this file is named something likeruby-aws-0.3.0.tar.gz. At the time of this writing, 0.3.0 was the current stable version of the library. Save this file to thebook_shelf/libdirectory.Extract the library archive into the
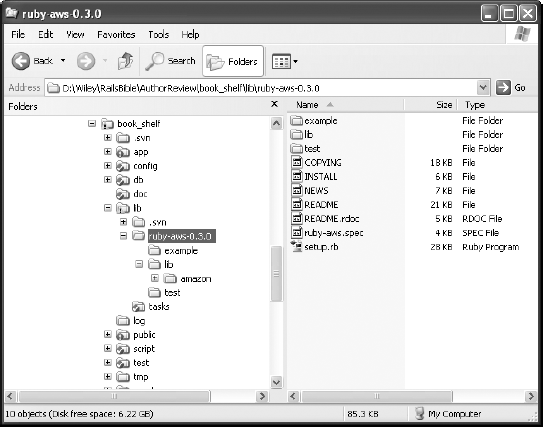
book_shelf/libdirectory. If you need help extracting theruby-aws-0.3.0.tar.gzon Windows see the sidebar, Extracting TAR and GZIP Files on Windows. You should see the directory structure shown in Figure 7.1 after you extract the Ruby/AWS archive.Move the contents of
ruby-aws-0.3.0/libto thebook_shelf/libdirectory. The Ruby/AWS library is implemented in the files contained in theruby-aws-0.3.0/libdirectory. Place these in thebook_shelf/libdirectory so that they are visible to Rails and your Book Shelf application code. Theruby-aws-0.3.0/libdirectory should contain both a file namedamazon.rband a directory namedamazon. Move theamazon.rbfile and theamazondirectory into thebook_shelf/libdirectory.Verify the library installation. Now open up a Rails console and include the Ruby/AWS library by using a
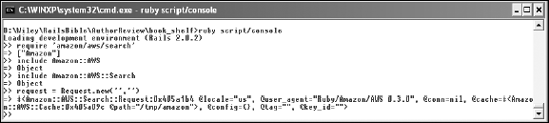
requirestatement to verify that the library can be found. Figure 7.2 shows how you can verify that you are able to successfully see the Ruby/AWS library from your Rails environment. TheRequestobject that is instantiated is part of the Ruby/AWS library. A successful instantiation of that object is a good sign that all is well with your Ruby/AWS library installation.
When you perform searches with the Ruby/AWS library it returns results as pages. Typically, each search query will return one page of results. At the time of this writing, there is a bug in the Ruby/AWS library that will prevent you from retrieving result pages beyond the first for searches that have more items than what is returned in a single query. Fortunately, it is very easy to fix this bug. Open up the file /lib/amazon/aws.rb and look at line 481. You should see this:
MinimumPrice OfferStatus Sort
Modify that line so that it also contains the keyword ItemPage. So after you modify the line, it should look like this:
MinimumPrice OfferStatus Sort ItemPage
This line and lines above it identify valid parameters to the ItemSearch that you will use later in this Chapter. The ItemPage is required to be able to get to result pages beyond the first. If you want to learn more about how the Ruby/AWS library is implemented and how it works, you should read the README file that is included with the library, and also look at the Amazon AWS documentation.
This completes the installation of the Ruby/AWS library. Now with that library in place, you have what you need to build an interface class that your application will use to read data from the Amazon library.
In this section, you can implement a class that encapsulates all of the Book Shelf's application access to Amazon. This class uses the Ruby/AWS API. This is also a reusable class that you can use in other applications.
In the bookshelf/lib directory, create a file named amazon_interface.rb. This is where you define the AmazonInterface class. Listing 7.2 contains the code that you want to enter for the AmazonInterface class. You want to give users the ability to search for books based on any keyword. For now, that is the only functionality you require from the Ruby/AWS library. In the AmazonInterface class, you'll create a method named find_by_keyword, which allows you to implement that search capability. You'll also use an initialize method to set up the interface.
To perform a keyword search using Ruby/AWS, you have to first create a Request object. The Request class contains the most common search methods for searching the Amazon catalog. To create a Request object, you pass an Amazon developer token and an Amazon associate ID. Only the developer token is required. The associate ID parameter is optional. If you do not pass an associate ID, the Ruby/AWS library contains a hard-coded associate ID that is used. However, by using your own associate ID, you earn credit for any books that are purchased from Amazon through links contained in the application. If you do not have an Amazon developer token or Amazon associate ID, see the sidebar "Obtaining an Amazon Developer Token" for information about how to get them. Both the developer token and the associate ID are available at no cost through a simple sign-up process on the Amazon Web site.
Now the Request object is set up and ready to use in other methods that you add to this class to perform searches against the Amazon catalog.
Example 7.2. AmazonInterface
require 'amazon/aws/search'

class AmazonInterface

  # don't want to have fully qualified identifiers
  include Amazon::AWS
  include Amazon::AWS::Search

    ASSOCIATES_ID = YOUR_AMAZON_ASSOCIATE_ID
    DEV_TOKEN = YOUR_AWS_DEV_TOKEN

   def initialize
       @request = Request.new(DEV_TOKEN, ASSOCIATES_ID)
   end

   def find_by_keyword(keyword, page)
       is = ItemSearch.new('Books', {'Keywords' => keyword })
       rg = ResponseGroup.new('Medium')
       resp = @request.search(is, rg)
       products = resp.item_search_response.items.item
   end

end
The find_by_keyword method takes two parameters: a keyword to search on and a page number. In order to perform a search, you use three classes from the Ruby/AWS library. The classes are ItemSearch, ResponseGroup, and the Request class that you instantiated in the initialize method. The first thing you do is setup the search by creating an ItemSearch instance like this:
is = ItemSearch.new('Books', {'Keywords' => keyword })This will tell Amazon that you want to search only for books and you want to use the keywords that have been passed into this method. For now you will ignore the page parameter. Later in this chapter when you add support for paging you will modify this setup to include the page number as well.
The next step in executing the search is to create a ResponseGroup instance like this:
rg = ResponseGroup.new('Medium')This tells Amazon how much information you want it to provide in the results that it returns. For the data requirements of the book shelf application, this should be Medium. Other options that you could specify here are Small and Large. For more details about using these parameters take a look at the Amazon AWS documentation at http://docs.amazonwebservices.com/AWSECommerceService/2008-03-03/DG/.
With the ItemSearch and ResponseGroup initialized, you are now ready to execute the search using the search method of the Request object like this:
resp = @request.search(is, rg)
You pass the ItemSearch and ResponseGroup instances that you created into the search method. The response that contains the search results is returned from the search method.
Before explaining the last line of the find_by_keyword method, you should understand the results that are returned from the search method. First consider the interface between Ruby/AWS and Amazon. Recall that Ruby/AWS makes requests using the Amazon REST API, so your search request might look like the following:
http://ecs.amazonaws.com/onca/xml?Service=AWSECommerceService
&Operation=ItemSearch&AWSAccessKeyId=[Access Key D]
&AssociateTag=[ID]&SearchIndex=Books&Keywords=ruby
In response to this request, Amazon will return results as XML data. Listing 7.3 is an example of what your search results might look like coming from Amazon.
This response is for a Small response group. The Medium response group follows the same format but contains much more data. Looking at just the smaller response however is good enough to understand the results that Ruby/AWS returns. The important section to understand is the set of <Item> elements. Each Item element specifies a book returned as part of the results.
The Ruby/AWS library converts each of the XML elements into a Ruby object. So in the response that Ruby/AWS returns, the root object will be an ItemSearchResponse instance. That instance will contain attributes that represent its children. The names of the attributes will be operation_request and items. When there are multiple instances of an XML element, that element is represented as an array of objects by the Ruby/AWS library. So for example, the items attribute of the ItemSearchResponse class is an instance of the Items class. The items instance will contain an array attribute named item which is an array of all of the individual book items.
This is enough explanation to understand the final line of the find_by_keyword method. This line is shown below:
products = resp.item_search_response.items.item
Example 7.3. Amazon Search Results
<ItemSearchResponse>
  <OperationRequest>
    <HTTPHeaders>
      <Header Name="UserAgent" Value="Mozilla/5.0 (X11; U; en-US;
  rv:1.8.1.13) Firefox/2.0.0.13"/>
   </HTTPHeaders>
   <RequestId>1TGEFS25LT11DF2222FFGT13</RequestId>
   <Arguments>
     <Argument Name="SearchIndex" Value="Books"/>
     <Argument Name="Service" Value="AWSECommerceService"/>
     <Argument Name="ResponseGroup" Value="Small"/>
     <Argument Name="Operation" Value="ItemSearch"/>
     <Argument Name="Version" Value="2008-03-03"/>
     <Argument Name="AssociateTag" Value="your_associate_tag"/>
     <Argument Name="Keywords" Value="Ruby"/>
     <Argument Name="AWSAccessKeyId" Value="01234567890123456789"/>
   </Arguments>
   <RequestProcessingTime>0.0731353958225256</RequestProcessingTime>
 </OperationRequest>
 <Items>
   <Request>
     <IsValid>True</IsValid>
     <ItemSearchRequest>
       <ResponseGroup>Small</ResponseGroup>
       <SearchIndex>Books</SearchIndex>
       <Title>Ruby</Title>
     </ItemSearchRequest>
   </Request>
   <TotalResults>87</TotalResults>
   <TotalPages>9</TotalPages></lt>
   <Item>
    <ASIN>0439943663</ASIN>
    <DetailPageURL>
<st>http://www.amazon.com/Ruby-Rails-Bible-Timothy-Fisher/dp/0470258225/</st>
   ref=pd_bbs_sr_1?ie=UTF8&s=books&qid=1212935000&sr=8-1
     </DetailPageURL>
      <ItemAttributes>
        <Author>Timothy Fisher</Author>
        <Manufacturer>Wiley</Manufacturer>
        <ProductGroup>Book</ProductGroup>
        <Title>Ruby on Rails Bible</Title>
      </ItemAttributes>
    </Item>
<Item>
...
</Item>
...
</Items>
</ItemSearchResponse>First, you get the root element item_search_response. From that you grab the items attribute which is equivalent to the <Items> XML element. The items attribute is an instance of Items and contains an attribute named item. The item attribute is an array of all of the book items. This array is what you want to return from the method.
Later in the chapter, you will use the same pattern to access the data about each book. For example, to get the ASIN value of a book, you could use this code:
asin = resp.item_search_response.items.item[0].asin
This returns the ASIN of the first book returned. To get the book title there is one more level of indirection. You would first have to get the ItemAttributes like this:
title = resp.item_search_response.items.item[0].item_attributes.
   title
With that in mind, you should know enough about the results that you are getting from Ruby/AWS to write the rest of the Book Shelf application. Remember, to learn more about Ruby/AWS refer to its home page.
This completes the functionality that you need to start integrating the book functionality into the Book Shelf application.
Note
The Ruby/AWS library contains a rich API of features and functionality. The Book Shelf application uses only a tiny piece of what is available to you. If you are interested in exploring all the capabilities of this library, I highly recommend looking at the API documentation, which you can find at www.caliban.org/ruby/ruby-aws/.
After a user logs into the Book Shelf application, they are taken to a user home page. The left column of the user home page contains a text entry field in which a user can enter a keyword, and a Search button to search for books containing that keyword, as shown in Figure 7.3. This is how the user is able to pull up a list of books that they can add to the user's shelf. In this section, you implement the keyword entry box, the Search button, the search results page, and the necessary back-end code to perform the book search using the Amazon interface that was developed in the previous section.

Get started by adding the search feature to the left side panel. Open up the app/views/shared/_sidebar.html.erb file and modify it so that it looks like Listing 7.4. To implement the book search feature, add the following code to the sidebar:
<li>
    <% form_tag ({:controller=> "book",:action=> "search"}) do %>
        <input type="hidden" name="page" value="1" />
        <span id="add_book_title">Add Book</span>
        <%= text_field_tag "book_keyword" %>
        <%= submit_tag "Search",:id=>'search_button' %>
    <% end %>
</li>
The Rails helper form_tag creates a search form. The form contains a text field containing the keyword a user types in to search on and a submit button labeled Search. The keyword text field is created using the text_field_tag helper method. The parameter passed to the text field helper book_keyword becomes the name of the text field, as well as the name you use in the controller to retrieve the value of the keyword. The submit_tag helper method creates the submit button. The submit_tag method is passed a string that becomes the button's label, and an id parameter that becomes the HTML id attribute for the submit button.
The form tag is passed a controller and action that is called when the form is submitted. In this case, the book controller and search action are specified. Because you don't yet have a book controller or a search action, you need to implement that next (see Listing 7.4).
Example 7.4. The _sidebar.html.erb File with Book Search
<div id="sidebar">
<div id="menu">
<ul id="user_nav_menu">
<% if logged_in %>
<li>
<%= link_to 'My Books',:controller=>'user',
:action=>'home',
:user_id=>session[:user].id
%>
</li>
<li>
<%= link_to 'All Books',:controller=>'book',
:action=>'list' %>
</li>
<li>
<% form_tag ({:controller=> "book",:action=> "search"}) do %>
<input type="hidden" name="page" value="1" />
<span id="add_book_title">Add Book</span>
<%= text_field_tag "book_keyword" %>
<%= submit_tag "Search",:id=>'search_button' %>
<% end %>
</li>
<% else %>
<ul id="home_menu">
<li>
<%= link_to 'Join Now',:controller=>'user',
:action=>'signup' %>
</li>
<li>
<%= link_to 'View the Books',
:controller=>'book',
:action=>'list' %>
</li>
</ul>
<% end %>
</ul>
</div>
<div style="clear:both;"> </div>
</div>You need to add a few additional styles to your application style sheet to make sure the book search form is nicely displayed. Add these styles to the public/stylesheets/style.css file as shown in Listing 7.5.
Example 7.5. Styles Added to public/stylesheets/style.css File
#user_nav_menu {
  list-style: none;
  margin: 0px;
  padding: 0px;
}

#user_nav_menu li {
 padding-top: 20px;
 padding-bottom: 20px;
 font-size: 1.5em;
 color: blue;
}

#user_nav_menu input {
  clear: both;
  float: left;
  width: 160px;
}

#user_nav_menu #search_button {
  width: 100px;
}

#book_search_field {
 width: 230px;
 float: left;
 margin-top: 5px;
 margin-bottom: 5px;
}

#search_button {
 float:left;
}
Now that you have the UI complete for requesting a book search, you need to implement the server action required to perform the search.
So far, your application has a home controller and a user controller. This section leads you through adding a book controller that handles requests related to book functionality. You can generate the book controller class using the script/generate command:
> ruby script/generate controller Book

 exists app/controllers/
 exists app/helpers/
 create app/views/book
 exists test/functional/
 create app/controllers/book_controller.rb
 create test/functional/book_controller_test.rb
 create app/helpers/book_helper.rb
As you should expect by now, this generates not only the book controller class but also a functional test class and a view helper class. Open up the app/controllers/book_controller.rb file to edit the BookController class and add a method to handle the book search request.
def search
    @books = Book.search_amazon(params[:book_keyword],
                                params[:page],
                                session[:user])
    @title = "Book Shelf Search Results"
end
The search method calls a search_amazon class method of the book model class. You can write this method in the next section after you generate the book model. Three parameters are passed to the search_amazon method: the keyword the user is searching on, the result page being requested, and the currently logged-in user. The keyword and page parameters are passed into the search action from the search form that you previously created. Finally, the search action sets the @title instance variable so that the results page has a proper page title.
The book model represents a book in the Book Shelf application. As you did with the user model, start by defining what the book model should look like. Table 7.1 shows the fields that are in the book model.
The fields that contain information about a book are all fields that are populated from the results of an Amazon catalog search. Instead of storing images in the database, the application stores the URL of the book's images that are held on Amazon. The user_id field is a foreign key into the users table, allowing a book to be related to a particular user.
Table 7.1. Book Model
Field Name | Description | Data Type |
|---|---|---|
| ID of the user who added the book | integer |
| Title of the book | string |
| Author of the book | string |
| Book's release date | date |
| Book description from Amazon | text |
| URL of small image from Amazon | string |
| URL of medium image from Amazon | string |
| URL of large image from Amazon | string |
| URL of book's page on Amazon | string |
| Book's ISBN | string |
| Date and time the book was added to the shelf | datetime |
| Time book record was updated | datetime |
Now that the fields for the book model are defined, you can generate the book model class using the script/generate command:
> ruby script/generate model Book

 exists app/models/
 exists test/unit/
 exists test/fixtures/
 create app/models/book.rb
 create test/unit/book_test.rb
 create test/fixtures/books.yml
 exists db/migrate
 create db/migrate/002_create_books.rb
In addition to the book model class, a unit test file, a fixtures file, and a database migration class are created for the book model. The migration class is usually a good place to start when you're implementing a model. The migration class creates the model in your database.
When you generated the book model, the generate script also created a migration for the books table. Edit the db/migrate/002_create_books.rb file, as shown here:
class CreateBooks < ActiveRecord::Migration
    def self.up
        create_table:books do |t|
            t.references:user
            t.string:title
            t.string:author
            t.date:release_date
            t.text:description
            t.string:image_url_small,:string
            t.string:image_url_medium,:string
            t.string:image_url_large,:string
            t.string:amazon_url
            t.string:isbn
            t.timestamps
        end
    end

    def self.down
        drop_table:books
    end
end
This creates a books table containing all the fields that were specified in the model's design from Table 7.1. Each book record also contains a primary key ID field, which is automatically created by the migration.
Using the rake tool, go ahead and run the CreateBooks migration:
> rake db:migrate
This creates the books table, as specified in the CreateBooks migration class.
The book model has a many-to-many relationship with the user model. In plain English, this means that one book can belong to many users, or many users can have the same book on their shelf. Furthermore, one user can have many books on their shelf. To implement this association in Rails, you use the built-in association DSL language. Open up the app/models/user.rb class and add a has_and_belongs_to_many association by adding the following line just below the class declaration:
has_and_belongs_to_many:books
Now you have to do the same thing for the book model to implement the other side of this association. Open up the app/models/book.rb class and add this line just below the class declaration:
has_and_belongs_to_many:users
Because this is a many-to-many relationship, there is one more thing you need to do to make it a valid relationship that Rails understands. A many-to-many relationship needs a new relationship table that maps book IDs and user IDs. Following Rails requirements for this table, it is named books_users. Recall that the table is named by using the pluralized form of each model separated with an underscore and in alphabetical order, so the book's name goes first. Go ahead and manually create a migration file named 003_create_books_users.rb in the db/migrate directory. The migration should look similar to what you see here:
class CreateBooksUsers < ActiveRecord::Migration
    def self.up
        create_table:books_users,:id => false do |t|
            t.references:book
            t.references:user
            t.timestamps
        end
    end

    def self.down
        drop_table:books_users
    end
end
Now go ahead and run the migrations again so that the books_users table is created.
> rake db:migrate
By adding these associations to the book and user models, you are now able to access the books associated with a user, or the users associated with a book through a simple instance attribute. For example, you could use the following code to get a reference to a specific user's books:
user = User.find(:first)
users_books = user.books
Recall that when you completed the search action in the book controller, it contained a call to a search_amazon method of the book model. You can now implement that method in the book model. Listing 7.6 shows the implementation of the search_amazon method along with a method that is used by the search_amazon method, convert_amazon_results. The search_amazon method uses the AmazonInterface class that was implemented earlier in this chapter.
The find_by_keyword method of the AmazonInterface class returns an array of Item instances. Instead of returning Item instances, the search_amazon method should return an array of Book instances. This is the purpose of the convert_amazon_results method. It converts the Amazon search results into instances of the book model.
Example 7.6. Implementing a Search in the Book Model
def Book.search_amazon(keyword, page, user_id)
    search = AmazonInterface.new
    results = search.find_by_keyword(keyword, page)
    return Book.convert_amazon_results(results, user_id)
end

  def Book.convert_amazon_results(results, user_id)
      user = User.find(user_id)
      converted_books = Array.new
      results.each do |result|
          book = user.books.find_by_isbn(result.asin.to_s)
          if (book)
              book.exists = true
          else
             book = Book.new
             book.exists = false
          end
          book.title = result.item_attributes[0].title[0].to_s
          if result.item_attributes[0].author
              book.author = result.item_attributes[0].author.join(',')
          end
          book.release_date =
               result.item_attributes[0].publication_date.to_s
          if result.small_image
             book.image_url_small = result.small_image.url.to_s
          end
          if result.medium_image
             book.image_url_medium = result.medium_image.url.to_s
          end
          if result.large_image
             book.image_url_large = result.large_image.url.to_s
          end
          book.isbn = result.asin.to_s
          book.amazon_url = result.detail_page_url.to_s
          converted_books.push(book)
      end
      return converted_books
  end
Within the convert_amazon_results method, notice that there is a call to find_by_isbn on the logged-in user's books object. The purpose of this call is to determine whether the book is already on the user's shelf. If the user already has the book, an attribute of the book instance named exists is set to true. Be sure to add an accessor for the exist property to the book model. To do that, add this line near the top of the app/models/book.rb class:
attr_accessor:exists
Also in the convert_amazon_results method you may have noticed the use of the to_s method in several places. This is because the Ruby/AWS library actually returns the attributes that you are interested in as instances of AWSObject. Fortunately, the AWSObject implements the to_s method allowing you to get the actual string value of the attribute.
Let me take a moment to say a bit more about the exists attribute before you move on. An instance of the book class can represent a book in either of these two states:
A book that is contained in the Book Shelf application database
A book that has been read from the Amazon catalog, but does not yet exist in the application database
The exists attribute allows you to differentiate between these types of book instances. As you will see a bit later in this Chapter, it is important to know whether or not a book is in the database when rendering views. If a book instance is created as the result of any of the Active Record methods that load data, such as the find methods, the exists attribute should always be set to true. To accomplish that, you can add an Active Record observer to the book model.
Observers are callbacks that are called by Rails when a specific action occurs. The particular observer method that helps you out here is the after_find method. If a model implements the after_find method, it is called immediately after any record is found using one of the Rails finder methods. Edit the app/models/book.rb file and add the after_find implementation shown here:
def after_find
    self.exists = true
end
The instance being created is passed to the after_find method. This implementation just sets the exists attribute to true for all records created as a result of an Active Record find method.
The converted array of book instances is what is returned from the search_amazon method. The controller action can then set this array as an instance variable to make it visible to the search results view template.
With the search results action implemented in the BookController class, the next thing you should do is implement the search results page. This is the page that is rendered after the search results action is complete. Because the search action of the book controller does not specifically render a template, a template with the name search.html.erb in the app/views/book directory is rendered by default. The search action creates an instance variable named @books, which contains an array of all the books found. This instance variable is accessed from the search.html.erb template to display the search results.
Listing 7.7 shows what your search.html.erb template should look like. The outer if-else block checks to see if there are any books in the @books array. If the array is empty or null, a message saying "No matching books found" appears. If the @books array contains one or more books, the array is stepped through using the each method of the array. Before the @books array is stepped through, a variable named first is set to true. This is used as a flag to indicate the first book in the list. The first book in the list is differentiated with a different class name on the div that wraps the book. This allows the first book in the list to be styled slightly differently than the other books. This is useful, for example, if you want a different top margin or different padding, perhaps on the first element.
Example 7.7. The app/views/book/search.html.erb File
<% if @books && @books.size > 0 %>
    <% first = true %>
    <% @books.each do |book| %>
        <% if (first == true) %>
            <% first = false %>
            <div class="book_data_first">
        <% else %>
            <div class="book_data">
        <% end %>
            <%= render:partial=>"book_detail",
                      :locals => {:book => book,:search => true } %>
        </div>
    <% end %>
<% else %>
    <%= "No matching books found." %>
<% end %>
After the opening div statement for a book is created, a partial named book_detail is called to render the details of the current book of the iteration. You pass the current book and a flag named search as locals to the partial. The book_detail partial is implemented in app/views/book/_book_detail.html.erb. Create that file and enter the code shown in Listing 7.8.
The first line of the partial displays an image of the book. This uses the image URL that was obtained from the Amazon search. The next section of the partial shown below displays the book's title, author, release date, and ISBN. Remember that in the book model during the search, the exists flag is set to true for a book if it is also found on the user's shelf. The partial uses that flag to determine whether to display the title as a link to the book's record, or just text.
Example 7.8. The app/views/book/_book_detail.html.erb Partial
<div class="book_image"><img src="<%= book.image_url_small %>" /></div>
<div class="book_info">
    <span class="book_name">
        <% if book.exists %>
            <%= link_to book.title, {:controller => "book",
                                     :action => "show",
                                     :id => book.id } %>
        <% else %>
            <%= book.title %>
        <% end %>
    </span><br/>
    Author(s): <%= book.author %><br/>
    Release Date: <%= book.release_date %><br/>
    ISBN: <%= book.isbn %>
</div>
<% if search %>
    <div class="add_control" id="add_control_<%= book.isbn %>">
        <% if !book.exists %>
            <%= link_to_remote "Add to Shelf",
                              :update => 'add_control_' + book.isbn,
                              :url => {:controller => 'book',
                              :action => 'add',
                              :isbn => book.isbn } %><br/>
            <div id="shelf_status_<%= book.isbn %>"></div>
        <% else %>
            <%= render:partial=>'book_exists',
                      :locals => {:book => book } %>
        <% end %>
    </div>
<% else %>
    <div class="add_control">
        <% if session[:user] %>
            <%= link_to_remote "Delete from Shelf",
                              :url => {:controller => 'book',
                              :action => 'delete',
                              :isbn => book.isbn } %>
            <% end %>
            <div id="shelf_status_<%= book.isbn %>">
                <span class="users_count"><%= book.users.size %> Users</
     span>
          </div>
      </div>
  <% end %>
If the book is on the user's shelf, the title appears as a link to the book's detail page.
<div class="book_info">
    <span class="book_name">
        <% if book.exists %>
            <%= link_to book.title, {:controller => "book",
                                     :action => "show",
                                     :id => book.id } %>
        <% else %>
            <%= book.title %>
        <% end %>
        </span><br/>
        Author(s): <%= book.author %><br/>
        Release Date: <%= book.release_date %><br/>
        ISBN: <%= book.isbn %>
    </div>
The following portion of the partial is shown next. Recall that from the search results page, the flag search was passed with the value true to the partial. This section of the partial displays a link to add the book to the user's shelf if the search flag is true. The search flag allows you to reuse this partial when you want to display the books on a user's shelf. In that case, you do not want to show the add control, and so the search flag is set to false to indicate that the partial is not being called as a result of a search (see Listing 7.10).
The add control only appears if the book is not already on the user's shelf. In the third line of the above code, an if statement checks the exists field to determine if the book is already on the user's shelf. The add control consists of a remote link that uses the link_to_remote Ajax helper method. The link_to_remote method results in an Ajax request to the add action of the book controller.
The book's ISBN is also passed as a parameter. The link_to_remote method is also passed an update parameter that tells the method to update the add control div after the Ajax method is complete. Because the page will most often contain multiple books and multiple add controls, the add control div is given an id attribute that consists of the string add_control_ with the book's ISBN appended.
If the book already exists on the user's shelf, instead of showing the add control, another partial called book_exists appears. The book record is passed along to that partial. You'll see details of that partial shortly.
Below the outermost else statement of this code block is the template that is rendered if the partial is not being called as a result of a search being performed. Instead of displaying a remote link allowing the user to add the book to her shelf, a link appears which allows the user to delete the book from her shelf. This uses the link_to_remote method, which creates an Ajax request, just as you use to add a book to the user's shelf. To delete a book, the delete action of the book controller is called, with the book's ISBN also being passed to the action.
Example 7.9.
<% if search %>
    <div class="add_control" id="add_control_<%= book.isbn %>">
        <% if !book.exists %>
            <%= link_to_remote "Add to Shelf",
                              :update => 'add_control_' + book.isbn,
                              :url => {:controller => 'book',
                              :action => 'add',
                              :isbn => book.isbn } %><br/>
            <div id="shelf_status_<%= book.isbn %>"></div>
        <% else %>
            <%= render:partial=>'book_exists',
                      :locals => {:book => book } %>
        <% end %>
    </div>
<% else %>
    <div class="add_control">
        <% if session[:user] %>
            <%= link_to_remote "Delete from Shelf",
                             :url => {:controller => 'book',
                             :action => 'delete',
                             :isbn => book.isbn } %>
            <% end %>
            <div id="shelf_status_<%= book.isbn %>">
                <span class="users_count"><%= book.users.size %>
                    Users
                </span>
            </div>
        </div>
    <% end %>
Now let's create the partial that appears if the book already exists on the user's shelf. You should create this partial, called book_exists, in app/views/book/_book_exists.html.erb. Create that file and enter the code shown in Listing 7.10.
Example 7.10. The _book_exists Partial
<%= link_to_remote "Delete from Shelf",
                  :url => {:controller => 'book',
                  :action => 'delete',
                  :isbn => book.isbn } %><br/>
<div id="shelf_status_<%= book.isbn %>">
    <span class="on_shelf">On Shelf</span>
    <span class="users_count"><%= book.users.size %> Users</span>
</div>
This book_exists partial displays a remote link allowing the user to delete the book from their shelf, along with a message indicating that the book is on the shelf, and a count of the number of users who have this same book on their shelves. The delete function is implemented using the link_to_remote helper method again to create an Ajax request to the delete action of the book controller. You will implement the delete action later in this Chapter.
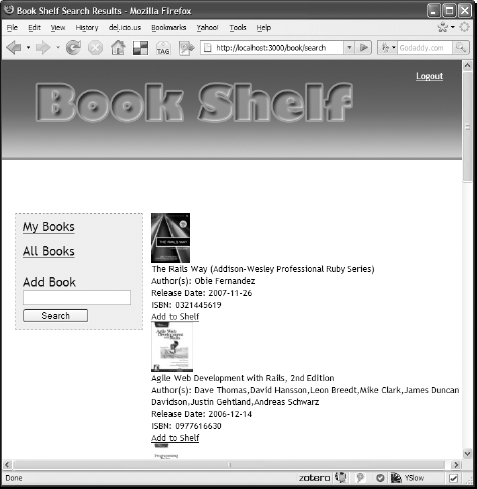
Stop for a moment and take a look at the progress you've made so far to make sure everything is working as planned. If you do not have the WEBrick server running, go ahead and start it using the ruby script/server command and go to the application's home page by navigating in your browser to http://localhost:3000. Log into the application or create a new user, and you should be taken to the user home page, which at this point should look similar to what is shown in Figure 7.3. From that page, enter a search term, such as "ruby programming," into the text field in the left column. Press the Search button to use the functionality you just completed in order to perform the search and display its results. You should see a search results page similar to what is shown in Figure 7.4.
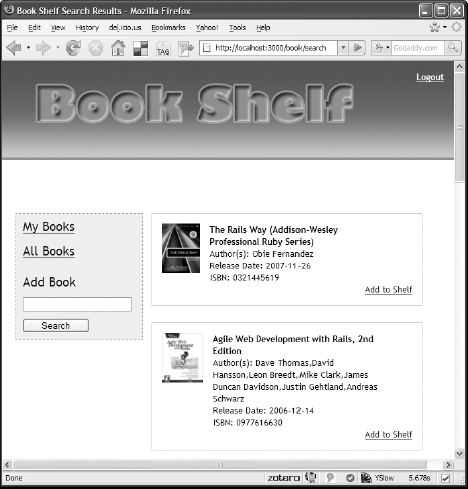
The results of your search appear, but the display isn't styled quite as nicely as it could be. You need to add a few more styles to your style sheet. Go ahead and add the styles in Listing 7.11 to your public/stylesheets/style.css file.
Example 7.11. Styles Added to public/stylesheets/style.css
.book_data_first {
 float:left;
 margin-bottom: 25px;
 border: 1px solid #cccccc;
 padding: 15px;
 width: 80%;
}

.book_data {
 float:left;
 clear:both;
 margin-bottom: 25px;
 border: 1px solid #cccccc;
 padding: 15px;
 width: 80%;
}

.book_image {
    float:left;
}

#book_image {
 float: left;
    padding: 20px;
    background-color: lightblue;
    width: 130px;
}

#book_view {
    margin-left: 25px;
}

.book_info {
 float: left;
 padding-left: 15px;
 text-align: left;
 width: 70%;
}

.book_name {
 font-weight: bold;
}

.add_control {
 color: green;
float: right;
text-align: right;
}
#book_keyword {
margin-top: 10px;
margin-bottom: 10px;
}
.on_shelf {
display: block;
color: green;
font-weight: bold;
margin-top: 20px;
}
.not_on_shelf {
display: block;
color: red;
margin-top: 20px;
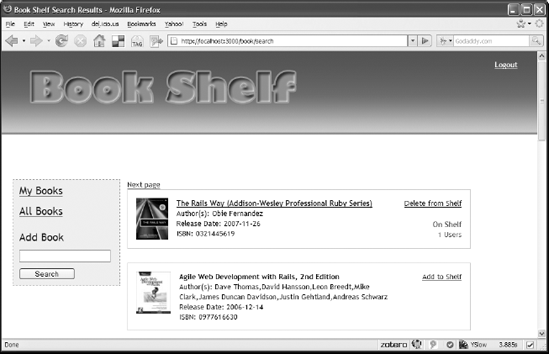
}With those styles added to your style sheet and the style.css file saved, reload the search results page; it should now look like Figure 7.5. I think you'll agree that this is a much nicer display of the results.
Now go ahead and try to add a book to your shelf by clicking the Add to Shelf link. Oops, you'll notice that it doesn't quite work as expected. Remember that when you created this link, you used the link_to_remote helper and specified the add action of the book controller to handle this request. However, you have not yet implemented the add action. That's okay for now, though, because your goal for this section is to get the search functionality working. In the next section, you'll complete the implementation of being able to add and remove books from a user's shelf.
If you use the suggested keywords of "ruby programming" for your search, and you scroll down on the search results page, you can count a total of ten books displayed. The problem is that this search actually finds more items, but you have not implemented results paging yet. Let's do that next.
Recall that a book search returns only the first ten results from the Amazon catalog. Currently, if a search finds more than ten books, there is no way to display those results beyond the first ten. The find_by_keyword method of the AmazonInterface class that you created earlier accepts a page parameter that allows you to get results beyond the first page of results. You just need to implement a way of passing a page parameter from the Web page down to this search method. Modify the search action of the book controller so that it looks like this:
def search
    @prev_page = params[:page].to_i - 1
    @next_page = params[:page].to_i + 1
    @books = Book.search_amazon(params[:book_keyword],
                                params[:page],
                                session[:user])
    @title = "Book Shelf Search Results"
end
The lines in bold print are new. These lines set two new instance variables that will be available to the search results view. The @prev_page variable holds the page number of the page previous to the one currently being viewed. The @next_page variable holds the page number of the next page of results. You use these two variables in the results view to display paging controls above the results.
Now you need to make some small changes to the search results view contained in app/views/book/search.html.erb. Open that file and add this code to the very top of the template:
<% if @prev_page > 0 %>
    <%= link_to "Prev page",:controller=>'book',
                            :action=>'search',
                            :book_keyword=>@keyword,
                            :page=>@prev_page %>
<% end %>
<% if @books && @books.size == 10 %>
    <%= link_to "Next page",:controller=>'book',
                            :action=>'search',
                            :book_keyword=>@keyword,
                            :page=>@next_page %>
<% end %>
This creates a paging control that allows a user to navigate to the next page of results or back to a previous page. Notice that the @prev_page and the @next_page variables are used as the page parameter that is sent to the search action.
Also modify the final else block at the bottom of the search.html.erb template to display a slightly different message if you're displaying an empty page as a result of the user trying to display a next page beyond the available results.
<% else %>
    <%= "No matching books found." unless @prev_page > 0 %>
    <%= "No additional matching books found." unless @prev_page =
   0 %>
<% end %>
Listing 7.12 shows what your search.html.erb file should look like, complete with the paging functionality.
Assuming your server is still running, reload the Book Shelf application in your browser and navigate back to the search results page. You should now see the paging links at the top of the book results display. Perform a keyword search again using a fairly common keyword and try out the paging links. You should be able to page forward and backward through the results.
Example 7.12. The app/views/book/search.html.erb file with Paging
<% if @prev_page > 0 %>
    <%= link_to "Prev page",:controller=>'book',
                            :action=>'search',
                            :book_keyword=>@keyword,
                            :page=>@prev_page %>
<% end %>
<% if @books.size = 10 %>
<%= link_to "Next page",:controller=>'book',
:action=>'search',
:book_keyword=>@keyword,
:page=>@next_page %>
<% end %>
<% if @books && @books.size > 0 %>
<% count = 0 %>
<% @books.each do |book| %>
<% if (count == 0) %>
<% count = 1 %>
<div class="book_data_first">
<% else %>
<div class="book_data">
<% end %>
<%= render:partial=>"book_detail",
:locals => {:book => book,:search => true } %>
</div>
<% end %>
<% else %>
<%= "No matching books found." unless @prev_page > 0 %>
<%= "No additional matching books found." unless @prev_page = 0 %>
<% end %>Now the users have the ability to perform book searches based on any keyword. The results of the search are pulled up on a list page from which they can select a book to add to their shelf. This section guides you through implementing the functionality that allows the user to actually add a book from the results page to their shelf. After they are able to add a book, you'll continue the development by adding the capability to remove a book from a user's shelf.
In the previous section, when you created the book search results page, a link to add a new book to a user's shelf was added for every book found that is not currently on the user's shelf. The link uses the link_to_remote helper method.
<%= link_to_remote "Add to Shelf",
                  :update => 'add_control_' + book.isbn,
                  :url => {:controller => 'book',
                  :action => 'add',
                  :isbn => book.isbn } %><br/>
This results in an Ajax call to the add action of the book controller. You have not yet implemented the add action, so let's go ahead and implement that now. Open up the app/controllers/book_controller.rb file and create an add method using this code:
def add
    isbn = params[:isbn]
    book = Book.find_or_create_from_amazon(isbn, session[:user])
    if book.save
        render:partial=>'book_exists',:locals => {:book =>
   book }
    else
        render:text => 'Failed to add book'
    end
end
The add method uses the isbn parameter and passes that along with the id of the current loggedin user to a new method of the book model, find_or_create_from_amazon. The method find_or_create_from_amazon is responsible for either looking up the book's details from the application's database in the case when the same book is already on another user's shelf, or looking up the book's details from Amazon when it cannot be found in the application's database. In either case, a book object is returned. The book is then saved.
If the save is successful, the book_exists partial is rendered back to the search results page from which the Ajax call originated. If the save is not successful, a failure message is rendered back to the search results page.
Now, open up the app/models/book.rb file and implement the find_or_create_from_amazon method. Type in the following code for this method:
def Book.find_or_create_from_amazon(isbn, user_id)
    book = Book.find_or_create_by_isbn(isbn)
    if book.title
        book.users << User.find(user_id)
    else
        search = AmazonInterface.new
        books = search.find_by_isbn(isbn)
        book.set_from_amazon_result(books[0])
        book.users << User.find(user_id)
    end
    return book
end
The goal of this method is to perform one of the following tasks:
Find the book in the application database. If found, add the current user to the book's
usersattribute.Find the book in the Amazon catalog. Create a book model object from the Amazon Item record that is returned.
The first line of the method looks up the book in the application database using the find_or_create_by_isbn method. This is one of the dynamic find methods created as a result of the book model extending ActiveRecord::Base. Because you are using a find_or_create method, the book model instance is created whether or not the book is found in the database, so you cannot simply check to see whether or not the returned record exists.
The find_or_create_by_isbn method is used because you need an instance of the book model class in either case. So this single line of code creates the book instance that will either be populated from the application database or later on from the result of an Amazon lookup.
To determine whether the book was found in the local database, the book's title attribute is checked. Because every book must have a non-blank title, this attribute is not null if the book was found in the application database. However, if the book was not found, the title attribute is null.
Remember that books and users share a many-to-many relationship. A user can be related to a book by adding the user instance to the book's users attribute. This is done if the book is found in the application database. If the book is not found in the database, the AmazonInterface class looks up the book in the Amazon catalog. This returns an array of Item records. The book with the matching ISBN is the first item in the resulting array.
Now you need to map the Item instance to your instance of the book class. This is done using the set_from_amazon_result method. After mapping the result to the book instance, the current user is associated with the book and the book is returned.
The set_from_amazon_result method used in the previous method is also a new method that you have to add to the Book model class. This is a relatively simple method that takes fields from the Item object and sets equivalent fields on the book instance object. Listing 7.13 shows the code for this method.
If you looked at the code in Listing 7.13, you probably recognized that it is very similar to code that you used in the convert_amazon_results method earlier in this Chapter. It would be a bad programming practice to keep both of these two nearly identical chunks of code. Code duplication is almost always a bad thing. It can often be the source of defects, and maintenance problems. In this case, there is a simple refactoring that you can perform on the convert_amazon_results method to remove the duplication.
Below is the refactored convert_amazon_results method. Notice that the duplicate code has been replaced with a call to your new set_from_amazon_result method.
def Book.convert_amazon_results(results, user_id)
    user = User.find(user_id)
    converted_books = Array.new
    results.each do |result|
        book = user.books.find_by_isbn(result.asin.to_s)
        if (book)
            book.exists = true
        else
book = Book.new
book.exists = false
end
book.set_from_amazon_result(result)
converted_books.push(book)
end
return converted_books
endExample 7.13. The set_from_amazon_result method
def set_from_amazon_result(result)
    self.title = result.item_attributes.title.to_s
    if result.item_attributes[0].author
        self.author = result.item_attributes[0].author.join(',')
    end
    self.release_date =
              result.item_attributes[0].publication_date.to_s

    if result.small_image
        self.image_url_small = result.small_image.url.to_s

    end
    if result.medium_image
        self.image_url_medium = result.medium_image.url.to_s

    end
    if result.large_image
        self.image_url_large = result.large_image.url.to_s
    end

    self.isbn = result.asin.to_s
    self.amazon_url = result.detail_page_url.to_send
You are nearly finished with the add functionality. You have only one more method to add. In the find_or_create_from_amazon method, you called a find_by_isbn instance method on the AmazonInterface class. This method has not been implemented yet, so create that now.
Open up the AmazonInterface class in lib/amazon_interface.rb and add this method as shown here:
def find_by_isbn(isbn)

    il = ItemLookup.new( 'ASIN', { 'ItemId' => isbn } )
    rg = ResponseGroup.new('Medium')
resp = @request.search(il, rg)
products = resp.item_lookup_response.items.item
endIn the find_by_keyword method, you used the ItemSearch class from Ruby/AWS. For this method, you use the ItemLookup class. The ItemLookup class is useful for when you have the ASIN or ISBN of a book and want to retrieve that exact book. ASIN is equivalent to an ISBN for books. However, Amazon gives every product an ASIN identifier, not just books; this why they call this field an ASIN instead of an ISBN. The ASIN is passed using the ItemId hash key. The rest of the method is identical to the find_by_keyword method. You create a ResponseGroup, perform the search, and return the results.
This completes the functionality required to add a book to a user's shelf. Make sure your server is running (start it if necessary), and navigate back to the search results page. Select a book returned from a search you performed and attempt to add that book to your bookshelf. If all goes well, you should see the book's listing updated, indicating that the book is now on your shelf. The results screen should look similar to Figure 7.6 after adding the book.
Instead of a link to add the book to your shelf, the link is changed to Delete from Shelf. This is also a new message indicating that the book is on your shelf, along with a count of users who have that book on their shelf.
At this point, if you click on the My Books link, you'll still just see a blank page. That is because you have not yet implemented the code to display a user's books on their home page. You will do that after you implement the ability to delete a book from a user's shelf.
In the previous section, you gave users the ability to add books to a personal bookshelf. In this section, you will give users the ability to delete books from their book shelf.
Earlier in this chapter, you added a delete link for books that a user adds to his shelf. That code is shown here:
<%= link_to_remote "Delete from Shelf",
                  :url => {:controller => 'book',
                  :action => 'delete',
                  :isbn => book.isbn } %>
This link is shown when the user performs a book search, and a book contained in the results is already on the user's shelf. Later in this chapter this link will also be used within the book list displayed on the user's home page.
Before you implement the functionality to delete a book, think about what should happen when the user clicks the Delete from Shelf link. From the :url parameter in the code above, you can assume that the delete method of the book controller class will be called, and the ISBN number of the book that you want to delete is passed to that action. Should you delete the book from the database in that method? Remember that the same book might also be on another user's shelf. So you would only want to delete the book from the books table if it is no longer on any user's shelf.
However, you do need to break the association between the selected book and the current user. To do that, you will delete the book from the books array attribute of the current user. Remember that the books array attribute contains the books that are associated with the user. By deleting the book from that array, the association record stored in the books_users table will also be deleted.
After you've deleted the book from the user's books association and deleted the book record if it is no longer associated with any other users, you need to tell the Web page to replace the Delete from Shelf link with the Add to Shelf link, so that the user is able to add the book again if she chooses to. It is also a good idea to give the user a message indicating that the delete happened successfully. You will perform the web page updates using RJS.
Start the implementation now by adding the delete method to the book controller. Edit the app/controllers/book_controller.rb file to add the delete method shown below:
def delete
    @book = Book.find_by_isbn(params[:isbn])
    current_user = User.find(session[:user])
current_user.books.delete(@book)
if @book.users.size == 0
Book.delete(@book.id)
end
endIn this method, you look up the book to be deleted using the find_by_isbn finder method. This is one of the dynamic finders that is automatically created for you by ActiveRecord. You also look up the current user using the user id stored in the session. Once you have those two items, you can break the association between the book and the user by deleting the book from the user's books array. Finally, in the last three lines of the method, you check to see if any other users are associated with the book. If the users count for that book is zero, you delete the book from the database using the Book.delete method.
In the delete action, you performed the necessary server-side operations, now you have to make sure that the Web page is updated to reflect the current state of the book. Since it has been deleted, the user should see a link allowing him to add it again if he chooses. You also want to show the user an indication that the delete action was successful. Right now, the code that displays the Add to Shelf link is embedded within the book_detail.html.erb partial. The specific section of interest is shown here:
<%= link_to_remote "Add to Shelf",
                  :update => 'add_control_' + book.isbn,
                  :url => {:controller => 'book',
                  :action => 'add',
                  :isbn => book.isbn } %><br/>
<div id="shelf_status_<%= book.isbn %>"></div>
So that you do not have to duplicate that block of code, it is a good idea to move it into a partial of its own. Create a partial and name it _book_not_exists.html.erb. Make sure it is in the app/views/book directory. After you have created that partial, go ahead and replace that block of code in the _book_details.html.erb partial with these two lines:
<%= render:partial=>'book_not_exists',
          :locals => {:book => book } %>
Now, you have the partial that you will display after you have deleted a book from a user's shelf. As I said a bit earlier, you will use RJS to perform the necessary page updates after the delete action. RJS allows you to perform page manipulations that you would normally do with JavaScript code. RJS actually results in JavaScript being generated.
Start by creating an RJS template in the file app/views/book/delete.rjs. Since this RJS template has the same name as the delete action, and there are no other templates with the same name, this template will be rendered automatically by the book controller. Type the code shown below into the RJS template:
# display book not exists partial
page['add_control_' + @book.isbn].replace_html
          :partial=>'book_not_exists',:locals => {:book => @
   book }

# display book deleted message and highlight it
page['shelf_status_' + @book.isbn].replace_html 'Book Deleted'
page['shelf_status_' + @book.isbn].visual_effect:highlight
You can tell from the comments, this template performs two page manipulations. First it displays the book_not_exists partial which contains the Add to Shelf link. That is done using what is called an element proxy. The code, page ['add_control_' + @book.isbn], is an element proxy for the div element with the id equal to 'add_control_' followed by the isbn number of the book for which this is being displayed. That div element currently contains the Delete from Shelf link along with the On Shelf message and the user count for that book.
The second half of the template displays a Book Deleted message and uses a Scriptaculous visual effect to highlight it.
Once you have this code in place, go ahead and try adding and then deleting a book. If you have followed along closely, it should work as expected. In the next section, you'll implement a page that will display all of the book's on a user's shelf.
Now that users have the ability to add and remove books from a bookshelf, go ahead and modify the user's home page so that the books from the user's shelf appear on the page. The user home page template is in app/views/user/home.html.erb. Open the file and add this line following the welcome message line:
<%= render:partial=>'book/list_books',:locals=>{:books=>@books}
   %>
This line uses a partial to render a list of the books that are on the user's shelf. The partial list_books is also new and you'll implement that shortly. First, however, you have to modify the home action of the user controller so that it reads in the books on the user's shelf and sets them in an array instance variable named @books. Edit the home action of the user controller, app/controllers/user_controller.rb:
def home
    current_user = User.find(session[:user])
    @books = current_user.books
    @title = "BookShelf - User Home"
end
The lines in bold print are the new lines that you have to add to the method. These lines get the current user's books from the books association attribute of the user. Now you have to create the new partial for listing the books.
Create the partial at app/views/book/_list_books.html.erb. Type in this code for the implementation of the partial:
<% count = 0 %>
<% books.each do |book| %>
<% if (count == 0) %>
<% count = 1 %>
<div class="book_data_first">
<% else %>
<div class="book_data">
<% end %>
<%= render:partial=>"book/book_detail",
:locals => {:book => book,:search => false } %>
</div>
<% end %>
<div style="clear:both"> </div>That's it! The user's home page should now display any books that are on his shelf. Try it out by clicking the My Books link in the left-hand navigation panel after adding a book to your shelf. This takes you to your home page, and the newly added book should appear.
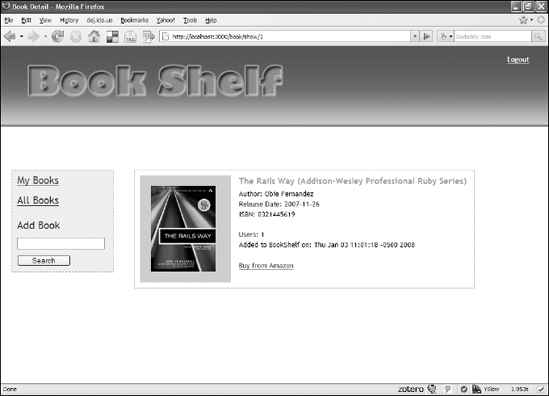
The last task of this Chapter will be to implement a book detail page. The book detail page is a Web page that contains detailed information about a specific book stored on a shelf in the Book Shelf application. In this section, you'll implement a basic book detail page that contains information about a selected book.
Note
In Chapter 8, you can extend the book detail page to include user reviews and ratings.
In the book_detail partial, the title of a book appears as a link to the book's detail page for books that exist in the application database. Here is the code from that partial template:
<%= link_to book.title, {:controller => "book",
                         :action => "show",
                         :id => book.id } %>
This uses the Rails helper method link_to to create a regular link to the show action of the book controller. The id of the book is also passed as a parameter to the request. You have not yet implemented the show action, so do that now. Open up the app/controllers/book_controller.rb file and add the show action as defined here:
def show
    @book = Book.find(params[:id])
    @title = "Book Detail"
end
Use the find method to grab the correct book instance from the database corresponding to the passed-in id. The book instance is made available to the view template by setting it as an instance variable, @book. The @title instance variable is also set so that the book detail page has a title. Because no template is explicitly rendered, a template named show.html.erb (see Listing 7.14) in the app/views/book directory is rendered by default.
Example 7.14. The /app/views/book/show.html.erb File
<div id="book_view">
<div id="book_view_upper">
<div id="book_image">
<%= image_tag @book.image_url_medium %>
</div>
<div id="book_summary">
<span class="book_title"><%= @book.title %></span>
Author: <%= @book.author %><br/>
<div id="book_details">
Release Date: <%= @book.release_date %><br/>
ISBN: <%= @book.isbn %><br/><br/>
</div>
Users: <%= @book.users.size %><br/>
Added to BookShelf on: <%= @book.created_at %><br/><br/>
<%= link_to „Buy from Amazon",
@book.amazon_url,
:class=>"action_button" %><br/><br/>
</div>
</div>
<div style="clear:both;"> </div>
</div>This view displays details about the book in a div named book_view_upper. Later, when reviews and rating are added, there will be another div that follows this div containing the review and ratings data. The template should be very easy for you to understand. There is nothing fancy going on with this one, nor are there any partials being called.
Before you try out this page, you need to add a few more styles to your growing style sheet. Add these styles to public/stylesheets/style.css:
#book_view_upper {
  float: left;
  border: solid thin #cccccc;
padding: 10px;
width: 80%;
}
#book_summary {
float: left;
margin-left: 20px;
line-height: 1.5em;
}
#book_summary .book_title {
font-weight: bold;
font-size: 12pt;
color: #f98919;
display: block;
margin-bottom: 5px;
}Now if you return to your browser and navigate to your user home page, either by logging in or clicking the My Books link if you are already logged in, you can click the title of a book that is on your shelf and be taken to the book detail page. You should see a book detail view similar to that shown in Figure 7.7.
This chapter continued the development of the Book Shelf application. In the previous chapter, the user model was implemented, providing full support for user authentication. In this chapter, you added the core functionality of the application, which was the ability to add and remove books from a user's bookshelf. This functionality included integration with the Amazon A2S Web service for reading information about books that a user searches for. Significant views added to the application in this chapter were the search results page, the book display on the user's home page, and the book detail page. Each of these views will continue to grow as you complete the application in the next chapter.
As you've been following along with the development, you may have noticed ways in which you can improve upon the design or implementation of the application. That is a very good sign that you are learning well, and I highly encourage you to follow your temptations and feel free to refactor the application as you wish. The next chapter includes some refactoring for some of the previously implemented functionality after all of the core features are implemented.