
In this final chapter of the Ruby on Rails Bible, you'll learn some additional Rails techniques that haven't been covered yet in previous chapters. While this chapter is named Advanced Topics, you should find the time to master the topics covered here, as many of them are extremely useful for most Rails projects.
If you've been reading this book from the beginning, throughout the course of the book you've learned all of the basic information you need to begin developing real applications with Rails. However, there is still more to say about the power and elegance of Rails. In this chapter you'll explore some additional technologies that you might use in a Rails application, and some that you will most likely want to use in all of your Rails applications.
The topics that you'll learn about in this chapter are the following:
RESTful Rails
Web services with Rails
Working with legacy databases
ActionMailer
Deploying with Capistrano
One of the things that any good developer strives for in the development of a Web application, or any application for that matter, is a well-organized code base with consistent use of patterns and naming conventions. This contributes a great deal to the overall maintainability of an application. However, maintaining a well-defined organization and consistency in a code base, especially one that is being worked on by multiple developers, is not an easy task. In Web development, there have never been any widely accepted patterns for how to name models, controllers, and their action methods. While Rails imposes a certain level of standards on the naming of classes, it doesn't do much for the structure inside controllers. Developers are often not sure when looking at a code base where they should put a new action method and how that method should be named. If this is a problem that you've faced, RESTful development is definitely something that you should be interested in.
Recently, there has been a surge in popularity for a development pattern known as Representational State Transfer (REST), and Rails has fueled its popularity. The creator of the Rails framework, David Heinemeier Hansson, is a great proponent of RESTful development. Hansson introduced RESTful development to the Rails community in his RailsConf keynote address of 2006, titled "A World of Resources." In that keynote, he challenged developers to embrace the constraints of RESTful development. With the release of version 2 of the Rails framework, RESTful development has become the standard way of creating a Rails application.. Before I dive into how you implement REST in a Rails application, let's explore the question of what RESTful development is and why developers are excited about it.
Note
You can download David Heinemeier Hansson's "A World of Resources" presentation from http://media.rubyonrails.org/presentations/worldofresources.pdf.
The term REST was coined by Roy Fielding in his Ph.D. dissertation. Roy Fielding was also one of the creators of the HTTP protocol. REST describes a method of architecting software, built around the concept of resources, rather than the concept of actions. REST happens to be a very good fit for Web application development. Although REST itself is not explicitly tied to the Web or Web application development, it is within the context of the Web and Web applications that I will discuss it. Within the REST architecture, requests from the browser use a standard set HTTP methods to manipulate an application's resources.
Most Web developers are familiar with just two of the available HTTP methods, the GET and POST methods. However, the HTTP protocol defines eight methods: GET, POST, PUT, DELETE, HEAD, TRACE, OPTIONS, and CONNECT. REST is concerned with the first four of these methods, GET, POST, PUT, and DELETE. These are the methods that a RESTful Web application uses to manipulate resources. REST happens to be a very good fit for database-backed Web applications. In a database-backed Web application, resources map well to models, which in turn map well to database tables.
Note
In his dissertation, Roy Fielding also discusses Stateless Communication as being a constraint of a REST architecture. However, nearly every Web application relies on maintaining state to some extent. State is typically stored in cookies and sessions in a Web application. Any Web application that relies on state is officially not completely compliant with REST; however, that doesn't stop most people from referring to these techniques as REST-based, even though they are not 100 percent true to the REST architecture.
In a traditional Web application developed in a framework such as Rails, a request would specify an action and a resource to perform the action on. For example, the following is a common URL found in a Rails application:
http://www.myapp.com/book/show/5
This URL tells the Rails backend to use the show method of the book controller to display the book resource that has an ID of 5. An application developed using REST would not specify the action in the URL. Instead, the URL would specify only the resource. The action is determined by the HTTP method with which the request is submitted. For example, a RESTful equivalent of the above URL would be the following:
http://www.myapp.com/book/5
This request would be submitted using the HTTP GET method and routed to the correct method, show, based on having come from a GET request. Let's expand on the example of manipulating a book resource, and look at how you would perform other actions on a book resource using RESTful development. Table 12.1 shows how various actions performed on a resource are mapped to URLs and HTTP methods.
Table 12.1. Actions and HTTP Methods in a RESTful Application
Action | URL | HTTP Method |
|---|---|---|
show |
|
|
destroy |
|
|
update |
|
|
create |
|
|
Notice that the URL for performing show, destroy, and update on a resource is identical. These requests are routed to the correct controller action based on a combination of the URL and the HTTP method that is used to submit them.
So the idea is that you would apply this pattern throughout your Web application's architecture. Every controller would consist of the same standard set of methods, show, destroy, update, and create... (index, edit and new also get their own standard URLs). The application framework routes to the correct method, based on looking at both the URL and the HTTP method used for incoming requests. Suddenly, you have great consistency in your Web applications.
All of your controllers are implemented in the same style and contain the same set of methods. You may be thinking about now that it is not very likely that you can actually implement an entire Web application using just resources with matched controllers and that small set of controller actions. You may find that you need a few additional controller methods, but you will be surprised at how far you can get by consistently following the RESTful pattern. You will find that this architecture also cleans up your controller and model designs.
In addition, keep in mind as you develop that not every resource is necessarily backed by a database table. You may have resources that are not stored in the database as models, yet you still follow this same resource/model matched with a controller implementation pattern — for example, the Session resource in the RESTful Authentication plugin described in Chapter 11, or search, which is often implemented as a separate search RESTful controller even if searches are not stored in the database.
So what are some of the advantages that you get from using this RESTful development approach?
Well-defined and consistent application design: RESTful architecture defines a standard way of implementing controllers and access to models in a Web application. Applications that consistently follow this architecture end up with a very clean, very maintainable code base that is also easy to read and understand.
Traditionally, when you have a Web development project that is worked on by several people, maybe not all concurrently, each may bring their own style of how they use controllers, what names they give to controller methods, what they determine are models, and so on. The RESTful approach makes it much easier for every developer that comes onto a project to maintain a very consistent implementation style, and thus preserve a solid architecture across the application.
With a RESTful architecture, you know where to put your code. Every application that implements a RESTful architecture has a consistent design, and developers know exactly where to put code.
CRUD-based controllers: Controllers can map one-to-one to a model. Each controller contains the code necessary to manipulate a specific model through the standard CRUD methods,
create, show, update, anddestroy.Clean URLs: Because URLs used in a RESTful application represent resources and not actions, they are less verbose and always follow a consistent format of a controller followed by the ID of a resource to manipulate.
Ease of integration: Because of the application's consistent API with pre-defined resource and action method names, it becomes easier for third-party applications to integrate with your RESTful application through a REST-based Web service.
While REST is an excellent fit for database-backed Web applications, it is probably an even stronger fit for Web services. The REST architecture provides an excellent platform for providing services. After all, Web services are essentially APIs that let you manipulate some form of resource. Rather than create another layer on top of HTTP, as the SOAP Web service protocol does, REST-based Web services rely on the existing functionality of HTTP to provide Web services.
Because REST uses what is already built into HTTP, rather than layering another semantic layer on top of it as SOAP does, REST is a much simpler architecture for implementing Web services. The most popular consumer-facing Web services, such as those provided by Amazon, Google, Yahoo, and others, all offer a REST-based interface. REST is more popular than SOAP today for implementing commercial Web services. Considering the book example again, you could easily imagine a Web service API that used URLs identical to those that a browser uses to get HTML content — in Rails, the same RESTful controller actions with xml at the end of the request URL is enough to get you full XML Web service responsiveness. This gets into the next topic of interest related to REST, that of representation.
When you request a page using a RESTful architecture, the page that is returned can be considered a representation of the resource that you are requesting. However, think of an HTML page as just one possible representation of any given resource. Other representations might include an XML document, a text document, or a block of JSON-encoded JavaScript.
Using the RESTful architecture, you would request a different representation of a resource using the same method, but by passing a different piece of metadata to the server, thus indicating the representation that you would like to have returned. For example, the following two requests would both be routed to the same controller and action method:
http://www.myapp.com/book/5
http://www.myapp.com/book/5.xml
The first request would return an HTML representation of the book resource. The second request would return an XML representation of the book resource — Chapter 5 showed the Rails mechanism for easily managing this. The ease of adding output mechanisms is another advantage of a RESTful architecture. The same controllers and actions can be used to deliver a variety of response representations — including HTML, RSS, and XML. This makes implementing Web services in a RESTful architecture extremely easy, and again maintains a consistent design style.
As I mentioned earlier, with the release of Rails 2.0, REST has been adopted as the standard architecture for a Rails application. What does that mean? Rails provides a set of tools that makes building RESTful-style applications easy for the developer.
When you use the scaffold generator to automatically create the CRUD skeleton of your application for a given resource, the controller and action methods generated are RESTful. In versions of Rails that supported REST prior to version 2.0, you had to explicitly say that you wanted your scaffolding to be REST-based by using the scaffold_resource generator. In just a bit, you'll get a chance to use the scaffold generator to create a REST implementation for a resource in a real Rails application.
In Table 12.1, you saw how REST uses a URL and an HTTP method to route to a specific action method. That table actually doesn't give you the complete story for how Rails maps URLs and HTTP methods to actions and controllers. In a standard RESTful Rails application, each controller has not just four, but seven actions. These actions are show, update, destroy, index, create, edit, and new.
Here is a description of the purpose for each of these actions. These map directly to CRUD actions for an ActiveRecord model, but RESTful resources may also interpret these categories a little more loosely for implicit server resources that aren't directly in the database:
showThis action is used to display a specific instance of a resource.
updateThis action is used to perform an update on a resource.
destroyThis action is used to delete an instance of a resource.
indexThis action displays a list of all of the resources of a given type.
createThis action creates a new instance of a resource.
editThis action returns a page that allows the user to make updates to a resource.
newThis action returns a page that allows the user to create a new instance of a resource.
The new and create actions together are used to create a new resource instance. The new action presents you with the form that you use to create the resource, and the create action handles the form submission to actually create the new resource in the database. Similarly, the edit and update actions are used to update an existing resource. The edit action presents you with the form that you can use to make changes to the resource, and the update action handles the form submission, saving updates to the database.
However, Rails still just uses the same four HTTP methods, GET, POST, PUT, and DELETE, to route to the seven supported actions. To accomplish this, Rails actually uses the GET method for multiple actions.
Table 12.2 shows how URLs and HTTP methods are routed to specific actions in a Rails application.
Rails also creates dynamic methods for the routes. In addition, methods such as link_to and form_for will infer the path from the resource, so link_to(@book), will be assumed to be a show action on the books controller.
Table 12.2. RESTful Routes in a Rails Application
Action | URL | HTTP Method | Named Method |
|---|---|---|---|
show |
|
|
|
update |
|
|
|
destroy |
|
|
|
index |
|
|
|
create |
|
|
|
edit |
|
|
|
new |
|
|
|
Notice that the show, index, edit, and new actions all use the GET method. However, they are each differentiated in Rails by the URL that is used. To support the edit and new methods, the pureness of RESTful URLs is actually broken a bit, as these actions require that the action name be used in the URL so that they can be differentiated from the show and index actions.
You can also add your custom actions to a restful controller, which gives you a custom named method matching that action. There's a purity vs. practicality tradeoff here — I find extra actions useful for, say, Ajax actions that update partial forms that don't quite justify their own controller.
So far, I've talked about using four HTTP methods in combination with specific URLs to route to a set of standard action methods. There is, however, one problem in the actual implementation of the system that I've described. The current generation of Web browsers does not handle the PUT and DELETE methods. This means that in the real world, you are stuck with using only GET and POST. The good news is that this does not change anything for you as a developer of a Rails application. As far as you are concerned, the URLs and HTTP methods and routes described in Table 12.2 are still completely valid.
Rails simulates the PUT and DELETE methods by inserting a hidden field called _method set to either put or delete. The Rails routing mechanism gets these requests and properly routes them to the actions that are shown in Table 12.2, just as if these were coming in as PUT or DELETE requests. There is nothing that you, as a developer, have to do to handle these requests any differently.
In this section, you'll create the start of a RESTful Rails application. To get started, create a Rails application and call it restful_cookbook.
> rails restful_cookbook
This gives you the standard skeleton for a Rails application. So far, there is nothing RESTful about this application. Because this is a cookbook application, it is easy to imagine what some of its model or resource objects will be. Rails provides you with two generators that allow you to create a RESTful resource:
scaffold:Thescaffoldgenerator creates an entire resource, including all the code that is necessary to perform the basic CRUD operations on it in a RESTful way. Specific files that are created include a model, a migration, a controller, views, and a full test suite.resource:Theresourcegenerator creates a model, migration, controller, and test stubs, but does not provide the code necessary to perform the CRUD operations. Also, no views are generated.
Let's use the scaffold generator to create a resource named Recipe.
> cd restful_cookbook
> ruby script/generate scaffold Recipe
    exists app/models/
    exists app/controllers/
    exists app/helpers/
    create app/views/recipes
    exists app/views/layouts
    exists test/functional
    exists test/unit
    create app/views/recipes/index.html.erb
    create app/views/recipes/show.html.erb
    create app/views/recipes/new.html.erb
    create app/views/recipes/edit.html.erb
    create app/views/layouts/recipes.html.erb
 identical public/stylesheets/scaffold.css
dependency model
    exists app/models/
    exists test/unit/
exists test/fixtures/
create app/models/recipe.rb
create test/unit/recipe_test.rb
create test/fixtures/recipes.yml
exists db/migrate
create db/migrate/001_create_recipes.rb
create app/controllers/recipes_controller.rb
create test/functional/recipes_controller_test.rb
create app/helpers/recipes_helper.rb
route map.resources:recipesLooking through the output printed to the screen, you can see all of the files that have been generated by the scaffold generator. You should see the model, controller, views, and test suite files. In just a bit, you'll take a look at some of those, but let's start with the last line of the output above — the line that says:
route map.resources:recipes
This line causes a single line to be added to the config/routes.rb file. The line added is
map.resources:recipes
This single line automatically creates the entire routing schema necessary to handle the CRUD methods in a RESTful manner. The RESTful routes shown in Table 12.2 are enabled for the Recipe resource by this line.
Without any further arguments, the resources call creates routing for the seven basic RESTful methods in Table 12.2. However, the method takes several optional arguments that allow you to create custom behavior and actions. Which argument you choose depends on what kind of action you want to create.
For typical controller actions that would manage a single object (such as edit), you use the argument :member. An action created with this option will have a URL based on the singular name of the controller and will expect an object id, as in recipe/print/32. Actions which, like index, manage on a list of objects are created with the :collection option, these URLs use the plural form of the controller name as in recipes/search_results. Finally, alternate actions that work with new objects are created using the :new option and create a URL of the form recipes/new/from_scratch.
The value you should pass to all these arguments is the same: a hash where the keys are the name of the new actions and the values are the HTTP method used to access them, for example, :member => {:print =>:get}.You'll also get a helper method like recipe_print_url, recipes_search_results_url, or recipes_new_from_scratch_url.
Note that to use additional actions in your RESTful controller using REST helpers, they must be declared in the routes.rb file — however, you can always fall back on the more traditional controller/action URL format even within an otherwise RESTful controller. I personally find that Ajax callbacks to update part of a display don't always fit easily in the RESTful structure.
There are two variations on the ordinary map.resources call. If the resource in question doesn't have meaningful group behavior and is a true singleton, you should declare it using the singular call map.resource. The singular resource call will create all the RESTful routes and helpers except the index and index-related ones. For example, the RESTful Authentication plugin uses a singular resource to manage the session controller.
Sometimes you will have a resource that only makes sense as a part of a parent resource. For example, in a project management application, a task may only exist as part of a project. You can express that relationship in a RESTful system by nesting the child resource inside the parent like so:
map.resources:projects do |project|
  project.resources:tasks
end
Nesting a resource makes no difference in what is generated for the parent resource, however all the child helper methods now take an instance of the parent resource as an argument. So while the show helper method for a project is still project_url(@project), the method for a task is project_task_url(@project, @task). If you are attempting to infer the URL within a link_to or form_for helper, again the parent syntax is unchanged, link_to("show project", @project), while a link to the child resource requires a parent, link_to("show task", [@project, @task]).
Custom actions can be added to either the parent or the child resource, using the syntax already described. Overall, nested resources are a powerful way to specify a relationship within your application, but since they do impose a fairly strong constraint on access to the child resource, you need to be sure that the relationship between the two models is consistent and constant. I also find the nested path names tend to quickly lose the value of being a shortcut.
The resources method can be customized in a couple of further ways. If, for some reason, the controller attached to your resource is different than the name of the resource in the code, you can specify the controller name with the :controller option — I believe this was added to support foreign language URL names.
The :name_prefix option allows you to change the prefix used in the helper methods, if you don't want it to match the resource name. The option :path_prefix is sort of the generic version of nesting resources, allowing you to specify a string that will be part of the URL before the part that controls the routing.
Now, take a look at the controller generated for the RESTful scaffolding of your recipes resource. Open up app/controllers/recipes_controller.rb. You should see code similar to Listing 12.1.
The first thing you should notice is that methods have been created for all of the standard RESTful CRUD actions: index, show, new, edit, create, update, and destroy. Comments before the definition of each of these methods show you how the action is called from a URL.
Also, notice that at the bottom of each of the methods is a respond_to block. The respond_to block, described in Chapter 5 allows you to handle requests for different response formats within the same method. The generated code includes handling of both HTML and XML response requests.
The scaffold generator also created all of the views necessary for the CRUD actions. The views created are edit.html.erb, index.html.erb, new.html.erb, and show.html.erb. The views are shown in Listings 12.2 through 12.5.
For the most part, there is nothing unique or different about these views. However, there are some URL helpers that are used within links. These are the URL helpers that were created by the map. resources method in the routes configuration, for example form_for(@recipe) in the edit view.
Example 12.1. recipes_controller.rb
class RecipesController < ApplicationController
    # GET /recipes
    # GET /recipes.xml
    def index
        @recipes = Recipe.find(:all)
        respond_to do |format|
            format.html # index.html.erb
            format.xml { render:xml => @recipes }
        end
    end
    # GET /recipes/1
    # GET /recipes/1.xml
    def show
        @recipe = Recipe.find(params[:id])
        respond_to do |format|
            format.html # show.html.erb
            format.xml { render:xml => @recipe }
        end
    end
    # GET /recipes/new
    # GET /recipes/new.xml
    def new
        @recipe = Recipe.new
        respond_to do |format|
format.html # new.html.erb
format.xml { render:xml => @recipe }
end
end
# GET /recipes/1/edit
def edit
@recipe = Recipe.find(params[:id])
end
# POST /recipes
# POST /recipes.xml
def create
@recipe = Recipe.new(params[:recipe])
respond_to do |format|
if @recipe.save
flash[:notice] = 'Recipe was successfully created.'
format.html {redirect_to(@recipe) }
format.xml {render:xml => @recipe,
:status =>:created,
:location => @recipe }
else
format.html {render:action => "new" }
format.xml {render:xml => @recipe.errors,
:status =>:unprocessable_entity }
end
end
end
# PUT /recipes/1
# PUT /recipes/1.xml
def update
@recipe = Recipe.find(params[:id])
respond_to do |format|
if @recipe.update_attributes(params[:recipe])
flash[:notice] = 'Recipe was successfully updated.'
format.html {redirect_to(@recipe) }
format.xml {head:ok }
else
format.html {render:action => "edit" }
format.xml {render:xml => @recipe.errors,
:status =>:unprocessable_entity }
end
end
end# DELETE /recipes/1
# DELETE /recipes/1.xml
def destroy
@recipe = Recipe.find(params[:id])
@recipe.destroy
respond_to do |format|
format.html {redirect_to(recipes_url)}
format.xml {head:ok }
end
end
endExample 12.2. edit.html.erb
<h1>Editing recipe</h1>
<%= error_messages_for:recipe %>
<% form_for(@recipe) do |f| %>
    <p>
        <%= f.submit "Update" %>
    </p>
<% end %>
<%= link_to 'Show', @recipe %> |
<%= link_to 'Back', recipes_path %>
Example 12.3. index.html.erb
<h1>Listing recipes</h1>
<table>
    <tr>
    </tr>
<% for recipe in @recipes %>
    <tr>
<td><%= link_to 'Show', recipe %></td>
<td><%= link_to 'Edit', edit_recipe_path(recipe) %></td>
<td><%= link_to 'Destroy', recipe,:confirm => 'Are you sure?',
:method =>:delete %></td>
</tr>
<% end %>
</table>
<br />
<%= link_to 'New recipe', new_recipe_path %>Unlike many code generation techniques from the past, all of the code that has been generated by the scaffold controller follows a consistent design pattern and gives you a very usable code base to build your application from.
REST is clearly the application structure of the future within Rails, since it is now the default structure for generated scaffolding. That said, there still is, as I write this, less than a year of experience with REST as the official, blessed Rails architecture (it was available as a plugin for some time before Rails 2.0 was released). I think it's fair to say that the best-practice usage of REST within a complex Web application is still being developed.
Example 12.4. new.html.erb
<h1>New recipe</h1>
<%= error_messages_for:recipe %>
<% form_for(@recipe) do |f| %>
    <p>
        <%= f.submit "Create" %>
    </p>
<% end %>
<%= link_to 'Back', recipes_path %>
Example 12.5. show.html.erb
<%= link_to 'Edit', edit_recipe_path(@recipe) %> |
<%= link_to 'Back', recipes_path %>
Within the context of the seven actions that it defines, the consistency and clarity of the REST architecture is great to work with. As I've alluded to, I've had some issues trying to adapt functionality into the REST structure — sometimes with really elegant results, sometimes less so. REST does encourage a thin controller/fat model structure that is in keeping with solid practice for Rails applications.
Using REST is recommended for the basic CRUD actions, and it's often worth the time to see what other functionality can be considered in terms of basic actions in it's own resource.
Ideally, you'll have the opportunity to design your application's database when you create a new Rails application. By using standard naming and schema conventions, you can save yourself work. However, in the real world, especially in large organizations, you will often have to write an application that works with an existing or legacy database.
The database may use table and column names that are very different from what Rails expects to see by default. In that case, is Rails a bad framework choice? Fortunately, the answer to that question is no, having to work with a legacy database does not make Rails a bad choice of framework. There are still plenty of useful features in Rails that make it worth having to do a bit of additional work to configure the framework to work with your legacy database.
The main problem with dealing with a Legacy database is the main strength of using Rails — convention over configuration. Rails has a specific set of conventions that it imposes on database table and column structure.
A database created without the intent of being used in a Rails application is unlikely to be consistent with those conventions. In particular, a database created under what you might call a typical classic IT department style will not match Rails default structure. Happily, while Rails does have strong opinions on default structure, it is also simple to override the defaults to support whatever the legacy database wants to throw at you.
In particular, Rails allows you to:
Override default database table names
Override primary key field names
Override foreign key field names
If your application is going to generate new data models that need to be stored in a database, you have the additional decision as to whether to create a second database for your new data. This decision may be made by outside forces — for instance, you may not have the access or permission needed to add new tables to the legacy database, or your Rails application may be seen as the eventual successor to the legacy database.
In any case, Rails can manage multiple database connections in a single application with a little bit of code.
Starting with the assumption that you are only using the one legacy database, exactly how you set up the database.yml file depends on how you can use the existing database. Presumably the production version of your application would connect to the production version of the database.
You'll likely want just the schema of the legacy database to support a test database for unit tests. If the database is relatively small, a copy of the data (or a subset of the data) may be appropriate for the development version. Otherwise, you might have to start with the schema and seed it with some basic data to support development. You never want to use the real production database for development.
Rails naming conventions for databases and models can be summarized as follows:
Database tables have plural names, and their associated model class has the singular form of the same name.
The primary key of every database table is expected to be named
id.A column with a name of the form
model_idis expected to represent a foreign key for the model table.A join table is expected to have the name of the two database tables being joined (in other words, the plural names) in alphabetical order.
It's not just legacy databases that violate this naming structure, by the way. Most commonly, a Rails database might use a non-standard name for a foreign key where the tables have multiple links, or where the connection has a more specific logical name in the context of the relationship then the foreign model has in general.
If your legacy database has more egregious departure from Rails' expectations, you can modify where Rails looks for database information at two different levels. The ActiveRecord::Base class has a couple of properties that allow you to change database defaults throughout your application (see Table 12.3. This is useful if you are only using the legacy database (or, I suppose, if you are creating a new database, but don't like Rails conventions). These properties are most usefully set in the environment.rb file so they take effect when your application is loaded.
Table 12.3. ActiveRecord::Base Properties
Property | Description |
|---|---|
pluralize_tablenames | Manages the default naming of databse tables. If explicitly set to false, then Rails will assume that database table names are singular. |
primary_key_prefix_table | Set this property to one of two preset values to capture common naming conventions for primary keys. If the value is:table_name, then primary keys are of the form |
table_name_prefix | A global prefix to all table names that should not be included when searching for an associated model. |
table_name_suffix | A global suffix to all table names that should not be included when searching for an associated model. |
However, there are many circumstances where changing global defaults will not be effective in mapping the legacy database. Your alternative option is to set the table names and primary keys on a model by model basis.
Within each model, the class properties set_table_name and set_primary_key can be used to customize the naming convention mapping that model to a database table. A sample usage would look like this:
class Book < ActiveRecord::Base
    set_table_name "book_data"
    set_primary_key "book_key"
end
Remember, the use of these properties is not limited to dealing with legacy databases, but with any naming oddities you choose to impose on databases you create.
Non-standard choices in the naming of foreign keys is noted in the declaration of the relationship in the ActiveRecord classes — the naming changes need to be noted on both sides of the relationship. The options for each kind of relationship are listed in Table 12.4.
Table 12.4. Relationship Options
Relationship | Customization Options |
|---|---|
|
|
|
Note that both ends of the relationship must be consistently named |
|
|
|
|
This set of methods, options, and properties should allow you to link up with any database that gets thrown at you.
Even if you are working with a legacy database, you may still want to create a second database using Rails conventions for data that is specific to your Rails application. Just to name one possible situation, the legacy database could be an existing book catalog shared by many different applications, and it might make sense to keep your user information in a database specific to your Web application. Rails can manage the case where there is more then one database in the system, but there are some tricks to managing it properly.
In the database.yml file, set up your new Rails database as the default development, test, and production environments, and set up the legacy database with a differently named set of environments. Continuing with the assumption that the legacy is some kind of centralized catalog, that would give you catalog_development, catalog_production, and catalog_test, all pointing to some version of the legacy database.
Now, each ActiveRecord model in your application will point to a exactly one table in one of the two databases. The models that point to the Rails database don't need any special treatment, but the models that point to the legacy database are going to need to explicitly mention to Rails. The best way to handle this if you have multiple legacy ActiveRecords is to create a common parent class for all of them. The parent class only needs to contain the line of code that establish the connection, for example:
class LegacyBase < ActiveRecord::Base
  self.abstract_class = true
  establish_connection "catalog_#{RAILS_ENV}"
end
There are two additional things to note. The abstract_class line is there to tell Rails that LegacyBase really is an abstract class that will have no instances, specifically that keeps ActiveRecord from searching the database for a table named legacy_bases. In the next line, the #{RAILS_ENV} within the string ensures that the Rails application will always connect to the appropriate version of the database for the environment, whether you are in production, development, or test mode.
You do lose a couple of Rails automation features when using a second database, whether or not it's legacy. The automatic features of the Rails test environment assume the regular database connections. This means, for example, that the rake test:prepare task which automatically reloads the database from the schema won't run on your second database. You also won't get automatic loading of fixtures. The fixture loading is also kind of balky in any case where the table name does not match the ActiveRecord model name — meaning any case where you've changed the naming default.
You can work around this by changing the naming defaults in the test classes. I recommend doing this all at once in the test_helper.rb file:
def self.set_fixture_classes
  set_fixture_class:legacy_database_table => LegacyClassName
end
You can include as many table/class pairs as you want in the call to set_fixture_class. To actually load the fixtures in the legacy test database, you need to explicitly load them. Again, include the following method in the test_helper.rb file:
def load_external_fixtures(*tables)
  fixture_root = File.join(RAILS_ROOT, 'test', 'fixtures')
  Fixtures.create_fixtures(fixture_root, tables) do
    LegacyBase.connection
  end
end
This works in all ways, except that you don't get the special helper methods that Rails uses to allow direct access to fixtures, you'll need to explicitly find the data from the database. Also, you need to be a little careful with the ordering of the tables — if there's a hard foreign key constraint you'll need to put the required class before the class that requires it.
You'll also need to explicitly remove the classes, again in the test helper. Foreign key constraints will need to be in the reverse order for teardown then for load.
def teardown_fixture_data(*classes)
  classes.each do |klass|
    klass.delete_all
  end
end
Then you need to explicitly call this in your test classes:
class LegacyTest < ActiveSupport::TestCase
  set_fixture_classes
  def setup
    load_external_fixtures("table_1", "table_2")
  end
  def teardown
    cleanup(Class2, Class2)
  end
end
The reason why you want to do the declaration in the helper rather than in the individual classes is simply that a single test will likely load multiple fixture classes, and it's easier to only have to type the messy table/class pairs once. You should also be able to explicitly call the set_fixture_class at the class level in the test helper, rather than just inside a method.
It is actually possible to define a relationship between two ActiveRecord models that live in different databases, as long as ActiveRecord does not need to perform an SQL JOIN command to mange the data. In practice, this means that one-to-one or one-to-many relationships are fine, but many-to-many relationships are problematic.
You can work around this limitation by creating a proxy object in your local database. The local table would only generally only have one column, the remote ID of the legacy model. You also need a join table that joins the proxy id to the legacy model id. That lets you set up a structure like this (these class declarations would of course normally be in their respective app/model files):
class LegacyProxy
  belongs_to:legacy_model
end
class LegacyModel
  has_one:legacy_proxy
end
This sets up an ordinary one-to-one relationship between the proxy in your local database, and the actual model in the legacy database. Now, a class that wants to have a many-to-many relationship with the legacy model can declare a relationship with the proxy — the join table here is whatever name you give to the join table:
class LegacyModelGroup
  has_and_belongs_to_many:legacy_proxies,
       :join_table => "legacy_join_table"
      def legacy_models
        legacy_proxies.collect {|p| p.legacy_model}
      end
end
Long term, you might want to make your life easier by defining accessors on the proxy object that defer to the legacy model, but you certainly don't need to do that to make this setup useful.
Even with all of the emerging technologies for interacting and collaborating with those around you, one of the Internet's first technologies, e-mail, is still the most popular way of communicating online. Sending and receiving e-mail is also a common requirement of most Web applications that you will develop. Some of the uses for e-mail in Web applications are:
To provide a confirmation step as part of a user registration process.
As a notification channel when something goes wrong with the application.
To provide a lost password reminder.
Rails provides built-in support for sending and receiving e-mail. In this section, you'll see how easy it is to include e-mail in a Rails application. The steps I'll cover are:
Configuring your Rails application for e-mail support.
Generating a mailer model.
Writing code to send e-mail.
Writing code to receive e-mail.
Handling e-mail attachments.
Rails has built-in support for sending outbound e-mails using either SMTP or SendMail. You can configure the mechanism you prefer by adding a single line to your application's config/environment.rb file. If you want to use SMTP, add this line to your environment.rb file:
config.action_mailer.delivery_method =:smtp
Or, if you want to use SendMail for your outbound e-mails, add this line:
config.action_mailer.delivery_method =:sendmail
The config.action_mailer call will actually trigger a class method on ActionMailer::Base. In most cases, you won't want to put this setting in the global environment.rb file.
Your email settings will probably change for each Rails environment — your production mail server is probably not accessible during development, and you probably don't want to be sending live emails during testing. Place the mailer configuration in the conifg/environment directory in the file corresponding to the environment you want to configure.
If you choose SMTP, you also have to add some additional code to configure your SMTP settings. You will add a block of code similar to the following to set up your SMTP options:
config.action_mailer.server_settings = {
   :address => "my.smtpserver.com",
   :port => 25,
   :domain => "My Domain",
   :authentication =>:login,
   :user_name => "username",
   :password => "password"}
By default the test environment in config/environment/test.rb sets the mail settings like this:
config.action_mailer.delivery_method =:test
This prevents test mails from being sent out, and instead puts the mail messages in a class property of each ActionMailer class, named deliveries.
You can also configure whether Rails will consider it an error if the mail message can't be sent, this setting is off in the development environment:
config.action_mailer.raise_delivery_errors = false
After you have your e-mail server properly configured in the environment.rb file, the next step in adding e-mail support to your application is to generate a mailer model using the script/generate mailer command.
> ruby script/generate mailer RegistrationNotice
       exists app/models/
       create app/views/registration_notice
       exists test/unit/
       create test/fixtures/registration_notice
       create app/models/registration_notice.rb
       create test/unit/registration_notice_test.rb
If you look at the model that is generated, you see that it is very similar to ActiveRecord-based models. It should look like this:
class RegistrationNotice < ActionMailer::Base
end
As with the ActiveRecord model classes, this class extends a Rails class, ActionMailer::Base, which provides the core of the class's functionality. The unit test file that is created is a simple stub, similar to what you get with the ActiveRecord generator.
Now that you have a RegistrationNotice mailer, you have the classes that you need to begin writing the e-mail code. Within the RegistrationNotice class, you add mailer methods that correspond to individual e-mail types that you want to support. In the mailer method, you set up the e-mail message by assigning values to variables representing attributes of the email to be sent. Let's look at an example of what a user registration e-mail mailer method might look like in the RegistrationNotice model that was created in the previous step:
def user_registered(user)
  recipients user.email
  subject = "Activate your Account"
  from = "[email protected]"
  body:recipient => user.name
end
In this method, you are setting four variables related to the e-mail message: the recipients, subject, from, and body. There are actually many more options that can be set for an e-mail, as described below:
attachment: Use this option to specify a file attachment. You can call this multiple times to specify more than one attachment for an e-mail message. The argument to this method is a hash with keys like
:content_typeand:body.bcc: Use this to specify a blind carbon-copy recipient for an e-mail message. You can pass a recipient parameter as a string for a single e-mail address, or an array of addresses.
body: This variable is used to define the body of the e-mail message. You can pass either a string or a hash value for the body. If you pass a string, the string's value becomes the actual text of the e-mail message. If you pass a hash, the hash should contain variables that will be passed to an e-mail template. The hash variables will be merged with the template to create the text of the e-mail message. You'll see more about this when I discuss e-mail templates a bit later.
cc: Use this to specify a carbon-copy recipient for an e-mail message. You can pass a recipient parameter as a string for a single e-mail address, or an array of addresses.
charset: Use this to specify the character set for the e-mail message. You can set a
default_charsetsetting for theActionMailer::Baseclass that will be the default value for the character set.content_type: Use this to specify the content type of the e-mail message. If not specified, the content type defaults to
text/plain. A global default can be set in the environment configuration.from: Use this to specify the from address for the e-mail message. The address is specified as a string value.
headers: You can use this to specify additional headers that you want to be added to the e-mail message. The additional headers are specified in a hash value.
implicit_parts_order: This is used to specify the order in which the parts of a multi-part e-mail should be sorted. You specify the sort order as an array of content types. The default sort order is: [
"text/html", "text/enriched", "text/plain"]. The default sort order can be set with thedefault_implicit_parts_ordervariable on theActionMailer::Baseclass.mailer_name: You can use this to override the default mailer name. This name tells Rails where it can find the mailer's templates. By default, the name used will be an inflected version of the mailer's class name.
mime_version: This is used to specify the MIME version you want to use. This defaults to version 1.0.
part: Can be used to specify a single part of a multipart message, options include:content_type, and:body.
recipients: The email or list of email addresses to which the message will be sent.
sent_on: The date the email was sent, as shown in the recipient's browser. You don't need to set this unless you are doing something weird, normally, it'll be sent by the mail server when the message is sent.
subject: The subject of the message.
In order to actually generate the message and send it, you don't call the mailer method directly — Rails creates a couple of wrapper methods that use the mailer method as part of the creation and delivery of the actual email message. These messages are of the form create_user_ registered and deliver_user_registered. The create version merely creates the email message object, while the deliver version creates the object and immediately sends it.
If you use the create version, you then send it using a structure like the following:
email = RegistrationNotice.create_user_notified(user)
RegistrationNotice.deliver(email)
This allows you to further process the email object before delivery if you want. Otherwise, the one line version just looks like this:
email = RegistrationNotice.deliver_user_notified(user)
If the body attribute of your mailer method is a hash, then Rails expects the actual body of the mail message to be in an ERb template located at app/views/registration_notice/user_notfied.html.erb. That's if you are sending an HTML email, the file name of the template for a text email would more properly end .text.erb or .plain.erb.
Rails will implicitly set the outgoing context type of the mail message to match the type extension of the ERb file, so choose wisely. Rails also allows you to have multiple templates for a single message, for example, both user_notified.text.erb and user_notified.html.erb. If Rails notices multiple templates, the mailer will assemble the message into a multi-part message, and let the user's client sort it out, giving the user control over whether to view the message in HTML or plain text.
This works nicely with attachments, which are specified in the mailer method using the attachment method. The :content_type is the MIME type of the attachment, the :body is the actual data, often acquired via File.read, and the :filename can also be specified. Multiple attachments can be added to a single message.
Writing code to receive e-mails through Rails is not any more difficult than it is to send e-mails. In fact, because there are fewer options to specify, it is probably easier to write the code to receive e-mails. Within an ActionMailer::Base subclass, if you specify a method named receive, it will be called with the email message already parsed into an email object exactly like the ones you would create in order to send an email. For example, the following snippet takes in a message and adds it to the database attached to the person who sent it.
def receive(email)
  person = Person.find_by_email(email.to.first)
  person.emails.create(:subject => email.subject,:body => email.
   body)
end
The tricky part is coaxing your email server to cause this method to be invoked when an email is received. The general form of this problem is well out of scope, however if you can access the email address you will be watching via IMAP, you can use the Ruby Net::IMAP library to fetch mail. The following code was adapted from the Rails wiki:
require 'net/imap'
imap = Net::IMAP.new('email_host_name')
imap.authenticate('LOGIN', username, password)
imap.select('INBOX')
imap.search(['ALL']).each do |id|
  message = imap.fetch(id, 'RFC822')[0].attr['RFC822']
  RegistrationNotice.receive(message)
  imap.store(message_id, "+FLAGS", [:Deleted])
end
imap.expunge()
A similar script could use NET::POP3. All you need to do is use a cron job or something similar to run this script periodically — note this script deletes emails as it reads them, which you might want to modify if you think you'll need access to the messages later on.
ActiveResource is the client-side complement to REST. A server using REST allows for a consistent interface to resources on the server, and makes it trivially easy to send out resource data as XML. Well, if you can send that data out, you'd also like to have some way to read the data and convert it from XML to a useful object. This is where ActiveResource comes in.
ActiveResource makes interacting with a remote Web service easier in almost exactly the same way as ActiveRecord makes interacting with a relational database easier. It provides a consistent interface for finding, updating, creating, and removing resources exposed by the Web service, all in a stateless system that uses existing Web standards and is fairly easy to implement.
You would use ActiveResource as part of a Web-services architecture. For example, a book buying application might receive information about individual books from a Web application provided by a publisher or distributor. If that Web application exposes a RESTful interface that returns HTML, than your Web application can use ActiveResource to easily read that data.
ActiveResource is not tied to the rest of Rails however, you could also use it in the context of a command line or GUI application. For example, Twitter is, as of this writing, one of the most heavily trafficked Ruby on Rails applications going. Its external API is largely RESTful, and therefore a potential Ruby-based desktop client for Twitter could use ActiveResource to take the API results and turn them into objects.
The most basic ActiveResource script looks something like this:
require 'active_resource'
class Book < ActiveResource::Base
  self.site = http://remote.restfulsite.com
end
That's all you need to do to set up the ActiveResource object. Note that the require statement assumes that ActiveResource is in your path somehow, normally it lives at <rails>/activeresource/lib/active_resource.rb where <rails> is either the vendor/rails directory of a Rails application or the root of the Rails gem in your Ruby home directory. Then you declare the Resource class as a subclass of ActiveResource::Base. This is different from any ActiveRecord class you might have named Book.
At the risk of repeating myself, this book class is backed by the RESTful server, not by the database. The site property specifies exactly which RESTful server will back this particular resource. If all your resources come from the same site, then you can specify the remote URL globally by setting ActiveResource::Base.site.
So far, this code has accomplished nothing other than setting up a connection. But actually using the connection is pretty simple. You can try the following:
books = Book.find(:all)
In the background, this line makes a remote HTTP call to http://remote.restfulsite.com/books.xml, parses the returned XML and converts it into ActiveResource objects. You have more or less the same implicit attributes that you would have in an ActiveRecord object, so you could do something like books.map(&:title), but based on the attributes included in the XML output.
The find functionality in ActiveResource is much less extensive than ActiveRecord. This makes sense, since the expressiveness of a relational database is much greater than that of a RESTful server — in a database there is more of an ability to set filters and sort and the like. In a RESTful server, you basically have:
Book.find(:all)
Book.find(12)
Book.find(:first)
Book.find(:one)
The first line, as seen earlier, returns all books as delineated by the index method of the remote server. The second line takes a single resource ID, and calls the show method on the remote server, returning XML data for a single item. The :first option retrieves all data from the index method, but only returns the first element, it's not clear in what circumstance that's actually very useful. The :one modifier is largely used with custom actions as a signal to ActiveRecord that exactly one record will be returned.
Beyond that, you're somewhat at the mercy of what the server implementation has provided. Any key/value pairs you add to any of the find methods are added to the URL as part of the query string, so if the server methods allow you to specify, say, sort order, or a limit, or the like, you can access that functionality from ActiveResource. You can also use the option :from to specify a specific URL for that one find query. This is the mechanism for sending a request to a custom action defined on the server.
Book.find(:one,:from => "remote.restfulsite.com/book/best_seller.xml")
Again, though, you're limited to what the server has chosen to implement.
Once you've gotten your resource, you can use it like any other Rails object. Remember, though, that it is not the server-side ActiveRecord object, and any functionality built into that model will not exist on the client-side ActiveResource unless you explicitly put it there. If you are writing both sides of the client-server application, it's probably a good idea to take the functionality that could potentially be of use to both ActiveRecord and ActiveResource flavors of your model and put them in a common module that could be included by both.
The downloaded resource will not, by default, include information about any related classes, again, even when there are specific ActiveRecord relationship defined server-side. The server could choose to include related objects in the XML being retrieved, but that's not the basic feature set. Ordinarily, recovering the related objects requires an additional call back to the server.
You can also perform the rest of the basic CRUD family of actions from your active resource. You can save the item back via the save method, which triggers an update call on the remote server, you can also use the create method in the same way as you would in ActiveRecord, to instantiate a new resource and save it back to the data store, in this case, by triggering a create call on the remote server.
Although you cannot automatically do client-side validation of your resource, the normal ActiveRecord validation will be performed server-side when the object is saved. Deletion is managed similarly to ActiveRecord, via a class level delete(id) method, or an instance level destroy method.
For a long time, the deployment was the most difficult part of creating a working Rails application. Part of this pain was caused by the difficulty in getting a Rails application to run consistently in a shared hosting environment, which, due to their low cost, is where most developers who are new to Rails start off. While the number of shared hosting providers that support Rails applications is growing, it is still low, and those that do, have had plenty of issues with application performance and reliability. However, the new mod_rails Apache module, in early release as of this writing, may go a long way toward improving Rails performance on shared hosts.
General deployment has become much easier using a tool named Capistrano. Capistrano was created by Rails developer Jamis Buck, who originally gave it the name Switchtower. Just as Rails itself was extracted from a real project and was developed to fulfill real project needs, Capistrano was originally created by Buck to support the Basecamp application for 37 Signals.
Capistrano can be used to automate the deployment of your Web application. It was developed for use with Rails applications, but there is actually nothing to prevent you from using Capistrano as a deployment tool for Web applications that are not Rails applications. Capistrano's greatest strengths are it's ability to manage simultaneous deployment to multiple servers at once, even if the servers have different roles, and also it's ability to quickly roll the deployment back to a previous known state in case of emergency.
The basic structure of Capistrano is for the developer to initiate a task on the local development box — either a predefined task, or one written using a task syntax similar to Rake. To run the task, Capistrano makes a remote connection to one, some, or all of the servers it knows about, and runs some set of tasks on that remote server. These tasks might include retrieving source code, running a database migration, or restarting the Web server.
Capistrano is distributed as a Ruby gem. As of this writing, the current version is 2.3.
> gem install Capistrano
To use Capistrano, certain things need to be true about your development and deployment environments. You need to be using some kind of source control, Subversion is the default, but many other popular systems are also supported, including Git, CVS, Mercruial, and Perforce.
Note
Technically, Capistrano recently added a no-source control mode, but that's intended just for emergencies and is not recommended for regular use. Capistrano interfaces with your source control system to perform a clean checkout of your code every time you request a deployment, this prevents issues with the previous deployment from bleeding into the newest version.
On the server side, you need at least one server to start, and you need a network address that can access that server. Obviously, the server needs to be able to run Rails. Less obviously, the server needs to be able to communicate via SSH. Capistrano sends commands to servers via a standard Unix SSH shell. The preferred target of a Capistrano deploy is Linux, although Mac OS X servers also should meet the standard. If your server is running MS Windows, you'll need to run Cygwin or some other Unix shell program to be able to use Capistrano. Capistrano prefers to have the login to the remote machines managed with public keys, although you can use password access if you'd prefer. If you have multiple servers, the same password must work on all of them.
Once Capistrano is installed, you start using it by typing the command capify . from your Rails root directory.
capify .
[add] writing './Capfile'
[add] writing './config/deploy.rb'
 [done] capified!
As you can see from the snippet, Capistrano will create two files, the Capfile's primary purpose is to load the deploy.rb file, which contains the actual deployment recipe. The Capistrano deployment file is just a Ruby file, with some custom structure behind it to allow you to create your own build tasks in addition to the standard ones.
The standard deployment file has a number of different settings and variables you'll need to adapt to the specifics of your application. The two most important are right at the top:
set:application, "set your application name here"
set:repository, "set your repository location here"
The application name is arbitrary, but is used as the root directory of your application files on the servers being deployed to. The repository variable has a URL for the code repository, which must be visible from the server being deployed to, not the development machine being deployed from.
You can also specify the remote directory location and the source control system being used, but Capistrano provides a default value for both (the default source control system is Subversion).
If you need to specify the username or password to your Subversion repository, you can use the same set syntax the attribute names are :svn_user and :svn_password. Instead of taking a string as the value of the property, you can also pass a block, which enables the following workaround if you don't want to place the Subversion password in the text file.
set:svn_password, Proc.new do
Capistrano::CLI.password_prompt('enter password: ')
end
The next most important thing you need to tell Capistrano is the location and types of your servers. The default in the file looks like this:
role:app, "your app-server here"
role:web, "your web-server here"
role:db, "your db-server here",:primary => true
Capistrano allows you to group your servers into roles. The naming of the roles is basically arbitrary, but the default convention separates your application into Web servers and database servers, or application servers that manage both. Normally, you'd start with on server, place it's address in the :app role, and comment out the other two lines. As your deployment gets bigger, you'd add additional servers to that line.
When you get to the point where different servers are playing different roles, then you split the list as needed. Capistrano's normal behavior is to run a command on all servers listed in all roles. Specific tasks, however, can be customized to run for a specific role or roles — it would make no sense to run database migrations on a server that didn't have a database, for example.
A role named :gateway, if it exists, is expected to have a single server, and Capistrano will route access to all other servers through that machine.
The first thing you need to do when you add a new server to your deployment is run the Capistrano setup task:
cap deploy:setup
The general form of a Capistrano command is very similar to a Rake command, cap is invoked, the first argument is the task to run, further options pass various options to the command.
The setup command creates a directory structure for your application. Figure 12.1 shows the directory structure.
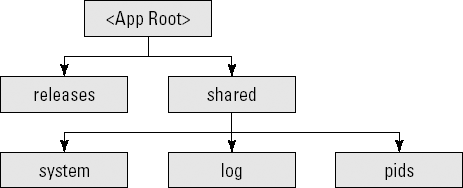
Each deployment you make to a server using Capistrano gets it's own new directory under releases. The top level directory has a symbolic link called current that always points to the most recent release directory. Files that would be shared across deployments are placed in the shared directory — Capistrano also manages the appropriate links from each deployment to the shared directories.
The setup command must be run on any server before you can deploy to it, however there is no harm from running it on servers that have already been set up.
Assuming you are starting from a basic, single server deployment, the first deploy task you run is a cold deploy, meaning that a Web server is not already running on the server.
cap deploy:cold
This performs three tasks, each of which can also be triggered as separate Capistrano tasks:
deploy:updateRetrieves a current checkout from your source control system and manages the symbolic linc manipulation
deploy:migrateRuns a
rake db:migrateon the remote server. This will fail if thedatabase.ymlfile is not properly configured for production mode. In a complicated deployment, it's a common practice to dynamically generate thedatabase.ymlfile from a custom Capistrano task.deploy:startStarts the Web server. This task assumes that there is a script in your application's
scriptdirectory namedspin. This script will be run to start the server — a simple way to start is just to defer to the standardscript/process/spawner, which starts a small mongrel cluster. If you're fine with just a normal mongrel deployment, which is plausible for a staging server, I guess, you can override the command using something like this:namespace:deploy do task:start,:roles =>:app do invoke_command "mongrel_rails start -C #{mongrel_file}", :via => run_method end end
Once you have the Web server running on the remote box, then you've entered the realm of hot deployment:
cap deploy
A hot deployment is the same as a cold deploy except that the database migrations are not performed (you need cap deploy:migrations to specifically do a hot deploy with database migrations. Also, instead of deploy:start, it calls deploy:restart, which calls the standard Rails script/process/reaper. This should stop anything that looks a Rails server process, then start them up again. It's designed to work with the spawner script. Again, you can customize behavior to match your own needs.
Should you notice a problem in the deploy and you need to go back to the previous known state, you run the following command:
cap rollback
This command deletes the current codebase, and points the current symbolic link back to the previous version, then restarts the Web server using the same deploy:restart task used in a hot deployment.
This section has covered the most commonly used Capistrano commands, here are a couple of others that you might find useful:
deploy:checkTests for a series of prerequisites on the remote machine including the directory structure. You can add tests by adding commands to your deploy file of the form
depend:type name. The type can be one of:gem,:command, or:directory, and any further options are used to specify the name of the dependency being checked, likedepend:gem "chronic".deploy:cleanupRemoves all but the last five non-current deploys from the remote server.
deploy:uploadA one-off task that uploads all the files and directories in a comma-delimited list stored in the
FILESenvironment variable, as incap deploy:upload FILES="db/schema.rb".invokeRuns an arbitrary command, stored in the
COMMANDenvironment variable.
There are two ways to customize Capistrano's behavior, setting variables and creating your own tasks. Many tasks depend on variables that can be set either at the command line or in your Capistrano recipe. Capistrano variables are either environment variables or Capistrano variables. Environment variables are declared in your script using the following syntax:
ENV["FILES"] = "app/views, app/models"
And are added at the command line using the syntax:
cap invoke COMMAND="script/process/reaper"
Capistrano variables are set in the recipe as follows:
set:svn_user, "hmason"
Such variables are set at the command line using one of the two forms:
cap deploy -s svn_user=hmason
cap deploy -S svn user=hmason
The difference between the two forms is when the variable set is applied. The lower-case form is applied after the recipe file loads, so that the command line setting overrides any setting in the actual recipe script. The upper-case form loads the command line variables first, so any setting in the script overrides the command line.
Setting variables is nice, but the real power of Capistrano comes in the ability to write your own custom tasks and assign them as dependencies to any Capistrano task. The syntax for writing a new task is extremely similar to Rake. Here's a sample task that generates a database.yml file — it assumes you have some way of specifying the database host for each server and that YAML has been loaded:
desc "create database.yml"
task:create_database_yml,:roles => [:app,:db] do
  yaml = {
     :production => {
         :adapter => mysql
         :database => my_production
         :host => find_host($HOSTNAME) ## This is your method to
  write
         :username => 'fred'
         :password => 'dref'
      }
  }
  put YAML::dump(buffer), "#{release_path}/config/databse.yml",
     :mode => 0664
end
As in Rake, the desc method sets the comment for the next task definition to come down the pike. Unlike Rake, task dependencies are not set in the task definition. Instead, the task definition allows you to optionally specify which server roles the task applies to — in this case, the task only applies to servers that have database. Also, whereas if you define a Rake task multiple times, it will combine the definitions, a second definition of a Capistrano task will completely override the original task.
Capistrano has a couple of handy helper methods that manage server side activities, the previous snippet shows put, which places content in a file. Another commonly used one is run, which runs a shell command on all the servers affected by the task.
As with any build system, it's helpful to automatically set up dependencies so that a task will always run before or after another task. In Capistrano, this is done by placing a declaration to that effect in the recipe script. The general form is one of the following
after 'existing_task', 'new_task'
before 'existing_task', 'new_task'
You can include more than one new task by continuing to add the tasks as further arguments to the command. As is probably clear, new tasks specified as before are guaranteed to run before the actual task, and new tasks specified as after will always run after the existing task. You can have both a before and after on the same task, and the before and after declarations do compose, so you can have more than one of them for the same task and they will not override each other. Instead of a list of tasks, you can also pass a block.
This just scratches the surface of what you can do with Capistrano, each deployment is different, and getting your needs exactly right is not trivial. Check out Capistrano online for more complex details.
In this chapter, I covered some topics that are important to developing an application with Rails that had not yet been covered in previous chapters.
Representational State Transfer (REST) is a pattern for structuring your Web application that is rapidly becoming standard for Rails. For a Rails programmer, REST simplifies the URL and action structure of your controllers, and provides for a consistent interface to the resources reached via the controller.
REST also enables your application to act as a Web service. A Rails application can act as the consumer of a RESTful Web service using the ActiveResource library, which provides an ActiveRecord style interface to a remote resource.
Sometimes you will be forced to use a legacy database that does not conform to Rails naming conventions. Rails provides hook methods to override standard naming to match whatever you have. You can also maintain multiple databases from within the same application.
Applications can send email using the ActionMailer library, which is something of a mashup between a model and view, and which allows you to specify the details of an email message. You can even use ERb syntax to create a template defining the message. The email message can also have a file attachment.
Capistrano has become the default tool for specifying the details of Rails deployments to remote servers. It allows you to run the same deployment script transparently across multiple servers. You have a wide range of customization options to adapt the script to the needs of your deployment.