
This chapter marks the beginning of step-by-step development of a complete and useful Rails application. If you are familiar with the Web development market, you know that most of the hottest applications being developed today feature some sort of social aspect. The option for users to provide content and interact with other users is a key component of what is usually referred to as a Web 2.0 application. The application you can write by following along in this chapter fits in nicely with the Web 2.0 paradigm.
This application will allow groups to create an online catalog of books. Using the application, users can add books, share book reviews, share book ratings, and organize the books using tags. Book Shelf, as I've named this application, could be used by a user group, a community group, a school, a local library, a workplace, or just about any group of people that have some interest in books.
You will develop Book Shelf using an iterative process in which you will design a feature and then code that feature. This process is repeated until all of the required features of the application have been implemented. In this chapter, you will put in place the basic framework of the application and implement a user model with authentication so that a user is able to log in to and out of the application. The development continues in the next two chapters.
I strongly encourage you to follow along with the development of the application and to write the code on your computer as you read about it. However, I do recognize that this is not the best learning style for everyone who will read this book. Therefore, if you'd like to see the complete source code for the application, you can download it from www.rubyonrailsbible.com.
Previous chapters have covered the various features that make up Rails; in this chapter you can learn through the experience of writing what I feel is an interesting application.
Your Book Shelf application will include the following features:
User registration, login, and account management
Ability to add and remove books to and from user-specific shelves
Automatic population of book information for added books
Ability to search the Amazon catalog to find books that a user wants to add
Links to purchase books online
Support for book reviews
Tagging of books
Rating of books
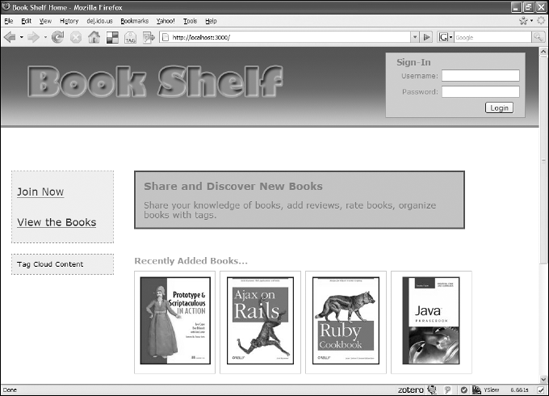
One of the best ways of communicating the goals for an application upfront is through pictures. To give you a good idea of what is to be developed, I'll cheat a bit here by showing you how the application looks when it's complete. Figures 6.1 to 6.4 show four of the Book Shelf application's main screens, which are described here:
Book Shelf Home Page: The screen shown in Figure 6.1 is what users will see when they first navigate to the Book Shelf application. This is the starting point for all users and visitors.
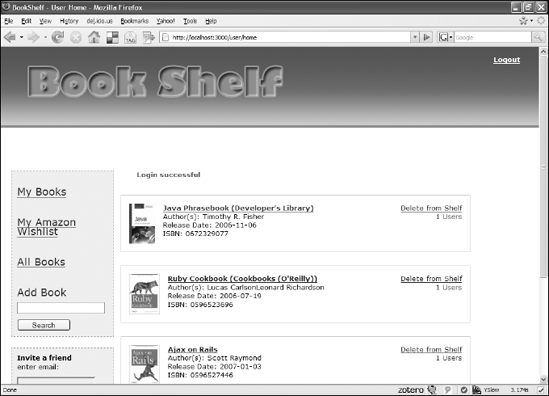
User Home Page: The page shown in Figure 6.2 is a home page for users who have logged into the application.
Add Book Page: The page shown in Figure 6.3 is where users can view results of searches against the Amazon catalog and find books that they want to add to their book shelf.
Book Detail Page: The page shown in Figure 6.4 is where users view details about a particular book that is on someone's shelf. This is also the page where users are able to read and submit book reviews.


If you follow the development of the Book Shelf application through the next two chapters, I hope you find something missing from the chapters. I am referring to unit tests, something that should normally be a part of your development process. In any real application development cycle, I very strongly recommend that you write your unit tests shortly after you implement a particular feature.
You can also practice test-driven development, in which you actually write your unit tests before you write the code that implement the tests. Either of these development styles will produce higher-quality code that is a great deal more maintainable. For this book, I have chosen to centralize the writing of tests into a chapter of its own so that the reader who wants to look up how to write tests for a Rails application has a dedicated chapter to go to.
Note
Chapter 9 includes tests for the Book Shelf application.
This section leads you through creating a skeleton for the Book Shelf application. The skeleton will set up the application's directory structure and provide a home for the code you will write throughout the remainder of the chapter. You will also create application databases for three different environments: test, development, and production.
Note
This chapter assumes that you have already installed Ruby and Rails on your development computer. If you have not, see the Quick Start chapter for help with installing those components.
The project is named Book Shelf, but it is common Rails convention to give the Rails project a name that is lowercase with underscore word separation. You can use book_shelf as the name of the Rails project. From your project directory, open a console window and use the rails command to generate the directory structure for the Book Shelf application:
rails -d mysql book_shelf
Prior to version 2.0.2 of Rails, MySQL was the default database for a Rails application. However as of Rails 2.0.2, SQLite is now the default database for a Rails application. If you run the rails command above without the -d option, your database configuration file will contain setup for a SQLite database. The -d mysql option tells Rails that you want it to setup a database configuration file for use with MySQL.
Running this command will output the list of directories and files that are being created for you. The directory structure that is created is common to all Rails applications. Inside of the directory in which you ran the rails command you should now see a directory named book_shelf. If you look at the drectories inside of the book_shelf directory you should see the directory structure shown in Figure 6.5.
From within the book_shelf directory, start the WEBrick server using the script/server command:
ruby script/server
=> Booting WEBrick
=> Rails application started on http://127.0.0.1:3000
=> Ctrl-C to shutdown server; call with --help for options
...

When you see feedback indicating that the WEBrick server has been successfully started on port 3000, open a browser and navigate to http://localhost:3000. You should see a screen similar to the one in Figure 6.6.

You have now successfully created the Book Shelf project directory and a skeletal framework where all of the code you write will go. You'll continue development by setting up the application's databases.
For any database-backed application, Rails supports three distinct environments; production, development, and test. Each of these environments should have their own database associated with it. In a real application, these databases may not all be on the same server. In fact it is very likely that your development and test databases will not exist on the same server that holds your production database. For this application, you will create all three databases on your local development machine.
Prior to Rails 2.0 you would have had to create the databases yourself using either the MySQL command-line tool, or some other tool. However, as of version 2.0 of Rails, you can easily create the databases using a simple Rake command. The first thing you must do is make sure the databases that you want created are configured in your application's database.yml file. This is a database configuration file contained in the book_shelf/config directory. If you open that up, you should see something similar to Listing 6.1.
The important things to notice in the configuration are the following:
The adapter is set to
mysql. This means you will be using MySQL as your database application.The database names are a concatenation of the name of the application
book_shelfwith an environment name, such asbook_shelf_development.The username and password fields should contain the username and password of a valid MySQL user. When you first install MySQL the root user is created with no password. If you have changed that, make sure you update this file appropriately.
The host for each database is set to be localhost, meaning that you will be hosting all of the databases on your local computer.
After you've made any necessary changes to your database configuration file, you can use Rake to create the databases. From a command prompt use the following Rake command:
rake db:create:all
This will create each of the three databases that were specified in the database.yml file. If for some reason, you made a mistake and need to start over, you can remove all of the databases using a similar command, rake db:drop:all will remove all of the databases specified in database.yml.
Now that you have the application skeleton generated and the databases created, it's time to begin building the application.
Example 6.1. Book_shelf/config directory
development:
  adapter: mysql
  encoding: utf8
  database: book_shelf_development
  username: root
  password:

  host: localhost

# Warning: The database defined as 'test' will be erased and
# re-generated from your development database when you run 'rake'.
# Do not set this db to the same as development or production.
test:
  adapter: mysql
  encoding: utf8
  database: book_shelf_test
  username: root
  password:
  host: localhost

production:
  adapter: mysql
  encoding: utf8
  database: book_shelf_production
  username: root
  password:
  host: localhost
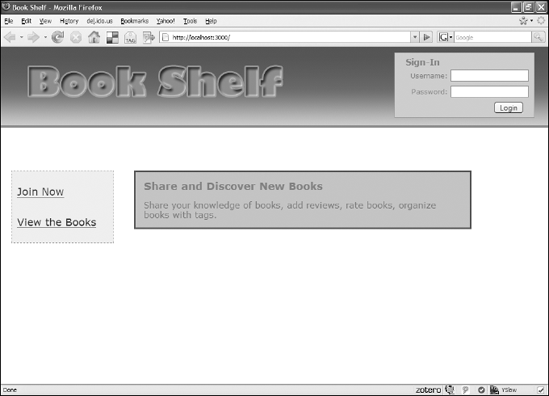
In the previous section, you saw that if you run the application right now, you get the Rails Welcome default page. You will now create a home page for the Book Shelf application that the user starts from. The end result of what you'll create in this section is shown in Figure 6.7. It's not yet the final home page that you saw at the beginning of this chapter, but it is a place to start from.

Now that you know what the goal is for this section, let's talk about what you need to do to get there. How do you display a page in a Rails application? You need to create a controller to handle the page request coming from the browser. The controller will contain a method corresponding to the particular action that the browser is requesting. The action method of the controller will render a view template file that defines the page you want to display. There are three steps you need to follow:
Create a controller to handle the home page request.
Create a method in the home controller to handle the home page request.
Create a view template to define the page to be rendered.
Let's get started with a home controller.
It is a good practice to create controller classes that correspond to your model classes. For example, if you have a user model, you would also have a user controller that would provide action methods related to working with users. However, for the home page, there is really not a specific model class that you want to work with yet. You can simply call the controller that renders the home page, 'HomeController.'
In a command window, go to the book_shelf directory and use the Rails generate script to create the HomeController class:
> ruby script/generate controller Home
 exists app/controllers/
 exists app/helpers/
 create app/views/home
 exists test/functional/
 create app/controllers/home_controller.rb
 create test/functional/home_controller_test.rb
 create app/helpers/home_helper.rb
This creates a stub for your Home controller, a functional test for the controller, a helper for the controller, and a views/home directory where you can put view templates that will be rendered by the Home controller.
Open up the app/controllers/home_controller.rb file, and you see a currently empty controller class like this:
class HomeController < ApplicationController
end
You need to add a method that will handle the rendering of the Book Shelf home page. It is a standard practice to name any Web site's start page as index. If you specify a URL containing only a controller name with no action, Rails will, by default, route to an index action. You can name the action method to display the home page, index. Edit the HomeController to add the index method:
class HomeController < ApplicationController
    def index
    end
end
Notice that you did not specify any template to render. By default, a view template with the same name as the action method will be rendered. In this case, when the index method is called, it will try to render a template stored in app/views/home/index.html.erb.
Now that you have a controller and an action method in place, let's move onto creating the home page view template.
You could put all of the HTML necessary to create the home page view into a Rails view template. However, some of the HTML is probably reusable across many of the other views that will also be created. If you look back at the four screen shots that were shown at the beginning of this chapter, you will notice that all four of those views had the same general layout. Rails has great support for common layouts, so it makes sense to start with a Rails layout template.
Rails layouts let you put HTML and embedded Ruby content into an html.erb file that can be used with multiple views. Layout files are just like other Rails view template files. Rails will look in the app/views/layouts directory for a layout template that contains the same name as the controller that is being requested. If a layout exists with the same name as the controller, Rails uses that layout file. If Rails cannot find a layout template that matches a controller name, it uses the layout file named application.html.erb. The application.html.erb template is a global template within which you can put your default page layout. Unless you override this by creating controller-specific layouts, Rails will always use the application.html.erb template.
You can also override the layout which will be used for any given controller by specifying a layout inside of a controller file. For example, if you wanted to use a layout file named home.html.erb with the methods in your home controller, you could modify the home controller adding the layout specification like this:
class HomeController < ApplicationController
    layout 'home'

    def index
    end
end
For this application, the home controller will use the default application.html.erb layout file.
Create the app/views/layouts/application.html.erb file now and enter the code shown in Listing 6.2.
This will set up the general layout across all of the application's pages. The following sections break down the various pieces of this layout template.
The HTML head defined in the layout looks like this:
<head>
 <title><%= @title %></title>
 <%= stylesheet_link_tag "style" %>

 <%= javascript_include_tag:defaults %>
</head>
The page title is set using an instance variable set by the action methods of your controllers. This allows each page to have a unique title while still using the same layout template. The second line of the head section links a style sheet named style.css from the public/stylesheets directory. Notice that you do not have to specify the .css extension. Just specifying the name of the file without the extension is enough for Rails to find the CSS file, assuming that you used the .css extension to name the file.
Example 6.2. The Application Layout Template in app/views/layouts/application.html.erb
<!DOCTYPE html PUBLIC "-//W3C//DTD XHTML 1.0 Transitional//EN" "http://
   www.w3.org/TR/xhtml1/DTD/xhtml1-transitional.dtd">
<html xmlns="http://www.w3.org/1999/xhtml">

<head>
 <title><%= @title %></title>
 <%= stylesheet_link_tag "style" %>

 <%= javascript_include_tag:defaults %>

</head>

<body>
 <div id="header">
 <div id="logo_image">
 <%= link_to image_tag('main_logo.png'),
 {:controller=>'home',:action=>'index'} %>
 </div>
      <div style="clear: both; height: 0px;"></div>
 </div>

 <%= render:partial=>"shared/sidebar" %>

 <div id="content">
 <% if flash[:notice] -%>
 <div id="notice"><%= flash[:notice] %></div>
 <% end -%>
 <% if flash[:error] -%>
 <div id="error"><%= flash[:error] %></div>
 <% end -%>
 <%= yield %>
 </div>
</body>
</html>
The last line of the head section includes default JavaScript files. Rails defines a standard set of JavaScript files that are included with the framework as its defaults. The default JavaScript files that will be included are as follows:
application.js: This is where you write any custom JavaScript that you want to include.
controls.js: This is a part of the Scriptaculous library.
dragdrop.js: This is a part of the Scriptaculous library.
effects.js: This is a part of the Scriptaculous library.
prototype.js: This contains the Prototype library.
Prototype and Scriptaculous are powerful JavaScript libraries that make it easy for you to create cool effects, create rich interactive features, and write well-structured JavaScript.
Note
For more about the Prototype and Scriptaculous libraries, see Chapter 10 of this book.
The HTML body section of the layout includes the main_logo.png image that links to the home page if the user clicks it.
<
<div id="header">
    <div id="logo_image">
        <%= link_to image_tag('main_logo.png'),
            {:controller=>'home',:action=>'index'} %>
    </div>
    <div style="clear: both; height: 0px;"></div>
</div>
Note
You can download the main_logo.png and other image files used by this project from the book's Web site at www.rubyonrailsbible.com.
The link to the home page is created using the link_to helper. The index action of the home controller is specified as the link's target. The last div in the header section is only for layout purposes. This helps to achieve the correct layout. If you are familiar with laying out pages using floating elements, you are probably also familiar with the technique of using a clearing div. For those of you not familiar with this, I'd suggest a good CSS reference book.
The sidebar defines the left menu that you see in each of the application screens. This will be rendered as a partial.
<%= render:partial=>"shared/sidebar" %>
You can create the sidebar partial now. In the app/views directory, create a subdirectory named shared. The shared directory is where you will put view partials that will be used by view templates associated with more than one controller. In the app/views/shared directory, create a file named _sidebar.html.erb. Edit the file to look the code in Listing 6.3.
Example 6.3. _sidebar.rhtml partial
<div id="sidebar">
<div id="menu">
<ul id="home_menu">
<li><%= link_to 'Join Now',
:controller=>'user',
:action=>'signup' %>
</li>
<li><%= link_to 'View the Books',
:controller=>'book',
:action=>'list' %>
</li>
</ul>
</div>
<div style="clear:both;"> </div>
</div>This creates a menu with a Join Now link and a View the Books link. Notice that the Join Now link is pointed to the signup method of the user controller. The View the Books link is pointed to the list method of the books controller. These controllers and methods do not exist yet, but you can anticipate their creation. Here again you see the use of the link_to helper to create the links.
The final section of the layout template defines the main content of the pages. This section is pretty simple. If there are any flash notice or error messages to be displayed, those display at the top of the content section. After those messages are printed, a yield method renders content defined in your page view templates.
<div id="content">
    <% if flash[:notice] -%>
        <div id="notice"><%= flash[:notice] %></div>
    <% end -%>
    <% if flash[:error] -%>
        <div id="error"><%= flash[:error] %></div>
    <% end -%>
    <%= yield %>
</div>
Remember that the flash hash is a special collection that is built-in to Rails for the purposes of passing simple messages from the controller to the views. The messages stored in flash will be automatically removed after a single request/response cycle. The flash is not a place to store persistent messages that you want to remember for long periods of time.
With the layout in place, the last task left to perform before you can view the home page is to create an index view template in the app/views/home directory. The view template is named index.html.erb so that it matches the name of the controller action method. Create that file now and edit it to contain the following code:
<div class="home_quote">
    <span class="quote_title">Share and Discover New Books</span>
    Share your knowledge of books, add reviews, rate books,
    organize books with tags.
</div>You should have all the elements necessary to get the basic home page to come up in a browser. From a command window, start up the WEBrick server if you do not already have it running.
> ruby script/server
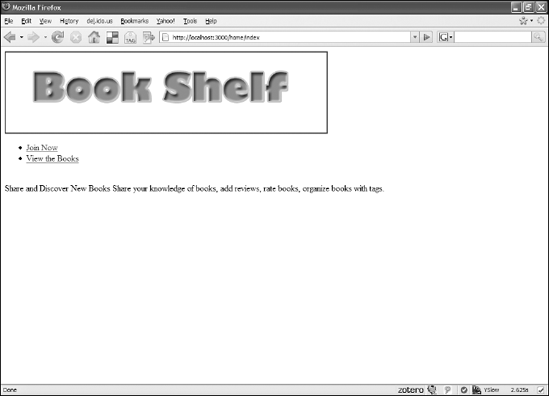
Now in your browser, navigate to the index action of the home controller by typing this URL: http://localhost:3000/home/index. If you've followed all the steps up to this point, you should see a page similar to Figure 6.8.
Oops, it doesn't quite look like the view that was shown in Figure 6.7, does it? The good news is that the content looks correct — it's just not styled the way you'd like it to be. That can be fixed by defining some CSS styles, which you'll do shortly.
There is one other problem with the page: There is no page title in the browser title bar. Remember that in the template for this page, the title was set using an @title instance variable. However, in the index action method of the home controller, you did not set the title. Go back and set the @title instance variable in the index method to something like "Book Shelf." You can do that by modifying the index method of the home controller (app/controllers/home_controller.rb) as shown below:
def index
   @title = 'Book Shelf'
end
Now you can reload the page in your browser to see the title displayed in the browser title bar.
Remember that in the layout template, you included a link to a style sheet named style.css. Go ahead and create that file in the public/stylesheets directory and edit it to contain the content shown in Listing 6.4. In this book, I won't get into the details of the CSS styles. If you want to learn more about CSS and how to style a Web application, I recommend the book, HTML, XHTML, and CSS Bible, 4th Edition, by Steven M. Schafer.
Example 6.4. Style.css
body {
 padding: 0;
 margin: 0;
 background-color: white;
 min-width: 700px;
 background-position: left top;
 background-repeat:repeat-x;
 font-family: Verdana, Arial, Helvetica, sans-serif;
font-size: 80%;
}
#header {
height: 150px;
background: url(../images/header_bg.png) repeat-x;
}
#logo_image {
float: left;
position: relative;
}
#logo_image img {
border: none;
}
#notice {
color: red;
font-weight: bold;
margin-left: 30px;
margin-bottom: 30px;
}
#error {
color: red;
font-weight: bold;
margin-left: 30px;
margin-bottom: 30px;
}
#join_now_text {
clear: both;
text-align: right;
}
#Content {
margin:75px 0px 50px 220px;
padding:5px;
}
#sidebar {
position:absolute;
top:230px;
left:20px;
width:170px;
}
#Menu {display:block;
float:left;
padding:10px;
background-color:#eee;
border:1px dashed #999;
line-height:17px;
width:170px;
margin-bottom: 20px;
}
#home_menu {
list-style: none;
margin: 0px;
padding: 0px;
}
#home_menu li {
padding-top: 20px;
padding-bottom: 20px;
font-size: 1.5em;
color: blue;
}
.home_quote {
font-family: Verdana, Arial, Helvetica, sans-serif;
float: left;
margin-left: 25px;
font-size: 12pt;
color: #777777;
border: 3px solid #0066cc;
width: 75%;
padding: 15px;
background-color: #a6cae1;
}
.home_quote.quote_title {
display: block;
font-size:14pt;
font-weight:bold;
color:gray;
margin-bottom: 15px;
}Now if you've done everything right up to this point, your home page should look like the home page shown in Figure 6.7. Your first task is nearly complete. There is just one more thing to do, and that is to add a default route to the Rails configuration.
Currently, you can navigate to the home page by specifying the home controller and action name in the URL like this: http://localhost:3000/home/index. Since the action is named index, you could have left the action name off. Rails will look for an action named index if no action is specified in the URL. However, it is better to have the home page come up when the user routes to the top level of the Web site, for example, using the URL http://localhost:3000. In order to get that URL to navigate to your home controller, you need to set up a default route. You can do that in this section by editing the Rails routes configuration.
Open up the config/routes.rb file. Near the top of the file, you should see these lines:
!# You can have the root of your site routed with map.root
# -- just remember to delete public/index.html
# map.root:controller => "welcome"
This defines a default or empty route that is used if there is not a controller or action specified in the URL. You need to uncomment the line that starts with map.root. This line sets up a route to match the empty pattern, ' '. You also need to change the name of the controller from welcome to home. The route definition should look like this:
map.root:controller => "home"
After making that change, you can close the routes.rb file; however, if you try going to http://localhost:3000, you still won't get the page you are after; instead, the index.html page that is stored in the public directory will be loaded. This is the application start page that was shown in Figure 6.6. Any HTML files that are stored in the public directory of a Rails application will be served directly, bypassing the Rails routing mechanism. You need to either rename or delete the public/index.html file.
After you have either renamed or deleted the public/index.html file, go back to your browser, and go to http://localhost:3000. Now you should see the home page that you created. Because there was no controller or action specified in the URL, the empty route was used to map to the home controller.
Now that you have the basic framework of the Book Shelf application started, you can implement support for users in this section. The ability to support user registration, login, and account management is a common requirement of most Web applications. This section leads you through building a system for user registration, login, and authentication. Much of what you'll learn and develop in this section is applicable to any Rails application that you will write.
Some developers would stop you at this point and suggest that instead of writing your own user authentication and login, instead you should use a Rails plug-in. There are several Rails plug-ins available that provide this functionality for you. Several of these plug-ins are described in Chapter 11 of this book. My advice is to first implement a user authentication and login system yourself at least once so that you learn how these things work in a Rails application.
Once you feel that you understand the basics of authentication and user login, it is a good idea to save yourself time and use one of the popular Rails plug-ins. Creating your own authentication system in the remainder of this chapter will be valuable experience that you can apply to existing authentication plug-ins that you want to evaluate.
The steps in this section to implement user accounts are as follows:
Create the user model
Implement user registration
Implement login and logout
These steps require creating a user model, a user controller, and a few view templates. Begin with creating the user model.
The first thing you need to do to add user support is create the user model. However, before you create the user model, it's a good idea to think about what type of information you want to be able to store about each user. This becomes the user model design. Table 6.1 lists the fields, along with a description and a data type for each of the fields that will be used in the user model of this application.
These fields allow you to keep track of all that the application needs to know about users. Notice that you take advantage of the created_at and upated_at fields that Rails will automatically update for you each time a user record is created or updated.
Table 6.1. The User Model
Field | Description | Data Type |
|---|---|---|
| Primary key | integer |
| User login id | string |
| User's first name | string |
| User's last name | string |
| User's e-mail address | string |
| Hashed password | string |
| Salt value | string |
| Count of user logins | integer |
| Date of last login | datetime |
| Date user was created | datetime |
| Date user was updated | datetime |
The password_hash and password_salt fields allow for the secure use of passwords without storing any user's password in plain-text form. When the user submits a password, a hashing algorithm is used to create a unique hash for that password. The password hash is stored in the database. When the hash is created, a salt value is combined with the password. The salt value makes a type of attack known as a dictionary attack much more difficult for hackers. In a dictionary attack, the attacker writes a program that scans a dictionary going through every word in an attempt to guess your password.
However, by adding a Salt value to the password, the password is no longer recognizable as any dictionary word even if you used a common word as your password. With this strategy, user passwords are never stored in the database; thus, only the users know their passwords, making for a more secure system.
Now that you have a good idea of what fields are used in the user model, go ahead and use the script/generate command to generate the user model class. Open up a command console in the book_shelf root directory and type this:
> ruby script/generate model User
 create app/models
 exists test/unit
 exists test/fixtures
 create app/models/user.rb
 create test/unit/user_test.rb
 create test/fixtures/users.yml
 create db/migrate
 create db/migrate/001_create_users.rb
This generates the user model class, along with a unit test file, a test fixture file, and a database migration file for the user model.
The user model class should be in the app/models directory and will have the filename user.rb. Rails uses the Ruby convention of naming class files using lowercase, underscore-separated names. The filename of any given class should be the lowercase, underscore-separated form of the class name. Open up the user.rb file, and you should see your User class similar to this:
class User < ActiveRecord::Base
end
The User class does not yet have any application-specific behavior, but don't forget that it has a great deal of built-in functionality as a result of extending the ActiveRecord::Base class. Leave the User class unchanged for now, and move onto creating a migration that creates the users database table.
Each of the model classes in a Rails application is generally mapped to a database table that holds records corresponding to instances of that model type. Table names in a Rails application are lowercase and the plural form of the model class name. You need a users table to hold the Book Shelf user data that is used by the user model.
When you generated the user model, a migration file was also generated for you and placed in the db/migrate directory of the book_shelf application directory. Open up the 001_create_users.rb file, and you should see code similar to this:
class CreateUsers < ActiveRecord::Migration
    def self.up
        create_table:users do |t|
            t.timestamps
        end
    end

    def self.down
    drop_table:users
    end
end
This is an empty migration class that does not do anything useful yet, other than create a users table with two timestamp columns. Remember that the t.timestamps method call in the migration will create the updated_at and created_at columns, which Rails manages for you automatically.
The two methods, self.up and self.down, are called when the migration is applied or reversed, respectively. The self.up method is responsible for setting up the users table completely, and the self.down method should reverse any action taken by the self.up method.
You need to modify this migration so that it creates the users table with the fields that are specified in Table 6.1. Go ahead and modify the migration class to match this:
class CreateUsers < ActiveRecord::Migration
    def self.up
        create_table:users do |t|
            t.string:login
            t.string:first_name
            t.string:last_name
            t.string:email
            t.string:password_hash
            t.string:password_salt
            t.integer:login_count
            t.datetime:last_login
            t.timestamps
        end
end
def self.down
drop_table:users
end
endNow the migration creates a column for each of the required data fields. You do not have to specify the id column, as Rails will create that automatically when the migration is run.
Apply the migration with Rake
Now that you have a completed migration that specifies how the users table is built, you can go ahead and apply that migration using the Rake tool. In your project's base directory, type this:
> rake db:migrate
This runs the only migration that you have so far and creates the users table. You should see output, letting you know that the users table has been created. Running this command is also a good test of your database setup. Rake reads the database configuration information that you entered in database.yml, so if you made any mistakes when you entered that information, they will become apparent now.
Rails model validations allow you to define field validations within a model class that will be automatically enforced by Rails. Using model validations, you can enforce things such as field length limits, field length content, and field uniqueness. For the Book Shelf user model, add the following validations:
Enforce minimum and maximum length of user login.
Enforce minimum and maximum length of user password.
Enforce presence of login and e-mail address.
Enforce uniqueness of login and e-mail address.
Make sure the user enters a password and a password confirmation that contain the same value.
Make sure the e-mail address entered conforms to a valid e-mail address format.
Each of these validations can be added using the Rails DSL that supports model validations. You won't have to create any if statements or even write any methods yourself to get these validations.
Open up the app/models/user.rb file and add the following validation code to the top of the class definition, just after the class statement.
validates_length_of:login,:within => 3..40
validates_length_of:password,:within => 5..40
validates_presence_of:login,:email
validates_uniqueness_of:login,:email
validates_confirmation_of:password
validates_format_of:email,

  :with => /^([^@s]+)@((?:[-a-z0-9]+.)+[a-z]{2,})$/i,
                   :message => "Invalid email"
A nice thing about using the Rails validation DSL is that the methods that you use to apply validations are very simple for you to read and understand what their function is. For example, even someone not familiar with Rails could look at the first line, validates_length_of:login,:within => 3..40, and understand that it validates the length of the login field, making sure that it is between 3 and 40 characters in length. Similarly, the other validations are easy to read and understand.
Note
If you want to learn more about the available validations, refer back to Chapter 3.
The last validation validates the format of the e-mail field and makes sure that it conforms to the format of a valid e-mail address. This is probably the most complex of the validations that you are using. This validation makes use of a regular expression. Regular expressions are text pattern strings that are used to look for matching strings or substrings. The regular expression used in the :with element is
/^([^@s]+)@((?:[-a-z0-9]+.)+[a-z]{2,})$/iThis regular expression will make sure that the email address conforms to a standard email address format, including the @ sign, and a domain name containing a period, such as yahoo.com.
Test user validations
At this point, you should have a users database in place and a user model containing a handful of field validations. Let's take a moment to test those validations using the Rails Console to verify that they work as expected.
Start up the Rails Console from the book_shelf top-level directory:
> ruby script/console
This gets you into the Rails Console environment. In the Rails Console, you have full access to all of your application classes. Go ahead and create an instance of the user model class:
>> user = User.new
The user object echoes back to you, showing that it currently contains nil values for each of the attributes. Before you set any of the fields, see if Rails thinks it is valid as is:
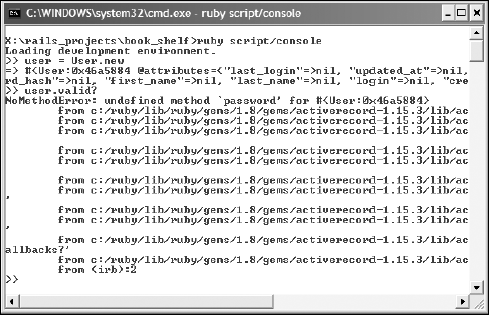
>> user.valid?
After entering this command, you should see the output shown in Figure 6.9. Oops, it looks like there is a problem in your user model. Ruby is complaining that there is an undefined method, password. This is caused by the following two validations that you added to the user model:
validates_length_of:password,:within => 5..40
validates_confirmation_of:password
These two validations validate a password field, but if you remember when you defined the model, you did not create a field named password; instead, you just had password_salt and password_hash. This is because the password is not directly stored in the database, and so the user model does not know about this field yet.
The validation is attempting to get the value of the password field through an accessor-named password, which causes the undefined method error. Because this field is not a column in the users database table, Rails does not automatically create an accessor for this field. You can fix this problem by explicitly creating an accessor for the password field. You also want an accessor for a password_confirmation field. The second validation looks for both the password and password_confirmation accessors. Add these two accessors below the validations code in the user model, app/models/user.rb:
attr_accessor:password,:password_confirmation
Now go back to the command window, where you have the Rails Console running, and type exit to end that session. Restart the console using ruby script/console, create a user, and try the valid? method again:
>> user.valid?
=> false
Now the method runs successfully and returns a value of false, indicating that the user object is not currently valid. This is because it does not meet the validations that you programmed for it. You can look at the problems that occurred during validation by looking at the user.errors object.
>> user.errors
You'll see error messages in the user.errors object related to the password, login, and e-mail fields. See if you can fix the problems by setting those three fields with reasonable values:
>> user.password = 'secret'
>> user.login = 'john'
>> user.email = '[email protected]'
Now try testing the object's validity again:
>> user.valid?
=> true
The user object is now valid. The values you entered for the password, login, and e-mail fields allow the user object to pass all of the defined validations.
Now that the application has a user model class and an associated database table to support users, let's turn our attention to implementing a mechanism that will allow users to register for an account in the Book Shelf application. The tasks that need to be completed to accomplish this are as follows:
The second task deserves a brief explanation. Recall that the database stores a password hash and a password salt but not the password itself. However, the user will submit a password and a password confirmation. You need to put code somewhere to take the password and create the password hash and salt values so that they can be saved. In the second task, you will create this code to make sure that the appropriate password fields are set and stored.
You've already created a user model, but right now there is not a user controller. You'll create a user controller to serve as a home for the user-related requests, such as calls related to user registration, logging in, and logging out. In the book_shelf directory, generate the user controller:
> ruby script/generate controller User
 exists app/controllers/
 exists app/helpers/
 create app/views/user
 exists test/functional
 create app/controllers/user_controller.rb
 create test/functional/user_controller_test.rb
 create app/helpers/user_helper.rb
This generates the user controller class, a functional test stub for the user controller, and a user helper class. An empty user directory is also created under app/views in which user-related view templates can be placed.
Open up the app/controllers/user_controller.rb file, which contains the source for the user controller class. It should look like this:
class UserController < ApplicationController
end
This is the class definition in which you'll add action methods to handle the user-related requests. For now, add a signup action method to handle user registration requests:
def signup
    @title = "Signup"
    if request.post? and params[:user]
        @user = User.new(params[:user])
        if @user.save
            session[:user] = @user
            flash[:notice] = "User #{@user.login} created!"
            redirect_to:action => "home"
        else
            flash[:error] = "Signup unsuccessful"
            @user.clear_password!
        end
    end
end
The signup method handles both the request to display the registration page and the request to register a user. The two types of requests are differentiated by the type of HTTP method call. A request to display the registration page is sent as an HTTP GET request. A request to register a user is sent as an HTTP POST request. In line 3 of the code, you check to see if the user parameter was posted. If so, the user registration code is executed; otherwise, you assume a simple page request.
If the method is called using a GET request, only the line that sets the @title instance variable is executed. This sets a page title for the registration page. Because there is no explicit call to render a template, Rails will look for a template named signup.html.erb in the app/views/user directory and attempt to render that view. You can create that view shortly. For now, look at the code that is executed if the method receives a POST request:
@user = User.new(params[:user])
if @user.save
session[:user] = @user.id
    flash[:notice] = "User #{@user.login} created!"
    redirect_to:action => "home"
else
    flash[:error] = "Signup unsuccessful"
    @user.clear_password!
end
In this code, a new user object is created from the parameters passed from the user form. The save method of the user object is called to attempt to save the new user to the database. If the save is successful, three operations take place:
The user's id is stored into the session with the
:userkey.A notice is placed in the flash message area, saying the user has been successfully created.
The browser is redirected to the
homeaction of the user controller.
Because no controller is specified in the redirect_to call, the current controller, UserController, is used. The home action should display the user's home page. Create the home method inside of the UserController now. Edit this file app/controllers/user_controller.rb:
def home
    @title = "BookShelf - User Home"
end
Right now, the home method only sets the @title instance variable and by default will also render a template located at app/views/user/home.html.erb. The home.html.erb template should display a user home page. You will create this template shortly. Eventually, when books are implemented in the application, this method will grow so that all of a user's books are retrieved prior to rendering the home template.
Before you implement the signup and user home views, you need to add some code to properly handle the password. Because the code will set and manipulate user model fields, the correct place to put this code is in the user model, app/models/user.rb. You want code that will create the password hash and password salt for you whenever the password field is set. You can do this by creating a new setter method for the password field. You also create a method to generate the password hash value. Add these methods to the user model:
attr_protected:password_salt

def password=(pass)
    @password=pass
    self.password_salt = User.random_string(10) if !self.password_
   salt?
    self.password_hash = User.hash_password(@password, self.
   password_salt)
end
protected
def self.hash_password(pass, password_salt)
Digest::SHA1.hexdigest(pass+password_salt)
end
def self.random_string(len)
#generate a random password consisting of strings and digits
chars = ("a".."z").to_a + ("A".."Z").to_a + ("0".."9").to_a
newpass = ""
1.upto(len) { |i| newpass << chars[rand(chars.size-1)] }
return newpass
endThe password= method is a setter method for the password field. This method creates a random salt value and uses a hash_password method to create the password_hash field. As a result, each time the password field is set, the password_salt and password_hash fields are also set.
The salt value is generated using another method that is also defined above, the User.random_string class method. The random_string method generates a random alphanumeric string, with the length being controlled by an argument passed into the method. For the salt value, a string length of ten is used. Notice that the salt value is generated only if the self.password_salt value does not already exist, in other words, has a value of nil. This ensures that a new salt value is generated only when a user is first created.
The hash_password method takes a password and a password salt value as parameters and uses the SHA1 digesting algorithm to generate a unique hash value for the concatenation of the password and password salt values.
With these methods in place, the password will be correctly handled when a user submits a registration to the application. Next, you need to create the views that are used for registration and the user home page.
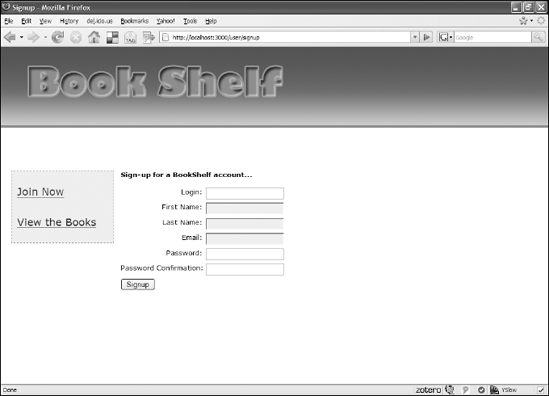
With the user controller and user model modifications in place, let's go ahead and create the view for the user registration process. The view is placed in the app/views/user/signup.html.erb file to correspond to the signup method of the user controller. Create that file and type in the code shown in Listing 6.5.
This template uses the Rails helper form_for to create an HTML form to contain all of the user model fields. Each of the fields uses the text_field helper to generate the correct HTML for the text input fields. The two exceptions are the password and password_confirmation fields. These use the password_field helper to generate HTML password input fields with blocked-out character input. Near the bottom of the form, a Submit button is created using the submit_tag helper.
Example 6.5. signup.html.erb
<div id="signup_content">
    <span class="title">Sign-up for a BookShelf account...</span>
    <% form_for:user, @user,:url => {:action => "signup" } do |f| %>

        <%= error_messages_for 'user' %><br/>

        <div class="signup_field">
            <label for="user_login">Login:</label>
            <%= f.text_field:login %><br/>
          </div>

        <div class="signup_field">
            <label for="user_first_name">First Name:</label>
            <%= f.text_field:first_name %><br/>
        </div>

        <div class="signup_field">
            <label for="user_last_name">Last Name:</label>
            <%= f.text_field:last_name %><br/>
        </div>

        <div class="signup_field">
            <label for="user_email">Email:</label>
            <%= f.text_field:email %><br/>
        </div>

        <div class="signup_field">
            <label for="user_password">Password:</label>
            <%= f.password_field:password %><br/>
        </div>

        <div class="signup_field">

   <label for="user_password_confirmation">Password Confirmation:</
label>
            <%= f.password_field:password_confirmation %>
        </div>

        <%= submit_tag "Signup" %>
    <% end %>
</div>
You're almost done with the signup page. The last task is to add some additional styles to the style sheet that you created earlier in this chapter. Add the following style definitions to the bottom of the public/stylesheets/style.css file:
// Implementing Registration
#signup_content {
   float: left;
   padding-left: 50px;
   width: 400px;
   text-align: right;
}

#signup_content.title, #login_content.title {
   font-weight:bold;
}

.signup_field,.login_field {
   white-space: nowrap;
   padding-bottom:.5em;
   text-align: left;
}

.signup_field label,.login_field label {
   display:block;
   float:left;
   margin-right:0.5em;
   text-align:right;
   width:12em;
}

.signup_field input,.login_field input {
   text-align: left;
}
The registration page should now be complete, so let's try it out. Start up the WEBrick server using the familiar ruby script/server command in the book_shelf directory, and navigate in your browser to http://localhost:3000. You should see the Book Shelf home page that you created earlier. From that page, click the Join Now link, and you should see the registration page that you just completed. It should look similar to Figure 6.10.
You can try typing some values into the text fields, but don't submit the form yet. You still have not created the user home page that is routed to after a successful user creation. Go ahead and create that page now.
The last view you need to create is the template for the user home page. For now, this view will be relatively simple, but as you build out the application, you'll add more content and features to this page. Create the home.html.erb template in the app/views/user directory and just put a simple welcome message as its content for now:
Welcome <%= User.find(session[:user]).first_name %>
This displays a message that welcomes the user by first name. The user's first name is read from the user object stored in the session.
Assuming you still have the WEBrick server running, navigate back to the registration page by clicking the Join Now link if you are not already there. Fill out the registration form and click the Signup button. If all goes well, you should be taken to a user home page that looks like Figure 6.11. You should see the welcome message and the first name of the user that you signed up as.

This is a good start for the user home page, but notice in the sidebar menu on the left that there is still a link that says Join Now. Because the user has already registered and has been logged into the application, it would be nicer if this link went away. That's not a difficult change to make, so go ahead and do that now.
Recall that the contents of the sidebar are defined in the view partial app/views/shared/_sidebar.html.erb. Open up that file and make the following modifications, highlighted in bold:
<div id="sidebar">
    <div id="menu">
        <ul id="home_menu">
            <% if !session[:user] %></ui>
                <li><%= link_to 'Join Now',
                          :controller=>'user',
                          :action=>'signup' %>
                </li>
            <% end %>
<li><%= link_to 'View the Books',
:controller=>'book',
:action=>'list' %>
</li>
</ul>
</div>
<div style="clear:both;"> </div>
</div>You've added a snippet of Ruby to the sidebar partial which will cause the Join Now link to be displayed only if there is no user stored in the session. This is because when a user is logged in, a user's id is stored in the session, so the link will never appear when a user is logged in. This is the desired behavior. If you refresh the user home page, you should see that the Join Now link is now gone.
The Book Shelf application now has the ability to register new users through a simple registration form. The application also has a basic user home page, which will be extended upon in future development. Before moving on, let's return to our friend the Rails Console and make sure that the user that was created is indeed in the application development database.
Start up the console from a command window by typing ruby script/console. In the console, use the find method of the User class to find the first user record stored in the database. At this point, your database should contain only the user that you created using the signup page in this section.
>> user = User.find(:first)
># ...
>> puts user.login
tfisher
If the user you registered is not found, go back and check all of your code to ensure that it matches the code in the book.
Your application now allows for users to register for an account with the Book Shelf application, but there is still not a way for existing users to log in and log out of the application. In this section, you'll add functionality to let users log in and log out. The tasks necessary to complete this functionality are to
Create a login action method
Create a logout action method
Implement a login view
You'll add the two new action methods to the user controller and implement a login box that is displayed in the upper-right corner of the application whenever a user is not logged in. You can see this login box in Figure 6.1 at the beginning of this chapter.
First implement the login method in the user controller. Open up the user controller in app/controllers/user_controller.rb and add the login method defined here:
def login

    if request.post?
       user = User.authenticate(params[:user][:login],
                                 params[:user][:password])
       if user
           session[:user] = user.id
           flash[:notice] = "Login successful"
           redirect_to:controller=>'user',:action=>'home'
       else
           flash[:error] = "Login unsuccessful"
           redirect_to:controller=>'home'
       end
    end
end
The body of the method is executed only if the request is an HTTP POST. The login method attempts to authenticate a user using the login and password passed in as request parameters. If the authentication attempt is successful, a user id is stored in the session, a successful login notice is placed into flash, and a redirect is sent to the browser, sending the user to the user home page. If the authentication is not successful, a login error message is placed into flash, and a redirect back to the application home page is sent to the browser.
The login method uses the User.authenticate method to authenticate the user. You have not yet created this method, so go ahead and do that now. This method goes into the user model class in the app/models/user.rb file. Add this method as defined here:
def self.authenticate(login, pass)
    u=find(:first,:conditions=>["login = ?", login])
    return nil if u.nil?
    return u if User.hash_password(pass, u.password_salt)==u.
   password_hash
    nil
end
The authenticate method takes two parameters: a login and a password. The first thing the method does is attempt to find a user that matches the login that is passed in. If a user cannot be found with a matching login, a nil value is returned and the method's work is done. If a user with a matching login is found, the next step is to create the password hash for the password that is passed in and see if it matches the password hash value that was stored with the user record.
If the password hashes match, the user record is returned. If the hashes do not match, the last line of the method is reached and results in the value nil being returned from the method. As a result, anytime an authentication is successful, a user model object for the authenticated user is returned. If the authentication fails for any reason, a nil value is returned.
The functionality necessary to process a user login is now complete. Next, you'll define the logout method before creating the login view.
The logout method handles a user's request to log out of the application. This method is very simple in comparison with the login method. Add the logout method defined below to the app/controllers/user_controller.rb file:
def logout
    session[:user] = nil
    flash[:notice] = 'Logged out'
    redirect_to:controller => 'home',:action => 'index'
end
To log a user out of the application, you simply have to clear the application's memory of the user. When a user is logged in, that user's id is stored in the session. This is how various methods in the application know that a user is logged in, by checking the session[:user] variable and seeing if it contains a user id. By setting the session[:user] variable to nil, you are effectively logging the user out of the application.
With login and logout methods completed, you can move on to implement a view template that displays the login form.
The login form is displayed in the top-right corner of any of the application's pages when a user is not logged in. You can see this in Figure 6.1. Because the login form is not a page itself, it is implemented as a partial that you can include in the application layout. Create the partial _signin.html.erb in the app/views/user directory. The content of the partial is shown in Listing 6.6. Type this into your _signin.html.erb partial.
The signin partial creates a form using the Rails form_tag helper. The controller and action that handles the form submit is passed to the form_tag helper method. Requests go to the login method of the user controller. The form contains two fields, the user login and password, and a Submit button.
The next thing you need to do is include the signin partial in the application layout template. Listing 6.7 shows the revised layout template from app/views/layouts/application.html.erb with the new code in bold. The code checks to see if a user is currently logged in by looking for a user id in the session. If a user is logged in, a link to the logout action is displayed; otherwise, the signin partial is rendered.
Example 6.6. _signin.html.erb partial
<div id="signin_section">
<div class="signin_box">
<div id="sign_in_title">Sign-In</div>
<% form_tag ({:controller=> "user",
:action=> "login"},
{:id=>'signin_form'}) do %> <div class="signin_field">
<label for="user_login">Username:</label>
<%= text_field "user", "login",:size => 20 %>
</div>
<div class="signin_field">
<label for="user_password">Password:</label>
<%= password_field "user", "password",:size => 20 %>
</div>
<div id="signin_button">
<%= submit_tag "Login" %>
</div>
<% end %>
</div>
</div>Example 6.7. application.rhtml with signin partial
<!DOCTYPE html PUBLIC "-//W3C//DTD XHTML 1.0 Transitional//EN" "http://
   www.w3.org/TR/xhtml1/DTD/xhtml1-transitional.dtd">
<html xmlns="http://www.w3.org/1999/xhtml">

<head>
    <title><%= @title %></title>
    <%= stylesheet_link_tag "style" %>

    <%= javascript_include_tag:defaults %>
</head>

<body>
    <div id="header">
        <div id="logo_image">
            <%= link_to image_tag('main_logo.png'),
                 {:controller=>'home',:action=>'index'} %>
        </div>
        <% if !session[:user] %>
<%= render:partial=>"user/signin" %><% else %><div id="user_menu"><%= link_to 'Logout',:controller=>'user',:action=>'logout' %></div><% end %><div style="clear: both; height: 0px;"></div> </div> <%= render:partial=>"shared/sidebar" %> <div id="content"> <% if flash[:notice] -%> <div id="notice"><%= flash[:notice] %></div> <% end -%> <% if flash[:error] -%> <div id="error"><%= flash[:error] %></div> <% end -%> <%= yield %> </div> </body> </html>
Before you attempt to view the signup form on the application home page, you need to add a few more styles to the style.css file that you've been working with in public/stylesheets. Add the styles listed here:
// Implementing User Login
#user_menu {
 float:right;
 font-weight: bold;
 margin-right: 35px;
 margin-top: 15px;
}

#user_menu a, #user_menu a:visited {
 color: orange;
}

.signin_box {
 float: left;
 background: #cccccc;
 border: solid 1px #f98919;

 padding-bottom: 6px;
 padding-top: 8px;
padding-right: 10px;
margin-top: 10px;
text-align: right;
width: 250px;
height: 100px;
}
#signin_form {
margin: 0px;
padding: 0px;
}
#signin_button {
margin: 0px;
padding: 0px;
}
#sign_in_title {
padding-bottom: 5px;
text-align:left;
margin-left:20px;
color: gray;
font-weight: bold;
font-size: 12pt;
}
#signin_section {
float: right;
margin-right: 25px;
}
.signin_field {
margin-bottom: 8px;
color:gray;
}Now make sure the WEBrick server is running and navigate to the application home page in your browser, http://localhost:3000. You should see the login box appearing in the upper-right corner of the page, as shown in Figure 6.12.
You should now be able to successfully log into and log out of your Book Shelf application. If you have not already created a user by following the Join Now link, do that now. Once you have created a user make sure that you are not already logged in. When you create a new user, the user will be automatically logged in after creation, so click the logout link to log the user out. Now you can test the login functionality.
From the Book Shelf home page, enter your login and password in the login box shown in the upper right corner of the page. Click the login button and you should be successfully logged into the application. Upon successful login, the login box will be replaced with a Logout link. You should also see a welcome message and the flash text "Login successful" displayed. The Join Now link in the left-side menu will also go away when you are logged in. If you encounter any errors during login, double-check all of the code that you created in this section and verify that you have not made any mistakes.
After you are logged into the application, it is very simple to test the log out functionality. You simply have to click the Logout link in the upper right corner of your screen. This should display the flash message "Logged out" and you should be taken back to the application home page showing the login box and the Join Now menu item again.
You have a nearly complete user implementation at this point. A user is able to register for an account with the application, and log in and log out of the application. When a user is logged in, they are taken to a special user home page. What would happen if a logged-in user bookmarked that user home page in their browser and attempted to return directly to that page without logging in? You would see an application error because the application would attempt to display the user welcome message when no user is logged in. This is not the behavior that is desired. This page and other pages that are available only to logged-in users should be protected and only accessible to users that have first logged into the application. You'll use a Rails filter to implement that feature. This implementation can be broken down into the following tasks:
Define a method in the application controller, which will be called from a filter.
Add a login form to the signup page.
A filter in Rails allows you to have a method that you define called automatically before any methods that you specify. This will work for the requirements that you have for the current situation. Prior to handling the request to display the user home page, you want to make sure that a user is logged in. To do this, you can setup a method that will be called from a filter that will check to see if a user is logged in. If a user is not logged in, instead of processing the request for the user home page, the user will be redirected to a user login page.
To get started, edit the application controller located in app/controllers/application.rb and create the login_required method shown below.
def login_required
    if session[:user]
        return true
    end
    flash[:notice]='Please login to continue'
    session[:return_to]=request.request_uri
    redirect_to:controller => "user",:action => "signup"
    return false
end
This method will be called before any controller actions that you want to protect unlogged in users from accessing. This method checks the session to see if it contains a user id. If not, a flash notice of 'Please login to continue' is set and the user is redirected to the signup page. In just a bit, you will modify the signup page to also contain a login form for users who are already signed up. The login_required method is placed in the application controller class because it is not specific to any individual controller. Methods contained in the application controller can be accessed by any of your controllers because they extend the application controller.
The next thing you will need to do is setup the actual filter using another piece of Rail's intelligent Web application DSL. In this case, you will use the before_filter method. For now, you just want to protect the home action contained in the user controller. To do this, add the following line somewhere near the top of the user controller in app/controllers/user_controller.rb.
before_filter:login_required,:only=>['home']
This method will result in the login_required method being called anytime the home method is accessed. The :only parameter tells Rails to only apply the filter to the home method. Without the :only parameter, the filter would have been applied to all methods in the controller.
The last remaining task to complete the login filter functionality is to add a login form to the signup page. To do that, edit the signup page from app/views/user/signup.html.erb. Add the login_content div shown below above the existing signup_content div.
<div id="login_content">
    <span class="title">Existing users, login...</span>
    <% form_for:user, @user,:url => {:action => "login" } do
   |f| %>
        <div class="login_field">
            <label for="user_login">Username:</label>
            <%= f.text_field:login %><br/>
        </div>

        <div class="login_field">
            <label for="user_password">Password:</label>
            <%= f.password_field:password %><br/>
        </div>

        <%= submit_tag "Login" %>

    <% end %>
</div>
This div creates a form that users can use to login from the signup page. Now if a user tries to access a page that requires a user to be logged in for, they will be redirected to the signup page which will allow a user to either signup if they do not have an account, or login if they already do have an account.
In future chapters, you will apply this same method of protecting content that should only be accessed by logged in users.
In this chapter, you started the implementation of a complete Rails application. The application will allow users to share information about books, and contains many features common in today's class of Web 2.0 applications. At this point, you have generated the application skeleton, created the database, and implemented support for user accounts for the application.
The functionality that you used to implement the user support is common to most Web applications and should be reusable by you in most other Web applications that you'll implement in Rails. Alternatively, you could use one of the third-party authentication solutions that were described in this chapter.
Even if you do use an existing solution for future applications, it was very worthwhile to have gone through the steps of implementing your own authentication solution in this chapter. The functionality you implemented in this chapter lies at the heart of the application's security model and is something that I firmly believe every developer should implement from scratch at least once before they just pull functionality from a third-party component. Having implemented your own authentication system will put you in a better position to evaluate other solutions.