
Rails applications implement the model-view-controller (MVC) design pattern. The model layer of an MVC application implements the application's business logic and encapsulates the application's data. This is often the most significant part of an application. It is this layer that should contain the core of your functionality. The view and controller layers could be replaced to re-implement your application in another environment, such as when converting a desktop application to a Web application; however, the model layer can ideally remain intact across these different operating environments.
Rails implements the model layer primarily using a component called Active Record. Active Record provides a powerful abstraction layer and is often referred to as elegant because of its use of the following techniques:
Convention over configuration: If you follow Active Record's conventions, you'll save yourself from having to write many lines of configuration code. Active Record is able to automatically discover the details of your database schema and provide you with simple functionality for accessing and managing your data.
Metaprogramming: Using metaprogramming, Active Record dynamically adds features to your model classes, saving you from having to write common code over and over again. For example, Active Record adds attributes to your model objects for every column in your database tables.
Domain-specific language: Rails implements a domain-specific language (DSL) for managing your data. Rails extends Ruby to implement a DSL, making actions such as adding validations and relationships to your objects seem like part of the language.
The model layer is also usually a good place to start your application development.
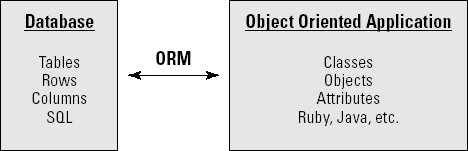
In object-oriented programming, data structures are represented by a hierarchy of classes. In a database, data is most often stored in a set of relational database tables. There is an inherent mismatch between your program's object view and the database's relational view of data. Over the years, there have been many attempts to reconcile this mismatch, including attempts to create object databases. For the most part, object databases never took off. A primary reason for this was the already established base of relational databases and tools supporting them. Another solution to this mismatch problem is through the use of Object-relational-mapping tools. Object relational mapping (ORM) is the mapping of relational database tables to object-oriented classes.
A good ORM hides the details of your database's relational data behind your object hierarchy. This is precisely what you get in a Rails application. One of the most important components of Rails is the Active Record library. Active Record implements an ORM for Rails applications.
As you can see in Figure 3.1, an ORM provides the mapping layer between how a database works with its data and how an object-oriented application works with its data. An ORM maps database tables to classes, database table rows to objects, and database table columns to object attributes. This is precisely the mapping that Active Record carries out for you. By using Active Record, your application does not have to deal with database constructs such as tables, rows, or columns at all. Your application only deals with classes, objects, and attributes. Active Record maps these to their database equivalents for you.
The pattern upon which the Active Record library is based is not unique to Rails; Active Record is based on a design pattern created by Martin Fowler that also goes by the name Active Record. It is from this design pattern that the Active Record library got its name.
There are many ORM implementations available in different languages. What makes Active Record special is its ease of use and the power you get from it with very few lines of code. Unlike most other ORM implementations, you don't have to write lines upon lines of configuration code to set up Active Record. In fact, Active Record will work in your application with absolutely no configuration at all, if you follow recommended naming schemes in your database and classes.
Another feature of Active Record that makes it easier for you to work with is its implementation of a domain-specific language (DSL) for working with your application's data. A DSL is a programming language intended for use in a specific problem domain. In general, Ruby's syntax makes it easy to create DSLs. The DSL nature of Active Record means that you can use dynamically generated methods, such as find_by_first_name('tim'), to retrieve a record by a column name. You can also perform tasks such as modeling an association between tables with the method has_one or has_many followed by the name of another model class. Many of the things you will do with Active Record methods will feel like they are a part of the language you are using. This is a side effect of the nature of a DSL.
In this section, you can learn some of the basics of Active Record prior to employing them in the sections that follow. Some basics I cover here are classes, objects, and naming conventions.
Active Record is implemented in Rails as a set of base classes from which your model objects extend. Each table in your database is generally represented by a class that extends an Active Record base class. Simply by extending the Active Record base classes, your model objects inherit a wealth of functionality. In fact, your model objects may be as simple as this:
class Book < ActiveRecord::Base
end
This empty class definition is enough to give your Book class quite a bit of functionality merely by extending the ActiveRecord::Base class. By using ActiveRecord::Base, Rails knows that this class wraps a database table named books. Active Record will dynamically add metadata to this class for all of the table columns that are in the books table. This includes data such as column names, types, and lengths. Active Record also adds attributes to your class for each of the columns in the database.
Active Record manages database connections for your application. You don't have to write any code to set up database connections or to manage those in your Rails application. Basically, all of the details related to working with a database are hidden from you, the developer, by Active Record. As a developer, you work with objects and do not have to deal with things like database connections, tables, columns, and SQL statements.
Active Record makes heavy use of the convention-over-configuration principle. If you follow a few simple naming conventions, you can take advantage of many dynamic features of Active Record with no configuration required.
Your database tables should be named with the plural form of the names of your model classes. For example, if you want a model class named Book, you would create a corresponding table named books. By using this convention, Rails is able to automatically find the table that corresponds to your model class without having to write any configuration code. Rails even supports many irregular plural nouns, such as 'people' being the plural of 'person.'
Note
Rails does not know about all irregular pluralizations, but for the cases when Rails doesn't know the plural form of a model you want to use, you can tell Rails about your custom pluralizations. To define your own pluralizations, you add code to the config/environment.rb file, like this:
Inflector.inflections do |inflect|
    inflect.irregular 'sheep', 'sheeps'
end
In this example, you are telling Rails to use the word 'sheeps' as the plural form of the word 'sheep'. You can add as many singular/plural definitions as you want within a single Inflector.inflections block.
You should name your database tables with all lowercase table names and underscore-separated words. The corresponding model classes use camel-casing. Camel-casing is a style of joining words where underscores are removed, and multiple words are joined together with the first letter of each word capitalized. For example, a database table named comic_books, would correspond to a model named ComicBook.
In some cases, such as when you are working with a legacy database, you may not have the freedom of naming the database tables yourself. In that case, you can override the default table name that Rails expects for a particular model by using the set_table_name method. The following code specifies that the Shape class should use the shape_items table.
class Shape < ActiveRecord::Base
    set_table_name 'shape_items'
endThere are two types of database keys for which naming is important in Rails: primary keys and foreign keys.
Primary keys
The primary key is what uniquely identifies each row in a database table. Your tables should have a primary key with the column name id. The id column should be an integer type and should be auto-incrementing. Rails will automatically use this column as a unique identifier. Rails migrations, which are discussed later in this chapter, automatically create a primary key column named id for each table that is created. If you want to use a different field as the primary key for a table, Rails allows that, but with some restrictions. See the sidebar "Using Alternate Primary Keys with Rails" for more information.
Foreign keys
Foreign keys are used in a table to identify a row in another table that is related to the row containing the foreign key. For example, in Figure 3.2, the book_id column in the pages table is a foreign key that relates a row in the pages table to a row in the books table. Foreign keys in a Rails application should be named with the singular name of the referenced table followed by id, just as book_id is named in Figure 3.2.

If you followed along with the development of your first Rails application in Chapter 2, you saw a simple example of generating a model using the Rails script/generate script. Here you will use the Rails script/generate script again to create a model class used throughout this chapter to explore the details of a Rails model layer and how Active Record helps you.
Begin by using a command-line and creating a Rails project, model, and database. The commandline feedback that you receive when you run the various commands throughout this chapter is not always specifically shown in this book; if you see feedback that is not shown in this book as you run the commands, don't be surprised. You should expect Rails to generate feedback from its commands, similar to what you saw in Chapter 2.
Create a new Rails project that you will use for the examples in this chapter. This creates the skeleton of a new Rails application, along with the correct Rails application directory structure.
rails -d mysql chapter3
The
-doption you used in the command above lets Rails know that you will be using a MySQL database. Valid values for the database type aremysql, oracle, postgresql, sqlite2, andsqlite3. If you do not use the-doption, the default database type issqlite3. This database type is used by Rails to configure a sample database configuration file that you can use to specify your database server. You will see how to use that file,database.yml, do that a bit later in this chapter.Navigate into the new
chapter3directory and generate a model calledComicBook. Use thescript/generatescript to do this, as shown below. This creates theComicBookmodel class, a migration for creating thecomic_bookstable, and some related unit test files.cd chapter3 ruby script/generate model ComicBook
Create a database for use with this chapter's examples. Now use the MySQL command-line to create a
comic_books_developmentdatabase. You could also use a MySQL GUI if you have one installed that you are comfortable with.mysql -u root -p Enter password: << your password >> mysql> create database comic_books_development;
You should now have the basic elements you need to follow along with the examples in this chapter: a Rails project named chapter3, a model within that chapter named ComicBook, and a MySQL database named comic_books_development.
You may have noticed that you gave your database a different name from the name you gave the Rails project. When the database is named the same as the project, with the addition of environment suffixes (_development, _test, or _production), and you are using MySQL as your database, you do not have to create any database configuration. For example, had you named your database chapter3_development, you could have skipped this configuration step. However, it is not always realistic that you can give your database the same name as the Rails project name you choose. Often you may have to follow a company standard for naming your databases.
Because your database name is completely different than the application name, a small amount of database configuration is required. The code that configures the databases you will use with your Rails application is stored in a configuration file called database.yml.
In your chapter3 project directory, open the file config/database.yml and look for the section that contains this code:
development:
    adapter: mysql
    encoding: utf8
    database: chapter3_development
    username: root
    password:
    host: localhost
This is the default database configuration that Rails created when you generated the chapter3 application. Notice the default database name of chapter3_development. The default configuration also assumes that a root username is available with a blank password. The database is assumed to be running on the same computer that you are developing on, localhost.
You created a database named comic_books_development, so change this line:
database: chapter3_development
to use the name of your database:
database: comic_books_development
Also, if you used a username and password other than root, be sure to change those lines in the configuration.
You may be wondering about the different database environments that have been referred to. Rails supports the use of three separate environments for running your application in: the development, test, and production environments. The following section has a description of the three environments supported by Rails.
It is a good development practice to use different infrastructure environments when developing a Web application. Each environment should contain a unique database, Web server, and other external components that your application may require. Rails has built-in support for running your applications in three different environments. The environments supported by Rails are called development, test, and production. Each of these environments is described below:
Development: This is the environment used when developing your application. You also perform most of your debugging in this environment. In this environment, Rails reloads classes each time you call a new action. This picks up any changes that you make to the class files dynamically, which makes this environment ideal for debugging your code as you write it.
Test: This is the environment in which you test your application. Rails uses this environment when running unit, functional, and integration tests. Each time your tests are run, the test database is completely replaced; therefore, you should be careful not to specify the same database name for your test environment as you use for your development or production environments.
Production: The production environment is used by your application in production. This must be the most robust and fault-tolerant of your environments. It should be adequately scalable and be able to handle expected load. In this environment, Rails loads your classes only once. If you make changes to your classes, they will not be picked up unless you restart your Rails application. While not ideal for developing in, this feature improves the performance of this environment, making it more suitable for use by end users.
You can specify the environment that you want your application to run in by editing the config/environment.rb file. The following line contained in that file specifies the environment that Rails will use:
# ENV['RAILS_ENV'] ||= 'production'
This line is commented out when you first create a Rails application. If you want to use this line to specify your environment, make sure you uncomment the line.
The databases for each environment are configured in the config/database.yml directory of your Rails application. You can also include environment specific configuration for your application by adding the appropriate configuration to the files contained in your application's config/environments directory. This directory contains a configuration file specific to each environment; development.rb, test.rb, and production.rb.
Most of the code that you will write in this book targets the development environment. However, when you get to Chapter 9, where testing is covered in detail, you'll see how the test environment is used.
Rails migrations are an excellent example of the DRY philosophy applied to Rails. Remember that DRY means Don't Repeat Yourself. With the power of migrations, you are able to define and manage the evolution of your database in a single place. You do not need SQL script files, XML configuration files, or any other files to manage the evolution of your application's database. Migrations also make your database definition independent of the specific database that you decide to use. The same migration file that you create for a MySQL database will also work with an Oracle or PostgreSQL database.
Rails migrations are simple Ruby classes that contain instructions that create or modify your database schema. You will create a new migration file for each change that you want to make to your database schema. When you generated your model, you may have noticed that a migration file was also created. Anytime you create a model using the Rails generator, a migration file is also created for you. Writing a migration file is often one of the first things you will do when you begin writing the model layer of your application.
Take a look at the migration file that was created for your ComicBook model. You'll find the file 001_create_comic_books.rb in the db/migrate directory of your chapter3 project.
class CreateComicBooks < ActiveRecord::Migration
    def self.up
        create_table:comic_books do |t|
            t.timestamps
        end
    end
    def self.down
        drop_table:comic_books
    end
end
The first thing you should notice is that this is a Ruby class that extends another Active Record class, ActiveRecord::Migration. The class contains two class methods:
self.upCalled when a migration is applied, and used to set up your database schema elements.
self.downCalled when a migration is reversed. This method should undo the actions of the
self.upmethod.
In the auto-generated migration, the self.up method creates the comic_books table using the create_table method. A code block is passed to this method that you will use to setup the columns of the table. So far the only columns being setup are created with this line:
t.timestamps
This will automatically create two columns for the table, one named created_at and one named updated_at. These columns will hold timestamps for row creation and update. The self.down method drops the table.
It is always a good practice to design your data model before you create your migrations. The data model design can be as simple as a table listing all of the columns and their data types for each of your tables. Table 3.1 shows a data model design for the comic_books table that you will implement.
Table 3.1. Comic Book Table Definition
Field Name | Field Type | Description |
|---|---|---|
id | Integer | The primary key |
title | String | The title of the comic book |
writer | String | The writer of the comic book |
artist | String | The artist of the comic book |
issue | Integer | Issue number of the comic book |
publisher | String | The publisher of the comic book |
created_at | Datetime | Date and time that the record was created |
updated_at | Datetime | Date and time that the record was updated |
Using the table definition provided in Table 3.1, you can now create a migration that creates the database schema for this table.
Edit the file
001_create_comic_books.rbso that it looks like this:class CreateComicBooks < ActiveRecord::Migration def self.up create_table:comic_books do |t| t.string:title t.string:writer t.string:artist t.integer:issue t.string:publisher t.timestamps end end def self.down drop_table:comic_books end endRun the migration by typing the following from a command-line. This should be run from your
chapter3project directory.rake db:migrate
When you run the migration above, you should see output similar to this:
== CreateComicBooks: migrating ==================================
   ==
-- create_table(:comic_books)
   -> 0.025s
== CreateComicBooks: migrated (0.257s)
   ============================
You can now take a look at the comic_books database using a GUI front-end tool or the MySQL command-line. You can see that the comic_books table has been created with the columns you specified in the migration.
Notice that the migration code does not specify a column for the id field. That is because the id field is the default primary key field for all tables and is created automatically unless you specify that it should not be created. Take a closer look at the block that you passed into the create_table method:
t.string:title
t.string:writer
t.string:artist
t.integer:issue
t.string:publisher
t.timestamps
Each of the lines in this block creates a new column in the table. For example in the first line, a column named title is created with a string type. Ruby will translate this into an appropriate database field type. In the case of MySQL this would become a varchar field. The valid field types that you can use in migrations are: string, text, integer, float, datetime, timestamp, time, date, binary, and boolean. Each of these Ruby types will result in an appropriate database field type. Notice that the name of the field is passed as a symbol object. If you look at the last line in the above code you will see something slightly different. The line contains the code t.timestamps and no field names. The t.timestamps method creates the created_at and updated_at columns.
You used the Rake tool to run the database migration. Rake is a tool written in Ruby that is used to perform a variety of build-related development tasks. If you are familiar with the UNIX make utility, or the Java Ant utility, Rake is similar to those tools. Scripts that are run using Rake are called Rake files. Rake files are written in pure Ruby code. Rails uses a Rake file to implement a bunch of useful tasks. You can see more of the Rake tasks available for your Rails application by typing this:
rake -tasks
You will use a variety of rake tasks throughout this book. In addition to the db:migrate task which you already used in this chapter, two additional rake tasks are useful to know about now.
rake db:create:allThis task will automatically create the databases that you have specified in your
config/database.ymlfile. This makes it easy for you to specify your database information in a single place, thedatabase.ymlfile and then you can useraketo create your database anytime that you need to create it. You do not have to rely on using any external tool, such as the MySQL command line tool.rake db:drop:allThis task drops all of the databases that you have specified in your
config/database.ymlfile. This is useful if you feel that your database has been corrupted or somehow put into a bad state.
The above commands create or drop all of your databases. You can also use similar commands to create or drop a database specific to a single environment. You specify a single environment like this:
rake db:create RAILS_ENV=development
rake db:drop RAILS_ENV=development
The first time you run a migration, a new table that you may not recognize is also created in your schema. This table is called schema_info, and it keeps track of the current version of the database schema. The database schema is the current structure of the database, including the tables and columns that make up the database.
Each migration file that is run creates a new database schema version. The migration you ran is contained in the file 001_create_comic_books.rb. The 001 at the beginning of the filename is the migration number that corresponds to the database version number that will be created after this migration is run. Each migration that either you create or that is generated for you must have a unique three-digit number as the first three characters of the migration filename.
Migrations that are used to create database tables commonly contain the name of the table prepended with the word 'Create' following the three digit migration number, such as you see in the file name 001_create_comic_books.rb.
Using the rake command that you used to run the migration, you can also specify a specific schema version number to migrate up to or back to. When migrating to a version number that is lower than the current schema version number, each of the migrations past the version that you are migrating to will have their self.down methods executed.
The following rake command will migrate your database to a specific schema version number:
rake db:migrate VERSION=3
If your database had been at schema version 5, the self.down methods would be run on migrations 004 and 005. If your schema version was 1, the self.up methods would be run on migrations 002 and 003. When migrating down, such as from version 5 to version 3, the migration self.down methods are run in reverse order. For example, the 005 migration self.down method would run first, followed by the 004 self.down method. When migrating up, the self.up methods are run in numerical order.
There are a large number of built-in migration methods available within your migration files that you inherit from extending the ActiveRecord::Migration class. The most common methods that you will use to manipulate tables, columns, and indexes are summarized here. For a complete reference of available migration methods, go to http://api.rubyonrails.com/classes/ActiveRecord/Migration.html.
Migration methods are available to create, drop, and rename a table. These methods are summarized here:
create_table(table_name, options)
drop_table(table_name)
rename_table(old_name, new_name)
Each of these methods takes one or two table names as parameters. The create_table method also takes a second parameter, called options, which is a hash containing SQL options that you might want to use when creating your table. An example of using create_table with the options hash is shown here:
create_table('tables', {'DEFAULT CHAR SET'=>'UTF-8'})This would create a table called players and set the SQL parameter DEFAULT CHAR SET to be UTF-8.
You can also add, rename, or remove columns from a database table using migration methods. The migration methods to perform these tasks are as follows:
add_column(table_name, column_name, column_type, options)
rename_column(table_name, old_column_name, new_column_name)
remove_column(table_name, column_name)
When you create a column using the add_column method, the column_type can be any of the following types: :string,:text,:integer,:float,:decimal,:datetime,:timestamp,:time,:date,:binary,:boolean.
The add_column method also takes an options hash that contains parameters related to the table you are creating. For example, you can specify a default value for a column by passing an options hash like this:
{:default => 10}Other common option parameters are :limit and :null. These can be used to set a field size limit and to specify whether or not a field can be set to null, respectively.
You can add and remove database indexes using the migration methods listed here:
add_index(table_name, column_name, options)
remove_index(table_name, options)
The options parameter for both of these methods is a hash that can be used to specify the index type and index name, such as in this example:
add_index(:comic_books,:writer,:unique=>true,:name=>'writer_
   idx')
or like below to remove an index:
remove_index(:comic_books,:name=>'writer_index')
In addition to modifying your database schema, you can also insert data into your database in a migration file. This makes it convenient to insert default data that your application might need to run. In this section, you can create a new migration and use it to add some default data into your comic_books database.
Create a new migration for inserting data. From the command-line, create the migration by running the generate migration scripts, as follows:
ruby script/generate migration AddDefaultData
This creates a new migration file in
db/migrationscalled002_add_default_data.rb. Recall that the first migration you ran was created automatically for you when you generated theComicBookmodel. You can use as many migrations as you want by supplementing the migrations that are generated with your model classes with migrations that you manually generate, such as the one you generated here.Edit the migration script to add data insertion. Now you should open the migration file that you just generated in
db/migrations/002_add_default_data.rband edit it so that it looks like this:class AddDefaultData < ActiveRecord::Migration def self.up ComicBook.create:title=>"Spectacular Spiderman", :writer=>"Roger Stern", :artist=>"Marie Severin", :publisher=>"Marvel", :issue=>"54" end def self.down ComicBook.delete_all end endRun the new migration to add your default data. From the command-line, run this migration using Rake, as follows:
rake db:migrate
Verify that the default data is now in your database. Using either the MySQL command-line or a GUI interface, verify that the
comic_bookstable contains the record added in your migration.
After going through the steps above, you could also migrate your database down by using the command:
rake db:migrate VERSION=1
This command would run the self.down method of your migration defined in 002_add_default_data.rb. You could then verify that the default data has been removed from your database.
Using a migration, you were able to create default data in your database. This is a common way of setting up default data for a Rails application. Remember that in a migration, you have full access to all of the code, including your models. Using the power of Ruby and your model layer, you can perform complex manipulations of your database using migrations.
You may have heard the term CRUD used before when referring to database operations. CRUD is an acronym that stands for the general categories of operations that you can perform on data stored in a database. These categories are as follows:
Create: Create records in the database.
Read: Read one or more records from the database.
Update: Update a record in the database.
Delete: Delete a record in the database.
Rails makes it easy to perform each of these operations on your data using built-in Active Record methods. In general, each of your model classes wraps a table in your database. For example, the ComicBook model class that you created with the script/generate script wraps the comic_books database table. You will use the ComicBook class and instances of that class to access data in the comic_books table and to create new records for that table.
Each column in a database table becomes an attribute in the class that wraps that table. Your ComicBook class will contain the following attributes: id, title, writer, artist, publisher, issue, created_at, and updated_at.
The following subsections step through each of these operation categories, exploring the details of each.
There are several ways of creating new records using your Rails model classes. Each way uses a slightly different syntax, which you can see in this section.
One of the ways in which you can create new records in Rails is by instantiating a new object, setting its attributes, and then performing a save operation. The database operations necessary to insert a record into the database are completely encapsulated behind Active Record. Within your code, you simply deal with Ruby code and Ruby objects. This is in keeping with a good ORM implementation.
Here is an example of creating a record in the comic_books table that you created earlier in this chapter:
my_comic_book = ComicBook.new
my_comic_book.title = 'Captain America'
my_comic_book.issue = 20
my_comic_book.writer = 'Ed Brubaker'
my_comic_book.artist = 'Mike Perkins'
my_comic_book.publisher = 'Marvel'
my_comic_book.save
This save method writes this record to the comic_books database table. The new method can also accept a hash attribute for setting the attributes of the object instance you are creating. Let's add another record to the database using this style:
my_comic_book = ComicBook.new(
    :title => 'Captain America',
    :issue => 10,
    :writer => 'Ed Brubaker',
    :artist => 'Lee Weeks',
    :publisher => 'Marvel')
my_comic_book.save
Yet another way of using the new method is to pass it a block. Shown here, this technique is used to add another comic book to your database:
ComicBook.new do |book|
    book.title = 'Batman'
    book.issue = 18
    book.writer = 'Bill Finger'
    book.artist = 'Bob Kane'
    book.publisher = 'DC'
    book.save
end
Add one more comic book to your database using this technique, which creates a model and database record all in one line:
my_comic_book = ComicBook.create(
    :title => 'Superman & Batman',
    :issue => 2,
    :writer => 'John Byrne',
    :artist => 'John Byrne',
    :publisher => 'DC')
You may recall that this is the style you used to create a default database record in the second migration you wrote. The create method both instantiates the ComicBook instance and saves the record to the database. You can pass an array of hashes to the create method to create multiple objects and database records with one method call. An array of object instances will be returned from that call.
In all of these methods for creating a new object and record, Active Record automatically creates a new unique value and sets that as the id attribute while saving the record. After performing a save, you can then access the primary key as an attribute of the object, like this:
new_id = my_comic_book.id
Rails uses a combination of database introspection and metaprogramming to simplify your life as a developer when it comes to using your model classes and objects to read data from the database.
This section details how Rails helps you read the data that is stored in the database using your Rails model classes and built-in Rails methods. You can learn how to use column metadata, object attributes, and Rails find methods in the following subsections:
Column metadata
Accessing attributes
Using the
findmethodDynamic finders
Find using SQL
When a model class such as ComicBook is first loaded, Rails is able to infer the database table name to which it corresponds from the name of the class. Rails then gathers information about that database table by querying the database system tables. Detailed information about each column of your database table is placed into the @@columns class variable, which makes @@columns an array of Column objects. Each of the Column objects contains the following attributes:
name:The name of the database column.null:Boolean value that is true if this column attribute can be set to null.primary:Boolean value that is true if this column is the Rails unique identifier.scale:Specifies the scale for a decimal column.sql_type:The type of the attribute this column holds.precision:Specifies the precision for a decimal column.default:The default value specified in the table definition for the column.
Using the ComicBook model class example, the following code would print out each of these metadata attributes, for each attribute of the ComicBook model:
ComicBook.columns.each { |column|
    puts column.name
    puts column.null
    puts column.primary
    puts column.scale
    puts column.sql_type
    puts column.precision
    puts column.default
    puts column.type
    puts column.limit
}
You may never need to use this column metadata, but it is good to know that it is available. A common use of it is to build dynamic user interfaces. This is how Rails scaffolding is built. Scaffolding is a built-in feature of Rails that dynamically creates a basic Web interface for your Web application.
Note
For more information regarding scaffolding, go to Chapter 11.
Attribute accessors for your Rails model classes are implemented using a Ruby metaprogramming technique that allows Rails to dynamically attach accessors to your classes. Rails overrides the method_missing method to implement the accessors. The method_missing method is called anytime you call a method that does not exist for the object you are calling it on. This allows you to access the attributes of any of your classes like this:
the_title = comic_book.title
This may look like you are just accessing an attribute of the comic_book object without going through a method at all. If you are a Java programmer this may seem like the common way that you access public attributes. However, keep in mind that in Ruby, you cannot access any attributes from outside of their class unless you have explicitly created attribute accessors. From this perspective, you can think of attributes in Ruby classes as always being equivalent to private attributes in Java classes. So in the above code, title is actually an accessor method that you are using to access the title attribute. Because of the way the accessors are implemented, the accessor methods actually do not exist in your objects until they are called. This means that if you were to try this:
comic_book.methods.include? 'title'
a value of false would be returned, because the title accessor method does not yet exist. Rails uses the same technique to implement dynamic finder methods for your objects.
Active Record provides a powerful find method that you can use to find data rows in your tables. The easiest way of finding a record in your database is to pass a primary key value to the find method. All of your model classes include a find method that takes one or more primary key values as a parameter and returns one or more records as objects. Multiple primary keys can be passed as an array, and an array of matching objects will be returned.
When attempting to find a record by primary key, a RecordNotFound exception is thrown if Active Record is not able to find a row with the primary key you are searching for.
The following code either returns an object that has an id value of 5, or prints "Record Not Found" to the console:
begin
    my_comic_book = ComicBook.find(5)
rescue
    puts "Record Not Found"
end
Finding with conditions
You can also use the find method with a first parameter of :first or :all, followed by a :conditions parameter that specifies criteria for finding records, similar to a SQL where clause. You could use the following code to retrieve all comic books with the 'Captain America' title:
ComicBook.find(:all,:conditions=>"title = 'Captain America'")
This call returns an array of ComicBook objects with the title of 'Captain America'. If no rows can be found that match the criteria, an empty array is returned. If you wanted to find only the first record matching the criteria, you would use the find method with the :first parameter, like this:
ComicBook.find(:first,:conditions=>"title = 'Captain America'")
When using the :first attribute, a single record's object is returned instead of an array. So the above line would return an instance of ComicBook, if a comic book with the title 'Captain America' was found. If a record can not be found meeting the conditions specified, a nil value is returned.
The :conditions parameter can also use placeholders when specifying attribute values. For example, suppose you wanted to execute the following search:
ComicBook.find(:first,
              :conditions=>"title='Spiderman' and writer='Stan
   Lee'")
Using attribute placeholders, you could write this as follows:
title = 'Spiderman'
writer = 'Stan Lee'
ComicBook.find(:first,
              :conditions=>["title=? and writer=?", title,
   writer])
Using this style, the :conditions parameter is an array. The where clause is the first element in the array, and the attribute values are the next elements in the array.
Rails automatically quotes and escapes the attribute values when you use this style. You should always use this style when you are using attribute values that have come directly from a Web page. If you did not use the ? placeholders and instead simply inserted the variables containing values that a user typed, you would be opening your application up to adverse attacks.
A malicious user could gain control over your database and execute any SQL statement they desired by submitting parameter values which themselves contained SQL commands. You may have heard this type of attack referred to as a SQL Injection Attack. When you use the placeholder style, Rails prevents this type of attack by quoting and escaping the attribute variables.
You can also pass the :order parameter to the find method to sort the returned objects. Here you find all of the database rows and sort them by the issue attribute in descending order:
ComicBook.find(:all,:order => 'issue DESC')
There is also a find_all method that returns all of the rows in your database. You can call this method with no parameters and all of your database rows will be returned as an array of objects. Be wary of using this method if your database contains many rows, as this uses a lot of memory to hold all of the objects that are created.
In addition to the basic find method, Rails creates additional finder methods dynamically that correspond to each of the columns in your database. For example, in your ComicBook class, you can easily find all of the comic books written by Stan Lee using this code:
results = ComicBook.find_by_writer('Stan Lee')You can use find_by method for every column in the table. These methods are dynamically created using the method_missing technique that was also used to create attribute accessors explained earlier in this chapter.
Now what if you want to find all of the comic books written by Stan Lee and drawn by your favorite artist? Rails can help you out there, too. In addition to the single-column find_by methods, Rails will also dynamically generate multiple-column find_by methods. You could answer your question with the following code:
results = ComicBook.find_by_writer_and_artist('Stan Lee','Steve
   Ditko')
In fact, Rails provides you with find_by methods using any number of your column names. Each column name is separated from the preceding by and, as in the above two-column example. Going a step further, you could execute the following find method, as well:
results = ComicBook.find_by_writer_and_artist_and_title('Stan
Lee','Steve Ditko','Spiderman'),If the find methods that Active Record provides for you do not meet your requirements, you can resort to using raw SQL to find the records that you want. You do this by using the find_by_sql method. This method takes a SQL statement as a parameter and executes that SQL statement. The records retrieved by the SQL statement you passed are returned in an array from the find_by_sql method.
Here's an example that uses the find_by_sql method:
results = ComicBook.find_by_sql("SELECT * from comic_books WHERE
   issue>25")
In this example, the SQL statement "SELECT * from comic_books WHERE issue>25" is passed to the database, and the records retrieved are turned into ComicBook objects and returned in an array.
If you've been reading along in this chapter up to this point, you've learned a lot of new techniques for creating and reading data into your application. Let's take a break from the Rails detailed coverage and try out some of what you've learned using the Rails Console.
At a command-line, start up the Rails Console for your chapter3 project. At the root of the chapter3 project, type this:
ruby script/console
This starts the Rails Console. Recall that the Rails Console is an interactive environment in which you have full access to your Rails classes and the full power of Ruby.
Find a record stored in the database. Earlier in this chapter, you ran a migration that added a row to the
comic_bookstable. Now use thefindmethod to retrieve this record, as shown here:comic_book = ComicBook.find(:first) puts comic_book.title => Captain America
The first line should have found the comic book entry you created earlier, and the second line prints the comic book's title. You should see the comic book's title,
'Captain America', printed on the console.Create a new instance of your
ComicBookclass. Now, create an instance of theComicBookclass and set its attributes, like this:comic_book = ComicBook.new comic_book.title = 'Spiderman' comic_book.issue = 1 comic_book.writer = 'Stan Lee' comic_book.artist = 'Steve Ditko' comic_book.publisher = 'Marvel'
Create a new row in the database by saving the
ComicBookinstance.comic_book.save
By executing the
savemethod, you have saved the new comic book to the database. Your database should now contain two records. Verify that in the next step.Retrieve all database rows. Use the
find_allmethod to get all of the rows in the database as an array of ComicBook objects. Use theArray#lengthmethod to get a count of objects in the database.all_rows = ComicBook.find_all puts all_rows.length => 2
This should print a value of
'2'to the console, because thecomic_bookstable should now contain two records. If you created the comic book records that were shown in the "Creating Records" section, you probably are up to six comic books in the database instead of two.Retrieve a database row by its primary key. Use the
findmethod and theidfrom the comic book you saved in Step 3 to retrieve that item from the database.id = comic_book.id new_comic_book = ComicBook.find(id) puts new_comic_book.writer => Stan Lee
This should have found the comic book that you created in Step 1 and printed its writer to the console.
Retrieve a database row using a dynamic finder method. Use one of the dynamic finder methods, such as
find_by_titleshown here, to retrieve the new record by its title.a_comic = ComicBook.find_by_title('Spiderman') puts a_comic.issue => 1This should have found the comic book that you created in Step 1 and printed its issue number to the console.
By now, you've learned how to create and retrieve records from your database the Rails way. Next, you'll learn how to update and delete records.
After you've made changes to a model, you usually want to save those changes back to the database. With Rails, you update your database records just by working with your model classes. You do not have to write any SQL code to perform database updates.
Before you can update a record, you first need to retrieve it. Here you retrieve the first record in the database and change the issue number:
comic = ComicBook.find(:first)
comic.issue = 100
comic.save
This code is very simple. You retrieve the desired record from the database, update one or more attributes on the returned object, and then perform a save.
You can simplify the above code even further by using the update_attribute method, as shown here:
comic = ComicBook.find(:first)
comic.update_attribute:issue, 100
The update_attribute method allows you to set the value of an attribute and save the changed value back to the database in one step.
Rails has two methods for deleting objects from your database. These methods are slightly different in their behavior, and are as follows:
delete:Aborts on minor errors.destroy:Does not abort unless there is a critical database error.
You can call either of these methods on any of your model object instances, such as your comic book instance:
comic.destroy
After calling the method, the record associated with the object is deleted from the database immediately.
Rails insulates you, the developer, from having to write SQL statements to access your database. However, there are times when you're debugging an application and you'd like to know what SQL Rails is using internally. For this purpose, the place to look is the development log file.
Open up the development.log file in the chapter3/log directory. You should see something similar to Figure 3.3.

The development.log file contains every SQL statement that is sent to the database server, including the details of how long it took to execute each SQL statement.
This level of logging would impact the performance of your production environment. You'd also end up with a very large log file that you'd somehow have to manage. For these reasons, you only get the SQL statement logging when you are in the development environment.
Modeling data relationships in your classes is an important part of mapping data that is stored in a relational database. The word relational implies that there are relations among the database tables that contain your data. Active Record provides powerful yet very easy-to-use syntax for representing data relationships in your model classes.
You define relationships in your data models using the data modeling domain-specific language (DSL) that is built into Active Record. Throughout this section, you can see examples of how Active Record's DSL makes data modeling easy for you, the developer.
The relationships that you'll define are of the following types:
One-to-one
Many-to-one
Many-to-many
To implement these relationship types, Rails uses the following methods, which make up the Rails association DSL:
You use these methods within your model classes to create associations. As you use these methods, their use may seem more like a natural part of the language, as opposed to the fact that you are explicitly calling methods. This is the hallmark of a well-designed DSL. Each of the methods is used with the form shown here:
<relationship> <relationship_target> <named parameters>
For example, a typical use of the has_many method would look like this:
has_many:chapters:order=>position
In this example, the relationship is has_many, the relationship target is :chapters and :order=>position is a named parameter that specifies how the associated chapters should be ordered. The following sections cover in more detail how these methods are used for each of the relationship types.
The one-to-one relationship is the simplest relationship, and can be modeled as shown in Figure 3.4. This type of relationship implies that there is a one-to-one correspondence between objects of one type and objects of another type. A one-to-zero-or-one relationship is actually modeled in the same way. In a one-to-zero-or-one relationship, one side of the relation can be empty.
The example used in Figure 3.4 considers books and their cover images. Assuming that the same image is never used on two different book covers, there is always a one-to-one relationship between books and cover images. Another way of saying this is that a book has one cover image, and a cover image belongs to one book.
Modeling this type of relationship in a Rails application requires a foreign key in one of the database tables and the use of some Rails DSL magic in your model classes. The foreign key should be used in the table that represents the zero-or-one side of the relationship. If it is a strict one-to-one relationship, one of the objects will usually seem to be naturally more dominant. The foreign key goes with the table of the less dominant object.
In the example of Figure 3.4, the cover_images table contains a foreign key book_id associating a cover_image with a specific book.

The Book class uses the has_one method to create the relationship with a CoverImage object:
class Book < ActiveRecord::Base
    has_one:cover_image
endThe has_one method causes the following methods to be automatically added to the Book class:
cover_imageReturns the associated
CoverImageobject, ornilif no object is associated.Assigns the
CoverImageassociate object, extracts the primary key, sets it as the foreign key, and saves theBookobject.Returns true if there is no associated
CoverImageobject.build_cover_image(attributes={})Returns a new
CoverImageobject that has been instantiated withattributesand linked to thisBookobject through a foreign key, but has not yet been saved. This will only work if the association already exists. It will not work if the association isnil.Returns a new
CoverImageobject that has been instantiated withattributes, linked to thisBookobject through a foreign key, and that has already been saved. Notice how this is different from thebuild_cover_imagemethod, in that this method saves the associatedCoverImageinstance that is returned.
These methods are all related to the associated class, which is the CoverImage class. For general purposes, replace the text cover_image in the methods above with the singular form of the associated class for whatever classes you are associating with the has_one relationship to get the methods added.
The CoverImage class also requires some special Rails code. For this side of the relationship, you use the belongs_to method, like this:
class CoverImage < ActiveRecord::Base
    belongs_to:book
endThe belongs_to method causes the following methods to be automatically added to the CoverImage class:
bookReturns the associated
Bookobject, ornilif no object is associated.Assigns the
Bookassociate object, extracts the primary key, sets it as the foreign key.Returns true if there is no associated
Bookobject.Returns a new
Bookobject that has been instantiated withattributesand linked to thisBookobject through a foreign key, but has not yet been saved.Returns a new
Bookobject that has been instantiated withattributes, linked to thisCoverImageobject through a foreign key, and that has already been saved. Notice how this is different from thebuild_bookmethod, in that this method saves the associatedBookinstance that is returned.
These methods are all related to the associated class, which is the Book class. For general purposes, replace the text book in the methods above with the singular form of the associated class for whatever classes you are associating with the belongs_to relationship to get the methods added.
The many-to-one relationship is the most common type of data relationship. The simplest way of explaining a many-to-one relationship is with a picture. Figure 3.5 shows a many-to-one relationship that exists between books and chapters. A book represents the 'one' side of the relationship, and the chapters are the 'many' side of the relationship; one book contains many chapters.
Both chapters and books are models in your Rails application. In your database, each of the models is represented in a separate table. Databases use a concept called foreign keys to create a relationship between two tables. A foreign key is a column in one table that points to a row in a different table. In a Rails application, the foreign keys must be named with the singular form name of the table they are pointing to, followed by _id. For example, the foreign key column in the chapter's table would be named book_id. This column specifies the book that a chapter is contained within.

In addition to setting up your database schema in the correct way to model a many-to-one relationship, you also add special code to your model classes in a Rails application. Using the books and chapters example, your Book class would look like this:
class Book < ActiveRecord::Base
    has_many:chapters
end
The has_many method indicates that a book has many chapters.
By using the has_many method, the following methods are added to your Book class:
Returns an array of all the associated objects. An empty array is returned if none are found.
Adds one or more objects to the collection by setting their foreign keys to the collection's primary key.
Removes one or more objects from the collection by setting their foreign keys to
NULL. This will also destroy the objects if they are declared asbelongs_toand dependent on this model.Replaces the collection's content by deleting and adding objects as appropriate.
Returns an array of the associated objects' ids.
Replace the collection with the objects identified by the primary keys in
ids.Remove every object from the collection. This associated objects are destroyed if they are associated with
:dependent =>:destroy, or deleted from the database if associated with:dependent =>:delete_all, otherwise their foreign keys are set toNULL.Returns true if there are no associated objects.
Returns the number of associated objects.
Finds an associated object using the same rules as when you use the
findmethod from one of your Active Record models directly.collection.build(attributes = {})Returns one or more new objects of the collection type that have been instantiated with
attributesand linked to this object through a foreign key, but have not yet been saved. This will only work if the associated object already exists and is notnil.collection.create(attributes = {})Returns a new object of the collection type that has been instantiated with attributes, linked to this object through a foreign key, and that has already been saved. This will only work if the associated object already exists and is not
nil.
Where the collection is referenced, in the case of the Book class this would be chapters. For example to determine how many chapters are associated with a given book, you could use this method:
chapter_count = book.chapters.size
You also add code to the Chapter model, which would look like this:
class Chapter < ActiveRecord::Base
    belongs_to:book
end
Here you used the belongs_to method, which is the other side of a has_many relationship.
In a many-to-many relationship, each side of the relationship can point to more than one related object. Again, the best way to illustrate this kind of relationship is through a picture. Let's look at the many-to-many relationship in Figure 3.6. This example uses a Book and a Store model. A store contains many books, and thus it's easy to understand this 'many' side of the relationship. Looking at the relationship from the other direction, a book is usually sold in many different stores. Because both objects can be related to many of the other objects, you have a many-to-many relationship.
In a many-to-one relationship, a foreign key was used to model the relationship in the database. A many-to-many relationship must be modeled in the database using a slightly more complex technique. You use a relationship join table to model the many-to-many relationship. In Figure 3.6 this join table is shown as books_stores. In order for Rails to recognize the table and correctly build the association, this join table should be named with the names of the two related tables in alphabetical order and separated by an underscore. Thus in this case, you end up with the table named books_stores. You would create this table using a migration, just as you create regular model object tables. However, you do not need to generate a model class to represent this table.

As with the other Rails recognized relationships, you also have to add some code to each of the related models. The method call that you will add to each model is the same in this case. It is the has_and_belongs_to_many method. You will often see this shortened as HABTM in discussions online. So following through with the example shown in Figure 3.6, you would add this method to each of the Book and Store classes.
class Book < ActiveRecord::Base
    has_and_belongs_to_many:stores
end

class Store < ActiveRecord::Base
    has_and_belongs_to_many:books
endBy using the has_and_belongs_to_many method, the following methods are added to your Book and Store classes:
Returns an array of all the associated objects. An empty array is returned if none are found.
Adds one or more objects to the collection by creating associations in the join table (
collection.pushandcollection.concatare aliases to this method).Removes one or more objects from the collection by removing their associations from the join table. This does not destroy the objects.
Replaces the collection's content by deleting and adding objects as appropriate.
Returns an array of the associated objects' ids.
Replace the collection with the objects identified by the primary keys in
ids.Remove every object from the collection. This does not destroy the objects.
Returns true if there are no associated objects.
collection.sizeReturns the number of associated objects.Finds an associated object responding to the
idand that meets the condition that it has to be associated with this object.collection.build(attributes = {})Returns a new object of the collection type that has been instantiated with
attributesand linked to this object through the join table, but has not yet been saved.collection.create(attributes = {})Returns a new object of the collection type that has been instantiated with
attributes, linked to this object through the join table, and that has already been saved.
Where the collection is referenced, in the case of the Book class this would be stores, and in the case of the Store class, this would be books. For example to determine how many stores are associated with a given book, you could use this method:
store_count = book.stores.size
and to find the number of books in a given store, you could use this method:
book_count = store.books.size
Validations allow you to define valid states for each of your Active Record model classes. Rails makes it easy to add validations to your model classes. As you saw with modeling relationships in Rails, you make use of more of Active Record's domain-specific language to model validations in your Rails application. You can do several kinds of validations using the built-in validation DSL.
When an attribute in one of your Active Record model classes fails a validation, that is considered an error. Each of your Active Record model classes maintains a collection of errors in an attribute called errors. This makes it easy for you to display appropriate error information to the users of your application when validation errors occur.
Now let's look at some examples of how you might use validations in your code. Remember the example of comic books that you worked with in previous sections of this chapter? Add a validation to ensure that a comic book always contains a title. Open the app/models/comic_book.rb file and edit it as follows:
class ComicBook < ActiveRecord::Base
    validates_presence_of:title
end
The validates_presence_of method adds a validation to the ComicBook class that will make sure every comic book has a title. If you attempt to save a ComicBook instance that does not contain a title, you will get an error preventing the record from being saved. There is a method available to you named valid? that you can use to test the validity of your attributes at any time. The valid? method will run the validations and return true or false indicating whether the validations passed for the model instance on which it was called. In the example below, you would get a return value of false when you call the valid? method.
comic = ComicBook.new
comic.valid? #=> false
You could then look at the errors collection to see what the validation problems are.
comic.errors.each_full do |message|
    puts message
end
Since you have only defined one validation for the ComicBook class, this would print the following message:
Title can't be blank
If you had defined additional validations, you would see an error message for each validation that was unsuccessful. This is very useful to use when displaying errors to the user of a Web application.
There are also methods available on the errors collection that are useful for obtaining additional information about your validation errors. The method invalid? allows you to pass it a specific attribute name and it will return true or false to tell you whether that specific attribute is valid or not. Using the comic book example, you could use this method like this:
comic = ComicBook.new
comic.valid?
comic.errors.invalid?(title) #=> true
Calling invalid? on the title attribute returns true since that attribute does not pass the validates_presence_of validation. If you want to get the error message associated with a specific attribute, you can use the on method as shown here:
comic = ComicBook.new
comic.valid?
comic.errors.on(:title) #=> can't be blank
This returns the string "can't be blank". Notice that the word "Title" is not a part of the string that is returned.
Note that you can only call these methods on the errors collection after you have performed a validation, such as by using the valid? method.
The next validation method we'll look at is the validates_format_of method. This method is useful for ensuring that an attribute conforms to a specific format. One of the places this is used most often is to validate the format of an email address. Below is an example of how you might use the validates_format_of method within a User class to validate an email attribute.
class User < ActiveRecord::Base
    validates_format_of:email
end
Rails includes many more built-in validation methods. These are briefly described in Table 3.2. For complete details of how these methods work and the options that you can use with these, you should refer to the Rails documentation on validations available online at the following URL:
http://api.rubyonrails.org/classes/ActiveRecord/Validations/ClassMethods.html
If you want to save an object despite any validation errors that you might have you can call the save method with an argument of false. The line below will force the object to be saved even with validation errors:
comic = ComicBook.new
comic.save(false)
Table 3.2. Rails Built-in Validation Methods
If you find that the built-in validation methods do not meet your needs, you can create custom validations that still allow you to use Rails errors collection and validations mechanics. You do this by defining a validate method for the Active Record class that you want the custom validations on. In this validate method you can check the state of multiple attributes and manipulate the errors collection as needed.
This might be very useful for cases when you want to determine the validity of your object based on the values of multiple attributes. For example, suppose you want to be sure that a user has either entered a login name, or an email address when registering. You could do this with the following custom validation:
Class User < ActiveRecord::Base
    def validate
        if login.blank? && email.blank?
   errors.add_to_base("You must enter either a login or an email
   address")
        end
    end
end
If both the login and the email are blank, an error message is added to the errors collection. This is done using the add_to_base method of the errors collection. This method allows you to add an error message that is not associated with a specific attribute, but instead it is associated with the object as a whole.
If you wanted to add your own error message specific to an attribute, you can do that using the add method of the errors collection. This method takes the name of an attribute and the error message you want to associate with that attribute as parameters. Below is an example of how you might use this method:
comic_book.errors.add('login', 'You must enter a login name')There is one more method that you'll find handy when using the errors collection. That is the clear method. The clear method will clear the errors collection of all errors. To repopulate it, you must validate the object again through either built-in or custom validations, or simply add error messages to it manually using the above add methods.
comic_book.errors.clear
You can create many very powerful Web applications using only the techniques and methods that were covered in the previous sections of this chapter. However, there are times when you may want to implement more advanced data related code. This section walks you through several more advanced things that you can do with Active Record. You'll learn how to implement single table inheritance, how to use composition, and how to implement transactions using Active Record and Rails.
Active Record uses a database technique called single table inheritance to support inheritance in your model classes. With single table inheritance, a class and all of its descendents use the same database table. For example, the ComicBook model that you've been working with in this chapter could have extended a model class called Book, because a comic book is a type of book. Your application might also work with other types of books, such as text books. You might have a TextBook model which also extends the Book model. With single table inheritance, books, comic books, and text books would be stored in the same table. See Figure 3.7 for an example of how the classes and database should be laid out.

Notice that the common table is given the plural name of the base class. In this case, the table is named books. The books table contains a column named type, which specifies for a particular record whether that record is a text book or a comic book. Active Record automatically manages the type column.
Your model classes would be defined like this:
class ComicBook < Book
end

class TextBook < Book
end

class Book < ActiveRecord::Base
end
If you perform a query using the Book class, it returns both text books and comic books. A query using the ComicBook class returns only comic books and a query using the TextBook class returns only text books, as expected.
If you ever need to see the type field, you cannot access it using book.type because the type field is a class attribute. However, you can access it from your objects like this:
book[:type]
The above line would return the type of the object, either ComicBook or TextBook.
Composition is a design pattern in which you have one class composed of several other classes. Note that this is not the same as inheritance, in which a subclass extends a base class. With composition, you have a main class and one or more component classes. This design pattern is also referred to as aggregation.
Rails implements the composition pattern using one table that is mapped to multiple classes. Consider the example of a Book that is composed of a Publisher. Figure 3.8 shows how the classes and database table would be laid out. As you can see, the books table contains columns for attributes that exist in both the Book and Publisher classes. You would implement the composition in your Book model class like this:
class Book < ActiveRecord::Base
    composed_of:publisher,:class_name => "Publisher",
               :mapping => [[:publisher_name,:name],
                                [:publisher_country,:country]]
End
The first parameter to composed_of is the name that the component class is referred to by the main class. In this example, because the first parameter to composed_of and the component class name are the same, you could have eliminated the :class_name parameter. By default, Rails looks for a class that contains the same name as the first parameter to composed_of.
The :class_name parameter allows you to override the Rails default and use a different name from that of the class as the first parameter. For example, you could have used this line:
composed_of:publisher_info,:class_name => "Publisher",
The second parameter to composed_of specifies the attribute mappings. The :mapping array associates columns in the books database with attributes in the Publisher class. For the mapping in this example, the publisher_name column in the books table is mapped to the name attribute of the Publisher class, and the publisher_country column is mapped to the country attribute of the Publisher class.
You also have to add some code to your component class, Publisher. Publisher would look like this:
class Publisher
    def initialize(name, country)
        @ name = name
        @ country = country
    end

    attr_reader: name,: country
end
You must create an initialize method that contains a parameter for each attribute that the component represents. Within the initialize method, you have to create instance attributes for each of the component attributes.
Rails adds accessors to the main class for the component class and each of its attributes. You could access the Publisher object from an instance of the Book class using: book.publisher. You can also set the publisher of a book using this code:
book.publisher = Publisher.new('', '', '')You access each of the attributes in the component class through the parent class attribute of the main class. From an instance of the Book class, you would access the Publisher attributes like this:
pub_name = book.publisher. name
pub_country = abook.publisher. country
Composition is often used when you have a class that you want to use across many models. An often-cited example is the case of a Person and Address class. A Person is composed of an Address. In this example, you might want to also use the Address class across other models. The Business and Museum classes might also be composed of an Address. Employing composition in this example would save you from having to repeat the attributes and behavior contained in the Address model in all of the models that are composed with it.
Many applications that you write will require the use of database transactions. Transactions are a way of grouping database actions together, such that they either all execute as expected, or none of them execute in the case of an error.
Rails supports transactions using a transaction class method that is available on all model classes that extend ActiveRecord::Base. A typical example of when transactions are required is when you are working with bank accounts. When you transfer money from one account to another, that process can be broken down into the following actions:
Subtract the transfer amount from the account that you are transferring from.
Add the transfer amount to the account that you are transferring to.
If the first action, subtracting the money from the 'from' account succeeded, but the second action of adding the money to the 'to' account failed, you would have many unhappy customers if your application did not make use of transactions. If both of these actions were wrapped in a transaction, a failure in the second action would cause the first action to be undone, or rolled back. A roll back is a database term for undoing an action that was performed on the database.
Using this example, in your Rails application, you would likely have a class named Account. The Account class would have a transfer method implemented as follows:
def transfer(from, to, amount)
    Account.transaction do
        from.withdraw(amount)
        to.deposit(amount)
    end
end
Now if any failures occur in either of the method calls contained in the block that begins with the Account.transaction do line, all of the database actions will be rolled back. Therefore, either both the withdrawal and deposit actions succeed, or they are both rolled back. This is exactly the behavior that you were seeking.
This chapter explored the details of Active Record and how you can use its features to create the model layer of your Web application. You were shown how to use Active Record to perform the following tasks:
Create models for your application using the Rails
script/generatescriptUse Rails migrations to create and modify your database
Find records in your database using a variety of ActiveRecord methods
Update and delete rows in your database
Model your database relations using ActiveRecord methods
Add data validations to your model classes
You also learned how to use some advanced features of Rails, including Single Table Inheritance, Composition, and Transactions. Active Record allows you to create the model layer of your Web applications with ease and simplicity.