
In the summer of 2003, David Heinemeier Hansson was building the Basecamp Web application for a small company called 37signals. In the process of developing Basecamp, he created a core of functionality that he wanted to reuse on other applications he was developing. He extracted it and turned it into an open-source project that became Ruby on Rails.
Rails was first released to the public in the summer of 2004 as version 0.5. Hansson presented Ruby on Rails at the 2004 International Ruby Conference. Since its release, Rails has grown in popularity at an incredible pace. Version 1.0 of Rails was released on December 13, 2005. At the time of this writing, Rails is at version 1.2.
Rails' growth is not limited to the existing community of Ruby developers. It has pulled in converts from languages such as Java, PHP, and Perl, among others. By the time you read this, there will be more books available about Ruby on Rails than any other framework from any language. The Ruby on Rails framework has served as a catalyst for incredible growth of awareness and use of the Ruby programming language. The creator of the Ruby programming language, Yukihiro Matsumoto (known online as Matz), has referred to Rails as Ruby's Killer App.
Tip
To take a look at some existing applications created using Rails, check out the list of real-world Rails applications maintained on the official Ruby on Rails wiki site at http://wiki.rubyonrails.org/rails/pages/RealWorldUsage. You can find a list of the top 100 Rails sites, as ranked by Alexa.com, at http://rails100.pbwiki.com. Finally, the site www.happycodr.com provides a showcase for applications built with Rails.
Ruby on Rails is an application framework composed of several libraries; together, these libraries supply a complete framework for building Web applications. You can use Rails to build any kind of Web application. Common examples of applications built using Rails include blogs, wikis (sites that can be edited by anyone with access to them), project tracking applications, photo gallery applications, social networking applications, and online shopping sites. Any database-backed Web application is a good candidate for Rails development.
So what has made Rails such a popular framework over such a short span of time? A simple response is that Rails lets you build powerful Web applications quickly and easily by doing a majority of the work common to most Web applications. What makes Rails different from the many other existing Web application frameworks, such as Apache Struts, Apache Cocoon, and Perl's Maypole, is that Rails makes development fun and easy for the developer. Rails accomplishes this through many innovations that have not been seen before in any other framework.
The boost in productivity that can be gained by building a Web application with the Rails framework is well documented and has been one of its strongest selling points. More than one case study has shown that Web application development can be sped up by a factor of as much as ten by using the Rails framework and the Ruby language instead of more traditional Java or .Net architectures.
Rails provides a full-stack framework. This means that Rails provides all the pieces needed to build a complete Web application in one package. You don't need to cobble together several different frameworks to get the functionality that is common to most Web applications. Using the analogy of building a house, Rails supplies the complete plumbing, electrical, and framework already built. You just have to add the functionality and features specific to your application. The basic functions provided by Rails are:
HTML templating
Database storage and retrieval
Handling of Web request and response
HTML form handling
If you've done a significant amount of Web development in the past, with or without a framework, you've probably gotten used to having to know several different languages. It is common to have to switch back and forth between languages from task to task in typical Web application development. For example, your database setup and access is coded in SQL, your front end may be coded in some specific templating language, and your business logic may be in Java, .Net, or some other programming language.
When you write a Web application using Rails, almost all of the development you do is in Ruby. You can define your database in Ruby, access your database in Ruby, use Embedded Ruby (ERb) in your templates, and code your business logic in Ruby. This frees your mind to focus on one language to learn and know well.
Both within the Rails source code and externally, Rails espouses several design paradigms that you will run into again and again as you develop with Ruby on Rails. The following sections describe these paradigms.
Don't Repeat Yourself (DRY) is a philosophy that can be seen throughout the Rails framework. What this philosophy means is that you should not have to repeat yourself in code, configuration, or in many cases even documentation, within a single Web application. For example, in a Rails application, you define your database structure in one place and one place only.
You do not have your database structure defined in SQL files, configuration files, or model object files. This saves you work and prevents errors, as well. When something in your application changes, you only need to make the change in one place. You generally do not need to hunt through a mess of files in a Rails application to make a change to your application.
Rails relies on accepted convention over configuration. A common characteristic of many application frameworks is that you have to configure them using lengthy and complex XML files. Rails does what you might think it should do in most cases without having to specify any configuration. You are also able to override the default behavior of Rails in most areas when you need to do something that may be unconventional.
A good example of this philosophy in use within Rails is in the standard Rails routing mechanism. Without having to type a single line of configuration, Rails figures out which classes and methods handle every page request, simply by inspecting the URL. Rails has a standard or conventional format for specifying the URLs your application uses. The name of a controller class, an action method, and a primary key identifying a record being worked with are specified in the URL.
The development team behind Rails is not shy about admitting that Rails contains built-in opinions of how Web applications should be developed and designed. Some developers might tell you that an application framework should be completely free of opinions, and designed to be as flexible as possible, accommodating any design decisions that application developers might want to use. Rejecting that view, the developers of Rails have staked out a vision and have taken a definite side on how applications should be developed.
The creator of Rails, David Heinemeier Hansson, has said that the opinionated software aspect of Ruby on Rails has been a large contributor to its ease of use and its overall success. By not trying to be all things to all people, Rails focuses on doing what it does exceptionally well, and in most cases it succeeds with flying colors. By sacrificing some flexibility at the infrastructure layer provided by Rails, you gain tremendous flexibility at the application layer, where you will be more productive and better able to implement your application the way you want it sooner and better.
Note
Throughout the remainder of this book, David Heinemeier Hansson is referred to by his initials DHH. This practice is common throughout Rails literature, probably due to the length of his name. Anytime you see a reference to DHH, you now know that it refers to the Rails creator.
The paradigm convention over configuration is a characteristic of opinionated software. By following the opinions set forth by the designers of Rails, you gain tremendous productivity by avoiding having to deal with configuration files. Rails also has an opinion of how your database should be designed, including details such as table-naming conventions. If you adhere to those opinions, you gain tremendous productivity by giving Rails the ability to automatically generate the vast majority of your database access code.
When developers are talking about architecture, they are speaking about the way an application's code and other components are assembled together into a whole that makes up the application. A good software architecture can make an application easier to develop, maintain, understand, and extend. A good software architecture also improves the quality of an application.
The architecture of the Rails framework is one of its many strengths. It provides a solid foundation upon which you can build your own applications.
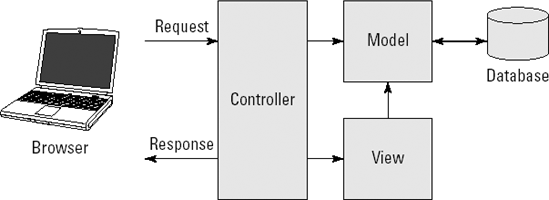
The Model-View-Controller, or MVC, design pattern, has long been accepted as a better way to architect software applications. MVC is accepted as a better way because it makes applications easier to develop, understand, and maintain. MVC simplifies the implementation of an application by dividing it into several layers, each with a given role and responsibilities.
The layers that make up an MVC application are the Model, the View, and the Controller layers. The model layer is responsible for maintaining the state of an application. It encapsulates an application's data and business logic for manipulating the data. The view layer provides the user interface of an application. The controller layer is responsible for figuring out what to do with user and other external input. The controller layer interprets user input and responds to user requests by communicating with the model layer, and rendering views using the view layer.
You can think of the controller as the conductor of the application. It determines which views to show, based on the input received.
MVC was originally created with desktop GUI applications in mind. When developers first started writing Web applications, they took a step backward and seemed to have forgotten the benefits of MVC. Many of the early Web applications mixed business logic, presentation, data access, and event handling all in giant, complex script files written in languages such as PHP, Perl, and Java's JSP. As Web applications became larger and grew in complexity, developers and Web architects realized they would need a better architecture to support these large applications. Web development frameworks such as Struts and WebObjects began to emerge, which brought the MVC design pattern back to Web applications.
The MVC design pattern, as applied to a Web application, is shown graphically in Figure 2.1. In the context of a Web application, the view layer represents the Web pages that make up the user interface of a Web application. The controller layer handles the HTTP requests and communicates with the model layer. The model layer communicates with a database and performs necessary business logic required to manipulate the data.
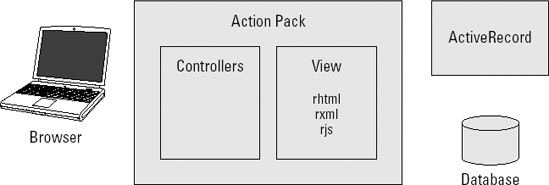
The MVC design pattern is at the core of the Rails framework. By using Ruby on Rails, your Web application will also use the MVC design pattern. The implementation of Rails is divided into libraries based around each layer of the MVC pattern. Model, view, and controller layer separation is very visible to Rails application developers. Most classes that you will write while building a Rails application will be one of these three types and, as discussed later in this chapter, they are even organized into model, view, and controller directories.
The ActiveRecord library provides the foundation of the model layer. ActiveRecord, and the model classes that you build on top of ActiveRecord, provide the model layer of your application. This layer provides object relational mapping (ORM) between Rails classes and the database you use, such as MySQL, Oracle, or some other database. An ORM maps relational database structures to an object hierarchy. It is possible to build a Rails application that does not use a database, but that is not common. If you were not using a database, your model layer might use some other form of persistent storage, or perhaps just provide business logic if your application does not provide any persistent storage.
Note
ActiveRecord is based on a design pattern by Martin Fowler. You can read more about the ActiveRecord design pattern at www.martinfowler.com/eaaCatalog/activeRecord.html.
The view layer of a Rails application is implemented in ERB template files. These files contain a mixture of HTML and embedded Ruby code (ERb), and are similar to JSP, ASP, or PHP files. There are two other built-in template file types that Rails supports. One file type is RXML files, which give you an easy way to create XML files using Ruby code.
The other file type is RJS files, which allow you to create JavaScript fragments using Ruby code. RJS stands for Ruby JavaScript. The JavaScript fragments are executed in the client browser just as JavaScript embedded in an HTML file is. The use of RJS is a common technique used for creating AJAX features. The Rails code that implements this feature comes from a library called Action Pack.
Note
For more information on using RJS to create AJAX features, see Chapter 5.
The Rails controller implementation, also part of the Action Pack library, insulates developers from having to deal with CGI and related request and response data, including form data. Controllers handle incoming browser requests, call appropriate functions on model objects, and render your view templates into pure HTML, which the Web server then returns to the browser.
Rails provides you with very simple methods for getting data sent from a Web page, and simple methods for returning data for presentation in Web pages. In the course of developing a Rails application, you will write many controller classes. Controller classes are written in pure Ruby and contain methods referred to as actions. Generally, a single controller corresponds to a single Web page, and each action corresponds to an action that you can perform on that Web page.
Figure 2.2 shows how a Rails application implements the MVC design pattern, and how requests are routed from a browser through the application.
All Rails applications are laid out in an identical style in terms of directory structure and locations of files. Following is an overview of the standard directory structure of a Rails application. Later in this chapter, when you create your first Rails application, you can see how easy it is to automatically generate this entire directory tree. Each directory and its contents are described here:
app: Where all the application's MVC code goes
config: Application configuration files
db: Database schema and migration files
doc: Documentation for your application
lib: Application-specific custom code that isn't part of your MVC code
log: The application log files automatically created by Rails
public: JavaScript, CSS, images, and other static files
script: Rails scripts for code generation, debugging, and performance utilities
test: Unit-test related code and related files
tmp: Cache, session information, and socket files used by the Web server
vendor: Where Rails plug-ins are installed
In addition to providing an application development framework that you use to write your Web application, Rails also provides some excellent tools that assist you in the process of developing your application. These tools are packaged as scripts that you run from the command-line of whatever operating system you develop on.
The most important scripts to become familiar with and use regularly in your development are:
Each of these script types is described in the next section.
The Rails Console is a command-line utility that lets you run a Rails application in a full Rails environment right from the command-line. This is an invaluable tool for debugging during the development process. You may recall that the last chapter introduced the Interactive Ruby console (irb). The Rails Console is an extension of irb, offering all the features of irb along with the ability to auto-load your complete Rails application environment, including all its classes and components. Using the Rails Console, you can walk through your application step-by-step and look at its state at any point of execution.
WEBrick is a Web server included with the Rails framework, and is ideal for local developer testing. The WEBrick server is written in pure Ruby and runs on any platform that you develop on, including Windows, Mac, or Unix. Rails is configured to automatically make use of the WEBrick server. Alternatively, if you have the Mongrel or lighttpd sever installed on your system, Rails uses either of those servers.
A really great feature about WEBrick, Mongrel, and lighttpd is that they all feature automatic reloading of code. This means that when you change your source code, you do not have to restart the server to have it take effect. You can immediately reload a Web page to see any of your changes take effect.
Rails includes code generation scripts, which are used to automatically generate model and controller classes for your application. Code generation is an important part of Rails that can increase your productivity when developing Web applications. By running a simple command-line script, you can generate skeleton files for all of your model and controller classes.
The code generation script also generates database migration files for each model it generates, as well as unit tests and associated fixtures. With more experience, you can even write your own generators to automatically generate pieces of your application that you find yourself using frequently.
Note
For more information about writing your own generators, check out Chapter 11.
Migrations are a very cool feature of Rails that can make your life simpler and easier. They bring the principle of DRY to life. Migrations are pure Ruby code that define the structure of a database. When you use migrations, you no longer have to write SQL to create your database. Over the course of a project, it is very common for your database schema to evolve as you learn more about your problem domain.
Migrations are written such that each change you make to your database schema is isolated in a separate migration file, which has a method to implement or reverse the change. This makes it an easy process to roll forward or backward across revisions of your project's schema. Migration files are run with a special Rails script.
At this point, although this chapter has barely scratched the surface of Rails and has not yet gone into any detail on any of the components that make up Rails, you can write your first Rails application. This section shows you how easy it is to write a simple Rails application, and how quickly you can get up and running with a basic application skeleton. The application you create in this section even includes a database.
As you work through this application, you are very much encouraged to follow along on your computer and build the application as you read this section. Reading coupled with practice is a much more efficient way of learning than through reading alone. However, for those who just want to download the completed application, you can find it on this book's Web site, rubyonrailsbible.com. Even if you download the completed application, you should still read through this section, as it presents many general Rails development concepts in the context of developing the application.
If you've been reading this book from the start, you should already have a working installation of Rails and MySQL on your computer. If you do not yet have Rails or MySQL installed and need help getting them installed, see this book's Quick Start chapter for complete installation instructions.
Each of the following five steps is described in the sections that follow.
Create the project using the
railscommand.Set up the database.
Create the model.
Create the controller and views.
Style the application.
The first step in creating a Rails application is to use the rails command-line program to generate the directory structure for your application. For your first Rails application, this section walks you through steps to create a very simplified version of a contact list manager.
This application implements a reasonable amount of real-world functionality, while remaining simple enough to not make your learning curve too steep. First create a directory called rails_projects that will serve as the root of the Rails projects that you can build throughout this book. After you've created the rails_projects directory, navigate into that directory and run the rails project generation script, as shown here:
cd rails_projectsrails contactlistcreate create app/controllers create app/helpers create app/models create app/views/layouts create config/environments create config/initializers create db create doc create lib ... create log/production.log create log/development.log create log/test.log
This script creates a directory called contactlist inside your rails_projects directory. Inside the contactlist directory, you can see that the rails command created the complete Rails standard directory structure that is common to all Rails applications. Standard versions of many files required by Rails were also created and put in their appropriate directories.
For example, the last three files created are the Rails log files. A separate log file is created for each environment used in the standard development process: development, test, and production. This simple command has done a tremendous amount of work for you. It also provides the benefit of creating a standard directory structure that is common across all Rails applications.
If you work on several Rails applications, you can always rely on files being located in the same places, no matter what the application is. Although it is easy to take this for granted, few other frameworks prior to Rails enforced such a practice. If you've spent a lot of time developing Java applications, you never know where you are going to find a given file or what the directory structure might look like as you transition across Java projects.
As mentioned earlier, Rails is compatible with many different Web servers. For your first application, stay with the Web server that is distributed with Rails, WEBrick. This allows you to launch the Web server to test out your application at any time without going through the trouble of installing another Web server. Now that you've generated the skeleton of your first application, start WEBrick and see what you've achieved with a single command.
ruby script/server Webrick
  Booting WEBrick
  Rails application started on http://0.0.0.0:3000
  Ctrl-C to shutdown server; call with --help for options
  ..
The script/server command tells Rails to start up the server specified as a parameter, in this case WEBrick. In UNIX environments, you normally would not have to precede the command with ruby, so you could just type ./script/server Webrick. Also, the server name parameter is not required if WEBrick is the only server you have configured for your Rails application. As a result, this command would also start the WEBrick server: ruby script/server.
By default, WEBrick always binds to port 3000. If you want to change the default port assignment, you can do that in the environment.rb file, which is covered later in this book. You can also specify a different port from the command-line when you start up the server using the -p option as shown here:
ruby script/server -p 80
This command would start the server bound to port 80.
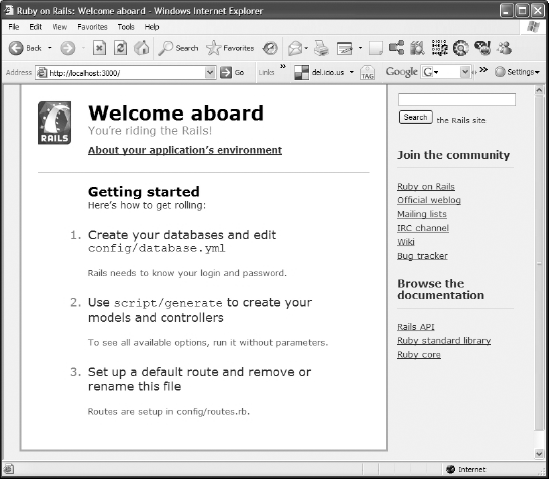
Now open your browser of choice and navigate to http://localhost:3000 to see the screen shown in Figure 2.3. You can see that by simply running the Rails generation script, you have the skeleton of a working Web application with no additional work yet on your part. Of course, a skeleton is all the application is in its current form. Now comes the more interesting task of actually making your application do something useful, or at least useful in the context of saying you wrote your first Rails application.
If you look back at the console window where you started the server, you can see that some log messages have printed. As your Rails application runs, it continuously outputs messages to this window, which allows you to trace your application and figure out what it is doing.
Note that the default Rails Web page shown in Figure 2.3 also lists the typical steps involved in getting your application built. Follow the steps shown in this figure for the remainder of this section.
Note
Throughout the rest of this chapter, the root directory, rails_projects/contactlist, will not be specified. When you see a directory mentioned, such as app/models, you should assume that it is located in the rails_projects/contactlist directory unless otherwise specified.
Begin by creating a simple database using MySQL with one table that will hold a list of contacts. In this database, titled contactlist_development, create one table with the name contacts. This table will hold contact information for your application. Use the command-line interface of MySQL to do this:
mysql -u root -pEnter password: Welcome to the MySQL monitor. Commands end with; or g. Your MySQL connection id is 2 Server version: 5.0.45-community-nt MySQL Community Edition (GPL) Type 'help;' or 'h' for help. Type 'c' to clear the buffer. mysql>create database contactlist_development;Query OK, 1 row affected (0.29 sec) mysql>use contactlist_development;Database changed mysql>create table contacts (-> id int not null auto_increment,-> first_name varchar(100) not null,-> last_name varchar(100) not null,-> address varchar(255) not null,-> city varchar(100) not null,-> state varchar(2) not null,-> country varchar(100) not null,-> phone varchar(15) not null,-> email varchar(100),-> primary key(id) );Query OK, 0 rows affected (0.40 sec)
You can verify that you created the database and table correctly using the Show and Describe commands, as shown here:
mysql>show tables;+-----------------------------------+ | Tables_in_contactlist_development | +-----------------------------------+ | contacts | +-----------------------------------+ 1 row in set (0.00 sec) mysql>describe contacts;+------------+--------------+------+-----+---------+------------- ---+ | Field | Type | Null | Key | Default | Extra | +------------+--------------+------+-----+---------+------------- ---+ | id | int(11) | NO | PRI | NULL | auto_increment | | first_name | varchar(100) | NO | | | | | last_name | varchar(100) | NO | | | | | address | varchar(255) | NO | | | | | city | varchar(100) | NO | | | | | state | varchar(2) | NO | | | |
| country | varchar(100) | NO | | | |
| phone | varchar(15) | NO | | | |
| email | varchar(100) | NO | | NULL | |
+------------+--------------+------+-----+---------+-------------
   ---+
9 rows in set (0.02 sec)
You should now have your database completely set up and ready to use. The database is strategically named contactlist_development, which is the same name you gave to your project, with the addition of the development suffix. This allows you to take advantage of more Rails automation, or convention-over-configuration, magic.
Rails automatically looks for databases that have the same name as the project, plus the environment suffixes (_development, _test, _production). Of course, if you want to use a different name for your database, you are able to do that by specifying the name of your database in the config/database.yml file.
Note
In Chapter 3 you will learn an easier way to create your database without having to use the mysql command-line application at all. Instead you will use a simple rake task to create the database.
Now that you have a working database, the next step in creating your Rails application is to create your model classes. In case you forgot, the model classes are responsible for managing an application's data and business logic. If you were to look at a description of the business problem your application is trying to solve, the model classes will usually correspond to the nouns that show up in that description.
For a contact list application, the most obvious noun that would show up would be the noun, contact. Rails gives you a generate script which allows you to automatically generate class files for models, views, and controllers.
The generate script is located in the script directory at the root of your Rails application. The first generate script parameter is the name of the object type you want to generate, in this case a model object. The second parameter is the name you want to give the model that is generated. Use the name Contact for your model class. This parameter is case-insensitive, and so you could specify it as either Contact or contact.
Using the generate script, go ahead and create the Contact model.
ruby script/generate model Contact
exists app/models/
exists test/unit/
exists test/fixtures/
create app/models/contact.rb
create test/unit/contact_test.rb
create test/fixtures/contacts.yml
create db/migrate
create db/migrate/001_create_contacts.rb
Notice that the choice of the name Contact for the model class is the same name given to the name of the table minus the plural. This is not an accident. By giving the model the same name as your table name, Rails provides you with a wealth of functionality for this model object, without having to write any code yourself. Again, you see an example of convention over configuration here. By sticking with the Rails conventions for naming database tables and model classes, you will gain a great deal of functionality with no configuration required.
Notice that by running this generate script, Rails created four files. The first file created, contact.rb, is your model object. This was created in the app/models directory. The app directory is the home for all of an application's model, view, and controller classes.
The second file created is the contact_test.rb file. This file contains the skeleton for a unit test that you can use to write unit tests in for the Contact object. This was created in the test/unit directory. Rails places all test-related files into the project's test directory. The subdirectory of test, called unit, contains unit test files. The third file created is another test-related file, contacts.yml. This file is called a fixture file, which is used to set up test data for your unit tests. Fixtures are covered in more detail later in this book.
Note
Developer testing in a Rails application is covered in detail in Chapter 9. Developer testing includes unit, functional, and integration testing. Rails provides built-in support for each of these types of tests.
The fourth file created is a migration class, 001_create_contacts.rb. This contains an empty migration class that you could use to create a migration for creating the contacts table in the database. Because you already did that using MySQL, you don't need to worry about the migration file in this chapter.
Note
For more information about cover migrations, check out the details of the model layer, as discussed in Chapter 3.
Take a look at the contents of the app/models/contact.rb file. Your file should look like this:
class Contact < ActiveRecord::Base
end
Were you expecting to see more? This is an empty class definition of a class called Contact that extends from the ActiveRecord::Base class. While this doesn't look like it provides much functionality, your class has gained quite a bit of functionality just by extending from the ActiveRecord::Base class. Thanks to magic provided by ActiveRecord, your Contact class now fully understands the contacts table that you created in the database earlier. You can use this class to create Contact objects, read contact records from the database, and store contact data to the database. All this without writing a single line of model code.
You probably want to see this for yourself, so start the Rails Console and play around with your new Contact class a little.
Start the Rails Console. From the root directory of your contactlist project, type this:
ruby script/consoleLoading development environment >>This starts up the Rails Console and loads your application's environment.
Create a new Contact model object. At the >> prompt, you can now type any valid Ruby syntax. Try this:
>>
my_contact = Contact.new=> #<Contact:0x476d488 @attributes={"city"=>"", "country"=>"", "first_name"=>"", "address"=>"", "last_name"=>"", "email"=>nil, "state"=>""}, @new_record=true> >>After you type the first line, the second line shown above is the response you get. Throughout this book and while you're in the Rails Console, you can differentiate input that you type from output by the prompt preceding the line. The >> prompt is the input line prompt. The
=>prompt begins lines that contain the Console output.The Rails Console always prints the final return value of whatever method was executed by the statement you typed. In this example, what you see is the notation for a Contact object instance. The
Contact.newstatement caused a new instance of Contact to be created and returned. This instance contains an attribute for each field that you created in the contacts database table. This is the first proof you have that the Contact object really has been tied to the contacts database table, through no code of your own. The hexadecimal number near the beginning of the return value following#<Contact:is probably a different value on your computer. This is the address that is assigned to the object that was created. You usually don't have to pay much attention to that number.Continue by assigning some values to the object's attributes. As you type each of the lines below, you will see the attribute value printed as output:
>>
my_contact.first_name = 'Timothy'>>my_contact.last_name = 'Fisher'>>my_contact.address = '25296 Hunter Lane'>>my_contact.city = 'Flat Rock'>>my_contact.state = 'MI'>>my_contact.country = 'USA'>>my_contact.phone = '555-555-5555'>>my_contact.email = '[email protected]'Save the contact object. Run the object's
savemethod to have this data saved to the database. Thesavemethod is inherited from theActiveRecord::Baseclass.>>
my_contact.save=> true
You have now created a new contact using the Contact model object. By calling it save method, a new record has been created in your contactlist_development database. Now you can use the Contact object to find and retrieve from the database the record that you just created. To do this, use a class method of Contact called find.
Load your contact object from the database. Make sure you are still in the Rails Console, and then try this:
>>
result = Contact.find(:first)=> #<Contact:0x474c864 @attributes={"city"=>"Flat Rock", "country"=>"USA", "id"=>"1", "phone"=>"555-555-5555", "first_name"=>"Timothy", "address"=>"25296 Hunter Lane", "last_name"=>"Fisher", "email"=>"[email protected]", "state"=>"MI"}> >>An instance of the
Contactclass representing the data record found in the database is returned and printed to the console after executing thefindmethod. The single argument you passed to thefindmethod is:first. This is a Ruby symbol that thefindmethod interprets to mean 'find the first row in the contacts table.'Print an attribute. Try printing the
first_nameattribute of theresultobject to verify that it contains the data you expect:>>
puts result.first_nameTimothy => nil >>As you can see, the value
Timothyis printed to the screen by theputscommand. The return value ofputsis alwaysnil. That is why you also seenilprinted following thefirst_namevalue.
Now you've created your Contact model object and convinced yourself that it is connected to the contacts table through some Rails code contained in the ActiveRecord::Base class.
You have a database and you have a model class. Now you need a way to talk to the model class from a Web application. This is where you use the controller and view layers of the MVC architecture. The controller you create will allow you to perform three of the four standard create, read, update, and delete (CRUD) operations on your contact list data. You will implement create, read, and update. Because this controller provides functionality related to the Contact model, call the controller the ContactController.
If you look at sample Rails code, you'll find that some developers would name the controller ContactsController instead of ContactController. Note the difference in plurality. Later in this chapter, you will see an example of Rails scaffolding which automatically creates controllers for your model objects. When you generate scaffolding, a pluralized controller is created. Pluralizing the controller name would seem to make sense as it is a controller that allows you to work with your contacts. I believe it is easy to justify either name, so my suggestion is to use the naming style you prefer and stick with it.
Just as you used the generate script to create your model class, use the generate script to create the controller and view classes. You simply have to change the first parameter to the generate script to the word controller, and Rails will generate the controller class given the name you pass as the second parameter. When you specify your controller name to the generator, you do not append the word Controller. For example, for the ContactController, you would just use the word Contact. Go ahead and generate your controller now:
ruby script/generate controller Contact
exists app/controllers/
exists app/helpers/
create app/views/contact
exists test/functional
create app/controllers/contact_controller.rb
create test/functional/contact_controller_test.rb
create app/helpers/contact_helper.rb
From the output you see after generating your controller, notice that Rails has generated more than just your controller object; Rails has also created a directory to hold views, a helper file, and a functional test file. These are objects that you generally always need to use in conjunction with a controller, and so the developers of Rails have simplified your life by just creating them all at once —you don't have to do any extra work. The app/views/contact folder will hold the html.erb view files associated with this controller.
The controller object is in the app/controllers/contact_controller.rb file. Take a look at that file. You should see this:
class ContactController < ApplicationController
end
After having seen the model file, perhaps you're not surprised to see such a short file. The ContactController class extends the ApplicationController class. You can find the ApplicationController class in the app/controllers directory with the filename application.rb. The ApplicationController class is where you place functionality that you want to be available to all of your application's controllers. If you were to look at the ApplicationController class, you would see that it inherits from another Rails class, ActionController::Base. ActionController::Base is a Rails class that provides all controllers with methods for performing common Web programming tasks, such as accessing form and session data.
To implement the required functionality for the contact list application, you will be adding the following methods to the controller class: index, show, new, create, and update. In many Rails applications it is common convention to use a method named index as the method that displays a list of all the objects of a given type. So for your application, the index method will display a list of all available contacts. The functionality of the other methods should be self-explanatory based on their name.
Open the contact_controller.rb file and add these methods, as shown here:
class ContactController < ApplicationController
       def index
       end

       def show
       end

       def new
       end
       def create
       end

       def update
       end
end
Each of these methods will handle a different type of request from the browser. There will also be a view template associated with the index, show, and new methods. The create and update methods to not need view templates because they simply process the forms displayed by new and show respectively and then redirect the user to the index method to show all contacts again.
By default, Rails looks for a view template that contains the same name as the controller method and renders that template after running the controller method. As a result, the index method would render a template located in app/views/contact with the name index.html.erb. Methods in a controller class that handle Web requests are called actions in Rails nomenclature.
You have created actions for index, show, new, create, and update in the ContactController. As you complete the remainder of the Contacts application in this chapter, you'll implement these actions to perform the following functions:
index:This action is called to display a list of all contacts stored in the database.show:This action is called to display the details of a selected contact. The details are displayed on an editable form that the user can also use to make updates to the contact.new:This action is used to display a form that will be used by the user to create a new contact. Do not confuse this instance method with the class method namednewthat is common to all classes.create:This action is called to process the request to create a new contact.update:This action is called to process the request to update an existing contact.
From these descriptions, note that show and update form a related pair of actions, as do new and create. The show action will always be called before the update action is called, and the new action will always be called before the create action is called. In both of these instances, one action displays a form, and the other action processes the form submit.
First, focus on the index method. The index method prints a list of all the contacts stored in the database.
Create the index action. Open up the app/controllers/contact_controller.rb class and create the index method as shown here:
def index
    @contacts = Contact.find(:all)
end
The single line you've added to the index method is enough for your application to be able to retrieve all of the contact records contained in the database. This is done using the find class method on the Contact class. The parameter :all tells the find method that you want it to return all of the contacts that it finds. The contacts are returned as an array of Contact objects and stored in the @contacts instance variable.
Recall that in Ruby, the @ symbol preceding a variable name makes that variable an instance variable. It is very important that you store the results of Contact.find(:all) into an instance variable because instance variables are also accessible from the view templates. This bit of controller code has made the list of contacts available to your index view template, which you will implement next.
You need to create a view template to display the contacts, but before you do that, you've now reached a good point in your application to discuss how Rails routes to a specific controller and method based on a URL. The routing mechanism that Rails uses is another example of the framework's use of convention over configuration. By default, Rails uses the following pattern to decide where to route URLs:
www.someapp.com/controller/method/id
The first path element in the above example URL controller is the name of the controller to use. The second path element method is the specific method contained in the controller to call. A method in a controller class that handles requests and can be routed to directly is also often referred to in Rails as an action.
Finally, the id is the id of an element that is passed to the method as a parameter called id. Not all of the controller methods require the id to be passed, and so that element is optional. The method index is a default action in Rails and can be omitted if you want to call that action. As a result, if you pass only a controller name in your URL, your request is routed to the default action name index.
Try starting the server again, and view the application to this point in the browser to see what kind of results you've achieved. This is also a good check to make sure you've done everything right up to this point. Start the server with this command:
ruby script/server
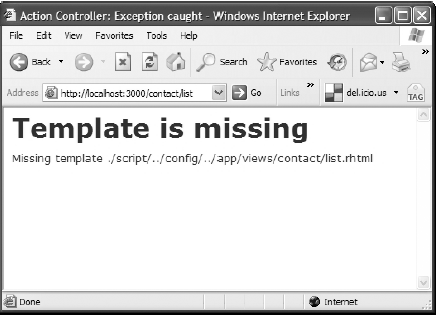
Once you see the response messages telling you that the server has successfully started, open a browser and navigate to this address: http://localhost:3000/contact/index.
Based on what was discussed about how Rails routes URLs, you should be able to realize that this URL will route to the index method of the Contact controller. You should see the message shown in Figure 2.4. This screen tells you that Rails is trying to render a template located in app/views/contact/index.html.erb.
Because you have not yet created that template, you get the Template is missing error display. Since index is the default method for a controller, you could also have navigated to it without specifying the action, like this: http://localhost:3000/contact.
Create the index template. In order to display the list of records on a Web page, you now need to create an index.html.erb template in the app/views/contact directory.
Create a file called index.html.erb in the app/views/contact directory. Type the following line into it and then save it:
My Contacts
Now go back to your browser, still pointing at http://localhost:3000/contact/index, and refresh the page. You should see the contents of the index.html.erb file displayed.
You've now reached an important milestone in your development. You have successfully routed a URL to a method in a controller that you wrote, and a view template that you wrote. You still can't see the list of contacts that you are after, though, and so you need to go back into index.html.erb and do the real work of displaying the contact list. Type this code into index.html.erb:
<h1>My Contact List</h1>
<% if @contacts.blank? %>
<p>No contacts to display.</p>
<% else %>
<ul id="contacts">
<% @contacts.each do |c| %>
<li>
<%= link_to c.first_name+' '+c.last_name,
{:action => 'show',:id => c.id} -%>
</li>
<% end %>
</ul>
<% end %>
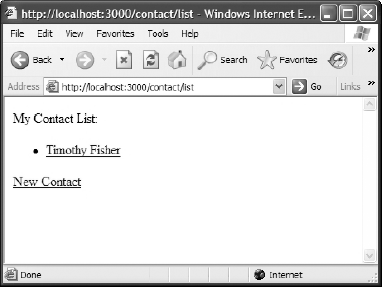
<p><%= link_to "New Contact", {:action => 'new' } %></p>Now if you refresh the browser, you should see the screen shown in Figure 2.5. If you have been following along with this example, the contact list should contain the single record that you created in the database earlier when you were testing the Contact model class using the Rails Console. The contact should be a link, and you should also see a New Contact link. Let me walk you through the code that you typed in to get this screen.
First, I'll explain some embedded Ruby (ERb) syntax. Notice that several lines in the above code are surrounded by <% %> and <%= %>. These symbols let Rails know that what's enclosed is Ruby code, which should be interpreted prior to returning the page. The <% %> syntax surrounds Ruby statements that do not return strings to be displayed. The <%= %> syntax surrounds Ruby statements that result in a string that is inserted into the HTML at the location of the statements.
Look at lines 2 and 3:
<% if @contacts.blank? %>
  <p>No contacts to display.</p>
Check to see if the @contacts array is blank or empty. The blank? method returns true if the array is empty; otherwise, it returns false. If the array is empty, the message "No contacts to display" appears on the screen.
The next portion of the code, lines 5 to 11, is reached if the @contacts array contains one or more items:
<ul id="contacts">
  <% @contacts.each do |c| %>
    <li>
      <%= link_to c.first_name+' '+c.last_name,
             {:action => 'show',:id => c.id} -%>
    </li>
  <% end %>
</ul>
This block of code creates an unordered list that contains a list item for each of the contacts in the @contacts array. The each method is an iterator that steps through each of the items contained in the @contacts array. For each item in the array, the block of code surrounded by the do and end statements is executed. Immediately following the do statement is the syntax |c|. This means that each item in the @contacts array is placed in the c variable.
For each item, the Rails link_to helper method is used, which creates an HTML link. The first parameter passed to link_to is the text that is placed between the <a> and </a> tags. The second parameter specifies the action that is called when the link is clicked. For example, this code:
<%= link_to 'Timothy Fisher', {:action => 'show',:id => 1} -%>ends up on the resulting Web page as:
<a href="contact/show/1">Timothy Fisher</a>
For each of the contacts, then, a link is created containing the contact's first and last name joined together. The href of the link will consist of contact/show/ followed by the id of the contact being displayed.
In the last line of the template:
<p><%= link_to "New Contact", {:action => 'new' } %></p>you again use the link_to method to create a link for adding a new contact. This link displays the text New Contact and calls the action new when clicked.
You now have a completed list view. No matter how many contacts you have in the database, this simple view displays a list of all the contacts. When you click any contact, you are routed to the show action. That action should cause the Web application to display a page that can be used to view and edit the details of a contact. Next you'll implement the new action and its associated view template so that you will be able to add additional entries into your contacts database.
With what you have implemented so far, you can start the contact list application and view a list of all of your contacts. Now let's go ahead and create the controller method and view template that will allow you to display a form from which a user can create a new contact.
Create the new action. Open up the
contact_controller.rbfile and modify thenewmethod to look like this:def new @contact = Contact.new endThe single line in the
newmethod creates a newContactobject that will be used to hold the new contact information you create. Next, you'll create a view template to display the new contact form in the browser.Create the new template. In the
app/views/contactdirectory, create a new file namednew.html.erb. This will be the template for creating a new contact. Type the following code into this file:
<h1>Create New Contact</h1>
<% form_for:contact,:url => {action=>'create'} do |f|
 <p><label for="contact_first_name">First Name:</label>
 <%= f.text_field 'contact', 'first_name' %></p>

 <p><label for="contact_last_name">Last Name:</label>
 <%= f.text_field 'contact', 'last_name' %></p>

 <p><label for="contact_address">Address:</label>
 <%= f.text_field 'contact', 'address' %></p>

 <p><label for="contact_city">City:</label>
 <%= f.text_field 'contact', 'city' %></p>

 <p><label for="contact_state">State:</label>
 <%= f.text_field 'contact', 'state' %></p>

 <p><label for="contact_country">Country:</label>
 <%= text_field 'contact', 'country' %></p>

 <p><label for="contact_phone">Phone:</label>
 <%= f.text_field 'contact', 'phone' %></p>

 <p><label for="contact_email">Email:</label>
 <%= f.text_field 'contact', 'email' %></p>

 <%= f.submit "Create" %>
<% end %>

<p><%= link_to 'Back', {:action => 'index'} %></p>
Now let's walk through the code you created in the new.html.erb template. There are really only a few interesting things going on in this template. First, look at the second line of the template:
<% form_for:contact,:url =>:action=>'create' do |f| %>
In this line, you use a Rails helper method form_for. This method creates the opening tag for an HTML form. You pass three parameters to the form_for tag. The first parameter specifies the object type for which the form is being created. In this case that is a contact object. The second parameter specifies where the form should be submitted. In this case, the form is submitted to the create action.
Since a controller is not specified it will default to the current controller, which is the contact controller. The last parameter that is passed to the form_for tag is the code block that begins with the do |f| statement. Inside the block is where you will specify the body of the form.
Now look at the contents of the form that you are creating. Within the form body, you see several repetitions of the following lines, one for each field in the contacts table:
<p><label for="contact_first_name">First Name:</label>
 <%= f.text_field 'first_name' %></p>
These lines create an HTML label tag and an HTML text input field. The input field is created using another Rails method called text_field which is called on the form_builder which was passed into the block as the f variable. The text_field method takes a single parameter. The parameter is the name of the attribute that this text field will contain. The output of the text_field method will be HTML code like the following:
<input id="contact_first_name" name="contact[first_name]"
   size="30" type="text" value="" />
After all of the labels and text fields, the last three lines of the new template contain this code:
<%= f.submit "Create" %>
<% end %>
<p><%= link_to 'Back', {:action => 'index'} %></p>
Here you see another Rails helper method. The submit method creates a form submit button. The button will use the parameter to the submit method as its label. The end statement ends the contents of the form block. Finally, the last line of the template uses the Rails helper method link_to to create a link back to the index view.
When a user clicks the Create button on this form, the data will be submitted to the create action of the Contact controller. The create action will handle the record creation for creating a new contact. In the next section you'll create the create action.
Make sure your WEBrick server is still running and go back to the contact list page. Now click the New Contact link, and you should see the new contact screen shown in Figure 2.6.
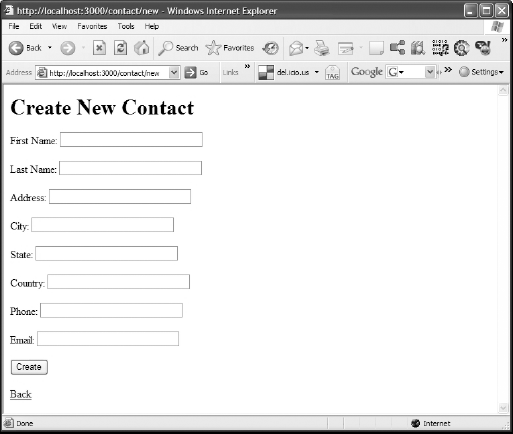
You should see the new contact form with a blank edit field for all of the attributes of the new contact. Don't click the Create button just yet. You need to create the create action next so that your application correctly handles the creation of a new contact.
In the previous section you created the new action and a view template that allows you to display an empty form that the user can use to create new contact records. The form you created will get submit to the create action of the contact_controller. That is a method you have not written yet, so that will be the next action method that you will create.
Create the create action. Open up the contact_controller.rb file and add a create method using the code below:
def create
    @contact = Contact.new(params[:contact])
    if @contact.save!
        redirect_to:action => "index"
    else
        render:action => "new"
    end
end
In this create method, you create a new instance of a Contact object passing the parameters from the new form into the Contact.new method. After creating the new Contact instance and setting it to the @contact instance variable, you attempt to save that using the save! instance method.
If the save! method returns successfully the redirect_to method is used to redirect the user back to the index method which will show the list page. The list should now contain the new contact that was created. If the save! method does not return successfully, the new form is re-rendered.
Create a few new contacts using the new contact page and make sure that everything works as expected. After you create a new contact, you should see the new contact listed along with your other contacts on the contacts list page. If you see any errors reported, or if the contacts are not being created as expected, read back through the previous sections, and make sure that you've done everything correctly up to this point.
At this point, your application is able to display a list of contacts, and you are able to create new contacts using a new contact form. You do not yet have a way to view and edit existing contacts. In this section, you'll take the first step towards creating the view and edit functionality by creating the show action. The show action will display a form containing an existing record's attributes. From the show form you can update the contact and then submit those changes to the update method that you'll implement in the next section.
Create the
showaction. Go back to thecontact_controller.rbfile. Create theshowmethod so that it now looks like this:def show @contact = Contact.find(params[:id]) endThe
showmethod uses theContact.find(params[:id])statement to find the contact whoseidmatches theidpassed on the URL. If found, the contact is loaded into the@contactinstance variable. Thefindmethod accepting the contact id is another method provided to all model classes that extendActiveRecord::Base. Because you know that instance variables are also accessible from the view templates, you now have what you need to proceed with creating the view template to display the contact's details.Create the show template. As you create the view, remember that it also has to support editing of the contact data, not just a static display. In the
app/views/contactdirectory, create a file calledshow.html.erbwith the following content:<h1>View/Edit Contact</h1> <% form_for:contact, @contact,:url => {:action=>'update', :id=>@contact.id} do |f| %> <p><label for="contact_first_name">First Name:</label> <%= f.text_field 'contact', 'first_name' %></p><p><label for="contact_last_name">Last Name:</label> <%= f.text_field 'contact', 'last_name' %></p> <p><label for="contact_address">Address:</label> <%= f.text_field 'contact', 'address' %></p> <p><label for="contact_city">City:</label> <%= f.text_field 'contact', 'city' %></p> <p><label for="contact_state">State:</label> <%= f.text_field 'contact', 'state' %></p> <p><label for="contact_country">Country:</label> <%= f.text_field 'contact', 'country' %></p> <p><label for="contact_phone">Phone:</label> <%= f.text_field 'contact', 'phone' %></p> <p><label for="contact_email">Email:</label> <%= f.text_field 'contact', 'email' %></p> <%= f.submit "Update" %> <% end %> <p><%= link_to 'Back', {:action => 'index'} %></p>
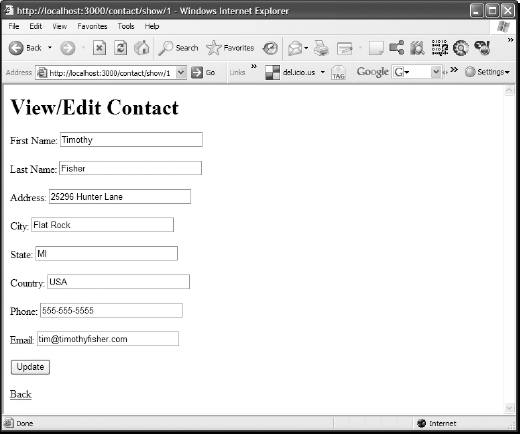
Assuming your server is still running, go back to the contact list screen from Figure 2.5 and click the contact, Timothy Fisher. Clicking the contact takes you to the show action, and you should now see the view shown in Figure 2.7. On this screen, you see a label and edit field for each of the contact's attributes. There is also an Update button, and a link back to the contact list screen.
Now take a closer look at the code in the show view template. Notice that this code is almost identical to the code you used in the new template. The only differences are a different page title in the first line, <h1>View/Edit Contact</h1>, different parameters for the form_for method, and a different label on the Submit button, Update. Let's take a look at the form_for line that is used in this template:
<% form_for: contact, @contact,:url => {:action=>'update',:id=>@
    contact.id} do |f| %>
Here you are passing four parameters to the form_for tag. This is one more than what was passed for the new template. The first parameter specifies the object type for which the form is being created. In this case that is a contact object.
The second parameter specifies a specific object instance that will be used to populate the form elements in the form that is created. Remember that in the show action, you set an @contact instance variable to contain the contact instance that the user clicked on. That object instance is used to populate the contact form.
The third parameter specifies where the form should be submitted. In this case, the form is submitted to the update action, and an id is also specified so that the update action will be able to retrieve the correct contact to update it. Since a controller is not specified it will default to the current controller, which is the contact controller.
The last parameter that is passed to the form_for tag is the code block that begins with the do |f| statement. Inside the block is where you will specify the body of the form.
With the exception of a different label on the form submit button, the contents of the form code block is identical to what you saw for the new form. However, since you passed an instance variable that holds a valid contact object, each of the form input fields will be pre-populated with the values of that contact instance.
If you remember that one of the core philosophies that drive Rails development is Don't Repeat Yourself, or DRY, you might be thinking at this point that there is an awful lot of duplication between the show.html.erb and new.html.erb templates. In Chapter 5, you will learn about another Rails technology called partials that will allow you to eliminate all of the duplication for cases such as this one where you have duplicated code between two or more views.
In the previous section you implemented the show action. This action allowed you to click on an existing contact and be taken to a form where you can view and change the details of an existing contact. Now you will implement the update action which will handle the submission of the form displayed by the show action to make changes to a contact.
Create the update action. Open up the contact_controller.rb file and add an update method using the code below:
def update
    @contact = Contact.find(params[:id])
    @contact.attributes = params[:contact]
    @contact.save!
    redirect_to:action => "index"
end
In this method, you first find the correct Contact object to update using the Contact.find method with the id of the contact that was edited. Remember that you specified the id of the contact being edited along with the update action in the form_for tag of the show template. After you have the correct contact instance, you update its attributes using the attributes= method of the contact instance.
You specify the new attributes by grabbing them from the request parameters using the syntax params[:contact]. The attributes= method is provided by ActiveRecord::Base to all of your model classes. Using this method is a quick way to update all of a model object's attributes with a single line of code. With the contact's attributes updated, you'll then call the save! method to save the new attributes to the database. Finally, the user is redirected back to the main contact list using the redirect_to method with the :action=>"index" parameter.
This completes the implementation of the show and edit functionality. Now you can try out the new functionality by clicking a contact from the contact list view. You should be taken to the contact display/edit view. From that view, go ahead and edit a few of the contact's fields and then click the update button. If you changed the contact's name, you should see that reflected in the display of the contat list. You can verify changes to other attributes by viewing the contact's details again by clicking on that contact again.
Assuming all went well for you, you have now completed the functionality that you originally set out to implement, that is the ability to create, view, and update contacts in your contact list application. If all did not go well and your show-and-edit functionality does not seem to work as advertised, I'd suggest that you double-check all of your code and make sure you did not skip any steps in the previous sections. In most cases, the error screens that Rails presents when something does go wrong are informative enough to be able to quickly diagnose a problem.
Let's recap what you have been able to accomplish so far. From absolutely nothing, you have created a new Rails application, and a MySQL database to serve as a Contact List application. With the Contact List application, you can show a list of contacts stored in the database, view and edit an existing contact, and create a new contact. If you've been creating the application as you read this, you were probably able to create everything in less than one hour. Not bad for your first experience with writing a Rails application. Now to finish off this first application, add a bit of style so that it looks better. You'll do that in the next section.
You have a complete application that meets the requirements set forth when you started developing it, but most people would find it lacking in appeal. The look and feel of an application is often an important part of whether or not it is successful.
A Rails application is typically styled using CSS style sheets. When you created the project, the public/stylesheets directory was created. This is the directory where you will place any style sheets that you create.
You want to be able to include a style sheet in every page without having to modify every view template file to link the style sheet. Rails gives you the answer you need through another file type called layouts.
You can put boilerplate HTML in a layout file and have that included in all of your view templates. The layout file can include content that goes both before and after the content of your view templates. The content in a layout file wraps the view templates with which it is associated. If you create a layout file with the same name as your controller, it is used automatically with all of the views associated with that controller. If you want to give the layout file a different name, you can specify the name of a layout file in any controller class.
If you want a layout file to apply to all of your view templates, regardless of the controller, you can use a layout file named application.html.erb in the application/views/layouts directory. This layout will be applied to all of your views that do not have a more specific layout file specified. If you have an application layout file and a controller specific layout file, the controller specific layout file will be used for views rendered from that controller.
To style the contact list application, you will create an application.html.erb layout file that will be used for each of your view templates.
Note
Specifying the name of a layout file in any controller class is covered in Chapter 4, along with details about the controllers.
Create a layout template. In the app/views/layouts directory, create a file called application.html.erb. Type the following content into the file:
<!DOCTYPE HTML PUBLIC "-//W3C//DTD XHTML 1.0 Strict//EN"
 "http://www.w3.org/TR/xhtml1/DTD/xhtml1-strict.dtd">
<html>
  <head>
    <title>Contact List Manager</title>
    <%= stylesheet_link_tag 'styles' %>
  </head>
  <body>
<%= yield %> </body> </html>
This provides the standard template for an HTML Web page. Now, all of your views rendered by the contact controller will be wrapped with this code and be a little more standards-compliant. The content of a view template is inserted where the <%= yield %> statement is also.
In the HTML HEAD section, a title is provided in the layout so that the title bar in the browser will show your application name as Contact List Manager. Finally, the layout includes a style sheet using a Rails helper method, stylesheet_link_tag.
The stylesheet_link_tag helper method allows you to easily link to a CSS style sheet without having to remember the standard HTML method of doing so. The parameter passed to this method specifies the name of your style sheet without the .css extension. Rails looks for style sheets in the public/stylesheets directory of your project. So with the link you've added to your layout template, Rails will look for a file named styles.css in the public/stylesheets directory.
Note
Within layout templates in older Rails application code, you might see the line <%=@content_for_layout %> instead of <%= yield %>. In new applications, the preferred method for indicating where content is inserted in a layout is to use <%= yield %> instead of <%= @content_for_layout %>. The <%= yield %> method is more indicative of the fact that Ruby blocks are involved in how the content insertion happens, because the yield keyword is associated with Ruby blocks.
Create a stylesheet. Create the styles.css file in public/stylesheets and begin adding some style to the application. Use the following content:
body {
    font-family: "Trebuchet MS";
}
h1 {
    font-weight: bold;
    text-align:center;
}
ul {
   font-size: 1.2em;
   line-height: 1.5em;
}

label {
    float: left;
    width: 125px;
    font-weight: bold;
}
input {
float: left;
width: 170px;
}
a, a:visited {
color: blue;
font-weight: bold;
}
form {
float:left;
margin-bottom: 20px;
}
p {
clear:both;
float: left;
margin-top: 0px;
margin-bottom: 10px;
}
#contact_submit {
clear: both;
float: left;
width: 75px;
margin-top: 15px;
margin-left: 220px;
}It is not a goal of this book to teach CSS skills, so I will not walk through the details of the CSS style sheet. However, CSS is an important skill for any Web developer to have. The style sheet shown above is fairly basic and should not be confusing to a Web developer. If you are not familiar with any of the styles used in this style sheet, it would be a very good idea for you to pick up a book about CSS and polish up on that skill. Whether it is your job to develop front-end code or not, you will find it helpful to understand basic CSS styling.
Now if you reload the application, you should see a nicer looking index view and much nicer looking form views also. On the form views, each of your text input boxes should be aligned on the left. With a bit of CSS styling you can turn any Web page into something that is nicer to look at.
Now that you've completed your first basic Rails application, here's another bit of Rails magic. You could have generated the model, controller, and view classes that you needed using a single Rails generator script called scaffolding. Scaffolding is an excellent resource for quickly prototyping an application or to get something up and running in the early stages of application development.
Let's walk through a quick example of how you might start an application using the Rails scaffolding generator. From a command-line, use the rails command to create a new Rails project:
> rails scaffold_test
That will create the skeleton for a new Rails project for you. For this example, let's assume you were creating an interface to manage a list of users. Use the scaffold generator to create complete scaffolding for a User model:
> ruby script/generate scaffold User name:string email:string
   birthdate:date
    exists app/models/
    exists app/controllers/
    exists app/helpers/
    create app/views/users
    exists app/views/layouts/
    exists test/functional/
    exists test/unit/
    create app/views/users/index.html.erb
    create app/views/users/show.html.erb
    create app/views/users/new.html.erb
    create app/views/users/edit.html.erb
    create app/views/layouts/users.html.erb
    create public/stylesheets/scaffold.css
  dependency model
    exists app/models/
    exists test/unit/
    exists test/fixtures/
    create app/models/user.rb
    create test/unit/user_test.rb
    create test/fixtures/users.yml
    create db/migrate
    create db/migrate/001_create_users.rb
    create app/controllers/users_controller.rb
    create test/functional/users_controller_test.rb
    create app/helpers/users_helper.rb
     route map.resources:users
As you see by the output of this command, the scaffold generator creates quite a few files for you with no additional work. You get everything that you need to support a users model including a controller, a helper, the model class, views, and tests.
Now take a look at a few of the files that were generated for you. First, open up the User model from app/models/user.rb. Your file should be similar to this:
class User < ActiveRecord::Base
end
There is nothing too interesting here. This looks just like a model class that is generated with the regular model generator. Now, open up the UsersController from app/controllers/users_controller.rb. You should see the code shown in Listing 2.1.
Example 2.1. app/controllers/users_controller.rb
class UsersController < ApplicationController
  # GET /users
  # GET /users.xml
  def index
    @users = User.find(:all)

    respond_to do |format|
      format.html # index.html.erb
      format.xml { render:xml => @users }
    end
  end

  # GET /users/1
  # GET /users/1.xml
  def show
    @user = User.find(params[:id])

    respond_to do |format|
      format.html # show.html.erb
      format.xml { render:xml => @user }
    end
  end

  # GET /users/new
  # GET /users/new.xml
  def new
    @user = User.new

    respond_to do |format|
      format.html # new.html.erb
      format.xml { render:xml => @user }
    end
  end

  # GET /users/1/edit
  def edit
    @user = User.find(params[:id])
  end

  # POST /users
  # POST /users.xml
  def create
@user = User.new(params[:user])
respond_to do |format|
if @user.save
flash[:notice] = 'User was successfully created.'
format.html { redirect_to(@user) }
format.xml { render:xml => @user,:status =>:created,:location =>
@user }
else
format.html { render:action => "new" }
format.xml { render:xml => @user.errors,:status =>:unprocessable_
entity }
end
end
end
# PUT /users/1
# PUT /users/1.xml
def update
@user = User.find(params[:id])
respond_to do |format|
if @user.update_attributes(params[:user])
flash[:notice] = 'User was successfully updated.'
format.html { redirect_to(@user) }
format.xml { head:ok }
else
format.html { render:action => "edit" }
format.xml { render:xml => @user.errors,:status =>:unprocessable_
entity }
end
end
end
# DELETE /users/1
# DELETE /users/1.xml
def destroy
@user = User.find(params[:id])
@user.destroy
respond_to do |format|
format.html { redirect_to(users_url) }
format.xml { head:ok }
end
end
endNow you see the real power of the scaffold generator. The users controller contains a complete implementation of all of the CRUD methods for users. The methods implemented for you include: index, show, new, edit, create, update, and destroy. The implementation of these methods uses the RESTful architecture style which is covered in detail in Chapter 12.
In addition to a controller that implements all of the CRUD methods, the scaffold generator also creates view templates for you that correspond to all of the CRUD methods. Within the app/views directory, you should see the following subdirectories and files:
-- layouts
------ users.html.erb
-- users
------ edit.html.erb
------ index.html.erb
------ new.html.erb
------ show.html.erb
With the controller methods and the view templates created by the scaffold generator, you have a complete implementation of the CRUD functionality for a given model. Many developers like to start their projects by generating scaffolding for all of their model objects. This gives them a head start on development and an excellent code base to build upon.
Note
In Chapter 11, you can read about some additional scaffolding implementations that are available as Rails plugins. These external scaffolding plugins generally will generate richer user interfaces in the view templates.
On the Web, you can find many excellent learning resources to get you started with Rails development. The Official Ruby on Rails Web site (www.rubyonrails.org) is the first place to look. A sampling of the learning resources you can find on this site includes the following:
Creating a Weblog in 15 minutes: This shows you how to create a simple Web log application from scratch in less than 15 minutes. The Web log you create includes a comments feature and an administration interface.
Putting Flickr on Rails: In this, you'll create a photo search application that makes use of the public API to the popular photo-sharing site,
Flickr.com.Evolving your database schema without a sweat: This 20-minute tutorial provides a great overview of the features available for managing your database schema using Rails migrations.
There are several very good Rails presentations on the Ruby on Rails site, and many excellent Rails resources are also available on other Web sites. If you do a Google search on Rails and tutorials you can find many excellent Rails tutorials, some emphasizing a certain feature, and others more general in nature. An excellent site with many online forums dedicated to Rails is the Rails Forum, available at www.railsforum.com.
You may also be interested in the Ruby on Rails mailing list. You can find more information about this at www.rubyonrails.org/community. Be warned, though, that the mailing list tends to generate a tremendous amount of traffic, so you may want to set up a filter to automatically sort these messages into a folder of their own or just subscribe to the weekly digest.
If you like to chat with live peers, you can also find the official Rails IRC channel on the irc.freenode.net server, with the channel name #rubyonrails. There are also many good Rails forums on various sites. Just doing a Rails search on Google should be enough to get you started with exploring what is available.
This chapter provides an overview of Ruby on Rails, a little bit of its history, and an introduction to what it provides and how it is architected. You were also shown how to write your very first Rails application. The steps you used to create the simple Rails application built in this chapter are the same steps that you will usually follow to begin development of any Rails application that you write. The steps to follow are:
Use the Rails command to create the project directory structure and default files.
Create the database for your project.
Create one or more model objects.
Create one or more controller objects.
Create and style your views.
With the relatively small number of lines of code that you have to actually write, you can create a Web application that allows users to view a list of contacts, add new contacts to a database, view a contact's details, and edit a contact.