
Chapter 8
Basic Login
Now that new users can sign up for our site (Chapter 7), it’s time to give them the ability to log in and log out. In this chapter, we’ll implement a basic but still fully functional login system: The application will maintain the logged-in state until the browser is closed by the user. The resulting authentication system will allow us to customize the site and implement an authorization model based on login status and identity of the current user. For example, we’ll be able to update the site header with login/logout links and a profile link.
In Chapter 10, we’ll impose a security model in which only logged-in users can visit the user index page, only the correct user can access the page for editing their information, and only administrative users can delete other users from the database. Finally, in Chapter 13, we’ll use the identity of a logged-in user to create microposts associated with that user, and in Chapter 14 we’ll allow the current user to follow other users of the application (thereby receiving a feed of their microposts).
The authentication system from this chapter will also serve as a foundation for the more advanced login system developed in Chapter 9. Instead of “forgetting” users on browser close, Chapter 9 will start by automatically remembering users, and will then optionally remember users based on the value of a “remember me” checkbox. As a result, taken together Chapter 8 and Chapter 9 develop all three of the most common types of login systems on the Web.
8.1 Sessions
HTTP is a stateless protocol, treating each request as an independent transaction that is unable to use information from any previous requests. This means there is no way within the Hypertext Transfer Protocol to remember a user’s identity from page to page; instead, web applications requiring user login must use a session, which is a semipermanent connection between two computers (such as a client computer running a web browser and a server running Rails).
The most common techniques for implementing sessions in Rails involve using cookies, which are small pieces of text placed on the user’s browser. Because cookies persist from one page to the next, they can store information (such as a user id) that can be used by the application to retrieve the logged-in user from the database. In this section and in Section 8.2, we’ll use the Rails method called session to make temporary sessions that expire automatically on browser close. In Chapter 9, we’ll learn how to make longer-lived sessions using the closely related cookies method.
It’s convenient to model sessions as a RESTful resource: Visiting the login page will render a form for new sessions, logging in will create a session, and logging out will destroy it. Unlike the Users resource, which uses a database back-end (via the User model) to persist data, the Sessions resource will use cookies, and much of the work involved in login comes from building this cookie-based authentication machinery. In this section and the next, we’ll prepare for this work by constructing a Sessions controller, a login form, and the relevant controller actions. We’ll then complete user login in Section 8.2 by adding the necessary session-manipulation code.
As in previous chapters, we’ll do our work on a topic branch and merge in the changes at the end:
$ git checkout -b basic-login8.1.1 Sessions Controller
The elements of logging in and out correspond to particular REST actions of the Sessions controller: The login form is handled by the new action (covered in this section), actually logging in is handled by sending a POST request to the create action (Section 8.2), and logging out is handled by sending a DELETE request to the destroy action (Section 8.3). (Recall the association of HTTP verbs with REST actions from Table 7.1.)
To get started, we’ll generate a Sessions controller with a new action (Listing 8.1).
Listing 8.1: Generating the Sessions controller.
$ rails generate controller Sessions new(Including new actually generates views as well, which is why we don’t include actions like create and destroy that don’t correspond to views.) Following the model from Section 7.2 for the signup page, our plan is to create a login form for creating new sessions, as mocked up in Figure 8.1.
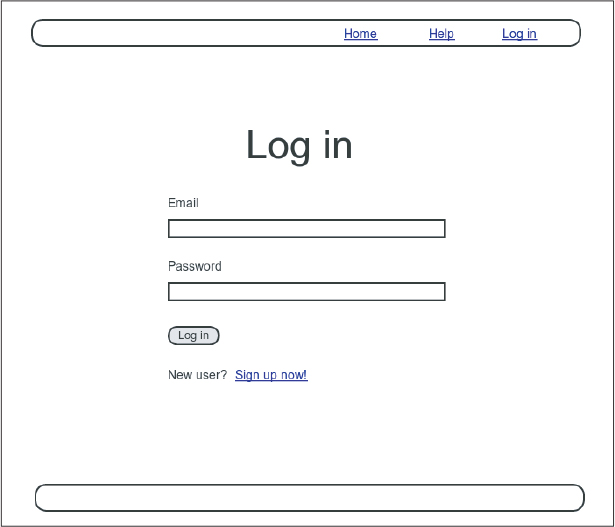
Figure 8.1: A mockup of the login form.
Unlike the Users resource, which used the special resources method to obtain a full suite of RESTful routes automatically (Listing 7.3), the Sessions resource will use only named routes, handling GET and POST requests with the login route and DELETE requests with the logout route. The result appears in Listing 8.2 (which also deletes the unneeded routes generated by rails generate controller).
Listing 8.2: Adding a resource to get the standard RESTful actions for sessions. REDconfig/routes.rb
Rails.application.routes.draw do
  root   "static_pages#home"
  get    "/help",    to: "static_pages#help"
  get    "/about",   to: "static_pages#about"
  get    "/contact", to: "static_pages#contact"
  get    "/signup",  to: "users#new"
  get    "/login",   to: "sessions#new"
  post   "/login",   to: "sessions#create"
  delete "/logout",  to: "sessions#destroy"
  resources :users
end
With the routes in Listing 8.2, we also need to update the test generated in Listing 8.1 with the new login route, as shown in Listing 8.3.
Listing 8.3: Updating the Sessions controller test to use the login route. GREENtest/controllers/sessions_controller_test.rb
require "test_helper"

class SessionsControllerTest < ActionDispatch::IntegrationTest

  test "should get new" do
    get login_path
    assert_response :success
  end
end
The routes defined in Listing 8.2 correspond to URLs and actions similar to those for users (Table 7.1), as shown in Table 8.1.
Table 8.1: Routes provided by the sessions rules in Listing 8.2.
HTTP request method | URL | Named route | Action | Purpose |
|---|---|---|---|---|
| /login |
|
| page for a new session (log in) |
| /login |
|
| create a new session (log in) |
| /logout |
|
| delete a session (log out) |
Since we’ve now added several custom named routes, it’s useful to look at the complete list of the routes for our application, which we can generate using rails routes:
$ rails routes
   Prefix Verb     URI Pattern                 Controller#Action
     root GET      /                           static_pages#home
     help GET      /help(.:format)             static_pages#help
    about GET      /about(.:format)            static_pages#about
  contact GET      /contact(.:format)          static_pages#contact
   signup GET      /signup(.:format)           users#new
    login GET      /login(.:format)            sessions#new
          POST     /login(.:format)            sessions#create
   logout DELETE   /logout(.:format)           sessions#destroy
    users GET      /users(.:format)            users#index
          POST     /users(.:format)            users#create
 new_user GET      /users/new(.:format)        users#new
edit_user GET      /users/:id/edit(.:format)   users#edit
     user GET      /users/:id(.:format)        users#show
          PATCH    /users/:id(.:format)        users#update
          PUT      /users/:id(.:format)        users#update
          DELETE   /users/:id(.:format)        users#destroy
It’s not necessary to understand the results in detail, but viewing the routes in this manner gives us a high-level overview of the actions supported by our application.
Exercises
To see other people’s answers and to record your own, subscribe to the Rails Tutorial course (https://www.railstutorial.org/) or to the Learn Enough All Access Subscription (https://www.learnenough.com/all-access).
What is the difference between
GET login_pathandPOST login_path?By piping the results of
rails routestogrep, list all the routes associated with the Users resource. Do the same for Sessions. How many routes does each resource have? Hint: Refer to the section on grep (https://www.learnenough.com/command-line-tutorial/inspecting_files#sec-grepping) in Learn Enough Command Line to Be Dangerous (https://www.learnenough.com/command-line).
8.1.2 Login Form
Having defined the relevant controller and route, now we’ll fill in the view for new sessions, i.e., the login form. Comparing Figure 8.1 with Figure 7.13, we see that the login form is similar in appearance to the signup form, except with two fields (email and password) in place of four.
As seen in Figure 8.2, when the login information is invalid we want to rerender the login page and display an error message. In Section 7.3.3, we used an error-messages partial to display error messages, but we saw in that section that those messages are provided automatically by Active Record. This won’t work for session creation errors because the session isn’t an Active Record object, so we’ll render the error as a flash message instead.

Figure 8.2: A mockup of login failure.
Recall from Listing 7.15 that the signup form uses the form_with helper, taking as an argument the user instance variable @user:
<%= form_with(model: @user) do |f| %>
  .
  .
  .
<% end %>
The main difference between the session form and the signup form is that we have no Session model, and hence have no @session variable corresponding to the @user variable in Listing 7.15. This means that, in constructing the new session form, we have to give form_with slightly different information; in particular, whereas
form_with(model: @user)allows Rails to infer that the action of the form should be to POST to the URL /users, in the case of sessions we need to indicate the corresponding URL, along with the scope (in this case, the session):
form_with(url: login_path, scope: :session)With the proper form_with in hand, it’s easy to make a login form to match the mockup in Figure 8.1 using the signup form (Listing 7.15) as a model, as shown in Listing 8.4.
Listing 8.4: Code for the login form.app/views/sessions/new.html.erb
<% provide(:title, "Log in") %>
<h1>Log in</h1>

<div class="row">
  <div class="col-md-6 col-md-offset-3">
    <%= form_with(url: login_path, scope: :session) do |f| %>

    <%= f.label :email %>
    <%= f.email_field :email, class: 'form-control' %>

    <%= f.label :password %>
    <%= f.password_field :password, class: 'form-control' %>

    <%= f.submit "Log in", class: "btn btn-primary" %>
  <% end %>

  <p>New user? <%= link_to "Sign up now!", signup_path %></p>
 </div>
</div>
Note that we’ve added a link to the signup page for convenience. With the code in Listing 8.4, the login form appears as in Figure 8.3. (Because the “Log in” navigation link hasn’t yet been filled in, you’ll have to type the /login URL directly into your address bar. We’ll fix this blemish in Section 8.2.3.)
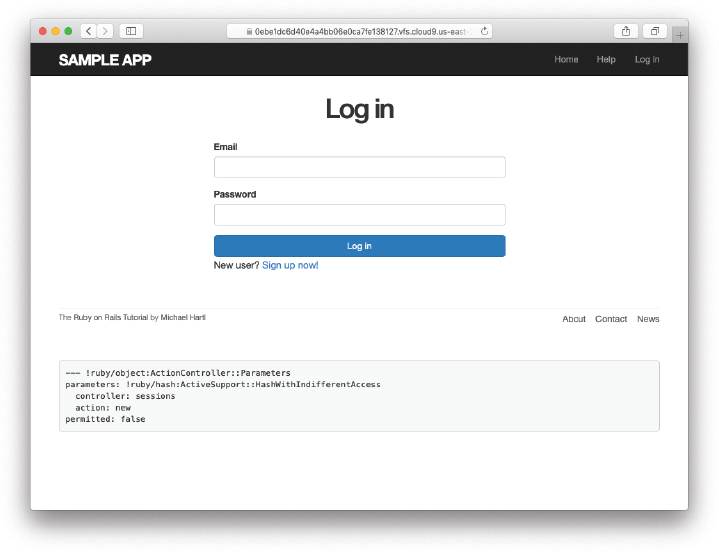
Figure 8.3: The login form.
Although details will differ, the generated form HTML should look something like Listing 8.5.
Listing 8.5: HTML for the login form produced by Listing 8.4.
<form action="/login" accept-charset="UTF-8" method="post">
    <input type="hidden" name="authenticity_token"
           value="4d0...FFw" autocomplete="off"/>
    <label for="session_email">Email</label>
    <input class="form-control" type="email" name="session[email]"
           id="session_email"/>
    <label for="session_password">Password</label>
    <input class="form-control" type="password" name="session[password]"
           id="session_password"/>
    <input type="submit" name="commit" value="Log in" class="btn btn-primary"
           data-disable-with="Log in"/>
</form>
Comparing Listing 8.5 with Listing 7.17, you might be able to guess that submitting this form will result in a params hash where params[:session][:email] and params[:session][:password] correspond to the email and password fields.
Exercises
To see other people’s answers and to record your own, subscribe to the Rails Tutorial course or to the Learn Enough All Access Subscription.
Submissions from the form defined in Listing 8.4 will be routed to the Session controller’s
createaction. How does Rails know to do this? Hint: Refer to Table 8.1 and the first line of Listing 8.5.
8.1.3 Finding and Authenticating a User
As in the case of creating users (signup), the first step in creating sessions (login) is to handle invalid input. We’ll start by reviewing what happens when a form gets submitted, and then arrange for helpful error messages to appear in the case of login failure (as mocked up in Figure 8.2). Then we’ll lay the foundation for successful login (Section 8.2) by evaluating each login submission based on the validity of its email/password combination.
Let’s start by defining a minimalist create action for the Sessions controller, along with empty new and destroy actions (Listing 8.6). The create action in Listing 8.6 does nothing but render the new view, but it’s enough to get us started. Submitting the /sessions/new form then yields the result shown in Figure 8.4 and Figure 8.5.
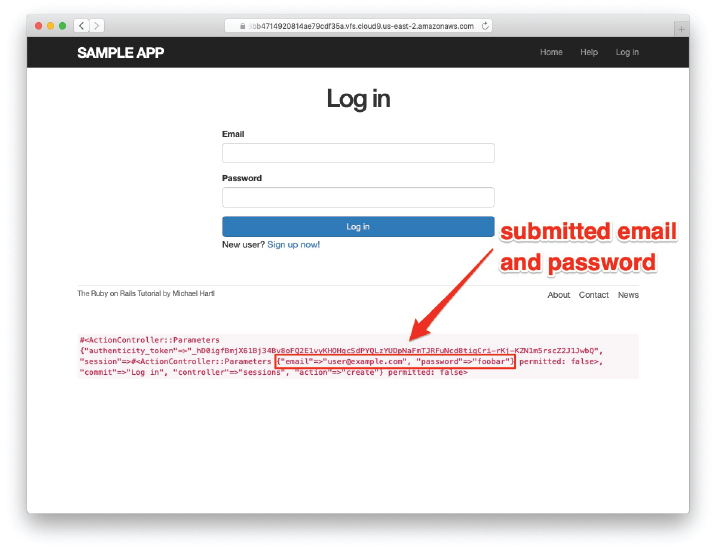
Figure 8.4: The initial failed login, with create as in Listing 8.6.

Figure 8.5: A closer look at the debug information from Figure 8.4.
Listing 8.6: A preliminary version of the Sessions create action.app/controllers/sessions_controller.rb
class SessionsController < ApplicationController

  def new
  end

  def create
    render 'new', status: :unprocessable_entity
  end

  def destroy
  end
end
Note the :unprocessable_entity status code in the create action, which (as noted in Section 7.3.1) is necessary when using Turbo (Section 8.2.4).
Carefully inspecting the debug information in Figure 8.5 shows that, as hinted at the end of Section 8.1.2, the submission results in a params hash containing the email and password under the key session, which (omitting some irrelevant details used internally by Rails) appears as follows:
#<ActionController::Parameters
{"authenticity_token"=>"…",
   "session" =>#<ActionController::Parameters
               {"email"=>"[email protected]",
               "password"=>"foobar"} permitted: false>,
               "commit"=>"Log in",
               "controller"=>"sessions",
               "action"=>"create"} permitted: false>
As with the case of user signup (Figure 7.17), these parameters form a nested hash like the one we saw in Listing 4.13. In particular, params contains a nested hash of the form
{ session: { password: "foobar", email: "[email protected]" } }(The debug information uses string keys, such as "session", but inside Rails the usual convention is to use symbols, such as :session.) This means that
params[:session]is itself a hash:
{ password: "foobar", email: "[email protected]" }As a result,
params[:session][:email]is the submitted email address and
params[:session][:password]is the submitted password.
In other words, inside the create action the params hash has all the information needed to authenticate users by email and password. Not coincidentally, we already have exactly the methods we need: the User.find_by method provided by Active Record (Section 6.1.4) and the authenticate method provided by has_secure_password (Section 6.3.4). Recalling that authenticate returns false for an invalid authentication (Section 6.3.4), our strategy for user login can be summarized as shown in Listing 8.7.
Listing 8.7: Finding and authenticating a user.app/controllers/sessions_controller.rb
class SessionsController < ApplicationController

  def new
  end

  def create
    user = User.find_by(email: params[:session][:email].downcase)
    if user && user.authenticate(params[:session][:password])
      # Log the user in and redirect to the user's show page.
    else
      # Create an error message.
      render 'new', status: :unprocessable_entity
    end
  end

  def destroy
  end
end
The first highlighted line in Listing 8.7 pulls the user out of the database using the submitted email address. (Recall from Section 6.2.5 that email addresses are saved as all lowercase, so here we use the downcase method to ensure a match when the submitted address is valid.) The next line can be a bit confusing but is fairly common in idiomatic Rails programming:
user && user.authenticate(params[:session][:password])This uses && (logical and) to determine if the resulting user is valid. Taking into account that any object other than nil and false itself is true in a boolean context (Section 4.2.2), the possibilities appear as in Table 8.2. We see from Table 8.2 that the if statement is true only if a user with the given email both exists in the database and has the given password, exactly as required.
Table 8.2: Possible results of user && user.authenticate(…).
User | Password | a && b |
|---|---|---|
nonexistent | anything |
|
valid user | wrong password |
|
valid user | right password |
|
Exercises
To see other people’s answers and to record your own, subscribe to the Rails Tutorial course or to the Learn Enough All Access Subscription.
Using the Rails console, confirm each of the values in Table 8.2. Start with
user = nil, and then useuser = User.first. Hint: To coerce the result to a boolean value, use the bang-bang trick from Section 4.2.2, as in!!(user && user.authenticate('foobar')).
8.1.4 Rendering with a Flash Message
Recall from Section 7.3.3 that we displayed signup errors using the User model error messages. These errors are associated with a particular Active Record object, but this strategy won’t work here because the session isn’t an Active Record model. Instead, we’ll put a message in the flash to be displayed upon failed login. A first, slightly incorrect, attempt appears in Listing 8.8.
Listing 8.8: An (unsuccessful) attempt at handling failed login.app/controllers/sessions_controller.rb
class SessionsController < ApplicationController

  def new
  end

  def create
    user = User.find_by(email: params[:session][:email].downcase)
    if user && user.authenticate(params[:session][:password])
      # Log the user in and redirect to the user's show page.
    else
      flash[:danger] = 'Invalid email/password combination' # Not quite right!
      render 'new', status: :unprocessable_entity
    end
  end

  def destroy
  end
end
Because of the flash message display in the site layout (Listing 7.29), the flash[:danger] message automatically gets displayed; because of the Bootstrap CSS, it automatically gets nice styling (Figure 8.6).
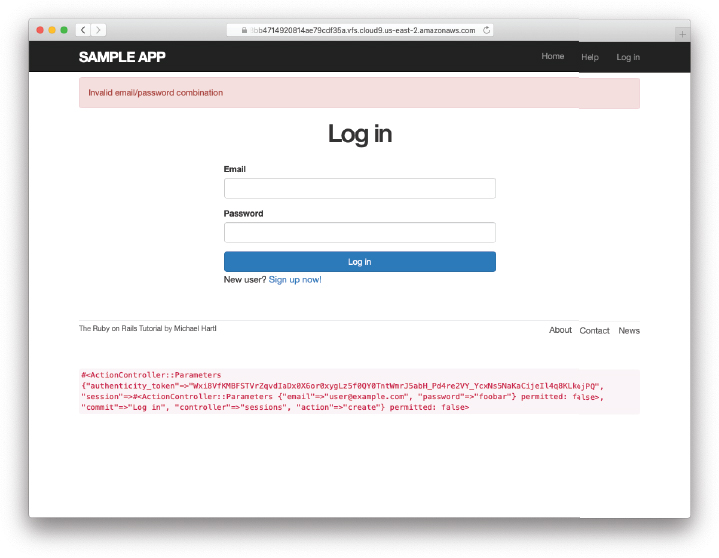
Figure 8.6: The flash message for a failed login.
Unfortunately, as noted in the text and in the comment in Listing 8.8, this code isn’t quite right. The page looks fine, though, so what’s the problem? The issue is that the contents of the flash persist for one request, but—unlike a redirect, which we used in Listing 7.27—re-rendering a template with render doesn’t count as a request. The result is that the flash message persists one request longer than we want. For example, if we submit invalid login information and then click on the Home page, the flash gets displayed a second time (Figure 8.7). Fixing this blemish is the task of Section 8.1.5.
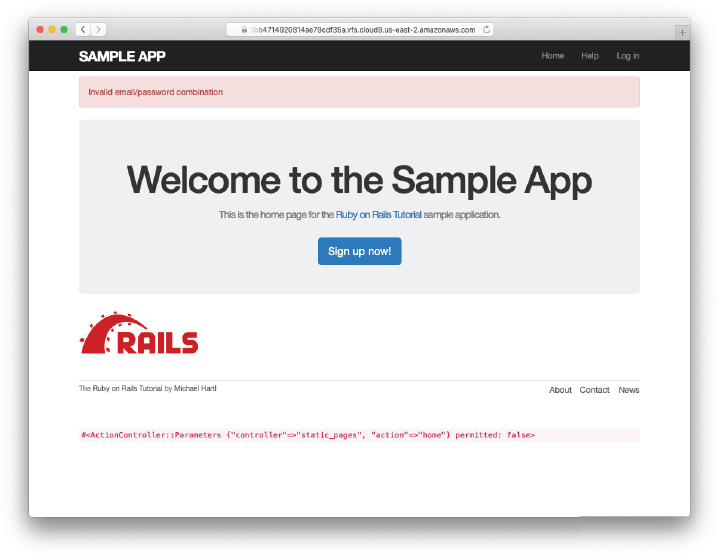
Figure 8.7: An example of flash persistence.
8.1.5 A Flash Test
The incorrect flash behavior is a minor bug in our application. According to the testing guidelines from Box 3.3, this is exactly the sort of situation where we should write a test to catch the error so that it doesn’t recur. We’ll thus write a short integration test for the login form submission before proceeding. In addition to documenting the bug and preventing a regression, this will also give us a good foundation for further integration tests of login and logout.
We start by generating an integration test for our application’s login behavior:
 $ rails generate integration_test users_login
      invoke  test_unit
      create    test/integration/users_login_test.rb
Next, we need a test to capture the sequence shown in Figure 8.6 and Figure 8.7. The basic steps appear as follows:
Visit the login path.
Verify that the new sessions form renders properly.
Post to the sessions path with an invalid
paramshash.Verify that the new sessions form returns the right status code and gets re-rendered.
Verify that a flash message appears.
Visit another page (such as the Home page).
Verify that the flash message doesn’t appear on the new page.
A test implementing the above steps appears in Listing 8.9.
Listing 8.9: A test to catch unwanted flash persistence. REDtest/integration/users_login_test.rb
require "test_helper"

class UsersLoginTest < ActionDispatch::IntegrationTest

  test "login with invalid information" do
    get login_path
    assert_template 'sessions/new'
    post login_path, params: { session: { email: "", password: "" } }
    assert_response :unprocessable_entity
    assert_template 'sessions/new'
    assert_not flash.empty?
    get root_path
    assert flash.empty?
  end
end
After adding the test in Listing 8.9, the login test should be RED:
Listing 8.10: RED
$ rails test test/integration/users_login_test.rbThis shows how to run one (and only one) test file using rails test and the full path to the file.
The way to get the failing test in Listing 8.9 to pass is to replace flash with the special variant flash.now, which is specifically designed for displaying flash messages on rendered pages. Unlike the contents of flash, the contents of flash.now disappear as soon as there is an additional request, which is exactly the behavior we’ve tested in Listing 8.9. With this substitution, the corrected application code appears as in Listing 8.11.
Listing 8.11: Correct code for failed login. GREENapp/controllers/sessions_controller.rb
class SessionsController < ApplicationController

  def new
  end

  def create
     user = User.find_by(email: params[:session][:email].downcase)
     if user && user.authenticate(params[:session][:password])
       # Log the user in and redirect to the user's show page.
     else
       flash.now[:danger] = 'Invalid email/password combination'
       render 'new', status: :unprocessable_entity
     end
  end

  def destroy
  end
end
We can then verify that both the login integration test and the full test suite are GREEN:
Listing 8.12: GREEN
$ rails test test/integration/users_login_test.rb
$ rails test
Exercises
To see other people’s answers and to record your own, subscribe to the Rails Tutorial course or to the Learn Enough All Access Subscription.
Verify in your browser that the sequence from Section 8.1.4 works correctly, i.e., that the flash message disappears when you click on a second page.
8.2 Logging In
Now that our login form can handle invalid submissions, the next step is to handle valid submissions correctly by actually logging a user in. In this section, we’ll log the user in with a temporary session cookie that expires automatically upon browser close. In Section 9.1, we’ll add sessions that persist even after closing the browser.
Implementing sessions will involve defining a large number of related functions for use across multiple controllers and views. You may recall from Section 4.2.4 that Ruby provides a module facility for packaging such functions in one place. Conveniently, a Sessions helper module was generated automatically when generating the Sessions controller (Section 8.1.1). Moreover, such helpers are automatically included in Rails views; by including the module into the base class of all controllers (the Application controller), we arrange to make them available in our controllers as well (Listing 8.13).1
1. I like this technique because it connects to the pure Ruby way of including modules, but Rails 4 introduced a technique called concerns that can also be used for this purpose. To learn how to use concerns, run a search for “how to use concerns in Rails”.
Listing 8.13: Including the Sessions helper module into the Application controller.app/controllers/application_controller.rb
class ApplicationController < ActionController::Base
  include SessionsHelper
end
With this configuration complete, we’re now ready to write the code to log users in.
8.2.1 The log_in Method
Logging a user in is simple with the help of the session method defined by Rails. (This method is separate and distinct from the Sessions controller generated in Section 8.1.1.) We can treat session as if it were a hash, and assign to it as follows:
session[:user_id] = user.idThis places a temporary cookie on the user’s browser containing an encrypted version of the user’s id, which allows us to retrieve the id on subsequent pages using session[:user_id]. In contrast to the persistent cookie created by the cookies method (Section 9.1), the temporary cookie created by the session method expires immediately when the browser is closed. (Some browsers offer an option to restore such sessions via a “continue where you left off” feature, but Rails has no control over this behavior. In such cases, the session cookie may persist even after logging out of the application. If you wish, you can use your technical sophistication to figure out how to disable this setting for your particular browser.)
Because we’ll want to use the same login technique in a couple of different places, we’ll define a method called log_in in the Sessions helper, as shown in Listing 8.14.
Listing 8.14: The log_in function.app/helpers/sessions_helper.rb
module SessionsHelper

  # Logs in the given user.
  def log_in(user)
    session[:user_id] = user.id
 end
end
Because temporary cookies created using the session method are automatically encrypted, the code in Listing 8.14 is secure, and there is no way for an attacker to infer the id from the encrypted version. The session is still vulnerable to a session hijacking attack, in which an attacker obtains a copy of the session id and then uses it to log in as the user (a process known as a session replay attack). Because the session disappears automatically on browser close, this is a relatively minor concern at the moment, but it’s far more serious in the case of the permanent cookies introduced in Chapter 9. We’ll discuss these issues further in Section 9.1.
There is a related attack we do need to be concerned with, though, known as session fixation. Briefly, it’s possible for an attacker to trick a user into using a session id known to the attacker, allowing the attacker to share the session. (See “Session Fixation” (https://guides.rubyonrails.org/security.html#session-fixation) in the Rails Guides security article (https://guides.rubyonrails.org/security.html) for more detail.) The solution is to reset the session immediately before logging in so that the attacker’s desired id gets cleared and a freshly created id ends up in the session hash, which we can do with the built-in Rails method reset_session:
reset_sessionWith the log_in method defined in Listing 8.14 and the reset_session discussion above, we’re now ready to complete the session create action by logging the user in and redirecting to the user’s profile page. The result appears in Listing 8.15.2
2. The log_in method is available in the Sessions controller because of the module inclusion in Listing 8.13.
Listing 8.15: Logging in a user.app/controllers/sessions_controller.rb
class SessionsController < ApplicationController

  def new
  end

  def create
    user = User.find_by(email: params[:session][:email].downcase)
    if user && user.authenticate(params[:session][:password])
      reset_session
      log_in user
      redirect_to user
    else
      flash.now[:danger] = 'Invalid email/password combination'
      render 'new', status: :unprocessable_entity
    end
  end

  def destroy
  end
end
Note the compact redirect
redirect_to userwhich we saw before in Section 7.4.1. Rails automatically converts this to the route for the user’s profile page:
user_url(user)With the create action defined in Listing 8.15, the login form defined in Listing 8.4 should now be working. It doesn’t have any effects on the application display, though, so short of inspecting the browser session directly there’s no way to tell that you’re logged in. As a first step toward enabling more visible changes, in Section 8.2.2 we’ll retrieve the current user from the database using the id in the session. In Section 8.2.3, we’ll change the links on the application layout, including a URL to the current user’s profile.
Exercises
To see other people’s answers and to record your own, subscribe to the Rails Tutorial course or to the Learn Enough All Access Subscription.
Log in with a valid user and inspect your browser’s cookies. What is the value of the session content? Hint: If you don’t know how to view your browser’s cookies, Google for it (Box 1.2).
What is the value of the
Expiresattribute from the previous exercise?
8.2.2 Current User
Having placed the user’s id securely in the temporary session, we are now in a position to retrieve it on subsequent pages, which we’ll do by defining a current_user method to find the user in the database corresponding to the session id. The purpose of current_user is to allow constructions such as
<%= current_user.name %>and
redirect_to current_userTo find the current user, one possibility is to use the find method, as on the user profile page (Listing 7.5):
User.find(session[:user_id])But recall from Section 6.1.4 that find raises an exception if the user id doesn’t exist. This behavior is appropriate on the user profile page because it will only happen if the id is invalid, but in the present case session[:user_id] will often be nil (i.e., for non-logged-in users). To handle this possibility, we’ll use the same find_by method used to find by email address in the create method, with id in place of email:
User.find_by(id: session[:user_id])Rather than raising an exception, this method returns nil (indicating no such user) if the id is invalid.
We could now define the current_user method as follows:
def current_user
  if session[:user_id]
    User.find_by(id: session[:user_id])
  end
end
(If the session user id doesn’t exist, the function just falls off the end and returns nil automatically, which is exactly what we want.) This would work fine, but it would hit the database multiple times if, e.g., current_user appeared multiple times on a page. Instead, we’ll follow a common Ruby convention by storing the result of User.find_by in an instance variable, which hits the database the first time but returns the instance variable immediately on subsequent invocations:3
3. This practice of remembering variable assignments from one method invocation to the next is known as memoization. (Note that this is a technical term; in particular, it’s not a misspelling of “memorization”—a subtlety lost on the hapless copyeditor of a previous edition of this book.)
if @current_user.nil?
  @current_user = User.find_by(id: session[:user_id])
else
  @current_user
end
Recalling the or operator || seen in Section 4.2.2, we can rewrite this as follows:
@current_user = @current_user || User.find_by(id: session[:user_id])Because a User object is true in a boolean context, the call to find_by only gets executed if @current_user hasn’t yet been assigned.
Although the preceding code would work, it’s not idiomatically correct Ruby; instead, the proper way to write the assignment to @current_user is like this:
@current_user ||= User.find_by(id: session[:user_id])This uses the potentially confusing but frequently used ||= (“or equals”) operator (Box 8.1).
Applying the results of the above discussion yields the succinct current_user method shown in Listing 8.16. (There’s a slight amount of repetition in the use of session[:user_id], which we’ll eliminate in Section 9.1.2.)
Listing 8.16: Finding the current user in the session.app/helpers/sessions_helper.rb
module SessionsHelper

  # Logs in the given user.
  def log_in(user)
    session[:user_id] = user.id
  end

  # Returns the current logged-in user (if any).
  def current_user
    if session[:user_id]
      @current_user ||= User.find_by(id: session[:user_id])
    end
  end
end
With the working current_user method in Listing 8.16, we’re now in a position to make changes to our application based on user login status.
Exercises
To see other people’s answers and to record your own, subscribe to the Rails Tutorial course or to the Learn Enough All Access Subscription.
Confirm at the console that
User.find_by(id: ...)returnsnilwhen the corresponding user doesn’t exist.In a Rails console, create a
sessionhash with key:user_id. By following the steps in Listing 8.17, confirm that the||=operator works as required.
Listing 8.17: Simulating session in the console.
>> session = {}
>> session[:user_id] = nil
>> @current_user ||= User.find_by(id: session[:user_id])
 <What happens here?>
>> session[:user_id] = User.first.id
>> @current_user ||= User.find_by(id: session[:user_id])
 <What happens here?>
>> @current_user ||= User.find_by(id: session[:user_id])
 <What happens here?>
8.2.3 Changing the Layout Links
The first practical application of logging in involves changing the layout links based on login status. In particular, as seen in the Figure 8.8 mockup,4 we’ll add links for logging out, for user settings, for listing all users, and for the current user’s profile page. Note in Figure 8.8 that the logout and profile links appear in a dropdown “Account” menu; we’ll see in Listing 8.19 how to activate this menu with JavaScript.
4. Image courtesy of Stefan Pircher/Shutterstock.
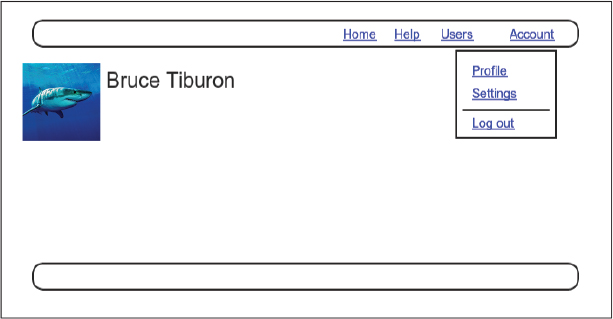
Figure 8.8: A mockup of the user profile after a successful login.
At this point, in real life I would consider writing an integration test to capture the behavior described above. As noted in Box 3.3, as you become more familiar with the testing tools in Rails you may find yourself more inclined to write tests first. In this case, though, such a test involves several new ideas, so for now it’s best deferred to its own section (Section 8.2.6).
The way to change the links in the site layout involves using an if-else statement inside embedded Ruby to show one set of links if the user is logged in and another set of links otherwise:
<% if logged_in? %>
  # Links for logged-in users
<% else %>
  # Links for non-logged-in-users
<% end %>
This kind of code requires the existence of a logged_in? boolean method, which we’ll now define.
A user is logged in if there is a current user in the session, i.e., if current_user is not nil. Checking for this requires the use of the “not” operator (Section 4.2.2), written using an exclamation point ! and usually read as “bang”. The resulting logged_in? method appears in Listing 8.18.
Listing 8.18: The logged_in? helper method.app/helpers/sessions_helper.rb
module SessionsHelper

  # Logs in the given user.
  def log_in(user)
    session[:user_id] = user.id
  end

  # Returns the current logged-in user (if any).
  def current_user
    if session[:user_id]
      @current_user ||= User.find_by(id: session[:user_id])
    end
  end

  # Returns true if the user is logged in, false otherwise.
  def logged_in?
    !current_user.nil?
  end
end
With the addition in Listing 8.18, we’re now ready to change the layout links if a user is logged in. There are four new links, two of which are stubbed out (to be completed in Chapter 10):
<%= link_to "Users",    '#' %>
<%= link_to "Settings", '#' %>
The logout link, meanwhile, uses the logout path defined in Listing 8.2:
<%= link_to "Log out", logout_path,
                       data: { "turbo-method": :delete } %>
Notice that the logout link passes a hash argument indicating that it should submit with an HTTP DELETE request.5
5. Web browsers can’t actually issue DELETE requests; Rails fakes it with JavaScript.
We’ll also add a profile link (using the current_user method defined in Listing 8.16) as follows:
<%= link_to "Profile", current_user %>We could have used an explicit call to user_path like this:
<%= link_to "Profile", user_path(current_user) %>This would work just fine, but Rails knows that current_user is a User object, so in the context of a link_to it automatically converts current_user into user_path(current_user).
Finally, when users aren’t logged in, we’ll use the login path defined in Listing 8.2 to make a link to the login form:
<%= link_to "Log in", login_path %>Putting everything together gives the updated header partial shown in Listing 8.19.
Listing 8.19: Changing the layout links for logged-in users.app/views/layouts/_header.html.erb
<header class="navbar navbar-fixed-top navbar-inverse">
  <div class="container">
    <%= link_to "sample app", root_path, id: "logo" %>
    <nav>
      <ul class="nav navbar-nav navbar-right">
        <li><%= link_to "Home", root_path %></li>
        <li><%= link_to "Help", help_path %></li>
        <% if logged_in? %>
          <li><%= link_to "Users", '#' %></li>
          <li class="dropdown">
            <a href="#" id="account" class="dropdown-toggle">
              Account <b class="caret"></b>
            </a>
            <ul id="dropdown-menu" class="dropdown-menu">
              <li><%= link_to "Profile", current_user %></li>
              <li><%= link_to "Settings", '#' %></li>
              <li class="divider"></li>
              <li>
                <%= link_to "Log out", logout_path,
                                       data: { "turbo-method": :delete } %>
              </li>
            </ul>
          </li>
        <% else %>
          <li><%= link_to "Log in", login_path %></li>
        <% end %>
      </ul>
    </nav>
  </div>
</header>
Note that only the new links are highlighted in Listing 8.19, but much of the rest of the code is also new, including the CSS id in the Account menu:
<ul id="dropdown-menu" class="dropdown-menu">We’ll put this id to good use in Section 8.2.4.
At this point, you should visit the login path and log in as the user you created in Section 7.4.3 (e.g., username [email protected], password foobar). With the code in Listing 8.19, you should see the links for logged-in users, as shown in Figure 8.9. If you quit your browser completely, you should also be able to verify that the application forgets your login status, requiring you to log in again to see the links change.6
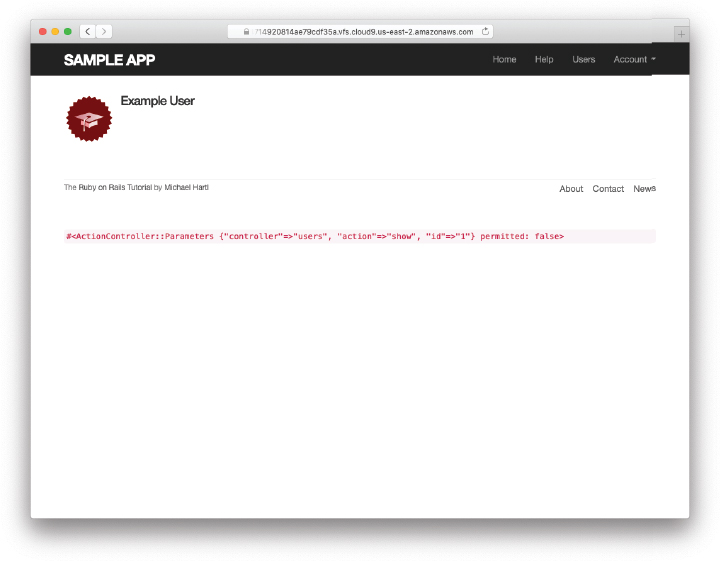
Figure 8.9: A logged-in user with new navigation links.
6. If you’re using the cloud IDE, I recommend using a different browser to test the login behavior so that you don’t have to close down the browser running the IDE.
8.2.4 Menu Toggle
In this section, we’ll use the CSS id added in Listing 8.19 to find the dropdown menu on the page and use JavaScript to toggle it (that is, to open and close it in the browser). To do this, we’ll have to solve the important problem of including JavaScript in a Rails project, which has uses that go far beyond this relatively simple application.
Over the years, Rails has used a variety of techniques for packaging Java-Script assets, and has now standardized on a technique known as Importmap. In Rails, Importmap is provided by the importmap-rails gem, which has already been included via the Gemfile in Listing 3.2. As a result, all we need to do is install Importmap itself (Listing 8.20) and then install Turbo and Stimulus, which are part of the Hotwire framework mentioned briefly in Box 1.1.
Listing 8.20: Installing Importmap, Turbo, and Stimulus.
$ rails importmap:install turbo:install stimulus:installNote that the installation commands in Listing 8.20 are ordinarily run automatically when creating a new Rails application using rails new, but here we have to run them by hand since they got skipped as part of passing the --skip-bundle option in Listing 3.1.
The installation commands in Listing 8.20 automatically update a couple of files in our project: the JavaScript manifest file manifest.js (Listing 8.21) and the application layout application.html.erb (Listing 8.22).
Listing 8.21: The automatically added Importmap lines in the JavaScript manifest.app/assets/config/manifest.js
//= link_tree ../images
//= link_directory ../stylesheets .css
//= link_tree ../../javascript .js
//= link_tree ../../../vendor/javascript .js
Listing 8.22: The automatically added Importmap line in the application layout.app/views/layouts/application.html.erb
<!DOCTYPE html>
<html>
  <head>
    <title><%= full_title(yield(:title)) %></title>
    <meta name="viewport" content="width=device-width, initial-scale=1">
    <meta charset="utf-8">
    <%= csrf_meta_tags %>
    <%= csp_meta_tag %>

    <%= stylesheet_link_tag "application", "data-turbo-track": "reload" %>
    <%= render 'layouts/shim' %>
    <%= javascript_importmap_tags %>
  </head>
  <body>
    <%= render 'layouts/header' %>
    <div class="container">
      <% flash.each do |message_type, message| %>
        <div class="alert alert-<%= message_type %>"><%= message %></div>
      <% end %>
      <%= yield %>
      <%= render 'layouts/footer' %>
      <%= debug(params) if Rails.env.development? %>
    </div>
  </body>
</html>
With that configuration done, we’re now ready to discuss our strategy for activating the Account dropdown menu:
Define behavior for the CSS
activeclass to make the menu visible (Listing 8.23).Create a new
customJavaScript directory and new filemenu.js(Listing 8.24).Fill
menu.jswith the code in Listing 8.25.Use Importmap to tell Rails about the custom JavaScript directory (Listing 8.26).
Import
menu.jsintoapplication.js(Listing 8.27).
Step 1 adds an active class that changes the display setting to block, which overrides the behavior of the Bootstrap class dropdown-toggle to make the dropdown menu visible (Listing 8.23).7
7. For more on CSS tricks like this one, see Learn Enough CSS & Layout to Be Dangerous (https://www.learnenough.com/css-and-layout).
Listing 8.23: CSS to make the dropdown menu active.app/assets/stylesheets/custom.scss
.
.
.
/* Dropdown menu */

.dropdown-menu.active {
  display: block;
}
Step 2 involves making a directory called custom in the app/javascript directory and then creating a menu.js file within it (Listing 8.24).
Listing 8.24: Adding a custom JavaScript file for the menu.
$ mkdir app/javascript/custom
$ touch app/javascript/custom/menu.js
Step 3, which is the most complicated step, involves adding a JavaScript event listener in menu.js to wait for a click on the Account menu and then toggle the active class from Listing 8.23 to activate and deactivate the menu.8 To ensure that the page has been properly loaded before adding the listener, we include an additional listener on the page-load event itself.
8. See Chapter 9 (https://www.learnenough.com/javascript-tutorial/dom_manipulation) in Learn Enough JavaScript to Be Dangerous for more information on event listeners and other DOM manipulation.
As noted (https://www.learnenough.com/javascript-tutorial/dom_manipulation#sec-event_listeners) in Learn Enough JavaScript to Be Dangerous (https://www.learnenough.com/javascript), the usual event type for page load is known as "DOMContentLoaded", and the usual click event type is "click". Because of Turbo, though, the event type for the first one is a little different: As described in the Turbo documentation, the page-loading event is "turbo:load".9 The resulting code appears in Listing 8.25.
9. There’s also a Turbo click event called "turbo:click", but in our case it turns out a regular "click" works fine, too.
Listing 8.25: JavaScript code to toggle the Account menu.app/javascript/custom/menu.js
// Menu manipulation

// Add toggle listeners to listen for clicks.
document.addEventListener("turbo:load", function() {
  let account = document.querySelector("#account");
  account.addEventListener("click", function(event) {
    event.preventDefault();
    let menu = document.querySelector("#dropdown-menu");
    menu.classList.toggle("active");
  });
});
If you have not previously studied JavaScript, Listing 8.25 might look a bit mysterious, but take a look at it and see how much you can understand. (Probably the trickiest parts are the lines to prevent the default link behavior and stop propagation to the link target, which are the kind of things you pick up from experience and lots of Googling.) Being able to figure useful things out about code in a language you don’t know (or don’t know well) is a hallmark of technical sophistication (Box 1.2). That said, understanding the code in Listing 8.25 is not required to proceed.
Step 4 is a configuration step to use Importmap to tell Rails about our project’s custom JavaScript code in app/javascript/custom (Listing 8.26).
Listing 8.26: Adding the custom JavaScript code to Importmap.config/importmap.rb
# Pin npm packages by running ./bin/importmap

pin "application", preload: true
pin "@hotwired/turbo-rails", to: "turbo.min.js", preload: true
pin "@hotwired/stimulus", to: "stimulus.min.js", preload: true
pin "@hotwired/stimulus-loading", to: "stimulus-loading.js", preload: true
pin_all_from "app/javascript/controllers", under: "controllers"
pin_all_from "app/javascript/custom",      under: "custom"
Finally, in Step 5 we need to add a line to import the menu JavaScript (Listing 8.27).
Listing 8.27: Importing the menu JavaScript.app/javascript/application.js
// Configure your import map in config/importmap.rb.
// Read more: https://github.com/rails/importmap-rails
import "@hotwired/turbo-rails"
import "controllers"
import "custom/menu"
With the above steps completed, stop the Rails server with Ctrl-C and restart it with rails server to apply the changes. Upon refreshing the profile page, clicking on the Account link should show the dropdown menu, as seen in Figure 8.10; clicking again should return it to the state shown in Figure 8.9. Absolutely everything has to go right for this to work, though, so if the menu doesn’t toggle properly I suggest retracing your steps and comparing to the reference app (https://github.com/learnenough/rails_tutorial_sample_app_7th_ed) if necessary.
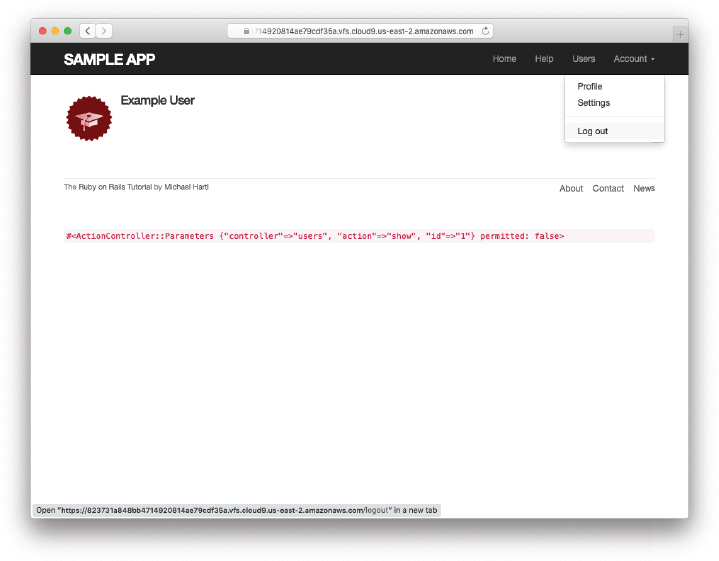
Figure 8.10: A logged-in user with a dropdown menu.
8.2.5 Mobile Styling
Now that we’ve got the dropdown menu working, we’re going to take an opportunity to add a few design tweaks for mobile devices, thereby fulfilling a promise made in Section 5.1.10 As noted in that section, this is not a tutorial on web design, so we’ll be making the minimum set of changes needed to make the mobile app look nice, but you can find a much more detailed treatment of mobile styling in Learn Enough CSS & Layout to Be Dangerous, especially Chapter 9, “Mobile media queries” (https://www.learnenough.com/css-and-layout-tutorial/mobile).
10. Several of these changes were based on or inspired by the excellent work of Rails Tutorial reader Craig Zeise. Learn Enough cofounder Lee Donahoe also made significant contributions. Thanks to both of them for their help.
Our first step in applying some mobile-friendly design is to view our current app as it appears in a mobile browser. One possibility is simply using a smartphone to view the site, but this can be inconvenient, especially if the development app is running behind a cloud IDE login wall or on a local network (which is often inaccessible to outside devices). A more convenient alternative is to use a feature of the Safari web browser known as “Responsive Design Mode”.11 To activate it, you first need to go to Preferences, and then in the “Advanced” section check the box that says “Show Develop menu in menu bar” (Figure 8.11).
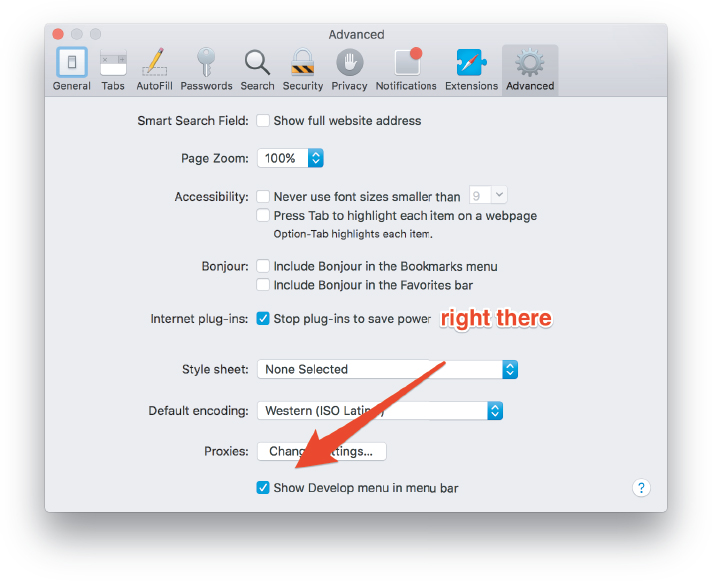
Figure 8.11: Enabling the Safari developer tools.
11. The web inspector for Google Chrome has a similar feature. See “Mobile viewport” (https://www.learnenough.com/css-and-layout-tutorial/mobile#sec-mobile-viewport) in Learn Enough CSS & Layout to Be Dangerous for yet another alternative.
With the configuration in Figure 8.11, the responsive design mode can be activated as shown in Figure 8.12. This mode gives us the ability to view the app as it appears on any of a number of different mobile devices, as seen in Figure 8.13.12
12. To change the aspect ratio from portrait to landscape for any of the devices, simply double-click on the corresponding icon. Back when we were making Learn Enough CSS & Layout to Be Dangerous, it took me and my coauthor Lee Donahoe a surprisingly long time to figure this out.
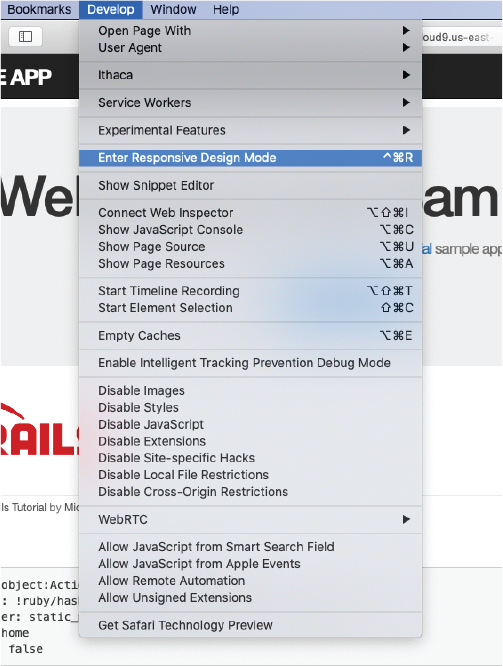
Figure 8.12: The menu item to enter Safari’s Responsive Design Mode.
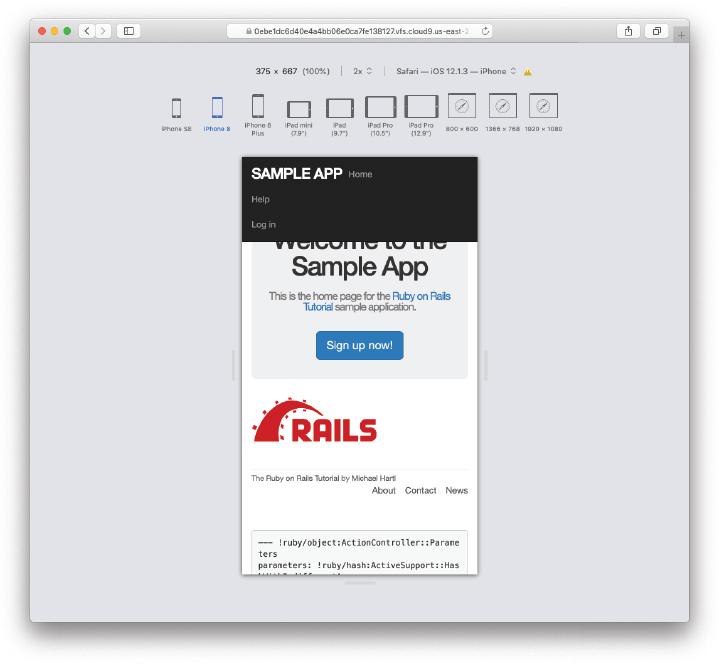
Figure 8.13: Safari’s Responsive Design Mode.
Now let’s take a look at the profile page from Figure 8.9 as it appears on a mobile device. As seen in Figure 8.14, the menu items currently aren’t nicely aligned, and the menu itself takes over a large part of the top of the screen. Meanwhile, the footer navigation links appear in an awkward location, squished up against the other link in the footer. These are the only major issues we need to address, and we’ll be able to fix both of them with a surprisingly small amount of code.
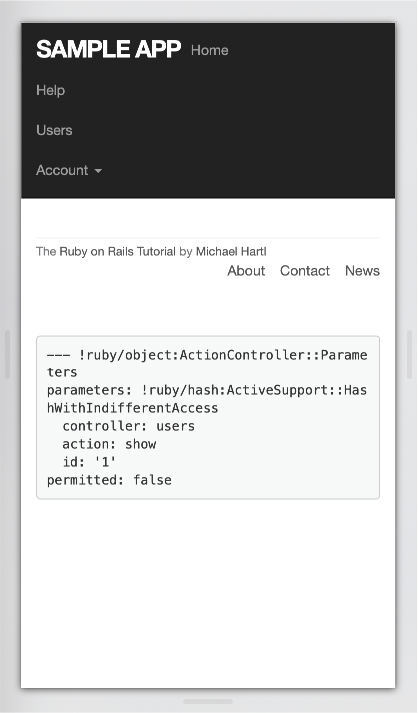
Figure 8.14: The current mobile view of a user profile.
Our first step is to use a special meta tag called the viewport, which lets developers switch between desktop and mobile modes.13 The latest Rails generator should actually add it automatically, but if it’s not already present in your application template you should include it now (Listing 8.28).
13. See “Mobile viewport” (Section 9.3) in Learn Enough CSS & Layout to Be Dangerous for more details.
Listing 8.28: Adding the viewport meta tag.app/views/layouts/application.html.erb
<!DOCTYPE html>
<html>
  <head>
    <title><%= full_title(yield(:title)) %></title>
    <meta name="viewport" content="width=device-width, initial-scale=1">
    <meta charset="utf-8">
    <%= csrf_meta_tags %>
    <%= csp_meta_tag %>
    .
    .
    .
To fix the menu on mobile devices, we’ll use a so-called “hamburger menu” (named for its unintentional resemblance to a hamburger) when in mobile mode. This involves adding some markup to the header file from Listing 8.19, as shown in Listing 8.29.14
14. The application in this tutorial is designed to be accessible in a wide variety of browsing scenarios by default (which includes the use of the “screen reader only” class sr-only in Listing 8.29), but the subject is enormous, and we can only scratch the surface here. See the MDN article on accessibility (https://developer.mozilla.org/en-US/docs/Web/Accessibility) for more information.
Listing 8.29: Adding the markup for a hamburger menu.app/views/layouts/_header.html.erb
<header class="navbar navbar-fixed-top navbar-inverse">
  <div class="container">
    <%= link_to "sample app", root_path, id: "logo" %>
    <nav>
      <div class="navbar-header">
        <button id="hamburger" type="button" class="navbar-toggle collapsed">
          <span class="sr-only">Toggle navigation</span>
          <span class="icon-bar"></span>
          <span class="icon-bar"></span>
          <span class="icon-bar"></span>
        </button>
      </div>
      <ul id="navbar-menu"
          class="nav navbar-nav navbar-right collapse navbar-collapse">
        .
        .
        .
      </ul>
    </nav>
  </div>
</header>
Next, we have to add the equivalent of Listing 8.25 to toggle the hamburger menu with JavaScript. The main difference is that, instead of toggling the "active" class, we toggle the "collapse" class (which is defined by Bootstrap).
Once you know the right event types and toggles, the resulting JavaScript is a fairly straightforward extension of the code in Listing 8.25, and you might be able to guess it even if you’ve never studied JavaScript. All we need to do is add event listeners to Listing 8.25 corresponding to the CSS id of the hamburger menu (which we can see from Listing 8.29 is "hamburger") and toggle the corresponding element (which from Listing 8.29 is "navbar-menu"). The result appears in Listing 8.30.
Listing 8.30: JavaScript code to toggle the mobile menu.app/javascript/custom/menu.js
// Menu manipulation

// Add toggle listeners to listen for clicks.
document.addEventListener("turbo:load", function() {
  let hamburger = document.querySelector("#hamburger");
  hamburger.addEventListener("click", function(event) {
    event.preventDefault();
    let menu = document.querySelector("#navbar-menu");
    menu.classList.toggle("collapse");
  });

  let account = document.querySelector("#account");
  account.addEventListener("click", function(event) {
    event.preventDefault();
    let menu = document.querySelector("#dropdown-menu");
    menu.classList.toggle("active");
  });
});
You might notice that there is a lot of repetition in Listing 8.30, a clear violation of the Don’t Repeat Yourself (DRY) principle mentioned in Section 3.4.3. Refactoring menu.js to eliminate this duplication is left as an exercise (Section 8.2.5). (The exercise actually includes a full solution via Listing 8.32, so you should be able to get it working even if you don’t know any JavaScript.)
The result of Listing 8.29 appears in Figure 8.15. Pressing or clicking the hamburger icon then opens the menu, as shown in Figure 8.16. Note what a significant improvement this is compared to the default menu shown in Figure 8.14.
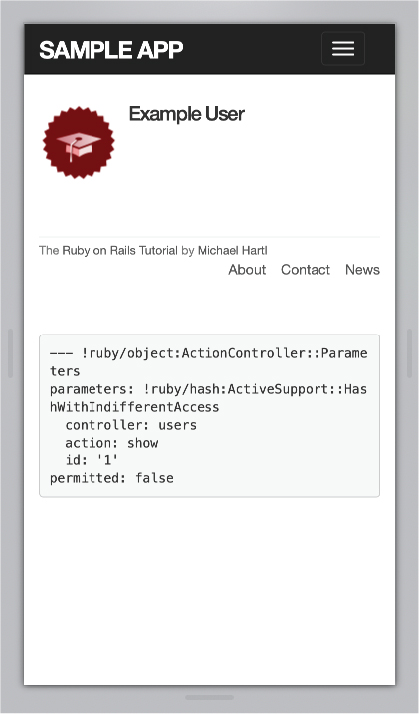
Figure 8.15: Using a hamburger menu for mobile.
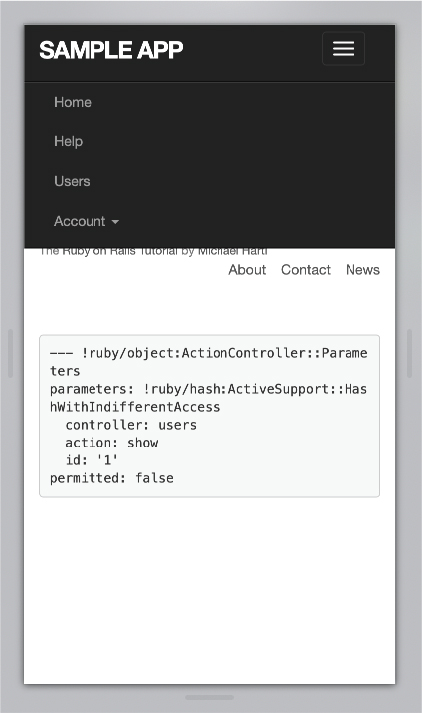
Figure 8.16: The view after clicking the hamburger menu.
By the way, verifying that the mobile menu works on a real mobile device can be a little tricky. One possibility is to deploy the application to production (Section 8.4) and use an actual mobile device to check that the hamburger menu is working as expected. The chapter on mobile design (https://www.learnenough.com/r/css_and_layout/mobile) in Learn Enough CSS & Layout to Be Dangerous covers a convenient but more advanced technique known as an iOS simulator.
As a final step, we’ll add a little CSS to fix the footer issue mentioned above. The trick is to use a media query to apply different CSS for mobile devices than for desktop computers. The result, obtained after some trial-and-error in a web inspector, appears in Listing 8.31.15 Note that the new styles will be applied when the width of the device is less than 800 pixels, which is a common threshold (known as a “breakpoint”) for mobile devices. After refreshing the browser to apply the style in Listing 8.31, our app appears as shown in Figure 8.17.
15. Thanks to Learn Enough cofounder and Learn Enough CSS & Layout to Be Dangerous coauthor Lee Donahoe for his assistance with this.
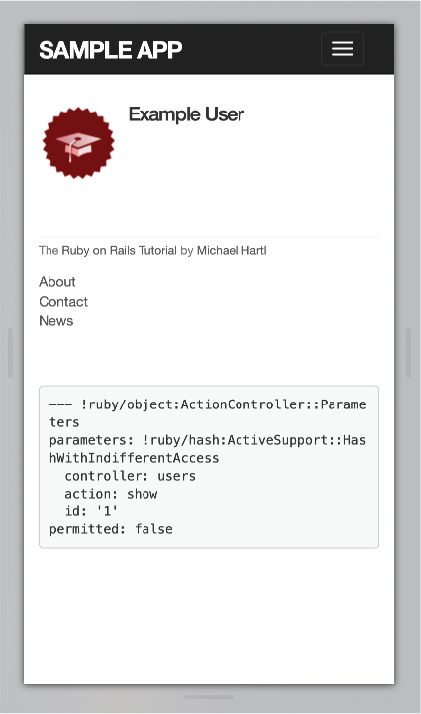
Figure 8.17: The footer styled for mobile.
Listing 8.31: Updating the footer CSS.app/assets/stylesheets/custom.scss
.
.
.
/* footer */

footer {
  .
  .
  .
}
@media (max-width: 800px) {
  footer {
    small {
      display: block;
      float: none;
      margin-bottom: 1em;
    }
    ul {
      float: none;
      padding: 0;
      li {
        float: none;
        margin-left: 0;
      }
    }
  }
}
.
.
.
With that, our mobile styling is done, and we’re ready to add some tests for the layout links added in this section.
Exercises
To see other people’s answers and to record your own, subscribe to the Rails Tutorial course or to the Learn Enough All Access Subscription.
Using the cookie inspector in your browser (Section 8.2.1), remove the session cookie and confirm that the layout links revert to the non-logged-in state.
Log in again, confirming that the layout links change correctly. Then quit your browser and start it again to confirm that the layout links revert to the non-logged-in state. (If your browser has a “remember where I left off” feature that automatically restores the session, be sure to disable it in this step (Box 1.2).)
As noted in the main text, the
menu.jscode in Listing 8.30 contains a lot of repetition. Confirm by direct testing that the menu toggles still work using the refactored code shown in Listing 8.32, which eliminates most of the duplication.
Listing 8.32: Refactored JavaScript code to toggle both the main and mobile menus.app/javascript/custom/menu.js
// Menu manipulation

// Adds a toggle listener.
function addToggleListener(selected_id, menu_id, toggle_class) {
  let selected_element = document.querySelector(`#${selected_id}`);
  selected_element.addEventListener("click", function(event) {
    event.preventDefault();
    let menu = document.querySelector(`#${menu_id}`)
    menu.classList.toggle(toggle_class);
  });
}

// Add toggle listeners to listen for clicks.
document.addEventListener("turbo:load", function() {
  addToggleListener("hamburger", "navbar-menu", "collapse");
  addToggleListener("account", "dropdown-menu", "active");
});
8.2.6 Testing Layout Changes
Having verified by hand that the application is behaving properly upon successful login, before moving on we’ll write an integration test to capture that behavior and catch regressions. We’ll build on the test from Listing 8.9 and write a series of steps to verify the following sequence of actions:
Visit the login path.
Post valid information to the sessions path.
Verify that the login link disappears.
Verify that a logout link appears.
Verify that a profile link appears.
In order to see these changes, our test needs to log in as a previously registered user, which means that such a user must already exist in the database. The default Rails way to do this is to use fixtures, which are a way of organizing data to be loaded into the test database. We discovered in Section 6.2.5 that we needed to delete the default fixtures so that our email uniqueness tests would pass (Listing 6.31). Now we’re ready to start filling in that empty file with custom fixtures of our own.
In the present case, we need only one user, whose information should consist of a valid name and email address. Because we’ll need to log the user in, we also have to include a valid password to compare with the password submitted to the Sessions controller’s create action. Referring to the data model in Figure 6.9, we see that this means creating a password_digest attribute for the user fixture, which we’ll accomplish by defining a digest method of our own.
As discussed in Section 6.3.1, the password digest is created using bcrypt (via has_secure_password), so we’ll need to create the fixture password using the same method. By inspecting the secure password source code (https://github.com/rails/rails/blob/main/activemodel/lib/active_model/secure_password.rb), we find that this method is
BCrypt::Password.create(string, cost: cost)where string is the string to be hashed and cost is the cost parameter that determines the computational cost to calculate the hash. Using a high cost makes it computationally intractable to use the hash to determine the original password, which is an important security precaution in a production environment, but in tests we want the digest method to be as fast as possible. The secure password source code has a line for this as well:
cost = ActiveModel::SecurePassword.min_cost ? BCrypt::Engine::MIN_COST :
                                              BCrypt::Engine.cost
This rather obscure code, which you don’t need to understand in detail, arranges for precisely the behavior described above: It uses the minimum cost parameter in tests and a normal (high) cost parameter in production. (We’ll learn more about the strange ?-: notation, known as the ternary operator, in Section 9.2.)
There are several places we could put the resulting digest method, but we’ll have an opportunity in Section 9.1.1 to reuse digest in the User model. This suggests placing the method in user.rb. Because we won’t necessarily have access to a user object when calculating the digest (as will be the case in the fixtures file), we’ll attach the digest method to the User class itself, which (as we saw briefly in Section 4.4.1) makes it a class method. The result appears in Listing 8.33.
Listing 8.33: Adding a digest method for use in fixtures.app/models/user.rb
class User < ApplicationRecord
  before_save { self.email = email.downcase }
  validates :name,  presence: true, length: { maximum: 50 }
  VALID_EMAIL_REGEX = /A[w+-.]+@[a-zd-.]+.[a-z]+z/i
  validates :email, presence: true, length: { maximum: 255 },
                    format: { with: VALID_EMAIL_REGEX },
                    uniqueness: true
  has_secure_password
  validates :password, presence: true, length: { minimum: 6 }

  # Returns the hash digest of the given string.
  def User.digest(string)
    cost = ActiveModel::SecurePassword.min_cost ? BCrypt::Engine::MIN_COST :
                                                  BCrypt::Engine.cost
    BCrypt::Password.create(string, cost: cost)
  end
end
With the digest method from Listing 8.33, we are now ready to create a user fixture for a valid user, as shown in Listing 8.34.16
16. It’s worth noting that indentation in fixture files must take the form of spaces, not tabs, so take care when copying code like that shown in Listing 8.34.
Listing 8.34: A fixture for testing user login.test/fixtures/users.yml
michael:
  name: Michael Example
  email: [email protected]
  password_digest: <%= User.digest('password') %>
Note in particular that fixtures support embedded Ruby, which allows us to use
<%= User.digest('password') %>to create the valid password digest for the test user.
Although we’ve defined the password_digest attribute required by has_secure_password, sometimes it’s convenient to refer to the plain (virtual) password as well. Unfortunately, this is impossible to arrange with fixtures, and adding a password attribute to Listing 8.34 causes Rails to complain that there is no such column in the database (which is true). We’ll make do by adopting the convention that all fixture users have the same password ('password').
Having created a fixture with a valid user, we can retrieve it inside a test as follows:
user = users(:michael)Here users corresponds to the fixture filename users.yml, while the symbol :michael references the user with the key shown in Listing 8.34.
With the fixture user as above, we can now write a test for the layout links by converting the sequence enumerated at the beginning of this section into code, as shown in Listing 8.35.
Listing 8.35: A test for a user logging in with valid information. GREENtest/integration/users_login_test.rb
require "test_helper"

class UsersLoginTest < ActionDispatch::IntegrationTest

  def setup
    @user = users(:michael)
  end
  .
  .
  .
  test "login with valid information" do
    post login_path, params: { session: { email:    @user.email,
                                          password: 'password' } }
    assert_redirected_to @user
    follow_redirect!
    assert_template 'users/show'
    assert_select "a[href=?]", login_path, count: 0
    assert_select "a[href=?]", logout_path
    assert_select "a[href=?]", user_path(@user)
  end
end
Here we’ve used
assert_redirected_to @userto check the right redirect target and
follow_redirect!to actually visit the target page. Listing 8.35 also verifies that the login link disappears by verifying that there are zero login path links on the page:
assert_select "a[href=?]", login_path, count: 0By including the extra count: 0 option, we tell assert_select that we expect there to be zero links matching the given pattern. (Compare this to count: 2 in Listing 5.32, which checks for exactly two matching links.)
Because the application code was already working, this test should be GREEN:
Listing 8.36: GREEN
$ rails test test/integration/users_login_test.rbExercises
To see other people’s answers and to record your own, subscribe to the Rails Tutorial course or to the Learn Enough All Access Subscription.
Confirm by commenting out everything after
if userin Line 8 of Listing 8.15 that the tests still pass even if we don’t authenticate the user by email and password, as shown in Listing 8.37. This is because Listing 8.9 doesn’t test the case of a correct user email but incorrect password. Fix this serious omission in our test suite by adding a valid email to the Users login test (Listing 8.38). Verify that the tests are RED, then remove the Line 8 comment to get back to GREEN. (Because it’s so important, we’ll add this test to the main code in Section 8.3.)Use the “safe navigation” operator
&.to simplify the boolean test in Line 8 of Listing 8.15, as shown in Line 8 of Listing 8.39.17 This Ruby feature allows us to condense the common pattern ofobj && obj.methodintoobj&.method. Confirm that the tests in Listing 8.38 still pass after the change.
17. Thanks to reader Aviv Levinsky for suggesting this addition.
Listing 8.37: Commenting out the authentication code, but tests still GREEN.app/controllers/sessions_controller.rb
class SessionsController < ApplicationController

  def new
  end

  def create
    user = User.find_by(email: params[:session][:email].downcase)
    if user # && user.authenticate(params[:session][:password])
      reset_session
      log_in user
      redirect_to user
    else
      flash.now[:danger] = 'Invalid email/password combination'
      render 'new', status: :unprocessable_entity
    end
  end

  def destroy
  end
end
Listing 8.38: Testing the case of valid user email, invalid password.test/integration/users_login_test.rb
require "test_helper"

class UsersLoginTest < ActionDispatch::IntegrationTest

  def setup
    @user = users(:michael)
  end

  test "login with valid email/invalid password" do
    get login_path
    assert_template 'sessions/new'
    post login_path, params: { session: { email:    FILL_IN,
                                          password: "invalid" } }
    assert_response :unprocessable_entity
    assert_template 'sessions/new'
    assert_not flash.empty?
    get root_path
    assert flash.empty?
  end
  .
  .
  .
end
Listing 8.39: Using the “safe navigation” operator &. to simplify the login code.app/controllers/sessions_controller.rb
 1 class SessionsController < ApplicationController
 2
 3   def new
 4   end
 5
 6   def create
 7     user = User.find_by(email: params[:session][:email].downcase)
 8     if user&.authenticate(params[:session][:password])
 9       reset_session
10       log_in user
11       redirect_to user
12     else
13       flash.now[:danger] = 'Invalid email/password combination'
14       render 'new', status: :unprocessable_entity
15     end
16   end
17
18   def destroy
19   end
20 end
8.2.7 Login Upon Signup
Although our authentication system is now working, newly registered users might be confused, as they are not logged in by default. Because it would be strange to force users to log in immediately after signing up, we’ll log in new users automatically as part of the signup process. To arrange this behavior, all we need to do is add a call to log_in in the Users controller create action.18 To guard against the session-fixation attacks discussed in Section 8.2.1, we’ll also add a call to reset_session immediately before logging in (just as we did in Listing 8.15). The result appears in Listing 8.40.
18. As with the Sessions controller, the log_in method is available in the Users controller because of the module inclusion in Listing 8.13.
Listing 8.40: Logging in the user upon signup.app/controllers/users_controller.rb
class UsersController < ApplicationController

  def show
    @user = User.find(params[:id])
  end

  def new
    @user = User.new
  end

  def create
    @user = User.new(user_params)
    if @user.save
      reset_session
      log_in @user
      flash[:success] = "Welcome to the Sample App!"
      redirect_to @user
    else
      render 'new', status: :unprocessable_entity
    end
  end

  private

    def user_params
       params.require(:user).permit(:name, :email, :password,
                                    :password_confirmation)
    end
end
To test the behavior from Listing 8.40, we can add a line to the test from Listing 7.31 to check that the user is logged in. It’s helpful in this context to define an is_logged_in? helper method to parallel the logged_in? helper defined in Listing 8.18, which returns true if there’s a user id in the (test) session and false otherwise (Listing 8.41). (Because helper methods aren’t available in tests, we can’t use the current_user as in Listing 8.18, but the session method is available, so we use that instead.) Here we use is_logged_in? instead of logged_in? so that the test helper and Sessions helper methods have different names, which prevents them from being mistaken for each other.19 (In this case we could actually just include the Sessions helper and use logged_in? directly, but this technique would fail in Chapter 9 due to details of how cookies are handled in tests, so instead we define a test-specific method that will work in all cases.)
19. For example, I once had a test suite that was GREEN even after I accidentally deleted the main log_in method in the Sessions helper. The reason is that the tests were happily using a test helper with the same name, thereby passing even though the application was completely broken. As with is_logged_in?, we’ll avoid this issue by defining the test helper log_in_as in Listing 9.25.
Listing 8.41: A boolean method for login status inside tests.test/test_helper.rb
ENV['RAILS_ENV'] ||= 'test'
.
.
.
class ActiveSupport::TestCase
  # Run tests in parallel with specified workers
  parallelize(workers: :number_of_processors)
  # Set up all fixtures in test/fixtures/*.yml.
  fixtures :all

  # Returns true if a test user is logged in.
  def is_logged_in?
    !session[:user_id].nil?
  end
end
With the code in Listing 8.41, we can assert that the user is logged in after signup using the line shown in Listing 8.42.
Listing 8.42: A test of login after signup. GREENtest/integration/users_signup_test.rb
require "test_helper"

class UsersSignupTest < ActionDispatch::IntegrationTest
  .
  .
  .
  test "valid signup information" do
    assert_difference 'User.count', 1 do
      post users_path, params: { user: { name:  "Example User",
                                         email: "[email protected]",
                                         password:              "password",
                                         password_confirmation: "password" } }
    end
    follow_redirect!
    assert_template 'users/show'
    assert is_logged_in?
  end
end
At this point, the test suite should still be GREEN:
Listing 8.43: GREEN
$ rails testExercises
To see other people’s answers and to record your own, subscribe to the Rails Tutorial course or to the Learn Enough All Access Subscription.
Is the test suite RED or GREEN if you comment out the
log_inline in Listing 8.40?By using your text editor’s (https://www.learnenough.com/text-editor) ability to comment out code (https://www.learnenough.com/text-editor-tutorial/advanced_text_editing#sec-commenting_out), toggle back and forth between commenting out code in Listing 8.40 and confirm that the test suite toggles between RED and GREEN. (You will need to save the file between toggles.)
8.3 Logging Out
As discussed in Section 8.1, our authentication model is to keep users logged in until they log out explicitly. In this section, we’ll add this necessary logout capability. Because the “Log out” link has already been defined (Listing 8.19), all we need is to write a valid controller action to destroy user sessions.
So far, the Sessions controller actions have followed the RESTful convention of using new for a login page and create to complete the login. We’ll continue this theme by using a destroy action to delete sessions, i.e., to log out.
Logging out involves undoing the effects of the log_in method from Listing 8.14.20 One way to do this would be to use the session’s delete method to remove just the user id:
20. Some browsers offer a “remember where I left off” feature, which restores the session automatically, so be sure to disable any such feature before trying to log out.
session.delete(:user_id)This would work in our case because the only current session variable is session[:user_id], but an even better technique is to use the reset_session method (Section 8.2.1) to ensure that all session variables are reset upon logging out. This never affects us in the main tutorial but is relevant to an exercise in Section 9.3.2, which adds a :session_token value to the session to protect against session hijacking (Section 8.2.1). Using the reset_session method future-proofs our application for just such a situation.
In addition to resetting the session, we’ll also set the current user to nil, although in the present case this won’t matter because of an immediate redirect to the root URL.21 As with log_in and associated methods, we’ll put the resulting log_out method in the Sessions helper module, as shown in Listing 8.44.
21. Setting @current_user to nil would matter only if @current_user were created before the destroy action (which it isn’t) and if we didn’t issue an immediate redirect (which we do). This is an unlikely combination of events, and with the application as presently constructed it isn’t necessary, but because it’s security-related I include it for completeness.
Listing 8.44: The log_out method.app/helpers/sessions_helper.rb
module SessionsHelper

  # Logs in the given user.
  def log_in(user)
    session[:user_id] = user.id
  end
  .
  .
  .
  # Logs out the current user.
  def log_out
    reset_session
    @current_user = nil
  end
end
We can put the log_out method to use in the Sessions controller’s destroy action, as shown in Listing 8.45. Note in particular the use of the status code :see_-other; when using Turbo, this status code (corresponding to the HTTP status code 303 See Other) is necessary to ensure the correct behavior when redirecting after a DELETE request.22 Compare to the use of the :unprocessable_entity status code in Listing 7.18.
22. See the Rails documentation on redirecting (https://api.rubyonrails.org/classes/ActionController/Redirecting.html) for more information.
Listing 8.45: Destroying a session (user logout).app/controllers/sessions_controller.rb
class SessionsController < ApplicationController

  def new
  end

  def create
    user = User.find_by(email: params[:session][:email].downcase)
    if user && user.authenticate(params[:session][:password])
      reset_session
      log_in user
      redirect_to user
    else
      flash.now[:danger] = 'Invalid email/password combination'
      render 'new', status: :unprocessable_entity
    end
  end

  def destroy
    log_out
    redirect_to root_url, status: :see_other
  end
end
To test the logout machinery, we can add some steps to the user login test from Listing 8.35. After logging in, we use delete to issue a DELETE request to the logout path (Table 8.1) and verify that the user is logged out and redirected to the root URL (using the required :see_other status code). We also check that the login link reappears and that the logout and profile links disappear. The new steps appear in Listing 8.46.
Listing 8.46: A test for user logout (and an improved test for invalid login). GREENtest/integration/users_login_test.rb
require "test_helper"

class UsersLoginTest < ActionDispatch::IntegrationTest

  def setup
    @user = users(:michael)
  end

  test "login with valid email/invalid password" do
    get login_path
    assert_template 'sessions/new'
    post login_path, params: { session: { email:    @user.email,
                                          password: "invalid" } }
    assert_not is_logged_in?
    assert_response :unprocessable_entity
    assert_template 'sessions/new'
    assert_not flash.empty?
    get root_path
    assert flash.empty?
  end

  test "login with valid information followed by logout" do
    post login_path, params: { session: { email:    @user.email,
                                          password: 'password' } }
    assert is_logged_in?
    assert_redirected_to @user
    follow_redirect!
    assert_template 'users/show'
    assert_select "a[href=?]", login_path, count: 0
    assert_select "a[href=?]", logout_path
    assert_select "a[href=?]", user_path(@user)
    delete logout_path
    assert_not is_logged_in?
    assert_response :see_other
    assert_redirected_to root_url
    follow_redirect!
    assert_select "a[href=?]", login_path
    assert_select "a[href=?]", logout_path,      count: 0
    assert_select "a[href=?]", user_path(@user), count: 0
  end
end
Now that we have is_logged_in? available in tests, we’ve thrown in a bonus assert is_logged_in? immediately after posting valid information to the sessions path. We’ve also added a similar assertion and the solution to the exercise from Section 8.2.6 by adding the results of Listing 8.38. By the way, you might have noticed that the tests in Listing 8.46 are getting a little long; breaking them into smaller pieces is left as an exercise (Section 8.3) and will be covered in more detail starting in Section 11.3.3.
With the session destroy action thus defined and tested, the initial signup/-login/logout triumvirate is complete, and the test suite should be GREEN:
Listing 8.47: GREEN
$ rails testExercises
To see other people’s answers and to record your own, subscribe to the Rails Tutorial course or to the Learn Enough All Access Subscription.
Confirm in a browser that the “Log out” link causes the correct changes in the site layout. What is the correspondence between these changes and the final three steps in Listing 8.46?
The tests in Listing 8.46 are getting a little long, which can make them challenging to maintain. One strategy for breaking them into pieces involves using separate Ruby classes (Section 4.4) for different sets of related tests. We can then use inheritance (Section 4.4.2) to reuse the relevant aspects of the necessary
setupmethods. A key element (highlighted in Listing 8.48) is the use ofsuper, which calls thesetupmethod in the corresponding superclass (i.e., one class up in the class hierarchy).Because this is a somewhat advanced topic, the exercise in this section simply involves verifying that the code in Listing 8.48 is GREEN as required, but if you’re interested in understanding it, give it a try—you might be surprised at how much you can figure out by reading carefully and comparing with Listing 8.46. We’ll discuss the details of this technique further in Section 11.3.3, Section 12.3.3, and Section 13.3.5.
Listing 8.48: A refactored test for user logout. GREENtest/integration/users_login_test.rb
require "test_helper"

class UsersLogin < ActionDispatch::IntegrationTest

  def setup
    @user = users(:michael)
  end
end

class InvalidPasswordTest < UsersLogin

  test "login path" do
    get login_path
    assert_template 'sessions/new'
  end

  test "login with valid email/invalid password" do
    post login_path, params: { session: { email:    @user.email,
                                          password: "invalid" } }
    assert_not is_logged_in?
    assert_template 'sessions/new'
    assert_not flash.empty?
    get root_path
    assert flash.empty?
  end
end

class ValidLogin < UsersLogin

  def setup
    super
    post login_path, params: { session: { email:    @user.email,
                                          password: 'password' } }
  end
end

class ValidLoginTest < ValidLogin

  test "valid login" do
    assert is_logged_in?
    assert_redirected_to @user
  end

  test "redirect after login" do
    follow_redirect!
    assert_template 'users/show'
    assert_select "a[href=?]", login_path, count: 0
    assert_select "a[href=?]", logout_path
    assert_select "a[href=?]", user_path(@user)
  end
end

class Logout < ValidLogin

  def setup
    super
    delete logout_path
  end
end

class LogoutTest < Logout

  test "successful logout" do
    assert_not is_logged_in?
    assert_response :see_other
    assert_redirected_to root_url
  end

  test "redirect after logout" do
    follow_redirect!
    assert_select "a[href=?]", login_path
    assert_select "a[href=?]", logout_path,      count: 0
    assert_select "a[href=?]", user_path(@user), count: 0
  end
end
8.4 Conclusion
With the material in this chapter, our sample application has a fully functional login and authentication system. In the next chapter, we’ll take our app to the next level by adding the ability to remember users for longer than a single browser session.
Before moving on, merge your changes back into the main branch:
$ rails test
$ git add -A
$ git commit -m "Implement basic login"
$ git checkout main
$ git merge basic-login
Then push up to the remote repository:
$ rails test
$ git push
Finally, deploy to Heroku as usual:
$ git push heroku8.4.1 What We Learned in This Chapter
Rails can maintain state from one page to the next using temporary cookies via the
sessionmethod.The login form is designed to create a new session to log a user in.
The
flash.nowmethod is used for flash messages on rendered pages.Test-driven development is useful when debugging by reproducing the bug in a test.
Using the
sessionmethod, we can securely place a user id on the browser to create a temporary session.We can change features such as links on the layouts based on login status.
Integration tests can verify correct routes, database updates, and proper changes to the layout.