
Chapter 11
Account Activation
At present, newly registered users immediately have full access to their accounts (Chapter 7); in this chapter, we’ll implement an account activation step to verify that the user controls the email address they used to sign up.1 This will involve associating an activation token and digest with a user, sending the user an email with a link including the token, and activating the user upon clicking the link. In Chapter 12, we’ll apply similar ideas to allow users to reset their passwords if they forget them. Each of these two features will involve creating a new resource, thereby giving us a chance to see further examples of controllers, routing, and database migrations. In the process, we’ll also have a chance to learn how to send email in Rails, both in development and in production.
1. This chapter is independent of subsequent ones, apart from the mailer generation in Listing 11.6, which is used in Chapter 12. Readers can skip to Chapter 12 or to Chapter 13 with minimal discontinuity, although the former will be significantly more challenging due to substantial overlap with this chapter.
Our strategy for handling account activation parallels user login (Section 8.2) and especially remembering users (Section 9.1). The basic sequence appears as follows:2
2. In addition to this basic sequence, another nice feature to have is the ability to resend account activation emails in case the initial confirmation gets lost, marked as spam, etc. Adding such a feature should be within your capabilities by the time you finish this tutorial. You might also consider using a solution such as Devise, which already includes the ability to resend confirmation emails.
Start users in an “unactivated” state.
When a user signs up, generate an activation token and corresponding activation digest.
Save the activation digest to the database, and then send an email to the user with a link containing the activation token and user’s email address.3
3. We could use the user’s id instead, since it’s already exposed in the URLs of our application, but using email addresses is more future-proof in case we want to obfuscate user ids for any reason (such as to prevent competitors from knowing how many users our application has, for example).
When the user clicks the link, find the user by email address, and then authenticate the token by comparing with the activation digest.
If the user is authenticated, change the status from “unactivated” to “activated”.
Because of the similarity with passwords and remember tokens, we will be able to reuse many of the same ideas for account activation (as well as password reset), including the User.digest and User.new_token methods and a modified version of the user.authenticated? method. Table 11.1 illustrates the analogy (including the password reset from Chapter 12).
Table 11.1: The analogy between login, remembering, account activation, and password reset.
Method | find_by | String | Digest | Authentication |
|---|---|---|---|---|
login |
|
|
|
|
remember me |
|
|
|
|
account activation |
|
|
|
|
password reset |
|
|
|
|
In Section 11.1, we’ll make a resource and data model for account activations (Section 11.1), and in Section 11.2 we’ll add a mailer for sending account activation emails (Section 11.2). We’ll implement the actual account activation, including a generalized version of the authenticated? method from Table 11.1, in Section 11.3.
11.1 Account Activations Resource
As with sessions (Section 8.1), we’ll model account activations as a resource even though they won’t be associated with an Active Record model. Instead, we’ll include the relevant data (including the activation token and activation status) in the User model itself.
Because we’ll be treating account activations as a resource, we’ll interact with them via a standard REST URL. The activation link will be modifying the user’s activation status, and for such modifications the standard REST practice is to issue a PATCH request to the update action (Table 7.1). The activation link needs to be sent in an email, though, and hence will involve a regular browser click, which issues a GET request instead of PATCH. This design constraint means that we can’t use the update action, but we’ll do the next-best thing and use the edit action instead, which does respond to GET requests.
As usual, we’ll make a topic branch for the new feature:
$ git checkout -b account-activation11.1.1 Account Activations Controller
As with Users and Sessions, the actions (or, in this case, the sole action) for the Account Activations resource will live inside an Account Activations controller, which we can generate as follows:4
4. Because we’ll be using an edit action, we could include edit on the command line, but this would also generate both an edit view and a test, neither of which we’ll turn out to need.
$ rails generate controller AccountActivationsAs we’ll see in Section 11.2.1, the activation email will involve a URL of the form
edit_account_activation_url(activation_token, ...)which means we’ll need a named route for the edit action. We can arrange for this with the resources line shown in Listing 11.1, which gives the RESTful route shown in Table 11.2.
Table 11.2: RESTful route provided by the Account Activations resource in Listing 11.1.
HTTP request method | URL | Action | Named route |
|---|---|---|---|
| /account_activation/<token>/edit |
|
|
Listing 11.1: Adding a route for the Account Activations edit action. config/routes.rb
Rails.application.routes.draw do
  root   "static_pages#home"
  get    "/help",    to: "static_pages#help"
  get    "/about",   to: "static_pages#about"
  get    "/contact", to: "static_pages#contact"
  get    "/signup",  to: "users#new"
  get    "/login",   to: "sessions#new"
  post   "/login",   to: "sessions#create"
  delete "/logout",  to: "sessions#destroy"
  resources :users
  resources :account_activations, only: [:edit]
end
We’ll define the edit action itself in Section 11.3.2, after we’ve finished the Account Activations data model and mailers.
Exercises
To see other people’s answers and to record your own, subscribe to the Rails Tutorial course (https://www.railstutorial.org/) or to the Learn Enough All Access Subscription (https://www.learnenough.com/all-access).
Verify that the test suite is still GREEN.
Why does Table 11.2 list the
_urlform of the named route instead of the_pathform? Hint: We’re going to use it in an email.
11.1.2 Account Activation Data Model
As discussed in the introduction, we need a unique activation token for use in the activation email. One possibility would be to use a string that’s both stored in the database and included in the activation URL, but this raises security concerns if our database is compromised. For example, an attacker with access to the database could immediately activate newly created accounts (thereby logging in as the user), and could then change the password to gain control.5
5. It’s mainly for this reason that we won’t be using the (perhaps slightly misnamed) has_secure_token facility added in Rails 5, which stores the corresponding token in the database as unhashed cleartext.
To prevent such scenarios, we’ll follow the example of passwords (Chapter 6) and remember tokens (Chapter 9) by pairing a publicly exposed virtual attribute with a secure hash digest saved to the database. This way we can access the activation token using
user.activation_tokenand authenticate the user with code like
user.authenticated?(:activation, token)(This will require a modification of the authenticated? method defined in Listing 9.6.)
We’ll also add a boolean attribute called activated to the User model, which will allow us to test if a user is activated using the same kind of auto-generated boolean method we saw in Section 10.4.1:
if user.activated? ...Finally, although we won’t use it in this tutorial, we’ll record the time and date of the activation in case we want it for future reference. The full data model appears in Figure 11.1.
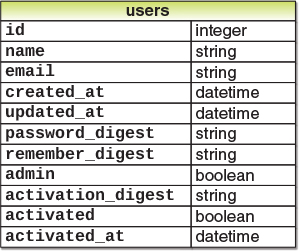
Figure 11.1: The User model with added account activation attributes.
The migration to add the data model from Figure 11.1 adds all three attributes at the command line:
$ rails generate migration add_activation_to_users
> activation_digest:string activated:boolean activated_at:datetime
(Note here that you should type the backslash character in the first line, but you shouldn’t type the literal angle bracket > in the second line. The is used for a line continuation, and after hitting return the > will be added automatically by your shell program.)
As with the admin attribute (Listing 10.55), we’ll add a default boolean value of false to the activated attribute, as shown in Listing 11.2.
Listing 11.2: A migration for account activation (with added index).db/migrate/[timestamp]_add_activation_to_users.rb
class AddActivationToUsers < ActiveRecord::Migration[7.0]
  def change
    add_column :users, :activation_digest, :string
    add_column :users, :activated, :boolean, default: false
    add_column :users, :activated_at, :datetime
  end
end
We then apply the migration as usual:
$ rails db:migrateActivation Token Callback
Because every newly signed-up user will require activation, we should assign an activation token and digest to each user object before it’s created. We saw a similar idea in Section 6.2.5, where we needed to convert an email address to lowercase before saving a user to the database. In that case, we used a before_save callback combined with the downcase method (Listing 6.32). A before_save callback is automatically called before the object is saved, which includes both object creation and updates, but in the case of the activation digest we only want the callback to fire when the user is created. This requires a before_create callback, which we’ll define as follows:
before_create :create_activation_digest
This code, called a method reference, arranges for Rails to look for a method called create_activation_digest and run it before creating the user. (In Listing 6.32, we passed before_save an explicit block, but the method reference technique is generally preferred.) Because the create_activation_digest method itself is only used internally by the User model, there’s no need to expose it to outside users; as we saw in Section 7.3.2, the Ruby way to accomplish this is to use the private keyword:
private

   def create_activation_digest
     # Create the token and digest.
   end
All methods defined in a class after private are automatically hidden, as seen in this console session:
$ rails console
>> User.first.create_activation_digest
NoMethodError: private method `create_activation_digest' called for #<User>
The purpose of the before_create callback is to assign the token and corresponding digest, which we can accomplish as follows:
self.activation_token  = User.new_token
self.activation_digest = User.digest(activation_token)
This code simply reuses the token and digest methods used for the remember token, as we can see by comparing it with the remember method defined in Listing 9.3 and extended in Listing 9.37:
# Remembers a user in the database for use in persistent sessions.
def remember
  self.remember_token = User.new_token
  update_attribute(:remember_digest, User.digest(remember_token))
  remember_digest
end
The main difference is the use of update_attribute in the latter case. The reason for the difference is that remember tokens and digests are created for users that already exist in the database, whereas the before_create callback happens before the user has been created, so there’s not yet any attribute to update. As a result of the callback, when a new user is defined with User.new (as in user signup, Listing 7.19), it will automatically get both activation_token and activation_digest attributes; because the latter is associated with a column in the database (Figure 11.1), it will be written to the database automatically when the user is saved.
Putting together the discussion above yields the User model shown in Listing 11.3. As required by the virtual nature of the activation token, we’ve added a second attr_accessor to our model. Note that we’ve taken the opportunity to replace the email downcasing callback from Listing 6.32 with a method reference.
Listing 11.3: Adding account activation code to the User model. GREENapp/models/user.rb
class User < ApplicationRecord
  attr_accessor :remember_token, :activation_token
  before_save   :downcase_email
  before_create :create_activation_digest
  validates :name,  presence: true, length: { maximum: 50 }
  .
  .
  .
  private

    # Converts email to all lowercase.
    def downcase_email
      self.email = email.downcase
    end

    # Creates and assigns the activation token and digest.
    def create_activation_digest
      self.activation_token  = User.new_token
      self.activation_digest = User.digest(activation_token)
    end
end
Seed and Fixture Users
Before moving on, we should also update our seed data and fixtures so that our sample and test users are initially activated, as shown in Listing 11.4 and Listing 11.5. (The Time.zone.now method is a built-in Rails helper that returns the current timestamp, taking into account the time zone on the server.)
Listing 11.4: Activating seed users by default.
db/seeds.rb
# Create a main sample user.
User.create!(name:  "Example User",
             email: "[email protected]",
             password:              "foobar",
             password_confirmation: "foobar",
             admin:     true,
             activated: true,
             activated_at: Time.zone.now)

# Generate a bunch of additional users.
99.times do |n|
  name  = Faker::Name.name
  email = "example-#{n+1}@railstutorial.org"
  password = "password"
  User.create!(name:  name,
               email: email,
               password:              password,
               password_confirmation: password,
               activated: true,
               activated_at: Time.zone.now)
end
Listing 11.5: Activating fixture users.test/fixtures/users.yml
michael:
  name: Michael Example
  email: [email protected]
  password_digest: <%= User.digest('password') %>
  admin: true
  activated: true
  activated_at: <%= Time.zone.now %>

archer:
  name: Sterling Archer
  email: [email protected]
  password_digest: <%= User.digest('password') %>
  activated: true
  activated_at: <%= Time.zone.now %>

lana:
  name: Lana Kane
  email: [email protected]
  password_digest: <%= User.digest('password') %>
  activated: true
  activated_at: <%= Time.zone.now %>

malory:
  name: Malory Archer
  email: [email protected]
  password_digest: <%= User.digest('password') %>
  activated: true
  activated_at: <%= Time.zone.now %>

<% 30.times do |n| %>
user_<%= n %>:
  name:  <%= "User #{n}" %>
  email: <%= "user-#{n}@example.com" %>
  password_digest: <%= User.digest('password') %>
  activated: true
  activated_at: <%= Time.zone.now %>
<% end %>
To apply the changes in Listing 11.4, reset the database to reseed the data as usual:
$ rails db:migrate:reset
$ rails db:seed
Exercises
To see other people’s answers and to record your own, subscribe to the Rails Tutorial course or to the Learn Enough All Access Subscription.
Verify that the test suite is still GREEN after the changes made in this section.
By instantiating a User object in the console, confirm that calling the
create_activation_digestmethod raises aNoMethodErrordue to its being a private method. What is the value of the user’s activation digest?In Listing 6.35, we saw that email downcasing can be written more simply as
email.downcase!(without any assignment). Make this change to thedowncase_emailmethod in Listing 11.3 and verify by running the test suite that it works.
11.2 Account Activation Emails
With the data modeling complete, we’re now ready to add the code needed to send an account activation email. The method is to add a User mailer using the Action Mailer library, which we’ll use in the Users controller create action to send an email with an activation link. Mailers are structured much like controller actions, with email templates defined as views. These templates will include links with the activation token and email address associated with the account to be activated.
11.2.1 Mailer Templates
As with models and controllers, we can generate a mailer using rails generate, as shown in Listing 11.6.
Listing 11.6: Generating the User mailer.
$ rails generate mailer UserMailer account_activation password_resetIn addition to the necessary account_activation method, Listing 11.6 generates the password_reset method we’ll need in Chapter 12.
The command in Listing 11.6 also generates two view templates for each mailer, one for plain-text email and one for HTML email. For the account activation mailer method, they appear as in Listing 11.7 and Listing 11.8. (We’ll take care of the corresponding password reset templates in Chapter 12.)
Listing 11.7: The generated account activation text view.app/views/user_mailer/account_activation.text.erb
User#account_activation

<%= @greeting %>, find me in app/views/user_mailer/account_activation.text.erb
Listing 11.8: The generated account activation HTML view.app/views/user_mailer/account_activation.html.erb
<h1>User#account_activation</h1>

<p>
  <%= @greeting %>, find me in app/views/user_mailer/account_activation.html.erb
</p>
Let’s take a look at the generated mailers to get a sense of how they work (Listing 11.9 and Listing 11.10). We see in Listing 11.9 that there is a default from address common to all mailers in the application, and each method in Listing 11.10 has a recipient’s address as well. (Listing 11.9 also uses a mailer layout corresponding to the email format; although it won’t ever matter in this tutorial, the resulting HTML and plain-text mailer layouts can be found in app/views/layouts.) The generated code also includes an instance variable (@greeting), which is available in the mailer views in much the same way that instance variables in controllers are available in ordinary views.
Listing 11.9: The generated application mailer.app/mailers/application_mailer.rb
class ApplicationMailer < ActionMailer::Base
  default from: "[email protected]"
  layout "mailer"
end
Listing 11.10: The generated User mailer.app/mailers/user_mailer.rb
class UserMailer < ApplicationMailer

  # Subject can be set in your I18n file at config/locales/en.yml
  # with the following lookup:
  #
  #   en.user_mailer.account_activation.subject
  #
  def account_activation
    @greeting = "Hi"

    mail to: "[email protected]"
  end

  # Subject can be set in your I18n file at config/locales/en.yml
  # with the following lookup:
  #
  #   en.user_mailer.password_reset.subject
  #
  def password_reset
    @greeting = "Hi"

    mail to: "[email protected]"
  end
end
To make a working activation email, we’ll first customize the generated template as shown in Listing 11.11. Next, we’ll create an instance variable containing the user (for use in the view), and then mail the result to user.email (Listing 11.12). As seen in Listing 11.12, the mail method also takes a subject key, whose value is used as the email’s subject line. Note: If you’re planning to send email in production (Section 11.4), you should replace [email protected] in Listing 11.11 with your actual email address.
Listing 11.11: The application mailer with a new default from address.app/mailers/application_mailer.rb
class ApplicationMailer < ActionMailer::Base
  default from: "[email protected]"
  layout "mailer"
end
Listing 11.12: Mailing the account activation link. REDapp/mailers/user_mailer.rb
class UserMailer < ApplicationMailer

  def account_activation(user)
    @user = user
    mail to: user.email, subject: "Account activation"
  end

  def password_reset
    @greeting = "Hi"

    mail to: "[email protected]"
  end
end
As indicated in the Listing 11.12 caption, the tests are currently RED (due to our changing account_activation to take an argument); we’ll get them to GREEN in Section 11.2.3.
As with ordinary views, we can use embedded Ruby to customize the template views, in this case greeting the user by name and including a link to a custom activation link. Our plan is to find the user by email address and then authenticate the activation token, so the link needs to include both the email and the token. Because we’re modeling activations using an Account Activations resource, the token itself can appear as the argument of the named route defined in Listing 11.1:
edit_account_activation_url(@user.activation_token, ...)Recalling that
edit_user_url(user)produces a URL of the form
http://www.example.com/users/1/editthe corresponding account activation link’s base URL will look like this:
http://www.example.com/account_activations/q5lt38hQDc_959PVoo6b7A/editHere q5lt38hQDc_959PVoo6b7A is a URL-safe base64 string generated by the new_token method (Listing 9.2), and it plays the same role as the user id in /users/1/edit. In particular, in the Activations controller edit action, the token will be available in the params hash as params[:id].
In order to include the email as well, we need to use a query parameter, which in a URL appears as a key–value pair located after a question mark:6
6. URLs can contain multiple query parameters, consisting of multiple key–value pairs separated by the ampersand character &, as in /edit?name=Foo%20Bar&email=foo%40example.com.
account_activations/q5lt38hQDc_959PVoo6b7A/edit?email=foo%40example.comNotice that the ‘@’ in the email address appears as %40, i.e., it’s “escaped out” to guarantee a valid URL. The way to set a query parameter in Rails is to include a hash in the named route:
edit_account_activation_url(@user.activation_token, email: @user.email)When using named routes in this way to define query parameters, Rails automatically escapes out any special characters. The resulting email address will also be unescaped automatically in the controller, and will be available via params[:email].
With the @user instance variable as defined in Listing 11.12, we can create the necessary links using the named edit route and embedded Ruby, as shown in Listing 11.13 and Listing 11.14. Note that the HTML template in Listing 11.14 uses the link_to method to construct a valid link.
Listing 11.13: The account activation text view.app/views/user_mailer/account_activation.text.erb
Hi <%= @user.name %>,

Welcome to the Sample App! Click on the link below to activate your account:

<%= edit_account_activation_url(@user.activation_token, email: @user.email) %>
Listing 11.14: The account activation HTML view.app/views/user_mailer/account_activation.html.erb
<h1>Sample App</h1>

<p>Hi <%= @user.name %>, </p>

<p>
Welcome to the Sample App! Click on the link below to activate your account:
</p>

<%= link_to "Activate", edit_account_activation_url(@user.activation_token,
                                                    email: @user.email) %>
Exercises
To see other people’s answers and to record your own, subscribe to the Rails Tutorial course or to the Learn Enough All Access Subscription.
At the console, verify that the
escapemethod in theCGImodule escapes out the email address as shown in Listing 11.15. What is the escaped value of the string"Don't panic!"?
Listing 11.15: Escaping an email with CGI.escape.
>> CGI.escape('[email protected]')
=> "foo%40example.com"
11.2.2 Email Previews
To see the results of the templates defined in Listing 11.13 and Listing 11.14, we can use email previews, which are special URLs exposed by Rails to let us see what our email messages look like. First, we need to add some configuration to our application’s development environment, as shown in Listing 11.16.
Listing 11.16: Email settings in development.config/environments/development.rb
Rails.application.configure do
  .
  .
  .
  config.action_mailer.raise_delivery_errors = false

  host = 'example.com' # Don't use this literally; use your local host instead.
  # Use this on the cloud IDE.
  config.action_mailer.default_url_options = { host: host, protocol: 'https' }
  # Use this if developing on localhost.
  # config.action_mailer.default_url_options = { host: host, protocol: 'http' }
  .
  .
  .
end
Listing 11.16 uses a host name of 'example.com', but as indicated in the comment you should use the actual host of your development environment. For example, on the cloud IDE you should use
host = '<hex string>.vfs.cloud9.us-east-2.amazonaws.com'     # Cloud IDE
config.action_mailer.default_url_options = { host: host, protocol: 'https' }
where the exact host is based on what you see in your browser (Figure 11.2). (Note in particular that the us-east-2 part may vary. In addition, the host should not include the https:// prefix.)

Figure 11.2: The host URL for the cloud IDE.
On a local system, you should use this instead:
host = 'localhost:3000'                     # Local server
config.action_mailer.default_url_options = { host: host, protocol: 'http' }
Note especially in this second example that https has changed to plain http.
After restarting the development server to activate the configuration in Listing 11.16, we next need to update the User mailer preview file, which was automatically generated in Section 11.2, as shown in Listing 11.17.
Listing 11.17: The generated User mailer previews.test/mailers/previews/user_mailer_preview.rb
# Preview all emails at http://localhost:3000/rails/mailers/user_mailer
class UserMailerPreview < ActionMailer::Preview

  # Preview this email at
  # http://localhost:3000/rails/mailers/user_mailer/account_activation
  def account_activation
    UserMailer.account_activation
  end

  # Preview this email at
  # http://localhost:3000/rails/mailers/user_mailer/password_reset
  def password_reset
    UserMailer.password_reset
  end

end
Because the account_activation method defined in Listing 11.12 requires a valid user object as an argument, the code in Listing 11.17 won’t work as written. To fix it, we define a user variable equal to the first user in the development database, and then pass it as an argument to UserMailer.account_activation (Listing 11.18). Note that Listing 11.18 also assigns a value to user.activation_token, which is necessary because the account activation templates in Listing 11.13 and Listing 11.14 need an account activation token. (Because activation_token is a virtual attribute (Section 11.1), the user from the database doesn’t have one.)
Listing 11.18: A working preview method for account activation.test/mailers/previews/user_mailer_preview.rb
# Preview all emails at http://localhost:3000/rails/mailers/user_mailer
class UserMailerPreview < ActionMailer::Preview

  # Preview this email at
  # http://localhost:3000/rails/mailers/user_mailer/account_activation
  def account_activation
    user = User.first
    user.activation_token = User.new_token
    UserMailer.account_activation(user)
  end

  # Preview this email at
  # http://localhost:3000/rails/mailers/user_mailer/password_reset
  def password_reset
    UserMailer.password_reset
  end
end
With the preview code as in Listing 11.18, we can visit the suggested URLs to preview the account activation emails. (If you are using the cloud IDE, you should replace localhost:3000 with the corresponding base URL.) The resulting HTML and text emails appear as in Figure 11.3 and Figure 11.4.
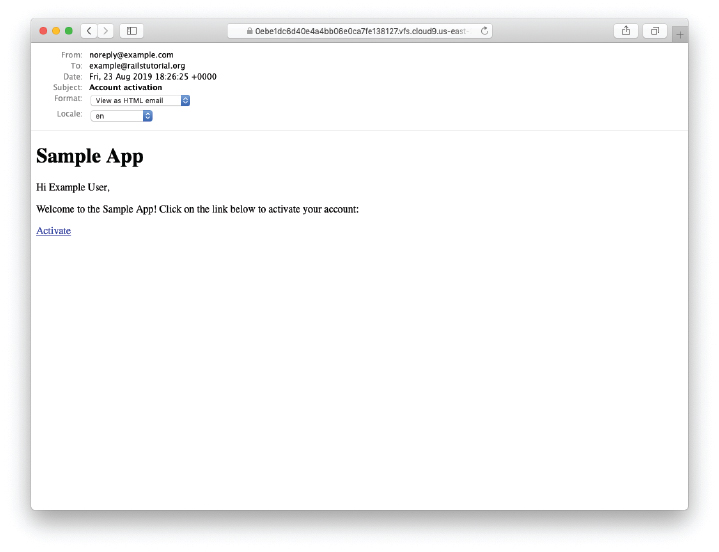
Figure 11.3: A preview of the HTML version of the account activation email.
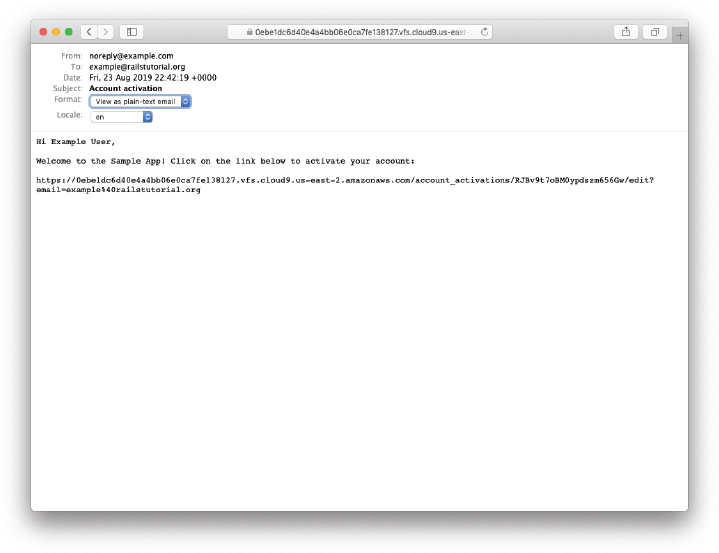
Figure 11.4: A preview of the text version of the account activation email.
Exercises
To see other people’s answers and to record your own, subscribe to the Rails Tutorial course or to the Learn Enough All Access Subscription.
Preview the email templates in your browser. What do the Date fields read for your previews?
11.2.3 Email Tests
As a final step, we’ll write a couple of tests to double-check the results shown in the email previews. This isn’t as hard as it sounds, because Rails has generated useful example tests for us (Listing 11.19).
Listing 11.19: The User mailer test generated by Rails. REDtest/mailers/user_mailer_test.rb
require "test_helper"

class UserMailerTest < ActionMailer::TestCase
  test "account_activation" do
    mail = UserMailer.account_activation
    assert_equal "Account activation", mail.subject
    assert_equal ["[email protected]"], mail.to
    assert_equal ["[email protected]"], mail.from
    assert_match "Hi", mail.body.encoded
  end

  test "password_reset" do
    mail = UserMailer.password_reset
    assert_equal "Password reset", mail.subject
    assert_equal ["[email protected]"], mail.to
    assert_equal ["[email protected]"], mail.from
    assert_match "Hi", mail.body.encoded
  end

end
As mentioned in Section 11.2.1, the tests in Listing 11.19 are currently RED.
The tests in Listing 11.19 use the powerful assert_match method, which can be used with either a string or a regular expression:
assert_match 'foo', 'foobar'       # true
assert_match 'baz', 'foobar'       # false
assert_match /w+/, 'foobar'       # true
assert_match /w+/, '$#!*+@'       # false
The test in Listing 11.20 uses assert_match to check that the name, activation token, and escaped email appear in the email’s body. For the last of these, note the use of
CGI.escape(user.email)to escape the test user’s email, which we met briefly in Section 11.2.1.7 Note: If you’re planning to send email in production (Section 11.4), you should replace [email protected] in Listing 11.20 with your actual email address.
7. When I originally wrote this chapter, I couldn’t recall offhand how to escape URLs in Rails, and figuring it out was pure technical sophistication (Box 1.2). What I did was Google “ruby rails escape url”, which led me to find two main possibilities, URI.encode(str) and CGI.escape(str). Trying them both revealed that the latter works. (It turns out there’s a third possibility: The ERB::Util library supplies a url_encode method that has the same effect.)
Listing 11.20: A test of the current email implementation. REDtest/mailers/user_mailer_test.rb
require "test_helper"

class UserMailerTest < ActionMailer::TestCase

  test "account_activation" do
    user = users(:michael)
    user.activation_token = User.new_token
    mail = UserMailer.account_activation(user)
    assert_equal "Account activation", mail.subject
    assert_equal [user.email], mail.to
    assert_equal ["[email protected]"], mail.from
    assert_match user.name,               mail.body.encoded
    assert_match user.activation_token,   mail.body.encoded
    assert_match CGI.escape(user.email),  mail.body.encoded
  end
end
Note that Listing 11.20 takes care to add an activation token to the fixture user, which would otherwise be blank. (Listing 11.20 also removes the generated password reset test, which we’ll add back (in modified form) in Section 12.2.2.)
To get the test in Listing 11.20 to pass, we have to configure our test file with the proper domain host, as shown in Listing 11.21. Note that, unlike in Listing 11.16, we can literally use the host name 'example.com' in Listing 11.21 because email won’t really be sent in a test environment.
Listing 11.21: Setting the test domain host. GREENconfig/environments/test.rb
Rails.application.configure do
  .
  .
  .
  config.action_mailer.delivery_method = :test
  config.action_mailer.default_url_options = { host: 'example.com' }
  .
  .
  .
end
With the code as above, the mailer test should be GREEN:
Listing 11.22: GREEN
$ rails test:mailersExercises
To see other people’s answers and to record your own, subscribe to the Rails Tutorial course or to the Learn Enough All Access Subscription.
Verify that the full test suite is still GREEN.
Confirm that the test goes RED if you remove the call to
CGI.escapein Listing 11.20.
11.2.4 Updating the Users create Action
To use the mailer in our application, we just need to add a couple of lines to the create action used to sign users up, as shown in Listing 11.23. Note that Listing 11.23 has changed the redirect behavior upon signing up. Before, we redirected to the user’s profile page (Section 7.4), but that doesn’t make sense now that we’re requiring account activation. Instead, we now redirect to the root URL.
Listing 11.23: Adding account activation to user signup. REDapp/controllers/users_controller.rb
class UsersController < ApplicationController
  .
  .
  .
  def create
    @user = User.new(user_params)
    if @user.save
      UserMailer.account_activation(@user).deliver_now
      flash[:info] = "Please check your email to activate your account."
      redirect_to root_url
    else
      render 'new', status: :unprocessable_entity
    end
  end
  .
  .
  .
end
Because Listing 11.23 redirects to the root URL instead of to the profile page and doesn’t log the user in as before, the test suite is currently RED, even though the application is working as designed. We’ll fix this by temporarily commenting out the failing lines, as shown in Listing 11.24. We’ll uncomment these lines and write passing tests for account activation in Section 11.3.3.
Listing 11.24: Temporarily commenting out failing tests. GREENtest/integration/users_signup_test.rb
require "test_helper"

class UsersSignupTest < ActionDispatch::IntegrationTest

  test "invalid signup information" do
    get signup_path
    assert_no_difference 'User.count' do
      post users_path, params: { user: { name:  "",
                                         email: "user@invalid",
                                         password:              "foo",
                                         password_confirmation: "bar" } }
    end
    assert_response :unprocessable_entity
    assert_template 'users/new'
    assert_select 'div#error_explanation'
    assert_select 'div.field_with_errors'
  end

  test "valid signup information" do
    assert_difference 'User.count', 1 do
      post users_path, params: { user: { name:  "Example User",
                                         email: "[email protected]",
                                         password:              "password",
                                         password_confirmation: "password" } }
    end
    follow_redirect!
    # assert_template 'users/show'
    # assert is_logged_in?
  end
end
If you now try signing up as a new user, you should be redirected as shown in Figure 11.5, and an email like the one shown in Listing 11.25 should be generated. Note that you will not receive an actual email in a development environment, but it will show up in your server logs. (You may have to scroll up a bit to see it.) Section 11.4 discusses how to send email for real in a production environment.
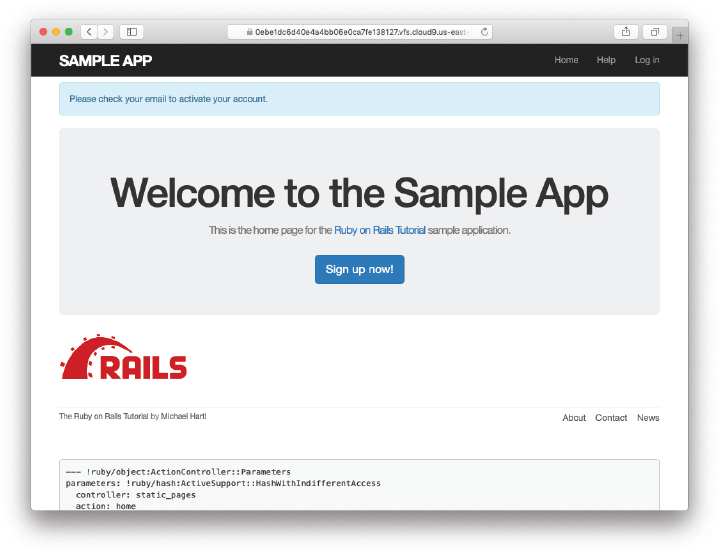
Figure 11.5: The Home page with an activation message after signup.
Listing 11.25: A sample account activation email from the server log.
UserMailer#account_activation: processed outbound mail in 5.1ms
Delivered mail [email protected] (3.2ms)
Date: Fri, 11 Mar 2022 22:54:15 +0000
From: [email protected]
To: [email protected]
Message-ID: <[email protected]>
Subject: Account activation
Mime-Version: 1.0
Content-Type: multipart/alternative;
 boundary="--==_mimepart_5d606e97b6f16_28872b106582df98876dd";
 charset=UTF-8
Content-Transfer-Encoding: 7bit


----==_mimepart_5d606e97b6f16_28872b106582df98876dd
Content-Type: text/plain;
 charset=UTF-8
Content-Transfer-Encoding: 7bit

Hi Michael Hartl,

Welcome to the Sample App! Click on the link below to activate your account:

https://0ebe1dc6d40e4a4bb06e0ca7fe138127.vfs.cloud9.us-east-2.
amazonaws.com/account_activations/zdqs6sF7BMiDfXBaC7-6vA/
edit?email=michael%40michaelhartl.com

----==_mimepart_5d606e97b6f16_28872b106582df98876dd
Content-Type: text/html;
 charset=UTF-8
Content-Transfer-Encoding: 7bit

<!DOCTYPE html>
<html>
  <head>
    <meta http-equiv="Content-Type" content="text/html; charset=utf-8" />
    <style>
      /* Email styles need to be inline */
    </style>
  </head>

  <body>
    <h1>Sample App</h1>

<p>Hi Michael Hartl,</p>

<p>
Welcome to the Sample App! Click on the link below to activate your account:
</p>

<a href="https://0ebe1dc6d40e4a4bb06e0ca7fe138127.vfs.cloud9.us-east-2.
amazonaws.com/account_activations/zdqs6sF7BMiDfXBaC7-6vA/
edit?email=michael%40michaelhartl.com">Activate</a>
  </body>
</html>

----==_mimepart_5d606e97b6f16_28872b106582df98876dd--
Exercises
To see other people’s answers and to record your own, subscribe to the Rails Tutorial course or to the Learn Enough All Access Subscription.
Sign up as a new user and verify that you’re properly redirected. What is the content of the generated email in the server log? What is the value of the activation token?
Verify at the console that the new user has been created but that it is not yet activated.
11.3 Activating the Account
Now that we have a correctly generated email as in Listing 11.25, we need to write the edit action in the Account Activations controller that actually activates the user. As usual, we’ll write a test for this action, and once the code is tested we’ll refactor it to move some functionality out of the Account Activations controller and into the User model.
11.3.1 Generalizing the authenticated? Method
Recall from the discussion in Section 11.2.1 that the activation token and email are available as params[:id] and params[:email], respectively. Following the model of passwords (Listing 8.7) and remember tokens (Listing 9.9), we plan to find and authenticate the user with code something like this:
user = User.find_by(email: params[:email])
if user && user.authenticated?(:activation, params[:id])
(As we’ll see in a moment, there will be one extra boolean in the expression above. See if you can guess what it will be.)
The above code uses the authenticated? method to test if the account activation digest matches the given token, but at present this won’t work because that method is specialized to the remember token (Listing 9.6):
# Returns true if the given token matches the digest.
def authenticated?(remember_token)
  return false if remember_digest.nil?
  BCrypt::Password.new(remember_digest).is_password?(remember_token)
end
Here remember_digest is an attribute on the User model, and inside the model we can rewrite it as follows:
self.remember_digestSomehow, we want to be able to make this variable, so we can call
self.activation_digestinstead by passing in the appropriate parameter to the authenticated? method.
The solution involves our first example of metaprogramming, which is essentially a program that writes a program. (Metaprogramming is one of Ruby’s strongest suits, and many of the “magic” features of Rails are due to its use of Ruby metaprogramming.) The key in this case is the powerful send method, which lets us call a method with a name of our choice by “sending a message” to a given object. For example, in this console session we use send on a native Ruby object to find the length of an array:
$ rails console
>> a = [1, 2, 3]
>> a.length
=> 3
>> a.send(:length)
=> 3
>> a.send("length")
=> 3
Here we see that passing the symbol :length or string "length" to send is equivalent to calling the length method on the given object. As a second example, we’ll access the activation_digest attribute of the first user in the database:
>> user = User.first
>> user.activation_digest
=> "$2a$10$4e6TFzEJAVNyjLv8Q5u22ensMt28qEkx0roaZvtRcp6UZKRM6N9Ae"
>> user.send(:activation_digest)
=> "$2a$10$4e6TFzEJAVNyjLv8Q5u22ensMt28qEkx0roaZvtRcp6UZKRM6N9Ae"
>> user.send("activation_digest")
=> "$2a$10$4e6TFzEJAVNyjLv8Q5u22ensMt28qEkx0roaZvtRcp6UZKRM6N9Ae"
>> attribute = :activation
>> user.send("#{attribute}_digest")
=> "$2a$10$4e6TFzEJAVNyjLv8Q5u22ensMt28qEkx0roaZvtRcp6UZKRM6N9Ae"
Note in the last example that we’ve defined an attribute variable equal to the symbol :activation and used string interpolation to build up the proper argument to send. This would work also with the string 'activation', but using a symbol is more conventional, and in either case
"#{attribute}_digest"becomes
"activation_digest"once the string is interpolated. (We saw how symbols are interpolated as strings in Section 7.4.2.)
Based on this discussion of send, we can rewrite the current authenticated? method as follows:
def authenticated?(remember_token)
 digest = self.send("remember_digest")
 return false if digest.nil?
 BCrypt::Password.new(digest).is_password?(remember_token)
end
With this template in place, we can generalize the method by adding a function argument with the name of the digest, and then use string interpolation as above:
def authenticated?(attribute, token)
 digest = self.send("#{attribute}_digest")
 return false if digest.nil?
 BCrypt::Password.new(digest).is_password?(token)
end
(Here we have renamed the second argument token to emphasize that it’s now generic.) Because we’re inside the User model, we can also omit self, yielding the most idiomatically correct version:
def authenticated?(attribute, token)
 digest = self.send("#{attribute}_digest")
 return false if digest.nil?
 BCrypt::Password.new(digest).is_password?(token)
end
We can now reproduce the previous behavior of authenticated? by invoking it like this:
user.authenticated?(:remember, remember_token)Applying this discussion to the User model yields the generalized authenticated? method shown in Listing 11.26.
Listing 11.26: A generalized authenticated? method. REDapp/models/user.rb
class User < ApplicationRecord
  .
  .
  .
  # Returns true if the given token matches the digest.
  def authenticated?(attribute, token)
    digest = send("#{attribute}_digest")
    return false if digest.nil?
    BCrypt::Password.new(digest).is_password?(token)
  end
  .
  .
  .
end
The Listing 11.26 caption indicates a RED test suite:
Listing 11.27: RED
$ rails testThe reason for the failure is that the current_user method (Listing 9.9) and the test for nil digests (Listing 9.18) both use the old version of authenticated?, which expects one argument instead of two. Note that this is exactly the kind of error a test suite is supposed to catch.
To fix the issue, we simply update the two cases to use the generalized method, as shown in Listing 11.28 and Listing 11.29. Note that Listing 11.28 incorporates the solution to the exercise on session fixation from Section 9.3.2, so be sure to update your User model with the code from Listing 9.37 if you didn’t complete that exercise.
Listing 11.28: Using the generalized authenticated? method in current_user. REDapp/helpers/sessions_helper.rb
module SessionsHelper
  .
  .
  .
  # Returns the current logged-in user (if any).
  def current_user
    if (user_id = session[:user_id])
      user = User.find_by(id: user_id)
      @current_user ||= user if session[:session_token] == user.session_token
    elsif (user_id = cookies.encrypted[:user_id])
      user = User.find_by(id: user_id)
      if user && user.authenticated?(:remember, cookies[:remember_token])
        log_in user
        @current_user = user
      end
    end
  end
  .
  .
  .
end
Listing 11.29: Using the generalized authenticated? method in the User test. GREENtest/models/user_test.rb
require "test_helper"

class UserTest < ActiveSupport::TestCase

  def setup
    @user = User.new(name: "Example User", email: "[email protected]",
                     password: "foobar", password_confirmation: "foobar")
  end
  .
  .
  .
  test "authenticated? should return false for a user with nil digest" do
    assert_not @user.authenticated?(:remember, '')
  end
end
At this point, the tests should be GREEN:
Listing 11.30: GREEN
$ rails testRefactoring the code as above is incredibly more error-prone without a solid test suite, which is why we went to such trouble to write good tests in Section 9.1.2 and Section 9.3.
Exercises
To see other people’s answers and to record your own, subscribe to the Rails Tutorial course or to the Learn Enough All Access Subscription.
Create and remember a new user at the console. What are the user’s remember and activation tokens? What are the corresponding digests?
Using the generalized
authenticated?method from Listing 11.26, verify that the user is authenticated according to both the remember token and the activation token.
11.3.2 Activation edit Action
With the authenticated? method as in Listing 11.26, we’re now ready to write an edit action that authenticates the user corresponding to the email address in the params hash. Our test for validity will look like this:
if user && !user.activated? && user.authenticated?(:activation, params[:id])Note the presence of !user.activated?, which is the extra boolean alluded to above. This prevents our code from activating users who have already been activated, which is important because we’ll be logging in users upon confirmation, and we don’t want to allow attackers who manage to obtain the activation link to log in as the user.
If the user is authenticated according to the booleans above, we need to activate the user and update the activated_at timestamp:8
8. Here we use two calls to update_attribute rather than a single call to update because (per Section 6.1.5) the latter would run the validations. Lacking in this case the user password, these validations would fail.
user.update_attribute(:activated,    true)
user.update_attribute(:activated_at, Time.zone.now)
This leads to the edit action shown in Listing 11.31. Note that Listing 11.31 handles the case of an invalid activation token as well; this should rarely happen, but it’s easy enough to redirect in this case to the root URL.
Listing 11.31: An edit action to activate accounts.
app/controllers/account_activations_controller.rb
class AccountActivationsController < ApplicationController

  def edit
    user = User.find_by(email: params[:email])
    if user && !user.activated? && user.authenticated?(:activation, params[:id])
      user.update_attribute(:activated,    true)
      user.update_attribute(:activated_at, Time.zone.now)
      log_in user
      flash[:success] = "Account activated!"
      redirect_to user
    else
      flash[:danger] = "Invalid activation link"
      redirect_to root_url
    end
  end
end
With the code in Listing 11.31, you should now be able to paste in the URL from Listing 11.25 to activate the relevant user. For example, on my system I visited the URL
https://0ebe1dc6d40e4a4bb06e0ca7fe138127.vfs.cloud9.us-east-2.
amazonaws.com/account_activations/zdqs6sF7BMiDfXBaC7-6vA/
edit?email=michael%40michaelhartl.com
and got the result shown in Figure 11.6.
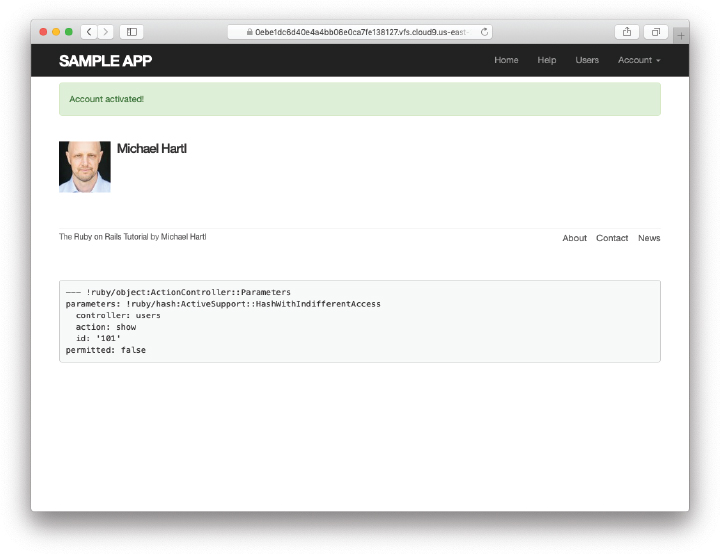
Figure 11.6: The profile page after a successful activation.
Getting account activation to work is a great first step, but the activation doesn’t actually do anything yet because we haven’t changed how users log in. In order to have account activation mean something, we need to allow users to log in only if they are activated. As shown in Listing 11.32, the way to do this is to log the user in as usual if user.activated? is true; otherwise, we redirect to the root URL with a warning message (Figure 11.7). As noted in the Listing 11.32 caption, the test suite is RED as a result, which we’ll fix in Section 11.3.3.
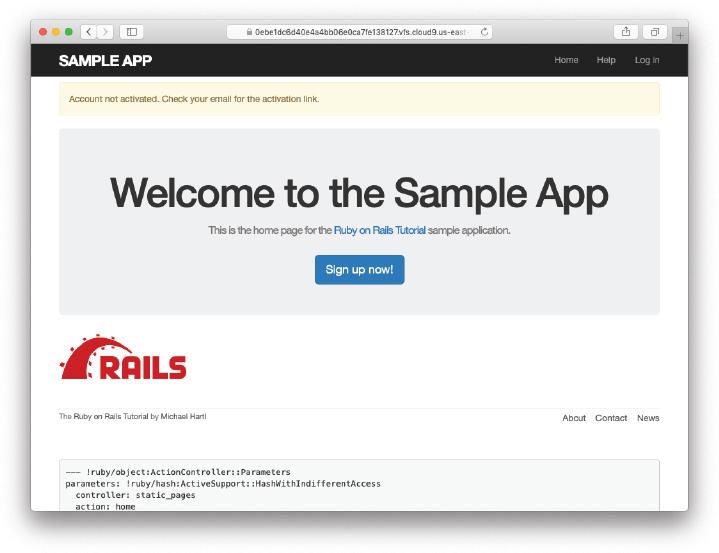
Figure 11.7: The warning message for a not-yet-activated user.
Listing 11.32: Preventing unactivated users from logging in. REDapp/controllers/sessions_controller.rb
class SessionsController   < ApplicationController

  def new
  end

  def create
    user = User.find_by(email: params[:session][:email].downcase)
    if user && user.authenticate(params[:session][:password])
      if user.activated?
        forwarding_url = session[:forwarding_url]
        reset_session
        params[:session][:remember_me] == '1' ? remember(user) : forget(user)
        log_in user
        redirect_to forwarding_url || user
      else
        message  = "Account not activated. "
        message += "Check your email for the activation link."
        flash[:warning] = message
        redirect_to root_url
      end
    else
      flash.now[:danger] = 'Invalid email/password combination'
      render 'new', status: :unprocessable_entity
    end
  end

  def destroy
    log_out if logged_in?
    redirect_to root_url, status: :see_other
  end
end
With that, apart from one refinement, the basic functionality of user activation is done. (That refinement is preventing unactivated users from being displayed, which is left as an exercise (Section 11.3.3).) In Section 11.3.3, we’ll complete the process by adding some tests and then doing a little refactoring.
Exercises
To see other people’s answers and to record your own, subscribe to the Rails Tutorial course or to the Learn Enough All Access Subscription.
Paste in the URL from the email generated in Section 11.2.4. What is the activation token?
Verify at the console that the user is authenticated according to the activation token in the URL from the previous exercise. Is the user now activated?
11.3.3 Activation Tests and Refactoring
In this section, we’ll add integration tests for account activation. Because we already have a test file for user signups, we’ll add the activation tests to the test developed in Section 7.4.4. Because there are a lot of new steps in this section, we’ll also take this opportunity to discuss in more detail the techniques for breaking tests into pieces introduced in the exercise associated with Listing 8.48. We’ll then apply these techniques to the tests for user signup and account activation.
Breaking Up Long Tests
The main barrier to breaking up long tests is that often several assertions require the same setup steps. For example, in Listing 8.46, a large number of assertions require a login with valid information via posting to the login path:
test "login with valid information followed by logout" do
  post login_path, params: { session: { email:    @user.email,
                                        password: 'password' } }
  assert is_logged_in?
  .
  .
  .
We might be tempted to try breaking this test up as follows:
test "valid login" do
  .
  .
  .
end

test "redirect after login" do
  .
  .
  .
end

test "successful logout" do
  .
  .
  .
end
The problem is that every one of these tests would need a duplicate call to post login_path.
The usual solution to such duplication is to put the relevant code in the shared setup method. Unfortunately, we can’t put the valid login in the shared setup method in this case because the other test in the file requires trying to log in with invalid information:
test "login with valid email/invalid password" do
  get login_path
  assert_template 'sessions/new'
  post login_path, params: { session: { email:    @user.email,
                                        password: "invalid" } }
  assert_not is_logged_in?
  .
  .
  .
The resolution to this conflict is to use Ruby classes (Section 4.4) to allow the use of multiple setup methods.9 In the case of Listing 8.46, this means putting the most basic setup method in its own class:
9. For an alternate technique that allows similar nesting of setup code, see minitest/spec in the minitest documentation (https://github.com/minitest/minitest) and at StackOverflow (https://stackoverflow.com/questions/14263839/how-to-organize-minitest-unit-tests). The minitest/spec syntax, as well as the closely related RSpec syntax, is a bit more advanced than vanilla minitest but is a recommended option for more advanced users. Earlier versions of the Ruby on Rails Tutorial actually used RSpec, but for simplicity and greater compatibility it was replaced with minitest in the third edition. (Among other things, because minitest is the default Rails testing system, it always works even with new versions of Rails, whereas RSpec is a separate project and sometimes lags a bit behind in terms of Rails compatibility.)
class UsersLogin < ActionDispatch::IntegrationTest

  def setup
    @user = users(:michael)
  end
end
Tests that need this setup method can then inherit from the base class, which automatically runs the corresponding setup method:
class InvalidPasswordTest < UsersLogin

  test "login path" do
    get login_path
    assert_template 'sessions/new'
  end
  .
  .
  .
For tests that need to override setup or (more commonly) add to it, we can simply define another class with a new setup method. For the case of the validlogin scenario just mentioned, we can define a ValidLogin class inheriting from UsersLogin:
class ValidLogin < UsersLogin

 def setup
   super
   post login_path, params: { session: { email:    @user.email,
                                         password: 'password' } }
 end
end
Note here the use of super, which arranges to call the setup method of the base class (in this case, UsersLogin) before proceeding. This is necessary in our case because the @user instance variable (defined by the setup method of UsersLogin) is needed in the parameters to post login_path.
Putting everything together gives the Users login test shown in Listing 11.33, which combines the results of Listing 8.48 and Listing 9.27. Listing 11.33 is fairly long, but see if you can follow its structure and figure out what each step is testing. (Some developers prefer to break down the tests even further and include only one assertion per test; as noted in Section 5.3.4, I prefer to include multiple assertions when they are part of a single scenario.)
Listing 11.33: Refactored tests for user login. GREENtest/integration/users_login_test.rb
require "test_helper"

class UsersLogin < ActionDispatch::IntegrationTest

  def setup
    @user = users(:michael)
  end
end

class InvalidPasswordTest < UsersLogin

  test "login path" do
    get login_path
    assert_template 'sessions/new'
  end

  test "login with valid email/invalid password" do
    post login_path, params: { session: { email:    @user.email,
                                          password: "invalid" } }
    assert_not is_logged_in?
    assert_template 'sessions/new'
    assert_not flash.empty?
    get root_path
    assert flash.empty?
  end
end

class ValidLogin < UsersLogin

  def setup
    super
    post login_path, params: { session: { email:    @user.email,
                                          password: 'password' } }
  end
end

class ValidLoginTest < ValidLogin

  test "valid login" do
    assert is_logged_in?
    assert_redirected_to @user
  end

  test "redirect after login" do
    follow_redirect!
    assert_template 'users/show'
    assert_select "a[href=?]", login_path, count: 0
    assert_select "a[href=?]", logout_path
    assert_select "a[href=?]", user_path(@user)
  end
end

class Logout < ValidLogin

  def setup
    super
    delete logout_path
  end
end

class LogoutTest < Logout

  test "successful logout" do
    assert_not is_logged_in?
    assert_response :see_other
    assert_redirected_to root_url
  end

  test "redirect after logout" do
    follow_redirect!
    assert_select "a[href=?]", login_path
    assert_select "a[href=?]", logout_path,      count: 0
    assert_select "a[href=?]", user_path(@user), count: 0
  end

  test "should still work after logout in second window" do
    delete logout_path
    assert_redirected_to root_url
  end
end

class RememberingTest < UsersLogin

  test "login with remembering" do
    log_in_as(@user, remember_me: '1')
    assert_not cookies[:remember_token].blank?
  end

  test "login without remembering" do
    # Log in to set the cookie.
    log_in_as(@user, remember_me: '1')
    # Log in again and verify that the cookie is deleted.
    log_in_as(@user, remember_me: '0')
    assert cookies[:remember_token].blank?
  end
end
By the way, you may wonder why we defined a class called UsersLogin and then inherited from it separately for the invalid-login tests. Why not just inherit directly from the base integration-test class? It seems like this should work:
class UsersLoginTest < ActionDispatch::IntegrationTest

  def setup
    @user = users(:michael)
  end

  test "login path" do
    get login_path
    assert_template 'sessions/new'
  end
  .
  .
  .
The answer is that it would work initially, but then the valid-login tests would need to inherit from UsersLoginTest:
class ValidLoginTest < UsersLoginTest

  def setup
    .
    .
    .
end
Because of the way minitest works, this would rerun all the tests in UsersLoginTest, which would be redundant. Furthermore, it would rerun the tests for invalid login using the setup method for valid logins, which would cause the test suite to fail.
Finally, minitest automatically runs the code in every class ending in Test, so we shouldn’t use such names for classes that contain only a setup method; in such cases, minitest would run setup and then do nothing. A good rule of thumb is therefore to encapsulate the setup methods in classes that don’t end in Test and then inherit from them for the actual tests, which is the practice we’ve followed in Listing 11.33.
Broken-Up Activation Tests
At this point, we’re ready to write the tests for account activation. We’ll build on the Users signup test, which we last saw in Listing 11.24, and apply the preceding techniques to break the tests into smaller pieces.
We’ll begin by defining a setup method to clear the mail deliveries, which is needed because the deliveries array is global, so we have to reset it in the setup method to prevent our code from breaking if any other tests deliver email (as will be the case in Chapter 12):
class UsersSignup < ActionDispatch::IntegrationTest

  def setup
    ActionMailer::Base.deliveries.clear
  end
end
The main account activation tests call this setup method using super and then post a valid user signup to trigger the account activation machinery:
class AccountActivationTest < UsersSignup

 def setup
   super
   post users_path, params: { user: { name:  "Example User",
                                      email: "[email protected]",
                                      password:              "password",
                                      password_confirmation: "password" } }
   @user = assigns(:user)
 end
 .
 .
 .
end
This setup method includes the assigns method for the first time in the main tutorial; as explained in a Chapter 9 exercise (Section 9.3.1), assigns lets us access instance variables in the corresponding action. For example, the Users controller’s create action defines an @user variable (Listing 11.23), so we can access it in the test using assigns(:user), which automatically looks for an instance variable with name corresponding to the given symbol (i.e., @user for :user). The assigns method isn’t included by default in versions of Rails later than Rails 5, but I still find it useful in many contexts, and it’s available via the rails-controller-testing gem we included in Listing 3.2.
Once we’ve defined a suitable setup method, we can add tests for a variety of different scenarios:
An unactivated user should not be able to log in.
A user should not be able to activate an account with an invalid token.
A user should not be able to activate an account with an invalid email.
A user should be able to activate an account with a valid token and email.
Converting these tests to code and combining them with a newly broken-apart version of Listing 11.24 gives the tests shown in Listing 11.34. The highlights in Listing 11.34 indicate lines that are especially important or easy to miss, but there are other new lines as well, so take care to add them all. Note in particular that Listing 11.34 restores the lines we commented out in Listing 11.24.
Listing 11.34: Adding account activation to the user signup test. GREENtest/integration/users_signup_test.rb
require "test_helper"

class UsersSignup < ActionDispatch::IntegrationTest

  def setup
    ActionMailer::Base.deliveries.clear
  end
end

class UsersSignupTest < UsersSignup

  test "invalid signup information" do
    assert_no_difference 'User.count' do
      post users_path, params: { user: { name:  "",
                                         email: "user@invalid",
                                         password:              "foo",
                                         password_confirmation: "bar" } }
    end
    assert_response :unprocessable_entity
    assert_template 'users/new'
    assert_select 'div#error_explanation'
    assert_select 'div.field_with_errors'
  end

  test "valid signup information with account activation" do
    assert_difference 'User.count', 1 do
      post users_path, params: { user: { name:  "Example User",
                                         email: "[email protected]",
                                         password:              "password",
                                         password_confirmation: "password" } }
    end
    assert_equal 1, ActionMailer::Base.deliveries.size
  end
end

class AccountActivationTest < UsersSignup

  def setup
    super
    post users_path, params: { user: { name:  "Example User",
                                       email: "[email protected]",
                                       password:              "password",
                                       password_confirmation: "password" } }
    @user = assigns(:user)
  end

  test "should not be activated" do
    assert_not @user.activated?
  end

  test "should not be able to log in before account activation" do
    log_in_as(@user)
    assert_not is_logged_in?
  end

  test "should not be able to log in with invalid activation token" do
    get edit_account_activation_path("invalid token", email: @user.email)
    assert_not is_logged_in?
  end

  test "should not be able to log in with invalid email" do
    get edit_account_activation_path(@user.activation_token, email: 'wrong')
    assert_not is_logged_in?
  end

  test "should log in successfully with valid activation token and email" do
    get edit_account_activation_path(@user.activation_token, email: @user.email)
    assert @user.reload.activated?
    follow_redirect!
    assert_template 'users/show'
    assert is_logged_in?
  end
end
There’s a lot of code in Listing 11.34, but the only completely novel material is in the line
assert_equal 1, ActionMailer::Base.deliveries.sizeThis code verifies that exactly 1 message was delivered as required by Listing 11.23.
At this point, the test suite should be GREEN:
Listing 11.35: GREEN
$ rails testRefactored Activation Code
With the tests in Listing 11.34, we’re ready to refactor the application code a little by moving some of the user manipulations out of the controller and into the model. In particular, we’ll make an activate method to update the user’s activation attributes and a send_activation_email to send the activation email. The extra methods appear in Listing 11.36, and the refactored application code appears in Listing 11.37 and Listing 11.38.
Listing 11.36: Adding user activation methods to the User model.app/models/user.rb
class User < ApplicationRecord
  .
  .
  .
  # Activates an account.
  def activate
    update_attribute(:activated,    true)
    update_attribute(:activated_at, Time.zone.now)
  end

  # Sends activation email.
  def send_activation_email
    UserMailer.account_activation(self).deliver_now
  end

  private
    .
    .
    .
end
Listing 11.37: Sending email via the User model object.app/controllers/users_controller.rb
class UsersController < ApplicationController
  .
  .
  .
  def create
    @user = User.new(user_params)
    if @user.save
      @user.send_activation_email
      flash[:info] = "Please check your email to activate your account."
      redirect_to root_url
    else
      render 'new', status: :unprocessable_entity
    end
  end
  .
  .
  .
end
Listing 11.38: Account activation via the User model object.app/controllers/account_activations_controller.rb
class AccountActivationsController < ApplicationController

  def edit
    user = User.find_by(email: params[:email])
    if user && !user.activated? && user.authenticated?(:activation, params[:id])
      user.activate
      log_in user
      flash[:success] = "Account activated!"
      redirect_to user
    else
      flash[:danger] = "Invalid activation link"
      redirect_to root_url
    end
  end
end
Note that Listing 11.36 eliminates the use of user., which would break inside the User model because there is no such variable:
-user.update_attribute(:activated,    true)
-user.update_attribute(:activated_at, Time.zone.now)
+update_attribute(:activated,    true)
+update_attribute(:activated_at, Time.zone.now)
(We could have switched from user to self, but recall from Section 6.2.5 that self is optional inside the model.) It also changes @user to self in the call to the User mailer:
-UserMailer.account_activation(@user).deliver_now
+UserMailer.account_activation(self).deliver_now
These are exactly the kinds of details that are easy to miss during even a simple refactoring but will be caught by a good test suite. Speaking of which, the test suite should still be GREEN:
Listing 11.39: GREEN
$ rails testExercises
To see other people’s answers and to record your own, subscribe to the Rails Tutorial course or to the Learn Enough All Access Subscription.
In Listing 11.36, the
activatemethod makes two calls to theupdate_-attribute, each of which requires a separate database transaction. By filling in the template shown in Listing 11.40, replace the twoupdate_attributecalls with a single call toupdate_columns, which hits the database only once. (Note that, likeupdate_attribute,update_columnsdoesn’t run the model callbacks or validations.) After making the changes, verify that the test suite is still GREEN.Right now all users are displayed on the user index page at /users and are visible via the URL /users/:id, but it makes sense to show users only if they are activated. Arrange for this behavior by filling in the template shown in Listing 11.41.10 (This template uses the Active Record
wheremethod, which we’ll learn more about in Section 13.3.3.)10. Note that Listing 11.41 uses
andin place of &&. The two are nearly identical, but the latter operator has a higher precedence, which binds too tightly toroot_urlin this case. We could fix the problem by puttingroot_urlin parentheses, but the idiomatically correct way to do it is to useandinstead.To test the code in the previous exercise, write integration tests for both /users and /users/:id. A template for a suggested /users test is shown in Listing 11.42 (which also shows the results of applying the techniques in this section to Listing 10.63 and assumes you have made the update shown in Listing 11.41). For /users/:id, you should run
railsgenerate integration_test user_showand then add an inactive fixture user as shown in Listing 11.43. A template for the corresponding test is shown in Listing 11.44.
Listing 11.40: A template for using update_columns.app/models/user.rb
class User < ApplicationRecord
  attr_accessor :remember_token, :activation_token
  before_save   :downcase_email
  before_create :create_activation_digest
  .
  .
  .
  # Activates an account.
  def activate
    update_columns(activated: FILL_IN, activated_at: FILL_IN)
  end

  # Sends activation email.
  def send_activation_email
    UserMailer.account_activation(self).deliver_now
  end

  private

    # Converts email to all lowercase.
    def downcase_email
      self.email = email.downcase
    end

    # Creates and assigns the activation token and digest.
    def create_activation_digest
      self.activation_token  = User.new_token
      self.activation_digest = User.digest(activation_token)
    end
end
Listing 11.41: A template for code to show only active users.app/controllers/users_controller.rb
class UsersController < ApplicationController
  .
  .
  .
  def index
    @users = User.where(activated: FILL_IN).paginate(page: params[:page])
  end

  def show
    @user = User.find(params[:id])
    redirect_to root_url and return unless FILL_IN
  end
  .
  .
  .
end
Listing 11.42: Test template for displaying only activated users.test/integration/users_index_test.rb
require "test_helper"

class UsersIndex < ActionDispatch::IntegrationTest

  def setup
    @admin     = users(:michael)
    @non_admin = users(:archer)
  end
end

class UsersIndexAdmin < UsersIndex

  def setup
    super
    log_in_as(@admin)
    get users_path
  end
end

class UsersIndexAdminTest < UsersIndexAdmin

  test "should render the index page" do
    assert_template 'users/index'
  end

  test "should paginate users" do
    assert_select 'div.pagination'
  end

  test "should have delete links" do
    first_page_of_users = User.paginate(page: 1)
    first_page_of_users.each do |user|
      assert_select 'a[href=?]', user_path(user), text: user.name
      unless user == @admin
        assert_select 'a[href=?]', user_path(user), text: 'delete'
      end
    end
  end

  test "should be able to delete non-admin user" do
    assert_difference 'User.count', -1 do
      delete user_path(@non_admin)
    end
    assert_response :see_other
    assert_redirected_to users_url
  end

  test "should display only activated users" do
    # Deactivate the first user on the page.
    # Making an inactive fixture user isn't sufficient because Rails can't
    # guarantee it would appear on the first page.
    User.paginate(page: 1).first.toggle!(FILL_IN)
    # Ensure that all the displayed users are activated.
    assigns(:users).each do |user|
      assert user.FILL_IN
    end
  end
end

class UsersNonAdminIndexTest < UsersIndex

  test "should not have delete links as non-admin" do
    log_in_as(@non_admin)
    get users_path
    assert_select 'a', text: 'delete', count: 0
  end
end
Listing 11.43: Adding an inactive user.test/fixtures/users.yml
michael:
  name: Michael Example
  email: [email protected]
  password_digest: <%= User.digest('password') %>
  admin: true
  activated: true
  activated_at: <%= Time.zone.now %>

inactive:
  name: Inactive User
  email: [email protected]
  password_digest: <%= User.digest('password') %>
  admin: false
  activated: false
.
.
.
Listing 11.44: Test template for user show page active/inactive behavior.test/integration/user_show_test.rb
require "test_helper"

class UsersShowTest < ActionDispatch::IntegrationTest

  def setup
    @inactive_user  = users(:inactive)
    @activated_user = users(:archer)
  end

  test "should redirect when user not activated" do
    get user_path(@inactive_user)
    assert_response      FILL_IN
    assert_redirected_to FILL_IN
  end

  test "should display user when activated" do
    get user_path(@activated_user)
    assert_response FILL_IN
    assert_template FILL_IN
  end
end
11.4 Email in Production
Now that we’ve got account activations working in development, in this section we’ll configure our application so that it can actually send email in production. We’ll first get set up with a free service to send email, and then configure and deploy our application.
To send email in production, we’ll use SendGrid, which is available as an add-on at Heroku for verified accounts.11 (This requires adding credit card information to your Heroku account, but there is no charge when verifying an account.) For our purposes, SendGrid’s “starter” tier (which as of this writing is limited to 400 emails a day but costs nothing) is the best fit. We can add it to our app as follows:
11. Another option is to use Gmail, but this will not scale up to a real production app, whereas SendGrid will.
$ heroku addons:create sendgrid:starterTo configure our application to use SendGrid, we need to fill out the SMTP settings for our production environment. As shown in Listing 11.45, you will also have to define a host variable with the address of your production website. One trick for finding the host name of your Heroku app is to use the grep utility on the Git configuration file:
$ grep heroku .git/config
[remote "heroku"]
  url = https://git.heroku.com/mysterious-atoll-47182.git
That shows the URL for my Heroku app. In this case, the host variable in Listing 11.45 would be
host = 'https://mysterious-atoll-47182.herokuapp.com'Listing 11.45: Configuring Rails to use SendGrid in production.config/environments/production.rb
Rails.application.configure do
  .
  .
  .
  config.action_mailer.raise_delivery_errors = true
  config.action_mailer.delivery_method = :smtp
  host = '<your heroku app>.herokuapp.com'
  config.action_mailer.default_url_options = { host: host }
  ActionMailer::Base.smtp_settings = {
    :address        => 'smtp.sendgrid.net',
    :port           => '587',
    :authentication => :plain,
    :user_name      => 'apikey',
    :password       => ENV['SENDGRID_API_KEY'],
    :domain         => 'heroku.com',
    :enable_starttls_auto => true
  }
  .
  .
  .
end
The email configuration in Listing 11.45 sets the user_name to 'apikey' and then sets password to the API key for the SendGrid account. Note that the latter is accessed via the ENV environment variable instead of being hard-coded. This is the best practice for production applications, which for security reasons should never expose sensitive information (such as raw passwords) in source code.
The next step is to create the necessary API key, which will allow Heroku to send email in production. In order to do this, you first need to create and configure a SendGrid account:
Sign up for a SendGrid account (https://signup.sendgrid.com/). When filling in the necessary information, the company name and website can be the Rails Tutorial and https://www.railstutorial.org (Figure 11.8).

Figure 11.8: Filling in the details when signing up at SendGrid.
Check your email and click the link to verify the email address you signed up with.
Create a verified Single Sender (Figure 11.9). This is a special authorized sender to prevent your account from being frozen or marked as a spammer. When filling in the necessary information, use your actual email address (i.e., the one you used in Listing 11.11) and your home or business mailing address. If you get stuck, follow the instructions on the SendGrid Single Sender Verification page (https://docs.sendgrid.com/ui/sending-email/sender-verification).
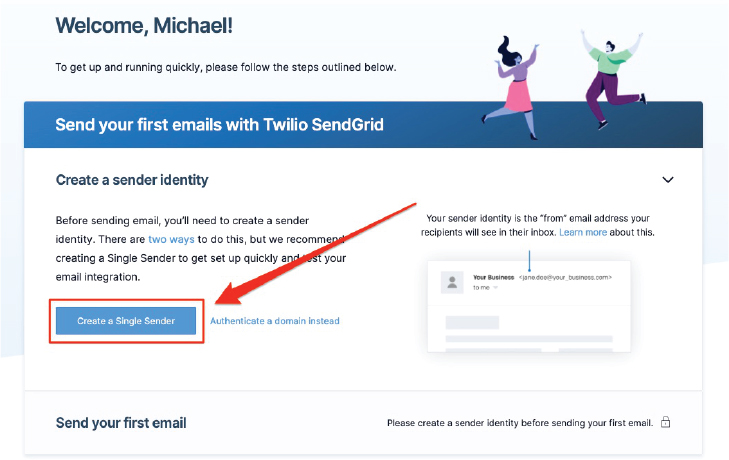
Figure 11.9: Creating a SendGrid Single Sender.
Check your email and click the link to verify the email address you used to create the Single Sender.
Having created a SendGrid account with a verified Single Sender, you’re now ready to create the necessary API key using the following steps:
Go to app.sendgrid.com/settings/api_keys and log in to SendGrid if you aren’t logged in already. After logging in, you should be forwarded automatically to the SendGrid API Keys page (Figure 11.10).
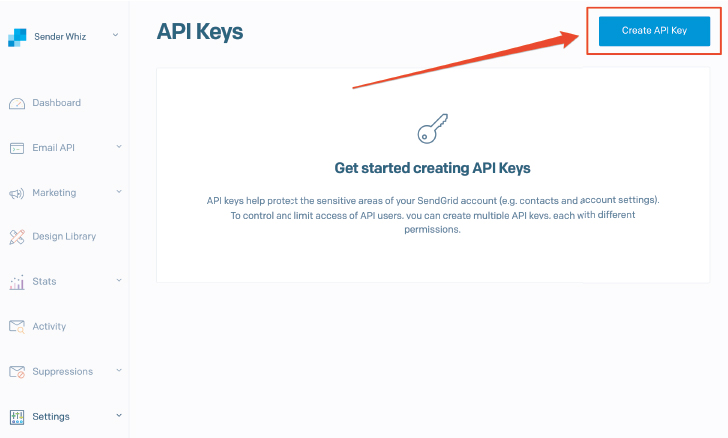
Figure 11.10: The SendGrid API Keys page.
Click on the “Create API Key” button, as shown in Figure 11.10.
Fill in the API Key Name field with “Rails Tutorial SendGrid API Key”, as shown in Figure 11.11.
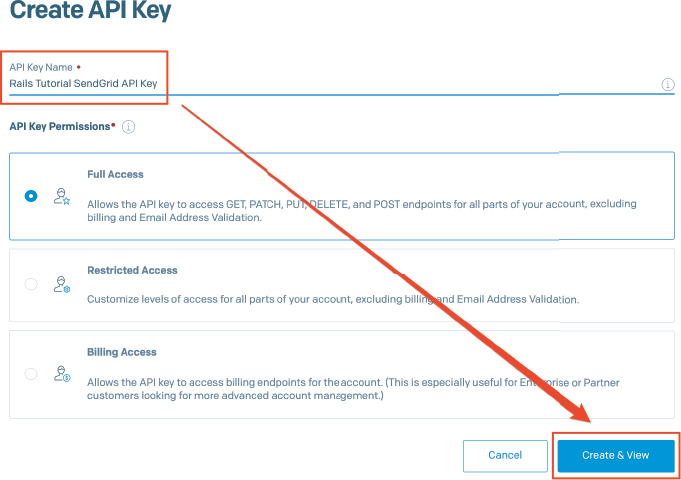
Figure 11.11: Creating a SendGrid API key.
Click on the API key to copy it, as shown in Figure 11.12, then click “Done”. Because the API key will only be shown once, it’s probably a good idea to save it in a password manager or somewhere else secure.
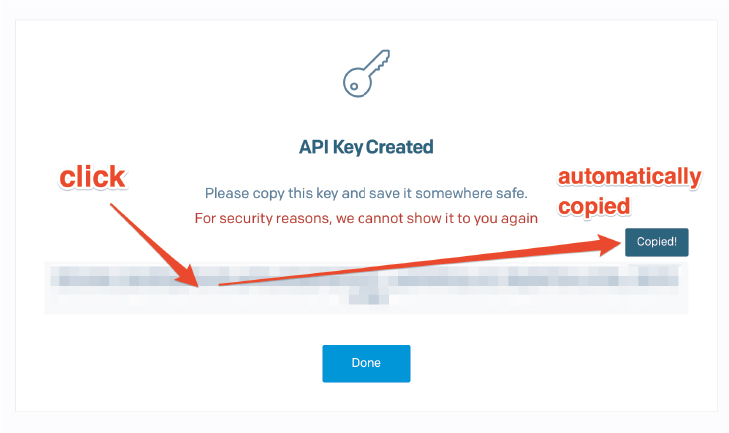
Figure 11.12: The SendGrid API key (be sure to copy!).
Having copied the API key, you should now set the corresponding environment variable at Heroku by pasting it into a config:set command:
$ heroku config:set SENDGRID_API_KEY=<paste SendGrid API key>This API key will now be available via the ENV variable at Heroku, as required by Listing 11.45 and as you can verify at the command line using config:get:
$ heroku config:get SENDGRID_API_KEY
<API key displayed>
That completes the SendGrid configuration. At this point, you should make sure that the Application Mailer has a real email address and not the one in Listing 11.9, as reiterated in Listing 11.46.
Listing 11.46: Reminder of what it shouldn’t be.app/mailers/application_mailer.rb
class ApplicationMailer < ActionMailer::Base
  default from: "[email protected]" # <- Make sure it's not this example adddress
  layout "mailer"
end
At this point, you should merge the changes on the topic branch into main:
$ rails test
$ git add -A
$ git commit -m "Add account activation"
$ git checkout main
$ git merge account-activation
Then push up to the remote repository and deploy to Heroku:
$ rails test
$ git push && git push heroku
$ heroku run rails db:migrate
Once the Heroku deployment has finished, try signing up for the sample application in production using an email address you control. You should get an activation email as implemented in Section 11.2, as shown in Figure 11.13. Clicking on the link should activate the account as promised, as shown in Figure 11.14.
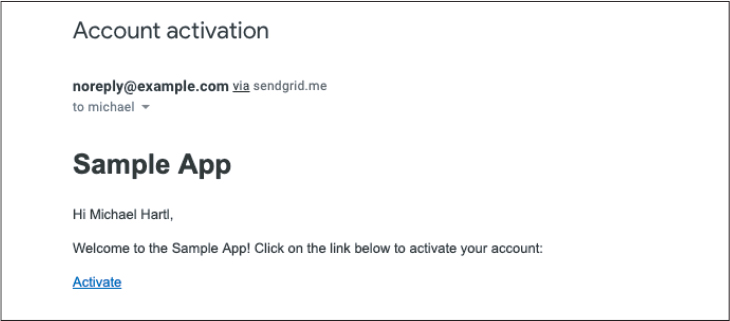
Figure 11.13: An account activation email sent in production.
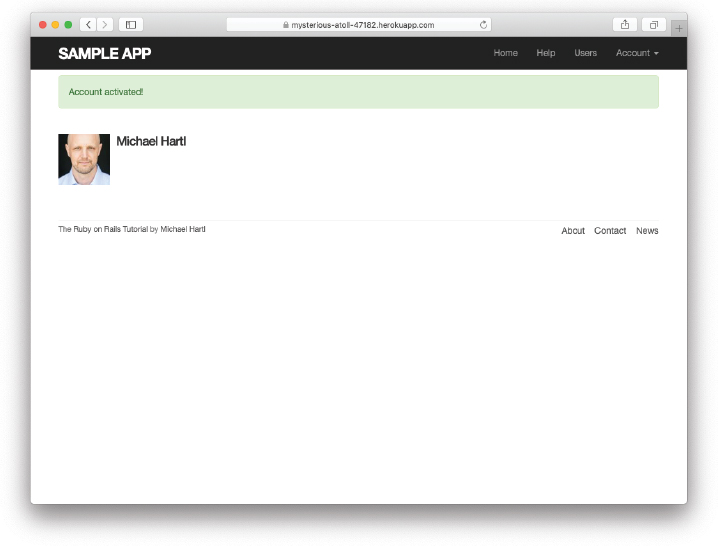
Figure 11.14: Successful account activation in production.
Note that the instructions in this section are intended primarily as a proof of concept, as with Heroku deployment (which uses a subdomain of the form <appname>.-herokuapp.com). Following SendGrid’s Single Sender Verification steps allows you to send test emails in production, but this method is not designed as a permanent solution for a real website. A fully functional production site should generally use a custom domain (as described in Learn Enough Custom Domains to Be Dangerous (https://www.learnenough.com/custom-domains)) and should use SendGrid domain authentication to ensure email deliverability. After following Learn Enough Custom Domains to Be Dangerous and setting up Cloudflare (https://www.learnenough.com/custom-domains-tutorial/dns_management), you will be prepared for the SendGrid DNS verification step needed to send email in production from a custom domain.
Exercises
To see other people’s answers and to record your own, subscribe to the Rails Tutorial course or to the Learn Enough All Access Subscription.
Sign up for a new account in production. Did you get the email?
Click on the link in the activation email to confirm that it works. What is the corresponding entry in the server log? Hint: Run
heroku logsat the command line.
11.5 Conclusion
With the added account activation, our sample application’s machinery to sign up, log in, and log out is nearly complete. The only significant feature left is allowing users to reset their passwords if they forget them. As we’ll see in Chapter 12, password reset shares many features with account activation, which means that we’ll be able to put the knowledge we’ve gained in this chapter to good use.
11.5.1 What We Learned in This Chapter
Like sessions, account activations can be modeled as a resource despite not being Active Record objects.
Rails can generate Action Mailer actions and views to send email.
Action Mailer supports both plain-text and HTML mail.
As with ordinary actions and views, instance variables defined in mailer actions are available in mailer views.
Account activations use a generated token to create a unique URL for activating users.
Account activations use a hashed activation digest to securely identify valid activation requests.
Both mailer tests and integration tests are useful for verifying the behavior of the User mailer.
We can send email in production using SendGrid.