
Chapter 13
User Microposts
In the course of developing the core sample application, we’ve now encountered four resources—users, sessions, account activations, and password resets—but only the first of these is backed by an Active Record model with a table in the database. The time has finally come to add a second such resource: user microposts, which are short messages associated with a particular user.1 We first saw microposts in larval form in Chapter 2, and in this chapter we will make a full-strength version of the sketch from Section 2.3 by constructing the Micropost data model, associating it with the User model using the has_many and belongs_to methods, and then making the forms and partials needed to manipulate and display the results (including, in Section 13.4, uploaded images). In Chapter 14, we’ll complete our tiny Twitter clone by adding the notion of following users in order to receive a feed of their microposts.
1. The name is motivated by the common description of Twitter as a microblog; since blogs have posts, microblogs should have microposts, which can be thought of as the generic equivalent of “tweets”.
13.1 A Micropost Model
We begin the Microposts resource by creating a Micropost model, which captures the essential characteristics of microposts. What follows builds on the work from Section 2.3; as with the model in that section, our new Micropost model will include data validations and an association with the User model. Unlike that model, the present Micropost model will be fully tested, and will also have a default ordering and automatic destruction if its parent user is destroyed.
If you’re using Git for version control, I suggest making a topic branch at this time:
$ git checkout -b user-microposts13.1.1 The Basic Model
The Micropost model needs only two attributes: a content attribute to hold the micropost’s content and a user_id to associate a micropost with a particular user. The result is a Micropost model with the structure shown in Figure 13.1.

Figure 13.1: The Micropost data model.
It’s worth noting that the model in Figure 13.1 uses the text data type for micropost content (instead of string), which is capable of storing an arbitrary amount of text. Even though the content will be restricted to fewer than 140 characters (Section 13.1.2) and hence would fit inside the 255-character string type, using text better expresses the nature of microposts, which are more naturally thought of as blocks of text. Indeed, in Section 13.3.2 we’ll use a text area instead of a text field for submitting microposts. In addition, using text gives us greater flexibility should we wish to increase the length limit at a future date (as part of internationalization, for example). Finally, using the text type results in no performance difference in production,2 so it costs us nothing to use it here.
2. www.postgresql.org/docs/9.1/static/datatype-character.html
As with the case of the User model (Listing 6.1), we generate the Micropost model using generate model (Listing 13.1).
Listing 13.1: Generating the Micropost model.
$ rails generate model Micropost content:text user:referencesThis migration leads to the creation of the Micropost model shown in Listing 13.2. In addition to inheriting from ApplicationRecord as usual (Section 6.1.2), the generated model includes a line indicating that a micropost belongs_to a user, which is included as a result of the user:references argument in Listing 13.1. We’ll explore the implications of this line in Section 13.1.3.
Listing 13.2: The generated Micropost model.app/models/micropost.rb
class Micropost < ApplicationRecord
  belongs_to :user
end
The generate command in Listing 13.1 also produces a migration to create a microposts table in the database (Listing 13.3); compare it to the analogous migration for the users table from Listing 6.2. The biggest difference is the use of references, which automatically adds a user_id column (along with an index and a foreign key reference)3 for use in the user/micropost association. As with the User model, the Micropost model migration automatically includes the t.timestamps line, which (as mentioned in Section 6.1.1) adds the magic created_at and updated_at columns shown in Figure 13.1. (We’ll put the created_at column to work starting in Section 13.1.4.)
3. The foreign key reference is a database-level constraint indicating that the user id in the microposts table refers to the id column in the users table. This detail will never be important in this tutorial, and the foreign key constraint isn’t even supported by all databases. (It’s supported by PostgreSQL, which we use in production, but not by the development SQLite database adapter.) We’ll learn more about foreign keys in Section 14.1.2.
Listing 13.3: The Micropost migration with added index.db/migrate/[timestamp]_create_microposts.rb
class CreateMicroposts < ActiveRecord::Migration[7.0]
  def change
    create_table :microposts do |t|
      t.text :content
      t.references :user, null: false, foreign_key: true

      t.timestamps
   end

   add_index :microposts, [:user_id, :created_at]
  end
end
Because we expect to retrieve all the microposts associated with a given user id in reverse order of creation, Listing 13.3 adds an index (Box 6.2) on the user_id and created_at columns:
add_index :microposts, [:user_id, :created_at]By including both the user_id and created_at columns as an array, we arrange for Rails to create a multiple key index, which means that Active Record uses both keys at the same time.
With the migration in Listing 13.3, we can update the database as usual:
$ rails db:migrateExercises
To see other people’s answers and to record your own, subscribe to the Rails Tutorial course (https://www.railstutorial.org/) or to the Learn Enough All Access Subscription (https://www.learnenough.com/all-access).
Using
Micropost.newin the console, instantiate a new Micropost object calledmicropostwith content “Lorem ipsum” and user id equal to the id of the first user in the database. What are the values of the magic columnscreated_atandupdated_at?What is
micropost.userfor the micropost in the previous exercise? What aboutmicropost.user.name?Save the micropost to the database. What are the values of the magic columns now?
13.1.2 Micropost Validations
Now that we’ve created the basic model, we’ll add some validations to enforce the desired design constraints. One of the necessary aspects of the Micropost model is the presence of a user id to indicate which user made the micropost. The idiomatically correct way to do this is to use Active Record associations, which we’ll implement in Section 13.1.3, but for now we’ll work with the Micropost model directly.
As in Section 6.2.5, we need to update the microposts fixtures in order to get the initial tests to pass. In analogy with Listing 6.31, this means replacing the contents of the generated microposts.yml file with a comment indicating that the file is empty, as shown in Listing 13.4. (We’ll add some real fixtures in Section 13.1.4.)
Listing 13.4: An empty fixtures file for microposts. GREENtest/fixtures/microposts.yml
# emptyThe initial micropost tests parallel those for the User model (Listing 6.7). In the setup step, we create a new micropost while associating it with a valid user from the fixtures, and then check that the result is valid. Because every micropost should have a user id, we’ll add a test for a user_id presence validation. Putting these elements together yields the test in Listing 13.5.
Listing 13.5: Tests for the validity of a new micropost. GREENtest/models/micropost_test.rb
require "test_helper"

class MicropostTest < ActiveSupport::TestCase

  def setup
    @user = users(:michael)
    # This code is not idiomatically correct.
    @micropost = Micropost.new(content: "Lorem ipsum", user_id: @user.id)
  end

  test "should be valid" do
    assert @micropost.valid?
  end

  test "user id should be present" do
    @micropost.user_id = nil
    assert_not @micropost.valid?
  end
end
As indicated by the comment in the setup method, the code to create the micropost is not idiomatically correct, which we’ll fix in Section 13.1.3.
As with the original User model test (Listing 6.5), the first test in Listing 13.5 is just a reality check, but the second is a test of the presence of the user id, for which we’ll add the presence validation shown in Listing 13.6.
Listing 13.6: A validation for the micropost’s user_id. GREENapp/models/micropost.rb
class Micropost < ApplicationRecord
  belongs_to :user
  validates :user_id, presence: true
end
By the way, as of Rails 5 the tests in Listing 13.5 actually pass without the validation in Listing 13.6, but only when using the idiomatically incorrect line highlighted in Listing 13.5. The user id presence validation is necessary after switching to the idiomatically correct code in Listing 13.13, so we include it here for convenience.
With the code in Listing 13.6 the tests should (still) be GREEN:
Listing 13.7: GREEN
$ rails test:modelsNext, we’ll add validations for the micropost’s content attribute (following the example from Section 2.3.2). As with the user_id, the content attribute must be present, and it is further constrained to be no longer than 140 characters (which is what puts the micro in micropost).4
4. The original version of the sample application was written before Twitter changed its character limit from 140 to 280 characters.
As with the User model validations (Section 6.2), we’ll add the micropost content validations using test-driven development. The resulting tests generally follow the examples from the User model validation tests, as shown in Listing 13.8.
Listing 13.8: Tests for the Micropost model validations. REDtest/models/micropost_test.rb
require "test_helper"

class MicropostTest < ActiveSupport::TestCase


  def setup
    @user = users(:michael)
    # This code is not idiomatically correct.
    @micropost = Micropost.new(content: "Lorem ipsum", user_id: @user.id)
  end

  test "should be valid" do
    assert @micropost.valid?
  end

  test "user id should be present" do
    @micropost.user_id = nil
    assert_not @micropost.valid?
  end

  test "content should be present" do
    @micropost.content = " "
    assert_not @micropost.valid?
  end

  test "content should be at most 140 characters" do
    @micropost.content = "a" * 141
    assert_not @micropost.valid?
  end
end
As in Section 6.2, the code in Listing 13.8 uses string multiplication to test the micropost length validation:
$ rails console
>> "a" * 10
=> "aaaaaaaaaa"
>> "a" * 141
=> "aaaaaaaaaaaaaaaaaaaaaaaaaaaaaaaaaaaaaaaaaaaaaaaaaaaaaaaaaaaaaaaaaaaaaaa
aaaaaaaaaaaaaaaaaaaaaaaaaaaaaaaaaaaaaaaaaaaaaaaaaaaaaaaaaaaaaaaaaaaaaa"
The corresponding application code is virtually identical to the name validation for users (Listing 6.16), as shown in Listing 13.9.
Listing 13.9: The Micropost model validations. GREENapp/models/micropost.rb
class Micropost < ApplicationRecord
   belongs_to :user
   validates :user_id, presence: true
   validates :content, presence: true, length: { maximum: 140 }
end
At this point, the full test suite should be GREEN:
Listing 13.10: GREEN
$ rails testExercises
To see other people’s answers and to record your own, subscribe to the Rails Tutorial course or to the Learn Enough All Access Subscription.
At the console, instantiate a micropost with no user id and blank content. Is it valid? What are the full error messages?
At the console, instantiate a second micropost with no user id and content that’s too long. Is it valid? What are the full error messages?
13.1.3 User/Micropost Associations
When constructing data models for web applications, it is essential to be able to make associations between individual models. In the present case, each micropost is associated with one user, and each user is associated with (potentially) many microposts—a relationship seen briefly in Section 2.3.3 and shown schematically in Figure 13.2 and Figure 13.3. As part of implementing these associations, we’ll write tests for the Micropost model and add a couple of tests to the User model.
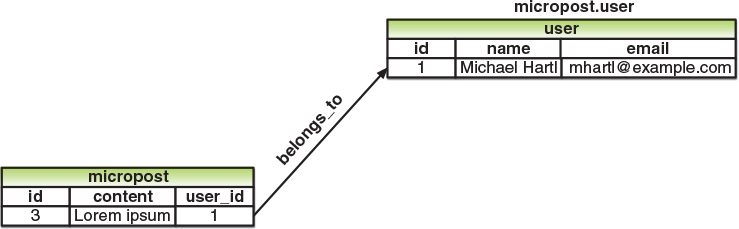
Figure 13.2: The belongs_to relationship between a micropost and its associated user.
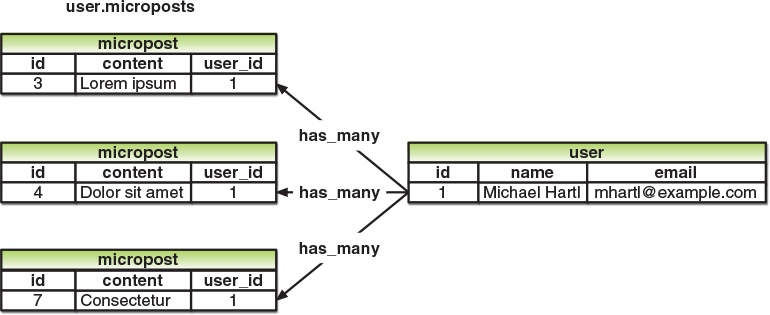
Figure 13.3: The has_many relationship between a user and its microposts.
Using the belongs_to/has_many association defined in this section, Rails constructs the methods shown in Table 13.1. Note from Table 13.1 that instead of
Micropost.create
Micropost.create!
Micropost.new
we have
user.microposts.create
user.microposts.create!
user.microposts.build
Table 13.1: A summary of user/micropost association methods.
Method | Purpose |
|---|---|
| returns the User object associated with the micropost |
| returns a collection of the user’s microposts |
| creates a micropost associated with |
| creates a micropost associated with |
| returns a new Micropost object associated with |
| finds the micropost with id |
These latter methods constitute the idiomatically correct way to make a micropost, namely, through its association with a user. When a new micropost is made in this way, its user_id is automatically set to the right value. In particular, we can replace the code
@user = users(:michael)
# This code is not idiomatically correct.
@micropost = Micropost.new(content: "Lorem ipsum", user_id: @user.id)
from Listing 13.5 with this:
@user = users(:michael)
@micropost = @user.microposts.build(content: "Lorem ipsum")
(As with new, build returns an object in memory but doesn’t modify the database.)5 Once we define the proper associations, the resulting @micropost variable will automatically have a user_id attribute equal to its associated user’s id.
5. In fact, if you look at the source, you’ll see that build is actually just an alias for new. Thanks to reader Abdullah Budri for pointing this out.
To get code like @user.microposts.build to work, we need to update the User and Micropost models with code to associate them. The first of these was included automatically by the migration in Listing 13.3 via belongs_to :user, as shown in Listing 13.11. The second half of the association, has_many :microposts, needs to be added by hand, as shown in Listing 13.12.
Listing 13.11: A micropost belongs_to a user. GREENapp/models/micropost.rb
class Micropost < ApplicationRecord
  belongs_to :user
  validates :user_id, presence: true
  validates :content, presence: true, length: { maximum: 140 }
end
Listing 13.12: A user has_many microposts. GREENapp/models/user.rb
class User < ApplicationRecord
  has_many :microposts
  .
  .
  .
end
With the association thus made, we can update the setup method in Listing 13.5 with the idiomatically correct way to build a new micropost, as shown in Listing 13.13.
Listing 13.13: Using idiomatically correct code to build a micropost. GREENtest/models/micropost_test.rb
require "test_helper"

class MicropostTest < ActiveSupport::TestCase

  def setup
    @user = users(:michael)
    @micropost = @user.microposts.build(content: "Lorem ipsum")
  end

  test "should be valid" do
    assert @micropost.valid?
  end

  test "user id should be present" do
    @micropost.user_id = nil
    assert_not @micropost.valid?
  end
  .
  .
  .
end
Of course, after this minor refactoring the test suite should still be GREEN:
Listing 13.14: GREEN
$ rails testExercises
To see other people’s answers and to record your own, subscribe to the Rails Tutorial course or to the Learn Enough All Access Subscription.
Set
userto the first user in the database. What happens when you execute the commandmicropost = user.microposts.create(content: "Lorem ipsum")?The previous exercise should have created a micropost in the database. Confirm this by running
user.microposts.find(micropost.id). What if you writemicropostinstead ofmicropost.id?What is the value of
user == micropost.user? How aboutuser.microposts.first == micropost?
13.1.4 Micropost Refinements
In this section, we’ll add a couple of refinements to the user/micropost association. In particular, we’ll arrange for a user’s microposts to be retrieved in a specific order, and we’ll also make microposts dependent on users so that they will be automatically destroyed if their associated user is destroyed.
Default Scope
By default, the user.microposts method makes no guarantees about the order of the posts, but (following the convention of blogs and Twitter) we want the microposts to come out in reverse order of when they were created so that the most recent post is first.6 We’ll arrange for this to happen using a default scope.
6. We briefly encountered a similar issue in Section 10.5 in the context of the users index.
This is exactly the sort of feature that could easily lead to a spurious passing test (i.e., a test that would pass even if the application code were wrong), so we’ll proceed using test-driven development to be sure we’re testing the right thing. In particular, let’s write a test to verify that the first micropost in the database is the same as a fixture micropost we’ll call most_recent, as shown in Listing 13.15.
Listing 13.15: Testing the micropost order. REDtest/models/micropost_test.rb
require "test_helper"

class MicropostTest < ActiveSupport::TestCase
  .
  .
  .
  test "order should be most recent first" do
    assert_equal microposts(:most_recent), Micropost.first
  end
end
Listing 13.15 relies on having some micropost fixtures, which we can define in analogy with the user fixtures, last seen in Listing 11.5. In addition to the content attribute defined in Section 13.1.1, we also need to define the associated user. Conveniently, Rails includes a way to build associations in fixtures, like this:
 orange:
   content: "I just ate an orange!"
   created_at: <%= 10.minutes.ago %>
   user: michael
By identifying the user as michael, we tell Rails to associate this micropost with the corresponding user in the users fixture:
 michael:
   name: Michael Example
   email: [email protected]
   .
   .
   .
The full micropost fixtures appear in Listing 13.16.
Listing 13.16: Micropost fixtures.test/fixtures/microposts.yml
orange:
  content: "I just ate an orange!"

  created_at: <%= 10.minutes.ago %>
  user: michael

tau_manifesto:
  content: "Check out the @tauday site by @mhartl: https://tauday.com"
  created_at: <%= 3.years.ago %>
  user: michael

cat_video:
  content: "Sad cats are sad: https://youtu.be/PKffm2uI4dk"
  created_at: <%= 2.hours.ago %>
  user: michael

most_recent:
  content: "Writing a short test"
  created_at: <%= Time.zone.now %>
  user: michael
Note that Listing 13.16 explicitly sets the created_at column using embedded Ruby. Because it’s a “magic” column automatically updated by Rails, setting created_at by hand isn’t ordinarily possible, but it is possible in fixtures.7
7. In practice this might not be necessary, and in fact on many systems the fixtures are created in the order in which they appear in the file. In this case, the final fixture in the file is created last (and hence is most recent), but it would be foolish to rely on this behavior, which is brittle and probably system-dependent.
With the code in Listing 13.15 and Listing 13.16, the test suite should be RED:
Listing 13.17: RED
$ rails test test/models/micropost_test.rbWe’ll get the test to pass using a Rails method called default_scope, which among other things can be used to set the default order in which elements are retrieved from the database. To enforce a particular order, we’ll include the order argument in default_scope, which lets us order by the created_at column as follows:
order(:created_at)Unfortunately, this orders the results in ascending order from smallest to biggest, which means that the oldest microposts come out first. To pull them out in reverse order, we can push down one level deeper and include a string with some raw SQL:
order('created_at DESC')Here DESC is SQL for “descending”, i.e., in descending order from newest to oldest.8 In older versions of Rails, using this raw SQL used to be the only option to get the desired behavior, but as of Rails 4.0 we can use a more natural pure-Ruby syntax as well:
8. SQL is case-insensitive, but it is conventional to write SQL keywords (such as DESC) in all caps.
order(created_at: :desc)Adding this in a default scope for the Micropost model gives Listing 13.18.
Listing 13.18: Ordering the microposts with default_scope. GREENapp/models/micropost.rb
class Micropost < ApplicationRecord
  belongs_to :user
  default_scope -> { order(created_at: :desc) }
  validates :user_id, presence: true
  validates :content, presence: true, length: { maximum: 140 }
end
Listing 13.18 introduces the “stabby lambda” syntax for an object called a Proc (procedure) or lambda, which is an anonymous function (a function created without a name). The stabby lambda -> takes in a block (Section 4.3.2) and returns a Proc, which can then be evaluated with the call method. We can see how it works at the console:
>> -> { puts "foo" }
=> #<Proc:0x007fab938d0108@(irb):1 (lambda)>
>> -> { puts "foo" }.call
foo
=> nil
(This is a somewhat advanced Ruby topic, so don’t worry if it doesn’t make sense right away.)
With the code in Listing 13.18, the tests should be GREEN:
Listing 13.19: GREEN
$ rails testDependent: Destroy
Apart from proper ordering, there is a second refinement we’d like to add to microposts. Recall from Section 10.4 that site administrators have the power to destroy users. It stands to reason that, if a user is destroyed, the user’s microposts should be destroyed as well.
We can arrange for this behavior by passing an option to the has_many association method, as shown in Listing 13.20.
Listing 13.20: Ensuring that a user’s microposts are destroyed along with the user.app/models/user.rb
class User < ApplicationRecord
  has_many :microposts, dependent: :destroy
  .
  .
  .
end
Here the option dependent: :destroy arranges for the dependent microposts to be destroyed when the user itself is destroyed. This prevents userless microposts from being stranded in the database when admins choose to remove users from the system.
We can verify that Listing 13.20 is working with a test for the User model. All we need to do is save the user (so it gets an id) and create an associated micropost. Then we check that destroying the user reduces the micropost count by 1. The result appears in Listing 13.21. (Compare to the integration test for “delete” links in Listing 10.63.)
Listing 13.21: A test of dependent: :destroy. GREENtest/models/user_test.rb
require "test_helper"

class UserTest < ActiveSupport::TestCase

  def setup
    @user = User.new(name: "Example User", email: "[email protected]",

                     password: "foobar", password_confirmation: "foobar")
  end
  .
  .
  .
  test "associated microposts should be destroyed" do
    @user.save
    @user.microposts.create!(content: "Lorem ipsum")
    assert_difference 'Micropost.count', -1 do
      @user.destroy
    end
  end
end
If the code in Listing 13.20 is working correctly, the test suite should still be GREEN:
Listing 13.22: GREEN
$ rails testExercises
To see other people’s answers and to record your own, subscribe to the Rails Tutorial course or to the Learn Enough All Access Subscription.
How does the value of
Micropost.first.created_atcompare toMicropost.last.created_at?What are the SQL queries for Micropost.first and Micropost.last? Hint: They are printed out by the console.
Let
userbe the first user in the database. What is the id of its first micropost? Destroy the first user in the database using thedestroymethod, then confirm usingMicropost.findthat the user’s first micropost was also destroyed.
13.2 Showing Microposts
Although we don’t yet have a way to create microposts through the web—that comes in Section 13.3.2—this won’t stop us from displaying them (and testing that display). Following Twitter’s lead, we’ll plan to display a user’s microposts not on a separate microposts index page but rather directly on the user show page itself, as mocked up in Figure 13.4. We’ll start with fairly simple ERb templates for adding a micropost display to the user profile, and then we’ll add microposts to the seed data from Section 10.3.2 so that we have something to display.

Figure 13.4: A mockup of a profile page with microposts.
13.2.1 Rendering Microposts
Our plan is to display the microposts for each user on their respective profile page (show.html.erb), together with a running count of how many microposts they’ve made. As we’ll see, many of the ideas are similar to our work in Section 10.3 on showing all users.
In case you’ve added some microposts in the exercises, it’s a good idea to reset and reseed the database at this time:
$ rails db:migrate:reset
$ rails db:seed
Although we won’t need the Microposts controller until Section 13.3, we will need the views directory in just a moment, so let’s generate the controller now:
$ rails generate controller MicropostsOur primary purpose in this section is to render all the microposts for each user. We saw in Section 10.3.5 that the code
<ul class="users">
  <%= render @users %>
</ul>
automatically renders each of the users in the @users variable using the _user.html.erb partial. We’ll define an analogous _micropost.html.erb partial so that we can use the same technique on a collection of microposts as follows:
<ol class="microposts">
  <%= render @microposts %>
</ol>
Note that we’ve used the ordered list tag ol (as opposed to an unordered list ul) because microposts are listed in a particular order (reverse-chronological). The corresponding partial appears in Listing 13.23.
Listing 13.23: A partial for showing a single micropost.app/views/microposts/_micropost.html.erb
<li id="micropost-<%= micropost.id %>">
  <%= link_to gravatar_for(micropost.user, size: 50), micropost.user %>
  <span class="user"><%= link_to micropost.user.name, micropost.user %></span>
  <span class="content"><%= micropost.content %></span>
  <span class="timestamp">
    Posted <%= time_ago_in_words(micropost.created_at) %> ago.
  </span>
</li>
This uses the awesome time_ago_in_words helper method, whose meaning is probably clear and whose effect we will see in Section 13.2.2. Listing 13.23 also adds a CSS id for each micropost using
<li id="micropost-<%= micropost.id %>">This is a generally good practice, as it opens up the possibility of manipulating individual microposts at a future date (using JavaScript, for example).
The next step is to address the difficulty of displaying a potentially large number of microposts. We’ll solve this problem the same way we solved it for users in Section 10.3.3, namely, using pagination. As before, we’ll use the will_paginate method:
<%= will_paginate @microposts %>If you compare this with the analogous line on the user index page, Listing 10.46, you’ll see that before we had just
<%= will_paginate %>This worked because, in the context of the Users controller, will_paginate assumes the existence of an instance variable called @users (which, as we saw in Section 10.3.3, should be of class ActiveRecord::Relation). In the present case, since we are still in the Users controller but want to paginate microposts instead, we’ll pass an explicit @microposts variable to will_paginate. Of course, this means that we will have to define such a variable in the user show action (Listing 13.24).
Listing 13.24: Adding an @microposts instance variable to the user show action.app/controllers/users_controller.rb
class UsersController < ApplicationController
  .
  .
  .
  def show
    @user = User.find(params[:id])
    @microposts = @user.microposts.paginate(page: params[:page])
  end
  .
  .
  .
end
Notice here how clever paginate is—it even works through the microposts association, reaching into the microposts table and pulling out the desired page of microposts.
Our final task is to display the number of microposts for each user, which we can do with the count method:
user.microposts.countAs with paginate, we can use the count method through the association. In particular, count does not pull all the microposts out of the database and then call length on the resulting array, as this would become inefficient as the number of microposts grew. Instead, it performs the calculation directly in the database, asking the database to count the microposts with the given user_id (an operation for which all databases are highly optimized). (In the unlikely event that finding the count is still a bottleneck in your application, you can make it even faster using a counter cache.)
Putting all the elements above together, we are now in a position to add microposts to the profile page, as shown in Listing 13.25. Note the use of if @user.microposts.any? (a construction we saw before in Listing 7.21), which makes sure that an empty list won’t be displayed when the user has no microposts.
Listing 13.25: Adding microposts to the user show page.app/views/users/show.html.erb
<% provide(:title, @user.name) %>
<div class="row">
  <aside class="col-md-4">
    <section class="user_info">
      <h1>
        <%= gravatar_for @user %>
        <%= @user.name %>
      </h1>
    </section>
  </aside>
  <div class="col-md-8">
    <% if @user.microposts.any? %>
      <h3>Microposts (<%= @user.microposts.count %>)</h3>
      <ol class="microposts">
        <%= render @microposts %>
      </ol>

      <%= will_paginate @microposts %>
    <% end %>
  </div>
</div>
At this point, we can get a look at our updated user profile page in Figure 13.5. It’s rather … disappointing. Of course, this is because there are not currently any microposts. It’s time to change that.

Figure 13.5: The user profile page with code for microposts—but no microposts.
Exercises
To see other people’s answers and to record your own, subscribe to the Rails Tutorial course or to the Learn Enough All Access Subscription.
As mentioned briefly in Section 7.3.3, helper methods like
time_ago_in_wordsare available in the Rails console via thehelperobject. Usinghelper, applytime_ago_in_wordsto3.weeks.agoand6.months.ago.What is the result of
helper.time_ago_in_words(1.year.ago)?What is the Ruby class for a page of microposts? Hint: Use the code in Listing 13.24 as your model, and call the
classmethod onpaginatewith the argumentpage: nil.
13.2.2 Sample Microposts
With all the work making templates for user microposts in Section 13.2.1, the ending was rather anticlimactic. We can rectify this sad situation by adding microposts to the seed data from Section 10.3.2.
Adding sample microposts for all the users can actually take a rather long time, so first we’ll select just the first six users (i.e., the five users with custom Gravatars, and one with the default Gravatar) using the take method:
User.order(:created_at).take(6)The call to order ensures that we find the first six users that were created.
For each of the selected users, we’ll make 50 microposts (plenty to overflow the pagination limit of 30). To generate sample content for each micropost, we’ll use the Faker gem’s handy Lorem.sentence method.9 The result is the new seed data method shown in Listing 13.26. (The reason for the order of the loops in Listing 13.26 is to intermix the microposts for use in the status feed (Section 14.3). Looping over the users first gives feeds with big runs of microposts from the same user, which is visually unappealing.)
9. Faker::Lorem.sentence returns lorem ipsum text; as noted in Chapter 6, lorem ipsum has a fascinating back story.
Listing 13.26: Adding microposts to the sample data.db/seeds.rb
.
.
.
# Generate microposts for a subset of users.
users = User.order(:created_at).take(6)

50.times do
  content = Faker::Lorem.sentence(word_count: 5)
  users.each { |user| user.microposts.create!(content: content) }
end
At this point, we can reseed the development database as usual:
$ rails db:migrate:reset
$ rails db:seed
You should also quit and restart the Rails development server.
With that, we are in a position to enjoy the fruits of our Section 13.2.1 labors by displaying information for each micropost.10 The preliminary results appear in Figure 13.6.
10. By design, the Faker gem’s lorem ipsum text is randomized, so the contents of your sample microposts will differ.

Figure 13.6: The user profile with unstyled microposts.
The page shown in Figure 13.6 has no micropost-specific styling, so let’s add some (Listing 13.27) and take a look at the resulting pages.11
11. For convenience, Listing 13.27 actually has all the CSS needed for this chapter.
Listing 13.27: The CSS for microposts (including all the CSS for this chapter).app/assets/stylesheets/custom.scss
.
.
.
/* microposts */

.microposts {
  list-style: none;
  padding: 0;
  li {
    padding: 10px 0;
    border-top: 1px solid #e8e8e8;
  }
  .user {
    margin-top: 5em;
    padding-top: 0;
  }
  .content {
    display: block;
    margin-left: 60px;
    img {
      display: block;
      padding: 5px 0;
    }
  }
  .timestamp {
    color: $gray-light;
    display: block;
    margin-left: 60px;
  }
  .gravatar {
    float: left;
    margin-right: 10px;
    margin-top: 5px;
   }
}

aside {
  textarea {
    height: 100px;
    margin-bottom: 5px;

  }
}

span.image {
  margin-top: 10px;
  input {
    border: 0;
  }
}
Figure 13.7 shows the user profile page for the first user, while Figure 13.8 shows the profile for a second user. Finally, Figure 13.9 shows the second page of microposts for the first user, along with the pagination links at the bottom of the display. In all three cases, observe that each micropost display indicates the time since it was created (e.g., “Posted 1 minute ago.”); this is the work of the time_ago_in_words method from Listing 13.23. If you wait a couple of minutes and reload the pages, you’ll see how the text gets automatically updated based on the new time.

Figure 13.7: The user profile with microposts (/users/1).

Figure 13.8: The profile of a different user, also with microposts (/users/5).

Figure 13.9: Micropost pagination links (/users/1?page=2).
Exercises
To see other people’s answers and to record your own, subscribe to the Rails Tutorial course or to the Learn Enough All Access Subscription.
See if you can guess the result of running
(1..10).to_a.take(6). Check at the console to see if your guess is right.Is the
to_amethod in the previous exercise necessary?Faker has a huge number of occasionally amusing applications. By consulting the Faker documentation (https://github.com/faker-ruby/faker), learn how to print out a fake university name, a fake phone number, a fake Hipster Ipsum sentence, and a fake Chuck Norris fact.
13.2.3 Profile Micropost Tests
Because newly activated users get redirected to their profile pages, we already have a test that the profile page renders correctly (Listing 11.34). In this section, we’ll write a short integration test for some of the other elements on the profile page, including the work from this section. We’ll start by generating an integration test for the profiles of our site’s users:
$ rails generate integration_test users_profile
      invoke  test_unit
      create    test/integration/users_profile_test.rb
To test micropost pagination, we’ll also generate some additional micropost fixtures using the same embedded Ruby technique we used to make additional users in Listing 10.48:
<% 30.times do |n| %>
micropost_<%= n %>:
  content: <%= Faker::Lorem.sentence(5) %>
  created_at: <%= 42.days.ago %>
  user: michael
<% end %>
Adding this to the code from Listing 13.16 gives the updated micropost fixtures in Listing 13.28.
Listing 13.28: Micropost fixtures with generated microposts.test/fixtures/microposts.yml
orange:
  content: "I just ate an orange!"
  created_at: <%= 10.minutes.ago %>
  user: michael

tau_manifesto:
  content: "Check out the @tauday site by @mhartl: https://tauday.com"
  created_at: <%= 3.years.ago %>
  user: michael

cat_video:
  content: "Sad cats are sad: https://youtu.be/PKffm2uI4dk"
  created_at: <%= 2.hours.ago %>
  user: michael

most_recent:
  content: "Writing a short test"
  created_at: <%= Time.zone.now %>
  user: michael

 <% 30.times do |n| %>
 micropost_<%= n %>:
   content: <%= Faker::Lorem.sentence(word_count: 5) %>
   created_at: <%= 42.days.ago %>
   user: michael
 <% end %>
With the test data thus prepared, the test itself is fairly straightforward: We visit the user profile page and check for the page title and the user’s name, Gravatar, micropost count, and paginated microposts. The result appears in Listing 13.29. Note the use of the full_title helper from Listing 4.2 to test the page’s title, which we gain access to by including the Application Helper module into the test.12
12. If you’d like to refactor other tests to use full_title (such as those in Listing 3.32), you should include the Application Helper in test_helper.rb instead.
Listing 13.29: A test for the user profile. GREENtest/integration/users_profile_test.rb
require "test_helper"

class UsersProfileTest < ActionDispatch::IntegrationTest
  include ApplicationHelper

  def setup
    @user = users(:michael)
  end

  test "profile display" do
    get user_path(@user)
    assert_template 'users/show'
    assert_select 'title', full_title(@user.name)
    assert_select 'h1', text: @user.name
    assert_select 'h1>img.gravatar'
    assert_match @user.microposts.count.to_s, response.body
    assert_select 'div.pagination'
    @user.microposts.paginate(page: 1).each do |micropost|
      assert_match micropost.content, response.body
    end
  end
end
The micropost count assertion in Listing 13.29 uses response.body, which we saw briefly in the Chapter 12 exercises (Section 12.3.3). Despite its name, response.body contains the full HTML source of the page (and not just the page’s body). This means that if all we care about is that the number of microposts appears somewhere on the page, we can look for a match as follows:
assert_match @user.microposts.count.to_s, response.bodyThis is a much less specific assertion than assert_select; in particular, unlike assert_select, using assert_match in this context doesn’t require us to indicate which HTML tag we’re looking for.
Listing 13.29 also introduces the nesting syntax for assert_select:
assert_select 'h1>img.gravatar'This checks for an img tag with class gravatar inside a top-level heading tag (h1).
Because the application code was working, the test suite should be GREEN:
Listing 13.30: GREEN
$ rails testExercises
To see other people’s answers and to record your own, subscribe to the Rails Tutorial course or to the Learn Enough All Access Subscription.
Comment out the application code needed to change the two
'h1'lines in Listing 13.29 from GREEN to RED.Update Listing 13.29 to test that
will_paginateappears only once. Hint: Refer to Table 5.2.
13.3 Manipulating Microposts
Having finished both the data modeling and display templates for microposts, we now turn our attention to the interface for creating them through the web. In this section, we’ll also see the first hint of a status feed—a notion brought to full fruition in Chapter 14. Finally, as with users, we’ll make it possible to destroy microposts through the web.
There is one break with past convention worth noting: The interface to the Microposts resource will run principally through the Profile and Home pages, so we won’t need actions like new or edit in the Microposts controller; we’ll need only create and destroy. This leads to the routes for the Microposts resource shown in Listing 13.31. The code in Listing 13.31 leads in turn to the RESTful routes shown in Table 13.2, which is a small subset of the full set of routes seen in Table 2.3. Of course, this simplicity is a sign of being more advanced, not less—we’ve come a long way since our reliance on scaffolding in Chapter 2, and we no longer need most of its complexity.
Table 13.2: RESTful routes provided by the Microposts resource in Listing 13.31.
HTTP request method | URL | Action | Named route |
|---|---|---|---|
POST | /microposts |
|
|
DELETE | /microposts/1 |
|
|
Listing 13.31: Routes for the Microposts resource.config/routes.rb
Rails.application.routes.draw do
  root   "static_pages#home"
  get    "/help",    to: "static_pages#help"
  get    "/about",   to: "static_pages#about"
  get    "/contact", to: "static_pages#contact"
  get    "/signup",  to: "users#new"
  get    "/login",   to: "sessions#new"
  post   "/login",   to: "sessions#create"
  delete "/logout",  to: "sessions#destroy"
  resources :users
  resources :account_activations, only: [:edit]
  resources :password_resets,     only: [:new, :create, :edit, :update]
  resources :microposts,          only: [:create, :destroy]
end
13.3.1 Micropost Access Control
We begin our development of the Microposts resource with some access control in the Microposts controller. In particular, because we access microposts through their associated users, both the create and destroy actions must require users to be logged in.
Tests to enforce logged-in status mirror those for the Users controller (Listing 10.20 and Listing 10.62). We simply issue the correct request to each action and confirm that the micropost count is unchanged and the result is redirected to the login URL with the correct status code, as seen in Listing 13.32.
Listing 13.32: Authorization tests for the Microposts controller. REDtest/controllers/microposts_controller_test.rb
require "test_helper"

class MicropostsControllerTest < ActionDispatch::IntegrationTest


  def setup
    @micropost = microposts(:orange)
  end

  test "should redirect create when not logged in" do
    assert_no_difference 'Micropost.count' do
      post microposts_path, params: { micropost: { content: "Lorem ipsum" } }
    end
    assert_redirected_to login_url
  end

  test "should redirect destroy when not logged in" do
    assert_no_difference 'Micropost.count' do
      delete micropost_path(@micropost)
    end
    assert_response :see_other
    assert_redirected_to login_url
  end
end
Writing the application code needed to get the tests in Listing 13.32 to pass requires a little refactoring first. Recall from Section 10.2.1 that we enforced the login requirement using a before filter that called the logged_in_user method (Listing 10.15). At the time, we needed that method only in the Users controller, but now we find that we need it in the Microposts controller as well, so we’ll move it into the Application controller, which is the base class of all controllers (Section 4.4.4).13 The result appears in Listing 13.33.
13. Note that, unlike the behavior in languages like Java or C++, private methods in Ruby can be called from derived classes. Thanks to reader Vishal Antony for bringing this difference to my attention.
Listing 13.33: Moving the logged_in_user method into the Application controller. REDapp/controllers/application_controller.rb
class ApplicationController < ActionController::Base
  include SessionsHelper

  private

    # Confirms a logged-in user.
    def logged_in_user
      unless logged_in?

        store_location
        flash[:danger] = "Please log in."
        redirect_to login_url, status: :see_other
      end
    end
end
To avoid code repetition, you should also remove logged_in_user from the Users controller at this time (Listing 13.34).
Listing 13.34: The Users controller with the logged-in user filter removed. REDapp/controllers/users_controller.rb
class UsersController < ApplicationController
  before_action :logged_in_user, only: [:index, :edit, :update, :destroy]
  .
  .
  .
  private

    def user_params
      params.require(:user).permit(:name, :email, :password,
                                   :password_confirmation)
    end

    # Before filters

    # Confirms the correct user.
    def correct_user
      @user = User.find(params[:id])
      redirect_to(root_url, status: :see_other) unless current_user?(@user)
    end

    # Confirms an admin user.
    def admin_user
      redirect_to(root_url, status: :see_other) unless current_user.admin?
    end
end
With the code in Listing 13.33, the logged_in_user method is now available in the Microposts controller, which means that we can add create and destroy actions and then restrict access to them using a before filter, as shown in Listing 13.35.
Listing 13.35: Adding authorization to the Microposts controller actions. GREENapp/controllers/microposts_controller.rb
class MicropostsController < ApplicationController
  before_action :logged_in_user, only: [:create, :destroy]

  def create
  end

  def destroy
  end
end
At this point, the tests should pass:
Listing 13.36: GREEN
$ rails testExercises
To see other people’s answers and to record your own, subscribe to the Rails Tutorial course or to the Learn Enough All Access Subscription.
Why is it a bad idea to leave a copy of
logged_in_userin the Users controller?
13.3.2 Creating Microposts
In Chapter 7, we implemented user signup by making an HTML form that issued an HTTP POST request to the create action in the Users controller. The implementation of micropost creation is similar; the main difference is that, rather than using a separate page at /microposts/new, we will put the form on the Home page itself (i.e., the root path /), as mocked up in Figure 13.10.

Figure 13.10: A mockup of the Home page with a form for creating microposts.
When we last left the Home page, it appeared as in Figure 5.8—that is, it had a “Sign up now!” button in the middle. Since a micropost creation form makes sense only in the context of a particular logged-in user, one goal of this section will be to serve different versions of the Home page depending on a visitor’s login status. We’ll implement this in Listing 13.38 below.
We’ll start with the create action for microposts, which is similar to its user analogue (Listing 7.26); the principal difference lies in using the user/micropost association to build the new micropost, as seen in Listing 13.37. Note the use of strong parameters via micropost_params, which permits only the micropost’s content attribute to be modified through the web.
Listing 13.37: The Microposts controller create action.app/controllers/microposts_controller.rb
class MicropostsController < ApplicationController
  before_action :logged_in_user, only: [:create, :destroy]

  def create
    @micropost = current_user.microposts.build(micropost_params)
    if @micropost.save
      flash[:success] = "Micropost created!"
      redirect_to root_url

    else
      render 'static_pages/home', status: :unprocessable_entity
    end
  end

  def destroy
  end

  private

    def micropost_params
      params.require(:micropost).permit(:content)
    end
end
To build a form for creating microposts, we use the code in Listing 13.38, which serves up different HTML based on whether the site visitor is logged in or not.
Listing 13.38: Adding microposts creation to the Home page (/).app/views/static_pages/home.html.erb
<% if logged_in? %>
  <div class="row">
    <aside class="col-md-4">
      <section class="user_info">
        <%= render 'shared/user_info' %>
      </section>
      <section class="micropost_form">
        <%= render 'shared/micropost_form' %>
      </section>
    </aside>
  </div>
<% else %>
  <div class="center jumbotron">
    <h1>Welcome to the Sample App</h1>

    <h2>
      This is the home page for the
      <a href="https://www.railstutorial.org/">Ruby on Rails Tutorial</a>
      sample application.
    </h2>

    <%= link_to "Sign up now!", signup_path, class: "btn btn-lg btn-primary" %>
  </div>

  <%= link_to image_tag("rails.svg", alt: "Rails logo", width: "200"),
                        "https://rubyonrails.org/" %>
<% end %>
(Having so much code in each branch of the if-else conditional is a bit messy, and cleaning it up using partials is left as an exercise (Section 13.3.2).)
To get the page defined in Listing 13.38 working, we need to create and fill in a couple of partials. The first is the new Home page sidebar, as shown in Listing 13.39.
Listing 13.39: The partial for the user info sidebar.app/views/shared/_user_info.html.erb
<%= link_to gravatar_for(current_user, size: 50), current_user %>
<h1><%= current_user.name %></h1>
<span><%= link_to "view my profile", current_user %></span>
<span><%= pluralize(current_user.microposts.count, "micropost") %></span>
Note that, as in the profile sidebar (Listing 13.25), the user info in Listing 13.39 displays the total number of microposts for the user. There’s a slight difference in the display, though; in the profile sidebar, “Microposts” is a label, and showing “Microposts (1)” makes sense. In the present case, though, saying “1 microposts” is ungrammatical, so we arrange to display “1 micropost” and “2 microposts” using the pluralize method we saw in Section 7.3.3.
We next define the form for creating microposts (Listing 13.40), which is similar to the signup form in Listing 7.15.
Listing 13.40: The form partial for creating microposts.app/views/shared/_micropost_form.html.erb
<%= form_with(model: @micropost) do |f| %>
  <%= render 'shared/error_messages', object: f.object %>
  <div class="field">
    <%= f.text_area :content, placeholder: "Compose new micropost..." %>
  </div>
  <%= f.submit "Post", class: "btn btn-primary" %>
<% end %>
We need to make two changes before the form in Listing 13.40 will work. First, we need to define @micropost, which (as before) we do through the association:
@micropost = current_user.microposts.buildThe result appears in Listing 13.41.
Listing 13.41: Adding a micropost instance variable to the home action.app/controllers/static_pages_controller.rb
class StaticPagesController < ApplicationController

  def home
     @micropost = current_user.microposts.build if logged_in?
  end

  def help
  end

  def about
  end

  def contact
  end
end
Of course, current_user exists only if the user is logged in, so the @micropost variable should only be defined in this case.
The second change needed to get Listing 13.40 to work is to redefine the error-messages partial so the following code from Listing 13.40 works:
<%= render 'shared/error_messages', object: f.object %>You may recall from Listing 7.20 that the error-messages partial references the @user variable explicitly, but in the present case we have an @micropost variable instead. To unify these cases, we can pass the form variable f to the partial and access the associated object through f.object, so that in
form_with(model: @user) do |f|f.object is @user, and in
form_with(model: @micropost) do |f|f.object is @micropost, etc.
To pass the object to the partial, we use a hash with value equal to the object and key equal to the desired name of the variable in the partial, which is what the second line in Listing 13.40 accomplishes. In other words, object: f.object creates a variable called object in the error_messages partial, and we can use it to construct a customized error message, as shown in Listing 13.42.
Listing 13.42: Error messages that work with other objects. REDapp/views/shared/_error_messages.html.erb
 <% if object.errors.any? %>
  <div id="error_explanation">
    <div class="alert alert-danger">
       The form contains <%= pluralize(object.errors.count, "error") %>.
    </div>
    <ul>
     <% object.errors.full_messages.each do |msg| %>
      <li><%= msg %></li>
    <% end %>
    </ul>
  </div>
<% end %>
At this point, you should verify that the test suite is RED:
Listing 13.43: RED
$ rails testThis is a hint that we need to update the other occurrences of the error-messages partial, which we used when signing up users (Listing 7.20), editing users (Listing 10.2), and resetting passwords (Listing 12.14). The updated versions are shown in Listing 13.44, Listing 13.45, and Listing 13.46.
Listing 13.44: Updating the rendering of user signup errors. REDapp/views/users/new.html.erb
<% provide(:title, 'Sign up') %>
<h1>Sign up</h1>

<div class="row">

  <div class="col-md-6 col-md-offset-3">
    <%= form_with(model: @user) do |f| %>
      <%= render 'shared/error_messages', object: f.object %>

      <%= f.label :name %>
      <%= f.text_field :name, class: 'form-control' %>

      <%= f.label :email %>
      <%= f.email_field :email, class: 'form-control' %>

      <%= f.label :password %>
      <%= f.password_field :password, class: 'form-control' %>

      <%= f.label :password_confirmation, "Confirmation" %>
      <%= f.password_field :password_confirmation, class: 'form-control' %>

      <%= f.submit "Create my account", class: "btn btn-primary" %>
    <% end %>
  </div>
</div>
Listing 13.45: Updating the errors for editing users. REDapp/views/users/edit.html.erb
<% provide(:title, "Edit user") %>
<h1>Update your profile</h1>

<div class="row">
  <div class="col-md-6 col-md-offset-3">
    <%= form_with(model: @user) do |f| %>
      <%= render 'shared/error_messages', object: f.object %>


      <%= f.label :name %>
      <%= f.text_field :name, class: 'form-control' %>

      <%= f.label :email %>
      <%= f.email_field :email, class: 'form-control' %>

      <%= f.label :password %>
      <%= f.password_field :password, class: 'form-control' %>

      <%= f.label :password_confirmation, "Confirmation" %>
      <%= f.password_field :password_confirmation, class: 'form-control' %>

      <%= f.submit "Save changes", class: "btn btn-primary" %>
   <% end %>


   <div class="gravatar_edit">
     <%= gravatar_for @user %>
       <a href="https://gravatar.com/emails">change</a>
    </div>
  </div>
</div>
Listing 13.46: Updating the errors for password resets. GREENapp/views/password_resets/edit.html.erb
<% provide(:title, 'Reset password') %>
<h1>Reset password</h1>

<div class="row">
  <div class="col-md-6 col-md-offset-3">
    <%= form_with(model: @user, url: password_reset_path(params[:id])) do |f| %>
      <%= render 'shared/error_messages', object: f.object %>

      <%= hidden_field_tag :email, @user.email %>

      <%= f.label :password %>
      <%= f.password_field :password, class: 'form-control' %>

      <%= f.label :password_confirmation, "Confirmation" %>
      <%= f.password_field :password_confirmation, class: 'form-control' %>

      <%= f.submit "Update password", class: "btn btn-primary" %>
    <% end %>
  </div>
</div>
At this point, all the tests should be GREEN:
$ rails testAdditionally, all the HTML in this section should render properly, showing the form as in Figure 13.11, and a form with a submission error as in Figure 13.12.14
14. Note that the URL after a submission error is /microposts, for which there is no response to a GET request as defined by the routes in Listing 13.31. As a result, hitting return in the address bar (or copying and pasting the URL) gives rise to a routing error. Although this should never happen in the normal operations of the application, you can prevent it from happening at all by adding the route get "/microposts", to: "static_pages#home" to config/routes.rb.

Figure 13.11: The Home page with a new micropost form.

Figure 13.12: The Home page with a form error.
Exercises
To see other people’s answers and to record your own, subscribe to the Rails Tutorial course or to the Learn Enough All Access Subscription.
Refactor the Home page to use separate partials for the two branches of the
if-elsestatement.
13.3.3 A Proto-Feed
Although the micropost form is actually now working, users can’t immediately see the results of a successful submission because the current Home page doesn’t display any microposts. If you like, you can verify that the form shown in Figure 13.11 is working by submitting a valid entry and then navigating to the profile page to see the post, but that’s rather cumbersome. It would be far better to have a feed of microposts that includes the user’s own posts, as mocked up in Figure 13.13. (In Chapter 14, we’ll generalize this feed to include the microposts of users being followed by the current user, à la Twitter.)
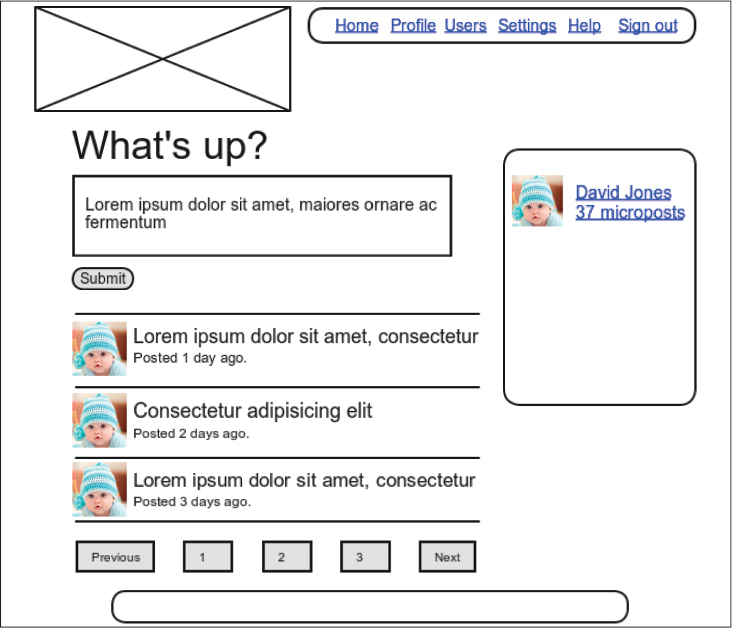
Figure 13.13: A mockup of the Home page with a proto-feed.
Since each user should have a feed, we are led naturally to a feed method in the User model, which will initially just select all the microposts belonging to the current user. We’ll accomplish this using the where method on the Micropost model (seen briefly before in Section 11.3.3), as shown in Listing 13.47.15
15. See the Rails Guide on the Active Record Query Interface for more on where and related methods.
Listing 13.47: A preliminary implementation for the micropost status feed.app/models/user.rb
class User < ApplicationRecord
  .
  .
  .
  # Defines a proto-feed.
  # See "Following users" for the full implementation.
  def feed
     Micropost.where("user_id = ?", id)
  end


  private
    .
    .
    .
end
The question mark in
Micropost.where("user_id = ?", id)ensures that id is properly escaped before being included in the underlying SQL query, thereby avoiding a serious security hole called SQL injection. The id attribute here is just an integer (i.e., self.id, the unique ID of the user), so there is no danger of SQL injection in this case, but it does no harm, and always escaping variables injected into SQL statements is a good habit to cultivate.
Alert readers might note at this point that the code in Listing 13.47 is essentially equivalent to writing
def feed
  microposts
end
We’ve used the code in Listing 13.47 instead because it generalizes much more naturally to the full status feed needed in Chapter 14.
To use the feed in the sample application, we add an @feed_items instance variable for the current user’s (paginated) feed, as in Listing 13.48, and then add a status feed partial (Listing 13.49) to the Home page (Listing 13.50). Note that, now that there are two lines that need to be run when the user is logged in, Listing 13.48 changes
@micropost = current_user.microposts.build if logged_in?from Listing 13.41 to
if logged_in?
  @micropost  = current_user.microposts.build
  @feed_items = current_user.feed.paginate(page: params[:page])
end
thereby moving the conditional from the end of the line to an if-end statement.
Listing 13.48: Adding a feed instance variable to the home action.app/controllers/static_pages_controller.rb
class StaticPagesController < ApplicationController

  def home
     if logged_in?
       @micropost  = current_user.microposts.build
       @feed_items = current_user.feed.paginate(page: params[:page])
     end
  end

  def help
  end

  def about
  end

  def contact
  end
end
Listing 13.49: The status feed partial.app/views/shared/_feed.html.erb
<% if @feed_items.any? %>
  <ol class="microposts">
    <%= render @feed_items %>
  </ol>
  <%= will_paginate @feed_items %>
<% end %>
The status feed partial defers the rendering to the micropost partial defined in Listing 13.23:
<%= render @feed_items %>Here Rails knows to call the micropost partial because each element of @feed_items has class Micropost. This causes Rails to look for a partial with the corresponding name in the views directory of the given resource:
app/views/microposts/_micropost.html.erbWe can add the feed to the Home page by rendering the feed partial as usual (Listing 13.50). The result is a display of the feed on the Home page, as required (Figure 13.14).

Figure 13.14: The Home page with a proto-feed.
Listing 13.50: Adding a status feed to the Home page.app/views/static_pages/home.html.erb
<% if logged_in? %>
  <div class="row">
    <aside class="col-md-4">
      <section class="user_info">
        <%= render 'shared/user_info' %>
      </section>
      <section class="micropost_form">
        <%= render 'shared/micropost_form' %>
      </section>
    </aside>
    <div class="col-md-8">
      <h3>Micropost Feed</h3>
      <%= render 'shared/feed' %>
    </div>
  </div>
<% else %>
  .
  .
  .
<% end %>
At this point, creating a new micropost works as expected, as seen in Figure 13.15.
There is one subtlety, though: On failed micropost submission, the Home page expects an @feed_items instance variable, so failed submissions currently break. The solution is to create the necessary feed variable in the branch for failed submissions in the Microposts controller create action, as shown in Listing 13.51.

Figure 13.15: The Home page after creating a new micropost.
Listing 13.51: Adding an (empty) @feed_items instance variable to the create action.app/controllers/microposts_controller.rb
class MicropostsController < ApplicationController
  before_action :logged_in_user, only: [:create, :destroy]

  def create
    @micropost = current_user.microposts.build(micropost_params)
    if @micropost.save
      flash[:success] = "Micropost created!"
      redirect_to root_url
    else
      @feed_items = current_user.feed.paginate(page: params[:page])
      render 'static_pages/home', status: :unprocessable_entity
    end
  end


  def destroy
  end

  private

    def micropost_params
      params.require(:micropost).permit(:content)
    end
end
Unfortunately, pagination still doesn’t quite work. We can see why by submitting an invalid micropost, say, one whose length is too long. Scrolling down to the pagination links, we see links on both “2” and “Next” pointing to the next page (Figure 13.16). Because the create action is in the Microposts controller (Listing 13.51), the URL is /microposts?page=2, which tries to go to the nonexistent Microposts index action. As a result, clicking on either link gives a routing error (Figure 13.17).
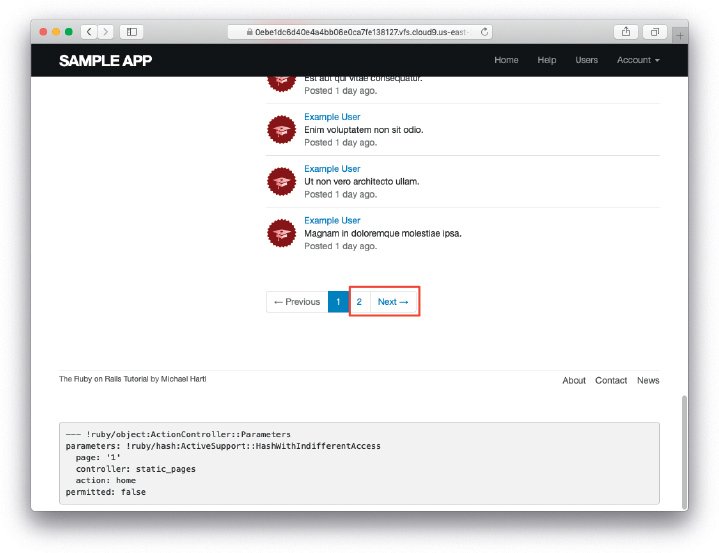
Figure 13.16: The Next link on the Home page.

Figure 13.17: A routing error on page 2.
We can solve this problem by giving will_paginate explicit controller and action parameters corresponding to the Home page, i.e., the static_pages controller and the home action.16 The result appears in Listing 13.52.
16. Thanks to reader Martin Francl for pointing out this solution.
Listing 13.52: Setting an explicit controller and action.app/views/shared/_feed.html.erb
<% if @feed_items.any? %>
  <ol class="microposts">
    <%= render @feed_items %>
  </ol>

   <%= will_paginate @feed_items,
                     params: { controller: :static_pages, action: :home } %>
<% end %>
Now clicking on either of the pagination links in Figure 13.16 yields the expected second page, as shown in Figure 13.18.
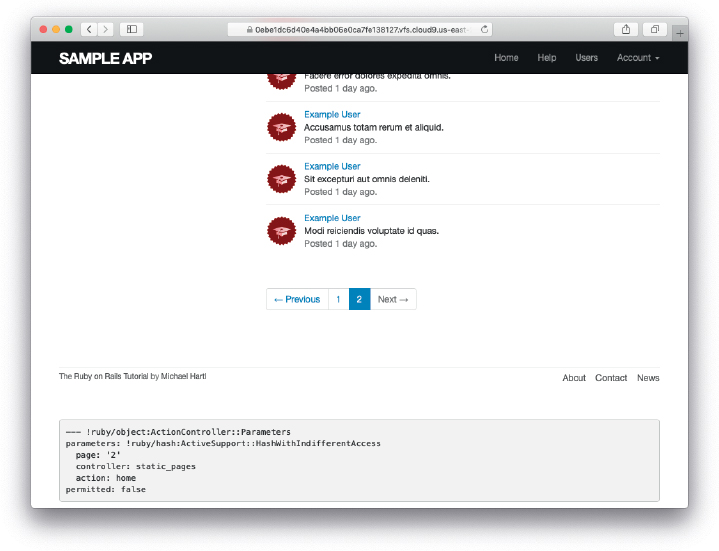
Figure 13.18: The result of a working pagination link to the second page.
Finally, as of this writing refreshing after an invalid micropost submission results in the error No route matches [GET] "/microposts" in some browsers (e.g., Chrome). Adding the route shown in Listing 13.53 fixes the error.
Listing 13.53: Fixing a refresh error in some browsers.config/routes.rb
Rails.application.routes.draw do
  root   'static_pages#home'
  get    '/help',    to: 'static_pages#help'
  get    '/about',   to: 'static_pages#about'
  get    '/contact', to: 'static_pages#contact'
  get    '/signup',  to: 'users#new'
  get    '/login',   to: 'sessions#new'
  post   '/login',   to: 'sessions#create'
  delete '/logout',  to: 'sessions#destroy'
  resources :users
  resources :account_activations, only: [:edit]
  resources :password_resets,     only: [:new, :create, :edit, :update]
  resources :microposts,          only: [:create, :destroy]

   get '/microposts', to: 'static_pages#home'
end
Exercises
To see other people’s answers and to record your own, subscribe to the Rails Tutorial course or to the Learn Enough All Access Subscription.
Use the newly created micropost UI to create the first real micropost. What are the contents of the
INSERTcommand in the server log?In the console, set
userto the first user in the database. Confirm that the values ofMicropost.where("user_id = ?", user.id),user.microposts, anduser.feedare all the same. Hint: It’s probably easiest to compare directly using==.
13.3.4 Destroying Microposts
The last piece of functionality to add to the Microposts resource is the ability to destroy posts. As with user deletion (Section 10.4.2), we accomplish this with “delete” links, as mocked up in Figure 13.19. Unlike that case, which restricted user destruction to admin users, the delete links will work only for microposts created by the current user.

Figure 13.19: A mockup of the proto-feed with micropost delete links.
Our first step is to add a delete link to the micropost partial as in Listing 13.23. The result appears in Listing 13.54. Note that we’ve used the same Turbo-compatible data values that we used in Listing 10.58 when deleting users.
Listing 13.54: Adding a delete link to the micropost partial.app/views/microposts/_micropost.html.erb
<li id="micropost-<%= micropost.id %>">
  <%= link_to gravatar_for(micropost.user, size: 50), micropost.user %>
  <span class="user"><%= link_to micropost.user.name, micropost.user %></span>
  <span class="content"><%= micropost.content %></span>
  <span class="timestamp">
    Posted <%= time_ago_in_words(micropost.created_at) %> ago.
    <% if current_user?(micropost.user) %>

      <%= link_to "delete", micropost, data: { "turbo-method": :delete,
                                                turbo_confirm: "You sure?" } %>
    <% end %>
  </span>
</li>
The next step is to define a destroy action in the Microposts controller, which is analogous to the user case in Listing 10.59. The main difference is that, rather than directly finding a user with User.find, we’ll find the micropost through the user association:
@micropost = current_user.microposts.find_by(id: params[:id])This has the added security benefit of failing automatically (by returning nil) if a user tries to delete another user’s micropost.
We’ll put the resulting find_by inside a correct_user before filter, which checks that the current user actually has a micropost with the given id (and redirects to the root URL if it doesn’t). The result appears in Listing 13.55.
Listing 13.55: Finding a micropost through the user association.app/controllers/microposts_controller.rb
class MicropostsController < ApplicationController
  before_action :logged_in_user, only: [:create, :destroy]
  before_action :correct_user,   only: :destroy
  .
  .
  .
  private

    def micropost_params
      params.require(:micropost).permit(:content)
    end

    def correct_user
      @micropost = current_user.microposts.find_by(id: params[:id])
      redirect_to root_url, status: :see_other if @micropost.nil?
    end
end
To perform the actual micropost deletion, we’ll generally follow the pattern for user deletion from Listing 10.59, which looks like this:
def destroy
  User.find(params[:id]).destroy
  flash[:success] = "User deleted"
  redirect_to users_url, status: :see_other
end
In place of User.find(params[:id]), we’ll have @micropost (defined by the correct_user filter in Listing 13.55); the flash message is likewise analogous, with “Micropost” in place of “User”. The result appears as follows:
def destroy
  @micropost.destroy
  flash[:success] = "Micropost deleted"

  # redirect to be determined
end
Note that, as with other redirects after DELETE requests (e.g., Listing 8.45), we’ve used status: :see_other for compatibility with Turbo.
The biggest difference between the User and Micropost cases is in the redirect. Because users can delete microposts from either the profile page or the Home page, it’s convenient to redirect back to the referring page, so that users always end up where they started from. We can accomplish this using the request.referrer method:17
17. This corresponds to HTTP_REFERER, as defined by the specification for HTTP. Note that “REFERER” is not a typo in the current tutorial—the word is actually misspelled in the HTTP spec. Rails corrects this error by accessing the referring URL via the correctly spelled referrer method.
redirect_to request.referrer, status: :see_otherThis method is related to the request.original_url variable used in friendly forwarding (Section 10.2.3), and in this case is just the previous URL.18
18. I didn’t remember offhand how to get this URL inside a Rails application, so I Googled “rails request previous url” and found a Stack Overflow thread with the answer.
There is also one edge case we need to deal with. The first is that the referring URL is sometimes nil inside tests, so we need to redirect to a default URL in that case, which we’ll choose to be the root URL:
if request.referrer.nil?
  redirect_to root_url, status: :see_other
else
  redirect_to request.referrer, status: :see_other
end
The resulting destroy action appears as in Listing 13.56.
Listing 13.56: The Microposts controller destroy action.app/controllers/microposts_controller.rb
class MicropostsController < ApplicationController
  before_action :logged_in_user, only: [:create, :destroy]
  before_action :correct_user,   only: :destroy
  .
  .
  .
  def destroy

    @micropost.destroy
    flash[:success] = "Micropost deleted"
    if request.referrer.nil?
      redirect_to root_url, status: :see_other
    else
      redirect_to request.referrer, status: :see_other
    end
  end

  private

    def micropost_params
      params.require(:micropost).permit(:content)
    end

    def correct_user
      @micropost = current_user.microposts.find_by(id: params[:id])
      redirect_to(root_url, status: :see_other) if @micropost.nil?
    end
end
At this point, the Home page has working delete links (Figure 13.20), which you can verify by deleting, e.g., the second post (Figure 13.21).

Figure 13.20: The Home page with delete links.

Figure 13.21: The result of deleting the second post.
Exercises
To see other people’s answers and to record your own, subscribe to the Rails Tutorial course or to the Learn Enough All Access Subscription.
Create a new micropost and then delete it. What are the contents of the
DELETEcommand in the server log?Confirm directly in the browser that the two redirects in Listing 13.56 can be replaced with the single line
redirect_back_or_to(root_url, status: :see_other), which arranges to redirect to the given URL if the referring URL isnil.
13.3.5 Micropost Tests
With the code in Section 13.3.4, the Micropost model and interface are complete. All that’s left is writing a short Microposts controller test to check authorization and a micropost integration test to tie it all together.
We’ll start by adding a few microposts with different owners to the micropost fixtures, as shown in Listing 13.57. (We’ll be using only one for now, but we’ve put in the others for future reference.)
Listing 13.57: Adding a micropost with a different owner.test/fixtures/microposts.yml
.
.
.
ants:
  content: "Oh, is that what you want? Because that's how you get ants!"
  created_at: <%= 2.years.ago %>
  user: archer


zone:
  content: "Danger zone!"
  created_at: <%= 3.days.ago %>
  user: archer

tone:
  content: "I'm sorry. Your words made sense, but your sarcastic tone did not."
  created_at: <%= 10.minutes.ago %>
  user: lana
We next write a short test to make sure one user can’t delete the microposts of a different user, and we also check for the proper redirect, as seen in Listing 13.58.
Listing 13.58: Testing micropost deletion with a user mismatch. GREENtest/controllers/microposts_controller_test.rb
require "test_helper"

class MicropostsControllerTest < ActionDispatch::IntegrationTest

  def setup
    @micropost = microposts(:orange)
  end

  test "should redirect create when not logged in" do
    assert_no_difference 'Micropost.count' do
      post microposts_path, params: { micropost: { content: "Lorem ipsum" } }
    end
    assert_redirected_to login_url
  end

  test "should redirect destroy when not logged in" do
    assert_no_difference 'Micropost.count' do
      delete micropost_path(@micropost)
    end
    assert_response :see_other
    assert_redirected_to login_url
  end

  test "should redirect destroy for wrong micropost" do
    log_in_as(users(:michael))
    micropost = microposts(:ants)
    assert_no_difference 'Micropost.count' do
      delete micropost_path(micropost)
    end
    assert_response :see_other
    assert_redirected_to root_url
  end
end
Finally, we’ll write an integration test to log in, check the micropost pagination, make an invalid submission, make a valid submission, delete a post, and then visit a second user’s page to make sure there are no “delete” links. We start by generating a test as usual:
$ rails generate integration_test microposts_interface
      invoke test_unit
      create   test/integration/microposts_interface_test.rb
The test appears in Listing 13.59. See if you can connect the lines in Listing 13.13 to the steps mentioned above.
Listing 13.59: An integration test for the micropost interface. GREENtest/integration/microposts_interface_test.rb
require "test_helper"

class MicropostsInterface < ActionDispatch::IntegrationTest

  def setup
    @user = users(:michael)
    log_in_as(@user)
  end
end

class MicropostsInterfaceTest < MicropostsInterface

  test "should paginate microposts" do
    get root_path
    assert_select 'div.pagination'
  end

  test "should show errors but not create micropost on invalid submission" do
    assert_no_difference 'Micropost.count' do
      post microposts_path, params: { micropost: { content: "" } }
    end
    assert_select 'div#error_explanation'
    assert_select 'a[href=?]', '/?page=2' # Correct pagination link
  end

  test "should create a micropost on valid submission" do
    content = "This micropost really ties the room together"
    assert_difference 'Micropost.count', 1 do
      post microposts_path, params: { micropost: { content: content } }
    end
    assert_redirected_to root_url
    follow_redirect!
    assert_match content, response.body
  end

  test "should have micropost delete links on own profile page" do
    get users_path(@user)
    assert_select 'a', text: 'delete'
  end

  test "should be able to delete own micropost" do
    first_micropost = @user.microposts.paginate(page: 1).first

    assert_difference 'Micropost.count', -1 do
      delete micropost_path(first_micropost)
    end
  end

  test "should not have delete links on other user's profile page" do
    get user_path(users(:archer))
    assert_select 'a', { text: 'delete', count: 0 }
  end
end
Note that Listing 13.59 preemptively defines a base class to reuse the setup method as described in Section 11.3.3. We won’t actually need to reuse this in the main text, but we’ll put it to good use in the exercises in Section 13.3.5 and Section 13.4.3.
Because we wrote working application code first, the test suite should be GREEN:
Listing 13.60: GREEN
$ rails testExercises
To see other people’s answers and to record your own, subscribe to the Rails Tutorial course or to the Learn Enough All Access Subscription.
For each of the four scenarios indicated by comments in Listing 13.59 (starting with “Invalid submission”), comment out the application code to get the corresponding test to RED, then uncomment to get back to GREEN.
Add tests for the sidebar micropost count (including proper pluralization). Listing 13.61 will help get you started.
Listing 13.61: A template for the sidebar micropost count test.test/integration/microposts_interface_test.rb
require "test_helper"

class MicropostsInterface < ActionDispatch::IntegrationTest

  def setup

    @user = users(:michael)
    log_in_as(@user)
  end
end
.
.
.
class MicropostSidebarTest < MicropostsInterface

  test "should display the right micropost count" do
    get root_path
    assert_match "#{FILL_IN} microposts", response.body
  end

  test "should user proper pluralization for zero microposts" do
    log_in_as(users(:malory))
    get root_path
    assert_match "0 microposts", response.body
  end

  test "should user proper pluralization for one micropost" do
    log_in_as(users(:lana))
    get root_path
    assert_match FILL_IN, response.body
  end
end
13.4 Micropost Images
Now that we’ve added support for all relevant micropost actions, in this section we’ll make it possible for microposts to include images as well as text. We’ll start with a basic version good enough for development use, and then add a series of enhancements to make image upload production-ready.
Adding image upload involves two main visible elements: a form field for uploading an image and the micropost images themselves. A mockup of the resulting “Upload image” button and micropost photo appears in Figure 13.22.
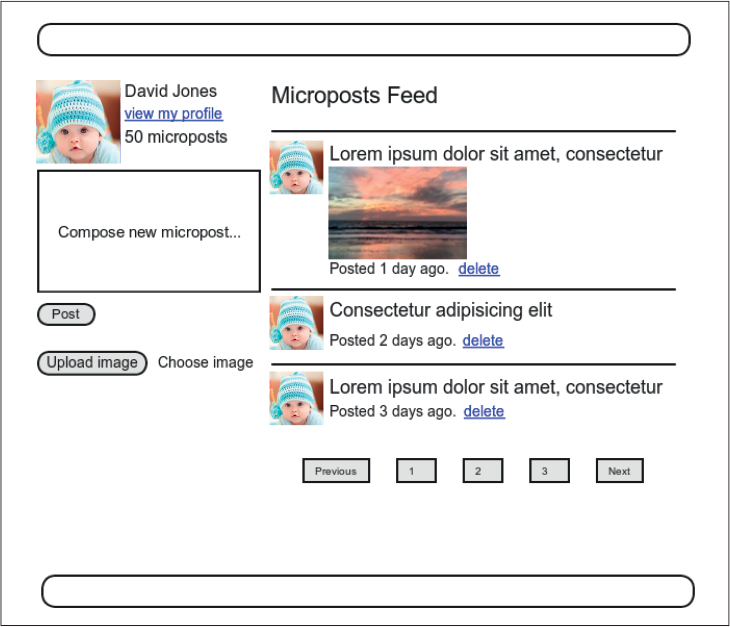
Figure 13.22: A mockup of micropost image upload (with an uploaded image).
13.4.1 Basic Image Upload
The most convenient way to upload files in Rails is to use a built-in feature called Active Storage.19 Active Storage makes it easy to handle an uploaded image and associate it with a model of our choice (e.g., the Micropost model). Although we’ll be using it only for uploading images, Active Storage is actually quite general, and can handle plain text and multiple kinds of binary files (such as PDF documents or recorded audio).
19. Active Storage was added in Rails 5.2.
As described in the Active Storage documentation (https://edgeguides.rubyonrails.org/active_storage_overview.html), adding Active Storage to our application is as easy as running a single command:
$ rails active_storage:installThis command generates a database migration that creates a data model for storing attached files. You’re welcome to take a look at it, but this is an excellent example of applying technical sophistication to know which details matter and which don’t. In this case, what matters is the API for interacting with Active Storage, which we’ll start covering in a moment; for our purposes, the implementation details are safe to ignore. All we need to do to set it up is run the migration:
$ rails db:migrateThe first part of the Active Storage API that we need is the has_one_attached method, which allows us to associate an uploaded file with a given model. In our case, we’ll call it image and associate it with the Micropost model, as shown in Listing 13.62.
Listing 13.62: Adding an image to the Micropost model.
app/models/micropost.rb
class Micropost < ApplicationRecord
  belongs_to :user
  has_one_attached :image
  default_scope -> { order(created_at: :desc) }
  validates :user_id, presence: true
  validates :content, presence: true, length: { maximum: 140 }
end
We’ll adopt a design of one image per micropost for our application, but Active Storage also offers a second option, has_many_attached, which allows for the attachment of multiple files to a single Active Record object.
To include image upload on the Home page as in Figure 13.22, we need to include a file_field tag in the micropost form, as shown in Listing 13.63 and Figure 13.23.

Figure 13.23: Adding an image upload field.
Listing 13.63: Adding image upload to the micropost create form.app/views/shared/_micropost_form.html.erb
<%= form_with(model: @micropost) do |f| %>
  <%= render 'shared/error_messages', object: f.object %>
  <div class="field">
    <%= f.text_area :content, placeholder: "Compose new micropost..." %>
  </div>
  <%= f.submit "Post", class: "btn btn-primary" %>
  <span class="image">
    <%= f.file_field :image %>
  </span>
<% end %>
Finally, we need to update the Microposts controller to add the image to the newly created micropost object. We can do this using the attach method provided by the Active Storage API, which attaches the uploaded image to the @micropost object in the Microposts controller’s create action. To allow the upload to go through, we also need to update the micropost_params method to add :image to the list of attributes permitted to be modified through the web. The result appears in Listing 13.64.
Listing 13.64: Adding image to the list of permitted attributes.app/controllers/microposts_controller.rb
class MicropostsController < ApplicationController
  before_action :logged_in_user, only: [:create, :destroy]
  before_action :correct_user,   only: :destroy

  def create
    @micropost = current_user.microposts.build(micropost_params)

    @micropost.image.attach(params[:micropost][:image])
    if @micropost.save
      flash[:success] = "Micropost created!"
      redirect_to root_url
    else
      @feed_items = current_user.feed.paginate(page: params[:page])
      render 'static_pages/home', status: :unprocessable_entity
    end
  end

  def destroy
    @micropost.destroy
    flash[:success] = "Micropost deleted"
    if request.referrer.nil? || request.referrer == microposts_url
      redirect_to root_url, status: :see_other
    else
      redirect_to request.referrer, status: :see_other
    end
  end

  private

  def micropost_params
    params.require(:micropost).permit(:content, :image)
  end

  def correct_user
    @micropost = current_user.microposts.find_by(id: params[:id])
    redirect_to root_url, status: :see_other if @micropost.nil?
  end
end
Once the image has been uploaded, we can render the associated micropost.image using the image_tag helper in the micropost partial, as shown in Listing 13.65. Notice the use of the attached? boolean method to prevent displaying an image tag when there isn’t an image.
Listing 13.65: Adding image display to microposts.app/views/microposts/_micropost.html.erb
<li id="micropost-<%= micropost.id %>">
  <%= link_to gravatar_for(micropost.user, size: 50), micropost.user %>
  <span class="user"><%= link_to micropost.user.name, micropost.user %></span>
  <span class="content">
    <%= micropost.content %>

    <%= image_tag micropost.image if micropost.image.attached? %>
  </span>
  <span class="timestamp">
    Posted <%= time_ago_in_words(micropost.created_at) %> ago.
    <% if current_user?(micropost.user) %>
      <%= link_to "delete", micropost, data: { "turbo-method": :delete,
                                               turbo_confirm: "You sure?" } %>
    <% end %>
  </span>
</li>
The result of making a micropost with an image appears in Figure 13.24. I’m always amazed when things like this actually work, but there’s the proof! (It’s also a good idea to write at least a basic automated test for image upload, which is left as an exercise (Section 13.4.1).)

Figure 13.24: The result of submitting a micropost with an image.
Exercises
To see other people’s answers and to record your own, subscribe to the Rails Tutorial course or to the Learn Enough All Access Subscription.
Upload a micropost with attached image. Does the result look too big? (If so, don’t worry; we’ll fix it in Section 13.4.3.)
Following the template in Listing 13.67, write a test of the image uploader in Section 13.4. As preparation, you should add an image to the fixtures directory using Listing 13.66. (You should type the backslash character
in Listing 13.66, which is a line continuation character, but not the right angle bracket>, which should automatically be added by your terminal’s shell program.) The additional assertions in Listing 13.67 check both for a file upload field on the Home page and for a valid image attribute on the micropost resulting from valid submission. Note the use of the specialfixture_file_uploadmethod for uploading files as fixtures inside tests.20 Hint: To check for a validimageattribute, use theassignsmethod mentioned in Section 11.3.3 to access the micropost in thecreateaction after valid submission.
20. Windows users should add a :binary parameter: fixture_file_upload(file, type, :binary).
Listing 13.66: Downloading a fixture image for use in the tests.
$ curl -o test/fixtures/files/kitten.jpg
>      -L https://cdn.learnenough.com/kitten.jpg
Listing 13.67: A template for testing image upload.test/integration/microposts_interface_test.rb
require "test_helper"

class MicropostsInterface < ActionDispatch::IntegrationTest

  def setup
    @user = users(:michael)
    log_in_as(@user)
  end
end
.
.
.
class ImageUploadTest < MicropostsInterface


  test "should have a file input field for images" do
    get root_path
    assert_select 'input[type=FILL_IN]'
  end

  test "should be able to attach an image" do
    cont = "This micropost really ties the room together."
    img = fixture_file_upload('kitten.jpg', 'image/jpeg')
    post microposts_path, params: { micropost: { content: cont, image: img } }
    assert FILL_IN.image.attached?
  end
end
13.4.2 Image Validation
The image upload code in Section 13.4.1 is a good start, but it has significant limitations. Among other things, it doesn’t enforce any constraints on the uploaded file, which can cause problems if users try to upload large files or invalid file types. To remedy this defect, we’ll add validations for the image size and format.
As of this writing, Active Storage (somewhat surprisingly) doesn’t offer native support for things like format and size validations, but as is so often the case there is a gem that adds it for us (Listing 13.68). (As always, you should use the version numbers listed at gemfiles-7th-ed.railstutorial.org if they differ from the ones listed here.)
Listing 13.68: Adding a gem for Active Storage validations.Gemfile
source "https://rubygems.org"
git_source(:github) { |repo| "https://github.com/#{repo}.git" }

gem "rails",                      "7.0.4"
gem "active_storage_validations", "0.9.8"
gem "bcrypt",                     "3.1.18"
.
.
.
Then bundle install:
$ bundle _2.3.14_ installFollowing the gem documentation, we see that we can validate the image format by examining the content_type as follows:
content_type: { in: %w[image/jpeg image/gif image/png],
                message: "must be a valid image format" }
This checks that the MIME type of the image corresponds to a supported image format. (We’re also using the %w[] array-building syntax, which you may recall from Section 6.2.4.)
Similarly, we can validate the file size like this:
size: { less_than: 5.megabytes,
        message:   "should be less than 5MB" }
This sets a limit of 5 megabytes using a syntax we saw before in the context of time helpers (Box 9.1).
Adding these validations to the Micropost model gives the code in Listing 13.69.
Listing 13.69: Adding validations to images.app/models/micropost.rb
class Micropost < ApplicationRecord
  belongs_to :user
  has_one_attached :image
  default_scope -> { order(created_at: :desc) }
  validates :user_id, presence: true
  validates :content, presence: true, length: { maximum: 140 }
  validates :image, content_type: { in: %w[image/jpeg image/gif image/png],
                                     message: "must be a valid image format" },
                    size:         { less_than: 5.megabytes,
                                     message:   "should be less than 5MB" }
end
The result of trying to upload a large, invalid image then appears as in Figure 13.25. (You will probably have to restart the Rails server first.)

Figure 13.25: Trying to upload a large, invalid image.
To go along with the validations in Listing 13.69, we’ll add two client-side (in-browser) checks on the uploaded image size and format. First, we’ll include a little JavaScript to issue an alert if a user tries to upload an image that’s too big (which prevents accidental time-consuming uploads and lightens the load on the server). We’ll put the code in an image_upload.js file in the same custom JavaScript directory created for menu.js in Listing 8.24:
$ touch app/javascript/custom/image_upload.jsThe code itself appears in Listing 13.70. Although JavaScript isn’t the focus of this book, you might be able to figure out that Listing 13.70 monitors the page element containing the CSS id micropost_image (as indicated by the hash mark #), which is the id of the micropost form in Listing 13.63. (The way to figure this out is to Ctrl-click and use your browser’s web inspector.) When the element with that CSS id changes, the JavaScript code fires and issues the alert method if the file is too big.
Listing 13.70: JavaScript to prevent the uploading of big images.app/javascript/custom/image_upload.js
// Prevent uploading of big images.
document.addEventListener("turbo:load", function() {
  document.addEventListener("change", function(event) {
    let image_upload = document.querySelector('#micropost_image');
    const size_in_megabytes = image_upload.files[0].size/1024/1024;
    if (size_in_megabytes > 5) {
      alert("Maximum file size is 5MB. Please choose a smaller file.");
      image_upload.value = "";
    }
  });
});
To use the code in our application, we also have to import it using Importmap (Section 8.2.4), as shown in Listing 13.71. After refreshing the page (and possibly restarting the Rails server), the result of trying to upload an image that’s too big is shown in Figure 13.26.

Figure 13.26: A JavaScript alert for a large file.
Listing 13.71: Importing the image JavaScript.app/javascript/application.js
// Configure your import map in config/importmap.rb.
// Read more: https://github.com/rails/importmap-rails
import "@hotwired/turbo-rails"
import "controllers"
import "custom/menu"
import "custom/image_upload"
Second, by using the accept parameter in the file_field input tag, we can specify that only valid file formats should be allowed (Listing 13.72).
Listing 13.72: Allowing only valid image formats.app/views/shared/_micropost_form.html.erb
<%= form_with(model: @micropost) do |f| %>
  <%= render 'shared/error_messages', object: f.object %>
  <div class="field">
    <%= f.text_area :content, placeholder: "Compose new micropost..." %>
  </div>

  <%= f.submit "Post", class: "btn btn-primary" %>
  <span class="image">
    <%= f.file_field :image, accept: "image/jpeg,image/gif,image/png" %>
  </span>
<% end %>
Listing 13.72 arranges to allow only valid image types to be selected in the first place, graying out any other file types (Figure 13.27).

Figure 13.27: Grayed-out invalid file types.
Preventing invalid images from being uploaded in a browser is a nice touch, but it’s important to understand that this sort of code can only make it difficult to upload an invalid format or large file; a user determined to upload an invalid file can always issue a direct POST request using, e.g., curl. It is thus essential to include server-side validations of the type shown in Listing 13.69.
Exercises
To see other people’s answers and to record your own, subscribe to the Rails Tutorial course or to the Learn Enough All Access Subscription.
What happens if you try uploading an image bigger than 5 megabytes?
What happens if you try uploading a file with an invalid extension?
13.4.3 Image Resizing
The image size validations in Section 13.4.2 are a good start, but they still allow the uploading of images large enough to break our site’s layout, sometimes with frightening results (Figure 13.28). Thus, while it’s convenient to allow users to select fairly large images from their local disk, it’s also a good idea to resize the images before displaying them.21

Figure 13.28: A frighteningly large uploaded image.
21. It’s possible to constrain the display size with CSS, but this doesn’t change the image size. In particular, large images would still take a while to load. (You’ve probably visited websites where “small” images seemingly take forever to load. This is why.)
We’ll be resizing images using the image manipulation program ImageMagick. Because ImageMagick includes the powerful convert command-line utility, we can check to see if the program is installed using which:22
22. The which command is covered (https://www.learnenough.com/command-line-tutorial/inspecting_files#sec-downloading-a-file) in Chapter 3 (https://www.learnenough.com/command-line-tutorial/inspecting_files) of Learn Enough Command Line to Be Dangerous (https://www.learnenough.com/command-line).
$ which convertIf this doesn’t print out the path to the convert command, it means you need to install ImageMagick on your system. If you’re using the cloud IDE recommended in Section 1.1, this can be accomplished as follows:
$ sudo apt-get -y install imagemagickIf you’re not using the cloud IDE or an equivalent Linux system, do a Google search for “imagemagick <your platform>”. On macOS, brew install imagemagick should work if you have Homebrew installed. Use your technical sophistication (Box 1.2) if you get stuck. (As we’ll see in Section 13.4.4, when using Heroku for deployment ImageMagick comes pre-installed in production.)
Next, we need to add the image_processing gem to our app’s Gemfile (Listing 13.73). (As always, you should use the version numbers listed at gemfiles-7th-ed.railstutorial.org if they differ from the ones listed here.)
Listing 13.73: Adding a gem for image processing.Gemfile
source "https://rubygems.org"
git_source(:github) { |repo| "https://github.com/#{repo}.git" }

gem "rails",                      "7.0.4"
gem "image_processing",           "1.12.2"
gem "active_storage_validations", "0.9.8"
.
.
.
Then install as usual:
$ bundle _2.3.14_ installFinally, we have to configure Rails to use the MiniMagick interface to ImageMagick (Listing 13.74). (The mini_magick gem is included automatically by bundle install since it is a dependency of the image_processing gem.)
Listing 13.74: Using MiniMagick for processing images.config/application.rb
require_relative "boot"
require "rails/all"

Bundler.require(*Rails.groups)

module SampleApp
  class Application < Rails::Application
    config.load_defaults 7.0
    config.active_storage.variant_processor = :mini_magick
  end
end
At this point, you will probably need to restart the Rails server.
For the actual resizing, we’re now ready to use the variant method supplied by Active Storage for creating transformed images. In particular, we’ll use the resize_to_limit option to ensure that neither the width nor the height of the image is greater than 500 pixels, as follows:
image.variant(resize_to_limit: [500, 500])The result for micropost image attachments is shown in Listing 13.75.
Listing 13.75: Adding a resized display image.app/models/micropost.rb
class Micropost < ApplicationRecord
  belongs_to :user
  has_one_attached :image do |attachable|
    attachable.variant :display, resize_to_limit: [500, 500]
  end
  default_scope -> { order(created_at: :desc) }
  validates :user_id, presence: true
  validates :content, presence: true, length: { maximum: 140 }
  validates :image,   content_type: { in: %w[image/jpeg image/gif image/png],
                                      message: "must be a valid image format" },
                      size: { less_than: 5.megabytes,
                              message:   "should be less than 5MB" }
end
Finally, we can use variant(:display) to use the display variant defined by Listing 13.75 in the micropost partial, as shown in Listing 13.76.
Listing 13.76: Using the resized display image.app/views/microposts/_micropost.html.erb
<li id="micropost-<%= micropost.id %>">
  <%= link_to gravatar_for(micropost.user, size: 50), micropost.user %>

  <span class="user"><%= link_to micropost.user.name, micropost.user %></span>
  <span class="content">
    <%= micropost.content %>
    <% if micropost.image.attached? %>
      <%= image_tag micropost.image.variant(:display) %>
    <% end %>
  </span>
  <span class="timestamp">
    Posted <%= time_ago_in_words(micropost.created_at) %> ago.
    <% if current_user?(micropost.user) %>
      <%= link_to "delete", micropost, data: { "turbo-method": :delete,
                                               turbo_confirm: "You sure?" } %>
    <% end %>
  </span>
</li>
The variant resizing in Listing 13.75 will happen on demand when the method is first called in Listing 13.76, and will be cached for efficiency in subsequent uses.23 The result is a properly resized display image, as seen in Figure 13.29.

Figure 13.29: A nicely resized image.
23. For larger sites, it’s probably better to defer such processing to a background process; this method is beyond the scope of this tutorial, but investigating Active Job will get you started if you need to go this route.
Exercises
To see other people’s answers and to record your own, subscribe to the Rails Tutorial course or to the Learn Enough All Access Subscription.
Upload a large image and confirm directly that the resizing is working. Does the resizing work properly even if the image isn’t square?
13.4.4 Image Upload in Production
The image uploading developed in Section 13.4.3 is good enough for development, but (as seen below in Listing 13.78) it uses the local disk for storing the images, which isn’t a good practice in production. (Among other things, file storage on Heroku is temporary, so uploaded images will be deleted every time you deploy.) Instead, we’ll use a cloud storage service to store images separately from our application.
There are many choices for cloud storage, but we’ll use one of the most popular and well-supported, Amazon.com’s Simple Storage Service (S3), part of Amazon Web Services (AWS).24
24. S3 is a paid service, but the storage needed to set up and test the Rails Tutorial sample application costs less than a cent per month.
To configure our application to use cloud storage in production, we’ll add the aws-sdk-s3 gem to the :production environment, as shown in Listing 13.77. (As always, you should use the version numbers listed at gemfiles-7th-ed.railstutorial.org if they differ from the ones listed here.)
Listing 13.77: Adding a gem for Amazon Web Services (AWS).Gemfile
source "https://rubygems.org"
git_source(:github) { |repo| "https://github.com/#{repo}.git" }

gem "rails",                      "7.0.4"
gem "image_processing",           "1.12.2"
gem "active_storage_validations", "0.9.8"
.
.
.
group :production do
  gem "pg",         "1.3.5"
  gem "aws-sdk-s3", "1.114.0", require: false
end
.
.
.
Then bundle one more time:
$ bundle _2.3.14_ installAWS Configuration
At this point, you’ll need to configure your AWS system to use S3. Here are the basic steps:25
25. The steps are current as of this writing, but services like AWS are constantly evolving, so the user interface may have changed in the interim. Use your technical sophistication to resolve any discrepancies.
Sign up for an Amazon Web Services account if you don’t have one already (Figure 13.30). (If you signed up for the Cloud9 IDE in Section 1.1.1, you already have an AWS account and can skip this step.)

Figure 13.30: Signing up for AWS.
Create a user via AWS Identity and Access Management (IAM). This involves using the IAM users interface (Figure 13.31) to navigate to the “Add user” page (Figure 13.32), where you should create a user while enabling “programmatic access” (Figure 13.33), grant the user administrator access (Figure 13.34), and then skip the optional user tags (Figure 13.35).

Figure 13.31: The AWS IAM interface.

Figure 13.32: Navigating to the “Add user” page.

Figure 13.33: Creating a user with “programmatic access”.

Figure 13.34: Granting the user administrator access.

Figure 13.35: Skipping optional user tags.
After clicking “Create user”, you should see the name of the user together with the access key ID and the secret access key (Figure 13.36). Copy these keys and store them someplace safe.

Figure 13.36: Displaying the access key ID and the secret access key.
Create an S3 bucket using the AWS Console (Figure 13.37). S3 buckets exist in a global namespace, so the name has to be unique, but otherwise the default bucket settings should be fine.

Figure 13.37: Creating an AWS bucket.
You may find setting up S3 to be a challenging exercise in technical sophistication (Box 1.2); for further details on the steps above, consult the S3 documentation (https://docs.aws.amazon.com/s3/index.html), the article “Setting up Rails 5 [or higher] with Active Storage with Amazon S3” (https://medium.com/alturasoluciones/setting-up-rails-5-active-storage-with-amazon-s3-3d158cf021ff), and, if necessary, Google or Stack Overflow.
Production AWS
As with production email configuration (Listing 11.45), we’ll be using Heroku ENV variables to avoid hard-coding sensitive information like AWS keys. In Section 11.4 and Section 12.4, these variables were defined automatically via the SendGrid add-on, but in this case we need to define them explicitly. Per the gem configuration documentation, these variables should be named using the prefix AWS, which we can accomplish using heroku config:set as follows:26
26. By putting all the config settings in one line using the command-line continuation character , we arrange to prevent Heroku from restarting multiple times. Thanks to reader Nico Greenarry for pointing this out.
$ heroku config:set AWS_ACCESS_KEY_ID=<access key>
>                   AWS_SECRET_ACCESS_KEY=<secret key>
>                   AWS_REGION=<region>
>                   AWS_BUCKET=<bucket name>
You should paste in the values for your configuration in place of the placeholder values above. To get the region, you can inspect the bucket URL on the S3 console page (Figure 13.38). (The bucket region can differ from the region on your AWS console, so be sure you’re using the right URL.) Also note that, as mentioned in Section 11.1.2, you should type the backslashes () but not the continuation characters (>).

Figure 13.38: Getting the AWS region from the S3 bucket URL.
Once the Heroku variables are set, the next step is to use them in a special YAML file for configuring storage options called storage.yml. We can create a storage option for Amazon using the code in Listing 13.78.
Listing 13.78: Adding Amazon AWS as a storage option.config/storage.yml
test:
  service: Disk
  root: <%= Rails.root.join("tmp/storage") %>

local:
  service: Disk
  root: <%= Rails.root.join("storage") %>

amazon:
  service: S3
  access_key_id:     <%= ENV['AWS_ACCESS_KEY_ID'] %>
  secret_access_key: <%= ENV['AWS_SECRET_ACCESS_KEY'] %>
  region:            <%= ENV['AWS_REGION'] %>
  bucket:            <%= ENV['AWS_BUCKET'] %>
Finally, we can put the option defined in Listing 13.78 to use in a production environment by adding the Active Storage service configuration parameter in production.rb. Be sure to replace the local storage option, which should look something like this:
# Store uploaded files on the local file system.
config.active_storage.service = :local
with this:
# Store uploaded files on Amazon AWS.
config.active_storage.service = :amazon
(I’m erring on the side of caution here by mentioning the replacement explicitly, but this is definitely the kind of thing you should be able to figure out yourself using your technical sophistication.) The result in production.rb appears in Listing 13.79.
Listing 13.79: Configuring the production environment to use Amazon AWS (S3).config/environments/production.rb
Rails.application.configure do
  .
  .
  .
  # Store uploaded files on Amazon AWS.
  config.active_storage.service = :amazon
  .
  .
  .
end
With the configuration above, we are ready to commit our changes and deploy:
$ rails test
$ git add -A
$ git commit -m "Add user microposts"
Because so many things can go wrong with the configuration, we’ll deploy the app directly from our current topic branch, making sure it’s working before merging into main. We can do this by including the branch name in the push to Heroku as follows:
$ git push heroku user-microposts:mainAs usual, we then reset the database and reseed the sample data:
$ heroku pg:reset DATABASE
$ heroku run rails db:migrate
$ heroku run rails db:seed
Because Heroku comes with an installation of ImageMagick, the result is successful image resizing and upload in production, as seen in Figure 13.39.

Figure 13.39: An uploaded image in production.
Exercises
To see other people’s answers and to record your own, subscribe to the Rails Tutorial course or to the Learn Enough All Access Subscription.
Upload a large image and confirm directly that the resizing is working in production. Does the resizing work properly even if the image isn’t square?
13.5 Conclusion
With the addition of the Microposts resource, we are nearly finished with our sample application. All that remains is to add a social layer by letting users follow each other. We’ll learn how to model such user relationships, and see the implications for the microposts feed, in Chapter 14.
If you skipped Section 13.4.4, be sure to commit your changes:
$ rails test
$ git add -A
$ git commit -m "Add user microposts"
Then merge into main:
$ git checkout main
$ git merge user-microposts
$ git push
And finally deploy to production:
$ git push heroku
$ heroku pg:reset DATABASE
$ heroku run rails db:migrate
$ heroku run rails db:seed
It’s worth noting that this chapter saw the last of the necessary gem installations. For reference, the final Gemfile is shown in Listing 13.80. (As always, you should use the version numbers listed at gemfiles-7th-ed.railstutorial.org if they differ from the ones listed here.)
Listing 13.80: The final Gemfile for the sample application.
source "https://rubygems.org"
git_source(:github) { |repo| "https://github.com/#{repo}.git" }

ruby "3.1.2"


gem "rails",                      "7.0.4"
gem "image_processing",           "1.12.2"
gem "active_storage_validations", "0.9.8"
gem "bcrypt",                     "3.1.18"
gem "faker",                      "2.21.0"
gem "will_paginate",              "3.3.1"
gem "bootstrap-will_paginate",    "1.0.0"
gem "bootstrap-sass",             "3.4.1"
gem "sassc-rails",                "2.1.2"
gem "sprockets-rails",            "3.4.2"
gem "importmap-rails",            "1.1.0"
gem "turbo-rails",                "1.1.1"
gem "stimulus-rails",             "1.0.4"
gem "jbuilder",                   "2.11.5"
gem "puma",                       "5.6.4"
gem "bootsnap",                   "1.12.0", require: false

group :development, :test do
  gem "sqlite3",  "1.4.2"
  gem "debug",    "1.5.0", platforms: %i[ mri mingw x64_mingw ]
end

group :development do
  gem "web-console", "4.2.0"
end

group :test do
  gem "capybara",                 "3.37.1"
  gem "selenium-webdriver",       "4.2.0"
  gem "webdrivers",               "5.0.0"
  gem "rails-controller-testing", "1.0.5"
  gem "minitest",                 "5.15.0"
  gem "minitest-reporters",       "1.5.0"
  gem "guard",                    "2.18.0"
  gem "guard-minitest",           "2.4.6"
end

group :production do
  gem "pg",         "1.3.5"
  gem "aws-sdk-s3", "1.114.0", require: false
end

# Windows does not include zoneinfo files, so bundle the tzinfo-data gem.
# Uncomment the following line if you're running Rails
# on a native Windows system:
# gem "tzinfo-data", platforms: %i[ mingw mswin x64_mingw jruby ]
13.5.1 What We Learned in This Chapter
Microposts, like Users, are modeled as a resource backed by an Active Record model.
Rails supports multiple-key indices.
We can model a user having many microposts using the
has_manyandbelongs_tomethods in the User and Micropost models, respectively.The
has_many/belongs_tocombination gives rise to methods that work through the association.The code
user.microposts.build(...)returns a new Micropost object automatically associated with the given user.Rails supports default ordering via
default_scope.Scopes take anonymous functions as arguments.
The
dependent: :destroyoption causes objects to be destroyed at the same time as associated objects.Pagination and object counts can both be performed through associations, leading to automatically efficient code.
Fixtures support the creation of associations.
It is possible to pass variables to Rails partials.
The
wheremethod can be used to perform Active Record selections.We can enforce secure operations by always creating and destroying dependent objects through their association.
We can upload images using Active Storage.