Chapter 10: Advanced Topics
The Pros and Cons of Each Interface
Using Response and Result Callback Functions
Handling Responses from Multiple Sessions Simultaneously
Connecting to Existing Sessions
There are a few topics that aren’t necessary to use SWAT with CAS, but understanding them can help you in situations you may come across. We’ll look at the different network interfaces used by CAS, different styles of handling CAS action responses, and other miscellaneous topics.
Binary vs. REST Interfaces
We mentioned in earlier chapters that there are two interfaces supported: binary and REST. The binary interface is a proprietary protocol supported on a limited number of platforms. This type of communication requires C extensions bundled with the SWAT installer on supported platforms. The REST interface allows SWAT to talk to the CAS server using the standard HTTP or HTTPS protocols. When using the REST interface, the SWAT client relies only on pure Python code, so it can be used on any platform that can run Python and Pandas.
We’ll discuss the details of each in the following sections.
The Binary Interface
A diagram of the communication over the binary interface is shown in the figure below.
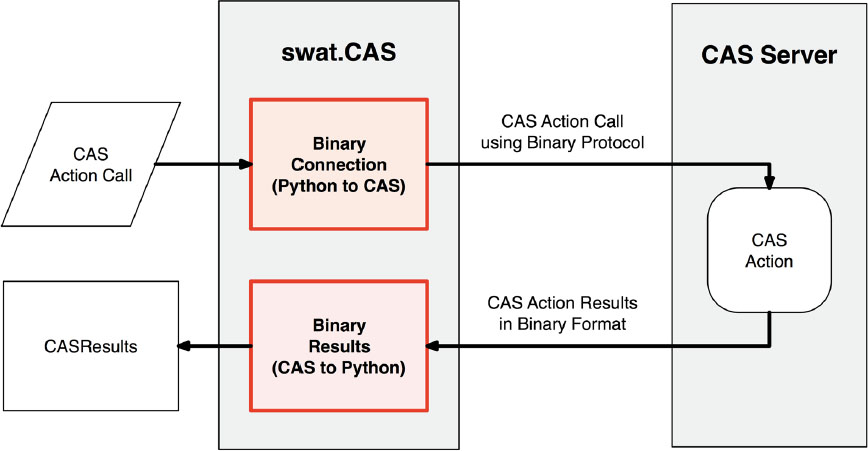
In this process, CAS action calls from the Python code are converted to a binary parameter structure that is transferred to CAS using a proprietary protocol. On the server side, the parameter structure is unpacked and the action is executed. When the action finishes, the results are returned to the client in a binary packed form. The client then converts the binary responses back to Python objects.
This form of communication is very fast and efficient, but it does require a Python C extension and supporting libraries from SAS (the SAS TK framework) to run on the client. Because of the performance aspects of this protocol, it is recommended that you use it if it is available for your platform. When you make a connection to CAS, the SWAT client will attempt to detect which type of port you are connecting to. The default is binary, but you can explicitly specify the protocol as well using the protocol parameter to the CAS object.
In [1]: binconn = swat.CAS(cashost, casport, protocol='cas')
Let’s look at the REST interface now.
The REST Interface
The diagram below shows the process used in communications with CAS using the REST interface.

In this process, the CAS action parameters from Python are converted to JSON (JavaScript Object Notation). The JSON parameters are sent to CAS using either the HTTP or HTTPS protocol. On the server side, the JSON is converted to the binary form needed by the CAS action and the action is executed. The results, in binary form, are then converted to JSON form and sent back to the client. The client must then convert the JSON into Python objects to be returned in the CASResults object.
As you can see, there is much more overhead in using the REST interface. However, it also has the benefit of using pure Python code, so it is more portable than using the binary interface.
To explicitly specify the REST interface when making a connection, you set the protocol option to ‘http’ or ‘https’ (depending on which protocol your server is configured to use).
In [2]: restconn = swat.CAS(cashost, casrestport, protocol='http')
The Pros and Cons of Each Interface
We’ll summarize the pros and cons of each interface to make it easier for you to decide which one is best for your situation.
Binary (CAS) Interface
Pros
■ Fast and efficient; not as many data conversions
■ More authentication methods supported
■ Supports custom data loaders using data message handlers
■ The required SAS TK system also includes support for SAS data formats
Cons
■ Not supported on all platforms
■ The download size is much larger
REST Interface
Pros
■ Uses standard HTTP / HTTPS protocols
■ Uses pure Python code, so it will run anywhere Python and Pandas is available
■ Smaller download size
Cons
■ More overhead due to conversions to and from binary formats
■ Less efficient communication
■ Data message handlers are not supported
Result Processing Workflows
Throughout this book, we have been calling actions using the methods on CAS connection objects and CASTable objects. This way of calling actions is the simplest but also has some limitations. It will only return the results of the action once all of the responses from the server have come back. If you want to process responses as the come back from the server, you may want to try one of the other workflows described here.
The Easy Way
The first workflow we’ll talk about is the simplest one; this is the method we have been using in this book so far. The diagram below shows the process used.
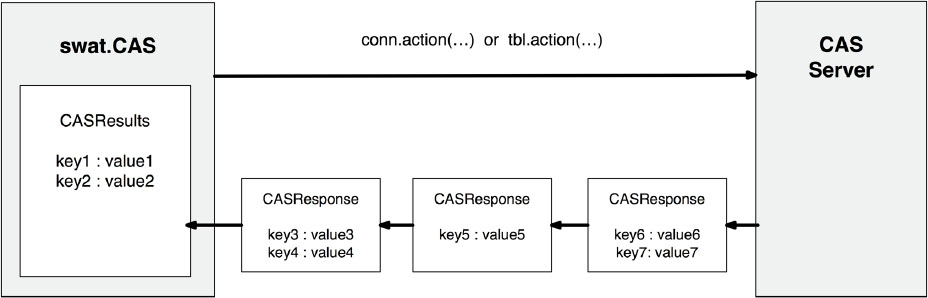
In this process, the CAS action is called on a CAS connection object or a CASTable object. The server executes the action and returns multiple responses back to the client. Each response contains one or more key / value pairs of results. The SWAT client processes each response from the server and combines them all into a single CASResults object. Once all responses have been received, the combined results are returned.
While this method is very easy and convenient, it may not be optimal if you have an action that returns a large number of responses or you have a long-running action where you want to process responses as they come back from the server. The methods of results processing in the next two sections may work better for those situations.
Using Response and Result Callback Functions
The next method of processing responses from CAS allows you to handle each response as it comes back from the server, rather than waiting until the action is complete. The diagram below shows how this workflow is handled.

In this workflow, you still use the CAS action methods on the CAS or CASTable objects to execute the action. However, in this case, you supply either a responsefunc or resultfunc parameter that contains a callable object (typically a function).
When a responsefunc parameter is specified, the given function is called for each response from the server. The arguments to the function are the CASResponse object, the CAS connection object, and a user-specified data structure (for holding state between responses).
When a resultfunc parameter is specified, the given function is called for each key / value pair from each response. The arguments to the function are the result key, the result value, the CASResponse object, the CAS connection object, and a user-specified data structure.
Both response callbacks and result callbacks have a user-specified data object that can be used to store state between calls. This will typically be an object that gets passed by reference in Python such as a list or a dictionary. If a user-specified object is used, it should be returned by the response / result callback on each call. The return value of the response / result callback is always used as the user data object on the next call to that function.
Let’s look at an example of using each of these callback types. We’ll start with the result callback. In this case, we’ll simply print the key and value for each result.
In [3]: def result_cb(key, value, response, connection, userdata):
...: print(' >>> RESULT %s ' % key)
...: print(value)
...: return userdata
...:
In [4]: tbl.groupby('Origin').summary(resultfunc=result_cb,
...: subset=['min', 'max'])
Out[4]:
>>> RESULT ByGroupInfo
ByGroupInfo
Origin Origin_f _key_
0 Asia Asia Asia
1 Europe Europe Europe
2 USA USA USA
>>> RESULT ByGroup1.Summary
Descriptive Statistics for CARS
Column Min Max
Origin
Asia MSRP 10280.0 89765.0
Asia Invoice 9875.0 79978.0
Asia EngineSize 1.3 5.6
Asia Cylinders 3.0 8.0
Asia Horsepower 73.0 340.0
Asia MPG_City 13.0 60.0
Asia MPG_Highway 17.0 66.0
Asia Weight 1850.0 5590.0
Asia Wheelbase 89.0 140.0
Asia Length 153.0 224.0
>>> RESULT ByGroup2.Summary
Descriptive Statistics for CARS
Column Min Max
Origin
Europe MSRP 16999.0 192465.0
Europe Invoice 15437.0 173560.0
Europe EngineSize 1.6 6.0
Europe Cylinders 4.0 12.0
Europe Horsepower 100.0 493.0
Europe MPG_City 12.0 38.0
Europe MPG_Highway 14.0 46.0
Europe Weight 2524.0 5423.0
Europe Wheelbase 93.0 123.0
Europe Length 143.0 204.0
>>> RESULT ByGroup3.Summary
Descriptive Statistics for CARS
Column Min Max
Origin
USA MSRP 10995.0 81795.0
USA Invoice 10319.0 74451.0
USA EngineSize 1.6 8.3
USA Cylinders 4.0 10.0
USA Horsepower 103.0 500.0
USA MPG_City 10.0 29.0
USA MPG_Highway 12.0 37.0
USA Weight 2348.0 7190.0
USA Wheelbase 93.0 144.0
USA Length 150.0 238.0
As you can see, the result callback is invoked for each result key. Now let’s look look at response callbacks.
In [5]: def response_cb(response, connection, userdata):
...: print(' >>> RESPONSE')
...: for k, v in response:
...: print(' >>> RESULT %s ' % k)
...: print(v)
...: return userdata
...:
In [6]: tbl.groupby('Origin').summary(responsefunc=response_cb,
...: subset=['min', 'max'])
Out[6]:
>>> RESPONSE
>>> RESULT ByGroupInfo
ByGroupInfo
Origin Origin_f _key_
0 Asia Asia Asia
1 Europe Europe Europe
2 USA USA USA
>>> RESPONSE
>>> RESULT ByGroup1.Summary
Descriptive Statistics for CARS
Column Min Max
Origin
Asia MSRP 10280.0 89765.0
Asia Invoice 9875.0 79978.0
Asia EngineSize 1.3 5.6
Asia Cylinders 3.0 8.0
Asia Horsepower 73.0 340.0
Asia MPG_City 13.0 60.0
Asia MPG_Highway 17.0 66.0
Asia Weight 1850.0 5590.0
Asia Wheelbase 89.0 140.0
Asia Length 153.0 224.0
>>> RESPONSE
>>> RESULT ByGroup2.Summary
Descriptive Statistics for CARS
Column Min Max
Origin
Europe MSRP 16999.0 192465.0
Europe Invoice 15437.0 173560.0
Europe EngineSize 1.6 6.0
Europe Cylinders 4.0 12.0
Europe Horsepower 100.0 493.0
Europe MPG_City 12.0 38.0
Europe MPG_Highway 14.0 46.0
Europe Weight 2524.0 5423.0
Europe Wheelbase 93.0 123.0
Europe Length 143.0 204.0
>>> RESPONSE
>>> RESULT ByGroup3.Summary
Descriptive Statistics for CARS
Column Min Max
Origin
USA MSRP 10995.0 81795.0
USA Invoice 10319.0 74451.0
USA EngineSize 1.6 8.3
USA Cylinders 4.0 10.0
USA Horsepower 103.0 500.0
USA MPG_City 10.0 29.0
USA MPG_Highway 12.0 37.0
USA Weight 2348.0 7190.0
USA Wheelbase 93.0 144.0
USA Length 150.0 238.0
>>> RESPONSE
This callback is called for each response. In order to retrieve the results from each CASResponse object that is passed in, you simply iterate over it in a for loop. Each iteration over a CASResponse object returns a two-element tuple containing key and value pair of results. You’ll notice that there is always an extra response at the end. This respone has no results associated with it and indicates the end of the action.
There are occasions when something happens in the server to cause the action to restart. In cases like this, the results that you have already processed may need to be thrown out. When an action sends a restart event, it means that it’s going to start over and it will start sending responses from the beginning again. This event is indicated by the updateflags attribute on the response. If the set contained in the updateflags attribute contains a string ‘action-restart’, you will need to handle it appropriately for your callback scenario.
While using callbacks allows you to handle server responses as they come back, you can still only process the responses from a single session. To get around that limitation, we’ll use another method in the next section.
Handling Responses from Multiple Sessions Simultaneously
The final method of handling responses is similar to the callback scenario except that the invocation of the action and the result processing are decoupled. This allows you to fire off multiple actions (each on a separate session) then process the results in the order that they come back. Here is a diagram of the process using multiple connection objects.

To call a CAS action without processing the results, you use the invoke method on the CAS connection object or CASTable object. This method returns immediately after calling the action and you must handle the responses yourself. To walk through the responses, you iterate over the connection object in a for loop.
Each iteration returns a CASResponse object which can then be iterated over (like when using a response callback) to get the key / value pairs of the result. Let’s look at an example.
In [7]: conn1 = tbl1.groupby('Origin').invoke('summary',
subset=['min', 'max']);
In [8]: for resp in conn1:
...: print(' >>> RESPONSE')
...: for k, v in resp:
...: print(' >>> RESULT %s ' % k)
...: print(v)
...:
Out[8]:
>>> RESPONSE
>>> RESULT ByGroupInfo
ByGroupInfo
Origin Origin_f _key_
0 Asia Asia Asia
1 Europe Europe Europe
2 USA USA USA
>>> RESPONSE
>>> RESULT ByGroup1.Summary
Descriptive Statistics for CARS
Column Min Max
Origin
Asia MSRP 10280.0 89765.0
Asia Invoice 9875.0 79978.0
Asia EngineSize 1.3 5.6
Asia Cylinders 3.0 8.0
Asia Horsepower 73.0 340.0
Asia MPG_City 13.0 60.0
Asia MPG_Highway 17.0 66.0
Asia Weight 1850.0 5590.0
Asia Wheelbase 89.0 140.0
Asia Length 153.0 224.0
>>> RESPONSE
>>> RESULT ByGroup2.Summary
Descriptive Statistics for CARS
Column Min Max
Origin
Europe MSRP 16999.0 192465.0
Europe Invoice 15437.0 173560.0
Europe EngineSize 1.6 6.0
Europe Cylinders 4.0 12.0
Europe Horsepower 100.0 493.0
Europe MPG_City 12.0 38.0
Europe MPG_Highway 14.0 46.0
Europe Weight 2524.0 5423.0
Europe Wheelbase 93.0 123.0
Europe Length 143.0 204.0
>>> RESPONSE
>>> RESULT ByGroup3.Summary
Descriptive Statistics for CARS
Column Min Max
Origin
USA MSRP 10995.0 81795.0
USA Invoice 10319.0 74451.0
USA EngineSize 1.6 8.3
USA Cylinders 4.0 10.0
USA Horsepower 103.0 500.0
USA MPG_City 10.0 29.0
USA MPG_Highway 12.0 37.0
USA Weight 2348.0 7190.0
USA Wheelbase 93.0 144.0
USA Length 150.0 238.0
>>> RESPONSE
The form above doesn’t give us any benefit over using callbacks. However, if you want to run multiple actions across several sessions, it has a distinct advantage. You can use the getnext function of the SWAT package to process responses as they come back. The responses returned by getnext are surfaced in the order that the sessions return them. This allows you to do parallel processing without using any sort of threading or subprocesses on the client. Let’s look at an example.
In [9]: conn1 = tbl1.groupby('Origin').invoke('summary',
...: subset=['min', 'max']);
In [10]: conn2 = tbl2.groupby('Origin').invoke('topk',
....: topk=1, bottomk=1);
In [11]: for resp, conn in swat.getnext(conn1, conn2):
....: print(' >>> RESPONSE')
....: for k, v in resp:
....: print(' >>> RESULT %s ' % k)
....: print(v)
....:
>>> RESPONSE
>>> RESULT ByGroupInfo
ByGroupInfo
Origin Origin_f _key_
0 Asia Asia Asia
1 Europe Europe Europe
2 USA USA USA
>>> RESPONSE
>>> RESULT ByGroup1.Summary
Descriptive Statistics for CARS2
Column Min Max
Origin
Asia MSRP 10280.0 89765.0
Asia Invoice 9875.0 79978.0
>>> RESPONSE
>>> RESULT ByGroup2.Summary
Descriptive Statistics for CARS2
Column Min Max
Origin
Europe MSRP 16999.0 192465.0
Europe Invoice 15437.0 173560.0
... output clipped ...
>>> RESPONSE
>>> RESULT ByGroup3.Topk
Top and Bottom Distinct Values for CARS2
Column FmtVar Rank
Origin
USA MSRP 81795 1
USA MSRP 10995 145
USA Invoice 74451 1
USA Invoice 10319 147
>>> RESPONSE
>>> RESULT ByGroup3.TopkMisc
Miscellaneous Information on Distinct Values for CARS2
Column N TruncatedTopk TruncatedBtmk ScoreOther
Origin
USA MSRP 145 0 0 NaN
USA Invoice 147 0 0 NaN
>>> RESPONSE
In the example above, we called the summary action and the topk action on two different sessions. The getnext function returns each CASResponse and the associated connection object at each iteration until all of the responses from all connections have been processed. In this case, the actions ran fast enough that the results still displayed in the order in which we executed them. However, for longer running actions, the output may be interleaved. You can use the returned CAS connection object to keep track of which connection the responses and results belong to.
Just as with the callback scenario, you can get an ‘action-restart’ event in the updateflags of the response object here as well. If necessary, your code should check this flag and act accordingly.
With these three different ways of processing results from CAS, you have options to cover the gamut from simple action calls that return all the combined results all the way up to processing results from multiple connections at once.
Connecting to Existing Sessions
While you can only run one action in a session at a time, it is possible to connect to existing sessions multiple times. This can be handy if you ran some actions while at work and want to continue your work from home when they are finished. Connecting to an existing session is fairly easy, you just need to know the session ID. While you could write down the session ID and take that with you, there is an easier way. Each Python connection is tagged with a more user-friendly name. You can see it when you display the string representation of a CAS connection object.
In [12]: conn
Out[12]: CAS('server-name.mycompany.com', 5570,
'username', protocol='cas',
name='py-session-1',
session='c4bbd504-d4a7-134f-af62-9340b3dc8048')
This name is going to be much easier to remember than the full session ID. When you want to connect to that session from another location, you can use the listsessions action to display all of the current sessions in the server. This will list all of the sessions on the server created by you.
In [13]: conn.listsessions()
Out[13]:
[Session]
SessionName
0 py-session-1:Mon Oct 31 16:29:34 2016
1 py-session-88:Mon Oct 31 16:34:20 2016
UUID State
0 c4bbd504-d4a7-134f-af62-9340b3dc8048 Connected
1 45b6ce2f-610f-e847-af87-78ee9a8523b9 Connected
Authentication Userid
0 Active Directory username
1 Active Directory username
+ Elapsed: 0.000429s, mem: 0.0904mb
We can now get the full session ID by looking for the user-friendly name in the SessionName column and copying the corresponding UUID value. Now that we have that, we can specify the UUID in the session parameter of a new connection.
In [14]: conn2 = swat.CAS('server-name.mycompany.com', 5570,
session='c4bbd504-d4a7-134f-af62-9340b3dc8048')
Your new connection is now connected to the specified session. Also, since the sessions are language agnostic, you can connect to existing CAS sessions created from other language interfaces such as Java or SAS.
Communicating Securely
If your server is configured to use TLS encryption either through the binary interface or using the REST interface through HTTPS, you will need to set the path to the file that contains the certificate chain to verify your connections. See SAS’ documentation on the different methods for creating your certificate files for use with CAS. Configuring the client is done by setting a CAS_CLIENT_SSL_CA_LIST environment variable. The method for setting environment variables varies by platform (or even command shell on Linux). Below is the way to set the environment variable using the bash shell on Linux.
export CAS_CLIENT_SSL_CA_LIST='/path/to/cacerts/trustedcerts.pem'
With this variable set, you should now be able to connect to your CAS server securely.
Conclusion
With the information in this chapter, you should be able to make educated decisions on which interface (binary or REST) you want to use. You can take advantage of multiple different styles of response handling depending on your needs. You can also connect to existing sessions, and connect to CAS using encrypted communications. This knowledge should allow you to handle more advanced uses of CAS connections and workflows.