A view is a virtual table whose result set is derived from a query. In reality, a view is simply a SELECT statement that is saved with the name in the database. Views are used just like regular tables without incurring additional cost, unless you are indexing the view. We typically create views based on one or more tables, views, CTEs, table-valued functions, or a combination of them all. We can reference views in Transact-SQL statements in the same way tables are referenced. We can also perform DML operations on views. The typical uses of views include:
- A denormalized presentation of normalized data
- Limiting access to specific columns of the underlying tables
- Creating a reusable set of data
- Restricting users' access to sensitive data
Tip
You should avoid using
SELECT *in views, because when you do, the columns list is resolved each time you query the view. Moreover, the result set of the view query changes when the underlying table schema changes. A good practice is returning only those columns that are required.The
ORDER BYclause is not valid in views unless used with aTOPclause.
This section describes how to create and manage views using Transact-SQL DDL statements and SSMS 2014.
You can create, alter, and drop views with these Transact-SQL DDL statements: CREATE VIEW, ALTER VIEW, and DROP VIEW.
The syntax for the CREATE VIEW statement is very simple and straightforward, as follows:
CREATE VIEW [schema.]view_name [(column_list)]
[WITH view_attributes]
AS select_statement [;]
[WITH CHECK OPTION]
The following are the arguments of the CREATE VIEW statement:
schema: This specifies the name of the schema in which you are creating a view.view_name: This specifies the name of the view; it must be unique within the schema.column_list: This specifies the name to be used for a column in the view; it is an optional argument unless you have a derived column.WITH view_attributes: This is an optional view attribute. The attributes are as follows:ENCRYPTION: This attribute encrypts the text of theCREATE VIEWstatementSCHEMABINDING: This attribute binds the view to the underlying table or tables, meaning users cannot modify the underlying table or tables in any way that affects the view definitionVIEW_METADATA: This attribute specifies the instance of SQL Server to return the metadata information about the view instead of the underlying base table or tables to the DB-Library, ODBC, and OLE DB application programming interfaces (APIs)
AS select_statement: This is theSELECTstatement defining the view.WITH CHECK OPTION: This forces the DML statements executed against the view to follow the criteria in theSELECTstatement.
Here is an example of the CREATE VIEW statement:
USE [AdventureWorks2012];
GO

CREATE VIEW [HumanResources].[vEmployeesWithinCompanyGroup]
AS
SELECT  [Executive General and Administration] , [Inventory Management] , [Manufacturing] , [Quality Assurance] , [Research and Development] ,[Sales and Marketing]
FROM (SELECT p.BusinessEntityID , d.[GroupName]
FROM [HumanResources].[Employee] e
INNER JOIN [HumanResources].[EmployeeDepartmentHistory] dhist
ON e.[BusinessEntityID] = dhist.[BusinessEntityID]
AND dhist.[EndDate] IS NULL
INNER JOIN [Person].[Person] p
ON p.[BusinessEntityID] = e.[BusinessEntityID]
INNER JOIN [HumanResources].[Department] d
ON dhist.[DepartmentID] = d.[DepartmentID]
) AS a PIVOT
(COUNT(a.[BusinessEntityID])
FOR [GroupName] IN ([Executive General and Administration], [Inventory Management], [Manufacturing], [Quality Assurance], [Research and Development], [Sales and Marketing])) AS b
GO
We use the ALTER VIEW statement to modify the view definition. The ALTER VIEW statement syntax is the same as the CREATE VIEW statement syntax:
ALTER VIEW [schema.]view_name [(column_list)]
[WITH view_attributes]
AS select_statement [;]
[WITH CHECK OPTION]
The following is an example of the ALTER VIEW statement:
USE [AdventureWorks2012];
GO

ALTER VIEW [HumanResources].[vEmployeesWithinCompanyGroup]
AS
SELECT  [Executive General and Administration] , [Inventory Management] , [Manufacturing] , [Quality Assurance] , [Research and Development] ,[Sales and Marketing]
FROM (SELECT p.BusinessEntityID , d.[GroupName]
FROM [HumanResources].[Employee] e
INNER JOIN [HumanResources].[EmployeeDepartmentHistory] dhist
ON e.[BusinessEntityID] = dhist.[BusinessEntityID]
AND dhist.[EndDate] IS NULL
INNER JOIN [Person].[Person] p
ON p.[BusinessEntityID] = e.[BusinessEntityID]
INNER JOIN [HumanResources].[Department] d
ON dhist.[DepartmentID] = d.[DepartmentID]
) AS a PIVOT
(COUNT(a.[BusinessEntityID])
FOR [GroupName] IN ([Executive General and Administration], [Inventory Management], [Manufacturing], [Quality Assurance], [Research and Development], [Sales and Marketing])) AS b
GO
You can use the SQL Server 2014 Management Studio GUI to create, alter, and drop views. This section demonstrates the steps to do that.
The following are the steps to create views with the SQL Server 2014 Management Studio GUI:
- Open SQL Server 2014 Management Studio.
- In Object Explorer, expand the
Databasesfolder. - Expand the database in which you want to create the view.
- Right-click on the
Viewsfolder and select New View... from the context menu. The Add Table dialog box now opens, as shown in the following screenshot: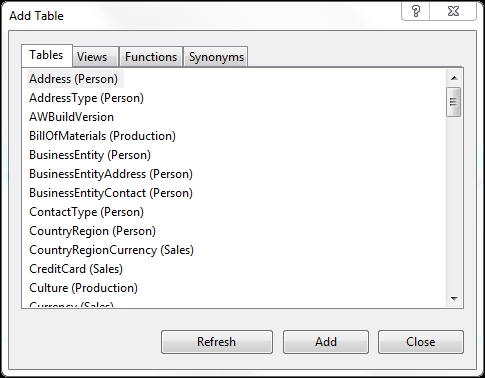
- Choose all the necessary base objects for your view query and then click on the Close button to close the Add Table dialog box. The Create View pane is now visible, as shown in the following screenshot:
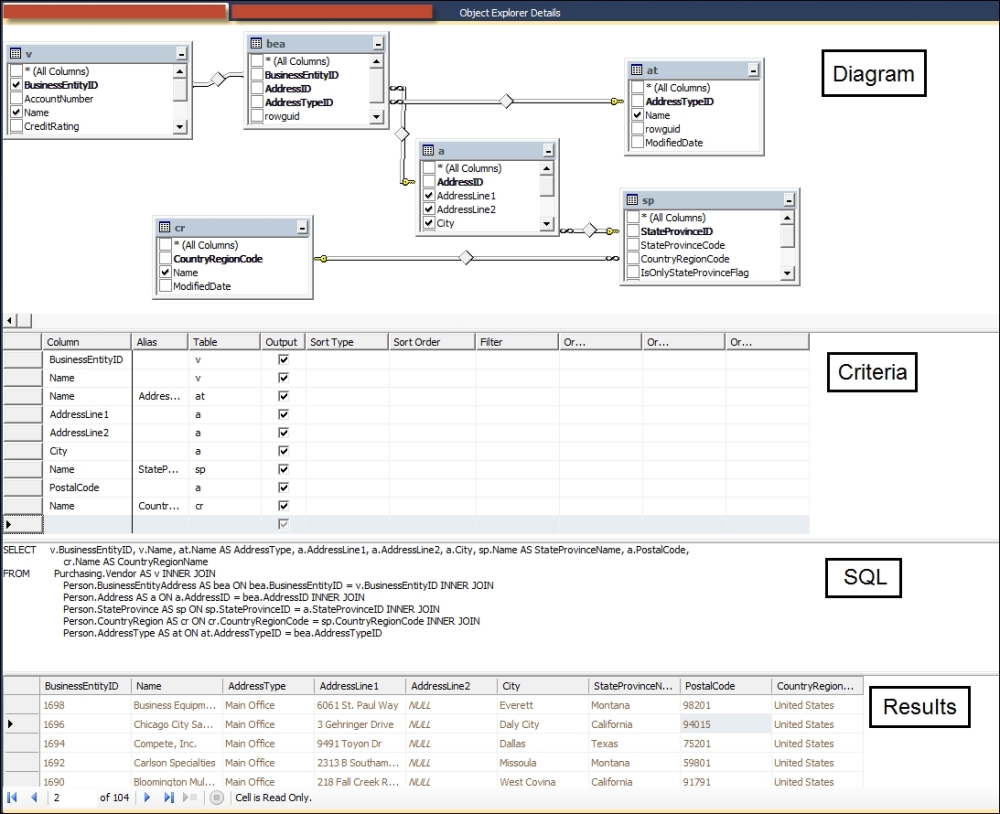
- You can use the Create View panes to design your views. For example, using the Create View pane, you can perform the following:
- Once satisfied with the changes, click on the save icon in the SSMS 2014 menu bar. This opens the Choose Name dialog box. Type in the name of the view and then click on OK to save the view.
- Finally, click on the X in the corner of the new view tab to close the view designer GUI.
To modify a view in SQL Server 2014 Management Studio, perform the following steps:
- Expand the
Viewsfolder. - Right-click on the view and choose Design from the context menu.
- Make the necessary changes to the Diagram, Criteria, and SQL panes.
- Save the view changes.
To drop a view in SQL Server 2014 Management Studio, perform the following steps:
- Expand the
Viewsfolder. - Right-click on the view and choose Delete.
- Click on OK to verify your action.
An indexed view is a persisted view that is stored on disk. The indexed view helps improve performance because, as long as the data in the base objects has not changed, SQL Server can process queries based on views without accessing the base objects. SQL Server Database Engine automatically updates the indexed view indexes if the data in the key columns changes.
When creating an indexed view, you should consider the following points:
- Create a view using
WITH SCHEMABINDING - The indexed view base objects cannot include other views
- You must reference base objects with two-part names (
schema.object_name) - You must create a clustered index on the indexed view
- The
SELECTstatement cannot include theUNIONkeyword or any subqueries - The
LEFT,RIGHT, orFULL OUTERjoins are not allowed for indexed view queries
To create an indexed view, first create a view. Use the following code to do so:
USE [AdventureWorks2012];
GO

CREATE VIEW [Sales].[vIndividualEmployeeIndexedViews]
WITH SCHEMABINDING
AS
SELECT  p.[Title] ,
p.[FirstName] + SPACE(1)
+ p.[MiddleName] + SPACE(1)
+ p.[LastName] AS [FullName] ,
e.[JobTitle] ,
d.[Name] AS [Department] ,
d.[GroupName] ,
dhist.[StartDate]
FROM [HumanResources].[Employee] e
INNER JOIN [HumanResources].[EmployeeDepartmentHistory] dhist
ON e.[BusinessEntityID] = dhist.[BusinessEntityID]
AND dhist.[EndDate] IS NULL
INNER JOIN [Person].[Person] p
ON p.[BusinessEntityID] = e.[BusinessEntityID]
INNER JOIN [HumanResources].[Department] d
ON dhist.[DepartmentID] = d.[DepartmentID];
GO
Then, using the following code, create a clustered index on the view to make it an indexed view:
USE [AdventureWorks2012];
GO

CREATE UNIQUE CLUSTERED INDEX ixc_EmployeeList ON [Sales].[vIndividualEmployeeIndexedViews]
([FullName], [JobTitle], [StartDate]);
GO