
Appendix C
Diagnostic Tools
As a Systems Security Certified Practitioner, you may be expected to use various tools when evaluating situations or solving problems. For example, analysis tools such as the Microsoft Password Checker are very handy to use during a user awareness training presentation. This tool drives home the point concerning the use of adequate passwords.
Although the use of these tools is not covered on the SSCP examination, it is advisable to review all of the tools available from Microsoft and other sources that may assist you in everyday problem analysis.
Microsoft Baseline Security Analyzer
Microsoft Baseline Security Analyzer (MBSA) lets administrators scan local and remote systems for missing security updates as well as common security misconfigurations. It offers a way for security administrators to form a vulnerability analysis on Windows-based PCs. It is a free tool that must be downloaded from Microsoft. It may be used to scan a single computer or several computers, and the administrator can choose to scan remote computers.
Using the Tool
In this exercise, you will download the Microsoft Security Baseline Analyzer and use it to scan your workstation.
- Click the Download button on this page at
www.microsoft.com/en-us/download/details.aspx?id=7558 - Select the version by placing a check mark in the box to the left (Figure C.1). Then click the Next button.

Figure C.1 Select an MBSA download version
- To enable the Microsoft Security Baseline Analyzer to scan a workstation once it has been downloaded, proceed with the following steps.
- Start the Microsoft Security Baseline Analyzer.
- Depending on your version of Windows, you may be prompted to confirm that you want to really run this. Choose Yes to continue Figure C.2. (You must have administrator rights on your PC to run MBSA.)
- Click Scan A Computer (Figure C.2).

Figure C.2 MBSA selection choices
- Notice that the computer's name will be inserted into the top box. You may also select the computer of your choice by inputting an IP address (Figure C.3).

Figure C.3 Select a device to scan.
To begin the scan, click the Start Scan button.
At the end of the scan, you will be presented with a report. The default will be to display the worst score first. Figure C.4 illustrates a saved report showing a number of security updates missing.

Figure C.4 Scanning report with errors
- View the report details. Items identified are classified in the various sections.
- Experiment by scanning other computers to view the report details (Figure C.4). If an item has a link titled How To Correct This, click it and examine the issue, solution, and instructions.
- Exit Microsoft Security Baseline Analyzer.
Microsoft Password Checker
Passwords are usually used as the first choice as an authentication mechanism during a logon procedure. They represent the “something you know” authentication factor. Many organizations have a password policy that specifies the criteria to be used to create a password. Many of these policies indicate that passwords should be at least eight characters long, and the longer the better. The strongest passwords include uppercase and lowercase letters, numerals, punctuation marks, and special symbols.
Users should be advised that the best passwords are actually passphrases. For instance, the phrase Igrewupat1604Sylvandrive is a personal passphrase I might remember. It also provides enough characters that it would take in excess of 20 million years for current computers to determine it through brute force.
Using the Tool
In this exercise, you will navigate to the Microsoft Safety & Security Center web page and use the Microsoft password Checker.
- Access the Microsoft Safety & Security Center page at www.microsoft.com/security/pc-security/password-checker.aspx
- Enter your password in the password box. The strength meter below the box will indicate the relative strength of the password (Figure C.5).
This is an excellent tool to use during user awareness training classes. You will illustrate to your users how to gauge the effectiveness of their passwords. Not only will this apply to passwords used in the workplace, but it will also instruct them on how to construct safe passwords for their personal accounts.

Figure C.5 Using Microsoft Password Checker
Internet Explorer Phishing and Malicious Software Filter
Internet Explorer's SmartScreen Filter analyzes web pages as you browse the Internet. It searches for characteristics that might be suspicious. It does this by checking sites that you visit against a dynamic list of reported phishing and malicious software sites. SmartScreen Filter will also check files that are downloaded against the list of reported software and programs that are known to be unsafe. If the filter detects the signature of a suspicious website or malicious software, it will display a message giving you the opportunity to comment and will advise you to proceed to the site using caution.
Using the Tool
In this exercise, you will enable the Internet Explorer SmartScreen Filter to analyze web sites that you visit.
- Start Internet Explorer, click Tools
 Internet Options, and choose the Advanced tab on the top right.
 - Scroll down to the Security section (Figure C.6).

Figure C.6 Internet Options advanced settings
- Under this section, find Enable SmartScreen Filter and place a check mark in the box. Click OK.
Manage Internet Cookies
Cookies are small text files that websites and advertisers placed on your computer. They used to contain your browsing patterns, shopping history, identification information, and other specific information about your preferences. The advantage of cookies is that websites will know your preferences based upon your last visit. For instance, forms might be prefilled with information so you may not have to sign on every time you visit a site. Cookies specifically from advertisers, referred to as third-party cookies, allow the advertisers to obtain a tremendous amount of your information. Besides tracking your purchasing preferences on their site, they could monitor your search habits, web site navigation, purchasing activities and many other items such as product returns or typical amounts spent on other web sites. This is information that you may not want them to know.
Using the Tool
In this exercise, you will establish privacy settings in Internet Explorer to manage both first-party as well as advertiser third-party cookies.
- Within Internet Explorer, click Tools Internet Options and choose the Privacy tab (Figure C.7).

Figure C.7 Internet Options Privacy tab
- Click the Advanced button to open the Advanced Privacy Settings dialog (Figure C.8).

Figure C.8 Advanced Privacy Settings dialog
- Check the Override Automatic Cookie Handling box.
- Choose Accept for First-Party Cookies.
- Choose Block for Third-Party Cookies.
- Check the Always Allow Session Cookies box.
- Click OK.
- Click OK again to exit Internet Options.
Observing Logs with Event Viewer
Windows workstations automatically record many events and log files. Event Viewer is a Windows tool that you can use to view these log files. It can be useful when troubleshooting system problems and errors such as programs failing to start as expected or updates failing to download automatically.
Using the Tool
In this exercise, you use the Event Viewer in Windows to observe Windows log files.
- Click the Start button and choose Control Panel System and Security (Figure C.9).

Figure C.9 Windows Control Panel
- Under Administrative Tools, click View Event Logs. The Event Viewer window is shown in Figure C.10.
- In the left panel, select Windows Logs.
- In the pop-up window, double-click Application.

Figure C.10 Event Viewer
- You'll see a list of events and errors (Figure C.11). You can click any event or error for detailed information.

Figure C.11 Event Viewer showing events and errors
Viewing a Digital Certificate
You learned in Chapter 7, “Domain 5: Cryptography,” that certificates are issued by third-party trusted certificate authorities and contain the owner's public key and other information about the owner. The certificate authority digitally signs the certificate to prove authenticity and nonrepudiation.
The certificate authority also provides a hash value, referred to on the certificate as a fingerprint, that can be used to validate certificate integrity. A typical web browser maintains dozens of certificates, and certificates can be added either automatically or manually when you are visiting other websites for the first time. Certificates can be easily viewed, installed, or deleted.
Using the Tool
There are two methods that can be used access certificates. To view the certificate associated with an e-commerce website, follow these steps:
- Within Internet Explorer 9 or above, go to a website such as Amazon.com and log in if you have an account.
- Once you have logged in, click the lock icon to the right of the URL.
- Then click View Certificates to open the dialog shown in Figure C.12.

Figure C.12 Certificate properties
- On the dialog, choose the Details tab on the top menu.
-
Scroll down to and click Public Key.
All of the hexadecimal characters in the text box represent the public key contained on this certificate.
-
Click other fields within the Details tab.
Notice that the issuer for the Amazon.com site is VeriSign. VeriSign is therefore the certificate authority. Clicking Subject will present the information concerning the public key owner, in this case Amazon.com, Inc.
To view all of the certificates that are on your PC, do the following:
- To open Certificate Manager, click the Start button.
- In the search box, enter certmgr.msc to open the Windows Certificate Manager (Figure C.13).

Figure C.13 Windows Certificate Manager
- Click Trusted Root Certification Authorities Certificates (Figure C.14).

Figure C.14 Certificates of trusted root certification authorities
Monitoring PC Activities with Windows Performance Monitor
Windows Performance Monitor is used to examine how programs and applications you run affect your computer's performance. You can view activities in real time or collect logs for later analysis. Windows Performance Monitor uses performance counters that can be used to create custom views of PC activities.
Using the Tool
In this exercise, you will use the Performance Monitor in Windows to observe the current PC activity.
- Open Performance Monitor by pressing the Windows button on the keyboard and typing R.
- Type perfmon.msc into the Run box. Figure C.15 shows the Performance Monitor window.
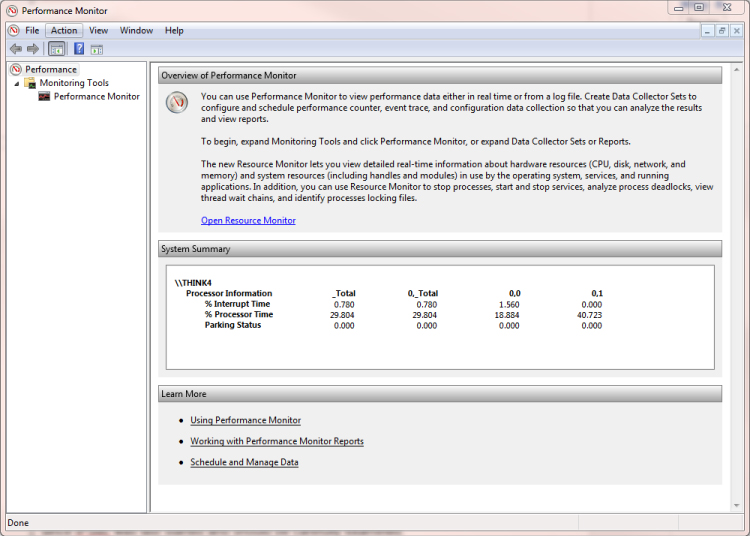
Figure C.15 Performance Monitor
-
Click the blue Open Resource Monitor link in the center of the Performance Monitor Window.
Resource Manager is shown in Figure C.16.

Figure C.16 Resource Monitor indicating usage levels
-
Notice the graphs of the current PC activity. Click across the tabs at the top to see different views.
The listing under CPU is a list of currently running services. You can see that it is dynamic and changing all of the time.
-
Click the down arrow on each of the three tabs below the CPU listing to expand them (Figure C.17).
This will provide a report on disk, network, and memory usage.

Figure C.17 Performance Monitor expanded view
Windows Performance Monitor may also be used to monitor specific applications and activities. You can track errors and watch the real-time performance of events as they transpire on the PC.
Analyzing Error Messages in Event Viewer
Analyzing log files has been a central method of determining problems within a system. Event Viewer is a Windows tool that allows you to view a number of log files and drill down to specific entries to identify potential problems.
Using the Tool
In this exercise, you will access Windows log files using Event Viewer. You will be able to observe events and sort critical errors in descending order.
- Click Start Control Panel System and Security Administrative Tools Event Viewer (Figure C.18).
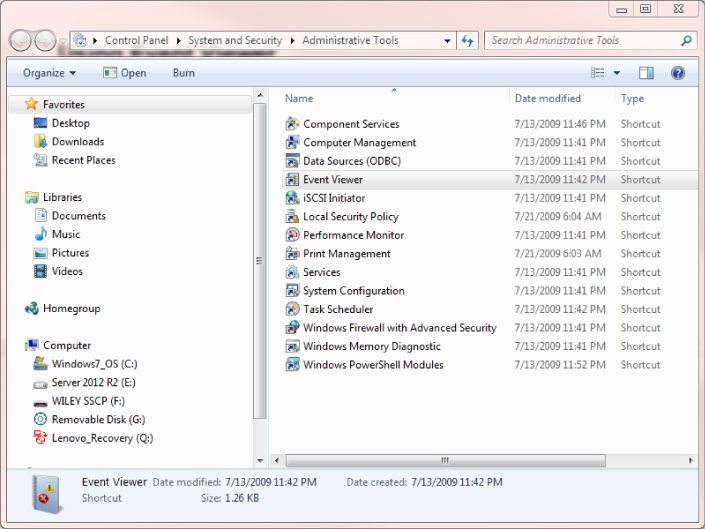
Figure C.18 Selecting Event Viewer from Control Panel
- Double-click Event Viewer. Figure C.19 shows the Overview and Summary page.

Figure C.19 Event Viewer Overview and Summary
- Expand Windows Logs in the left pane to open the panel shown in Figure C.20.

Figure C.20 Windows Logs
-
Click System. In the center pane, click the Level column heading.
This will sort the column and may take a couple of minutes to complete (Figure C.21). This will sort the events into descending order according to how critical they are.

Figure C.21 Summary of the system event errors
- Double-click one of the events. An Event Properties pop-up will appear with an explanation of the error condition (Figure C.22).

Figure C.22 Event properties
- Click the Details tab and expand System to view the error details (Figure C.23).

Figure C.23 Event details
Calculate Hash Values
Calculating a hash value is a primary method of determining the integrity of a message. The sender hashes their message to obtain a hash value. Messages are sent along with the hash value to the receiver. The receiver also hashes the message to obtain a second hash value. Upon comparison, if the hash values are the same, the receiver can be assured that the message has not changed in transit.
The same process can also be used when verifying the integrity of a message signed with a digital signature. When preparing a digital signature, the sender encrypts the hash value of the message with their private key. The receiver would have to use the sender's public key to decrypt the hash value. This would provide proof of origin as well as nonrepudiation, and at the same time the hash value would provide message integrity.
There are a number of different hash calculators on the Internet for free download.
Using the Tool
In this exercise, you will download a typical free calculator and explore processing a message to obtain a hash value.
- Download the free hash calculator from the following location:
http://sourceforge.net/projects/hash-calculator/
Figure C.24 shows the calculator in text mode.
Figure C.24 The MD2 Hash Calculator in text mode
- Expand the drop-down list to view the available hash algorithms (Figure C.25).
Notice that the SHA-XXX algorithms will produce a hash value with the corresponding number of bits. For instance, SHA-256 will produce a hash value of 256 bits.

Figure C.25 Choosing a hash algorithm
- Select a hash algorithm.
- Enter a message into the message box and click the Calculate Hash button.
Notice the resulting hash. Change the message by one character and view the new resulting hash. This proves that even if one character changes, the entire hash value changes, and therefore when compared with the sender's original hash value, it will be quite obvious that the hash values are not equal and therefore the message has changed (Figure C.26).

Figure C.26 Hash Calculator creating a hash value from a message