

|
TECHNOLOGY |

IN THE GREEK MYTH PYGMALION, A SCULPTOR CREATES A MARBLE STATUE, FALLS IN LOVE WITH IT, AND IT COMES TO LIFE. TODAY, THE MODERN WORLD IS IN LOVE WITH TECHNOLOGY AND THE INTERACTIVE DEVICES IT’S HELPED US CREATE.
In recent decades, we’ve brought ideas—that once seemed impossible—to life. Technology has improved our lives in many ways, but it is a medium that pushes back. Just as we’ve shaped technology, the products we’ve created have changed us and we continue to learn how to live with them.
Because technology is such an important part of our lives, it’s essential to understand some of the basic science and engineering that makes the modern world tick. Most technology is powered by electricity, which can be used to run motors, power computers, and light LEDs (light-emitting diodes).
In this unit, the labs are opportunities to try your hand at using technology to assemble electrical circuits, light LEDs, play with solar cells, make motors spin, and build simple robots.
“Creativity and science connect the dots for the technology of tomorrow. Through a year and a half of hilarious trial and error, we created a violin that the world has never seen before. The Hovalin is a 3-D printable violin for nerds, by nerds. Creating it was a labor of love, requiring knowledge of software, violin techniques, 3-D design, and the ability to embrace failure.”
—Kaitlyn Hova, UX developer, neuroscientist, violinist/composer, and cofounder of Hova Labs
|
LIGHT-UP CREATURE |

You’ve seen light-emitting diodes (LEDs) in your smartphone as indicator lights, in streetlights, on a computer power button, and as lights on a microwave. In this experiment from the youth development nonprofit Mouse, we’ll create an LED light-up creature to learn how simple circuits work. In this activity, you’ll design a monster, animal, or any type of creature and make it light up by creating a circuit out of LED lights and tiny coin cell batteries. To learn more about Mouse, see here or visit mouse.org.
SAFETY TIPS AND HINTS
![]() Coin cell batteries and LEDs are choking hazards. Young children should have adult supervision when doing this activity.
Coin cell batteries and LEDs are choking hazards. Young children should have adult supervision when doing this activity.
![]() Short circuit warning! Make sure the positive and negative legs of the LED don’t touch each other! They should be completely separate. If they touch, it creates a short circuit, which will break the LED light!
Short circuit warning! Make sure the positive and negative legs of the LED don’t touch each other! They should be completely separate. If they touch, it creates a short circuit, which will break the LED light!
MATERIALS
![]() 2 LED lights
2 LED lights
![]() 2 (3 volt) coin cell batteries
2 (3 volt) coin cell batteries
![]() Tape
Tape
![]() 1 paper cup (something to make the body of the creature)
1 paper cup (something to make the body of the creature)
![]() Craft materials, for example:
Craft materials, for example:
• Scissors
• Markers
• Construction paper
• Pipe cleaners
• Craft sticks
• Play clay
• Plastic forks or spoons
PROTOCOL
1. The 2 legs of your LED light are made of conductive metal and help you connect your LED light within the circuit. The longer leg is positive (+) and the shorter end is negative (–) or “ground.”
2. Try to light your LED by touching the coin cell battery. The long LED leg needs to touch the positive side (+) of the battery, while the short LED leg needs to touch the negative (–) side of the battery (fig. 1). If it didn’t light, try again.
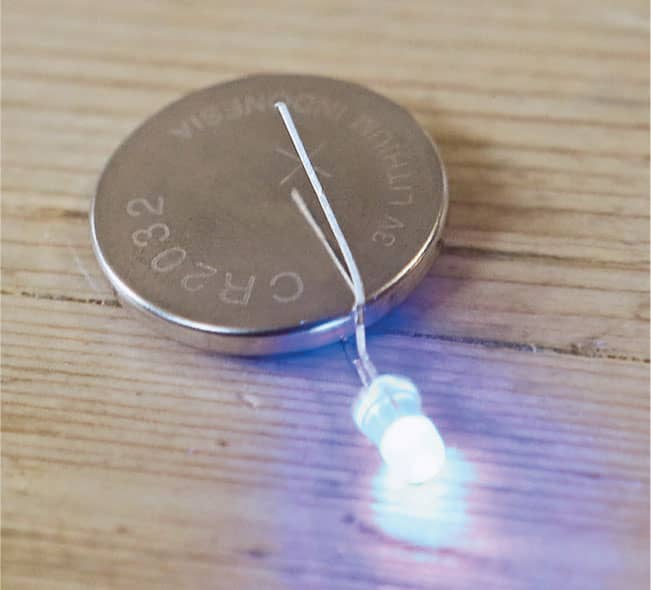
Fig. 1: Try to light your LED.
3. Design your creature: The creature you design will have at least 2 LED lights—the rest is up to you. Before you start building, what type of creature are you going to make? Make a sketch, if you like (fig. 2).
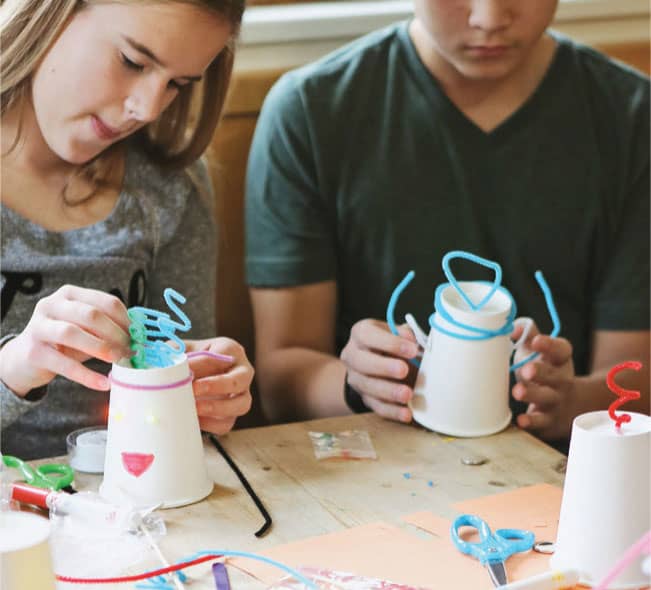
Fig. 2: Design and start building your creature.
4. Poke the legs of the LED lights through the cup where you want the lights to be. You can use scissors or a pencil to make the holes, if it helps (fig. 3).
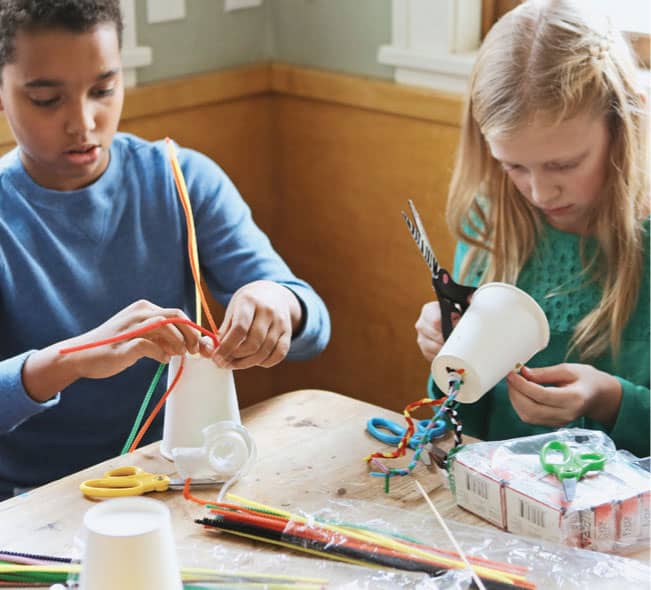
Fig. 3: Make holes for the LEDS.
5 Place the LED’s positive and negative legs on the matching sides of the battery and use tape to keep it in place. Place both of your LEDs this way (fig. 4).

Fig. 4: Tape the LEDs to the batteries.
6. Use craft supplies or whatever you can find around your space to design your creature. Take a photo of your creature (fig. 5).
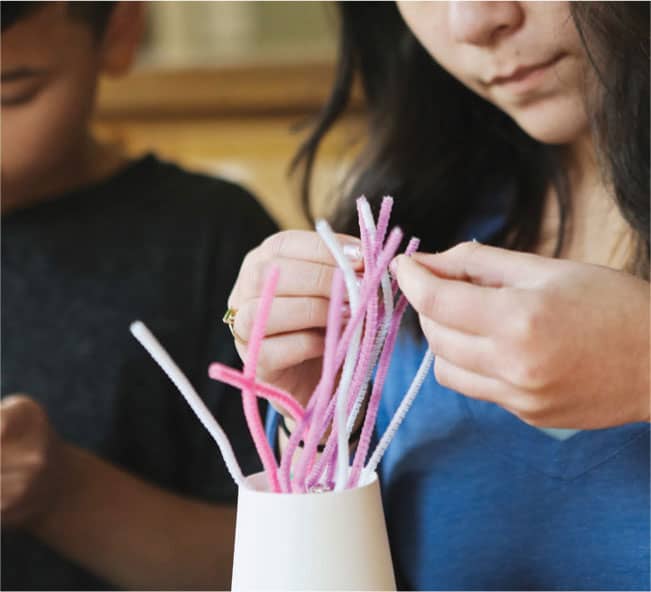
Fig. 5: Be creative with your decorations!
CREATIVE ENRICHMENT
![]() How would you get the LED to light up if the battery had to be placed 3 feet (1 m) away?
How would you get the LED to light up if the battery had to be placed 3 feet (1 m) away?
![]() How many LED lights can you connect to 1 (3 volt) battery? Try it!
How many LED lights can you connect to 1 (3 volt) battery? Try it!
|
HOMEMADE DISCO BALL |

Dance the night away under the swirling stars created by a disco light you built yourself.
SAFETY TIPS AND HINTS
![]() Young children should have adult supervision around batteries.
Young children should have adult supervision around batteries.
MATERIALS
![]() Glue
Glue
![]() Sequins or large glitter
Sequins or large glitter
![]() Styrofoam ball
Styrofoam ball
![]() Small low-speed DC (direct current) motor or gear motor
Small low-speed DC (direct current) motor or gear motor
![]() Battery snaps or alligator clip test leads
Battery snaps or alligator clip test leads
![]() Tape
Tape
![]() Flashlight
Flashlight
![]() AA battery holder
AA battery holder
![]() 2 AA batteries
2 AA batteries
PROTOCOL
1. Use glue to cover a Styrofoam ball with sequins (fig. 1).

Fig. 1: Glue sequins onto a foam ball.
2. Attach the ball to the rotating part of the gear motor. If you use glue, be careful not to glue any moving parts and only use a little bit, so you can remove the ball.
3. Attach the motor to a battery snap or alligator clip test leads.
4. Put the batteries in the battery holder and test the motor by clipping the snaps or alligator clips to the metal terminals of the battery holder (fig. 2).

Fig. 2: Attach the foam ball to a gear motor and hook the motor to a battery snap or alligator clip test leads.
5. Tape the battery holder next to the motor under a countertop or onto a surface (fig. 3).

Fig. 3: Determine where to position the flashlight.
6. Shine a flashlight on the disco ball from several angles to determine how you want to position it. Tape it into position using duct tape and turn it on (figs. 3 and 4).

Fig. 4: Duct tape everything into place.
7. Attach the battery holder to the motor using the alligator clips and enjoy the show (fig. 5).
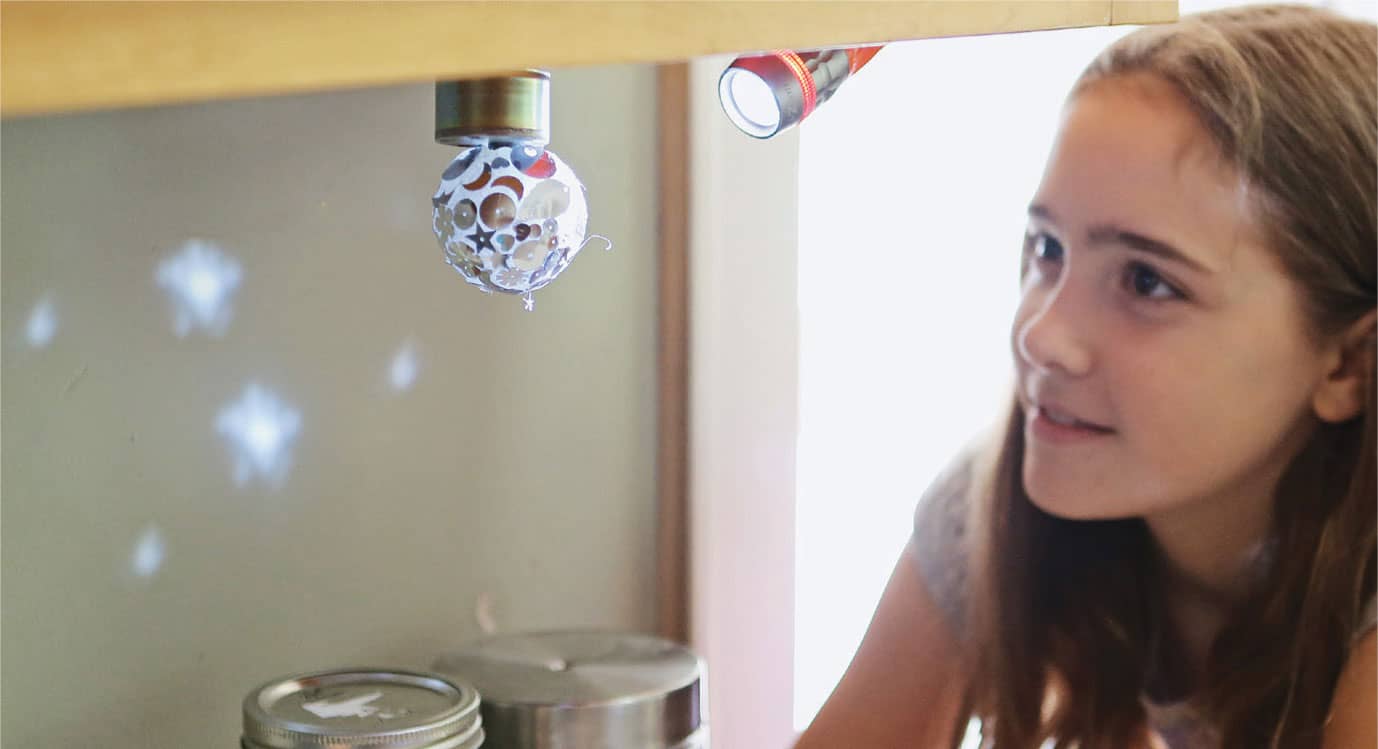
Fig. 5: Enjoy the disco light!
CREATIVE ENRICHMENT
![]() Make different sizes of disco balls to attach to the motor to see what happens.
Make different sizes of disco balls to attach to the motor to see what happens.
![]() Draw a light source in one corner of a piece of paper and an apple in the center of the page. Try to draw light beams from the light source to the apple to see where they would reflect. Where would the shadows fall? Try the same thing, but draw light rays hitting waves on a lake. How would you paint this? How does the time of day affect the light?
Draw a light source in one corner of a piece of paper and an apple in the center of the page. Try to draw light beams from the light source to the apple to see where they would reflect. Where would the shadows fall? Try the same thing, but draw light rays hitting waves on a lake. How would you paint this? How does the time of day affect the light?
|
SOLAR LIGHT FIREFLIES |

Harness the Sun’s energy to create glowing garden decorations.
SAFETY TIPS AND HINTS
![]() Adult supervision is required when using a glue gun.
Adult supervision is required when using a glue gun.
MATERIALS
![]() Small LED solar garden light
Small LED solar garden light
![]() 1 or 2 sparkly pipe cleaners or a small piece of aluminum foil
1 or 2 sparkly pipe cleaners or a small piece of aluminum foil
![]() Fishing line
Fishing line
![]() Scissors
Scissors
![]() Glue gun and glue sticks
Glue gun and glue sticks
PROTOCOL
1. Remove the plastic cover from a garden solar light. Turn the solar light switch to ON, if it has one (fig. 1).
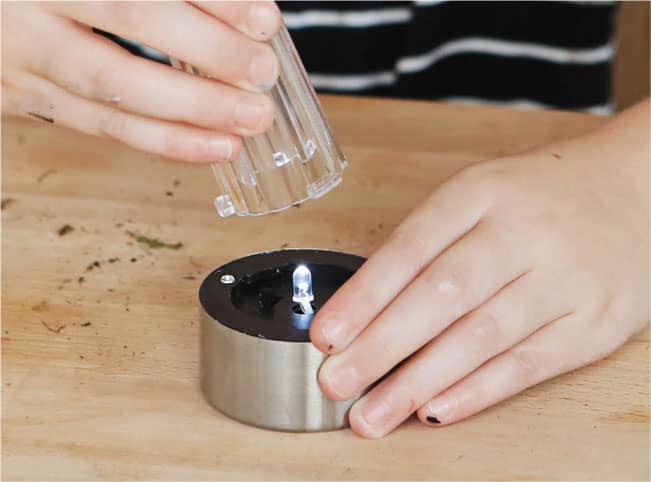
Fig. 1: Remove the plastic cover from a small solar garden light.
2. Bend a piece of pipe cleaner or aluminum foil to make it look like a small firefly that will fit in the plastic part of the light. Attach it to some fishing line using a glue gun (fig. 2).

Fig. 2: Make a tiny firefly using a metallic pipe cleaner and attach it to fishing line.
3. Cut the fishing line to a length that will allow the attached firefly to dangle from a spot near the LED, down into the plastic chamber.
4. Attach the fishing line to the spot near the LED using the glue gun (fig. 3). Reattach the cover.
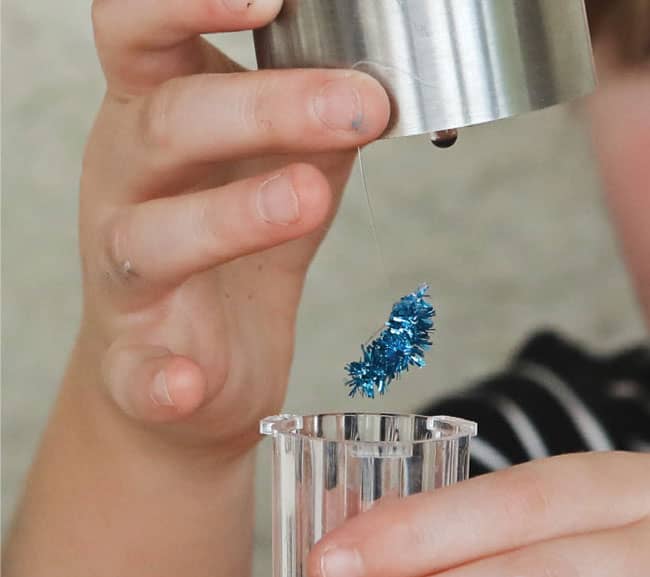
Fig. 3: Attach the fishing line to the light and reattach the cover.
5. Decorate the light and hang the firefly light from a tree branch or put it in a fairy garden (fig. 4).

Fig. 4: Decorate the light. Hang it from a tree branch or put it in a fairy garden.
6. Find a spot where it gets some sunlight during the day (fig. 5).
Fig. 5: Find a sunny spot for your solar firefly.
7. Enjoy the glow when the sun goes down (fig. 6).
Fig. 6: Watch your firefly light up when the sun goes down.
CREATIVE ENRICHMENT
![]() Create another project with a solar light. Can you design a light-up snow globe? Could you make another piece of garden art that is illuminated at night?
Create another project with a solar light. Can you design a light-up snow globe? Could you make another piece of garden art that is illuminated at night?
|
GRAPHITE CIRCUITS |

Create a work of art that conducts enough electricity to light an LED.
SAFETY TIPS AND HINTS
![]() Adult supervision is required for this lab.
Adult supervision is required for this lab.
![]() School pencils will not work well for this lab. Soft graphite pencils and crayons can be found in art stores or ordered online.
School pencils will not work well for this lab. Soft graphite pencils and crayons can be found in art stores or ordered online.
MATERIALS
![]() Printer paper
Printer paper
![]() 1 graphite pencil or crayon (softer is better; we used a #9B graphite crayon)
1 graphite pencil or crayon (softer is better; we used a #9B graphite crayon)
![]() 2 alligator clip test leads
2 alligator clip test leads
![]() Several small LEDs
Several small LEDs
![]() 1 (9 volt) battery
1 (9 volt) battery
PROTOCOL
1. Gather your supplies (fig. 1).
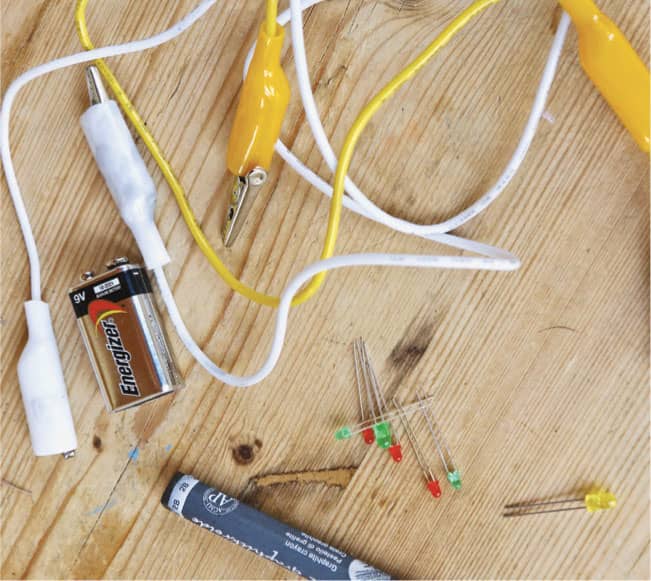
Fig. 1: Gather your supplies.
2. On a piece of printer paper, draw a thick, black rectangle about 1/2 inch (1 cm) wide and 11/2 inches (4 cm) long using a graphite pencil or crayon. Color over it again and again until you create a solid layer of graphite. This lab won’t work if there are any spaces or gaps (fig. 2).

Fig. 2: Draw and trace with graphite.
3. Connect one end of each alligator clip to one of a battery terminal.
4. Clip the other end of the alligator clip attached to the positive (+) battery terminal to the long leg of an LED bulb.
5. Touch the free wire of the LED bulb to the right side of the graphite bar you drew (fig. 3).
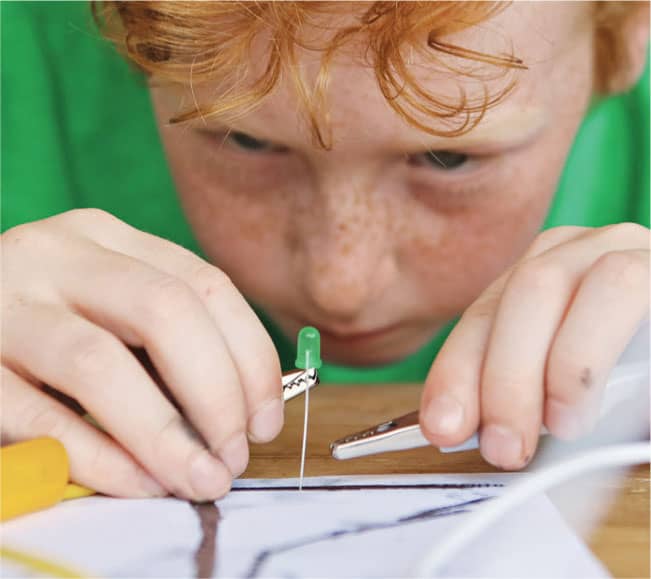
Fig. 3: Touch the free LED bulb wire to the graphite bar.
6. Touch the alligator clip attached to the negative (–) battery terminal to the left side of the graphite bar you drew (fig. 4).
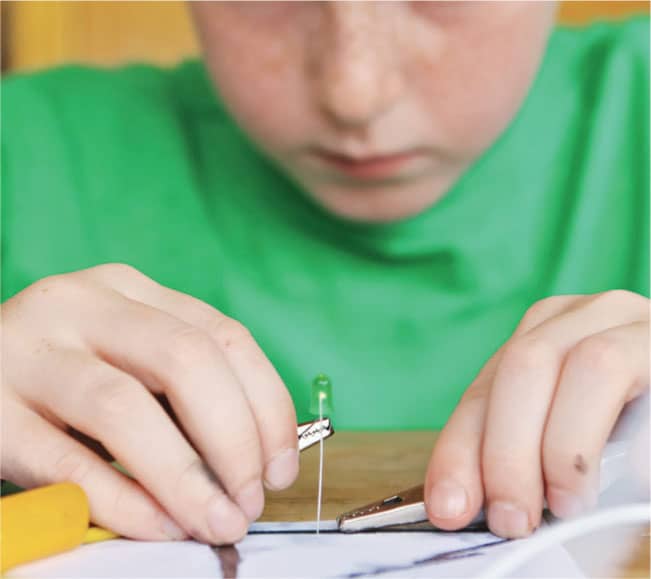
Fig. 4: Touch the metal alligator clip to the graphite bar on the other side.
7. Move the LED wire closer to the alligator clip to see what happens. The light should get brighter as you decrease the distance. Try not to touch the bulb directly to the clip (fig. 5).
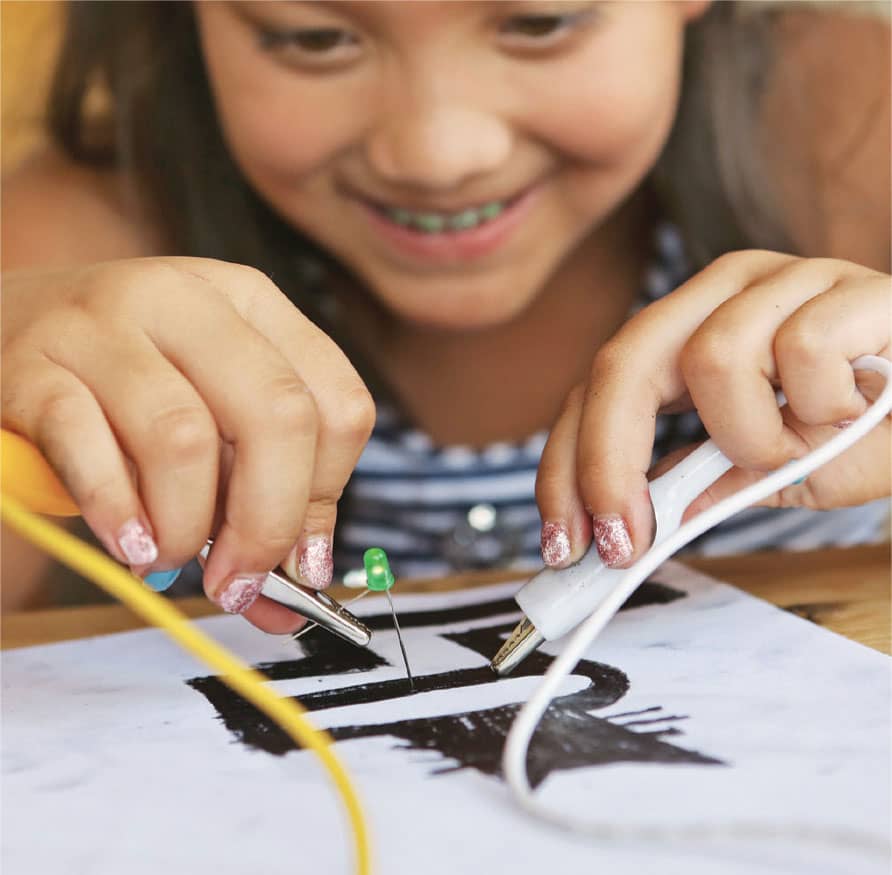
Fig. 5: Does the bulb get brighter as you move it closer to the clip?
8. If the bulb doesn’t light up, switch the positive alligator clip to the other leg of the LED bulb and try it again. If it still doesn’t work, make sure there are no gaps in the line you drew and then try a different LED.
9. Make some new drawings with the graphite pencil or crayon. Can the electrical current travel around corners or curves? What happens if you erase part of the drawing to create a gap?
CREATIVE ENRICHMENT
![]() Use graphite to create a light-up comic strip or comic book with characters or features you can use as circuits to light LEDs.
Use graphite to create a light-up comic strip or comic book with characters or features you can use as circuits to light LEDs.
|
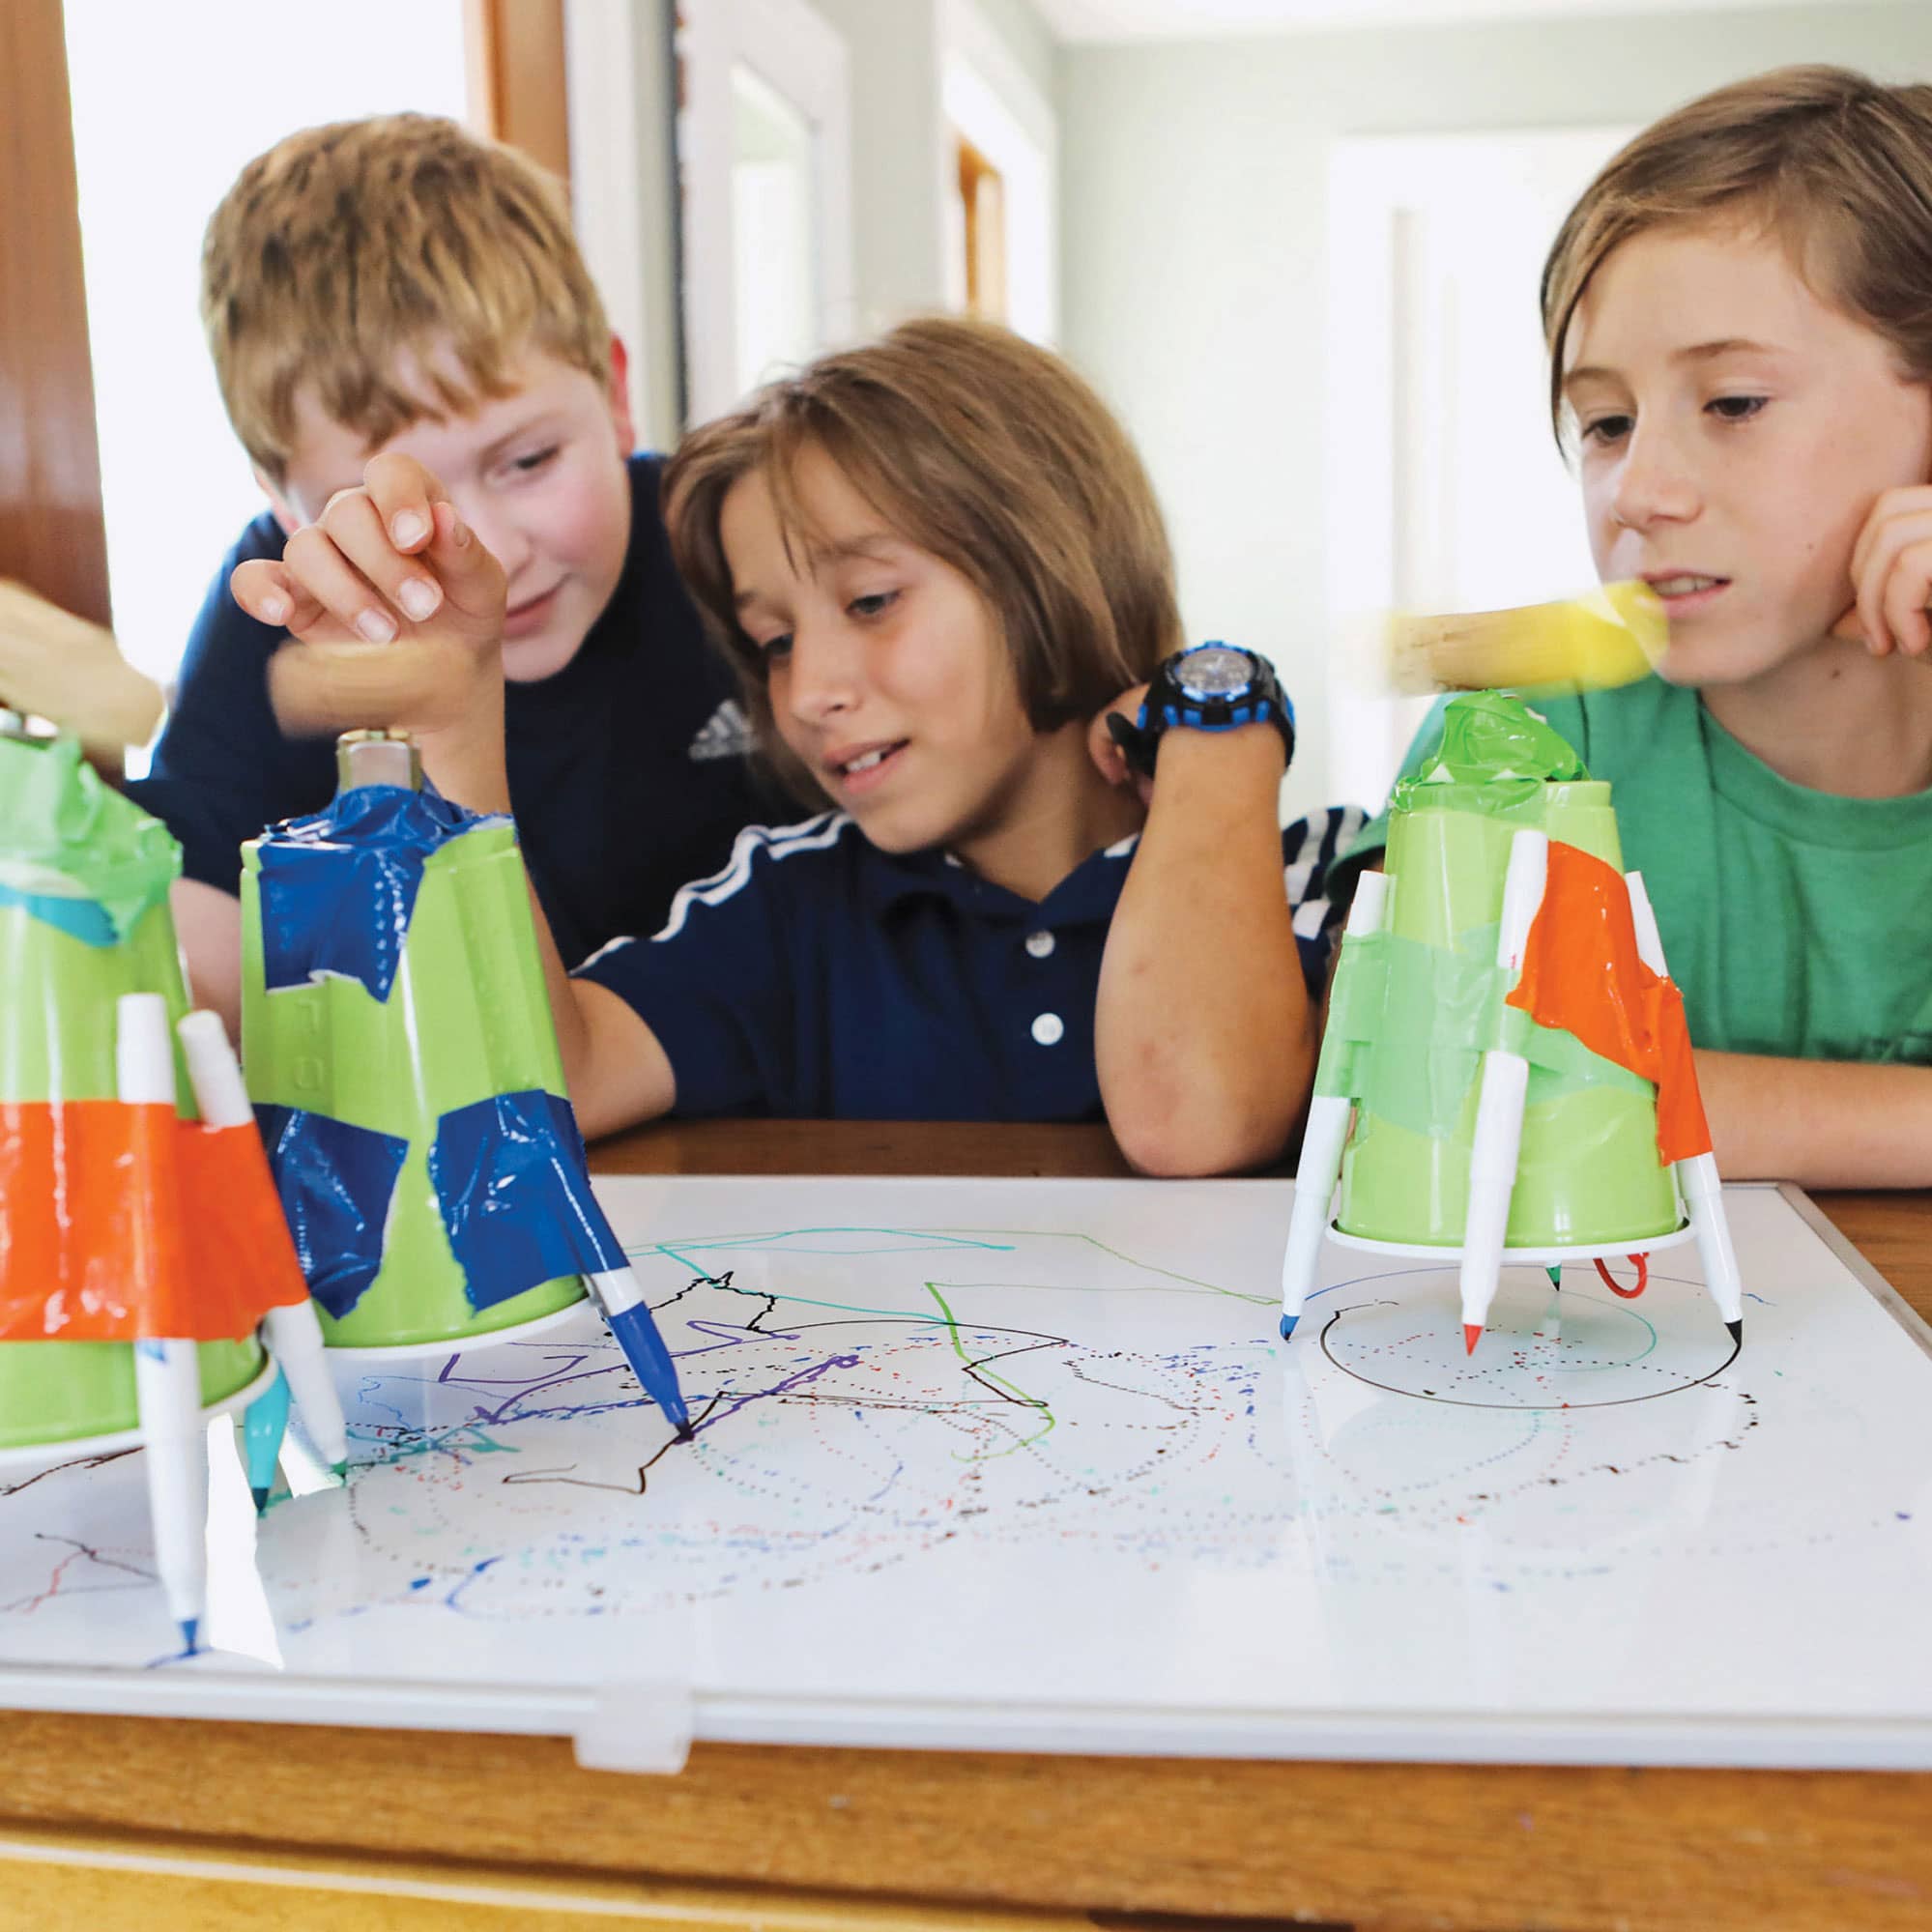
ART BOT |

In this lab, you build a simple robot that can draw.
SAFETY TIPS AND HINTS
![]() Adult supervision is required when using a utility knife.
Adult supervision is required when using a utility knife.
![]() Test your motor by attaching the battery clip or the alligator clips to the battery holder terminals. If it’s working, the cork should spin. If not, try switching the alligator clips to the opposite terminals.
Test your motor by attaching the battery clip or the alligator clips to the battery holder terminals. If it’s working, the cork should spin. If not, try switching the alligator clips to the opposite terminals.
MATERIALS
![]() 1 cork
1 cork
![]() 1 (3 volt) toy or hobby DC (direct current) motor
1 (3 volt) toy or hobby DC (direct current) motor
![]() 1 (18 fluid ounce, or 535 ml) plastic cup
1 (18 fluid ounce, or 535 ml) plastic cup
![]() Scissors or utility knife
Scissors or utility knife
![]() 2 alligator clip test leads
2 alligator clip test leads
![]() Duct tape
Duct tape
![]() AA battery holder
AA battery holder
![]() 2 AA batteries
2 AA batteries
![]() Battery clip (optional)
Battery clip (optional)
![]() Dry erase board markers or washable markers
Dry erase board markers or washable markers
![]() Dry erase board or paper
Dry erase board or paper
![]() Decorating objects such as markers, plastic eyes, pom-poms, and pipe cleaners
Decorating objects such as markers, plastic eyes, pom-poms, and pipe cleaners
PROTOCOL
1. Attach a cork to the moving part of the toy motor.
2. Cut a hole in the bottom of the cup large enough for the motor terminals to poke through, but smaller than the motor itself. Be sure the moving part of the motor points straight up.
3. Attach the alligator clips to the motor by clipping them onto wires or directly onto the motor terminals (fig. 1).
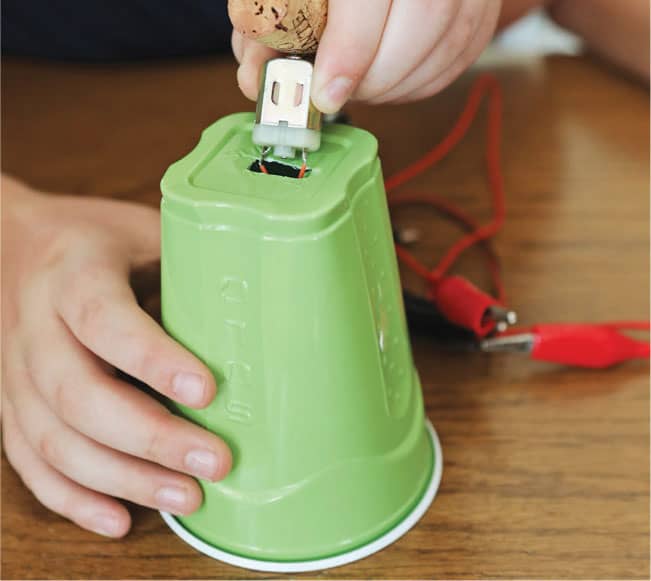
Fig. 1: Attach the motor to alligator clips through a hole in the top of a plastic cup.
4. Tape the connections and tape the motor to the top of the cup so the cork can still spin (fig. 2).
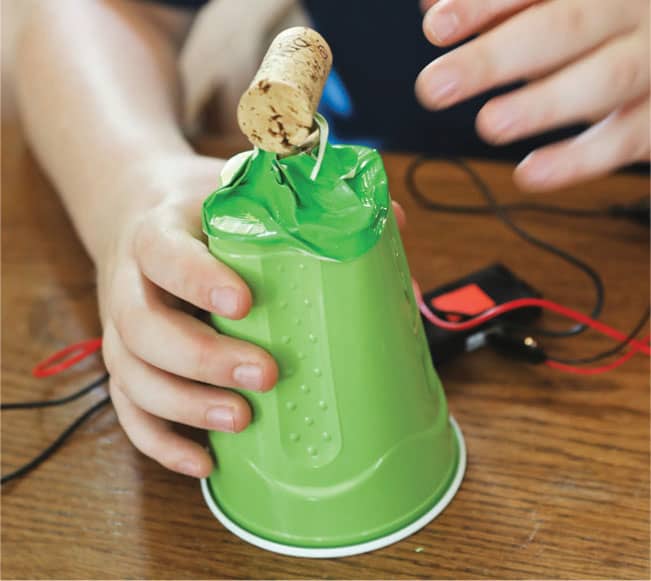
Fig. 2: Tape the connections and the motor to the cup so it can still spin.
5. Secure an AA battery holder to the inside of the cup using duct tape and insert the batteries (fig. 3).
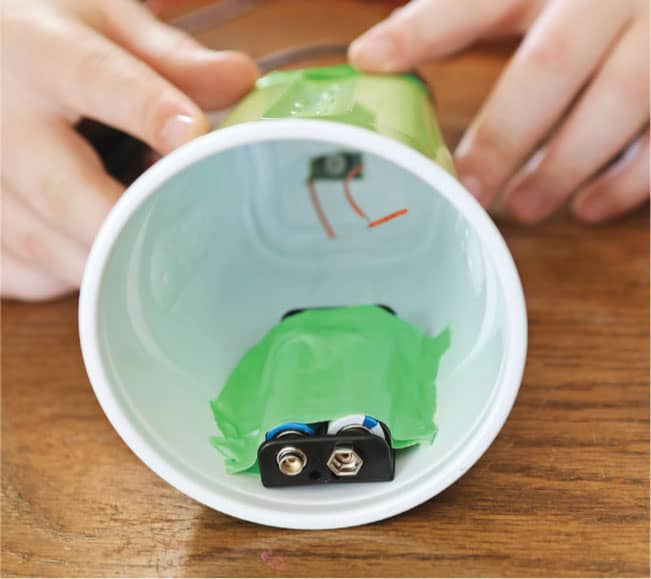
Fig. 3: Tape an AA battery holder to the inside of the cup and insert the batteries.
6. Attach a battery clip (if using) to the free ends of the alligator clips (fig. 4). Tape the wires inside the cup.
Fig. 4: Secure alligator clips and attach a battery clip (optional).
7. Tape 3 or 4 markers to the outside of your cup, marker-side down. Space them evenly and try to attach them so they extend an equal distance from the bottom of the cup. Connect the motor to the battery holder using the clips or the battery snap (fig. 5).

Fig. 5: Tape markers to the outside of the cup and attach the clip to the battery to start.
8. Remove the lids from the markers and set your art bot on a piece of paper or a dry erase board.
9. Watch your art bot go. Does it create dots or lines?
CREATIVE ENRICHMENT
![]() Experiment with moving the cork to see how that changes the balance and affects your bot’s ability to draw. How does moving the markers to different heights on the side of the cup affect balance and drawing ability?
Experiment with moving the cork to see how that changes the balance and affects your bot’s ability to draw. How does moving the markers to different heights on the side of the cup affect balance and drawing ability?
|
DESKTOP BEAD BUBBLER |

Use an aquarium pump to design a piece of moving art.
SAFETY TIPS AND HINTS
![]() Plastic beads are a choking hazard; young children should have adult supervision when doing this project.
Plastic beads are a choking hazard; young children should have adult supervision when doing this project.
![]() Poke holes near the top of the bottle before turning the pump on, so air can escape easily.
Poke holes near the top of the bottle before turning the pump on, so air can escape easily.
![]() Wear safety glasses when making a hole in the bottle cap.
Wear safety glasses when making a hole in the bottle cap.
MATERIALS
![]() Protective glasses
Protective glasses
![]() Hammer
Hammer
![]() Nail
Nail
![]() Clear 2 quart (2 L) bottle with cap
Clear 2 quart (2 L) bottle with cap
![]() Screwdriver (optional)
Screwdriver (optional)
![]() 2 to 3 feet (30 to 60 cm) flexible tubing to fit the pump
2 to 3 feet (30 to 60 cm) flexible tubing to fit the pump
![]() Rubber band
Rubber band
![]() Rock or weight small enough to fit through the mouth of the 2 quart (2 L) bottle
Rock or weight small enough to fit through the mouth of the 2 quart (2 L) bottle
![]() Small air pump, such as an aquarium pump
Small air pump, such as an aquarium pump
![]() Water
Water
![]() Beads
Beads
![]() Oil, such as vegetable oil
Oil, such as vegetable oil
PROTOCOL
1. Use a hammer and nail to make a hole in the center of the bottle cap (fig. 1).

Fig. 1: Use a nail to make a hole in the bottle cap.
2. If needed, use a screwdriver to make the hole large enough for the tubing.
3. Push the tubing through the hole in the lid.
4. With a rubber band, attach a small rock or weight to one end of the tubing.
5. Attach the other end of the tubing to the pump.
6. Push the weighted end (with the rock) of the tubing into the bottle so the rock or weight is suspend just above the bottom.
7. Fill the bottle halfway with water.
8. Add beads to the bottle.
9. Use the oil to fill the bottle almost to the top, leaving 3 to 4 inches (7.5 to 10 cm) below the threads for the cap (fig. 2). Screw the lid on.

Fig. 2: Add water, beads, and oil to the bottle.
10. Poke several holes in the air space at the top of the bottle, near the cap, so air can escape.
11. Plug the air pump in to start creating bubbles (fig. 3).
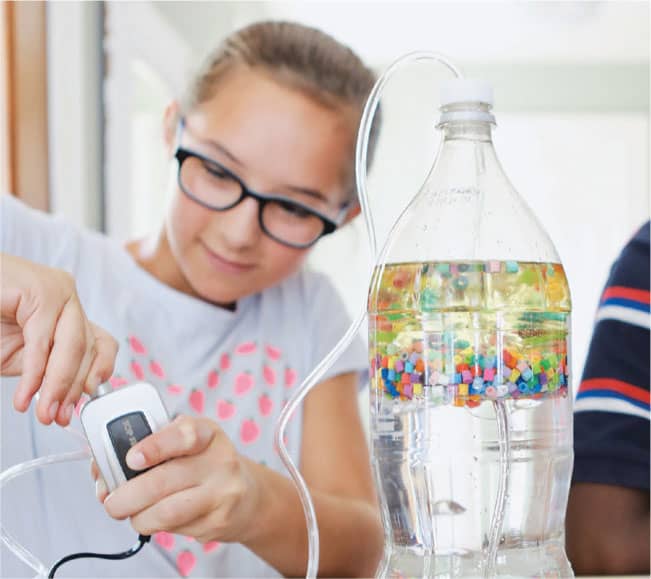
Fig. 3: Plug in the pump.
12. Guess what will happen to the oil, water, and beads when you add air bubbles to the mix (figs. 4 and 5).
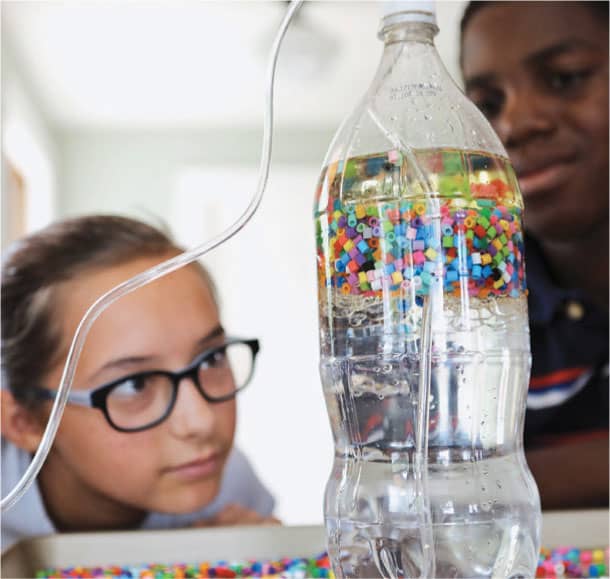
Fig. 4: See what happens.
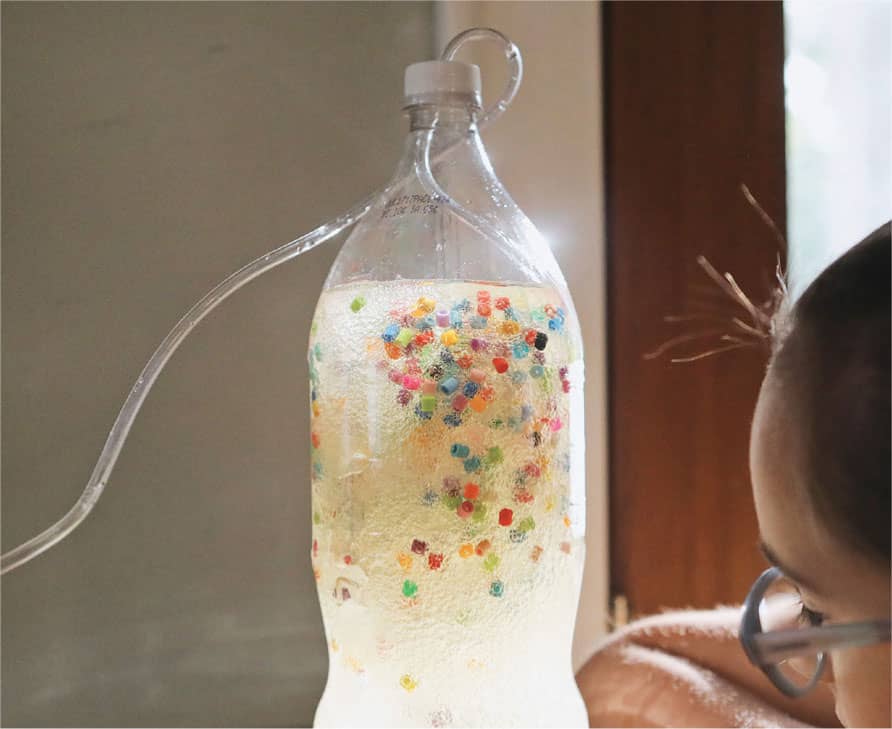
Fig. 5: Watch the beads move.
CREATIVE ENRICHMENT
![]() Try this experiment using different materials or different ratios of oil to water. What materials could you use to create lifelike fish that would move around in a bubbler like this one?
Try this experiment using different materials or different ratios of oil to water. What materials could you use to create lifelike fish that would move around in a bubbler like this one?
|
SEWABLE CIRCUITS |

Whip up some lighted textiles using conductive thread to complete a circuit.
SAFETY TIPS AND HINTS
![]() Young children should have adult supervision using sewing needles and coin cell batteries.
Young children should have adult supervision using sewing needles and coin cell batteries.
![]() To make this project simple, use a battery holder with a switch and a single LED. See steps 10 and 11 in this lab for instructions.
To make this project simple, use a battery holder with a switch and a single LED. See steps 10 and 11 in this lab for instructions.
![]() Be sure the thread connecting the positive (+) holes doesn’t touch or cross the thread connecting the negative (–) holes or your light won’t work.
Be sure the thread connecting the positive (+) holes doesn’t touch or cross the thread connecting the negative (–) holes or your light won’t work.
MATERIALS
![]() Ruler
Ruler
![]() Scissors
Scissors
![]() Sewing needle
Sewing needle
![]() Sewing thread
Sewing thread
![]() Sewable coin cell battery holder with an ON/OFF switch or a sewable coin cell battery holder
Sewable coin cell battery holder with an ON/OFF switch or a sewable coin cell battery holder
![]() Coin cell battery that fits into the battery holder
Coin cell battery that fits into the battery holder
![]() 1 or more sewable LEDs
1 or more sewable LEDs
![]() 1 or more pieces of heavy fabric, such as felt
1 or more pieces of heavy fabric, such as felt
![]() Uncoated sewable metal snaps (optional)
Uncoated sewable metal snaps (optional)
![]() 1 or 2 small pieces of fabric (optional)
1 or 2 small pieces of fabric (optional)
![]() Conductive thread
Conductive thread
![]() Embroidery hoop (optional)
Embroidery hoop (optional)
![]() Glue
Glue
PROTOCOL
1. Design your project. Decide where you want to place the battery holder and the LEDs. Be sure to leave enough room between them for several stiches. Remember, if you will be using snaps to connect the circuit, you can cover the battery holder with fabric as you finish up, but if the battery holder has a switch, you will need to be able to access it.
2. Use a sewing needle and sewing thread (nonconductive) to anchor a battery holder and sewable LED(s) onto the fabric—just make one or two loops through each hole (fig. 1).

Fig. 1: Anchor the battery holder and LED(s) onto the fabric.
3. If you’re using snaps, with sewing thread and a sewing needle, tack half a metal snap onto a separate small piece of fabric.
4. Cut a 12 inch (30 cm) piece of conductive thread and thread it through a sewing needle. Knot one end and pull it up through the positive (+) hole in the battery holder. Push it back down just outside the negative (+) hole. Repeat several times to form a tight connection between the holder and the thread. Be sure there is plenty of conductive thread contacting the metal. Do not cut the thread.
5. Using the same thread, make a running stitch (fig. 2) to sew a path to the positive (+) hole in the LED and sew around the negative (+) hole in the LED several times, as you did with the battery. Now, sew a running stitch to connect the positive (+) hole of a second LED, if you have one. Knot the thread and cut off the excess.

Fig. 2: Sew LED lights to the battery, to each other, and to a snap.
6. With a second 12 inch (30 cm) piece of conductive thread and using a running stitch that avoids touching any components, connect the negative (–) holes of the two LEDs. Continue a running stitch to one side and use the same thread to reinforce the snap on the small piece of fabric, sewing around the entire snap to form a good connection.
7. Cut a third 12 inch (30 cm) piece of conductive thread and use it to tack down the negative (–) hole of the battery holder. Use a running stich to sew down one half of a snap a few inches (7.5 cm) from the battery board. Knot it and cut the thread (fig. 2).
8. To light the LED, close the snap (figs. 3 and 4).
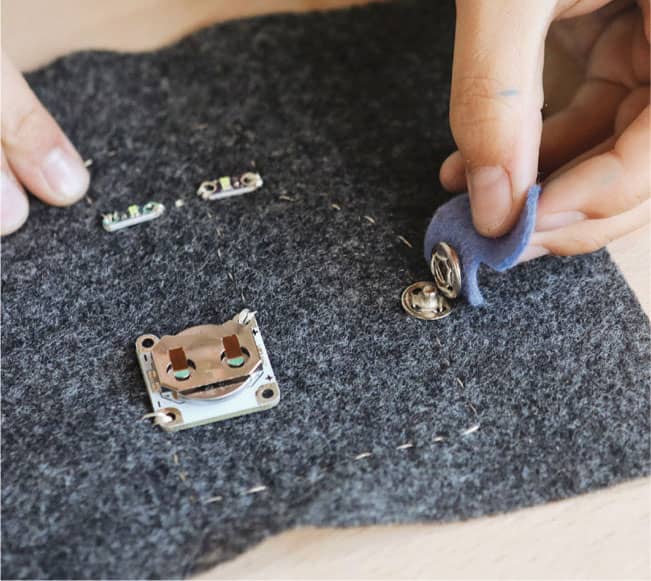
Fig. 3: Closing the snap will complete the circuit.

Fig. 4: Your sewable circuit is complete!
9. Complete your design. You can cover the battery holder and attach decorations using sewing (nonconductive) thread or glue. (figs. 5 and 6).
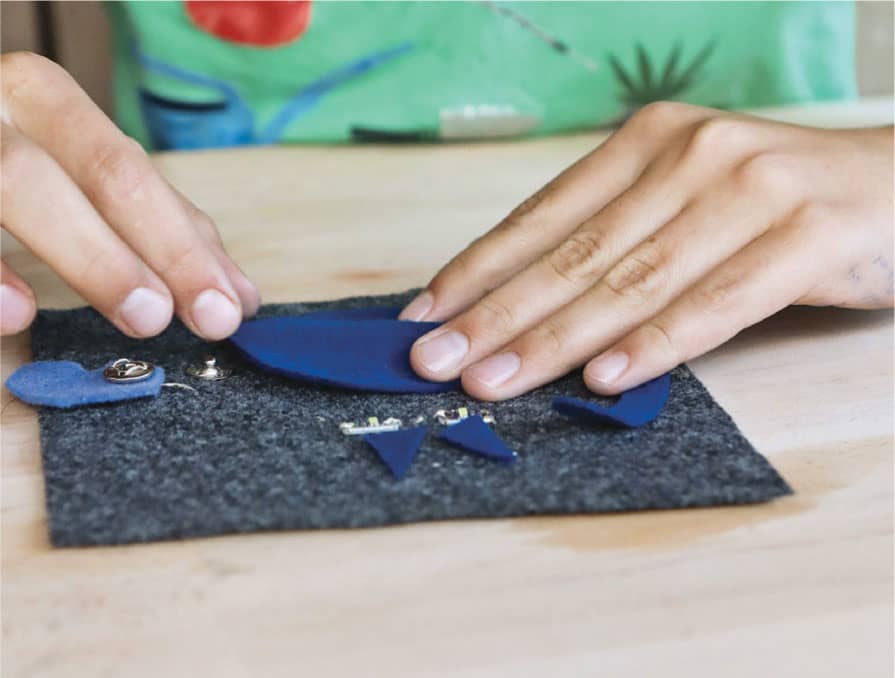
Fig. 5: You can cover the battery holder with fabric.

Fig. 6: Glue on decorations to embellish your electric art.
10. If you are using a battery holder with a switch and a single LED: Thread a 12 inch (30 cm) piece of conductive thread through a sewing needle. Knot one end and pull it up through the positive (+) hole in the battery holder. Push it back down just outside the positive (+) hole and repeat several times to form a tight connection. Be sure there is plenty of conductive thread contacting the metal.
11. Using the same thread, create a running stitch to sew a path from the positive (+) hole in the battery holder to the positive (+) hole in the LED and sew around the positive (+) hole in the LED several times, as you did with the battery. Knot the thread and cut off the excess.
12. Repeat the process with a second 12 inch (30 cm) piece of conductive thread, anchoring it to the negative (–) hole in the battery holder, making a running stitch to the negative (–) hole in the LED, sewing around the negative (–) hole, and knotting the thread as before. Turn the switch to ON to light the LED (figs. 7 and 8).
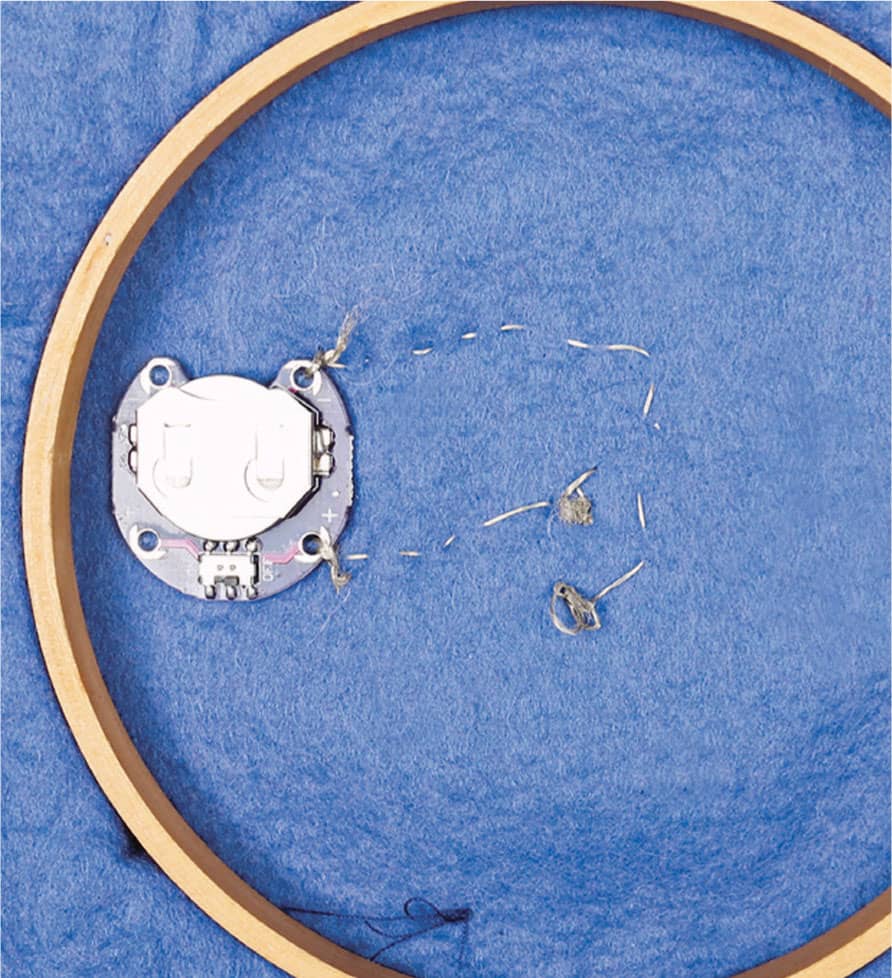
Fig. 7: You can also sew a light to a battery with a switch.

Fig. 8: Ta da!
CREATIVE ENRICHMENT
![]() Once you’ve got the hang of it, try connecting more lights to your design.
Once you’ve got the hang of it, try connecting more lights to your design.
![]() Fashion and home designers sometimes incorporate sewable LEDs into textiles. Create your own functional or fashionable design for a piece of clothing or furniture that utilizes this technology.
Fashion and home designers sometimes incorporate sewable LEDs into textiles. Create your own functional or fashionable design for a piece of clothing or furniture that utilizes this technology.
|
WIND TURBINE |

Generate enough power to light an LED using your breath or a blow dryer.
SAFETY TIPS AND HINTS
![]() Adult supervision is required for this lab. Keep blow driers away from water.
Adult supervision is required for this lab. Keep blow driers away from water.
![]() Use a pinwheel fan if you don’t want to make your own.
Use a pinwheel fan if you don’t want to make your own.
MATERIALS
![]() Pencil
Pencil
![]() Drawing compass
Drawing compass
![]() Ruler
Ruler
![]() Cardboard
Cardboard
![]() Scissors
Scissors
![]() Glue gun and glue sticks
Glue gun and glue sticks
![]() Craft sticks
Craft sticks
![]() Alligator clip test leads
Alligator clip test leads
![]() 1 micromotor for wind turbine generator or 3 phase AC generator model (see resources)
1 micromotor for wind turbine generator or 3 phase AC generator model (see resources)
![]() LED
LED
![]() Blowdryer (optional)
Blowdryer (optional)
PROTOCOL
1. Use a compass and ruler to draw a circle that is 43/4 inches (12 cm) in diameter (from one side to the other) on your cardboard.
2. Place the point of your compass on the line of the circle and draw another circle the same size.
3. Align your ruler with the two holes made by the compass and draw a line that bisects both circles. Draw a third circle with its center at the point the ruler crossed the original circle.
4. Use your ruler to draw a line perpendicular to the first line you drew. Then, draw two more circles with their center where that line intersects the original circle.
5. Use the points where the circles intersect to draw two more lines, dividing the circle into 8 even segments (fig. 1).
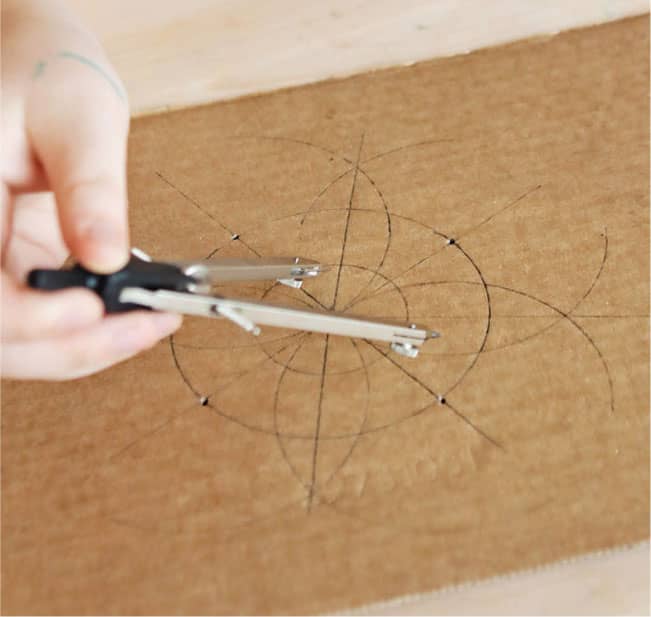
Fig. 1: Use a compass and ruler to create a cardboard circles divided into 8 sections.
6. Draw a 11/2 inch (4 cm) circle inside the center circle, using the same center point.
7. Use scissors to cut out the original 43/4 inch (12 cm) circle.
8. Cut notches along the 8 lines you made, from the outside of the circle to the inner circle. Bend the blades up, all in the same direction.
9. Hot glue craft sticks to the fan blades to reinforce them (fig. 2).
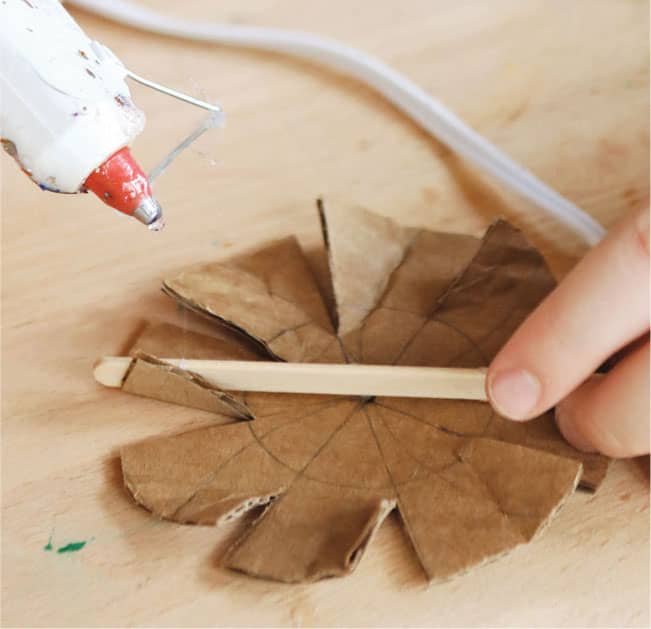
Fig. 2: Glue craft sticks to reinforce.
10. Attach alligator clips to each terminal of the motor. Firmly attach the motor to the fan using hot glue and the glue gun (fig. 3).
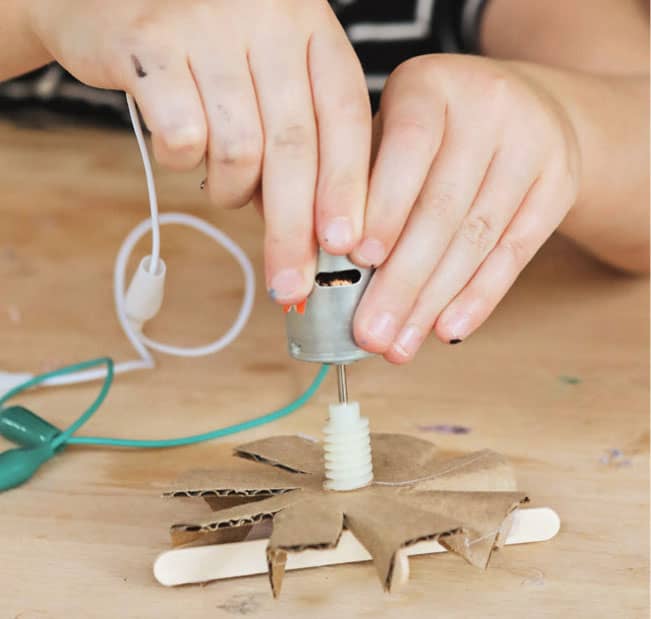
Fig. 3: Attach alligator clips to the motor and glue the motor to the fan.
11. Attach an LED to the other ends of the alligator clips.
12. Blow on the fan as hard as you can or use a blow dryer to spin it. Watch for the LED to light up. If it doesn’t, switch the alligator clips on the LED (figs. 4 and 5).
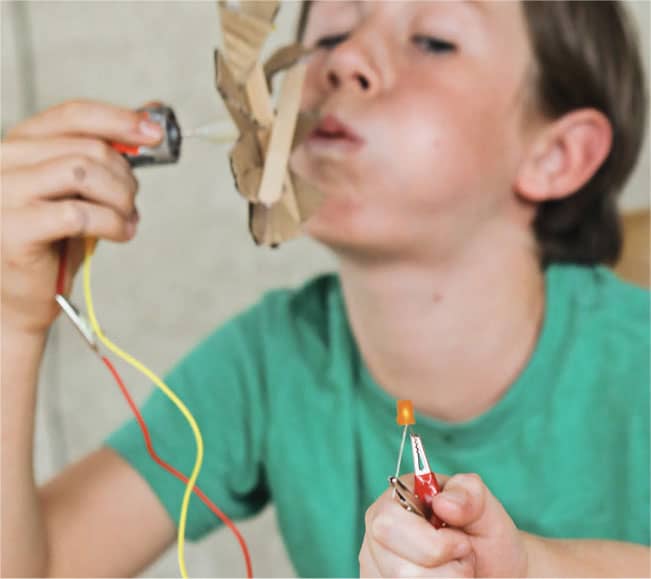
Fig. 4: Blow hard on the fan blade to spin it and light up the LED.

Fig. 5: Try using a blow dryer!
CREATIVE ENRICHMENT
![]() Build different kinds of turbine blades to connect to a motor. Test them to see which ones work best.
Build different kinds of turbine blades to connect to a motor. Test them to see which ones work best.
|
CD BOT |

Create moving, spinning robots from old CDs and toothbrushes.
SAFETY TIPS AND HINTS
![]() Young children should have adult supervision using batteries.
Young children should have adult supervision using batteries.
![]() Adult supervision is required when using a glue gun.
Adult supervision is required when using a glue gun.
MATERIALS
![]() AA battery holder
AA battery holder
![]() 1 compact disc (CD)
1 compact disc (CD)
![]() Glue (a glue gun and glue sticks are best)
Glue (a glue gun and glue sticks are best)
![]() 2 AA batteries
2 AA batteries
![]() 4 bottle caps
4 bottle caps
![]() Alligator clip test leads or battery snap
Alligator clip test leads or battery snap
![]() 1 small (3 volt) toy motor
1 small (3 volt) toy motor
![]() Duct tape or electrical tape
Duct tape or electrical tape
![]() 4 similar toothbrushes
4 similar toothbrushes
![]() Cork
Cork
![]() Decorations such as tape, pipe cleaners, sequins, or paint (optional)
Decorations such as tape, pipe cleaners, sequins, or paint (optional)
PROTOCOL
1. Center an AA battery holder on a CD and firmly glue or tape it down. Insert the batteries.
2. Space 4 bottle caps evenly around the battery holder and glue them down (fig. 1).
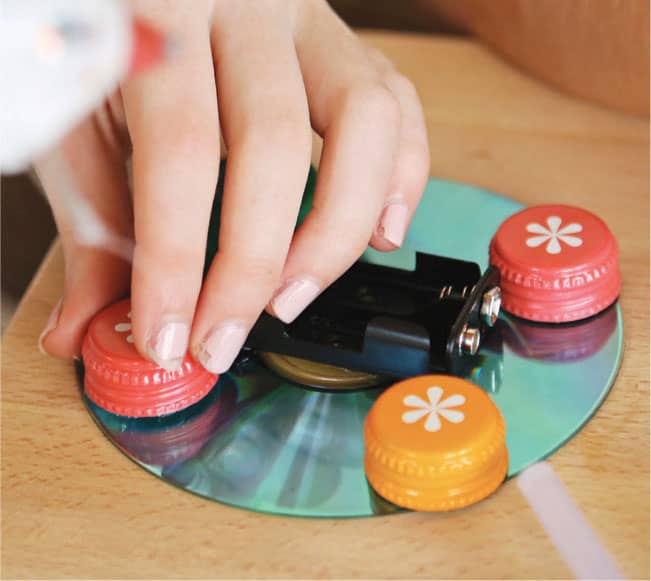
Fig. 1 Firmly glue or tape an AA battery holder and bottle caps to one side of a CD.
3. Attach alligator clips or a battery snap or to the motor’s terminals or wires (fig. 2). Tape the connections.
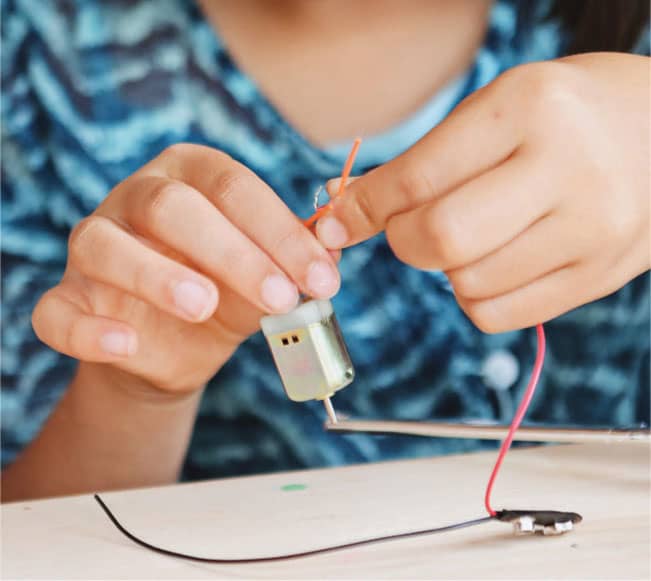
Fig. 2: Attach alligator clips or a battery snap to the motor.
4. Glue 4 toothbrushes, brush-side away from the CD, onto the bottle caps, with the brushes on the outside (fig. 3).
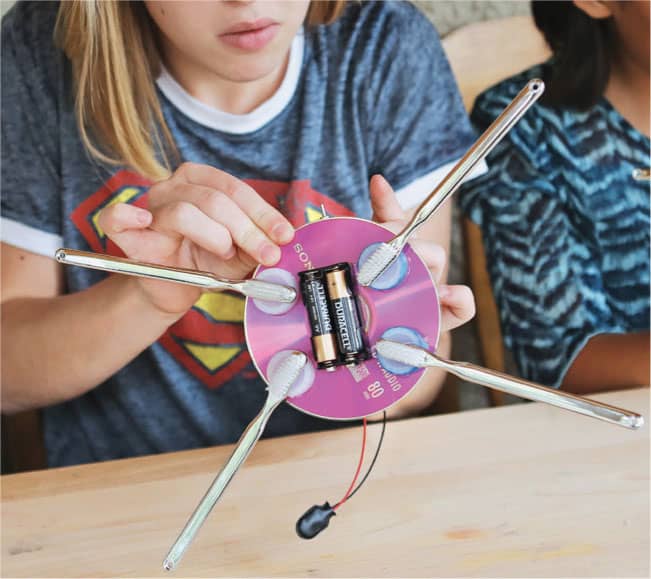
Fig. 3: Glue 4 toothbrushes, brush-side away from the CD, onto the bottle caps.
5. Attach a cork to the motor and glue or tape the motor to the top of the CD so the cork can spin freely (fig. 4).

Fig. 4: Attach a cork to the motor and attach it to the top of the CD so it can spin.
6. Decorate your robot!
7. Clip the motor to the battery holder using the alligator clips or the battery snap.
8. Set the robot down and let it go (fig. 5)!
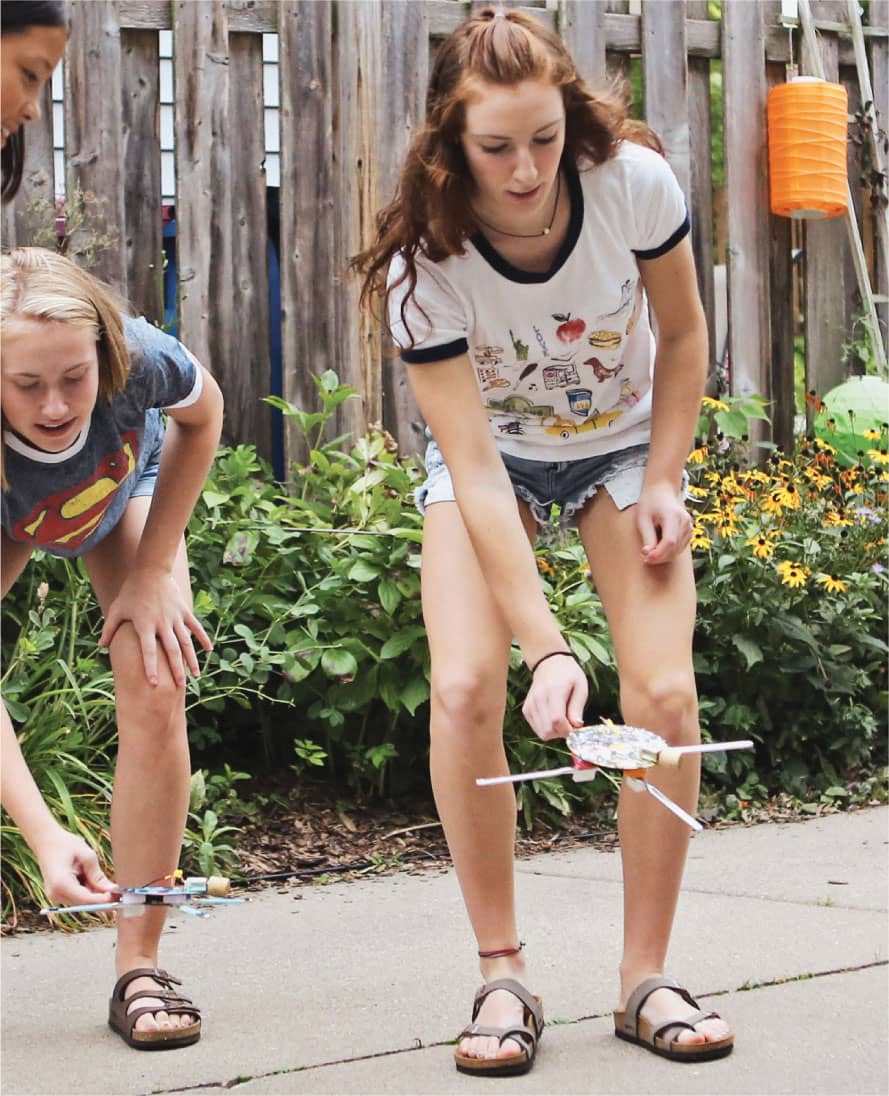
Fig. 5: Clip the motor to the battery holder and let your robot go!
CREATIVE ENRICHMENT
![]() Design another robot that uses bristles to move. Test how the type or arrangement of the brushes affects the movement.
Design another robot that uses bristles to move. Test how the type or arrangement of the brushes affects the movement.
|
GADGET-READY GLOVES |

Make any pair of gloves gadget-ready using conductive thread.
SAFETY TIPS AND HINTS
![]() Young children should have adult supervision using sewing needles.
Young children should have adult supervision using sewing needles.
MATERIALS
![]() Sewing needle
Sewing needle
![]() Conductive thread
Conductive thread
![]() Knit gloves
Knit gloves
![]() Cork (optional)
Cork (optional)
PROTOCOL
1. Thread a sewing needle with 12 inches (30 cm) of conductive thread (fig. 1). Knot one end of the thread.
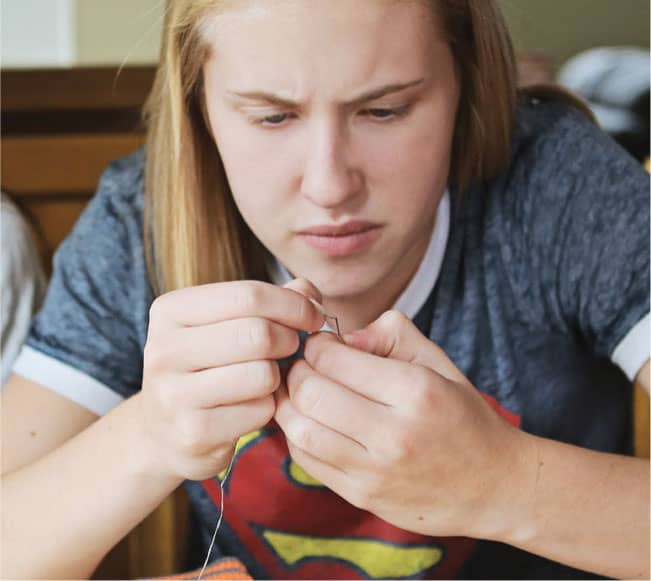
Fig. 1: Thread a sewing needle with conductive thread.
2. Place a cork or other object into the index finger of the glove (right or left glove, depending on whether you’re right-handed or left-handed) to support your stitching. Sew 10 to 20 small overlapping stiches into the fingertip of the glove (fig. 2).
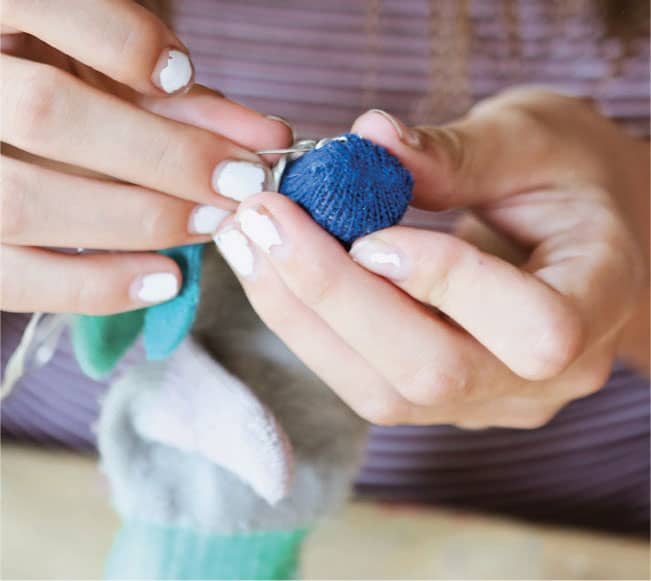
Fig. 2: Sew small stitches into the index fingertip of the glove (use a cork to support your stitching).
3. Tie off the thread and cut off the excess (fig. 3).

Fig. 3: Tie off the thread.
4. Put the glove on and test it on a touch screen device (figs. 4 and 5).

Fig. 4: Try it out!

Fig. 5: The thread conducts current from your finger to the device.
5. If it doesn’t work, add more stitches and test it again.
CREATIVE ENRICHMENT
![]() Can you think of another good use for conductive thread? Try making sewable circuits (see Lab 17).
Can you think of another good use for conductive thread? Try making sewable circuits (see Lab 17).