
Whereas a native iPhone app is built entirely in Objective-C, an iPhone Web app is composed of a variety of core technologies that serve as interlocking building blocks. HTML provides structure for the user interface and application data, and CSS is used for styling and presentation. JavaScript and Ajax provide the programming logic used to power the app. And, depending on the app, it may have a backend application server, such as Java or PHP.
Books on programming native iPhone apps often have a primer chapter on the basics of Objective-C to make sure everyone is speaking the same language, so to speak. And, although an entire book could easily be filled writing a primer on the core Web technologies you will work with to develop an iPhone Web app, I do want to explore some of the key technologies you'll need to be sure you know about to be successful.
So as not to start from ground zero, I will assume that you at least know the basics of HTML and have a working knowledge of CSS. That's why I will spend most of my time talking about both the scripting logic layer and the Document Object Model (DOM). However, before I do so, I want to highlight the new HTML 5 tags that Safari on iPhone supports for embedding media into your Web app.
Before iPhone OS 3.0, working with video inside of an iPhone Web app usually consisted of a simple link to a YouTube clip, which then launched the YouTube app. Because Safari on iPhone didn't (and still doesn't) support Flash video (FLV), there were few alternatives to an ordinary link when working with video. However, one of the key HTML 5 technologies that Safari on iPhone now supports is the video element.
The video element defines a video clip or stream, much like an img tag defines an image on your page. The promise of the video tag is that it eliminates the complicated hoops that developers have to go through now with embedded media content. Instead of mixing complicated object definitions and script, you can embed media with a simple tag definition.
Unfortunately for normal Web sites, the video element remains something of a tease, because most desktop browsers don't yet support HTML 5. As a result, developers have to either add code for unsupported browsers or avoid its use altogether.
However, if you are creating an iPhone Web app, you don't have this same dilemma. Safari on iPhone, starting with the OS 3.0 release, provides full support. Therefore, if you need to utilize video in your app, be sure to take advantage of the video tag.
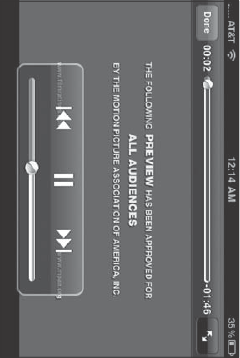
Note that the video does not play inside the Web page as an embedded video, but instead launches the built-in iPhone media player, which occupies the full screen of the iPhone. The user then clicks the Done button to return to your app.
The basic syntax for the element is shown here:
<video src="../video/trailer.mov" controls="true" poster="picture.jpg" width="300"
height="200"/>
Table 2-1. Attributes for video Element
Attribute | Description |
|---|---|
| When set to |
| If |
| Specifies the endpoint to stop playing the video. If it's not defined, the video plays to the end. |
| Defines the height of the video player. |
| Defines the ending point of a loop. |
| Defines the starting point of a loop. |
| Specifies the number of times a video clip is played. Defaults to |
| Specifies the URL of a "poster image" to show before the video begins playing. |
| Defines the URL of the video. |
| Sets the point at which the video begins to play. If |
| Defines the width of the video player. |
Supported video formats include QuickTime (MOV) and MPEG (MP4). Note that Safari on iPhone does not support Flash media (FLV) or Ogg Theora (OGG).
Adding a video into your app becomes as easy as adding the video tag to your page. For example:
<!DOCTYPE html PUBLIC "-//W3C//DTD XHTML 1.0 Strict//EN"
        "http://www.w3.org/TR/xhtml1/DTD/xhtml1-strict.dtd">

<html xmlns="http://www.w3.org/1999/xhtml">
<head>
<title>Video</title>
<meta name="viewport" content="width=320; initial-scale=1.0; maximum-scale=1.0;
user-scalable=0;"/>
<style type="text/css">

body
{
  background-color: #080808;
  margin: 10;
}

p
{
  color: #ffffff;
  font-family: Helvetica, sans-serif;
  font-size:10px;
}

</style>

</head>
<body>
  <div style="text-align:center">
  <p>Check out the new trailer for our upcoming video game release.</p>
  <video src="../videos/tlr2_h.640.mov" controls="true" width="300"/>
  </div>
</body>
</html>
Figure 2-1 shows how Safari displays the video player. When the user touches the video player, Safari displays the video in the built-in media player, as shown in Figure 2-2.
The audio element works in much the same way, although its attributes are a subset of the video tag's set. They include src, autobuffer, autoplay, loop, and controls. Figure 2-3 shows the audio file being played in the media player.


The scripting layer of your iPhone Web app is often the "brains behind the operation," the place on the client side in which you add your programming logic. That's why as you begin to develop more and more sophisticated Web apps for the iPhone platform, you'll find that the technology you'll rely more and more on is JavaScript. Therefore, before you go any further in this book, you need a solid grasp of how to script with JavaScript. Use this extended section as a primer for the core essentials of programming with JavaScript.
Like any other programming language, JavaScript has its own syntax rules and conventions. Consider the following script:
<script language="javascript" type="text/javascript">

// Defining a variable
var message = "Hello";

// Creating a function, a module of code
function showGreeting(allow)
{
  // If allow is true, then show the message variable
  if (allow == true)
{
alert(message);
}
// Otherwise, show this message
else
alert("I withhold all greetings.");
}
// Call function
showGreeting(true)
</script>Notice a few aspects of the JavaScript syntax:
Case sensitivity: JavaScript is a case-sensitive language. The core language words (such as
var,function, andifin the example) are all lowercase. Built-in JavaScript and Document Object Model objects use lowerCamelCase conventions, which are explained in the later section titled "JavaScript Naming Conventions." Variable names that you define can be in the case you choose, but note that the following terms are not equivalent:var message = "Hello"; var MESSAGE = "Hello"; var Message = "Hello";
Whitespace: Just like HTML, JavaScript ignores spaces, tabs, and new lines in code statements. Each of the following is equivalent:
var message="Hello";
var message = "Hello";
These are as well:
if (allow==true)
if ( allow == true )
Semicolons: Each JavaScript statement ends with a semicolon (except for the descriptive comment lines).
Curley brackets: Some JavaScript control structures, such as functions and
ifstatements, use curly brackets{}to contain multiple statements between them. These brackets can be placed on separate lines or on the same line as the other code. For example:if (allow == true) { alert(message) }is the same as
if (allow == true) {
  alert(message) }
A variable is an alias that stores another piece of data — a text string, a number, a true or false value, or whatever. Variables are core to programming because they eliminate the need for having everything known while you are developing the script or application.
For example, suppose you wanted to capture the first name of the user and add it to a welcome message that appears when the user returns to your iPhone Web app. Without variables, you'd have to know the person's name beforehand — which is, of course, impossible — or you'd have to use a generic name for everyone.
By using a variable, you eliminate this problem. You can capture the name of the user and then store it in the code as a variable — I'll call it firstName. Then, anytime in my script I need to work with the user's name, I call firstName instead.
When you want to use a variable, your first task is to declare it with the keyword var and then assign it a value. Here's how this two-step process can look:
var firstName;
firstName = "Jonah";
The var keyword instructs the JavaScript interpreter to treat the following word, in this case firstName, as a variable. The following line then assigns the literal string Jonah to the firstName variable.
Although declaring and assigning a variable may be two separate actions, you'll usually want to combine them into one step. For example, the following code is functionally equivalent to the previous two lines of code:
var firstName = "Jonah";
Truth be told, you can actually assign a variable without even using the keyword var. For example, the following code also works:
firstName = "Jonah";
However, I strongly recommend regular use of var when you first define it to ensure your code is readable and manageable by both you and other developers.
You can assign a variety of data types to a variable. Following are a few examples:
// String value
var state = "CO";
// Boolean value
var showForm = true;
// Number value
var maxWidth = 300;
// HTML document "node"
var element = document.getElementById("container");
// Array item var item = myArray[0];
If you are coming from an Objective C, Java, ActionScript, or other stronger-typed language, you are probably wondering where you declare the type of data that can be stored by the variable. Well, to put it simply — you don't have to. Because JavaScript is a loosely typed language, you don't need to declare the variable type.
When you are naming variables, keep in mind the following general rules:
A variable name must begin with a letter or underscore, not a number or other special character. For example:
// Valid
var helper;
var _helper;

// Invalid
var 2helper;
var ^helper;
Although a number can't start off a variable name, you can include one elsewhere in the word, such as here:
var doc1;
var doc2;
As with other aspects of JavaScript, variable names are case sensitive. Therefore, each of the following is a unique variable name:
var counter;
var Counter;
var COUNTER;
var counTer;
A variable name can't contain spaces. For example:
// Valid
var streetAddress;
var street_address;

//Invalid
var street address;
You can't use a reserved word (see Table 2-8) or the name of a JavaScript or Document Object Model object as a variable name. For example:
// Valid
var isDone;
var defaultValue;
var mainWindow;

// Invalid
var in;
var default;
var window;
After you define a variable and assign it a value, each time you reference it in your code, the variable represents the value that was last assigned to it. In the following snippet of code, the company variable is assigned a string value and displayed in an alert box:
var company = "Cyberg Coffee";
alert( "Our company is proudly named " + company);
The alert box displays this:
Our company is proudly named Cyberg Coffee.
You can also change the value of a variable inside your source code. After all, they are called variables, aren't they? A typical example is a counter variable that has a value incremented during a looping process. Consider the following example:
for (var i = 1;i <= 5; i++)
{
  document.write( "The value of the variable is: " + i + ".<br/>" );
}
I'll explain what the for loop does later in the chapter. For now, just focus on the variable named i. The variable starts out with a value of 1 during the execution of the first pass of the code inside the for block. During the next pass, its value is incremented to 2. On the third pass, its value is incremented to 3. This same process continues until i is 5. In total, the document.write() method would be called five times and would output the following content:
The value of the variable is 1.
The value of the variable is 2.
The value of the variable is 3.
The value of the variable is 4.
The value of the variable is 5.
Variables can have either a limited or a wide scope. If you define a variable inside a function, that variable (called a local variable) is only available to the function and expires when the function is finished processing. For example, check out the markup variable in the code that follows:
function boldText(textToDisplay)
{
  var markup = "<strong>" + textToDisplay + "</strong>";
  return markup;
}
The variable is created when the boldText() function runs, but it no longer exists after the function ends.
However, if you define the variable at the top level of the scripting block — in other words, outside a function — that variable (known as a global variable) is accessible from anywhere in the document. What's more, the lifetime of a global variable persists until the document is closed.
Table 2-2 summarizes the differences between local and global variables.
Table 2-2. Local Versus Global Variables
Type | Scope | Lifetime |
|---|---|---|
Local | Accessible only inside a function | Exists until the function ends |
Global | Accessible from anywhere in the document | Exists until the document closes |
Scope deals with the context of the variable within the scripting hierarchy. However, the location at which a variable is defined also matters. Simply put, a variable is accessible when it is declared. Therefore, you'll typically want to define global variables at or near the top of the script and local variables at or near the top of the function.
I've put together a sample script that demonstrates the scope of variables. First, I'll define a global variable at the top of a script:
<script language="javascript" type="text/javascript">
var msg = "I am a global variable";
var msgEnd = ", and you cannot stop me."
Next, I'll add an alert box to display the variable:
alert(msg + msgEnd);
When this code runs, the alert message text that appears will be as follows:
I am a global variable, and you cannot stop me.
Now check out what I am going to do. I am creating a function that assigns a local variable with the same name (msg) and then simply references msgEnd, the global variable I already defined. Here's the code:
function displayAltMessage()
{
  var msg = "Don't hassle me, I'm a local variable";
  alert(msg + msgEnd);
}
I call this function in my script with the following line:
displayAltMessage();
When this function is executed, the alert box displays the following text:
Don't hassle me, I'm a local variable, and you cannot stop me.
Notice that the local variable msg took precedence over the global variable msg. So within the function, the local msg variable "hides" the global msg variable, and any changes made to msg apply only to the local variable. However, when that function finishes, the local variable msg is destroyed, whereas the global variable msg remains.
Suppose that I reassign the value of the global variable msg later in my script and then display the alert box once again:
msg = "Reassigning now!";
alert(msg);
Yes, you've got it — the following text is displayed:
Reassigning now!
Notice that when I reassigned the variable, I didn't need to add the var keyword again.
Here's the full script:
<script type="text/javascript">
  // Global variable
  var msg = "I am a global variable";
  var msgEnd = ", and you cannot stop me."

  // Displays "I am a global variable, and you cannot stop me."
  alert(msg + msgEnd);
  function displayAltMessage()
  {
    // Local variable
    var msg = "Don't hassle me, I'm a local variable';
    // Displays "Don't hassle me, I'm a local variable, and you cannot stop me."
    alert(msg + msgEnd);
  }
  // Calls the function
  displayAltMessage();

  // Reassigning value to msg
  msg = "Reassigning now!";

  // Displays "Reassigning now!"
  alert(msg);
</script>Like Java and ActionScript, JavaScript uses CamelCase conventions for naming parts of the language. Variables, properties, and methods use what is known as lowerCamelCase. When using the lowerCamelCase convention, the name begins with a lowercase letter, but the first letter of each subsequent new word in a compound word is uppercase, with all other letters lowercase. You'll find that JavaScript and the DOM adhere to this convention. For example:
var divElements = document.getElementsByTagName("div");In this example, document is the DOM object name for the HTML document and is all in lowercase. The method getElementsByTagName() is a compound word, so the first letter of each additional word in the method is capitalized. My variable divElements uses lowerCamelCase style to make it clear that the term combines two words.
Another type of coding convention that some JavaScript developers follow is what is known as Hungarian notation. Following this coding style, variables are prefixed with a letter that indicates the data type of the variable. Table 2-3 shows several examples of this notation.
In the end, the coding and naming convention you decide on is your personal or team preference. But no matter what you decide on, what ultimately matters is sticking with your conventions to create readable and manageable code.
As you work with variables, they often change values during the course of a script. However, sometimes you want to work with a variable that refers to a value that doesn't change. These are called constants.
ActionScript, Java, and many other programming languages actually have a constant built into the language that is different from a variable. JavaScript does not. However, from a practical standpoint, you can define a variable and treat it as a constant in your code.
If you do, I recommend following standard conventions for naming constants:
Use uppercase letters.
Separate words with underscores.
For example:
var APP_TITLE = "iPhoneWebApp";
var VERSION_NUM = "2.01";
var MAX_WIDTH = 320;
You can then use these constant-looking variables just as you would a variable throughout your script.
An operator is a no-frills symbol used to assign values, compare values, manipulate expressions, or connect pieces of code.
The equal sign is perhaps the most common operator. It assigns a value to an expression. For example:
var i = 10;
Note that the operator that assigns a value (=) is different from the operator that compares whether two values are equal. The == operator is charged with comparing two items and returning true if conditions are true or false if not. For example:
alert(n == 100);
As you would expect, the + operator can add two number values together. However, you can also use it to combine two string literals or variables. So, check out this code:
var s = "Welcome ";
var t = " to the world of operators.";
alert(s + t);
The text Welcome to the world of operators would be displayed in a JavaScript alert box.
Tables 2-4 through 2-7 highlight the major operators. A few of the operators are pretty esoteric in real-world situations, but the ones you will typically use are shown in bold.
Table 2-4. Assignment Operators
Operator | Example | Description |
|---|---|---|
|
| The value of |
|
| Same as |
|
| Same as |
|
| Same as |
|
| Same as |
|
| Same as |
Table 2-5. Comparison Operators
JavaScript has reserved words (see Table 2-8) that are set aside for use with the language. Avoid using these words when you name variables, functions, or objects.
Table 2-8. JavaScript 1.5 Reserved Words
abstract | boolean | break | byte | case |
Char | class | const | continue | |
debugger | Default | delete | do | double |
else | Enum | export | extends | false |
final | Finally | float | for | function |
goto | If | implements | import | in |
instanceof | Int | interface | long | native |
new | Null | package | private | protected |
public | Return | short | static | super |
switch | Synchronized | this | throw | throws |
transient | True | try | typeof | var |
void | Volatile | while | with |
JavaScript has three conditional statements that you can use to evaluate code:
ifif/elseswitch
These three statements are explained in the following sections.
The if statement is used when you want to evaluate a variable and expression and then perform an action depending on the evaluation. The basic structure looks like this:
if (condition)
{
  // code to execute if condition is true
}
For example:
response = prompt("Enter the name of the customer.", "");
if (response == "Jerry Monroe")
{
  alert("Yes!");
}
A prompt box is displayed to the user. The typed response of the user is assigned to the response variable. The if statement then evaluates whether response is equal to "Jerry Monroe". If it is, the alert box is displayed. Otherwise, the if block is ignored.
I mentioned this in the operator section, but it bears repeating. The double equal signs are not a typo. Whereas a single equal sign (=) is used to assign a value to a variable, a double equal sign (==) compares one side of an expression to another.
If you are evaluating a Boolean variable, you can write the if statements in two ways:
if (isValid == true)
{
  alert("Yes, it is valid!");
}
Or, as a shortcut:
if (isValid)
{
  alert("Yes, it is valid!");
}
If you have a single line of code in the if block, you can actually forgo the curly brackets. So, this syntax works too:
if (isValid == true) alert("Yes, it is valid!");You can also use if on a negative expression. Suppose, for example, that you want to perform an operation if a Boolean variable named isValid is false. The code would look something like this:
if (isValid == false)
{
  // do something to get validation
}
Notice that even though the false value is being used to evaluate the variable, the if block only executes if the expression (isValid == false) is true.
An alternative and usually preferred way to write this expression is to use the not operator (!):
if (!isValid)
{
  // do something to get validation
}
This expression says, in effect, if isValid is not true, then do something.
The if/else statement extends the if statement so that you can also execute a specific block of code if the expression evaluates to true and a separate block if it evaluates to false. The basic structure is this:
if (condition)
{
  // code to execute if condition is true
}
else
{
  // code to execute if condition is false
}
Here's an example of the if/else statement:
if (showName)
{
  document.write("My name is Sonny Madison.");
}
else
{
  document.write("I cannot disclose my name.");
}You can also chain together if and if/else statements. Consider this scenario:
if (state = "MA")
{
  document.write("You live in Massachusetts.");
}
else if (state="CA")
{
  document.write("You live in California.");
}
else
{
  document.write("I have no idea where you live.");
}Besides chaining the if and if/else statements, you can use the switch statement to evaluate multiple values. Its basic structure is this:
switch (expression) { caselabel1 :// code to be executed if expression equals label1 break;
caselabel2 ://code to be executed if expression equals label2 break; caselabel3 ://code to be executed if expression equals label3 break; default : // code to be executed if expression is different // from both label1, label2, and label3 }
The switch statement evaluates the expression to see if the result matches the first case value. If it does, the code inside the first case statement is executed. Note the break at the end of each of the case statements. This stops the switch statement from continuing to evaluate more of the case statements that follow. The default statement is executed if no matches are found.
Note that the case blocks do not use curly braces inside of them.
Here's an example that uses the switch statement to evaluate the current time of day using the built-in Date() object:
var d = new Date();
var hrs = d.getHours();

switch (hrs)
{
case 7 :
  document.write("Good morning.");
  break;
case 12 :
  document.write("It must be time for lunch.");
  break;
case 15 :
  document.write("Afternoon siesta. Zzzzz.");
  break;
case 23 :
  document.write("Bed time. Boo!");
  break;
default
  document.write("Check back later.");
}
The hrs variable is assigned the current hour using the Date,getHours() method. The switch statement evaluates hrs, examining whether this value matches the case statements in sequence. If it finds a match, the code inside the case is executed. Otherwise, the default statement is executed.
A common need that you will have in developing scripts in your iPhone Web apps is the ability to perform a given task several times or on a series of objects. Or maybe you need to execute code until a condition changes. JavaScript provides two programming constructs for these purposes: for and while blocks. A for loop cycles through a block of code x number of times. A while loop executes a block of code as long as a specific condition is true.
Along with the if statement, the for loop is likely the construct you'll use most often. The following snippet shows a for loop calling document.write() five times:
for (var i = 1; i <= 5; i++)
{
  document.write("Number:" i + "<br/>");
}
When run, the output looks like this:
Number 1
Number 2
Number 3
Number 4
Number 5
Going back to the code, notice the three parts of the for statement inside the parentheses:
Initialize variable: The
var i = 1initializes the variable used in the count. (The variableiis the typical name you'll see used for loop counters.)Looping condition: The
i <= 10indicates the condition that is evaluated each time the loop is cycled through. The condition returnstrueas long as theivalue is less than or equal to 10.Update: The
i++statement is called after each pass of the loop completes. The++is the operator that increments the value ofiby 1.
A while loop also cycles through a block of code one or times. However, it continues as long as the expression evaluates to true. Here's the basic form:
while(expression)
{
  // statements
}
Here's an example:
var max = 100;
while(num > max)
{
  document.write("Current count: " + num);
  num++;
}
In this example, the code block loops as long as num is less than 100. However, suppose that num has the value of 101. If it does, the while code block is never executed.
The do/while loop is similar except that the condition evaluates at the end of the loop instead of at the start. Here's the basic structure:
do
{
   // statement
} while (expression)
In real-world practice, while loops are used more often than do/while ones.
As in HTML or other languages, you can add your own comments to your JavaScript code. Comments are useful when you go back into the code weeks or months later and need to understand again your code and the thought process behind it. Or, you might use comments to note specific places in the code that you need to rework later on.
You can add single-line or multiline comments.
To add a single-line comment, add two slashes (//) to a line. Any text on the same line to the right of the slashes is considered a comment and is ignored by the interpreter. For example:
// Define two string variables
var s = "Welcome ";
var t = " to the world of operators.";
// Display concatenated values in an alert box
alert(s + t);
You can also define a comment that spans multiple lines. To do so, enclose the comments inside /* and */ marks. Here's what it looks like:
/*
 * Purpose: Converts Internet string date into Date object
 * RICH TO DO: Double-check that this works under all cases
*/
function getDateFromString(s)
{
  s = s.replace(/-/g, "/");
  s = s.replace("T", " ");
  s = s.replace("Z", " GMT-0000");
  return new Date(Date.parse(s));
}The Java world has a documentation generator called Javadoc, which is a tool that can generate HTML-based documentation from the comments a developer adds to source code. JSDoc is an open source tool, written in Perl, that provides similar functionality.
You can download JSDoc at http://jsdoc.sourceforge.net.
To enable a script for JSDoc, simply denote that comments you want included using a multiline comment, but with a slightly special syntax: open the comment with a slash and two asterisks (/**), and close the comment the normal way (*/). Here's an example:
/**
 * Converts Internet string date into Date object
*/
function getDateFromString(s)
{
  s = s.replace(/-/g, "/");
  s = s.replace("T", " ");
  s = s.replace("Z", " GMT-0000");
  return new Date(Date.parse(s));
}
You can also add several attributes that can be used to better describe the code. These attributes are prefixed with an @ sign. You can even add HTML tags for readability. Check this out:
/**
 * Converts Internet string date into Date object.
 * <p>
 * This function is called when the user selects the
 * Cyborg option in the left-side module.
*
 * @param  s string containing the
 * @returns  the date as a Date object
*/
function getDateFromString(s)
{
  s = s.replace(/-/g, "/");
  s = s.replace("T", " ");
  s = s.replace("Z", " GMT-0000");
  return new Date(Date.parse(s));
}
For full details on available attributes, formatting commands, and syntax rules, check out http://jsdoc.sourceforge.net as well the Javadoc conventions page at http://java.sun.com/j2se/javadoc/writingdoccomments.
Even if you don't plan on using the JSDoc tool to create source code documentation, the JSDoc conventions are useful for creating well-documented code. Plus, you may find in the future that if you would like to use the JSDoc generator, you're all set.
A function is the basic building block or organizing unit of JavaScript. A foundation of a house is composed of many building blocks. In the same way, a JavaScript or Ajax script usually consists of a set of functions.
These building blocks may be easy to take for granted. But just as a beautifully decorated home means nothing apart from its foundation, a killer Ajax or JavaScript animation routine is pretty meaningless without these building blocks to rest upon.
A function is a module of JavaScript statements that together perform a specific action. Here's a basic example:
function addAndDisplay(a, b)
{
  var total = a + b;
  alert(total);
}
To call the function, you do this:
addAndDisplay(3, 2);
There are a few things to note. The function is named addAndDisplay() and takes two arguments: a and b. An argument (also called a parameter) is a variable or literal value that you want to pass on to the function to process. In this case, the calling function sends to the 3 and 2 integer values the function to do something with (add them together).
Inside the curly brackets, the first line adds together the arguments and assigns the sum to the total variable. The second line displays the total in an alert box. When the alert box is closed, the function ends and returns control to the code that called it.
As you can see, a function
Is called by another section of code to perform a process, return a result, or both
Hides the details of its programming logic from other parts of the code
A function can return a value to the calling code. For example, check out the following function:
function getTotal(subtotal)
{
  var t = subtotal * .05;
  return t;
}
The getTotal() function receives subtotal as an argument, multiples it by the state tax percentage, and then returns the total value to the statement that called the function using the return command.
When return executes, the function stops executing at that line and returns to the calling function. For example:
function createProfile(el)
{
if (el == null)
{
alert("Undefined DOM element. Cannot continue.");
return;
}
else
{
// do something really important to el
}
}In this example, the function checks to see if the el parameter is null. If it is, the function ends processing after displaying an alert box. If not, the function continues.
JavaScript also supports inline functions, which enable you to define an unnamed function for use within a specific context. For example, suppose you want to display an alert message when the window loads. Using a normal function, you can structure your script as follows:
<script>
  function init()
  {
    alert("I am saying something important.");
  }

  window.onload = init;

</script>
The onload event is assigned the init() function as its event handler. However, you can also use an inline function and eliminate the specific function definition:
<script>
  window.onload = function() { alert("I am saying something important.") };
</script>
Another advantage is that you can reference variables within a specific scope without having to pass them to a function as arguments.
Function overloading is the concept of being able to pass varying amounts of arguments to a function. You can overload a function in JavaScript if you use the arguments property of a function. For example, suppose you wanted to create a function that added two numbers together and then returned the result. You could code it like this:
function add(a, b)
{
  return a + b;
}
However, your needs can change over time. Instead of two numbers, you might now need to add three or four or five numbers at a time. Instead of writing separate functions for each case, you could overload the add() function to do all these summing tasks:
function add()
{
  var t = 0;
  for (var i = 0, l = arguments.length; i < l; i++)
  {
    t += arguments[i];
  }
  return t;
}
The add() function creates a for loop to iterate through each of the supplied arguments. As it does so, it adds the current argument to the t variable. This total is then returned to the statement that called the function. Each of the following calls now works:
var t = add(2, 2);
var t1 = add(2, 4, 5);
var t2 = add(392, 1230, 3020202, 1, 2033);
You can also use the typeof() command to overload different data types inside the same function. For example, if I wanted to expand the functionality of add to "add" string values, I could modify the function as follows:
function add()
{
  var argType = typeof(arguments[0]);

  if (argType == "number")
  {
    var t = 0;
    for (var i = 0, l = arguments.length; i < l; i++)
    {
      t += arguments[i];
    }
    return t;
  }
  else if (argType == "string")
  {
    for (var i = 0, l = arguments.length; i < l; i++)
    {
      if (i == 0)
      {
        var s = arguments[i];
      }
      else
      {
        s += ", " + arguments[i];
}
return s;
}
else
return "Unsupported data type";
}
}The add() function examines the type of the first parameter and assigns the result to argType. If the type is a number, the routine continues just like the earlier example. If the type is a string, however, the function combines the arguments into a single comma-delimited string. If the type is neither a number nor a string, an error message is returned.
JavaScript allows you to work with specific data types:
String
Number
Boolean
Null
Undefined
Array
Object
Strings, numbers, and Booleans are often known as primitive data types, null and undefined as special data types, and objects and arrays as composite data types.
A string is a collection of characters enclosed in single or double quotation marks. A string is also called a string literal. The following lines are examples of strings:
var wd = 'Kitchen sink';
var el = "<p>This is HTML.</p>";
var n = "3.14";
var char = 'z';
var special = "@#(*&^%$#@!~<>S"}{+=";
var blank = "";
As you can see, you can include most anything in a string — normal text, HTML tags, numeric values, special characters, and more.
Notice that you can have an empty string (""), which is not the same as a null or undefined value.
Because a string can be enclosed in either single or double quotation marks, you can easily embed a quotation mark and apostrophe by using the opposite type pair to enclose the string literal. For example:
var str = '"I like living dangerously", said Jack. "I am enclosing a quote in this
string."';
var str2 = "I'm happy, aren't I?";
Alternatively, you can use the backslash character () to "escape" an apostrophe/quotation mark if the string is enclosed by the same type of quotation mark. Here are a couple cases:
var str2 = 'I'm happy, aren't I';
var el = "<div id="container"></div>";
The backslash character tells the interpreter to treat the following quote mark as part of the string rather than as the ending delimiter.
For many tasks, you can work with string values as string literals in the manner in which I described. However, if you are going to parse, manipulate, transform, or otherwise pick on a string, you can also treat it as a String object.
The number data type represents any sort of numeric value — integer, real floating-point number, octal, and even hexadecimal numbers.
Table 2-9 lists the variety of number values that are valid within JavaScript.
Table 2-9. Examples of Numbers
Number | Description |
|---|---|
32 | Integer |
.00223 | Floating-point number |
1.42e5 | Floating-point number |
0377 | Octal value |
0x32CF | A hexadecimal integer. |
In addition to these normal number types, JavaScript contains a special value NaN, which stands for "not a number." As you might expect, if you perform an invalid math operation, you'll get NaN as the result.
A Boolean type represents either a true or a false value. You typically use it to determine whether a condition in your code is true or false. For example, suppose you assign false to the flagUser variable:
var flagUser = false;
You can then evaluate the flagUser variable to determine its Boolean state in an if control structure. For example:
if (flagUser == true)
{
  alert("Hey User! You are hereby flagged.");
}
The if statement displays the alert box if flagUser evaluates to true.
Note that a Boolean value is not wrapped in quotation marks. So notice the difference:
// Boolean
var isABoolean = true;
var isAString = "true";
When a variable or object contains no value, its value is expressed as null. (Not the literal string "null", just null.) You can test whether a variable or object is null to determine if it was defined earlier in the code. For example:
if (myArray != null)
{
  doSomethingReallyImportant();
}
This code block evaluates the variable myArray. If its value is not equal to null, the condition evaluates to true and something really important happens.
A null value is not the same as an empty string, the number 0 or NaN, or the undefined data type, which I explain in the next section.
If you want to remove the contents of the variable, you can assign it a non-value by setting it to null:
if (loggedOut == true)
{
  userName = null;
}
So, in this example, if the loggedOut variable is true, the userName variable is reset.
On first take, an undefined value sounds like just another name for null. But an undefined value is actually a different data type. An undefined value is returned by the interpreter when you access a variable that has been declared but never assigned a value. For example, the following snippet displays an alert box with undefined as the message.
var isSmiling;
alert (isSmiling);
You'll also get undefined if you try to call a property that does not exist. For example:
alert(document.theStreetThatHasNoName);
So far, I've been talking about variables as individuals. An array, in contrast, is a collection of values. An array is grouped and indexed so that you can access a specific item stored in the group.
JavaScript stores arrays as Array objects, meaning that it has a variety of properties and methods. As you work with these members, you can perform numerous tasks.
You can create a new array by assigning a variable to empty brackets:
var castMembers = [];
You can also create a new array by using new Array(). It goes like this:
var myArray = new Array();
However, using the new operator to create an array is considered old school and is not considered a good practice.
In some programming languages, you need to specify the number of items in an array at the time you define it. That's not so with JavaScript. It just increases the size of the array each time you add a new item to it.
To add items to the array, you simply assign a value to a specific index in the array. The index is designated by a value within brackets, such as the following:
var castMembers = [];
castMembers[0] = "Jerry";
castMembers[1] = "George";
castMembers[2] = "Elaine";
castMembers[3] = "Kramer";
Notice that, because arrays are zero-based, you start counting at 0 rather than 1.
You can also define the array items by passing values as parameters:
var primeNumbers = [1, 3, 5, 7, 11];
You can store most any kind of data in an array, including strings, numbers, Boolean values, undefined and null values, objects, and functions. You can even store an array within an array if you really want to. What's more, you can store various types of data within the same array. For example, consider the following array that contains a string, number, function, DOM object, and Boolean value:
var el = document.getDocumentById("easy_bake_oven");
var pieLove = ["pie", 3.14, function() { alert("Apple Pie") }, el, true];You can get the number of items in an array by accessing its length property. (Yes, an array is an object, so it has its own set of properties and methods.) For example:
var primeNumbers = [1, 3, 5, 7, 11];
alert(primeNumbers.length));
The alert box displays 5.
In most cases, you don't need to explicitly set the size of an array, because it dynamically resizes on its own when you add or remove items from it. However, when you need to specify an array's size, you can assign a value to the length property. For example, the following line increases the size of the array to 10:
primeNumbers.length = 10;
Note that no new data items are created when you do so.
If you specify a length that is smaller than the current size of the array, the items that fall outside of that length value get the axe.
Keep in mind that because array indices start at 0, the last item in the array will have an index value one fewer than the total number of elements in an array.
You can access any value in the array according to its index. For example, to write the third item in a states array to the document, you can use the following code:
function showHomeState(idx)
{
  document.write("<p>Your home state is " + states[idx] + "</p>";
}
You can also iterate through an array using a for loop if you want to work with each item in the group:
var castMembers = [];
castMembers[0] = "Jerry";
castMembers[1] = "Jan";
castMembers[2] = "Elias";
castMembers[3] = "Bob";
document.writeln("<ul>");
for (var i = 0, l = castMembers.length; i < l; i++)
{
document.writeln("<li>" + castMembers[i] + "</p>");
}
document.writeln("</ul>");In this example, the castMembers array defines four string items. The length property determines the size of the array, so you know the number of times to loop through the for structure.
Notice that the length property is assigned to a variable rather than being included directly inside the for loop like this:
// Valid, but less efficient
for (var i = 0; i < castMembers.length; i++)
{
}
Although that is perfectly valid, it is not as efficient, particularly for large arrays. That's because the interpreter has to evaluate the length property on each pass rather than once. Therefore, it's a good habit to assign an array's length to a variable for loops.
The HTML output for this script is as follows:
<ul>
<li>Jerry</li>
<li>Jan</li>
<li>Elias</li>
<li>Bob</li>
</ul>
When a primitive variable (string, number, or Boolean) is passed into an array, the array creates a copy of the variable's value rather than storing a reference to that variable. In programming lingo, this is known as passing by value. Here's an example that demonstrates the difference:
var n = 100;
var b = true;
var s = "string";
ar = [n, b, s];

document.write("<p>[First pass]</p>");
for (var i = 0; i <= 2; i++)
  document.write("<p>"+ar[i]+"</p>");

n = 200;
b = false;
s = "new and improved string";
document.write("<p>[Second pass]</p>");
for (var i = 0; i <= 2; i++)
document.write("<p>"+ar[i]+"</p>");Notice that the variables n, b, and s are passed as parameters in the ar array. The for loop then outputs the values of the array items as HTML content to the document. The variables are then updated and given new assignments. However, when the same for loop is run again, the original values are output. Check out the HTML content that is output:
[First pass]
100
true
string
[Second pass]
100
true
string
However, when you pass an object or a function into an array, the array stores a reference to those advanced data types rather than a copy of it. As a result, any changes you make to the object or function outside the array are reflected when you access its corresponding item in the array. This is called passing by reference.
The Document Object Model (DOM) provides a scripting interface into an HTML document so that you can work with all its elements within a hierarchical structure. As a result, you can navigate through the document structure with JavaScript to access and manipulate anything inside of it.
The DOM is a standard that was originated by the W3C, the Web standards body. There are three DOM levels:
Level 1: Level 1 contains the core functionality to be able to script the DOM for an HTML or XML document. Any modern browser provides support for the Level 1 version of the DOM.
Level 2: Level 2 extends DOM support to include new core functionality, event listeners, CSS DOM, and traversal and range. Safari and other browsers generally provide strong support for aspects of DOM2.
Level 3: Level 3 adds support for newer properties and methods, keyboard events, and XPath. Safari provides strong support for Level 3.
You'll find it helpful to think of the DOM as a hierarchical tree that contains all the parts of the HTML document — elements, attributes, text, comments, and so on. In DOM lingo, these individual pieces are known as nodes.
When working with HTML markup, the primary building block of your document is the element. However, when working with the DOM, the basic piece you will work with is the node. Remember that they are not identical. Although the DOM tree is dominated by element nodes, you need to be aware of several other types.
Just like a family tree in real life, each of the nodes is interconnected. A node can have a parent, a sibling, a child, and the occasional half-crazy "grandparent" that no one talks about. The document object is the family patriarch, serving as the container for all the nodes (the descendants) of the HTML file. The document object has no corresponding HTML element. The html, head, and body elements are contained by document.
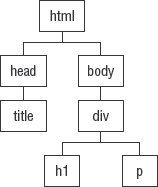
One point I should stress is that a DOM hierarchy is not identical to the natural element hierarchy you find in an HTML document. Take, for example, the following plain vanilla HTML file:
<html>
    <head>
        <title>Really Awesome Web Page</title>
    </head>
    <body>
        <div id="container">
            <h1>Pretty awesome heading</h1>
            <p id="para1">Pretty lame paragraph</p>
        </div>
    </body>
</html>
The levels of indentation show the natural element hierarchy in the document. Or, you can express the same hierarchy in a visual tree, as shown in Figure 2-4.
Every HTML element in the DOM has properties that correspond to the element's attributes. For example, an img has src and alt properties. However, DOM elements also have a set of common properties and methods.
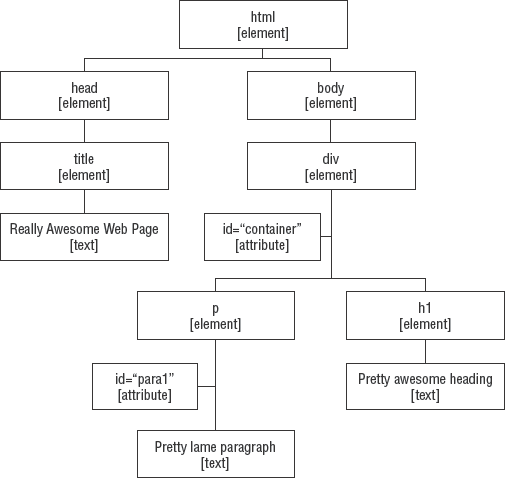
In the DOM, elements are just one type of node. As a result, you have to express other nodes of the document, such as attributes and text content, in the tree. The text content inside an element is a child node of the parent element. So, for example, Pretty lame paragraph is considered a child node of the p element that contains it.
Attributes are also considered nodes, but they are a bit of a special case. They don't participate in the parent/child relationships that the other nodes do. Instead, they are accessed as properties of the element node that contains them. Figure 2-5 shows the same document in a DOM tree.
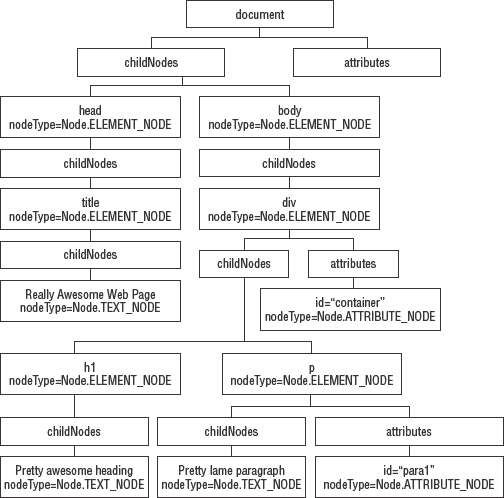
When working with the DOM in JavaScript, you typically work with the document object and DOM element objects. Each DOM element object has childNodes and attributes properties for accessing these nodes, as shown in Figure 2-6. And, as Figure 2-6 illustrates, each node has a nodeType property that can determine the type of node you are working with.
Before you begin to access the DOM, it is important to take a moment to identify the node types that the DOM contains and that you'll work with. The nodeType property of each DOM node returns a constant from the Node object that represents the type of node. These include:
Each of the Node constants represents an unsigned short number. ELEMENT_NODE represents 1, ATTRIBUTE_NODE equals 2, and so on.
You access the document object through a named object called, appropriately enough, document. Therefore, if you want to access a document object's property or method, you can do so directly. For example:
document.open();
You can access other elements and nodes in the DOM in a variety of ways, as shown in the following sections.
When you know the id of an element, the most common way to access the element node is by using getElementById(). This method searches the DOM looking for the one node that has an id value matching the string you specify. For example, consider the following:
<html>
<body>
<div id="header">
<p>Rawhide!</p>
</div>
</body>
</html>
If you wanted to access the div, you could use the following line:
var d = document.getElementById("header");The variable d now references the div id="header" element. You can now use the d variable to access its properties and perform methods on it. For example, to set its text color, you can use the following:
d.style.color = #cccccc;
In addition to accessing a specific element, you'll find occasions in which you'll want to access all element nodes of a given kind. You can also access a set of elements by using the document object's getElementsByTagName() method. This method takes an HTML element as its parameter:
var e = document.getElementsByTagName(elementName);
This method returns all the elements with the specified tag name as a NodeList, or a collection of nodes ordered by their appearance in the document.
For example, to get all the p elements in a document and return it as a NodeList, you can type the following:
var cPara = document.getElementsByTagName("p");After you have the collection of elements through either of these techniques, you can access a particular node in the NodeList by using its index number. For example, to access the first p element in the document, you can write this:
var p1 = cPara[0];
If you are accessing a specific p element, such as the first, you can combine both lines into a single call:
var p1 = document.getElementByTagName("p")[0];This returns the first p element and assigns it to the p1 variable.
More commonly, you can use it in a for loop to perform an action on each element:
for (var i = 0; i < cPara.length; i++)
{
    var para = cPara[i];
    para.style.color = #000000;
}
This code block iterates through each p element in the document and changes its text color to black. Notice that because the cPara variable is a nodeList, you can access its length property to determine the number of elements returned.
In addition, you can use getElementsByTagName() to return all element nodes inside the calling element by using * as the parameter:
var cElements = document.getElementsByTagName("*");This call returns all the descending elements inside the document, regardless of the level of hierarchy they sit on.
You can access nodes related to other nodes through more "familial ways" by using several node properties:
For example, you can use the parentNode property to get the parent node of a given element. For example, consider the following HTML snippet:
<div id="container">
<p id="p1"></p>
</div>
The following JavaScript returns a reference to the div element:
iParent = document.getElementById("p1").parentNode;A parent node must be the document, the element node, or a document fragment.
In addition, suppose you wanted to return all the nodes that were direct children under an element. You could use the childNodes property instead to retrieve its children as a NodeList and store it in a variable. Here's what you would code:
var c = document.getElementById("container");
var cChildren = c.childNodes;
In this code, the element with an id of container is assigned to the c variable. Its children are then assigned to the cChildren variable and are ready for action.
You can also use the hasChildNodes() method to verify whether an element has child nodes. For example:
var c = document.getElementById("container");
if (c.hasChildNodes())
{
    var cChildren = c.childNodes;
}Attributes are technically nodes in a DOM, but don't think of them as being equal to element nodes. You cannot, for example, retrieve a list of id attribute nodes through some sort of GetAttributeByName() method. In fact, except in rare occasions, there would be no practical reason for doing so because attributes are inextricably associated with an element. Not surprisingly, attributes are accessible through a DOM element by accessing its attributes property or by using one of two methods (hasAttributes() and hasAttribute()).
The object that returns from the attributes property is called NamedNodeMap object, which is similar to a NodeList except that its items are listed in arbitrary order, rather than a specific defined order.
If you want to retrieve a list of attributes for a given element, you might write something like the following:
var atts = document.getElementById("container").attributes;You can then work with the attributes by accessing their name and value properties. For example:
var atts = document.getElementById("container").attributes;
var str = "";

for (var i = 0; i < atts.length; i++)
{
str += "Name:" + atts[i].name + " Value:" + atts[i].value + "<br/>";
}
This code block gets the attributes for an element and outputs the name and value for each attribute to the str variable.
You can check to see whether an element has attributes by using the hasAttributes() method:
var ctr = document.getElementById("container");
if (ctr.hasAttributes())
{
    var atts = ctr.attributes;
}You can also access a specific attribute using the element's getAttribute() method. Simply enter the name of the attribute as the parameter. Suppose, for example, you want to get the href attribute from a link:
var att = document.getElementById("book").getAttribute("href");You can also check for the existence of an attribute with the hasAttribute() method. To verify whether an element has a style attribute, use the following code:
if (document.getElementById("contentMajor").hasAttribute("style"))
{
    var att = document.getElementById("contentMajor").getAttribute("style");
}You can do more with the DOM than simply look at a document. In fact, you can also manipulate it — creating nodes, adding them to the DOM tree, editing nodes, and removing parts of a document you have no more use for.
When it comes to creating nodes, the document is the one in charge. The document creates all the nodes, and then you can insert it into the DOM tree at the appropriate location.
In the sections that follow, I'll show you how to add and remove various parts of a document to and from the DOM.
The document object has several methods for creating nodes. I'll focus on element nodes here.
To create an element, use the document.createElement() method. This method creates an instance of the element specified by the parameter. For example, to create a p element, use this:
var para = document.createElement("p");The createElement() method creates the p element and returns the node, which is assigned to the para variable.
Note that the act of creating an element does not automatically add it to the DOM tree. The instance only exists in your script until you explicitly add it. It's in a sort of limbo land — a node without a country, if you will. Instead, you need to insert it into the document hierarchy to be a card-carrying node of the DOM.
DOM elements have two methods that you can use to add a node to the tree:
appendChild(node)adds the node as a child at the end of the current element'schildNodeslist.insertBefore(newNode, targetNode)adds a new element as a child of the current node but inserts it just before the node specified by thetargetNodeparameter.
To show these in action, I'll be working with this HTML document:
<html>
  <head>
    <title>FavFilms</title>
  </head>
  <body>
    <div id="content">
      <h1 id="header1">Welcome to the World of Cinema</p>
      <p id="p1">Favorite films are shown below:</p>
      <ol id="movieList">
        <li id="film_30329">The Shawshank Redemption</li>
        <li id="film_30202">Casablanca</li>
        <li id="film_20216">Braveheart</li>
        <li id="film_28337">Groundhog Day</li>
      <ol>
    </div>
  </body>
</html>
Suppose that I wanted to add a new film onto the end of the movieList. I'd use the following code:
var fa = document.createElement("li");
document.getElementById("movieList").appendChild(f);
At the same time, I'd like to add a movie in the spot just before Casablanca by using insertBefore():
var fb = document.createElement("li");
var casa = document.getElementById("film_30202");
document.getElementById("movieList").insertBefore(f, casa);
Although there is no insertAfter() method, you can perform the equivalent functionality by using insertBefore() in combination with the nextSibling property of the targetNode. So, supposing I wanted to add a node after Braveheart, I could use this:
var fb = document.createElement("li");
var br = document.getElementById("film_20216");
document.getElementById("movieList").insertBefore(f, br.nextSibling);
It's time to look at our results. The ordered list would now be updated to include the new element I added:
<ol id="movieList">
  <li id="film_30329">The Shawshank Redemption</li>
  <li/>
  <li id="film_30202">Casablanca</li>
  <li id="film_20216">Braveheart</li>
  <li/>
  <li id="film_28337">Groundhog Day</li>
  <li/>
<ol>
The document object contains methods for creating the rest of the common node types: attribute, text, comment, and document fragment. Each of these methods returns a node that you can add to your document using appendChild() or insertBefore().
An attribute node represents an element's attribute. To create an attribute, you use createAttribute(). For example:
var a = document.createAttribute("alt");
a.nodeValue = "Welcome to DOM and DOMMER.";
document.getElementById("logo").appendChild(a);
A text node is a container of text. When you are introduced to the DOM, it is probably natural to think of text being a property of an element. But text inside of an element is contained by a child text node. To create a text node, use createTextNode(). For example, the following code snippet creates a text node and adds it to the end of a p element with an id of para:
var t = document.createTextNode("I scream for ice cream.");
document.getElementById("para").appendChild(t);
A comment node represents an HTML comment. To create it, use createComment():
var c = document.createComment("Insert new toolbar here.");
document.getElementById("toolbar_container").appendChild(c);
Finally, a document fragment is a temporary off-line document that you can use to create and modify part of a tree before you add the fragment to the actual DOM tree. When you're manipulating the DOM, it's much more efficient to work with a document fragment during the processing of a subtree (less overhead) than to always work directly with the actual DOM. To create a document fragment, use createDocumentFragment(). For example, the following script creates a document fragment, adds nodes to it, and appends it to the document:
var df = document.createDocumentFragment();

for (var i = 0; i < 30; i++)
{
  var e = document.createElement("p");
  var t = document.createTextNode("Line " + i);
  e.appendChild(t);
  df.appendChild(e);
}

document.getElementById("content").appendChild(df);
Now that you know how to create the other node types, I want to revisit the movie list example in the previous section. Instead of adding empty li elements, I want to add attribute and text nodes needed to fill out the ordered list appropriately.
First, I want to add a new film onto the end of the movieList using the following code:
var e; // Element
var a; // Attribute
var t; // Text
var nd; // Target/Parent

e = document.createElement("li");
a = document.createAttribute("id", "film_29299");
t = document.createTextNode("Babette's Feast");
e.appendChild(a);
e.appendChild(t);
document.getElementById("movieList").appendChild(e);

e = document.createElement("li");
a = document.createAttribute("id", "film_29323");
t = document.createTextNode("Amélie (Le Fabuleux destin d'Amélie Poulain)");
e.appendChild(a);
e.appendChild(t);
nd = document.getElementById("film_30202");
document.getElementById("movieList").insertBefore(e, nd);
e = document.createElement("li");
a = document.createAttribute("id", "film_30276");
t = document.createTextNode("Vertigo");
e.appendChild(a);
e.appendChild(t);
nd = document.getElementById("film_20216");
document.getElementById("movieList").insertBefore(f, nd.nextSibling);The ordered list will now look the way I want it to:
<ol id="movieList">
  <li id="film_30329">The Shawshank Redemption</li>
  <li id="film_29323">Amélie (Le Fabuleux destin d'Amélie Poulain)</li>
  <li id="film_30202">Casablanca</li>
  <li id="film_20216">Braveheart</li>
  <li id="film_30276">Vertigo</li>
  <li id="film_28337">Groundhog Day</li>
  <li id="film_29299">Babette's Feast</li>
<ol>
The setAttribute() method is a shortcut to creating an attribute and adding it to an element. This method sets the attribute value for an element, but if the attribute doesn't exist, the method creates it. It takes the attribute name and value as parameters:
setAttribute("name", "value")For example, if you want to change the href of a link, you might use this:
document.getElementById("myblog").setAttribute("href",
"http://richwagnerwords.com");
Here's a little more detailed example of using setAtttribute() to clean up a document. Suppose you have an HTML document that has attributes with uppercase names. If you want to convert them to all lowercase, you can use the following script:
var all = document.getElementsByTagName("*");
for (var i = 0; i < all.length; i++)
{
  var e = all[i];

  for (var j = 0; j < all.length; j++)
  {
    e.attibutes[j].setAttribute(all.attributes[j].nodeName.toLowerCase());
  }
}
The script looks for all the elements in a document and returns them as a NodeList. The first for loop iterates through all the elements and assigns the e variable to be the current element in the loop. The second for loop cycles through all the attributes of e and uses setAttribute() in combination with toLowerCase().
Although no moveNode() method is defined in JavaScript, appendChild() and insertBefore() do the same thing. In addition to adding new nodes you create, these two methods enable you to move a node from one location to another in the tree. For example, consider the following document:
<html>
  <head>
  </head>
  <body>
    <div id="header">
      <img id="logoImg" src="logo.png"/>
    </div>
    <div id="footer">
    </div>
    </body>
</html>
If you want to move the image from the header to the footer, you can write this:
var i = document.getElementById("logoImg");
document.getElementById("footer").appendChild(i);
When this code is executed, the appendChild() method moves the logoImg from its current location and adds it as a child to the footer div.
You can clone a node and add it elsewhere to the document tree by using the DOM element's cloneNode() method. This method copies the specified node and returns a new instance that is not part of the DOM. You can then add it wherever you want using the familiar appendChild() and insertBefore() methods.
This method takes a single Boolean parameter:
cloneNode(deepBoolean)
If the parameter is set to true, all subnodes of the current node are copied along with it.
When cloning nodes, you have to be careful. Every part of the node comes with using cloneNode(), including its id. Be sure to update the id before you add it to the document tree.
To demonstrate, I'll begin with the following document:
<html>
  <head>
  </head>
  <body>
    <div id="right_box">
<p id="main">All content should begin with this sentence.</p>
</div>
<div id="left_box">
</div>
</body>
</html>If I want to copy the paragraph to the left_box div, I can enter the following:
var cn = document.getElementById("main_right").cloneNode(true);
cn.setAtttribute("id", "main_left");
document.getElementById("left_box").appendChild(cn);To remove a node, call the removeChild() method of its parent, specifying it as the parameter. For example, to remove a paragraph with id="p1", use the following code snippet:
var cp = document.getElementById("p1");
cp.parentNode.removeChild(cp);
In this code, the p variable is assigned the returning node of the specified paragraph element. Using parentNode to reference its parent, the removeChild() method is then called, specifying cp as the node to delete. The paragraph is removed from the DOM.
Or, suppose you want to remove all the children an element. To do so, you can loop through all the child nodes and delete them one at a time. Here's the code you can use:
while (bodyContent.childNodes[0])
{
  bodyContent.removeChild(bodyContent.childNodes[0]);
}
In this routine, the while loop checks to see if a child node exists for the current node. If it does, the child node is removed using removeChild(). This process repeats until there are no childNodes[0].
Suppose you have had it with an attribute and simply want to rid yourself of the pain and aggravation. Or maybe you just don't have a use for it anymore. If so, you can use the removeAttribute() method to delete an attribute from the DOM. The following rather draconian script removes all the alt attributes from the document — simply out of spite! Here's the code:
var kitAndKaboodle = document.getElementsByTagName("*");
for (var i = 0; i < kitAndKaboodle.length; i++)
{
  kitAndKaboodle[i].removeAttribute("alt");
}In this chapter, I walked through some of the basics that will help you as you begin iPhone web app development. I began by showing you how to use and incorporate the new HTML 5 media elements into your web app to display rich media and serve as an alternative to using Flash or another unsupported technology. The chapter continued with an in-depth primer on the basics of JavaScript, which is a skill set you'll want to have as you begin to create functionality for your web apps. Finally, I closed out with a survey of the Document Object Model and how you can use it to find page data as well as manipulate it.