Lesson 1. Introducing Google+
In this lesson, you explore Google+ and learn how to set up your Google+ account.
Exploring Google+
Google+ is Google’s social networking site that emphasizes real-life sharing where you’re in control of exactly who sees—or doesn’t see—your content. Launched on June 28, 2011, Google+ has tens of millions of users, with thousands of new users joining every day.
In addition to its extensive social sharing features, Google+ also enables you to chat with friends via text and video, upload unlimited photos and videos, play games, and more. Google+ integrates automatically with other Google applications you may already use, including Profiles, Picasa, Gmail, and more.
If you use other social sites such as Facebook, LinkedIn, or Twitter, the basic concepts of Google+ should be familiar to you. Google+ has several unique features, however, and its own terminology. You’ll learn more about each of these features as you read through this book, but for now, it’s a good idea to become familiar with these Google+ terms:
• Profile. Your profile is your public presence on Google+ that includes your photo, information about your background, and links to your other sites on the Web. You can create a Google+ profile only for an individual. If you use Facebook or LinkedIn, the concept of a profile should be familiar to you. With Google+, you have control over each section on your profile and can specify exactly who can see that section. For example, you can display a detailed profile to people you know and reveal less information to those you don’t. To view a sample Google+ profile, visit my profile at https://plus.google.com/108294135476012165013.
Note: How Can I Shorten My Google+ Profile URL?
By default, your Google+ profile URL includes a 21-digit identifier. Google+ doesn’t offer custom URLs at this time, but you can use a third-party tool, such as gplus.to (http://gplus.to) or Plusya (http://plusya.com), to create a custom URL. For example, my Google+ profile shortened with gplus.to is http://gplus.to/PatriceRutledge.
• Page. A Google+ page enables a business, brand, or organization to have a professional presence on Google+. If you’re familiar with Facebook pages, the functionality of Google+ pages should be familiar to you. To view a sample Google+ page, visit Google’s official Google+ page at https://plus.google.com/116899029375914044550.
• Circles. Circles enable you to organize your Google+ network by placing people into distinct groups, such as Family, Friends, and Acquaintances. When you post content on Google+, you can specify exactly which circles can view each post. You can also specify privacy settings by circle. This gives you complete control over who sees what content. Placing people in a Google+ circle is similar to following people on Twitter. They don’t need to accept a formal request and can choose whether they want to place you in one of their circles (in other words, whether they want to follow you back).
• Stream. The Google+ stream offers a central location for viewing the posts, links, photos, and videos that you and others have shared. You can join the conversation on the stream by adding your own posts and comments, sharing interesting content you discover, and supporting quality posts using the Google +1 button. If you’re familiar with Facebook, the Google+ stream is similar to the Facebook wall but with added privacy controls.
• +1 button. The Google +1 button offers a way to publicly show your support for a post that you like. The +1 button is available on Google+ and, optionally, on other websites and blogs that choose to enable this button. Google+ uses the term “+1” as both a noun and a verb. Using Google+ terminology, you +1 a post using the +1 button. In many ways, the +1 button is similar to the Like button on Facebook.
• Hangouts. Hangouts enable you to get together with other Google+ users using live video chat. You can even watch a YouTube video together during a hangout. In addition to regular hangouts, Google+ also offers Hangouts with Extras and Hangouts On Air, which enable you to collaborate with others in real-time and reach a wider audience.
• Messenger. Participate in group texting, either one-on-one or with the people in one of your Google+ circles. You can invite others or receive a notification on your status bar when someone invites you. This feature is currently available only for the Google+ Android app and Google+ iPhone app.
• Instant Upload. Upload photos and videos automatically from your Android 2.1+ smartphone or iPhone to a private Google+ album. You can later make any photos or videos public if you choose to share them.
Signing Up for Google+
Google+ requires you to have an existing Google account. If you already use another Google product—such as Gmail, AdWords, or Reader—you have a Google account. For example, you can use your Gmail address to sign up for Google+. If you don’t have a Google account, you can sign up for one when you sign up for Google+. In addition, you must be at least 18 years old to participate on Google+.
Note: How Does Google+ Work with Google Apps?
Companies that use Google Apps can manually enable Google+ for their users. If your company has enabled this feature, you can sign up for a Google+ profile at www.google.com/+ just like anyone else with a Google account.
To sign up for Google+, follow these steps:
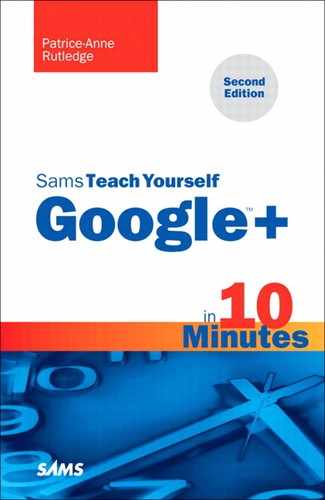
1. Navigate to www.google.com/+, as shown in Figure 1.1.
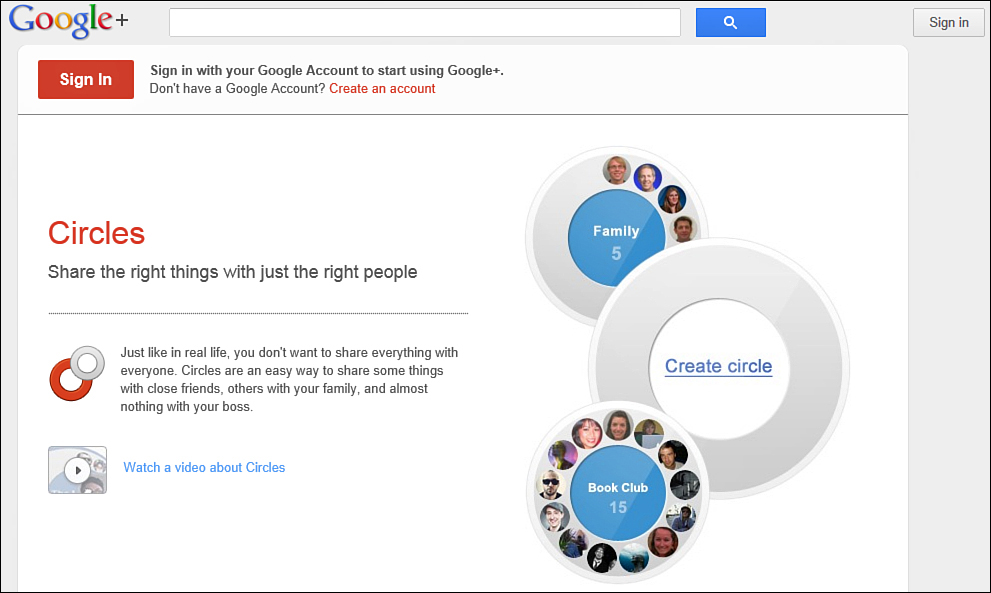
Figure 1.1. Signing up for Google+ takes just a few minutes.
2. If you aren’t signed in to your Google account, click the Sign In button to open Google’s sign-in page. Enter your email and password and click the Sign In button. If you are signed in to your Google account, you don’t need to sign in again.
Note: How Do I Sign Up for a Google Account?
If you don’t have an existing Google account, click the Create an Account link on the Google+ page. The Create an Account page opens, where you can sign up for a Google account. When you’re done, return to the Google+ page to sign up for Google+.
3. Verify that your first and last names are correct on the Google+ sign-up page, shown in Figure 1.2. By default, Google+ uses the First Name and Last Name fields from your Google account.
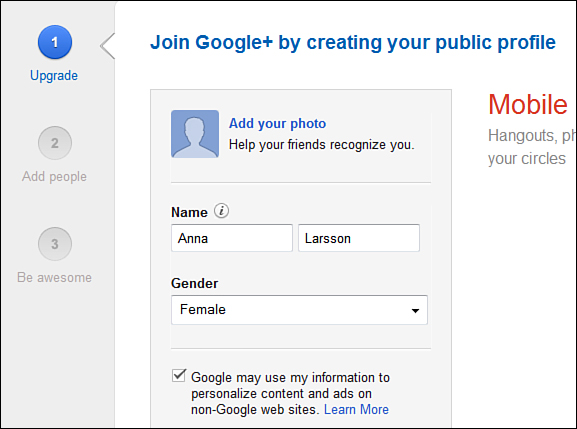
Figure 1.2. Google+ connects with your existing Google account.
Tip: You Can Also Sign Up for Google+ by Responding to an Invitation
If a friend invites you to Google+, you’ll receive your invitation by email. Click the Join Google+ button in the email you receive. If your email address is associated with a Google account, the Google+ sign-up page displays (refer to Figure 1.2). If Google doesn’t recognize your email address, you’re prompted to sign in to your Google account or create a new account.
Caution: You Must Use Your Real Name on Google+
Google+ requires that you use your real name when creating a Google+ profile. If you have privacy concerns, you can specify exactly who has access to the information you post on Google+. To learn more about the Google+ name policy and its exceptions, visit http://support.google.com/plus/bin/answer.py?hl=en&answer=1228271.
4. Select your Gender from the drop-down list.
5. Click the Add Your Photo link to open the Select Profile Photo dialog box, shown in Figure 1.3.
Figure 1.3. Select a photo to display on your Google+ profile.
Tip: Add a Photo Using Drag and Drop
Optionally, you can drag and drop a photo to the Select Profile Photo dialog box. For example, if you have Windows Explorer open in a separate, minimized window, you can select your photo and drag it to this dialog box.
6. Click the Select a Photo from Your Computer button.
7. In the File Upload dialog box, select the photo you want to upload and click the Open button. Depending on your browser and operating system, this dialog box and button could have different names.
8. In the Select Profile Photo dialog box, shown in Figure 1.4, drag the four white squares that surround your photo to crop it to the desired size.

Figure 1.4. Crop your photo to fit in the space provided.
Tip: Quickly Fix Problems with Your Photo
Optionally, you can click the Left or Right button next to your photo to fix rotation problems. If you need to fix cosmetic issues such as red eye or color contrast, click the Creative Kit button to open Picnik (www.picnik.com), a web-based photo-editing application where you can enhance your photo.
9. Click the Set as Profile Photo button. Google+ returns to the sign-up box where your photo now displays (see Figure 1.5).
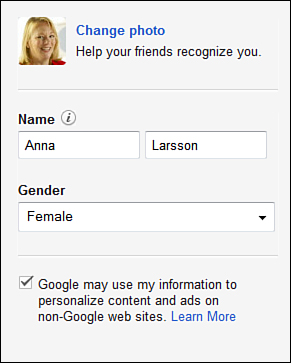
Figure 1.5. Return to the sign-up page to finish the sign-up process.
10. By default, Google uses your information to personalize content and ads on non-Google websites. If you don’t want Google to use your Google+ data to personalize ads in this manner, remove the check mark from the check box that displays below your photo.
11. Click the Upgrade button in the lower-right corner of the page to join Google+.
12. Optionally, you can search for your email contacts on sites such as Yahoo! or Hotmail. In general, however, it’s a good idea to complete your profile first before connecting with others. Click the Continue button to skip this step for now.
13. Google+ prompts you to add people to circles, suggesting several people you might know, based on your email address. You can add people to circles now or add them later. In general, it’s a good idea to understand how circles work and affect your privacy before adding a lot of people to circles. See Lesson 4, “Managing Your Network with Circles,” for more information. Click the Continue button to go to the next step.
14. Google+ prompts you to add some well-known people and celebrities to your circles. Again, you can do this now or wait until you’ve learned more about circles. If you want to add people now, it’s recommended to add celebrities to your Following circle because you don’t actually know them. Click the Continue button to go to the next step.
15. Google+ prompts you to enter basic profile data, such as the school you attended, your employer, and the places you lived (see Figure 1.6). When you start typing the name of a school or employer, Google+ displays a drop-down list of potential matches for you to choose from. Although entering this data is optional, it makes it easier for the people you know to find you.
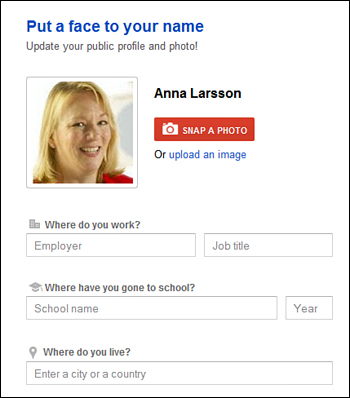
Figure 1.6. Add details about your schools, employers, and places you’ve lived.
Note: You Can Expand Your Profile After Signing Up for Google+
Google+ asks you to enter basic profile data during the sign-up process, but you can expand your profile later, even specifying exactly who can see each section of your profile. See Lesson 2, “Working with Google+ Profiles,” for more information.
16. Click the Upload an Image link if you want to change the profile photo you uploaded. Optionally, you can click the Snap a Photo button to a take a picture with your webcam. If you’re satisfied with your profile photo, you can skip this step.
17. Click the Finish button in the lower-right corner of the screen.
Google+ opens, displaying your stream (see Figure 1.7).
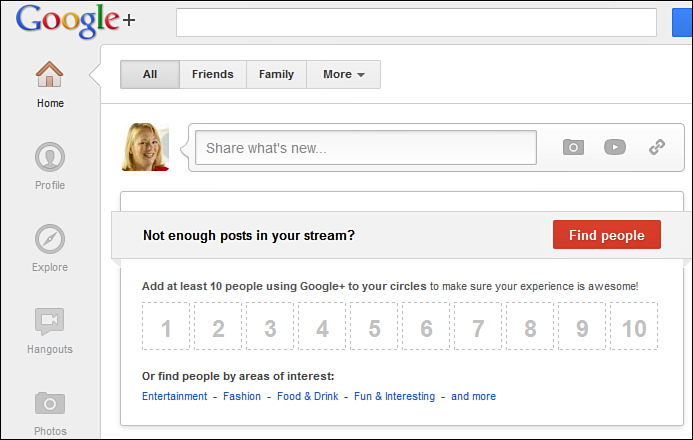
Figure 1.7. Your stream displays posts from people in your circles.
Your stream displays the posts of the people you added to circles during steps 12, 13, and 14 as well as Hot on Google+ posts from people not in your circles that Google+ deems particularly interesting or informative. If you haven’t added anyone yet, your stream displays only Hot on Google+ posts—for now. In Lesson 7, “Viewing Your Google+ Stream,” you learn how to customize the number of Hot on Google+ posts that display on your stream.
From here, you can complete your profile, add people to circles, specify your privacy settings, and then start participating on Google+ by adding your own content and commentary.
Signing In to Google+
After you have a Google+ account, you can sign in by going to the Google+ website (www.google.com/+), clicking the Sign In button, and entering your email address and password (refer to Figure 1.1).
If you’re already signed in to another Google application (such as Gmail), click your first name in the upper-left corner of the Google bar to open Google+ (see Figure 1.8). Be aware that you must have signed up for Google+ for this link to be available.
Figure 1.8. You can also access Google+ from the Google bar.
Navigating Google+
The left side of Google+ displays a navigation ribbon that enables you to access popular Google+ features easily (see Figure 1.9).

Figure 1.9. Quickly find the content and features you want using the Google+ navigation ribbon.
The ribbon includes the following icons: Home, Profile, Explore, Hangouts, Photos, Circles, Games, Pages, and More. Because the ribbon is dynamic, the order in which the icons display varies and not all icons display at the same time. (Some are hidden in the More pop-out menu.) You can use your mouse to drag and drop icons so that those you use the most are on the top. The only icons you can’t move are Home and More (but you can change the icons that display in More).
If you don’t use a particular icon very often, you can drop it on the More icon where it stays hidden from view until you need it. For example, if you don’t have a page or don’t play games often, you could move those icons to More.
To access related features, pause your mouse over an icon to display a menu of options (not all icons have this feature yet). For example, when you pause your mouse over the Photos icon, you can choose to add photos, view photos from your phone, or view your photo albums. When you pause over the More icon, you can view the icons you’ve hidden from view.
Accessing Popular Google+ Features
The upper-right corner of every Google+ page gives you quick access to popular Google+ features. When you click your full name or your gravatar (small photo), a pop-up box opens, as shown in Figure 1.10.

Figure 1.10. Quickly access popular features.
In this box, you can click the following buttons and links:
• Notifications. Open the Notifications menu, which displays your latest notifications. The Notifications button tells you how many unread notifications you have by highlighting this number in red. If you don’t have any unread notifications, the button displays the number zero (0) and isn’t highlighted in red. See Lesson 9, “Viewing and Managing Notifications,” for more information.
• Share. Open the share box where you can share text, photos, videos, and links. See Lesson 6, “Sharing Content on Google+,” for more information.
• Account. Open the Account Overview page, described in Lesson 5, “Managing Google+ Settings and Privacy.”
• Privacy. Open the Profile and Privacy page, described in Lesson 5.
• View Profile. Open your Google+ profile, described in Lesson 2, “Working with Google+ Profiles.”
• Add Account. Open a new window that enables you to sign in to another Google account. To learn more about multiple sign-in, click the Learn More link.
• Sign Out. Sign out of Google+. If you’re using a public computer or if other people have ready access to your own computer, you should sign out of Google+ when you’re finished using it.
If you create any Google+ pages (see Lesson 3, “Creating a Google+ Page for Your Business,” for more information), you will be able to access them from this pop-up box as well.
Getting Help
Although Sams Teach Yourself Google+ in 10 Minutes, Second Edition should provide answers to most of your Google+ questions, at times you might want to refer to online help. For example, Google+ Help keeps you updated on new Google+ features that are released after this book’s publication.
To access Google+ Help, click the Home icon on the Google+ ribbon and select Help from the drop-down menu in the upper-right corner of the page (see Figure 1.11). The Google+ Help page opens, shown in Figure 1.12.
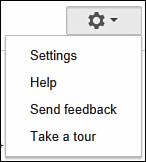
Figure 1.11. Access Help from this menu of options.
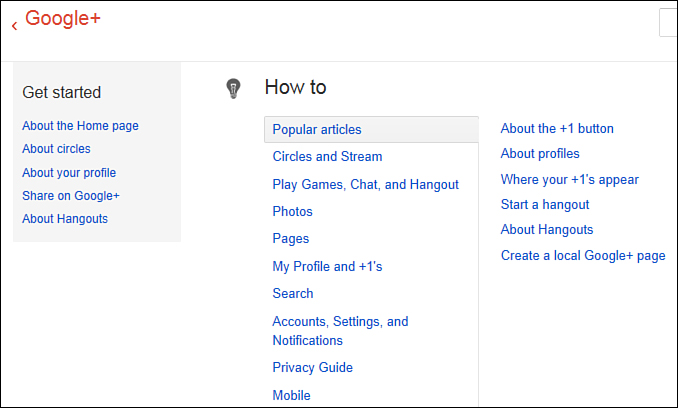
Figure 1.12. Learn what’s new on Google+.
Here you can search for answers to your questions, review information about popular topics, and learn what’s new on Google+.
Sending Feedback
If you run into a problem on Google+ or want to give Google suggestions about future features or improvements, you can submit feedback.
To submit feedback to Google, click the Home icon on the Google+ ribbon and select Send Feedback from the drop-down menu in the upper-right corner of the page (refer to Figure 1.11). The Google Feedback dialog box opens, shown in Figure 1.13, where you can enter your feedback. Depending on your operating system and browser, the appearance of this dialog box could vary.
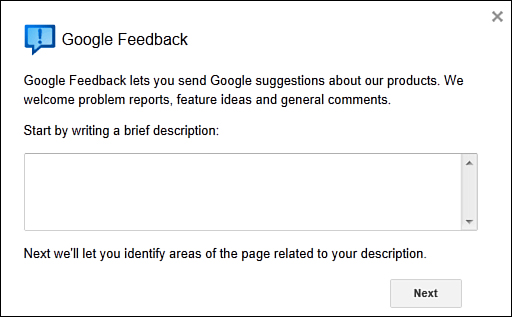
Figure 1.13. Send Google your feedback about Google+.
Tip: Submit One Feedback Report per Problem
If you have multiple problems, submit a feedback report for each problem. This makes it easier for Google to categorize and respond to your feedback.
Summary
In this first lesson, you learned about the many features Google+ offers and how to sign up for an account. Next, it’s time to create a more detailed profile.