
Welcome to Day 21! As you've already seen throughout the book, client-side programming in JavaScript can come in handy when you're working with JSP applications. In fact, creating JSP/JavaScript hybrid applications is often the best way to get things done. You may want to check the user's data before sending it on to the server, support multiple forms in a Web page, open another window to give the user additional information or help, or let the user calculate some interim results, and so on. Today you'll get an introduction to JavaScript programming from a JSP programmer's perspective.
Because today is also the last day of our JSP coverage, it's appropriate to take a look at how to deploy your Web applications now that you've created them. Among other things, you'll learn how to create Web Archive (WAR) files, which you can simply drop into the webapps directory to deploy your application. You'll also learn how to create standard Java Archive (JAR) files to deploy your compiled Java code.
Here are today's topics:
Working with JavaScript
Checking user data
Creating
<SCRIPT>elementsCreating JavaScript variables
Using JavaScript operators
Creating JavaScript functions
Deploying your applications
Creating WAR files for deployment
Creating JAR files for deployment
Today's work starts with an introduction to JavaScript from the JSP programmer's point of view.
JavaScript is very valuable to the JSP programmer. Say, for example, that you want to check the data a user has entered before using valuable server time to work with incorrect data. One good way of doing this is to use JavaScript as a frontline data checker—it operates in the browser, so no roundtrip is required.
Tip
To learn more about regular expressions, visit http://www.perldoc.com/perl5.6/pod/perlre.html.
Example 21.1. Checking User Data Using JavaScript (ch21_01.html)
<HTML>
    <HEAD>
        <TITLE>Verifying User Data</TITLE>
        <SCRIPT LANGUAGE="JavaScript">
            <!--
            function checker()
            {
                var regExp1 = /^(d{1,2})/(d{1,2})/(d{2})$/
                var regExp2 = /^(d{1,2})/(d{1,2})/(d{4})$/
                var result1 = document.form1.text1.value.match(regExp1)
                var result2 = document.form1.text1.value.match(regExp2)
                if (result1 == null && result2 == null) {
                    alert("Sorry, that's not a valid date.")
                    document.form1.text1.value = ""
                    return false
                } else {
                    document.form1.submit()
                }
            }
            //-->
        </SCRIPT>
    </HEAD>

    <BODY>
        <H1>Verifying User Data</H1>
        <FORM NAME="form1" ACTION="ch21_02.jsp" METHOD="POST" ONSUBMIT="return checker()">
            Please enter a date:
            <INPUT TYPE="TEXT" NAME="text1">
            <INPUT TYPE="SUBMIT" value="Submit">
        </FORM>
    </BODY>
<HTML>
You can see this page at work in Figure 21.1.
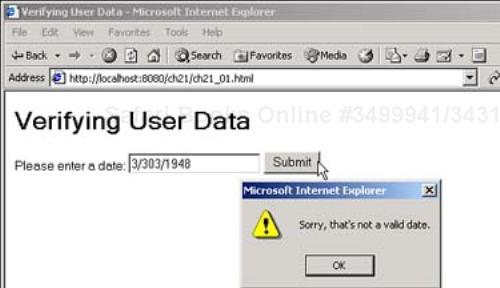
That function appears in the <SCRIPT> element in Listing 21.1; if the user's data is not in valid format, the script displays an alert dialog box, as you can see in Figure 21.1. It also clears the data in the page's text field, and returns a value of false from this function, which tells the browser not to submit data to the server:
if (result1 == null && result2 == null) {
    alert("Sorry, that's not a valid date.")
    document.form1.text1.value = ""
    return false
        .
        .
        .
On the other hand, if the user's data was in the correct format, the JavaScript code submits the form's data. From the browser's point of view, elements such as forms and buttons and images are all represented by objects, so to submit the form's data, the JavaScript code uses the form object's submit method:
if (result1 == null && result2 == null) {
    alert("Sorry, that's not a valid date.")
    document.form1.text1.value = ""
    return false
} else {
    document.form1.submit()
}
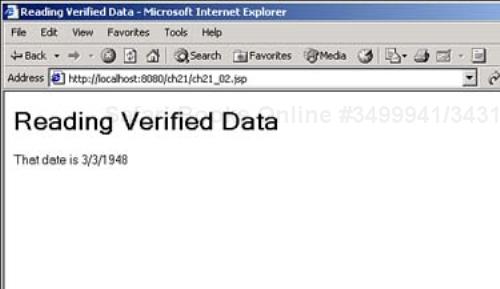
If the user enters data in the correct format and clicks the Submit button, the form's data is submitted to the JSP page you see in Listing 21.2, which displays that date, as you see in Figure 21.2.
Notice how much the JavaScript code in Listing 21.1 looks like standard Java. The main difference you see is that there are no semicolons following each statement here. In fact, the JavaScript standard says that you should use a semicolon after each statement, just as Java does, but doesn't insist on it. Because JavaScript doesn't demand the use of semicolons, they've been dropped in common usage, so you won't see them in today's work (but you can put them in if you want to). As you can see, having a basic understanding of Java means that you can already understand and write a great deal of JavaScript.
This example points out that data verification is one important job JavaScript can perform for you. Note that using regular expressions is pretty advanced—you don't need to use regular expressions to check user data. You can check whether data fits into a numerical range:
if (document.form1.text1.value <= 0) {
    alert("Please enter a positive bid amount.")
    return false
} else {
    document.form1.submit()
}
Or you can just make sure that the user entered any value:
if (document.form1.text1.value == "") {
    alert("Please enter your name.")
    return false
} else {
    document.form1.submit()
}
As you can see in this code, one of the most powerful aspects of JavaScript is that it lets you access the data in HTML controls, and lets you work with that data right in the browser.
JavaScript gives you access to all the HTML controls and their data in a Web page, which gives you a lot of power. Take a look at the following text field:
<FORM NAME="form1" ACTION="ch21_02.jsp" METHOD="POST" ONSUBMIT="return checker()">
    Please enter a date:
    <INPUT TYPE="TEXT" NAME="text1">
    <INPUT TYPE="SUBMIT" value="Submit">
</FORM>
How will you refer to this text field in JavaScript code? You begin with the document object, which refers to the current document, followed by the form object that contains the text field form1 (named by using the <FORM> element's NAME attribute), followed by the text field text1 (named by using the <INPUT> element's NAME attribute). That gives you the expression document.form1.text1 for this text field, and you can use this expression in JavaScript to refer to the text field.
The text in the text field is stored in the text1 object's value property (matching the HTML attribute of the same name), so you can access that text as document.form1.text1.value in your JavaScript code. For example, to display the text "Hello from JavaScript" in the text field, you can use the code
document.form1.text1.value = "Hello from JavaScript"
That's the way to access the data in the controls in a Web page's forms—as document.formname.controlname.property.
But what about the actual JavaScript code that works with that data? That code goes into a <SCRIPT> element.
The JavaScript code you saw in the first example is enclosed in an HTML <SCRIPT> element, and you can use this element's LANGUAGE attribute to indicate what you're scripting in JavaScript:
<SCRIPT LANGUAGE="JavaScript">
    <!--
    function checker()
    {
        var regExp1 = /^(d{1,2})/(d{1,2})/(d{2})$/
        var regExp2 = /^(d{1,2})/(d{1,2})/(d{4})$/
        var result1 = document.form1.text1.value.match(regExp1)
        var result2 = document.form1.text1.value.match(regExp2)
        if (result1 == null && result2 == null) {
            alert("Sorry, that's not a valid date.")
            document.form1.text1.value = ""
            return false
        } else {
            document.form1.submit()
        }
    }
    //-->
</SCRIPT>
Note
The actual script code is often enclosed in an HTML comment so that non-JavaScript browsers don't simply display the script instead of hiding it.
Where do you put the <SCRIPT> element? You usually put this element in the page's <HEAD> section, as you see in Listing 21.3. This example displays a button, as you see in Figure 21.3.
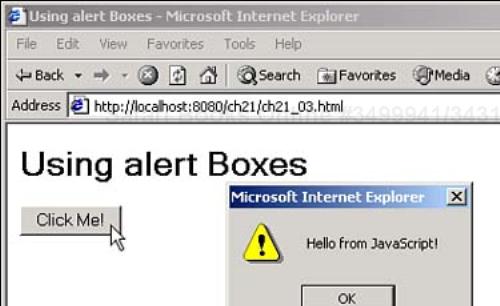
When the user clicks the button, the browser uses the button's ONCLICK attribute to execute the JavaScript function displayer, which uses the built-in alert method to display an alert box with a message:
<SCRIPT LANGUAGE="JavaScript">
    <!--
    function displayer()
    {
        alert("Hello from JavaScript!")
    }
    //-->
</SCRIPT>
If the call to the alert method is not inside a function, it is run as soon as the <SCRIPT> element is loaded by the browser:
<SCRIPT LANGUAGE="JavaScript">
    <!--
        alert("Hello from JavaScript!")
    //-->
</SCRIPT>
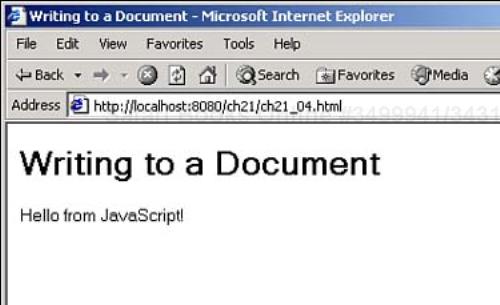
Sometimes, you can't place <SCRIPT> elements in the <HEAD> section of a page, however—for example, the JavaScript document object has a write method that writes to the Web page itself. However, you can't write to the Web page until the <BODY> element has been loaded. In this case, you can place the <SCRIPT> element in the <BODY> element, as you see in Listing 21.4.
This example writes the message "Hello from JavaScript!" to a Web page when that Web page is loaded, as you can see in Figure 21.4.
However, the <SCRIPT> element is usually stored in a Web page's <HEAD> element. Now that you've learned how to enclose JavaScript code in a <SCRIPT> element, the next step is to start doing something with that code—and the first step is to see how to work with data using variables.
JavaScript is significantly different from Java in one respect—it's not a strongly typed language. Internally, JavaScript keeps track of the type of data stored in variables, but in code, you only need to use the var statement to create a variable.
In this case, suppose you want to store the number of days left until summer in a variable named numberOfDaysToSummer, which you can declare using var:
<SCRIPT LANGUAGE="JavaScript">
    <!--
        var numberOfDaysToSummer
            .
            .
            .
    // -->
</SCRIPT>
Now you can assign this new variable a value, and display that value using document.write, as you see in Listing 21.5.
Example 21.5. Using Variables in JavaScript (ch21_05.html)
<HTML>
    <HEAD>
        <TITLE>
            Working With JavaScript Variables
        </TITLE>
    </HEAD>

    <BODY>
        <H1>Working With JavaScript Variables</H1>
        <SCRIPT LANGUAGE="JavaScript">
        <!--
            var numberOfDaysToSummer
            numberOfDaysToSummer = 119
            document.write("Number of days until summer: " + numberOfDaysToSummer + ".")
        // -->
        </SCRIPT>
     </BODY>
</HTML>
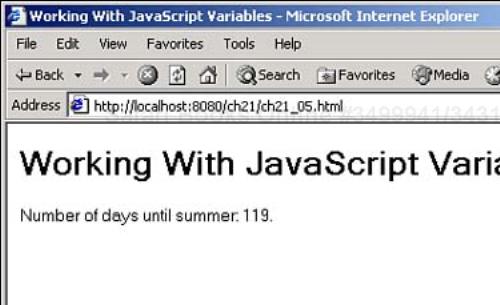
You can see the result in Figure 21.5, where the value in numberOfDaysToSummer isdisplayed.
Note that this code just used the var statement to declare numberOfDaysToSummer—you didn't have to say what type of data will be stored in this variable. How does JavaScript decide internally what type of data is stored in a variable? It makes its decision based on how you treat that data—for example, if you use a numerical comparison, JavaScript treats your data as a number:
if (document.form1.text1.value < 0) {
        .
        .
        .
}
Like Java, JavaScript supports operators such as the < logical operator, and plenty more as well.
JavaScript has all kinds of operators—assignment, comparison, arithmetic, bitwise, logical, string, and special. Most of them are recognizable from Java; you can find them all listed in Table 21.1, along with what they do.
Table 21.1. The JavaScript Operators
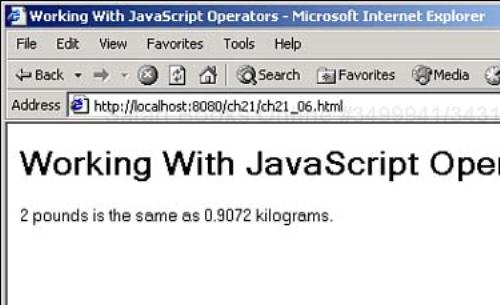
Listing 21.6 shows an example using JavaScript operators to convert pounds to kilograms (note that this example uses the JavaScript toPrecision method to limit the numerical precision displayed in the result).
Example 21.6. Using Operators in JavaScript (ch21_06.html)
<HTML>
    <HEAD>
        <TITLE>
            Working With JavaScript Operators
        </TITLE>
    </HEAD>

    <BODY>
        <H1>Working With JavaScript Operators</H1>
        <SCRIPT LANGUAGE="JavaScript">
        <!--
             var pounds = 2.0
             var kilograms = pounds / 2.2046
             document.write(pounds + " pounds is the same as " + kilograms.toPrecision(4)
 + " kilograms.")
        // -->
        </SCRIPT>
     </BODY>
</HTML>
+ " kilograms.")
// -->
</SCRIPT>
</BODY>
</HTML>
You can see the results in Figure 21.6.
Like Java, JavaScript supports two branching statements: if and switch. The syntax of both is just like Java—here's what the syntax of the if statement looks like:
if (condition) {
    statements1
}
[else {
    statements2
}]
And here's the switch statement:
switch (expression){
    case label1:
        statements
        break
    case label2:
        statements
        break
        .
        .
        .
    [default:
        statements]
}
As you can see, they're just like their Java counterparts. And like Java, JavaScript also supports loops, which are next.
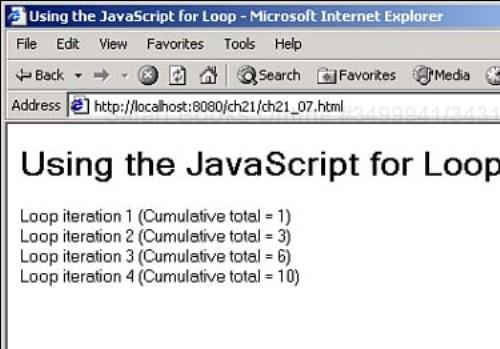
Just as in Java, there are several kinds of loops available in JavaScript. As you might expect, they're the same loops—the for loop, the for...in loop, the while loop, and the do...while loop. These loops work just as they do in Java, and you can see an example in Listing 21.7 using the for loop—note how much the code looks like Java code.
Example 21.7. Using the for Loop in JavaScript (ch21_07.html)
<HTML>
    <HEAD>
        <TITLE>
            Using the JavaScript for Loop
        </TITLE>
    </HEAD>

    <BODY>
        <H1>Using the JavaScript for Loop</H1>
        <SCRIPT LANGUAGE="JavaScript">
            <!--
            var loopIndex, total
            total = 0
            for (loopIndex = 1; loopIndex < 5; loopIndex++) {
                total += loopIndex
                document.write("Loop iteration "
                    + loopIndex + " (Cumulative total = "  + total + ")<BR>")
            }
            // -->
        </SCRIPT>
    </BODY>
</HTML>
You can see the results in Figure 21.7.
Functions are similar to the methods you've developed in Java in this book, except that they're not part of any class (JavaScript is less object-oriented than Java). Just like a method, a function is a set of statements that runs when you call it, not before, and you can call a function by treating its name as an expression to be evaluated. Here's the formal syntax for creating a function using the function statement:
function name([param1] [, param2] [..., paramN])
{
    statements
}
You've already seen an example that connects a function named alerter to an HTML button, using that button's ONCLICK event attribute:
<HTML>
    <HEAD>
        <TITLE>Using alert Boxes</TITLE>
        <SCRIPT LANGUAGE="JavaScript">
            <!--
            function displayer()
            {
                alert("Hello from JavaScript!")
            }
            //-->
        </SCRIPT>
    </HEAD>

    <BODY>
        <H1>Using alert Boxes</H1>
        <FORM>
            <INPUT TYPE="BUTTON" ONCLICK="displayer()" VALUE="Click Me!">
        </FORM>
    </BODY>
<HTML>
This shows the basics of creating a function—you just use the function keyword, followed by the name you want to give to the function, followed by a parentheses-enclosed list of parameters used to pass data to the function, and the body of the function, enclosed in curly braces. You can also use the return statement to return a value, just as in Java. The interesting part of this code is that you can connect the function directly to a button click.
You've already seen that you can connect JavaScript functions to HTML buttons using the ONCLICK event. Buttons are fairly simple controls, however. Controls like check boxes and radio buttons are a little more advanced; in JavaScript, both have a checked property that tells you whether they're checked. You can set the checked property to true to make the control appear checked, or to determine whether it is checked.
The following example uses both check boxes and radio buttons to let the user customize a pizza, as you see in Figure 21.8. Here, the radio buttons on the left select a prebuilt pizza, and the check boxes on the right display the default items in the pizza. The total cost for the selected pizza is displayed, and the user can customize her pizza by checking or unchecking any of the boxes.
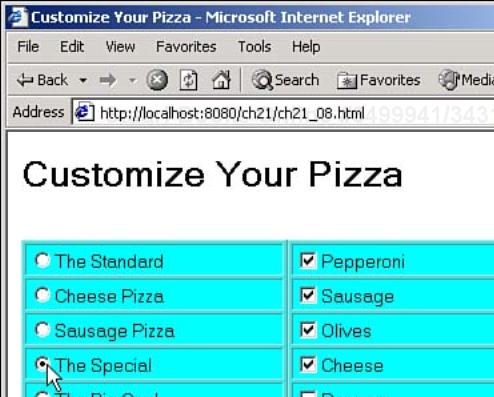
Each radio button's ONCLICK event attribute is connected to a function named radioNClicked, where N is the number of the radio button. Here's what that looks like for radio button 1:
<INPUT TYPE="RADIO" NAME="radios" ONCLICK="radio1Clicked()">The Standard
When the user clicks this radio button, the radio1Clicked function is called. In that function, the code first calls a function named clearCheckboxes to clear all the currently set check boxes. Then it sets the check boxes corresponding to the toppings on the currently selected pizza using the checked property, and finally calls another function, displayCost, to display the cost of that pizza in a text field:
function radio1Clicked()
{
    clearCheckboxes()
    document.form1.check1.checked = true
    document.form1.check4.checked = true
    displayCost()
}
The clearCheckboxes function clears all the check boxes:
function clearCheckboxes()
{
    document.form1.check1.checked = false
    document.form1.check2.checked = false
    document.form1.check3.checked = false
    document.form1.check4.checked = false
    document.form1.check5.checked = false
}
The displayCost function adds $0.50 to a base cost of $10.00 for every topping selected, and displays the total cost in the text field you see in Figure 21.8:
function displayCost()
{
    var cost = 10.00

    if(document.form1.check1.checked){
        cost += .50
    }
    if(document.form1.check2.checked){
        cost += .50
    }
    if(document.form1.check3.checked){
        cost += .50
    }
    if(document.form1.check4.checked){
        cost += .50
    }
    if(document.form1.check5.checked){
        cost += .50
    }
    document.form1.text1.value = "Total cost: $" + cost.toPrecision(4)
}
The user can also customize her pizza by adding or removing toppings just by checking or unchecking the boxes. The ONCLICK event attribute for each check box is connected to the displayCost function, which will compute and display the total cost for the new pizza choices:
<INPUT TYPE="CHECKBOX" NAME="check1" ONCLICK="displayCost()">Pepperoni
This is all it takes—you can see the entire code in Listing 21.8.
Example 21.8. Using HTML Controls in JavaScript (ch21_08.html)
<HTML>
    <HEAD>
        <TITLE>Customize Your Pizza</TITLE>
        <SCRIPT LANGUAGE="JavaScript">
            <!--
               function radio1Clicked()
               {
                    clearCheckboxes()
                    document.form1.check1.checked = true
                    document.form1.check4.checked = true
                    displayCost()
               }

               function radio2Clicked()
               {
                    clearCheckboxes()
                    document.form1.check3.checked = true
                    document.form1.check4.checked = true
                    displayCost()
               }

               function radio3Clicked()
               {
                    clearCheckboxes()
                    document.form1.check2.checked = true
                    document.form1.check4.checked = true
                    displayCost()
               }

               function radio4Clicked()
               {
                    clearCheckboxes()
                    document.form1.check1.checked = true
                    document.form1.check2.checked = true
                    document.form1.check3.checked = true
                    document.form1.check4.checked = true
                    displayCost()
               }

               function radio5Clicked()
               {
                    clearCheckboxes()
                    document.form1.check1.checked = true
                    document.form1.check2.checked = true
                    document.form1.check3.checked = true
                    document.form1.check4.checked = true
                    document.form1.check5.checked = true
                    displayCost()
               }

               function clearCheckboxes()
               {
                    document.form1.check1.checked = false
                    document.form1.check2.checked = false
                    document.form1.check3.checked = false
                    document.form1.check4.checked = false
                    document.form1.check5.checked = false
               }

               function displayCost()
               {
                    var cost = 10.00

                    if(document.form1.check1.checked){
                        cost += .50
                    }
                    if(document.form1.check2.checked){
                        cost += .50
                    }
                    if(document.form1.check3.checked){
                        cost += .50
                    }
                    if(document.form1.check4.checked){
                        cost += .50
                    }
                    if(document.form1.check5.checked){
                        cost += .50
                    }
                    document.form1.text1.value = "Total cost: $" + cost.toPrecision(4)
               }
            //-->
       </SCRIPT>
    </HEAD>

    <BODY>
        <H1>Customize Your Pizza</H1>
        <BR>
        <FORM NAME="form1">
           <TABLE NAME="table1" BORDER BGCOLOR="cyan" WIDTH="200" ALIGN="LEFT">
                <TR><TD><INPUT TYPE="RADIO" NAME="radios" ONCLICK="radio1Clicked()">The
 Standard</TD></TR>
                <TR><TD><INPUT TYPE="RADIO" NAME="radios" ONCLICK="radio2Clicked()">Cheese
 Pizza</TD></TR>
                <TR><TD><INPUT TYPE="RADIO" NAME="radios" ONCLICK="radio3Clicked
()">Sausage Pizza</TD></TR>
                <TR><TD><INPUT TYPE="RADIO" NAME="radios" ONCLICK="radio4Clicked()">The
 Special</TD></TR>
                <TR><TD><INPUT TYPE="RADIO" NAME="radios" ONCLICK="radio5Clicked()">The
 Big One!</TD></TR>
            </TABLE>

           <TABLE NAME="table2" BORDER BGCOLOR="cyan" WIDTH="200" ALIGN="LEFT">
                <TR><TD><INPUT TYPE="CHECKBOX" NAME="check1" ONCLICK="displayCost
()">Pepperoni</TD></TR>
                <TR><TD><INPUT TYPE="CHECKBOX" NAME="check2" ONCLICK="displayCost
()">Sausage</TD></TR>
                <TR><TD><INPUT TYPE="CHECKBOX" NAME="check3" ONCLICK="displayCost
()">Olives</TD></TR>
                <TR><TD><INPUT TYPE="CHECKBOX" NAME="check4" ONCLICK="displayCost
()">Cheese</TD></TR>
                <TR><TD><INPUT TYPE="CHECKBOX" NAME="check5" ONCLICK="displayCost
()">Peppers</TD></TR>
            </TABLE>
            <BR CLEAR="ALL">
            <BR>
            <INPUT NAME="text1">
        </FORM>
    </BODY>
</HTML>
That gives you a basic understanding of working with JavaScript, which is very useful because creating JSP/JavaScript hybrid applications is often the best way to get things done. For example, you may remember the following JSP/JavaScript hybrid application from Day 4, “Reading Data from Web Pages: Buttons and Text Fields,” which used JavaScript to store text in an HTML hidden control and let the JSP code know what button was clicked:
<HTML>
    <HEAD>
        <TITLE>Using Buttons</TITLE>
    </HEAD>

    <BODY>
        <H1>Using Buttons</H1>
        <FORM NAME="form1" ACTION="ch04_15.jsp" METHOD="POST">
            <INPUT TYPE="HIDDEN" NAME="buttonName">
            <INPUT TYPE="BUTTON" VALUE="Button 1" ONCLICK="button1()">
            <INPUT TYPE="BUTTON" VALUE="Button 2" ONCLICK="button2()">
            <INPUT TYPE="BUTTON" VALUE="Button 3" ONCLICK="button3()">
        </FORM>

        <SCRIPT LANGUAGE="JavaScript">
            <!--
               function button1()
               {
                   document.form1.buttonName.value = "button 1"
                   form1.submit()
               }
               function button2()
               {
                   document.form1.buttonName.value = "button 2"
                   form1.submit()
               }
               function button3()
               {
                   document.form1.buttonName.value = "button 3"
                   form1.submit()
               }
            // -->
        </SCRIPT>
    </BODY>
</HTML>
The JSP part of this application can read the text in the hidden control and determine what button has been clicked. In fact, you saw a JSP/JavaScript hybrid application yesterday, in this code:
<HTML>
    <HEAD>
    </HEAD>

    <BODY>
        <DIV STYLE="POSITION:ABSOLUTE; LEFT:10; TOP:10; WIDTH:480; HEIGHT:400;
        BACKGROUND-COLOR:BLACK;"></DIV>
    </BODY>
        <SCRIPT>
            <!--
            document.onmousedown = mouseDown
            document.onmouseup = mouseUp

                var x1, y1, x2, y2
                function mouseDown()
                {
                    x1 = event.offsetX
                    y1 = event.offsetY
                }
                function mouseUp()
                {
                    x2 = event.offsetX
                    y2 = event.offsetY
                    var outString = "ch20_03.jsp?x1=" + x1
                    outString += "&y1=" + y1
                    outString += "&x2=" + x2
                    outString += "&y2=" + y2
                    location.href = outString
                }
                function dragStart(event)
                {
                    return false
                }
            // -->
        </SCRIPT>
</HTML>
In this case, the JavaScript part of the application recorded the location at which the mouse button was pressed, and the location at which it was released. Then it passed the data on to the JSP part of the application, which drew the corresponding line in a JPEG image and sent it back to the browser.
There's plenty more to JavaScript, of course. Here are some online resources:
Netscape's JavaScript 1.5 user guide is at http://developer.netscape.com/docs/manuals/js/core/jsguide15/contents.html.
Netscape's JavaScript 1.5 reference manual can be found at http://developer.netscape.com/docs/manuals/js/core/jsref15/contents.html.
You can download the Netscape JavaScript 1.5 user guide and reference manual from http://developer.netscape.com/docs/manuals/index.html?content=javascript.html.
Microsoft's JScript (JScript is Microsoft's version of JavaScript) 5.6 user guide and reference manual are available at http://msdn.microsoft.com/library/default.asp?url=/library/en-us/script56/html/js56jsconjscriptfundamentals.asp.
You can also download the JScript 5.6 user guide and reference manual: http://msdn.microsoft.com/downloads/default.asp?URL=/downloads/sample.asp?url=/msdn-files/027/001/733/msdncompositedoc.xml.
The last topic for today discusses how to deploy your Web applications after you've created them. After all, now that you've created your new Web applications, how about installing them on someone else's computer when they want to use them? There are a variety of such techniques, and you'll see the most popular ones here—copying files, using WAR files, and using JAR files.
Copying files is just what it sounds like—Tomcat lets you simply copy files into a new subdirectory named webapps to install a Web application. That's probably the easiest way to deploy a Web application, but not all users will be able to handle this task correctly.
You can also use Web Archive (WAR) files to deploy Web applications. Just place the WAR file into the webapps directory, and Tomcat does the rest. This is a very common technique for deploying Web applications.
You can also distribute your Java code in Java Archive (JAR) files, which go into lib directories (such as struts.jar). You don't put a whole Web application into JAR files, but you can store your compiled Java code there, such as JavaBeans.
Tip
As of Version 4, Tomcat also has a Manager Web application to deploy and remove Web applications—even while Tomcat is running. This Web application requires administrator privileges and is still being developed however, and is beyond the scope of this book.
The easiest way to deploy a Web application is to simply copy its files to the target directories with which you want to work. For example, suppose you want to deploy an application you developed earlier in the book, ch06_04.jsp, which uses a Java package, beans.ch06_03. To deploy ch06_04.jsp to the directory for today's examples, ch21, you can simply copy that file to the ch21 directory. This JSP page also needs the Java package beans.ch06_03, so you can also create a beans subdirectory of the classes directory. Put ch06_03.class and ch06_03.java in that subdirectory (you don't need to deploy the source code, of course; this example does so simply to give the next programmer access to that source code if he wants it). That gives you the following directory structure:
ch21
  |  ch06_04.jsp
  |__WEB-INF
     |__lib
     |__classes
        |__beans
             ch06_03.java
             ch06_03.class
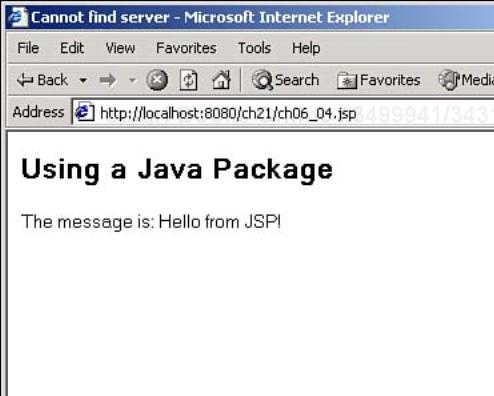
Now you can restart Tomcat and navigate to http://localhost:8080/ch21/ch06_04.jsp, as you see in Figure 21.9. Congratulations—you've deployed an application, simply by copying files.
A common way of deploying Web applications is to use WAR files, which can compress an entire Web application into one file. For example, here's the directory structure that you've already developed by copying files:
ch21
  |  ch06_04.jsp
  |__WEB-INF
     |__lib
     |__classes
        |__beans
             ch06_03.java
             ch06_03.class
You can duplicate this directory structure using a single WAR file. To create a WAR file, you use the JAR tool that comes with Java. (If the Java bin directory is in your path, you can use the JAR tool at the command prompt. Otherwise, you'll need to specify the complete path to the JAR tool, as mentioned in the discussion on paths in Day 1, “Getting Started!”) This tool supports a number of options, and you can learn more about them simply by typing JAR at the command line; the JAR tool will display these options and this explanatory text:
-c—. Create new archive.-t—. List table of contents for archive.-x—. Extract named (or all) files from archive.-u—. Update existing archive.-v—. Generate verbose output on standard output.-f—. Specify archive filename.-m—. Include manifest information from specified manifest file.-0—. Store only; use no ZIP compression.-M—. Do not create a manifest file for the entries.-i—. Generate index information for the specified JAR files.-C—. Change to the specified directory and include the following file.
For example, suppose you wanted to store the ch21 directory structure and files in a WAR file named ch21war.war. You can create that file using the JAR tool in the ch21 directory; that might look like the following in Windows, where using the wildcards *.* means all files in all subdirectories will be included in the WAR file:
C:	omcatjakarta-tomcat-4.0.3webappsch21>jar cvf ch21war.war *.*
added manifest
adding: ch06_04.jsp(in = 244) (out= 144)(deflated 40%)
adding: WEB-INF/(in = 0) (out= 0)(stored 0%)
adding: WEB-INF/classes/(in = 0) (out= 0)(stored 0%)
adding: WEB-INF/classes/beans/(in = 0) (out= 0)(stored 0%)
adding: WEB-INF/classes/beans/ch06_03.java(in = 140) (out= 108)(deflated 22%)
adding: WEB-INF/classes/beans/ch06_03.class(in = 289) (out= 229)(deflated 20%)
adding: WEB-INF/lib/(in = 0) (out= 0)(stored 0%)
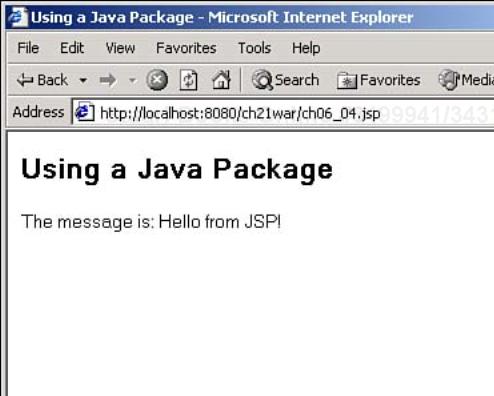
This creates ch21war.war, which holds all the files from the ch21 directory, all packaged into a single file, ready for deployment. To deploy this Web application, just place ch21war.war into the webapps directory. When Tomcat starts, it'll expand this file and create a new directory, ch21war (the name comes from the WAR file ch21war.war), installing your Web application automatically using the same directory structure as before:
ch21war
  |  ch06_04.jsp
  |__META-INF
  |    MANIFEST.MF
  |__WEB-INF
     |__lib
     |__classes
        |__beans
             ch06_03.java
             ch06_03.class
This new directory also includes a directory named META-INF, which contains a file named MANIFEST.MF that holds information about the WAR file contents. Now you can navigate to the new URL http://localhost:8080/ch21war/ch06_04.jsp in the ch21war directory. Figure 21.10 depicts the deployed and working Web application.
Imagine how easy this makes deploying an application if you have multiple files (web.xml, .class files, and so on) in one application. All you need to do is create a WAR file and drop it into the target webapps directory—the server will do the rest.
You can also deploy your compiled Java classes in JAR files. You've seen how to use JAR files such as struts.jar already—you just place them into a lib directory. For example, suppose this is how your Web application is set up now, with ch06_03.class in the beans directory:
ch21
  |  ch06_04.jsp
  |__WEB-INF
     |__lib
     |__classes
        |__beans
             ch06_03.class
Now suppose you want to use a JAR file, ch21jar.jar, instead of ch06_03.class. After creating that JAR file, you can place it in the lib directory:
ch21
  |  ch06_04.jsp
  |__WEB-INF
     |__lib
           ch21jar.jar
     |__classes
        |__beans
Then you can navigate to http://localhost:8080/ch21/ch06_04.jsp and the Web application will work as before, as you see in Figure 21.9.
To create the JAR file, go to the classes directory (not the beans directory where ch06_03.class is located—remember that this application uses the package beans.ch06_03, and the directory structure of the JAR file must mirror that package) and use the JAR tool to create a JAR file. That might look like this in Windows, which adds beans.ch06_03 to ch21jar.jar:
C: omcatjakarta-tomcat-4.0.3webappsch21WEB-INFclasses>jar cvf ch21jar.jar beans
This creates ch21jar.jar, which you can place in webappsch21WEB-INFlib, giving the server access to beans.ch06_03. To see this application at work, just navigate to http://localhost:8080/ch21/ch06_04.jsp, and the code in the JAR file is automatically searched and used.
Today you were presented with two major topics—working with JavaScript from a JSP programmer's point of view, and how to deploy your Web applications.
Throughout the book, you've seen JavaScript used in hybrid JSP/JavaScript Web applications. JavaScript is great for when you want to perform some action in the browser, such as processing or storing hidden data, working with mouse events, and so on. You can also check user-input data, perform intermediate calculations, display error messages and help, among many other tasks.
Luckily for the JSP programmer, you also learned that JavaScript's core syntax is very similar to Java's. That means you can often write scripts in Web pages aided by your knowledge of Java. For the JSP programmer, the main benefit of JavaScript is that you have access to the data in the controls of a Web page, so you can work with that data before sending it back to the server.
You also learned how to deploy Web applications using three techniques—copying files to target directories, using WAR files, and using JAR files. For Web applications, WAR files are a good choice for deployment—all you have to do is place the WAR file into the webapps directory and the server will do the rest for you, expanding the WAR file and installing the Web application automatically.
This workshop tests whether you understand all the concepts you learned today. It's a good idea to master today's concepts by honing your knowledge here before starting tomorrow's material. You can find the answers to the quiz questions in Appendix A.
1: | Modify the Customize Your Pizza example for today (Listing 21.8) so that it sends the total price to a JSP page, which displays the price. Extra credit: Make use of the radio button and check box settings in the JSP page to display the type of pizza the user wants and what toppings are included. |
2: | Today you learned how to create a WAR file that includes |