
Welcome to Day 19! Today you'll learn about the Struts framework, an application framework that you can use to build your own Web applications. Struts contains various components that enable you to develop Model-View-Controller (MVC) applications of the type discussed in Day 13, “Creating More Powerful Servlets,” and because of its adoption by the Apache project, it's now in widespread use. Developing the application is up to you; what Struts does is provide a framework that you can use to implement MVC architecture. Struts supports ways of communicating between MVC components as well as base classes whose methods you can override to implement your own logic. Here are today's topics:
Getting Struts
Installing Struts
Creating Model-View-Controller applications using Struts
Creating a start page
Handling requests from the controller
Implementing the model
Handling errors in Struts
Displaying results in a page
As you'll see today, creating a Struts-based application is not necessarily an easy task. However, as applications grow in size, Struts can indeed be helpful in maintaining an MVC architecture.
Note
What does Struts stand for? It's not an acronym—the idea is that this framework provides the support you need to build Web applications.
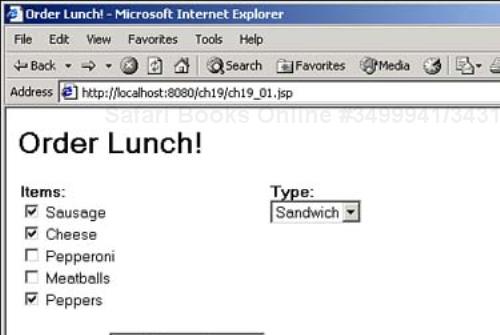
Today, you'll see how all this works as you build a Struts example that will use MVC architecture. This example will read input from the user and display it in a summary form. In particular, the example will ask the user what he wants for lunch, as you see in Figure 19.1.
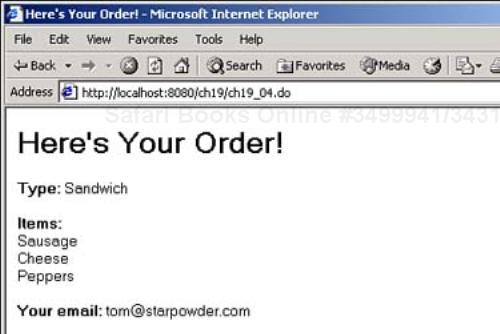
When the user makes his lunch selection and clicks the Order button you see in Figure 19.1, the Struts application reads what the user has entered and displays a summary, as you see in Figure 19.2.
That's not to say that the example you see in Figures 19.1 and 19.2 is necessarily simple to construct—Struts is not a lightweight application framework. To create this example, you need about a dozen files; for the sake of reference, here's an overview showing what those files are and how they are arranged in the ch19 directory:
webapps
|
|__ch19
   |   ch19_01.jsp [View: Start Page]
   |   ch19_05.jsp [View: Results Page]
   |
   |__WEB-INF
      |   struts-config.xml [Struts Configuration File]
      |   ch19.tld  [Custom Tag Definitions]
      |   Struts TLD files [Struts Tag Definitions]
      |   web.xml  [Application Descriptor File]
      |
      |__lib
      |      struts.jar  [Java Archive of Struts Classes]
      |
      |__classes
         |   ApplicationResources.properties [Contains Property Values]
         |
         |__beans
               ch19_02.class  [Custom Tag 1 Implementation]
               ch19_03.class  [Custom Tag 2 Implementation]
               ch19_04.class  [Controller Adapter]
               ch19_06.class  [Model]
You'll learn how to build this application today.
You can download Struts at jakarta.apache.org/struts in compressed format. To install Struts, simply unzip the download file to get struts.jar. Place JAR files such as struts.jar in lib directories—you can either use the lib subdirectory of the WEB-INF directory of your application (as today's example does) to make it available to your application, or the jakarta-tomcat-4.0.3lib directory to make struts.jar available to all applications.
In addition, Struts relies on a number of custom tags, so place the Struts .tld files that come in the download into the WEB-INF directory of your application:
struts.tldstruts-bean.tldstruts-form.tldstruts-html.tldstruts-logic.tldstruts-template.tld
That installs Struts. The next step is to actually start writing the code that puts the application framework to work.
Everything starts with the JSP start page you see in Figure 19.1. This page, ch19_01.jsp, appears in Listing 19.1.
Example 19.1. A Sample XML Document (ch19_01.jsp)
<%@ taglib uri="/bean" prefix="bean" %>
<%@ taglib uri="/html" prefix="html" %>
<%@ taglib uri="/logic" prefix="logic" %>
<%@ taglib uri="/ch19" prefix="ch19" %>

<HTML>
    <HEAD>
        <TITLE>Order Lunch!</TITLE>
    </HEAD>

    <BODY>
        <H1>Order Lunch!</H1>
        <html:errors/>
        <ch19:type/>
        <ch19:items/>

        <html:form action="ch19_04.do">
            <TABLE>
                <TR>
                    <TD ALIGN="LEFT" VALIGN="TOP">
                        <bean:message key="items"/>
                        <BR>
                        <logic:iterate id="items1" name="items">
                            <html:multibox property="items">
                                <%= items1 %>
                            </html:multibox>
                            <%= items1 %>
                            <BR>
                        </logic:iterate>
                    </TD>
                    <TD ALIGN="LEFT" VALIGN="TOP">
                        <bean:message key="type"/>
                        <BR>
                        <html:select property="type">
                            <html:options name="type"/>
                        </html:select>
                    </TD>
                </TR>
                <TR>
                    <TD ALIGN="LEFT">
                                    <BR>
                        <bean:message key="email"/>
                        <html:text property="email"/>
                    </TD>
                <TR>
            </TABLE>
                  <BR>
            <html:submit value="Order"/>
        </html:form>
    </BODY>
</HTML>
To see how this page does its work, we'll dissect it here. To start, this page imports the Struts custom tag libraries that it will use, as well as a custom tag library developed for today's work:
<%@ taglib uri="/bean" prefix="bean" %>
<%@ taglib uri="/html" prefix="html" %>
<%@ taglib uri="/logic" prefix="logic" %>
<%@ taglib uri="/ch19" prefix="ch19" %>
        .
        .
        .
Next you see these three custom tags:
<HTML>
    <HEAD>
        <TITLE>Order Lunch!</TITLE>
    </HEAD>

    <BODY>
        <H1>Order Lunch!</H1>
        <html:errors/>
        <ch19:type/>
        <ch19:items/>
        .
        .
        .
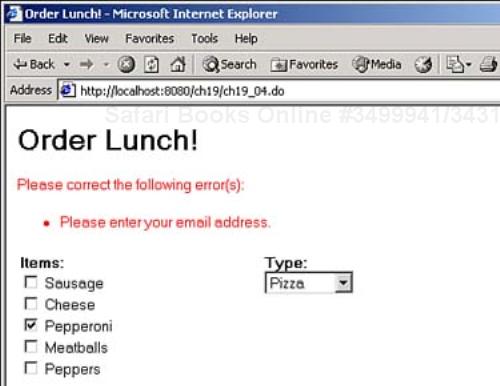
The <html:errors/> tag is a custom Struts tag that inserts error messages if the user omits some data, as you can see in Figure 19.3. You'll see how to set the error messages today.
There are a number of Struts custom <html> tags, such as <html:errors/>, and you can see them in Table 19.1 in overview.
Table 19.1. Custom <html> Struts Tags
Tag Name | Does This |
|---|---|
| Creates an HTML |
| Creates a button input field. |
| Creates a cancel button. |
| Creates a check box input field. |
| Displays error messages. |
| Creates a file select input field. |
| Defines an input form. |
| Creates a hidden field. |
| Creates an HTML |
| Creates an input tag of type |
| Creates an HTML |
| Creates an HTML anchor or hyperlink. |
| Creates a check box input field. |
| Creates a select option. |
| Creates a collection of select options. |
| Creates a password input field. |
| Creates a radio button input field. |
| Creates a reset button input field. |
| Creates a URI. |
| |
| Creates a submit button. |
| Creates an input field of type |
| Creates a |
The <html:errors> Struts element supports the attributes you see in Table 19.2.
Table 19.2. The <html:errors> Element Attributes
Attribute Name | Does This |
|---|---|
| Specifies the servlet context attribute key to use. |
| The session attribute for the |
| Name of the request scope bean where error messages have been stored. |
| Name of the property for which the error messages will be displayed. The default displays all error messages. |
The two custom tags (<ch19:type/> and <ch19:items/>) that appear after <html:errors/> will initialize and insert data into the page by setting attributes. These tags will load the data for the Type drop-down list you see in Figure 19.1, as well as the Items check boxes you see in the same figure. The <ch19:type/> element provides the names of the types of food available (pizza, sandwiches, and so on), and the <ch19:items/> element provides the names of food items you can have on your pizza or sandwiches (sausage, cheese, and so on). These are just standard custom tags, and you'll learn how to create them in a few pages.
To display the controls you see in Figure 19.1, you'll need an HTML form, and you can create one with the Struts <html:form> element:
<HTML>
    <HEAD>
        <TITLE>Order Lunch!</TITLE>
    </HEAD>

    <BODY>
        <H1>Order Lunch!</H1>
        <html:errors/>
        <ch19:type/>
        <ch19:items/>
        <html:form action="ch19_04.do">
        .
        .
        .
You can see the attributes of the <html:form> element in Table 19.3.
Table 19.3. The <html:form> Element Attributes
Attribute Name | Does This |
|---|---|
| The URL where this form will be submitted. |
| The content encoding to be used to submit this form, if the method is |
| The name of the field where focus will be assigned initially using a |
| The HTTP method that will be used to submit this request (set to |
| The name of the bean in request scope or session scope (defined by the |
| The |
| The |
| The scope for the bean associated with this input form (must be either |
| The CSS styles to be applied to the HTML form. |
| |
| The identifier to be assigned to the HTML form. |
| Frame target where this form is submitted, if any. |
| Fully qualified Java class name of the bean to be created if no such bean already exists. |
Note in particular the action attribute in the form in this case, which is set to "ch19_04.do". That extension, .do, is customarily mapped to the controller servlet in Struts. You can see how this works in web.xml, which maps the extension .do to a servlet named action, which uses the Struts main controller servlet class, org.apache.struts.action.ActionServlet:
<?xml version="1.0" encoding="ISO-8859-1"?>

<!DOCTYPE web-app
  PUBLIC "-//Sun Microsystems, Inc.//DTD Web Application 2.2//EN"
  "http://java.sun.com/j2ee/dtds/web-app_2_2.dtd">

<web-app>

  <servlet>
    <servlet-name>action</servlet-name>
    <servlet-class>org.apache.struts.action.ActionServlet</servlet-class>
    <init-param>
      <param-name>application</param-name>
      <param-value>ApplicationResources</param-value>
    </init-param>
    <load-on-startup>2</load-on-startup>
  </servlet>

  <servlet-mapping>
    <servlet-name>action</servlet-name>
    <url-pattern>*.do</url-pattern>
  </servlet-mapping>
        .
        .
        .
Also in web.xml, you'll need the declarations of the Struts custom tags, as well as the custom tags designed for today's work:
<?xml version="1.0" encoding="ISO-8859-1"?>

<!DOCTYPE web-app
  PUBLIC "-//Sun Microsystems, Inc.//DTD Web Application 2.2//EN"
  "http://java.sun.com/j2ee/dtds/web-app_2_2.dtd">

<web-app>

  <servlet>
    <servlet-name>action</servlet-name>
    <servlet-class>org.apache.struts.action.ActionServlet</servlet-class>
    <init-param>
      <param-name>application</param-name>
      <param-value>ApplicationResources</param-value>
    </init-param>
    <load-on-startup>2</load-on-startup>
  </servlet>

  <servlet-mapping>
    <servlet-name>action</servlet-name>
    <url-pattern>*.do</url-pattern>
  </servlet-mapping>

  <taglib>
    <taglib-uri>/bean</taglib-uri>
    <taglib-location>/WEB-INF/struts-bean.tld</taglib-location>
  </taglib>

  <taglib>
    <taglib-uri>/html</taglib-uri>
    <taglib-location>/WEB-INF/struts-html.tld</taglib-location>
  </taglib>

  <taglib>
    <taglib-uri>/logic</taglib-uri>
    <taglib-location>/WEB-INF/struts-logic.tld</taglib-location>
  </taglib>

  <taglib>
    <taglib-uri>/template</taglib-uri>
    <taglib-location>/WEB-INF/struts-template.tld</taglib-location>
  </taglib>

  <taglib>
    <taglib-uri>/ch19</taglib-uri>
    <taglib-location>/WEB-INF/ch19.tld</taglib-location>
  </taglib>

</web-app>
The next step in the start page is to display the HTML text and controls you see in Figure 19.1, starting with the prompt Items:. You can store that prompt—and all the messages in this application—in a file usually named WEB-INFclassesApplicationResources.properties, such as this (the errors.header and errors.footer messages here are ones that Struts looks for automatically, and will use to straddle any error text if it needs to display errors):
email=<b>Your email:</b>
type=<b>Type:</b>
items=<b>Items:</b>

error.noemail=<LI><FONT COLOR="RED">Please enter your email address.</FONT></LI>
error.notype=<LI><FONT COLOR="RED">Please select a type.</FONT></LI>
error.noitems=<LI><FONT COLOR="RED">Please select at least one item.</FONT></LI>

errors.header=<FONT COLOR="RED">Please correct the following error(s):</FONT><UL>
errors.footer=</UL>
After you've stored messages such as this in ApplicationResources.properties, you can reference them by name, such as this in a <bean:message> Struts element:
<HTML>
    <HEAD>
        <TITLE>Order Lunch!</TITLE>
    </HEAD>

    <BODY>
        <H1>Order Lunch!</H1>
        <html:errors/>
        <ch19:type/>
        <ch19:items/>
        <html:form action="ch19_04.do">
            <TABLE>
                <TR>
                    <TD ALIGN="LEFT" VALIGN="TOP">
                        <bean:message key="items"/>
        .
        .
        .
This makes the prompt Items: appear in the start page—that's what you use the <bean:message> element for, to insert text into a Web page. There are a number of <bean:xxxx> elements in Struts:
cookie—. Creates a scripting variable using the value of the given cookie.define—. Creates a scripting variable using the value of the given bean property.header—. Creates a scripting variable using the value of the given request header.include—. Loads theresponseobject and makes it available as a bean.message—. Writes an internationalized message string to the response.page—. Makes the given item available from the page context as a bean.parameter—. Creates a scripting variable using the value of the given request parameter.resource—. Loads a Web application resource and makes it available as a bean.size—. Creates a bean containing the number of elements.struts—. Makes a Struts configuration object available as a bean.write—. Writes the value of the given bean property to theJspWriterobject.
The <bean:xxxx> elements all have attributes, including the following that they all have in common:
id—. Specifies the scripting variable/attribute that will be created by this custom tag.key—. Specifies a key in a properties file.name—. Specifies the name by which an existing bean will be looked up.property—. Defines the name of aJavaBeansproperty, of the JSP bean identified by thenameattribute.scope—. Identifies the JSP scope (set topage,request,session, orapplication) where Struts will search for a bean.
Having displayed the Items: label, the code will next display the check boxes you see in Figure 19.1 using a Struts <logic:iterate> element. This element will iterate over the values in the items attribute set by the <ch19:items/> custom tag, creating a check box for each item using the Struts <html:multibox> element:
<HTML>
    <HEAD>
        <TITLE>Order Lunch!</TITLE>
    </HEAD>

    <BODY>
        <H1>Order Lunch!</H1>
        <html:errors/>
        <ch19:type/>
        <ch19:items/>
        <html:form action="ch19_04.do">
            <TABLE>
                <TR>
                    <TD ALIGN="LEFT" VALIGN="TOP">
                        <bean:message key="items"/>
                        <BR>
                        <logic:iterate id="items1" name="items">
                            <html:multibox property="items">
                                <%= items1 %>
                            </html:multibox>
                            <%= items1 %>
                            <BR>
                        </logic:iterate>
                    </TD>
        .
        .
        .
There are a number of <logic:xxx> elements in Struts, such as <logic:iterate>:
equal—. Compares an attribute value against a constant value to see whether the two are equal.notEqual—. Compares an attribute value against a constant value to see whether the two are not equal.greaterEqual—. Compares an attribute value against a constant value to see whether it is greater than or equal to that value.lessEqual—. Compares an attribute value against a constant value to see whether it is less than or equal to that value.greaterThan—. Compares an attribute value against a constant value to see whether it is greater than that value.lessThan—. Compares an attribute value against a constant value to see whether it is less than that value.match—. Checks whether an attribute value matches a string.notMatch—. Checks whether an attribute value does not match a string.forward—. Forwards a request.redirect—. Redirects a request.
You can see the attributes of the <logic:iterate> element in Table 19.4.
Table 19.4. The <logic:iterate> Element Attributes
The next step is to create and label the drop-down list you see in Figure 19.1. The custom tag <ch19:type/> will store the various types of food items—Sandwich, Pizza, and so on—in an attribute named type, which you can use with the <html:select> and <html:options> elements to create the drop-down list:
            <TABLE>
                <TR>
                    <TD ALIGN="LEFT" VALIGN="TOP">
                        <bean:message key="items"/>
                        <BR>
                        <logic:iterate id="items1" name="items">
                            <html:multibox property="items">
                                <%= items1 %>
                            </html:multibox>
                            <%= items1 %>
                            <BR>
                        </logic:iterate>
                    </TD>
                    <TD ALIGN="LEFT" VALIGN="TOP">
                        <bean:message key="type"/>
                        <BR>
                        <html:select property="type">
                            <html:options name="type"/>
                        </html:select>
                    </TD>
                .
                .
                .
                </TR>
You can add the email text field you see in Figure 19.1 using a <html:text> element:
<HTML>
    <HEAD>
        <TITLE>Order Lunch!</TITLE>
    </HEAD>

    <BODY>
        <H1>Order Lunch!</H1>
        <html:errors/>
        <ch19:type/>
        <ch19:items/>
        <html:form action="ch19_04.do">
            <TABLE>
                <TR>
                    <TD ALIGN="LEFT" VALIGN="TOP">
                        <bean:message key="items"/>
                        <BR>
                        <logic:iterate id="items1" name="items">
                            <html:multibox property="items">
                                <%= items1 %>
                            </html:multibox>
                            <%= items1 %>
                            <BR>
                        </logic:iterate>
                    </TD>
                    <TD ALIGN="LEFT" VALIGN="TOP">
                        <bean:message key="type"/>
                        <BR>
                        <html:select property="type">
                            <html:options name="type"/>
                        </html:select>
                    </TD>
                </TR>
                <TR>
                    <TD ALIGN="LEFT">
                                    <BR>
                        <bean:message key="email"/>
                        <html:text property="email"/>
                    </TD>
                <TR>
            </TABLE>
                  <BR>
            <html:submit value="Order"/>
        </html:form>
    </BODY>
</HTML>
As you can see, that's all it takes to use Struts custom tags to create various HTML elements in a Web page. These tags get the data they use from various page context attributes you set, as you saw here with the <ch19:type> and <ch19:items> tags, and those custom tags are coming up next.
How do the <ch19:type> and <ch19:items> tags work? The <ch19:type> custom tag is just a standard custom tag. It supplies the types of the different food items using an attribute named type, as you can see in Listing 19.2. The Struts tags you saw in Listing 19.1 will read these names using the type attribute (for example, <html:options name="type"/> creates <OPTION> elements using the type attribute).
Example 19.2. Support for the <ch19:type> Element (ch19_02.java)
package beans;

import java.util.*;
import javax.servlet.jsp.tagext.TagSupport;

public class ch19_02 extends TagSupport
{
    public int doStartTag()
      {

        String[] typeArray = {"", "Pizza", "Calzone", "Sandwich"};

        pageContext.setAttribute("type", typeArray);

        return SKIP_BODY;
    }
}
The <ch19:items> tag supplies the names of the food items you can select (Sausage, Cheese, and so on) using an attribute named items. You can find the code for this custom tag in Listing 19.3.
Example 19.3. Support for the <ch19:items> Element (ch19_03.java)
package beans;

import java.util.*;
import javax.servlet.jsp.tagext.TagSupport;

public class ch19_03 extends TagSupport
{
    public int doStartTag()
      {
        String[] itemsArray = {"Sausage", "Cheese", "Pepperoni", "Meatballs", "Peppers"};

        pageContext.setAttribute("items", itemsArray);

        return SKIP_BODY;
    }
}
Together, <ch19:type> and <ch19:items> supply the data used by the Struts tags in the start page for the application. To use <ch19:type> and <ch19:items>, you also need to describe them in a .tld file, which will be named ch19.tld in this example. This is what the contents of that .tld file look like:
<?xml version="1.0"  ?>
<!DOCTYPE taglib PUBLIC "-//Sun Microsystems, Inc.//DTD JSP Tag Library 1.1//EN"
    "http://java.sun.com/j2ee/dtds/web-jsptaglibrary_1_1.dtd">

<taglib>
    <tlibversion>1.0</tlibversion>
    <jspversion>1.2</jspversion>
    <shortname>StrutsExample</shortname>
    <info>
        Supports the Struts Example
    </info>

    <tag>
        <name>type</name>
        <tagclass>beans.ch19_02</tagclass>
        <bodycontent>empty</bodycontent>
   </tag>

    <tag>
        <name>items</name>
        <tagclass>beans.ch19_03</tagclass>
        <bodycontent>JSP</bodycontent>
    </tag>
</taglib>
That's it—you've created the Web page you see in Figure 19.1.
When the user clicks the Order button on this page, the data in the HTML form is sent to the Web resource given by the form's action attribute:
<html:form action="ch19_04.do">
So what exactly is ch19_04.do? The answer is coming up next.
As you'll recall from the discussion about web.xml earlier, the URL pattern *.do is connected to the Struts ActionServlet named action, such as this snippet from web.xml:
<servlet>
  <servlet-name>action</servlet-name>
  <servlet-class>org.apache.struts.action.ActionServlet</servlet-class>
  <init-param>
    <param-name>application</param-name>
    <param-value>ApplicationResources</param-value>
  </init-param>
  <load-on-startup>2</load-on-startup>
</servlet>

<servlet-mapping>
  <servlet-name>action</servlet-name>
  <url-pattern>*.do</url-pattern>
</servlet-mapping>
      .
      .
      .
You connect the Struts ActionServlet object to your Action adapter in the file WEB-INFstruts-config.xml. In this example, the Action adapter is ch19_04, and the bean class that implements the model is ch19_06. You can declare the ch19_06 bean with a <form-beans> element in struts-config.xml, and register the Action adapter ch19_04 with Struts, so that ch19_04 can be used in URLs such as this:
<?xml version="1.0"?>

<!DOCTYPE struts-config PUBLIC
    "-//Apache Software Foundation//DTD Struts Configuration 1.0//EN"
    "http://jakarta.apache.org/struts/dtds/struts-config_1_0.dtd">

<struts-config>
  <form-beans>
    <form-bean name="ch19_06" type="beans.ch19_06"/>
  </form-beans>

  <action-mappings>
    <action path="/ch19_04"
      type="beans.ch19_04"
      name="ch19_06"
      scope="request"
      input="/ch19_01.jsp">
      <forward name="OK" path="/ch19_05.jsp"/>
    </action>
  </action-mappings>
</struts-config>
This means that when the user sends data to ch19_04.do, the controller servlet will send a fully initialized object of the model's bean class, ch19_06, to the ch19_04 adapter. This will give your code access to the data in the model.
Note also the <forward> element here—if the code in the adapter decides that the data passed to it is okay, this element tells the controller to forward the results to the view JSP ch19_05.jsp.
How do you create the adapter code, ch19_04.java? The code in the adapter extends the Struts Action class:
public class ch19_04 extends Action
{
        .
        .
        .
}
You can see the methods of the Action class in Table 19.5.
Table 19.5. The Action Class Methods
Note
Action objects must be programmed in a threadsafe manner—see the discussion of thread safety at the end of Day 13.
The Struts controller will call this class's perform method, and pass it a copy of the bean used as the model, ch19_06. That's how you get access to the data—you can read it from the bean's get methods. You can check that data in the adapter—if anything you consider an error appears, you can create a new Struts ActionError object and add it to a Struts ActionErrors object:
public class ch19_04 extends Action
{
    public ActionForward perform(ActionMapping mapping, ActionForm form,
        HttpServletRequest request, HttpServletResponse response)
            throws IOException, ServletException
      {
        ActionErrors actionerrors = new ActionErrors();

        ch19_06 orderForm = (ch19_06)form;

        String email = orderForm.getEmail();
        if(email.trim().equals("")) {
            actionerrors.add(ActionErrors.GLOBAL_ERROR, new ActionError("error.noemail"));
        }

        String type = orderForm.getType();
        if(type.trim().equals("")) {
            actionerrors.add("ActionErrors.GLOBAL_ERROR", new ActionError("error.notype"));
        }

        String[] items = orderForm.getItems();
        if(items == null) {
            actionerrors.add("ActionErrors.GLOBAL_ERROR", new ActionError ("error
.noitems"));
        }
        .
        .
        .
    }
}
.noitems"));
}
.
.
.
}
}
You can see the fields of the ActionError class in Table 19.6, and the methods of the ActionError class in Table 19.7.
Table 19.6. The ActionError Class Fields
Field | Does This |
|---|---|
| The message key for this error message. |
| Holds replacement values for this error message. |
Table 19.7. The ActionError Class Methods
If there were any errors, you can save them with the saveErrors method and return to the start page using the mapping object's getInput method this way:
if(actionerrors.size() != 0) {
    saveErrors(request, actionerrors);
    return new ActionForward(mapping.getInput());
}
Doing so will open the start page with the errors inserted where the <html:errors/> element is, as you see in Figure 19.3. The mapping object used here is passed to the perform method, and it contains the information in the <action-mappings> element of struts-config.xml, including the name of the start page:
<action-mappings>
  <action path="/ch19_04"
    type="beans.ch19_04"
    name="ch19_06"
    scope="request"
    input="/ch19_01.jsp">
    <forward name="OK" path="/ch19_05.jsp"/>
  </action>
</action-mappings>
If there were no errors, you can make the controller display the results page by returning the page given in the <forward> element in the <action-mappings> element, which you can find with the mapping object's findForward method:
return mapping.findForward("OK");
That's all you need—you've handled both errors and successful results. You can see the whole code in Listing 19.4.
Example 19.4. The Controller Adapter Code (ch19_04.java)
package beans;

import java.io.*;
import java.util.*;
import beans.ch19_06;
import javax.servlet.http.HttpServletRequest;
import javax.servlet.http.HttpServletResponse;
import javax.servlet.ServletException;
import org.apache.struts.action.*;

public class ch19_04 extends Action
{
    public ActionForward perform(ActionMapping mapping, ActionForm form,
        HttpServletRequest request, HttpServletResponse response)
            throws IOException, ServletException
      {
        ActionErrors actionerrors = new ActionErrors();

        ch19_06 orderForm = (ch19_06)form;

        String email = orderForm.getEmail();
        if(email.trim().equals("")) {
            actionerrors.add(ActionErrors.GLOBAL_ERROR, new ActionError("error.noemail"));
        }

        String type = orderForm.getType();
        if(type.trim().equals("")) {
            actionerrors.add("ActionErrors.GLOBAL_ERROR", new ActionError("error.notype"));
        }

        String[] items = orderForm.getItems();
        if(items == null) {
            actionerrors.add("ActionErrors.GLOBAL_ERROR", new ActionError("error.noitems"));
        }

        if(actionerrors.size() != 0) {
            saveErrors(request, actionerrors);
            return new ActionForward(mapping.getInput());
        }
        return mapping.findForward("OK");
    }
}
That completes the controller adapter code. If there are no errors, the controller adapter makes the controller display the results page, ch19_05.jsp, which is covered next.
In the results page, you have access to the user's data in the ch19_06 bean, and you can write that data to the results page using the <bean:write> element. For example, here's how you can get the prompt for the type of food the user wants using <bean:message>, and then by using <bean:write> to actually write the selected food type to the results Web page:
<bean:message key="type"/>
<bean:write name="ch19_06" property="type"/>
The user may also have selected multiple food items (such as cheese and sausage), and you can use the <logic:iterate> element to loop over them:
<bean:message key="items"/>
<logic:iterate id="items1" name="ch19_06" property="items">
    <%= items1 %>
    <BR>
</logic:iterate>
That's how to recover the data the user entered—using the model bean that is passed on to the results page (which is part of the view). You can see the whole code for the results page, ch19_05.jsp, in Listing 19.5.
Example 19.5. The Results Page (ch19_05.jsp)
<%@ taglib uri="/bean" prefix="bean" %>
<%@ taglib uri="/logic" prefix="logic" %>

<HTML>
    <HEAD>
        <TITLE>Here's Your Order!</TITLE>
    </HEAD>

    <BODY>
        <H1>Here's Your Order!</H1>
        <bean:message key="type"/>
        <bean:write name="ch19_06" property="type"/>
        <BR>
        <BR>
        <bean:message key="items"/>
        <BR>
        <logic:iterate id="items1" name="ch19_06" property="items">
            <%= items1 %>
            <BR>
        </logic:iterate>
        <BR>
        <bean:message key="email"/>
        <bean:write name="ch19_06" property="email"/>
        <BR>
    </BODY>
</HTML>
All that's left is to construct the bean that represents the model and holds the data for the application, ch19_06.java.
In this example, the model stores and returns the data the user has entered. As discussed in Day 13, the model usually implements the internal data-handling logic (sometimes called the business rules) of the application. That means you would usually implement your connection to a database here, or check to see whether an item is in stock, calculate the state tax, and so on.
In Struts, you can base a model component such as ch19_06.java on the ActionForm class:
public class ch19_06 extends ActionForm
{
        .
        .
        .
}
You can see the methods of the ActionForm class in Table 19.8.
Table 19.8. The ActionForm Class Methods
Because this example model just stores and returns data using bean properties, all you need are get/set methods for the food type, food items, and user email address. You can see the entire code for this model component in Listing 19.6.
Example 19.6. The Model (ch19_06.java)
package beans;
import org.apache.struts.action.ActionForm;

public class ch19_06 extends ActionForm
{

    private String email = "";
    private String type = "";
    private String[] items;

    public String getEmail()
    {
        return email;
    }

    public void setEmail(String email)
    {
        this.email = email;
    }

    public String getType()
    {
        return type;
    }

    public void setType(String type)
    {
        this.type= type;
    }

    public String[] getItems()
    {
        return items;
    }

    public void setItems(String[] items)
    {
        this.items = items;
    }
}
That completes the Struts application, which you can see at work in Figures 19.1 and 19.2. As you can see, setting up a Struts application is not a trivial exercise, and it's not something you would do for a small application. However, Struts can be useful for larger applications that you want to base on MVC architecture.
Struts is a Web application framework designed to enable you to create Web applications using MVC architecture. Although setting up a Struts Web application is fairly involved, it can be worth the effort for larger applications.
It's up to you to write the application's logic as you want it; Struts is all about providing a framework that you can use to implement MVC architecture, including ways of communicating between MVC components and base classes that provide a framework whose methods you can override to implement your own logic.
Struts supports custom Java classes, as well as JSP custom tag libraries. A controller servlet dispatches requests to appropriate Action classes you provide. The Action classes act as controller adapters that can work with the controller to forward data to the view.
Struts also provides a mechanism for handling errors in a relatively easy way, letting you display the original input page along with a list of errors.
Tomorrow, we'll take a look at an exciting part of JSP programming—creating images on the fly on the server, and sending them back to the browser.
Are there other reasons for using Struts besides the MVC architecture? | |
A1: | Yes—for example, Struts is especially good at supporting internationalization automatically, tailoring what it does to various locales around the world. There's more information on this in the Struts documentation. |
Where can I find Struts tutorials, sample applications, and ISPs that support Struts? | |
A2: | Take a look at http://jakarta.apache.org/struts/resources.html. |
This workshop tests whether you understand all the concepts you learned today. It's a good idea to master today's concepts by honing your knowledge here before starting tomorrow's material. You can find the answers to the quiz questions in Appendix A.