
LESSON 4. Customizing Your LinkedIn Settings
In this lesson, you learn how to customize your LinkedIn profile, email, and privacy settings.
Customizing the Way You Use LinkedIn
Now that you’ve created a profile and connected with other LinkedIn members, it’s time to customize your LinkedIn settings to optimize your experience on the site.
Tip: Customize for Optimal Privacy and Simplicity
If you’re not sure which options to choose, select the ones that provide you the most privacy and simplicity while still allowing you to achieve your goals.
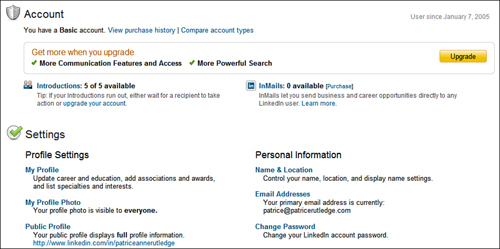
The Account & Settings page provides a lengthy list of options for customizing your LinkedIn experience. To access this page, go to the global navigation bar, click the down arrow to the left of your name, and select Settings from the drop-down menu. Figure 4.1 shows the Account & Settings page, which opens.
Figure 4.1. The Account & Settings page provides numerous options for customizing your LinkedIn experience.
Note: Learn More About Account Options and Upgrades
The top portion of the Account & Settings page describes options for upgrading your account. See Lesson 1, “Introducing LinkedIn,” to learn more about LinkedIn account options and upgrades.
Caution: Don’t Skip Account Customization
The many options provided on the Account & Settings page might seem overwhelming at first, and you might be tempted to skip this step. Setting aside some time to customize the options on this page, often a one-time task, can pay off in the long run. By customizing your LinkedIn settings, you’ll better protect your privacy, receive only the specific information you want, and avoid any unpleasant surprises regarding the way LinkedIn handles your personal data.
Customizing Profile Settings
To customize your profile settings, go to the global navigation bar, click the down arrow to the left of your name, and select Settings from the drop-down menu. In the Profile Settings section of this page, you can customize the following:
• My Profile: Update and edit your profile content on the Edit Profile page. See Lesson 2, “Creating Your Profile,” for more information about this page.
• My Profile Photo: Upload or remove your profile photo. If you don’t want everyone to view your photo, you can restrict its visibility to only your network or only your connections. See Lesson 2 for more information and uploading and editing profile photos.
Plain English: My Connections Versus My Network
Several of the options on this page give you the option to restrict visibility to My Connections or to My Network. My Connections refers to the LinkedIn members you connect with directly. My Network refers to the people two or three degrees away from your connections (in other words, your connections’ connections). See Lesson 6, “Communicating with Other LinkedIn Members,” for more information on this distinction.
• Public Profile: Specify the content you want to include in your public profile and customize your web URL.
• Manage Recommendations: Request, provide, and manage recommendations. See Lesson 10, “Requesting and Providing Recommendations,” for more information about the power of LinkedIn recommendations.
• Member Feed Visibility: Make your member feed visible to everyone or restrict it to your network or connections. For maximum privacy, you can choose not to display your member feed.
• Twitter Settings: Enable your LinkedIn account to integrate with Twitter. If you’ve already added your Twitter account, you can change your access settings or disable the integration at any time. See Lesson 2 for more information about integrating LinkedIn and Twitter.
Plain English: Member Feed
Your member feed refers to the network updates that appear on your home page and the home page of your connections.
Customizing Email Notification Settings
LinkedIn enables you to make extensive customizations to the way you handle email notification of various actions and activities. To customize your email notification settings, go to the global navigation bar, click the down arrow to the left of your name, and select Settings from the drop-down menu.
The Email Notification Settings section of the Account & Settings page lets you customize your contact settings, the way you receive messages, the invitations you receive, and the InMails you receive from LinkedIn promotional partners.
To customize your contact settings, such as the way you handle InMail and introductions, click the Contact Settings link. See Lesson 2 for more information on contact settings.
To customize how you receive messages on LinkedIn, click the Receiving Messages link. The Receiving Messages page appears, shown in Figure 4.2.
Figure 4.2. LinkedIn enables you to provide specific instructions on its delivery of email messages.
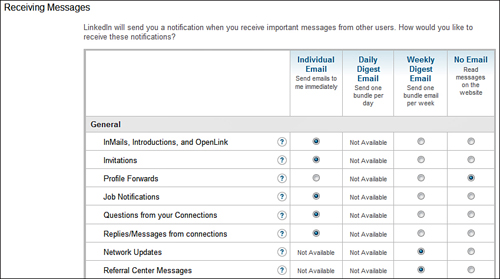
You have four choices on the way you receive messages:
• Individual Email: LinkedIn sends an email to your primary email address as soon as the action takes place.
• Daily Digest Email: LinkedIn sends one bundled email notification per day.
• Weekly Digest Email: LinkedIn sends one bundled email notification per week.
• No Email: LinkedIn sends no email. You need to go to the website to read messages and notifications.
Note: How LinkedIn Handles Bundled Notifications
With bundled notifications, you don’t receive a notification if there is no activity.
You can further customize your notifications based on message type such as InMails, introductions, OpenLink messages, invitations to connect, status updates, group updates, and so forth.
As you expand your network on LinkedIn, you could potentially receive a large volume of messages. Think carefully about how to best manage and process information. Many people choose to receive email notifications of the updates that are most important to them and review online those that are less time-sensitive. For example, you might want to receive invitations and job notifications immediately, but review group news only on the web. If you decide that your choices aren’t working well for you, you can always modify these selections.
Note: Notification Methods Vary by Message Type
Not all notification methods are available for each type of message. For example, daily digest emails are available only for group notifications. Additionally, you can’t receive network updates by individual email because this would involve more messages than most members want to handle.
To customize which connection invitations you receive, click the Invitation Filtering link. By default, you receive all invitations, but you can choose to receive invitations only from those who know your email address or those who are in your Imported Contacts list. Keep in mind, however, that restricting your invitations could block an invitation from someone you might actually want to connect with.
Finally, you can specify whether you want to receive InMail messages from LinkedIn marketing or hiring partners. To do so, click the Partner InMails link, and enter your preferences on the Partner InMail Settings page.
Customizing Your Home Page Settings
Network updates on your home page give you a quick snapshot of your connections’ activities on LinkedIn. Although it’s good to keep up with the latest news in your network, you might find that some network updates are of more interest to you than others are. See Lesson 1 for more information about your home page.
Fortunately, there’s a way to customize exactly what appears on your home page. You can choose which updates you want to view and which you want to hide, including content from your connections, groups, applications, and more.
To customize your home page settings:
- On the global navigation bar, click the down arrow to the left of your name, and select Settings from the drop-down menu.
- On the Account & Settings page, click the Network Updates link in the Home Page Settings section.
- Click the Manage Updates by Type tab, shown in Figure 4.3.
Figure 4.3. Customize the content that appears on your home page.

- Specify how many updates you want to view on your home page. The default is 15, but you can choose from 10 to 25 updates.
- Specify whether you want to Show or Hide each of the identified updates.
- Click the Save Changes button. LinkedIn immediately makes the specified changes to your home page.
Subscribing to RSS Feeds
If you use a feed reader such as My Yahoo!, Google Reader, Newsgator, or Netvibes to subscribe to and read your favorite blog and news feeds, you might be interested in adding several LinkedIn feeds.
Plain English: RSS
RSS stands for Really Simple Syndication, a popular format for web feeds. Content publishers can syndicate their content with a feed, making it available for users to subscribe to it and view with feed reader applications. Feeds for blog content are most common, but you can also create a feed for web content such as the content on LinkedIn. The advantage of feeds for the user is that you can view frequently updated content from your favorite blogs, podcasts, news sites, and other websites in one place. The standard feed icon is a small orange square with white radio waves, letting you know that the content is available via feed for your subscription.
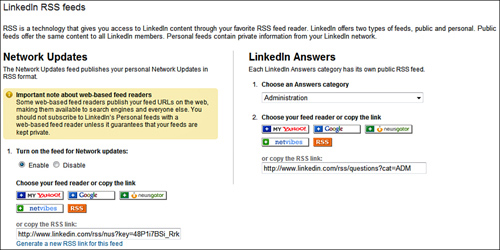
To subscribe to LinkedIn feeds, go to the global navigation bar, click the down arrow to the left of your name, and select Settings from the drop-down menu. On the Account & Settings page, click the Your Private RSS Feeds link in the RSS Settings section to open the LinkedIn RSS Feeds page, shown in Figure 4.4.
Figure 4.4. You can view LinkedIn content with your favorite feed reader.
Plain English: Private Feeds Versus Public Feeds
It’s important to understand the difference between a private feed and a public feed. LinkedIn private feeds contain personal data such as your updates and your connections’ updates and are meant for your private viewing. Public feeds contain data available for public viewing on the web, such as the content in LinkedIn Answers.
LinkedIn offers a private feed of the network updates that appear on your home page.
Caution: Ensuring Feed Privacy
Be careful not to publish your private feed on the web. If you use a web-based feed reader, verify that your data will remain private if you don’t want others to view your LinkedIn network updates.
To subscribe to this feed, select the Enable option button and choose your favorite feed reader from the buttons that appear. You can also copy the RSS link and use it in another feed reader if you prefer.
Subscribing to public feeds of your favorite LinkedIn Answers categories is another option. Each category maintains its own feed, so you can subscribe to one or more feeds based on your personal interests.
To do so, select a category from the drop-down list and click the button for your preferred feed reader. You can also copy the RSS link to use it in another feed reader.
Tip: Subscribe to LinkedIn News
LinkedIn also offers an RSS feed for LinkedIn news updates. To access this feed, go to http://learn.linkedin.com/whats-new/ and click the orange RSS feed icon to subscribe with your favorite feed reader.
Customizing Group Invitations Settings
By default, you will receive group invitations from your connections. If you don’t want to receive these invitations, you can block them.
To do so, go to the global navigation bar, click the down arrow to the left of your name, and select Settings from the drop-down menu. On the Account & Settings page, click the Group Invitation Filtering link in the Groups section to open the Group Invitation Settings page.
This page offers two choices for handling group invitations:
• I Am Open to Receiving Group Invitations: This is the default option that LinkedIn recommends.
• I Am Not Interested in Receiving Any Group Invitations: LinkedIn blocks all future group invitations, and you no longer receive them.
Tip: View Group Invitations Only on the Web
Rather than blocking all group invitations, you can specify to view them online rather than receiving them by email. See the section titled “Customizing Email Notification Settings,” earlier in this lesson for more information.
The Groups section on the Account & Settings page also includes the Groups Order and Display link. See Lesson 11, “Participating in LinkedIn Groups,” for more information on creating and using LinkedIn groups, including how to order and display them.
Customizing Your LinkedIn Personal Information
To customize your LinkedIn personal information, go to the global navigation bar, click the down arrow to the left of your name, and select Settings from the drop-down menu.
The Personal Information section on the Account & Settings page provides links to modify the following data:
• Name and Location: Update your name and location. Additionally, specify the display name you want others to see. If you have strong privacy concerns, you can choose to display only your first name and last initial (such as Patrice R.) to people who aren’t your connections. Displaying your full name will yield better results.
• Email Address: Add or delete email addresses and specify your primary email address where LinkedIn sends all messages.
Tip: Add All Your Email Accounts to the Email Addresses Page
Enter all the email addresses you use on the Email Addresses page. This includes your work email, personal email, and school email if you’re a recent graduate or still use a university email account. When people invite you to connect, LinkedIn matches the email address they enter for you to your LinkedIn account. Entering all your email accounts helps ensure a match.
Note: The Importance of Confirming Your Email Address
Remember that many LinkedIn features aren’t available until you confirm your email address. If you haven’t done so yet, or didn’t receive your original confirmation email, you can request another confirmation message on this page.
• Change Password: Specify a new password to use. Changing passwords on occasion is a good security measure. Also, remember to create a strong password that includes a combination of uppercase and lowercase letters, numbers, and symbols.
• Close Your Account: Close your account and specify your reason for doing so. Keep in mind that if you choose this option, you’ll lose all your LinkedIn connections and will no longer have access to the site.
Customizing Your Privacy Settings
LinkedIn enables you to specify privacy settings for the data you display on the LinkedIn site and for the way LinkedIn uses your personal information.
Tip: Read LinkedIn’s Privacy Policy
To learn more about LinkedIn’s privacy policy, click the Privacy Policy link on LinkedIn’s bottom navigation menu.
To customize your privacy settings, go to the global navigation bar, click the down arrow to the left of your name, and select Settings from the drop-down menu. Next, click one of the following links in the Privacy Settings section of the Account & Settings page:
• Research Surveys: Specify whether you want to receive invitations to participate in LinkedIn online market research surveys.
• Connections Browse: By default, LinkedIn allows your direct connections to browse a list of your other connections. This can provide a useful way to develop your network because it’s quite likely that you might know some of your connections’ connections. If you want to hide your connections list, however, you can choose to do so on the Connections Browse page. Your connections will still be able to view shared connections, however.
• Profile Views: The LinkedIn home page displays a box titled Who’s Viewed My Profile that provides information about the people who visit your profile. You can customize what, if anything, LinkedIn publishes about you when you visit a LinkedIn member’s profile. Options include displaying your name headline, and photo; anonymous profile characteristics (such as industry and title); or nothing at all. If you’re using LinkedIn as a business development tool, you might want others to know that you visited their profile. Otherwise, you might prefer complete or partial anonymity.
Note: Your Choice in the Profile Views Section Affects Profile View Stats
Be aware that you must allow LinkedIn to display your name and headline if you want to see who’s viewed your own profile. If you want to remain anonymous, you must upgrade to a premium account to gain access to this information.
• Viewing Profile Photos: You can choose whose photos you want to view. Options include all photos, no photos, or only photos of people in your network or people who are your connections.
Tip: Determine Who Can View Your Photo
To specify who can view your photo, go to the Account & Settings page, and click the My Profile Photo link in the Profile Settings section.
• Profile and Status Updates: When you update your status, modify your profile, or make recommendations, LinkedIn notifies your connections of these changes and publishes them in company and industry updates. For most people, this provides good exposure on the LinkedIn network. If you want to block these notifications, however, you can do so. LinkedIn handles profile update notifications and status update notifications separately, so you can choose to participate in one, both, or neither.
• Service Provider Directory: LinkedIn publishes a service provider directory for members who offer professional services. If another member recommends you, you can choose whether you want to be listed in the service provider directory. For most people, this is a great form of free publicity. If you’re a corporate employee, however, you might not want to be included if you perform professional services only on occasion. See Lesson 14, “Using LinkedIn Service Providers,” for more information about becoming a service provider.
• Partner Advertising: LinkedIn analyzes anonymous data from your profile, such as your industry, to customize the advertisements it displays and the content you view on partner sites (such as nytimes.com). For example, if you specify Banking as your industry, you’ll view ads that are relevant to professionals in that industry. If you don’t want LinkedIn to use your personal data in this way, you can opt out of this service.
• Authorized Applications: The Authorized Applications page enables you to remove LinkedIn applications you installed. You can also remove access to external websites that you previously allowed to access your LinkedIn data, such as Simply Hired or Business Exchange. See Lesson 13, “Using LinkedIn Applications,” for more information about how to use LinkedIn applications.
Specifying How You Want to Use the LinkedIn Network
The final section of the Account & Settings page enables you to let LinkedIn know how you plan to use your LinkedIn network. For example, you can let LinkedIn know that you want to find a job, hire employees, sell products or services, and so forth. Click the Using Your Network link to provide LinkedIn with this informational data.
Summary
In this lesson, you learned how to customize your LinkedIn settings for optimal efficiency and privacy. This often one-time effort will pay off in the end with a much easier, more streamlined system for using LinkedIn.