Lesson 6. Getting to Know the SELECT Statement
Knowledge of the T-SQL language is vital to your success as a SQL Server administrator or developer. You use the T-SQL language to manipulate the data in your database. Using T-SQL, you can select, insert, update, and delete data. In this lesson, you learn:
![]() What T-SQL is
What T-SQL is
![]() How to build a
How to build a SELECT statement
![]() How to work with a
How to work with a WHERE clause
![]() How to order your output
How to order your output
Introducing T-SQL
T-SQL, or Transact-SQL, is the dialect of the Structured Query Language (SQL) incorporated in SQL Server. To work effectively as a SQL Server developer, you must have a strong grasp of T-SQL. Fortunately, T-SQL is easy to learn. When retrieving data, you simply build a SELECT statement. SELECT statements are composed of clauses that determine the specifics of how the data is selected. When they’re executed, SELECT statements select rows of data and return them as a recordset.
Note
In the examples that follow, keywords appear in uppercase. Values that you supply appear italicized. Optional parts of the statement appear in square brackets. Curly braces, combined with vertical bars, indicate a choice. Finally, ellipses are used to indicate a repeating sequence.
Working with the SELECT Statement
The SELECT statement is at the heart of the SQL language. You use the SELECT statement to retrieve data from one or more tables. Its basic syntax is the following:
SELECT column-list FROM table-list WHERE where-clause
ORDER BY order-by-clause
The SELECT clause specifies what columns you want to retrieve from the table that SQL Server returns to the result set. The basic syntax for a SELECT clause is as follows:
SELECT column-list
Selecting All Fields
The simplest SELECT clause looks like this:
SELECT * FROM Person.Person
This SELECT clause, combined with the FROM clause covered in the next section, retrieves all columns from a table.
Selecting Specific Fields
You will not always want to retrieve all fields from a table. In fact, most often you need to retrieve data only from specific fields.
The example that follows retrieves only the BusinessEntityID and FirstName columns from a table:
SELECT BusinessEntityID, FirstName FROM Person.Person
Adding an Expression
Not only can you include columns that exist in your table, but you also can include expressions in a SELECT clause. Here’s an example:
SELECT BusinessEntityID, Title, FirstName + ' ' + MiddleName + ' ' +
LastName AS FullName FROM Person.Person
This SELECT clause retrieves the BusinessEntityID column, the Title column, and an alias called FullName, which includes an expression that concatenates the FirstName, MiddleName, and LastName columns (see Figure 6.1).

FIGURE 6.1 A SELECT clause that includes an expression that concatenates the FirstName, MiddleName, and LastName columns.
Note
The examples throughout this book are based on the AdventureWorks sample database. A backup of this database is available at http://msftdbprodsamples.codeplex.com/releases/view/125550. After you download the file, you must restore the database so that you can follow along with the examples. Lesson 22, “Maintaining the Databases You Build,” covers the process of restoring a database.
After installing the AdventureWorks database, you will probably notice that all the table names appear in the format schema-name.table-name. All objects in databases are contained in schemas. There are many advantages to placing database objects in schemas. Throughout the book, you will see examples such as Person.Address, with Person being the schema name and Address being the table name. When an object is associated with a schema, you must refer to the object along with its schema name.
Adding on the FROM Clause
The FROM clause specifies the tables or views from which the records should be selected. It can include an alias that you use to refer to the table. The FROM clause looks like this:
FROM table-list [AS alias]
Here’s an example of a basic FROM clause:
FROM Person.Address
In this case, the name of the table is Address. If you combine the SELECT clause with the FROM clause, the SQL statement looks like this:
SELECT AddressID, AddressLine1 FROM Person.Address
This SELECT statement retrieves the AddressID and AddressLine1 columns from the Address table, which is part of Person schema.
Using Table Aliases
Just as you can alias the fields included in a SELECT clause, you can also alias the tables included in the FROM clause. The alias is used to shorten the name and to simplify a cryptic name, as well as for a variety of other reasons. Here’s an example:
SELECT BusinessEntityID, FirstName FROM Person.Person AS Clients
Including the WHERE Clause
The WHERE clause limits the records retrieved by the SELECT statement. A WHERE clause can include columns combined by the keywords AND and OR. The syntax for a WHERE clause looks like this:
WHERE expression1 [{AND|OR} expression2 [...]]
A simple WHERE clause looks like this:
WHERE PersonType = 'EM'
Using an AND to further limit the criteria, the WHERE clause looks like this:
WHERE PersonType = 'EM' AND LastName Like 'Ma%'
This WHERE clause limits the records returned to those in which the PersonType is equal to EM and the LastName begins with Ma. Notice that T-SQL uses the percent (%) sign as a wildcard. Using an OR, the SELECT statement looks like this:
WHERE PersonType = 'EM' OR PersonType = 'SC'
This WHERE clause returns all records in which the PersonType is equal to either EM or SC. Compare that with the following example:
WHERE PersonType = 'EM' OR LastName Like 'Ma%'
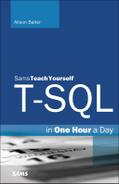
This WHERE clause returns all records in which the PersonType is equal to EM or the LastName begins with Ma. For example, the people with EM as their PersonType are returned from this WHERE clause, as are the people whose LastName begins with Ma. The WHERE clause combined with the SELECT and FROM clauses looks like this (see Figure 6.2):
SELECT BusinessEntityID, PersonType, LastName FROM Person.Person
WHERE PersonType = 'EM' OR LastName Like 'MA%'

FIGURE 6.2 A SELECT clause that retrieves the BusinessEntityID, PersonType, and LastName columns for all the people with either the PersonType ‘EM’, or a LastName that begins with ‘MA’.
Notice in Figure 6.2 that records with a PersonType of ‘MA’ appear regardless of their last name. Records of people whose last names begin with ‘MA’ appear regardless of their PersonType.
Contrast this example to the following example:
SELECT BusinessEntityID, PersonType, LastName FROM Person.Person
WHERE PersonType = 'EM' AND LastName Like 'MA%'
The results appear in Figure 6.3.
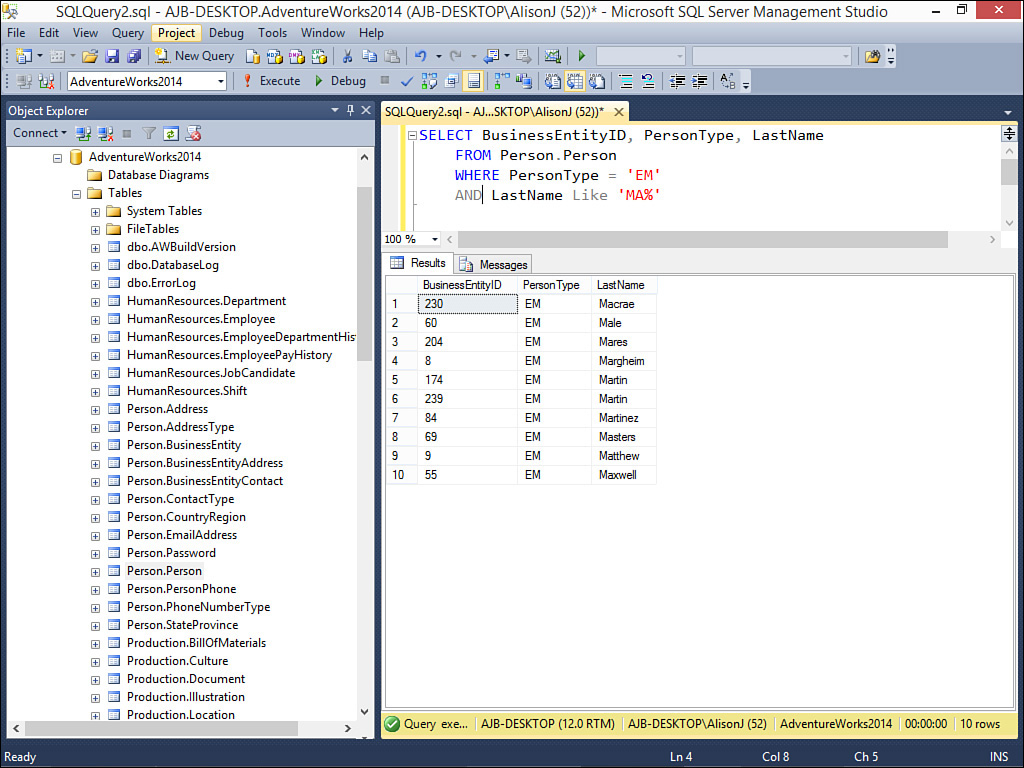
FIGURE 6.3 Using the keyword AND, both conditions must be true for a row to appear in the result set.
If you look at the records returned in Figure 6.3, you see that all records that appear in the result have both a PersonType of ‘EM’ and a last name that begins with ‘MA’.
Rules When Filtering Data
You must follow several rules when building a WHERE clause. You must enclose the text strings for which you are searching in apostrophes. You must also surround dates with apostrophes. Unlike text strings and dates, you do not delimit numeric fields. Finally, you must include the keyword LIKE when utilizing wildcard characters. Remember that T-SQL uses the percent symbol as the wildcard for zero or more characters. The underscore (_) is the wildcard for a single character. Let’s take a look at some examples:
SELECT BusinessEntityID, PersonType, LastName FROM Person.Person
WHERE BusinessEntityID >= 200
In this example, because BusinessEntityID is a numeric field with the int data type, the criteria for BusinessEntityID contains no apostrophes. With character (string) data, the process is different:
SELECT BusinessEntityID, PersonType, LastName FROM Person.Person
WHERE LastName = 'Martin'
Notice that the text string we are looking for is enclosed in apostrophes. You might be surprised that when specifying criteria for dates, you also use apostrophes:
SELECT BusinessEntityID, PersonType, LastName, ModifiedDate FROM Person.Person
WHERE ModifiedDate >= '1/1/2013'
Working with Dates and Times
The T-SQL language is rich with date and time functions you can use when specifying criteria. The text that follows covers many of these powerful functions.
The GetDate() function returns the current date and time. Take a look at the simplest example:
SELECT GetDate()
This example returns one column containing the current date and time. A more complex example of using the GetDate() function looks like this:
SELECT ModifiedDate, CONVERT(int. ModifiedDate – GetDate())
FROM Person.Person
The T-SQL in this example returns the ModifiedDate from the Person table, along with the number of days between the current date and the ModifiedDate. The results appear in Figure 6.4.
Another T-SQL date function is DAY. Its counterparts are the MONTH and YEAR functions. These functions return the day, month, and year associated with a date. They look like this:
SELECT DAY(GetDate()), MONTH(GetDate()), YEAR(GetDate())
The results of executing this statement appear in Figure 6.5.

FIGURE 6.5 Use the DAY, MONTH, and YEAR functions to return the day, month, and year associated with a date.
The DATEPART function extracts a part of a date. You use it to determine the day of the month, month of the year, year of a date, day of the year, day of the week, week of the year, and other parts of a date. An example of several uses of the DATEPART function appear in Figure 6.6.

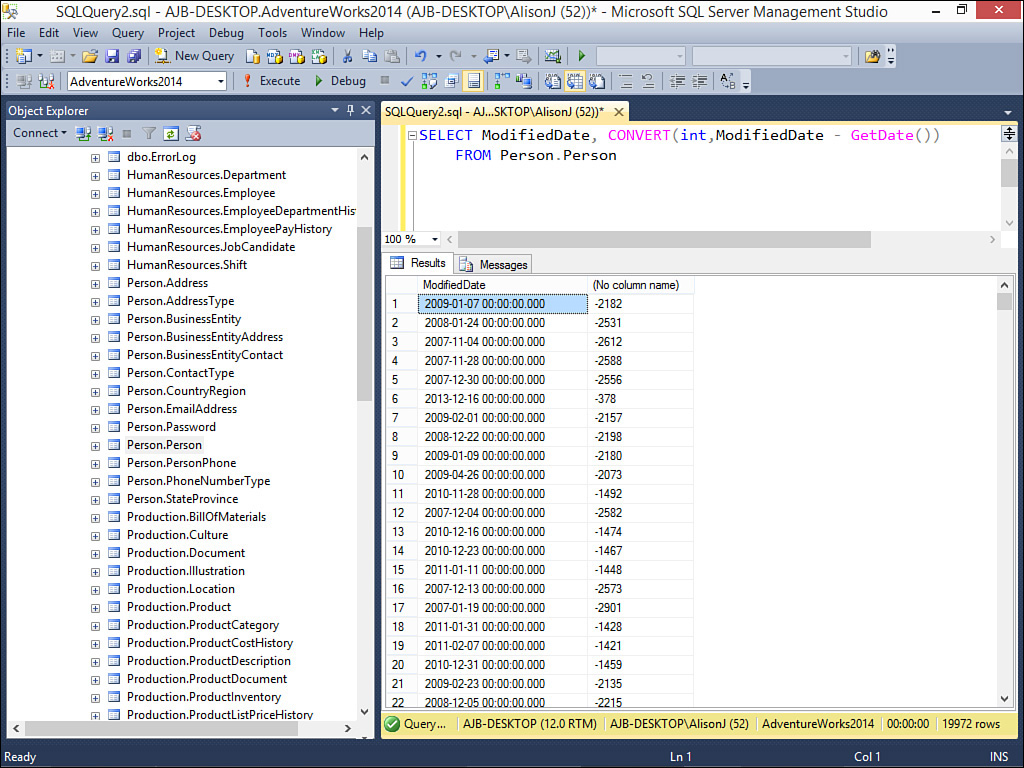
With the DATEADD function, you add or subtract a specified period of time from a date. For example, you can add a quarter to a date. Examples of the uses of the DATEADD function appear in Figure 6.7.
Another powerful date-related T-SQL function is DATEDIFF. It allows you to determine the number of days, months, years, or other time increments between two dates. Figure 6.8 illustrates some examples of the DATEDIFF function.

Using IN and NOT
The IN and NOT keywords facilitate the process of determining what rows appear in the result of your SELECT statement. The IN keyword allows you to select a series of values that will appear in the result. The NOT keyword allows you to exclude what appears in the result. The following is an example of the use of the IN keyword:
SELECT BusinessEntityID, PersonType, LastName, ModifiedDate FROM Person.Person
WHERE PersonType IN('EM','IN','VC')
This SELECT statement returns the designated fields from the Person table for all records where the PersonType is ‘EM’, ‘IN’, or ‘VC’. If you want to retrieve all rows where the PersonType is not ‘EM’, ‘IN’, or ‘VC’, you simply add the keyword NOT to the statement:
SELECT BusinessEntityID, PersonType, LastName, ModifiedDate FROM Person.Person
WHERE PersonType NOT IN('EM','IN','VC')
Another example of the use of the NOT keyword is where you want to return all rows from the Person table where the ModifiedDate is not between 1/1/2013 and 12/31/14. It looks like this:
SELECT BusinessEntityID, PersonType, LastName, ModifiedDate FROM Person.Person
WHERE ModifiedDate NOT BETWEEN '1/1/2013' AND '12/31/2014'
Another keyword you might find useful is the NULL keyword. The NULL keyword allows you to designate that you want to retrieve only those rows where the designated field does not contain data or only those rows where the designated field does contain data. Here’s how it works:
SELECT BusinessEntityID, PersonType, LastName, ModifiedDate FROM Person.Person
WHERE Suffix IS NULL
This SELECT statement returns all rows where the Suffix field does not contain data. By adding the keyword NOT, you can return only those rows where the Suffix field contains data.
SELECT BusinessEntityID, PersonType, LastName, ModifiedDate FROM Person.Person
WHERE Suffix IS NOT NULL
As you can see, by combining everything you have learned in this section, you can retrieve only the data you want and need.
Using the ORDER BY Clause
The ORDER BY clause determines the order in which SQL Server sorts the returned rows. It’s an optional clause and looks like this:
ORDER BY column1 [{ASC|DESC}], column2 [{ASC|DESC}] [,...]]
Here’s an example:
ORDER BY BusinessEntityID
The ORDER BY clause can include more than one field:
ORDER BY LastName, FirstName
When you specify more than one field, SQL Server uses the leftmost field as the primary level of sort. Any additional fields are the lower sort levels. Combined with the rest of the SELECT statement, the ORDER BY clause looks like this:
SELECT BusinessEntityID, FirstName, LastName, ModifiedDate FROM Person.Person
WHERE ModifiedDate Between '1/1/2013' AND '12/31/2014'
ORDER BY ModifiedDate
The results appear in order by ModifiedDate (see Figure 6.9).
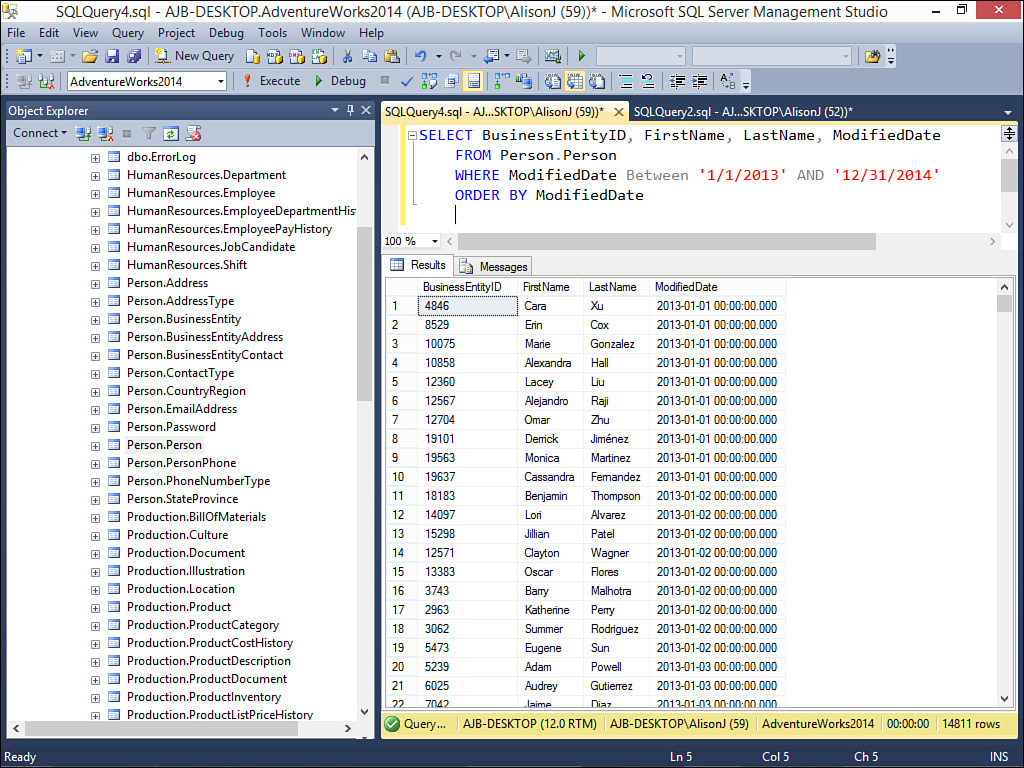
FIGURE 6.9 A SELECT clause that retrieves the BusinessEntityID, FirstName, LastName, and ModifiedDate columns for all the people whose ModifiedDate is between 1/1/2013 and 12/31/2014. SQL Server orders the results by ModifiedDate.
Changing the Sort Direction
The ORDER BY clause enables you to determine whether the sorted output appears in ascending or descending order. By default, output appears in ascending order. To switch to descending order, use the optional keyword DESC. Here’s an example:
SELECT BusinessEntityID, FirstName, LastName, ModifiedDate FROM Person.Person
WHERE ModifiedDate Between '1/1/2013' AND '12/31/2014'
ORDER BY ModifiedDate DESC
This example selects the BusinessEntityID, FirstName, LastName, and ModifiedDate fields from the Person table, ordering the output in descending order by the ModifiedDate field (see Figure 6.10).

FIGURE 6.10 A SELECT clause that retrieves the BusinessEntityID, FirstName, LastName, and ModifiedDate columns for all the people with a ModifiedDate between 1/1/2013 and 12/31/2014. SQL Server orders the results in descending order by ModifiedDate.
Summary
The T-SQL language is the foundation for most of what you do in SQL Server. It is therefore necessary to have a strong understanding of the T-SQL language constructs. This lesson covered many of the basics of the T-SQL language. You learned about the SELECT statement, the FROM keyword, the WHERE clause, and the ORDER BY clause. We cover T-SQL in additional detail throughout the remainder of the book.
Q&A
Q. Why do you use a SELECT statement?
A. To retrieve data from one or more tables.
Q. Name the wildcard characters you can use when searching and explain the differences between them.
A. The two wildcard characters are the percent (%) sign and the underscore (_). T-SQL uses the percent symbol (%) as the wildcard for zero or more characters. The underscore (_) is the wildcard for a single character.
Workshop
Quiz
1. Which keyword do you use to designate the tables you will include in the query?
2. You use an alias to permanently rename a field in a table (true/false).
3. What is the keyword you use if you want the data to appear in descending order?
Quiz Answers
1. You use FROM to designate the tables you will include in the query.
2. False. ALIAS provides only an alias for the field in the query output.
3. If you want the query output to appear in descending order, use the DESC keyword.
Activities
Build a simple SELECT statement based on the Person.Address table in the AdventureWorks2014 sample database. Include the AddressID, AddressLine1, AddressLine2, City, StateProvinceID, and PostalCode fields. Add a WHERE clause to limit the records returned in the result to those where the City is Seattle, Redmond, or Newport Hills. Order the data in descending order by City.