
Lesson 19. Authentication
Security is a critical aspect of a server database. It ensures that the data you enter into the database is protected. This lesson covers:
![]() The basics of security
The basics of security
![]() The types of authentication available
The types of authentication available
![]() How to create logins
How to create logins
![]() How to create roles
How to create roles
The Basics of Security
Security is necessary to prohibit access by unauthorized users and to ensure that authorized users have only the rights you want them to have. SQL Server security is robust and offers you several alternatives for your security model.
Let’s begin by contrasting SQL Server security to that of a desktop database such as Microsoft Access. Access security is very limited and does not provide you with a lot of protection. You must grant read, write, and delete permissions to the users of an Access database for the network share on which the database resides. This makes the database vulnerable to hackers as well as the inadvertent actions of users (for example, accidentally moving or deleting a file). Furthermore, user-level security is not available in recent versions of Access. This means that you must “home-grow” Access security using VBA code, and users must log on to both the operating system and Microsoft Access. Finally, operating system features such as password aging, the logging of user activity, and the logging of invalid login attempts are all unavailable with Microsoft Access.
On the other hand, SQL Server offers a robust and flexible security model. SQL Server security is tightly integrated with Windows security. This means that SQL Server can utilize the users and roles you set up at the operating system level. Within SQL Server, you determine the rights the users and roles have for the various SQL Server objects. Not only are Windows users and roles available, but you can also take advantage of operating system features such as password expiration and the logging of login attempts and database activities.
The process of validating a user is known as authentication. The process of determining what a user can do is called permissions validation. This lesson covers authentication. Lesson 20, “SQL Server Permissions Validation,” covers permissions validation.
Types of Authentication
Authentication involves ensuring that a user is who he says he is. After SQL Server authenticates a user, the user can perform any actions specifically granted to his login, as well as actions granted to any roles of which the user is a member.
Two types of authentication exist:
![]() SQL Server and Windows (Mixed authentication)
SQL Server and Windows (Mixed authentication)
![]() Windows only
Windows only
With SQL Server and Windows authentication, SQL Server supports both SQL Server and Windows logins. With Windows-only authentication, SQL Server supports only Windows logins. When you install SQL Server, you can configure the type of authentication that SQL Server uses. To modify the type of authentication you want to use, follow these steps:
1. Launch SQL Server Management Studio.
2. Right-click the server whose authentication mode you want to modify and select Properties. The Server Properties dialog box appears.
3. Click the Security node.
4. Modify the Server authentication, as shown in Figure 19.1.
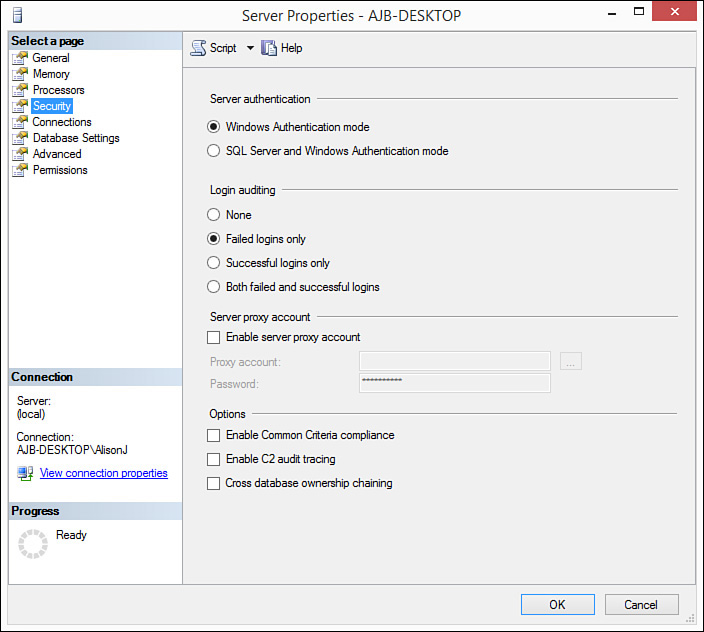
FIGURE 19.1 The Security tab of the SQL Server Properties dialog box enables you to modify the authentication type of the server.
Windows Only authentication has several advantages over SQL Server and Windows (Mixed) authentication. These advantages include the following:
![]() Requirement for the user to log on only once
Requirement for the user to log on only once
![]() Central administration of logins
Central administration of logins
![]() Enforceable minimum password length
Enforceable minimum password length
![]() Account lockout after unsuccessful login attempts
Account lockout after unsuccessful login attempts
![]() More secure validation
More secure validation
![]() Encryption of passwords
Encryption of passwords
![]() Auditing features
Auditing features
The main advantage of SQL Server and Windows (Mixed) authentication is that SQL Server and Windows (Mixed) authentication enables you to support non-Windows users such as Novell users.
Creating Logins
If you select Windows authentication, SQL Server assumes a trust relationship with your Windows server. It assumes that the user has already successfully logged in. Regardless of the authentication mode you select, you must still create SQL Server logins.
Adding a Windows Login
To begin, we’re going to take a look at the process of creating a Windows login; the process is somewhat different from creating a SQL login. Follow these steps to create a Windows login:
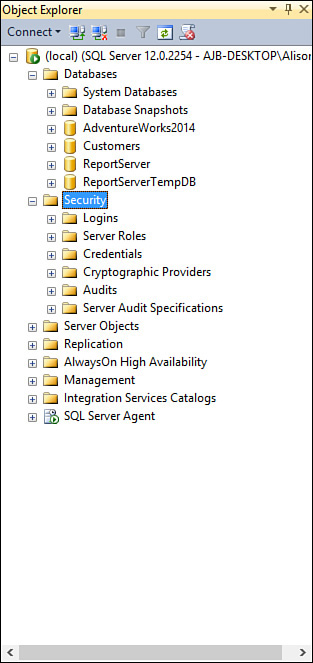
1. Click to expand the Security node for the server (see Figure 19.2).
2. Right-click Logins and select New Login. The Login – New dialog box appears (see Figure 19.3).

3. Type the name for the login or click Search to locate the login.
4. If you click Search, the Select User or Group dialog box appears (see Figure 19.4). Make sure that the object type and location are correct and then type the name of the user or group.
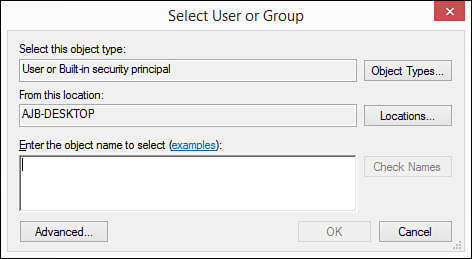
5. Click Check Names to verify that the user or group exists.
6. Click OK to close the Select User or Group dialog box.
7. Make sure that Windows authentication is selected.
8. Specify the default database for the user (refer to Figure 19.3).
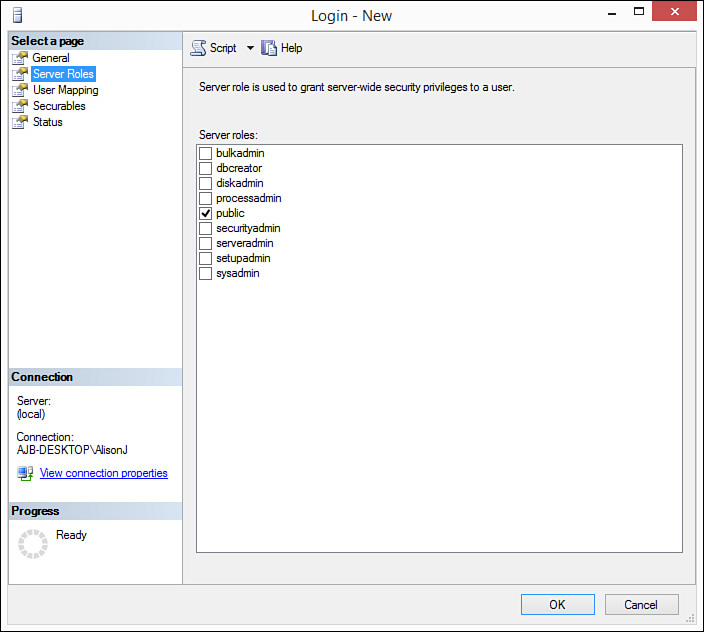
9. Click the Server Roles node to grant the user membership to server roles (see Figure 19.5).
10. Click the User Mapping node to designate to which databases the user has rights. The “Granting Database Access to Logins” section of this lesson covers database access.
11. Click OK to close the dialog box and add the user.
Adding a SQL Server Login
When adding a SQL Server login, you are adding a login that does not exist anywhere else. The login is independent of the operating system and its logins. Follow these steps to create a SQL Server login:
1. Click to expand the Security node for the server.
2. Right-click Logins and select New Login. The Login – New dialog box appears.
3. Type the name for the login.
4. Make sure you select SQL Server authentication.
5. Type a password for the user (see Figure 19.6). This case-sensitive password can contain from 1 through 128 characters, including letters, symbols, and digits.

FIGURE 19.6 When using SQL Server and Windows (Mixed) authentication, the SQL Server Login — New dialog box prompts you to type a password for the user.
7. Specify the default database for the user.
8. Click the Server Roles node to grant the user membership to server roles.
9. Click the User Mapping node to designate to which databases the user has rights. The “Granting Database Access to Logins” section of this lesson covers database access.
10. Click OK to close the dialog box.
Granting Database Access to Logins
Whether you use Windows Only authentication or SQL Server authentication, you need to determine to which databases the user has rights and to which fixed database and user-defined database roles the user belongs. You can grant database access for a login when adding the login (see previous text). To grant database access for an existing login, follow these steps:
1. Click to expand the Security node for the server.
2. Click Logins. The available logins appear. Right-click the login you want to affect and select Properties. The Login Properties dialog box appears.
3. Click to select the User Mapping node. The dialog box appears, as shown in Figure 19.7.

FIGURE 19.7 The User Mapping tab of the SQL Server Login Properties dialog box enables you to designate the databases to which you want the user to have access.
4. Click the Map check box next to each database to which you want the user to have access.
5. Click the check box next to each database role (system- and user-defined) to which you want the user to belong.
6. Click OK to commit your changes.
Understanding the SA Login
The SA Login is a special login within the SQL Server environment. If you install SQL Server in mixed mode (Windows and SQL Server authentication), the SA login has unlimited powers. With mixed-mode authentication, there is no way to modify or delete the SA account. It is therefore imperative you assign a password to the SA account. Failure to do so renders any other security you apply to the server futile.
Creating Roles
Roles are the equivalent of Windows groups. You create roles and then grant users membership to those roles. Users who are members of a role inherit the permissions assigned to that role. The process of creating roles and assigning permissions to those roles greatly facilitates the process of administering security. Rather than having to assign specific rights to each user of a system, you can instead assign rights to groups of users.
Types of Roles
SQL Server offers four types of roles:
![]() Fixed server roles
Fixed server roles
![]() Fixed database roles
Fixed database roles
![]() User-defined database roles
User-defined database roles
![]() Application roles
Application roles
Each of these types of roles serves a specific purpose. Generally you will use several types of roles in combination. The sections that appear later in the lesson discuss each type of role in detail.
Fixed Server Roles
Fixed server roles are built into SQL Server and are in no way user-definable (you cannot add them, modify them, or delete them). They enable their members to perform server-level administrative tasks. The fixed server roles are the following:
![]() Bulk Insert Administrators (bulkadmin)—Can execute bulk insert statements.
Bulk Insert Administrators (bulkadmin)—Can execute bulk insert statements.
![]() Database Creators (dbcreator)—Can create and alter databases.
Database Creators (dbcreator)—Can create and alter databases.
![]() Disk Administrators (diskadmin)—Can manage disk files.
Disk Administrators (diskadmin)—Can manage disk files.
![]() Process Administrators (processadmin)—Can manage SQL Server processes.
Process Administrators (processadmin)—Can manage SQL Server processes.
![]() Security Administrators (securityadmin)—Can manage server logins.
Security Administrators (securityadmin)—Can manage server logins.
![]() Server Administrators (serveradmin)—Can configure server-wide settings.
Server Administrators (serveradmin)—Can configure server-wide settings.
![]() Setup Administrators (setupadmin)—Can install replication and can manage extended properties.
Setup Administrators (setupadmin)—Can install replication and can manage extended properties.
![]() System Administrators (sysadmin)—Can perform any activity on that SQL Server instance. This includes all activities of the other roles. In fact, if a user is a member of the sysadmin role, you cannot prohibit him from performing any tasks on the server.
System Administrators (sysadmin)—Can perform any activity on that SQL Server instance. This includes all activities of the other roles. In fact, if a user is a member of the sysadmin role, you cannot prohibit him from performing any tasks on the server.
Server roles greatly facilitate the process of managing security. They accomplish this by allowing you to compartmentalize the administrative tasks that users can perform and to grant them rights to perform only those specific tasks.
Note
When you install SQL Server, the installation process adds the Windows Administrators group to the sysadmin role. This means that all members of the Administrators group instantly become members of sysadmin. Fortunately, you can remove this mapping from Administrators to the sysadmin role. To remove the mapping, you must deny the Administrators group from logging on to the SQL Server. You then grant the individual users membership to the sysadmin role.
To assign a user to a fixed server role, follow these steps:
1. Expand the Security node until you can see the Server Roles subnode (see Figure 19.8).

FIGURE 19.8 The Server Roles subnode of the Security node enables you to assign users to a fixed server role.
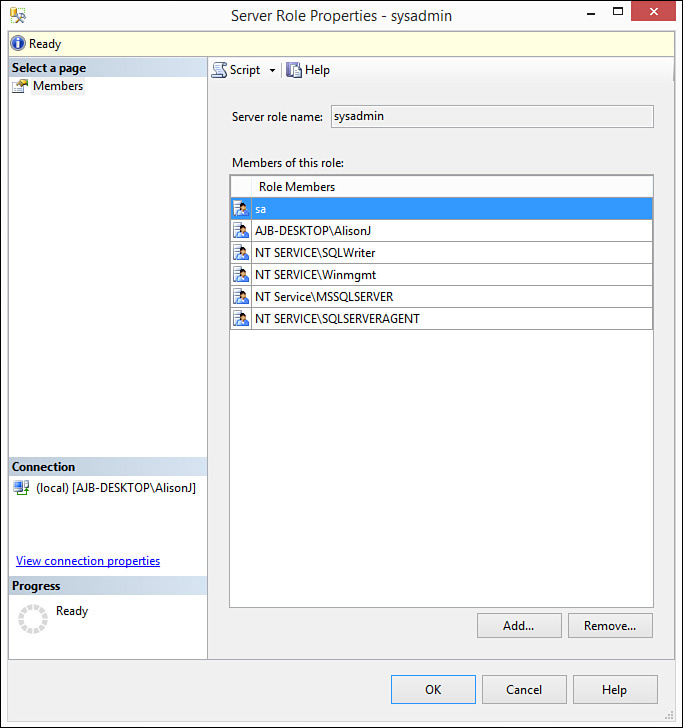
2. Right-click the role to which you want to grant users membership and select Properties. The Server Role Properties dialog box opens (see Figure 19.9).
3. Click Add to add a user to the role. The Select Server Login or Role dialog box appears (see Figure 19.10).

4. Click Browse to select the logins you want to add. The Browse for Objects dialog box opens (see Figure 19.11).

FIGURE 19.11 The Browse for Objects dialog box enables you to select the users you want to add to a role.
5. Click to check the objects you want to add to the role.
6. Click to close the Browse for Objects dialog box.
7. Click OK. SQL Server adds the selected users to the role.
Fixed Database Roles
Whereas fixed server roles enable you to assign rights to users that apply at the server level, fixed database roles enable you to assign rights at the database level. Because fixed server roles apply at the server level, they are found under the Security node. Because fixed database roles apply at a database level, they are located under the specific database node of the database to which they apply.
As with fixed server roles, you cannot add, remove, or modify the rights granted to fixed database roles. Fixed database roles facilitate the process of assigning permissions for a database. The fixed database roles are as follows:
![]() db_accessadmin—Can add and remove Windows users and groups and SQL Server users for the database.
db_accessadmin—Can add and remove Windows users and groups and SQL Server users for the database.
![]() db_backupoperator—Can back up the database.
db_backupoperator—Can back up the database.
![]() db_datareader—Can view data in all user tables in the database.
db_datareader—Can view data in all user tables in the database.
![]() db_datawriter—Can add, edit, and delete data in all user tables in the database.
db_datawriter—Can add, edit, and delete data in all user tables in the database.
![]() db_ddladmin—Can add, modify, and drop database objects.
db_ddladmin—Can add, modify, and drop database objects.
![]() db_denydatareader—Cannot see any data in the database.
db_denydatareader—Cannot see any data in the database.
![]() db_denydatawriter—Cannot modify any data in the database.
db_denydatawriter—Cannot modify any data in the database.
![]() db_owner—Can perform the activities of any of the other roles. Can also perform all database maintenance and configuration tasks.
db_owner—Can perform the activities of any of the other roles. Can also perform all database maintenance and configuration tasks.
![]() db_securityadmin—Can manage role membership and statement and object permissions for the database.
db_securityadmin—Can manage role membership and statement and object permissions for the database.
To assign a user to a fixed database role, perform these steps:
1. Expand the Database node of the desired database until you can see the Security subnode.
2. Click to expand the Roles node for the database.
3. Click to expand the list of Database Roles (see Figure 19.12).

4. Right-click the role to which you want to grant users membership and select Properties. The Database Role Properties dialog box appears (see Figure 19.13).

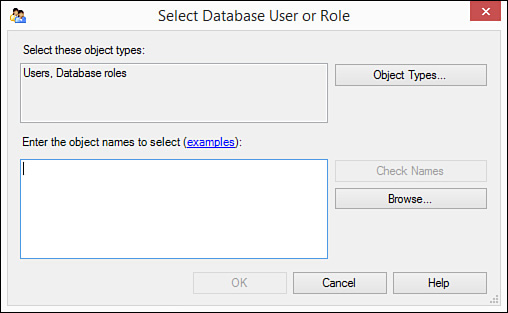
5. Click Add to add a user to the role. The Select Database User or Role dialog box appears (see Figure 19.14).
6. Click Browse. The Browse for Objects dialog box appears (see Figure 19.15).
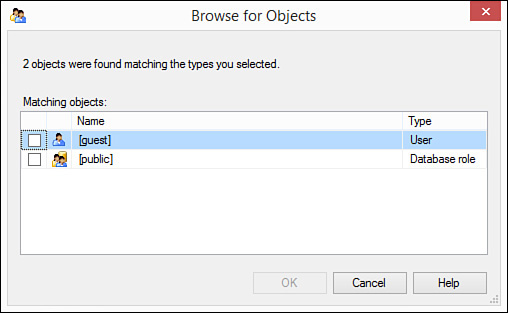
FIGURE 19.15 The Browse for Objects dialog box enables you to select the users you want to add to a role.
7. Click to select the logins you want to add and click OK. Click OK to close the Select Database User or Role dialog box. SQL Server adds the selected users to the role.
The Public role is a special built-in fixed database role. Every user is a member of it. When you grant a user access to a database, SQL Server adds the user to the Public database role. You can’t remove the Public role, nor can you remove users of a database from the Public role. Any rights that you grant to the Public role are automatically granted to all users of the database. The Public role therefore provides an excellent means of easily granting all users rights to a particular object. On the other hand, if you accidentally grant the Public role rights, those rights apply to all users of the database.
User-Defined Database Roles
At a database level, you are not limited to the predefined roles. In addition to the predefined roles, you can add your own roles. SQL Server offers two types of user-defined roles. They are the following:
![]() Standard role—Custom role that you use to facilitate the task of assigning rights to users of the database.
Standard role—Custom role that you use to facilitate the task of assigning rights to users of the database.
![]() Application role—Role used by an application.
Application role—Role used by an application.
To create a user-defined role, follow these steps:
1. Expand the Database node of the desired database until you can see the Roles subnode (see Figure 19.16).

FIGURE 19.16 The Roles subnode of the Database node enables you to create and work with user-defined database roles.
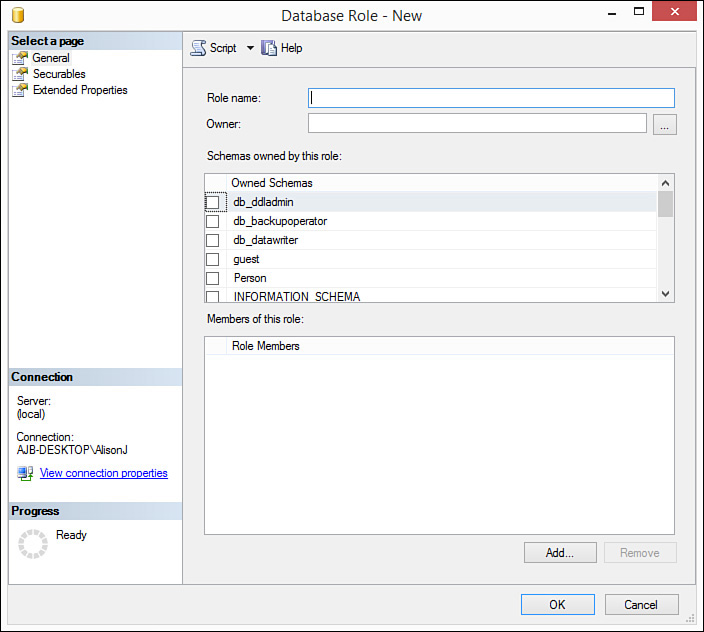
2. Right-click the Roles subnode, select New, and then select New Database Role. The Database Role – New dialog box appears, prompting you to enter the name of the new role (see Figure 19.17).
3. Type the name of the role in the Role name text box.
4. Designate the schemas owned by the role.
5. Click Add to add a user to the role. The Select Database User or Role dialog box appears.
6. Select the logins you want to add (clicking Browse if necessary) and click OK. SQL Server adds the selected users to the role and the role to the database.
Ownership
It is important to understand what ownership is and what the implications of ownership are. SQL Server designates the creator of an object as its owner. The owner of an object has full permissions for that object. Furthermore, the name of the object is actually owner.objectname—for example, alexis.tblCustomers.
You cannot remove a user from a database as long as he owns objects within it. Ownership of an object is implied. This means you cannot directly administer an object’s owner.
dbo is a special user account within each database. SQL Server maps the dbo to the sysadmin fixed server role. This means that if you are a member of the sysadmin group and you create an object, SQL Server flags the object as owned by dbo, not by you. You can refer to the object as dbo.objectname.
The sp_changeobjectowner system-stored procedure enables you to change an object’s owner. Only members of the sysadmin fixed server role, the db_owner fixed database role, or a member of both the db_ddladmin and db_securityadmin fixed database roles can execute the sp_changeobjectowner stored procedure. It looks like this:
EXEC sp_changeobjectowner 'tblCustomers', 'Brendan'
When you change an object’s owner, SQL Server drops all permissions for the object. To change the owner back to dbo, you must fully qualify the owner name and object name. The syntax looks like this:
EXEC sp_changeobjectowner 'Brendan.tblCustomers', 'dbo'
Summary
You can create the best application and database in the world, but if it is not properly secured, someone can easily sabotage it. This lesson explained the basics of security. You read about the types of authentication available and about logins and roles. Lesson 20, “SQL Server Permissions Validation,” covers security in additional detail.
Q&A
Q. Explain the difference between Windows Only authentication and SQL Server and Windows (Mixed) authentication.
A. With Windows authentication, the user does not need to log on to the server more than one time. Users you add to the SQL Server then gain the specified access to the server. With Windows authentication, you also get all the benefits of the operating system login process. For example, you can enforce minimum password length.
With SQL Server and Windows (Mixed) Authentication you can use SQL Server logins. You do not have to have organized Windows domains, and finally, SQL Server and Windows (Mixed) authentication enables you to support non-Windows users such as Novell users.
Q. Explain the SA Login and what it can do.
A. The SA Login is available only with Mixed Authentication and has unlimited powers! There is no way to modify or delete the SA account. It is therefore imperative that you assign a password to the SA account. Otherwise, any other security measures you take will be futile.
Q. Explain the interaction between sysadmin and the Windows Administrators group.
A. All members of the Windows Administrators group are added automatically to the sysadmin role upon installation of SQL Server. Remember that sysadmin is all-powerful in working with your server. Fortunately, you can remove this mapping. You must first deny the Administrators group from logging on to the SQL Server. You then grant the individual users membership to the sysadmin role as required.
Workshop
Quiz
1. Name four types of roles.
2. The SA user is available with both SQL Server and Windows authentication (true/false).
3. Name some benefits of Windows authentication.
4. If a login exists in Windows and you want them to be able to access the SQL Server, you don’t have to do anything special (true/false).
5. You find fixed database roles under the database node of the database with which they are associated (true/false).
6. What user is automatically the owner of an object?
7. Name the stored procedure that enables you to change an object’s ownership.
Quiz Answers
1. Server, Database, User-Defined, Application.
2. False. Only with Mixed authentication.
3. Single login, password expiration, central administration, more secure validation, password encryption, account lockout after a certain number of attempts.
4. False. You still have to create them as a user in SQL Server.
5. True.
6. The user that creates the object.
7. sp_changeobjectowner.
Activities
Set up a server with Windows-Only authentication. Add three new logins. Grant each login access to the AdventureWorks database. Assign one user to the Process Administrator fixed server role. Assign another user to the db_datareader role of AdventureWorks. Create a user-defined role as part of the AdventureWorks database. Assign all three logins to that role.