Lesson 24. Installing and Upgrading SQL Server
Although you can use the material in this book with most versions of SQL Server, SQL Server 2014 is the most commonly used version of SQL Server at the time of this writing. This lesson explains:
![]() How to launch the SQL Server installation process
How to launch the SQL Server installation process
![]() How to configure the various installation options
How to configure the various installation options
![]() How to launch SQL Server Management Studio
How to launch SQL Server Management Studio
Installing SQL Server 2014 Enterprise Edition
Although installing SQL Server is a fairly simple process, there are a few questions you are asked during the installation process that might need some clarification. The text that follows walks you through the process of installing the SQL Server 2014 database engine and provides an explanation of the various options available to you. Here’s the process:
1. Before launching the setup program, you must first locate and mount the ISO file. Right-click the ISO file and select Mount (see Figure 24.1). This opens the ISO file so you can view its contents (see Figure 24.2).


2. Double-click setup.exe.
3. When prompted to allow the program to make changes to your computer, click Yes.
4. After a short delay, the SQL Server Installation Center appears. Here you can opt to perform a variety of operations.
5. Click Installation. The dialog box displays as in Figure 24.3.

FIGURE 24.3 After clicking Installation, you can select the type of installation you want to perform.
6. Click New SQL Server Stand-alone Installation or Add Features to an Existing Installation. The installation process goes through a series of steps that might take quite a bit of time to execute (see Figure 24.4).

7. After quite some time, the installation wizard prompts you to indicate whether you want to perform a new instance of SQL Server or add features to an existing instance of SQL Server (see Figure 24.5).

FIGURE 24.5 You can either create a new SQL Server instance, or add features to an existing instance.
8. Click Perform a New Installation of SQL Server 2014 and click Next.
9. Indicate whether you are installing a free edition or if you have a product key that you will be using. Click Next.
10. Accept the license terms and click Next.
11. Select SQL Server Feature Installation and click Next.
12. As its name implies, the Feature Selection step of the installation process enables you to easily designate the features you want to include in your instance of SQL Server (see Figure 24.6). Select the desired features and click Next.

13. If you have multiple instances of SQL Server installed on your computer, each one must be identified by a unique instance name. Provide a name for the instance that you are creating (see Figure 24.7) and click Next.

14. With the Server Configuration step of the installation process, you can create accounts for the various server processes and indicate when the operating system starts each service (see Figure 24.8). Make your selections and click Next.

15. In the Database Engine Configuration step, you designate the type of authentication you prefer, information about administrators, and details about data directories. In Figure 24.9, Windows authentication mode is designated, and AlisonJ has been designated as an Administrator.

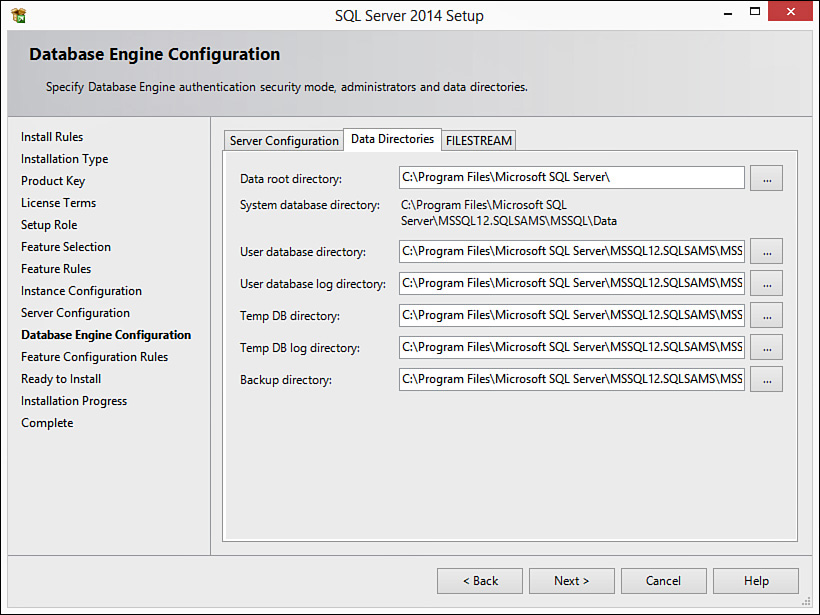
16. On the Data Directories tab, shown in Figure 24.10, you can view and modify the directories within which SQL Server will store the various files utilized by the server (for example, databases).
17. After designating all desired features, click Next. The Ready to Install step displays, reflecting all features you installed (see Figure 24.11). Review the settings carefully.

18. Click Install to complete the process. After several minutes, you should receive a message indicating that you need to reboot your computer. After rebooting your computer, you will be ready to start working with SQL Server.
Installing SQL Server Management Studio
SQL Server Management Studio is a separate download and a separate installation process. Use the following steps to install SQL Server Management Studio:
1. Download the file and run the executable file (.exe).
2. Double-click the executable and click Yes, allowing the program to run.
3. Choose a directory for the extracted files and click OK.
4. When the SQL Server Installation Center launches, click the link to select New SQL Server Stand-alone Installation or Add Features to an Existing Installation.
5. Accept the license terms and click Next.
6. Select Add Features to an Existing Instance of SQL 2014 (see Figure 24.12).

FIGURE 24.12 To install Management Studio, you must add features to your existing instance of SQL Server.
7. Click Next. The Feature Selection portion of the installation appears. Select all the desired features. Note that in Figure 24.13, Management Tools is selected. This includes Management Studio.

FIGURE 24.13 Add Management Tools to your SQL Server instance so that you can use Management Studio.
8. Click Next.
9. Complete the installation. Management Studio is now ready to use.
Summary
Although Microsoft makes it fairly easy to install SQL Server, it prompts you for information that you might not be familiar with. This lesson walked you through the installation process, covering the available options.
Q&A
Q. What is the difference between the SQL Server Database Engine and Management Studio?
A. The SQL Server Database Engine is the application that provides the processing for the database. This processing includes the execution of T-SQL, whether from the Query window, views, stored procedures, functions, or triggers. SQL Server Management studio provides a means of graphically managing database servers, databases, and their objects.
Workshop
Quiz
1. You are prompted for the authentication model during the installation of the SQL Server 2014 database engine (true/false).
2. Name the management tool you use to manage SQL Server 2014 databases.
Quiz Answers
1. True
2. SQL Server Management Studio