

4
SHOOTING HOOPS WITH GRAVITY
Many platformer games, such as Super Mario Bros. and Donkey Kong Country, show a side view of the action, where the bottom of the screen is the ground and the character is shown from the side. These games have gravity: characters can jump up and then fall until they land on the ground. In this chapter, we’ll write a basketball game that has gravity. The player will jump and throw a basketball, and the basketball player and ball will fall downward.
Before you start coding, look at the final program at https://www.nostarch.com/scratchplayground/.

SKETCH OUT THE DESIGN
First, let’s sketch out what we want the game to do. The player controls the cat, which can move left and right and jump. The goal is to have the cat shoot baskets into a moving basketball hoop, which will glide around the Stage randomly.

If you want to save time, you can start from the skeleton project file, named basketball-skeleton.sb2, in the resources ZIP file. Go to https://www.nostarch.com/scratchplayground/ and download the ZIP file to your computer by right-clicking the link and selecting Save link as or Save target as. Extract all the files from the ZIP file. The skeleton project file has all the sprites already loaded, so you’ll only need to drag the code blocks into each sprite.
|
MAKE THE CAT JUMP AND FALL |
Let’s start by adding gravity to make the cat jump up and fall down.
1. Add the Gravity Code to the Cat Sprite
Click the i button for the Sprite1 sprite to open its Info Area. Rename the sprite Cat, and then close the Info Area. Then rename the program from Untitled to Basketball in the text field at the top of the Scratch editor.
Click the Choose backdrop from library button under New backdrop to open the Backdrop Library window. Select brick wall1 and click OK to change the backdrop. The Stage will look like this:

Programming gravity requires variables. You can think of a variable as a box for storing numbers or text that you can use later in your program. We’ll create a variable that contains a number representing how fast the cat is falling.
First, make sure the Cat sprite is selected in the Sprite List and then click the Scripts tab. In the orange Data category, click the Make a Variable button to bring up the New Variable window. Enter y velocity as the variable name. (Velocity means how fast something is going and in what direction. When y velocity is a positive number, the cat moves up. When y velocity is a negative number, the cat moves down.) Make sure For this sprite only is selected. (If you see only For all sprites, the Stage is selected, not the Cat sprite.) Then click OK.

Several new blocks will appear in the Data category, and one of those is the round y velocity variable block, shown here:

When you create the y velocity variable, you have to select For this sprite only. This option creates a variable that only the Cat sprite can use. The For all sprites option will create a variable that all sprites can use.
To identify the kind of variable you’ve created, check the box next to the round variable block in the Blocks Area to make the variable appear on the Stage. If you selected For this sprite only, the sprite name will display in front of the variable name. But if you selected For all sprites, only the variable name will show.

If you made a mistake and the sprite name Cat does not appear at the start of the variable name in your program, right-click the y velocity block in the orange Data category and select delete variable from the menu. Then create the y velocity variable again, making sure you select For this sprite only.
As with any variable block, you can place the y velocity block anywhere you would normally enter a number or some text. The code block will use the number or text set in the variable. When you use variables, your program can change the variable’s number or text while the program is running.
To put a value in your variable, you use the orange set to block. For example, if you created a variable greeting, you could use set to to put the value Hello! in it. Then, you could use greeting in a say block, which would be the same as entering Hello!. (Don’t add these blocks or create a greeting variable in your Basketball program; this is just an example.)

If you want to change the greeting text while the program is running, you can add another set to block to your program. If the variable contains a number, you can add to or subtract from this number by using the change by block.
Gravity makes objects accelerate downward. In the game, the Cat sprite has to move down, and the speed at which it moves down must change while the program is running. Add the following code to the Cat sprite to add gravity to your Scratch program. This is the minimal amount of code you need to make a sprite fall under gravity. You could add this code to any sprite to make it fall.

When you click the green flag, the y velocity variable is set to 0, and then the script enters a forever loop. The y position (vertical position) of the Cat sprite is changed by y velocity, and y velocity is changed by -2. As the program goes through the loop, the y position will change faster and faster, making the cat fall faster and faster.

Before you click the green flag, drag the Cat sprite to the top of the Stage. When you click the green flag, notice that the cat begins to fall. If you want the cat to fall again, click the red stop sign, move the Cat sprite back to the top of the Stage, and click the green flag again. Save your program.
2. Add the Ground Level Code
Right now, the cat falls. But we want the cat to stop when it hits the ground. Let’s keep adding to the Cat sprite’s code so it looks this:

In this code, we set the y position of the ground level to -130. If the Cat sprite’s y position is greater than (above) the ground level, then y velocity is changed by -2 and the Cat sprite will fall. Eventually, the Cat sprite will fall past -130, and its y position will be less than (below) the -130 ground level. When that happens, the Cat sprite will be reset at the ground level of -130, and y velocity will go back to 0 to stop the sprite from falling.
Click the green flag to test the code so far. Drag the cat up using your mouse, and let go. Make sure the cat falls to the ground but does not fall past the edge of the Stage. You can experiment with different ground levels by changing -130 to another number. Then click the red stop sign and save your program.
When you’re done testing your program, make the y velocity variable invisible on the Stage by unchecking the checkbox next to it in the orange Data category.
3. Add the Jumping Code to the Cat Sprite
After adding the gravity code to the Cat sprite, making the cat jump is easy. Add this code to the Cat sprite:

Now when you press the up arrow key, y velocity is set to the positive number 20, making the Cat sprite jump up. But the y velocity variable will still be changed by -2 each time the loop runs. So although the cat jumps by 20 at first, the next time through the loop it will be at 18, then 16, and so on. Notice that the if then block checks that the Cat sprite is on the ground. You shouldn’t be able to make the cat jump if it’s already in midair!

When y velocity is set to 0, the Cat sprite is at the peak of the jump. Then y velocity changes by -2 each time through the loop, and the Cat sprite continues falling until it hits the ground. Try experimenting with different numbers for the set y velocity to and change y velocity by blocks. Figure out how to make the cat jump higher or lower (but always above the ground) or make gravity stronger or weaker.
Click the green flag to test the code so far. Press the up arrow key, and make sure the cat jumps up and falls back down. Then click the red stop sign and save your program.
|
MAKE THE CAT MOVE LEFT AND RIGHT |
Let’s add the Cat sprite’s walking code next so that the player can control the cat with the keyboard.
4. Add the Walking Code to the Cat Sprite
Add the following code to the bottom of the Cat sprite’s code:

Inside the forever loop, the program checks if the left arrow or right arrow key is being pressed. If it is, the Cat sprite switches to the next costume and changes its x position by -10 (moves to the left) or 10 (moves to the right). The Cat sprite comes with two costumes that you can view by clicking the Costumes tab above the Blocks Area. By switching between the two costumes using the next costume block, you can make it look like the cat is walking.

Click the green flag to test the code so far. Press the left and right arrow keys, and make sure the cat moves in the correct direction. It’s okay if the cat walks backward when moving to the left; that’s what we want. Then click the red stop sign and save your program.
|
MAKE A HOVERING BASKETBALL HOOP |
Now that the Cat sprite is complete, let’s move on to the next sprite in the game: the basketball hoop.
5. Create the Hoop Sprite
Click the Paint new sprite button next to New sprite. Before you start drawing, click the Convert to vector button in the lower-right corner. The drawing tool buttons will appear on the right side of the Paint Editor. (Vector mode lets you draw using shapes, rather than drawing the individual pixels of an image.) Click the yellow color and use the Ellipse tool to draw a hoop. You can also slide the Line width slider in the lower-left corner to make the ellipse’s line thicker. Make sure the Paint Editor’s crosshairs are in the center of the hoop.

Rename the sprite Hoop in its Info Area. We want the Hoop sprite to play a cheer sound when the player makes a basket, so let’s load the cheer sound next. Click the Sounds tab at the top of the Blocks Area, and then click the Choose sound from library button under New sound. When the Sound Library window opens, select cheer and click OK.

The cheer sound will now appear as an option for the play sound block you’ll add to the Hoop sprite.

Add the following code to the Hoop sprite to make it glide randomly around the top half of the Stage. You’ll need to create a broadcast message by clicking the when I receive block’s black triangle and selecting new message. Name the new broadcast message swoosh.

Script ➊ makes the hoop slide to a new position every second. A moving hoop will make the game more challenging to play! Script ➋ plays the cheer sound and displays “Swoosh!” when the swoosh broadcast is received. Later, we’ll make the Basketball sprite broadcast this message when a basket is made.
6. Create the Hitbox Sprite
Now let’s think about how to create code that determines whether or not the player makes a basket. We could write a program that checks whether the basketball is simply touching the hoop. But because the hoop is so wide, just the edges of the basketball touching the hoop would count as a basket. We want the basket to count only if the basketball goes through the middle of the hoop. We’ll have to think of a better fix.

Instead, you can create a hitbox. A hitbox is a game-design term for a rectangular area that determines whether two game objects have collided with each other. We’ll make a hitbox sprite. Create a new sprite by clicking the Paint new sprite button next to New sprite. Draw a small black square in the middle of the crosshairs by using the Rectangle tool and selecting the solid fill option. Rename this sprite Hitbox. The Hitbox sprite will look like this:

Add the following code to the Hitbox sprite:

The Hitbox sprite will now follow the Hoop sprite, no matter where it glides.
In Step 9, we’ll write a program that makes sure a basket counts only if the basketball is touching the Hitbox sprite, not the Hoop sprite. The basketball will have to be much closer to the middle of the hoop to count as a basket!

It looks odd to see a black square in the middle of the Hoop sprite, so let’s make the Hitbox sprite invisible. Add the set ghost effect block to the Hitbox sprite and set it to 100.

There’s a difference between the hide block and the set ghost effect to 100 block. If you used the hide block to make the Hitbox sprite invisible, the touching blocks would never detect that the ball was touching the Hitbox sprite, and the player would never be able to score. The set ghost effect to 100 block makes the sprite invisible, but this block still allows the touching blocks to detect the Hitbox sprite’s presence.
Click the green flag to test the code so far. Make sure the hoop glides around the Stage and the hitbox rectangle is always in the middle of it. Then click the red stop sign and save your program.
|
MAKE THE CAT SHOOT HOOPS |
Next, you’ll add a basketball for the cat to throw. Like the cat, the basketball will have gravity code and fall to the ground.
7. Create the Basketball Sprite
Click the Choose sprite from library button next to New sprite to open the Sprite Library window. Select the Basketball and click OK.
Next, click the Sounds tab at the top of the Blocks Area, and then click the Choose sound from library button next to New sound to open the Sound Library window. Select the pop sound and click OK. Click the Scripts tab at the top of the Blocks Area to bring back the Scripts Area.
Now go to the orange Data category. You’ll make two variables. Click the Make a Variable button. Name the variable y velocity, and make sure For this sprite only is selected before you click OK. Because they are For this sprite only variables, the Basketball sprite’s y velocity variable is separate from the Cat sprite’s y velocity variable. Even though they have the same name, they are two different variables.
Click the Make a Variable button again to make another variable named Player 1 Score, but this time select For all sprites. (We capitalize Player 1 Score because we’ll make it visible on the Stage. Uncheck the box next to y velocity to hide it on the Stage.) The new variable blocks should appear in the orange Data category.

8. Add the Code for the Basketball Sprite
After you’ve added the pop sound and two variables, add this code to the Basketball sprite:

Script ➊ makes sure the player starts with 0 points and hides the Basketball sprite to start.
Script ➋ uses code similar to the Cat sprite code. When the player presses the spacebar, the basketball appears in front of the cat and starts moving forward. The code sets the Basketball sprite’s y velocity variable to a positive number, just like how the Cat sprite’s y velocity variable is set to a positive number when the cat jumps; this is how the cat throws the ball.
The repeat until y position < -130 block will keep the Basketball sprite falling until it reaches the ground. When it reaches the ground, the basketball will be hidden until the next time the player presses the spacebar.
Click the green flag to test the code so far. Press the spacebar to make the cat throw the basketball. Make sure the basketball disappears when it touches the ground. Then click the red stop sign and save your program.
9. Detect Whether a Basket Is Made
Next, you’ll add the code that checks whether the Basketball sprite is touching the Hitbox sprite. This is how you know whether a basket has been made, and if it has, the Player 1 Score variable should increase. However, there is one snag: the basket shouldn’t count if the basketball goes up through the hoop.
Keep in mind that if the y velocity variable is positive, the change y by y velocity block will move the Basketball sprite up. If y velocity is 0, then the Basketball sprite is not moving up or down. But if y velocity is a negative number, then the Basketball sprite will be falling down.
So you’ll add another if then condition to the Basketball sprite’s code. You’ll increase the score only if the basketball is touching the hitbox (using the touching Hitbox? block) and falling downward (y velocity < 0).

The and block combines two conditions. For Scratch to run the code blocks inside the if then block, both of these conditions must be true. It isn’t enough for the sprite to be touching the Hitbox sprite or for the y velocity variable to be less than 0. Both touching Hitbox? and y velocity < 0 must be true for the player to score. If these conditions are true, the Player 1 Score variable is increased by 1 and the swoosh message is broadcasted.
Click the green flag to test the code so far. Shoot some baskets. The Player 1 Score variable should increase only if the basketball touches the center of the hoop and is moving down. The Hoop sprite should also say swoosh and play the cheer sound when this happens. Click the red stop sign and save your program.
10. Fix the Scoring Bug
Did you notice that Player 1 Score increases by several points for a single basket? This is a bug, which is a problem that makes the program behave in an unexpected way. We’ll need to take another careful look at the code to figure out why this happens.
The repeat until loop block keeps looping until the ball hits the ground, so all of this code is for a single throw. The repeat until loop block checks several times whether or not the Basketball sprite is touching the Hitbox sprite and falling down. The Player 1 Score should increase only the first time.
You fix this bug by creating a new variable that keeps track of the first time the basketball touches the hoop for a single throw. Then you can make sure the player scores a point only once per throw.
Click the orange Data category at the top of the Blocks Area, and then click Make a Variable. Name the variable made basket and select For this sprite only. Then modify the Basketball sprite code.

The made basket variable is set to no when the player first presses the spacebar. This makes sense because the player has not made a basket when the ball is initially thrown. We’ll also use an and block to add another condition to the code that checks whether a basket has been made. A basket is now detected and the code in the if then block is run when three conditions are true:

The Basketball sprite is touching the Hitbox sprite.
The y velocity variable is negative (the basketball is falling down).
The made basket variable is set to no.
The first time the Basketball sprite detects it has made a basket, it increases Player 1 Score by 1 point and sets made basket to yes. In future checks for that shot, made basket will not be equal to no, so the basket is no longer detected. The made basket variable resets to no the next time the player presses the spacebar to throw the basketball.
Click the green flag to test the code so far. Shoot some baskets. Make sure that Player 1 Score increases by only 1 point for each basket. Then click the red stop sign and save your program.
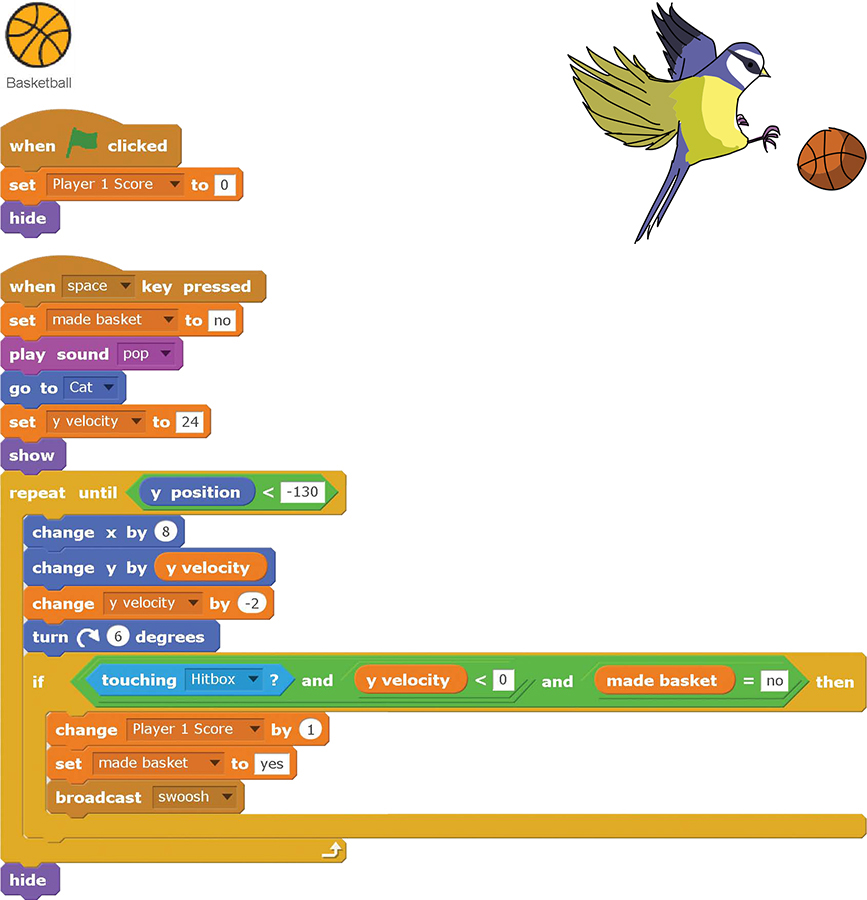
THE COMPLETE PROGRAM
Here is the final code. If your program isn’t working correctly, check your code against this code.

VERSION 2.0: TWO-PLAYER MODE
Let’s upgrade the Basketball game by adding a second player. This will be easy since the second player’s code will be almost identical to the first player’s code.
Duplicate the Cat and Basketball Sprites
Duplicate the Cat sprite and the Basketball sprite by right-clicking them in the Sprite List and selecting duplicate. Select the new Cat2 sprite and click the Costumes tab at the top of the Blocks Area. Use the Fill tool to make the cat blue. Then click the Flip left-right button at the top-right corner of the Paint Editor to make the second player shoot for the hoop from the other side.

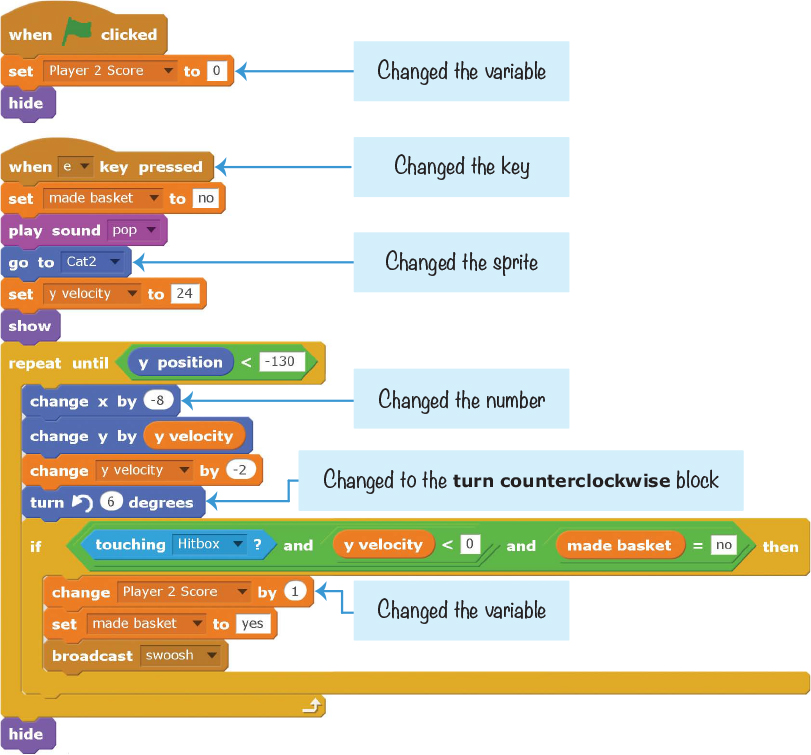
Modify the Code for the Cat2 Sprite
Change the code in the new Cat2 sprite to match this:

Now two different players will be able to play the game using the same keyboard. Each cat will be controlled by its own unique keys.
Modify the Code for the Basketball2 Sprite
The second player will need their own variable for keeping score. From the orange Data category, click the Make a Variable button, name the variable Player 2 Score, and select For all sprites. Change the code in the new Basketball2 sprite to match the code shown here.
This code makes the basketball thrown by the second player go to the left and assigns the Player 2 Score variable to the second player. You can rename a variable by going to the orange Data category, right-clicking the variable, and selecting Rename variable.
CHEAT MODE: FREEZE THE HOOP
The moving basketball hoop is a hard target to hit. Let’s add a cheat that will freeze it in place for a few seconds when a player presses the 7 key.
Select the Hoop sprite, and click the Make a Variable button to create a new For this sprite only variable named freeze. Then modify the code for the Hoop sprite to match the following code.

Click the green flag to test the code so far. Press the 7 key, and make sure the hoop stops gliding to new positions for 6 seconds. Then click the red stop sign and save your program.
SUMMARY
In this chapter, you built a game that
![]() Implements gravity and realistic falling
Implements gravity and realistic falling
![]() Has a side-view perspective instead of a top-down view
Has a side-view perspective instead of a top-down view
![]() Uses variables to keep track of scores, falling speeds, and the first time a basket is made
Uses variables to keep track of scores, falling speeds, and the first time a basket is made
![]() Has a hitbox to detect when a basket is made
Has a hitbox to detect when a basket is made
The use of gravity in this program was pretty simple. By the time you reach Chapter 9, you’ll be able to make an advanced platformer game with more complex jumping and falling. But there are plenty of Scratch programming techniques to practice first. In Chapter 5, you’ll make a side-view game that uses cloning to duplicate a sprite dozens of times.