

5
A POLISHED BRICK BREAKER GAME
Have you ever seen a brick breaker game? The player controls a paddle at the bottom of the screen to bounce a ball that breaks blocks at the top of the screen. The player loses when the ball gets past the paddle. This game is simple enough to program, but it can look a bit boring. In this chapter, you’ll learn a few tricks to make the game more colorful and interesting by adding animations and effects.
You’ll use an iterative process: first, you’ll make the basic game, and then you’ll make small improvements to it. The result will be a more professional-looking game that other Scratchers on the Scratch website will think looks awesome.
The following figure shows what the Brick Breaker game looks like before and after polishing it.

Before you start coding, take a look at the final game at https://www.nostarch.com/scratchplayground/.
SKETCH OUT THE DESIGN
Let’s start by drawing what the game should look like. The sketch for Brick Breaker might look something like the following figure.
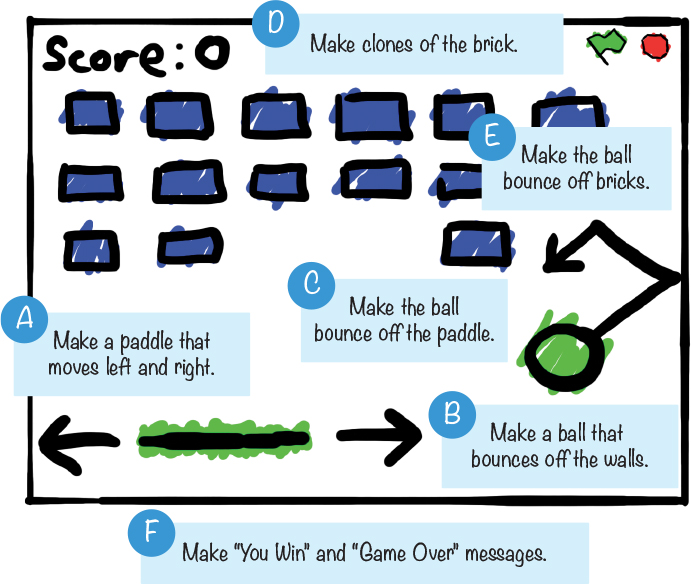
If you want to save time, you can start from the skeleton project file, named brickbreaker-skeleton.sb2, in the resources ZIP file. Go to https://www.nostarch.com/scratchplayground/ and download the ZIP file to your computer by right-clicking the link and selecting Save link as or Save target as. Extract all the files from the ZIP file. The skeleton project file has all the sprites already loaded, so you’ll only need to drag the code blocks into each sprite.
|
MAKE A PADDLE THAT MOVES LEFT AND RIGHT |
The player will control the paddle by moving the mouse. The ball bounces off the paddle toward the bricks, but the player loses if the ball gets past the paddle.
1. Create the Paddle Sprite
We don’t need the orange cat in this game, so right-click the Sprite1 cat in the Sprite List and select delete from the menu. Then paint a sprite by clicking the Paint new sprite button next to New sprite. When the Paint Editor appears, draw a wide rectangle using the Rectangle tool.

I’ve made my paddle green, but you can choose another color. A short paddle makes the ball more difficult to hit. Later, you can experiment with different paddle sizes to make the game easier or harder. Click the i button to open the Info Area, and rename this sprite Paddle.
Next, add this code to program the Paddle sprite to make it follow the mouse along the bottom of the Stage:

The Paddle sprite constantly moves 10 steps directly toward the mouse, but its y position stays set to -140.

The Paddle sprite will move only left and right because its y position is always set to the bottom of the Stage (-140).
The rotation style sets how the sprite looks when it changes direction. The three rotation styles are all around, left-right, and don’t rotate.

When a sprite is set to all around, it will face exactly where its direction points. But this won’t work for a side-view game (like the Basketball game in Chapter 4), because the sprite will be upside down when its direction faces left. Instead, for these games you’ll use the left-right rotation style. The sprite will face only 90 degrees (right) or -90 degrees (left), whichever is closest to the sprite’s direction. If you don’t want the sprite to rotate at all, even as its direction changes, set the rotation style to don’t rotate.
Because we’re changing the Paddle sprite’s direction, we also need to set the sprite’s rotation style with the set rotation style block. The Paddle sprite is programmed to face and move toward the mouse, but we want the sprite to always look flat and horizontal, so the rotation style is set to don’t rotate.

Click the green flag to test the code so far. Move the mouse around and see if the Paddle sprite follows it. Make sure the Paddle stays at the bottom of the Stage. Then click the red stop sign and save your program.
|
MAKE A BALL THAT BOUNCES OFF THE WALLS |
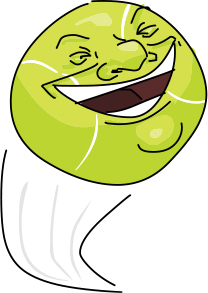
The Scratch Sprite Library has several sprites you could use for the ball, but let’s use the Tennis Ball sprite for this game.
2. Create the Tennis Ball Sprite
Click the Choose sprite from library button next to New sprite, and select the Tennis Ball sprite from the Sprite Library window. Add the following code:

When the game starts, the Tennis Ball sprite starts at position (0, 0) in the center of the Stage; then the Tennis Ball sprite points down and to the right toward the Paddle sprite. Next, in the forever loop, the Tennis Ball sprite starts to move. When the Tennis Ball sprite touches the edge of the Stage, it will bounce in a new direction.
Click the green flag to test the code so far. Make sure the Tennis Ball sprite moves around and bounces off the edges. The tennis ball will not bounce off the paddle, because you haven’t added that code yet. Click the red stop sign and save your program.
|
MAKE THE BALL BOUNCE OFF THE PADDLE |
The Tennis Ball sprite now bounces off the walls but not off the Paddle sprite. Let’s add that code now.
3. Add the Bounce Code to the Tennis Ball Sprite
Add the following code to the Tennis Ball sprite so it will bounce off the Paddle sprite. To do so, you’ll need to create a new broadcast message, bounce.

You’ll use the broadcast message in script ➊ to control what happens when the ball touches the paddle in script ➋.
The point in direction 180 - direction code in script ➋ might seem a bit mysterious, but this simple equation calculates the direction in which the ball will bounce based on the ball’s current direction. If the ball is pointed up and right (45 degrees), then when it bounces off the bottom of a brick, its new direction will be down and right (135 degrees, because 180 – 45 = 135). If the ball is pointed up and left (–45 degrees), then when it bounces off the bottom of a brick, its new direction will be down and left (225 degrees, because 180 – (–45) = 225).

You’ll use this broadcast message again later in the program when you add code to make the ball bounce off the bricks.
Click the green flag to test the code so far. Make sure the tennis ball bounces off the paddle. Then click the red stop sign and save your program.
The create clone of myself block makes a duplicate of the sprite, which is called a clone. This feature is handy whenever you want to create many copies of an object in your game, such as a lot of bad guys that look the same, a bunch of coins for the player to collect, or in the Brick Breaker game, the bricks you need to hit.
Let’s look at how clones work. Open Scratch in a new tab, and create a new program. Add this code to the Cat sprite:

Script ➊ makes the Cat sprite bounce around the Stage, just like the Tennis Ball sprite does in the Brick Breaker game. But in script ➋, we create a clone again and again, every 2 seconds. Script ➌ uses the when I start as a clone block to control the behavior of the cloned sprites. What do you think will happen when you run this code? Run the code now to find out if you were right.
The original Cat sprite bounces around the Stage. Every 2 seconds a duplicate of the sprite is created: these are the clones. Each clone will then start to turn because of script ➌.
|
MAKE CLONES OF THE BRICK |
Now the game needs lots of bricks, so you’ll create one Brick sprite and then clone it using Scratch’s create clone block.
4. Add the Brick Sprite
Click the Choose sprite from library button next to New sprite, and select the Button 2 sprite from the Sprite Library window. Click the i button to open the Info Area, and rename this sprite Brick.
You’ll have to create a new variable by selecting the orange Data category and clicking the Make a Variable button. Name this variable Score, and set it to For all sprites. Then add the following code to the Brick sprite:

At the beginning of the game, the Score variable is set to 0 so that any points from a previous game are reset. The original sprite hides itself with the hide block, shrinks in size by 50 percent, and moves to the top-left corner of the Stage at (–200, 140). The clones, which we’ll create next, show themselves with the show block.
5. Clone the Brick Sprite
For the Brick Breaker game, we want many rows of bricks. To make the rows of bricks, we’ll move the original sprite across the top of the screen, creating a trail of clones. Add the following code to the Brick sprite. (Be sure not to confuse the set x to and change x by blocks!)

This code will create clones of the Brick sprite for all the bricks in the game, as shown here:

The original sprite moves to the top-left corner of the Stage at (–200, 140) ➊. Then the repeat 7 block repeatedly moves 65 steps to the right while making clones of itself ➋ to create a row of seven Brick clones ➌. The repeat 4 block repeats the row-creating code to create four rows of Brick clones ➍. Seven Brick clones multiplied by four rows results in 28 Brick clones. The 29th Brick in the previous figure is the original sprite, not a clone, and we’ll hide it next.
After all the clones have been created, the original sprite hides itself. Now all the bricks on the Stage are clones, so you don’t need to duplicate the code under the when I start as a clone block for the original sprite.
Imagine if you duplicated the sprites instead of cloning them. Then, if you wanted to change the code, you’d have to change all 28 Brick sprites. Cloning saves you a lot of time!

|
MAKE THE BALL BOUNCE OFF BRICKS |
The Tennis Ball sprite bounces off the Stage edges and the Paddle sprite. Now let’s make it bounce off the Brick clones.
6. Add the Bounce Code to the Brick Sprite
Update the code for the Brick sprite to match this:

When the Tennis Ball sprite hits a Brick sprite, the Brick sprite broadcasts the bounce message, which brings the Tennis Ball code into play. The ball’s direction changes, just like it does when it hits the paddle. The program adds 1 to the player’s Score, and then the clone deletes itself.
Click the green flag to test the code so far. Make sure the top part of the Stage fills with Brick clones and the clones disappear when the Tennis Ball sprite bounces off them. Then click the red stop sign and save your program.
|
MAKE “YOU WIN” AND “GAME OVER” MESSAGES |
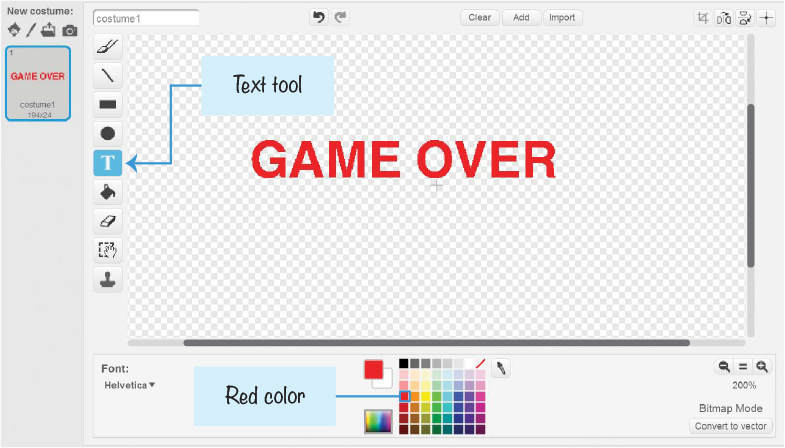
You need two more sprites for this game, but they won’t appear until the game ends. I created mine with the Paint Editor’s Text tool. If the player breaks all the Brick clones, the program displays the You Win sprite. If the tennis ball gets past the paddle, the program displays the Game Over sprite.
7. Modify the Tennis Ball Sprite’s Code
When the Tennis Ball sprite gets past the Paddle sprite—that is, when the Tennis Ball sprite’s y position is less than -140—the game is over. Once the game ends, the Tennis Ball sprite should broadcast a game over message. Add the following code to the Tennis Ball sprite. This will require you to create the game over broadcast message.
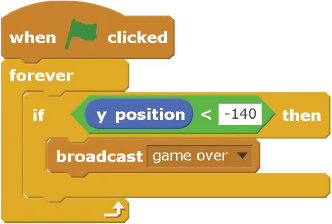
The game over broadcast will tell the Game Over sprite to appear. Let’s create the sprite next.
8. Create the Game Over Sprite
Click the Paint new sprite button next to New sprite. When the Paint Editor appears, use the Text tool to write GAME OVER in red.
Click the i button to open the Info Area, and rename this sprite Game Over. Then add this code to the Game Over sprite:

The sprite stays hidden until it receives the game over broadcast. The stop all block then stops all the sprites from moving as well.
Click the green flag to test the code so far. Let the tennis ball fall past the paddle, and make sure the Game Over sprite appears and the program stops. Save your program.
9. Create the You Win Sprite
Click the Paint new sprite button next to New sprite. In the Paint Editor, use the Text tool to write You win! in green.

Click the i button to open the Info Area, and rename this sprite You Win. Add this code to the You Win sprite:
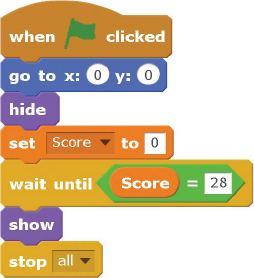
As with the Game Over sprite, the You Win sprite is hidden until a condition is met. In this game, the player needs to break all 28 bricks to win, so the condition is Score = 28. After the You Win sprite displays, the program stops all the other sprites from moving with stop all.
Click the green flag to test the code so far. Make sure the You Win sprite appears after breaking all the bricks and the program stops. To make winning the game faster, temporarily change the wait until Score = 28 block to wait until Score = 1. Then you only need to break one brick to win. Save your program.
THE COMPLETE PROGRAM
The final code for the entire program is shown here. If your program isn’t working right, check your code against this code.


VERSION 2.0: POLISHING TIME
The game works well as it is. But now you’ll add some polish to the game. Many of the ideas for the polished features in the Brick Breaker game came from a Nordic Game Indie Night presentation called “Juice It or Lose It!” by Martin Jonasson and Petri Purho. The word juice in game design means polish, or modifying a game in small ways to make it feel more alive and responsive. These tricks can turn a barebones game into an exciting, colorful one. A juicy game looks more professional than a plain game. You can watch their presentation where they add juice to their brick breaker game at https://www.nostarch.com/scratchplayground/.
You can add many tricks to the Brick Breaker game to make it look polished. Even better, you can use these tricks in any of your games. Before you start coding, take a look at the complete program at https://www.nostarch.com/scratchplayground/.

Draw a Cool Backdrop
Adding an interesting background is a simple way to make the game look cooler. Click the Stage in the Sprite List, and then click the Backdrops tab above the Blocks Area. In the Paint Editor, select two different purple colors. First, click a light purple color; then click the Color switcher and click a dark purple color. Using the Fill tool’s various gradient settings, randomly click around the Paint Editor to create an unusual but interesting background like the one shown in the following figure.


Add Music
Sounds set the mood and make a game feel more alive. With the Stage selected in the Sprite List, click the Sounds tab at the top of the Blocks Area. Click the Choose sound from library button (it looks like a speaker) under New sound. When the Sound Library window appears, select the dance celebrate sound and click OK.
Then click the Scripts tab and add this code to the Stage’s Scripts Area to give the game some background music:

Make the Paddle Flash When Hit
In this step, you’ll make the paddle flash different colors when it is hit by the ball. Add the following code to the Paddle sprite.

The bounce message is broadcast when the Tennis Ball sprite bounces off a Brick clone and when it bounces off the Paddle sprite. The if distance to Tennis Ball < 60 block makes the color changes happen when the Tennis Ball sprite bounces off the Paddle sprite (which means the ball will be less than 60 steps away).
Click the green flag to test the code so far. Make sure the paddle flashes different colors when the ball bounces off it. Then click the red stop sign and save your program.
Add an Animated Entrance and Exit to the Bricks
The Brick clones’ entrance to the game is rather boring. They just appear as soon as they’re cloned. To animate their entrance, modify the Brick sprite’s code to match this code.

Setting the ghost effect to 100 and then slowly decreasing it makes the Brick clones fade into view rather than instantly appear. The code also sets the Brick clones 10 steps below their final positions and slowly raises them by changing their y position in the repeat block. This makes the Brick clones look like they’re sliding into place.

Click the green flag to test the code so far. Make sure the Brick clones fade into view rather than just instantly appearing. Then click the red stop sign and save your program.
Now let’s animate the exit of the Brick clones. Modify the Brick sprite’s code so the Brick clones have an animated exit instead of just instantly disappearing.

Now the Brick clones will disappear in an exciting way! The change effect by blocks inside the repeat loop will make the Brick clones flash different colors and increase their ghost effect so they become more and more transparent. Meanwhile, the change size by -4 block causes the Brick clones to shrink, the change y by 4 block lifts them up, and the turn clockwise 15 degrees block rotates them. This animated exit is short but fun to watch.

Click the green flag to test the code so far. Hit the bricks with the tennis ball, and make sure they spin and move up as they fade out of sight rather than just instantly disappearing. Then click the red stop sign and save your program.
Add a Sound Effect to the Brick Exit
Let’s also make the Brick clones play different sound effects as they disappear. Select the Brick sprite in the Sprite List, and then click the Sounds tab above the Blocks Area. Click the Choose sound from library button under New sound, and select laser1 from the Sound Library. Repeat this step to add the laser2 sound as well.
Modify the Brick sprite’s code to match this code:

When these sounds have been loaded and the following code has been added, the Brick clones will play a random sound effect as they disappear. The if then else block adds some variety to the program’s sound effects by randomly selecting which sound to play. Each time the Tennis Ball sprite touches a Brick clone, the program will choose either 1 or 2 at random and then play a different sound as a result.
Add a Sound Effect to the Tennis Ball
Now you’ll add a sound effect for when the Tennis Ball sprite hits the Paddle sprite. The pop sound is already loaded for each sprite; all you have to do is update the Tennis Ball sprite’s code to match this:

Add a Trail Behind the Tennis Ball
Adding a trail of clones behind the Tennis Ball sprite as it moves around the Stage will give it a cool comet tail. You don’t want to use clones of the Tennis Ball sprite, because they would respond to the bounce broadcast whenever the original Tennis Ball sprite bounces. Instead, click the Choose sprite from library button next to New sprite. Then select Tennis Ball from the Sprite Library window to create another sprite called Tennis Ball2. You’ll clone this second ball to create the trail. Unlike a Tennis Ball clone, the Tennis Ball2 clones won’t have a when I receive bounce block. Add this code to the Tennis Ball2 sprite:

The only thing the clone is programmed to do is go to the current Tennis Ball sprite’s location. The tennis ball keeps moving, but the clone stays in place, shrinking and becoming more transparent. At the end of this shrinking and fading animation, the clone is deleted.
You’ll also need to update the Tennis Ball sprite with this code:

This script makes a new Tennis Ball2 clone after a 0.1 second wait, which creates the trail of tennis balls.
Click the green flag to test the code so far. Make sure a trail of shrinking Tennis Ball2 clones follows the original Tennis Ball sprite. Then click the red stop sign and save your program.
Add an Animated Entrance for the Game Over Sprite
When the player loses, the GAME OVER text simply appears. It would be more exciting if the GAME OVER text had an animated entrance like the Brick clones do. Modify the Game Over sprite’s code to match the following code. First load the gong sound effect by clicking the Choose sound from library button on the Sounds tab. You’ll create a new broadcast message named stop game that will tell the Paddle and Tennis Ball sprites to stop moving.

At the start of the game, the Game Over sprite hides itself and sets its ghost effect to 100. When the show block runs at the end of the game, the GAME OVER text is still completely invisible. The animation code inside the repeat 10 block makes the GAME OVER text slowly fade in by changing the ghost effect by -10. The turn clockwise 15 degrees and change size by 12 blocks rotate and enlarge the text. After a 4 second pause, the stop all block ends the program.
To handle the stop game broadcast message in the Tennis Ball and Paddle sprites, add the following code to both of these sprites:

The reason you need to use the stop other scripts in sprite block instead of stop all is that the program needs to continue running while the GAME OVER text is animated. The stop other scripts in sprite block will stop the Tennis Ball and Paddle sprites from moving but let the other sprites in the program continue running. When the Game Over sprite has finished appearing on the screen, the stop all block will end the entire program.
Click the green flag to test the code so far. Try to lose the game, and make sure the GAME OVER text has an animated entrance instead of just instantly appearing on the screen. Then click the red stop sign and save your program.
Add an Animated Entrance for the You Win Sprite
Let’s give the You Win sprite a fancy, animated entrance too. Update the code in the You Win sprite to match the following. You will have to load the sound effect named gong by clicking the Choose sound from library button on the Sounds tab.

There are two sets of animations, one in the repeat 10 block and another in the repeat 2 block. The code in the repeat 10 block makes the You Win sprite fade into visibility, enlarges it, and moves it upward. After this short animation plays, the repeat 2 block’s code increases the sprite’s brightness to 50, waits a tenth of a second, and then resets the brightness to 0. This makes the sprite look like it’s flashing. After a 4 second pause, the stop all block ends the program.
Click the green flag to test the code so far. When you win the game, make sure the You win! text has an animated entrance instead of just instantly appearing on the screen. To make winning the game faster, temporarily change the wait until Score = 28 block to wait until Score = 1. Then you need to break only one brick to win. Save your program.
SUMMARY
In this chapter, you built a game that
![]() Uses clones to quickly create many copies of the Brick sprite and a trail of Tennis Ball2 sprites
Uses clones to quickly create many copies of the Brick sprite and a trail of Tennis Ball2 sprites
![]() Controls the Paddle sprite with the mouse instead of the keyboard arrow keys
Controls the Paddle sprite with the mouse instead of the keyboard arrow keys
![]() Shows the player GAME OVER and You Win! messages that you created using the Paint Editor’s Text tool
Shows the player GAME OVER and You Win! messages that you created using the Paint Editor’s Text tool
![]() Has several animated entrances and exits for sprites
Has several animated entrances and exits for sprites
![]() Uses sound effects and background music to make the game feel more alive
Uses sound effects and background music to make the game feel more alive
Making the Brick Breaker game provided you with several techniques that you can add to future games. You can include animated entrances, color flashes, and sound effects in many programs to make them more exciting and fun. But it’s always best to make sure the plain, basic version of your game is working first and then start making it look cooler later.
This chapter also introduced cloning, which is a useful technique that we will use in the Snaaaaaake game in Chapter 6. As you read on, the games you create will become more sophisticated, but don’t worry: you just have to keep following the instructions step-by-step!