

7
FRUIT SLICER
Fruit Ninja was a popular mobile game released in 2010. In the game, fruit is thrown in the air, and the player must slice it before it hits the ground. In this chapter, you’ll make the Fruit Slicer game, which copies the mechanics of the Fruit Ninja game. Just as exciting, we’ll program this game using some completely new Scratch features, so get ready!
Before you start coding, look at the final program at https://www.nostarch.com/scratchplayground/.
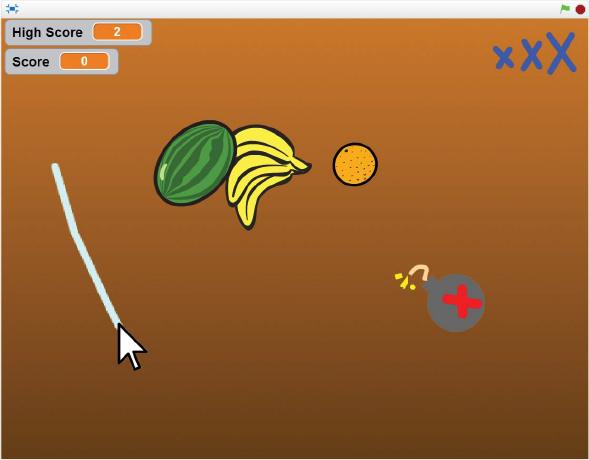
In the version we’ll create, the player slices fruit by clicking and dragging the mouse.
SKETCH OUT THE DESIGN
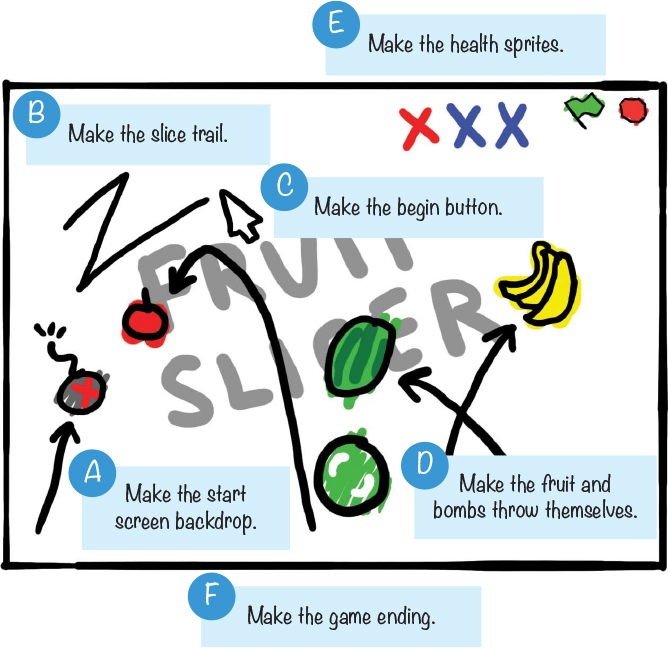
Let’s draw what the game should look like. The sketch for the Fruit Slicer game should look something like this:
If you want to save time, you can start from the skeleton project file, named fruitslicer-skeleton.sb2, in the resources ZIP file. Go to https://www.nostarch.com/scratchplayground/ and download the ZIP file to your computer by right-clicking the link and selecting Save link as or Save target as. Extract all the files from the ZIP file. The skeleton project file has all the sprites already loaded, so you’ll only need to drag the code blocks into each sprite.
|
MAKE THE START SCREEN BACKDROP |
Fruit Slicer will have a start screen. When the player clicks the green flag, the start screen shows the game’s title. When the player loses, the game will return to the start screen. The start screen is a good place to put your name or logo when you show off your games to others. In fact, try to come up with a game studio name for you and your programs now!
Start a new project in the Scratch editor, and enter Fruit Slicer as the project name.
1. Draw the Backdrops
Select the Stage in the Sprite List, and then click the Backdrops tab at the top of the Blocks Area. (The Costumes tab is renamed Backdrops when the Stage is selected.) Select a color, and then use the Line tool to draw the letters in the Fruit Slicer title. Then use the Fill tool to fill in the letters.
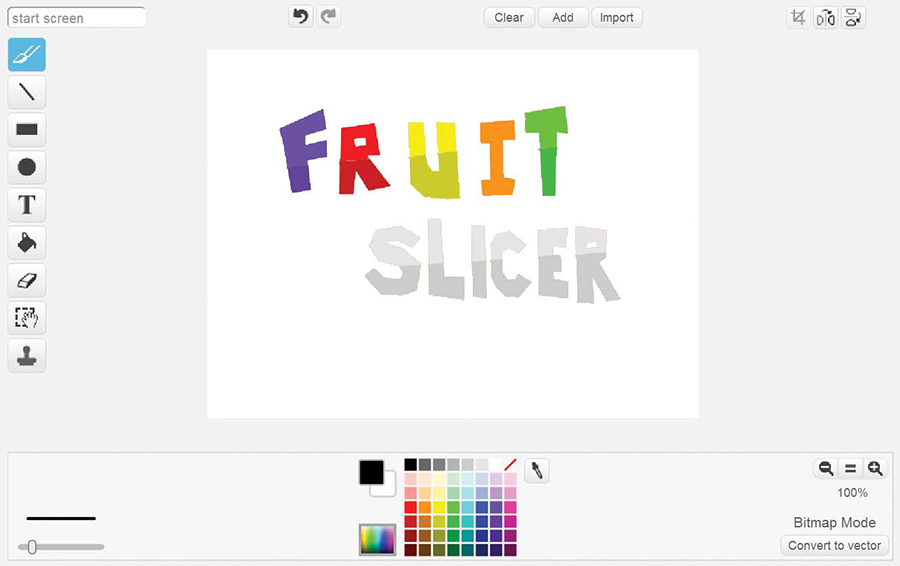
After drawing the title, replace the white background with a dark brown gradient. (When you select the Fill tool, the four gradient buttons appear next to the color buttons.) First click the Color switcher and select a light brown color. Then click one of the gradient buttons to select the gradient type. I used the vertical gradient.

Click the Paint Editor’s canvas to fill the background with your gradient. If you want to experiment, click the Undo button at the top of the Paint Editor before you try a different gradient. Be sure to also fill in the holes in the R letters. When you’re done, rename the backdrop start screen.

Now we need to create a plain backdrop. When the game begins, the program should hide the Fruit Slicer title and switch to this backdrop. Click the Paint new backdrop button under New backdrop to create a second backdrop. Then draw a brown gradient for this backdrop, like this:

Rename this new backdrop game screen. We’ll switch between the start screen and game screen backdrops when the game starts.
2. Add the Code for the Stage
Now let’s program the Stage. Select the Stage in the Sprite List, and click the Scripts tab at the top of the Blocks Area. Create two variables, Score and High Score, by clicking the Make a Variable button in the orange Data category. Make both variables For all sprites.
NOTE
The Stage only uses For all sprites variables, so the For this sprite only option won’t even appear here!
You also need to create two new broadcast messages, start screen and start game. Do this by clicking the black triangle in a broadcast or when I receive block and selecting new message. Then add the following scripts to the Stage.
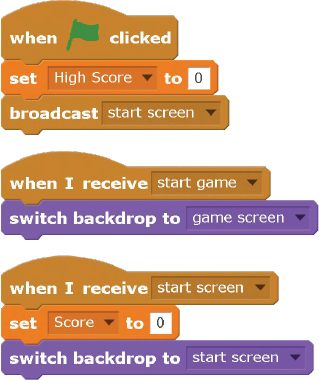
This code resets High Score and Score to 0 when the program begins. The start screen message is broadcast at the beginning of the program and when the player loses a game. The Score variable is reset to 0, and switch backdrop to start screen makes the start screen appear again when the player loses a game.
|
MAKE THE SLICE TRAIL |
There isn’t a sprite used for the player’s character in Fruit Slicer. Instead, the player clicks and drags the mouse across the screen, causing a trail to briefly appear as a blade slice effect.
3. Draw the Slice Sprite
Click the Paint new sprite button next to New sprite. Open the Info Area and rename the sprite Slice. In the Paint Editor, draw a light blue rectangle that looks like the following.
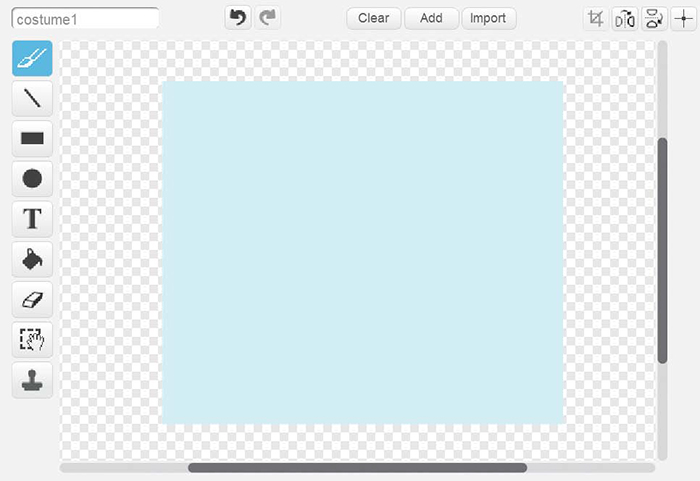
The Slice sprite should not be the same color as any color used in the fruits. Otherwise, some of the fruits will end up slicing other fruit.
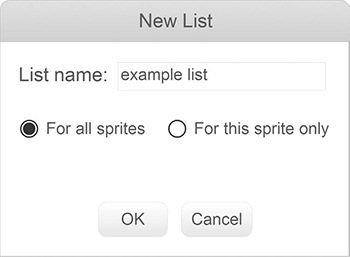
Now you’ll learn about an advanced Scratch feature—a new way to store data. A list is like a variable except it can store many values instead of just one value. Open a new web browser tab and start a new Scratch editor. We will explore the list blocks in a new Scratch project. Select the orange Data category and click the Make a List button to open the New List window. Name the list example list and make it For all sprites.
New dark orange blocks will appear under the Make a List button.

Lists have more than set to and change by blocks. Lists have values, but each value also has a position, so the values need different kinds of code blocks. Positions in a list are defined by numbers; number 1 is the first value in the list.
The following blocks control lists:
![]() The add to block adds a value to the end of the list.
The add to block adds a value to the end of the list.
![]() The delete block removes the value at a certain position.
The delete block removes the value at a certain position.
![]() The insert at block is like the add to block, but you can also select the position where the value should be inserted.
The insert at block is like the add to block, but you can also select the position where the value should be inserted.
![]() The replace item block is like a combination of delete and insert at. It replaces the value at a certain position with a new value.
The replace item block is like a combination of delete and insert at. It replaces the value at a certain position with a new value.
Add the following code and then double-click it to run it. Take a look at the effects of these code blocks on a list named example list.

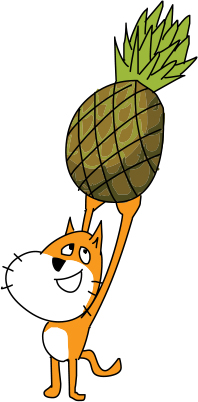
Recall that you can use the value in a variable in its bubble-shaped block. The list’s bubble-shaped blocks are similar but require you to specify a position so the bubble-shaped block knows which value in the list it should get. The scripts on the left and right sides both make the cat say “Hello!”, but the code that uses a list (left) must also specify the position of the value to use:

4. Create Lists and Variables for the Slice Sprite
You’ll create a list for the Fruit Slicer game to keep track of where the player is “slicing” on the screen. Because the slice is drawn between many x and y positions with Pen blocks, using a list is ideal.
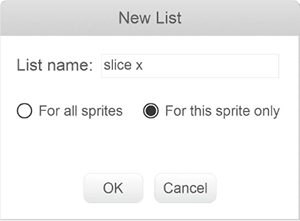
Click the Scripts tab at the top of the Blocks Area, and select the orange Data category. Click the Make a List button to open the New List window. Name the list slice x and make it For this sprite only.
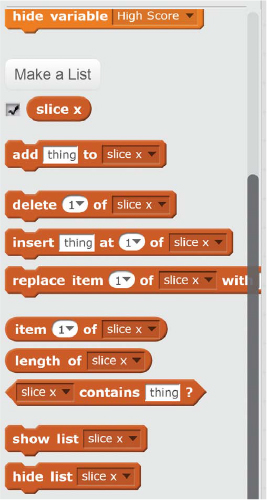
New dark orange blocks will appear under the Make a List button.
In the orange Data category, click the Make a List button to make a second list for Fruit Slicer. Name the list slice y and make it For this sprite only.
Then click Make a Variable, create a variable named i, and make it For this sprite only. You’ll use this i variable in the next step. The Slice sprite will use the two lists and i variable to draw the light blue trail.
5. Record the Mouse Movements
You’ll use the Pen blocks to draw lines for the slice. But first you need to know where to draw the lines. Add the following code to the Slice sprite:
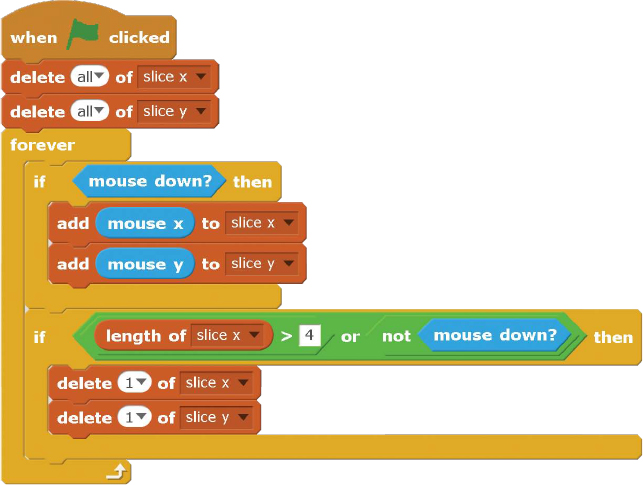
When the player clicks and holds down the mouse button, the mouse position’s x- and y-coordinates are repeatedly added to the end of the slice x and slice y lists. If more than four values are in the lists, the value at the beginning of each list is deleted. This is how the program records the mouse’s last four x- and y-coordinates. The first values are also deleted when the mouse button isn’t being held down, so the trail shortens when the player releases the mouse button.
This script provides the proper coordinates for the slice x and slice y lists. The next script will actually draw the slice trail.
6. Make a Custom Block to Draw the Slice
Select the purple More Blocks category and click the Make a Block button to open the New Block window. The purple blocks are custom Scratch blocks that you create.
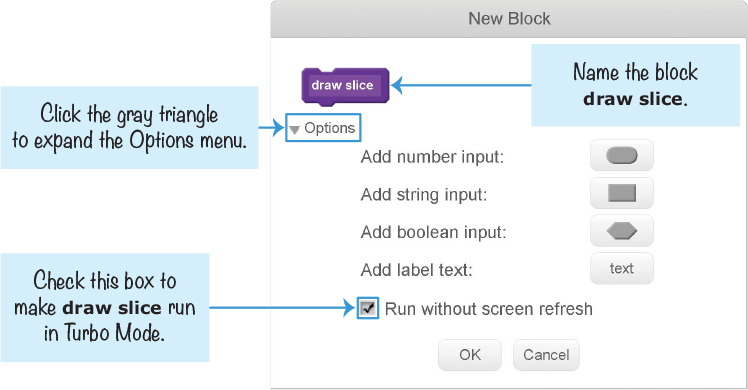
Fill in the name draw slice for your new purple block. Click the gray triangle to expand the Options, and check the Run without screen refresh checkbox. With this box checked, Scratch will run the code in your custom purple block in Turbo Mode, even if the player didn’t enable Turbo Mode by SHIFT-clicking on the green flag. Click OK to create the custom block.
A new draw slice block will appear in the dark purple More Blocks category.
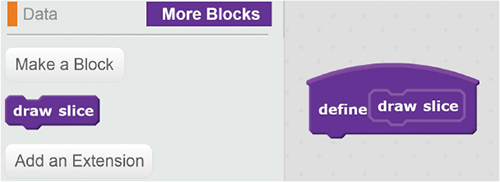
This new block with the curved top in the Scripts Area is the defining block for the draw slice block. When you want to use this new defining block, you must also drag the draw slice block, which is the calling block, from the Blocks Area into the code. Whenever Scratch runs this calling block, the code in the defining block is run.
Add the following code to the Slice sprite:

The color for the set pen color to block should be the same color as the blue rectangle Slice sprite. Click the block’s color square, and then click the light blue color.
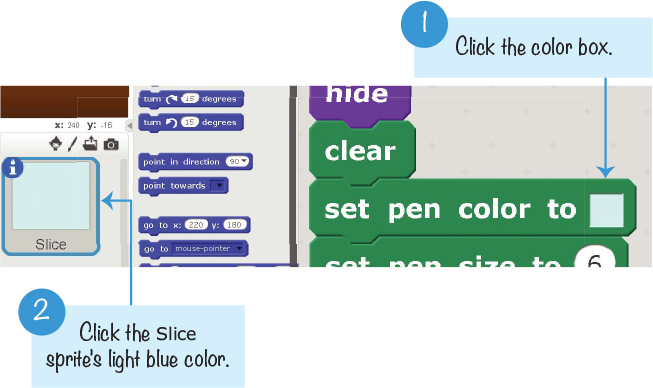
This script hides the Slice sprite and sets the pen to the right size and color. Then the forever loop continually runs the draw slice block.
Next, you need to define the define draw slice block. You want draw slice to draw a line starting with the first coordinates: the first value in the slice x list (for the x position) and the first in the slice y list (for the y position). This line goes to the x and y positions in the next values of the slice x and slice y lists, then the next values, and so on, until the last pair of values is reached. Our code will make sure the lengths of the slice x and slice y lists are always the same. Add the following code to the define draw slice block. Notice that the length of slice x block is dark orange and from the Data category, not the green Operators category.

This code lifts up the pen before moving it to the first x-and y-coordinate values in slice x and slice y and then sets the pen down. Inside the repeat until loop, the code uses a temporary variable named i to keep track of where the pen should move next.
The first time through the repeat until loop, the sprite moves to value 2 of the slice x and slice y lists. The pen draws a line as the sprite moves. Then i increases by 1 the next time through the loop, and the sprite moves to value 3 of the slice x and slice y lists. The loop continues until i is larger than the number of values in the list (that is, the length of the list).
NOTE
All the code under define draw slice could have been put in the other script’s forever loop, but then it wouldn’t have run in Turbo Mode. The Run without screen refresh option that you checked when you made the draw slice block enables Turbo Mode for the code in define draw slice. Otherwise, the slice drawing would be too slow for the game.

Click the green flag to test the code so far. Hold down the mouse button and drag the cursor around the Stage. Make sure the light blue trail is drawn behind the mouse cursor and that it quickly disappears when the mouse button is released. Then click the red stop sign and save your program.
|
MAKE THE BEGIN BUTTON |
Fruit Slicer requires the player to have quick reflexes. So let’s add a button to the start screen to give the player a chance to get ready to play. Slicing a begin button with the mouse will start the game.
7. Create the Begin Button Sprite
You don’t need to draw the begin button, because Scratch already has one. Click the Choose sprite from library button next to New sprite. Select Button1 from the Sprite Library window and click OK. Open the Info Area for this sprite and rename it Begin Button.
Click the Costumes tab at the top of the Blocks Area. Select the white color; then, using the Text tool, type begin and click somewhere on the canvas but not on the text. Then resize and drag the text over the bottom part of the green button.

Using the Text tool, create the text begin again. And again, click somewhere on the canvas but not on the text. Grab the top handle of the text box and rotate the text so it’s upside down. Then position it at the top of the green button.

Add this code to the Begin Button sprite:

Set the color in the touching color? block to the color of the Slice sprite in the Sprite List. Click the block’s color square, and then click the light blue color, as you did in Step 6.
The Begin Button slowly rotates on the Stage until the player slices it. The button knows it’s been sliced when the light blue slicing color touches it, at which point it broadcasts the start game message to all the other sprites.
Click the green flag to test the code so far. Slice the Begin Button sprite. Make sure it disappears and the backdrop changes when it’s sliced. Then click the red stop sign and save your program.
|
MAKE THE FRUIT AND BOMBS THROW THEMSELVES |
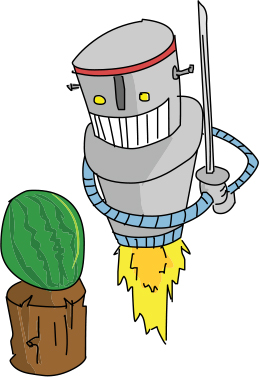
Because the fruits in the game look different but have the same behavior, you’ll use one sprite with the same code but different costumes.
8. Create the Fruit Sprite
Click the Choose sprite from library button next to New sprite, and select Apple from the Sprite Library. Then click OK. Click the new sprite’s i button to open the Info Area, and rename the sprite Fruit.

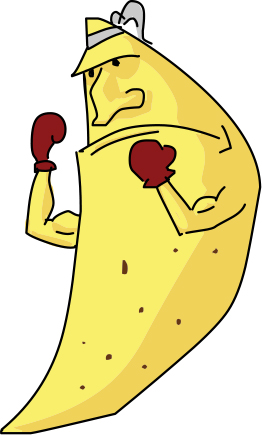
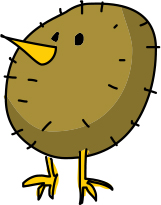
Click the Fruit sprite’s Costumes tab. Click the Choose costume from library button next to New costume. Add the banana costume. Click the button again and add the orange costume. Then click the button one more time to add the watermelon-a costume. Make sure the order of the costumes matches the following figure. If they’re not in this order, drag the costumes into the correct order.

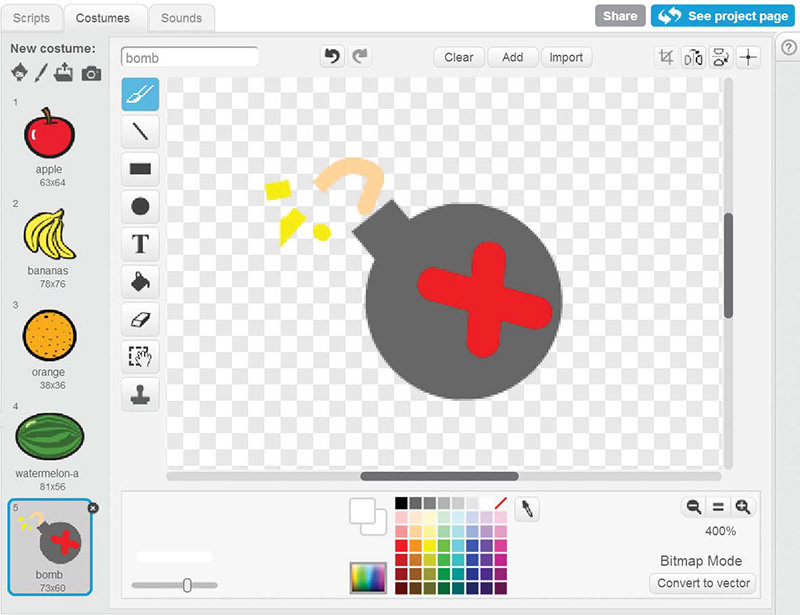
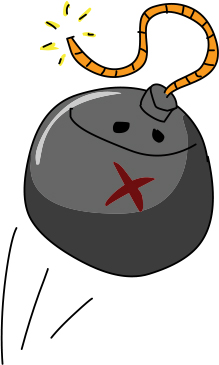
The Costume Library doesn’t have a bomb costume, so you’ll have to draw one for the Fruit sprite. If the player accidentally slices the bomb, they lose the game. In the Paint Editor, click the Paint new costume button next to New costume.
In the Paint Editor, draw a bomb with a red X on it. Use the Circle tool to draw the main body of the bomb and the Line tool to draw the top and X. Slide the Line width slider to make the lines thicker or narrower. Rename this costume bomb.
9. Make the Sliced Fruit Costumes
The Fruit sprite will have costumes for the four fruits, the bomb, and the sliced fruit. This step is easy because you don’t have to draw anything. You’ll just duplicate the costumes and pull them apart slightly so they look neatly sliced.
In the Paint Editor, right-click costume 1 (the apple costume) and select duplicate to create a second apple costume for costume 6.

Duplicate the banana, orange, watermelon-a, and bomb costumes as well. Make sure they’re in the same order as the original costumes:
apple
bananas
orange
watermelon-a
bomb
apple2
bananas2
orange2
watermelon-a2
bomb2
NOTE
Double-check the order of the costumes! It can be hard to figure out how to fix the costume order later on. Being extra careful now can save you a lot of future frustration.
For the code to work with every fruit, the sliced fruit’s costume number will be five more than the unsliced costume. So the apple costume is costume 1, and the sliced apple is costume 6. The banana costume is costume 2, and the sliced banana is costume 7. This is the reason the order of the costumes is important. Also, you need a second bomb costume for costume 10. Duplicate the bomb costume, but you don’t have to draw a sliced version of it.
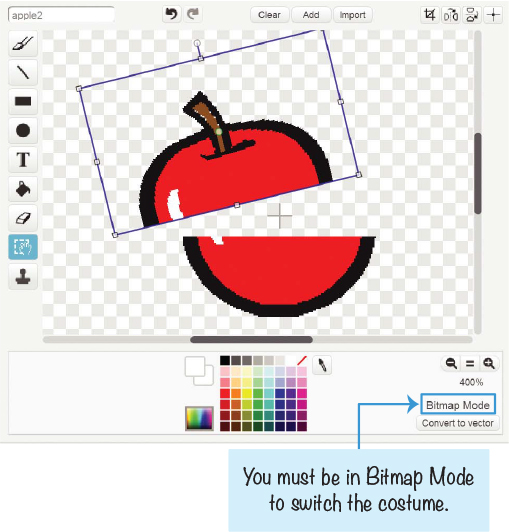
The fruit costumes were drawn in Scratch’s Vector Mode, which means they were drawn as a collection of shapes rather than as a grid of pixels. Although vector images look better than bitmap images, vector images can’t be split in half with the Paint Editor’s drawing tools. You’ll need to convert the costumes to Bitmap Mode first.
For each duplicated fruit costume (costumes 6, 7, 8, and 9), select the costume and click the Convert to bitmap button in the lower right of the Paint Editor. Then use the Select tool to drag a selection rectangle over half of the costume. Drag the selected half away from the other half a bit, and rotate it a little to make it look like it’s been cut in half.
You can also select and rotate the other half a little. Repeat this step for the duplicated bananas, orange, and watermelon-a costumes.

10. Add the Code to the Fruit Sprite
The Fruit sprite now has all the costumes it needs, so let’s code its behavior. The Fruit sprite creates clones of itself, and each clone will randomly choose costume 1, 2, 3, 4, or 5. Then the clone throws itself up in the air. The clone will detect if it was sliced and switch to its sliced costume. Or, if the clone randomly chose the bomb costume and the player slices it, it will end the game.
Create For this sprite only variables named x velocity, y velocity, rotation speed, and number of fruit. All clones will use these variables to determine how they are thrown up and fall down. Make sure these variables are For this sprite only. The only For all sprites variables in this program are Score and High Score.
If the bomb is sliced, the game will make a noise. Click the Sounds tab and then click the Choose sound from library button under New sound. Select alien creak2 and click OK.
With the variables and sounds set up, you can now add the code so the original Fruit sprite can create multiple clones of itself every second. You’ll add the code for the clones in Step 11.
Add the following code to the Fruit sprite.
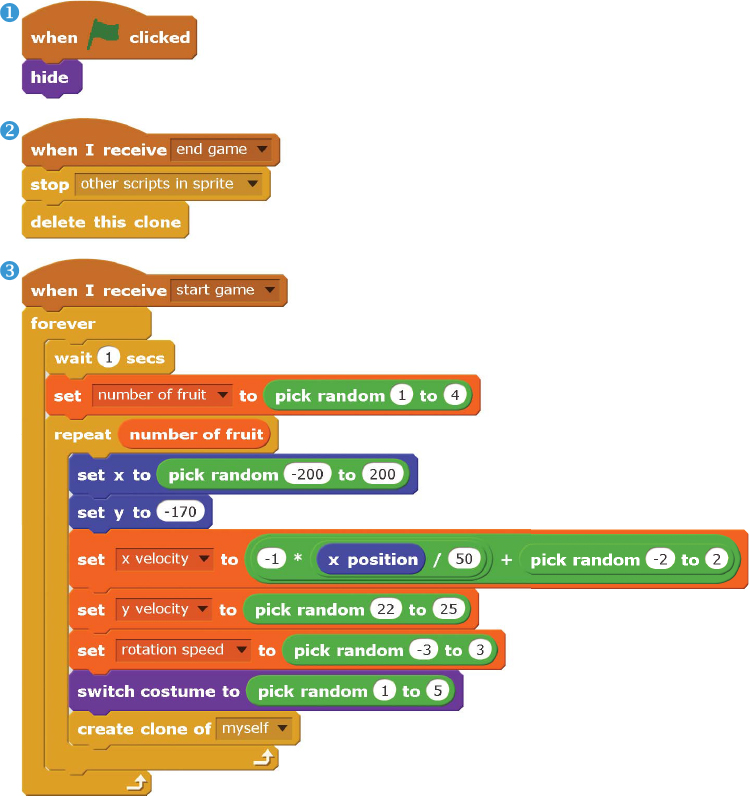
Script ➊ hides the fruit at the start of the game. Script ➋ cleans up the Stage when the game ends by deleting clones when the end game broadcast is received. Script ➌ runs when the player slices the Begin Button sprite and starts creating clones.
Let’s take a closer look at how script ➌ works. After waiting 1 second, the number of fruit variable is set to 1, 2, 3, or 4. The code in the repeat number of fruit loop will create a new clone on each iteration. Inside the loop, the original Fruit sprite sets its x position to a random position and its y position to -170, placing the original Fruit sprite somewhere at the bottom of the Stage.
Next, the x velocity, y velocity, and rotation speed variables are randomly set (so the cloned fruit will be thrown randomly). The sprite’s costume is also randomly set to costume 1, 2, 3, 4, or 5. All this code sets up the Fruit sprite to create a clone of itself. The clone’s position, variables, and costume are cloned from the original Fruit sprite, which means the original is ready to randomly set itself up for the next clone.
The set x velocity to block uses a complicated equation, which is -1 * x position / 50 + pick random -2 to 2, for the x velocity variable’s value. The x velocity value determines how far to the left or right the fruit is thrown. This should be a small value, so the sprite’s x position (a random number from -200 to 200) is divided by 50, which is equal to a number between -4 and 4.
We always want the fruit to be thrown toward the center of the Stage. That means if the Fruit sprite is on the left side of the Stage, its x position will be negative and the clone should be thrown to the right. In other words, the x velocity variable should be set to a positive number. And if the Fruit is on the right (with a positive x position), it should be thrown to the left. This means the x position / 50 number should be multiplied by -1; so if x position is positive, x velocity will be negative, and vice versa. Multiplying x velocity by -1 ensures that fruit on the left side of the Stage is thrown right and fruit on the right side is thrown left. Just to add some variation in the throws, a random number between -2 and 2 is added. You’ll see how the clones use the x velocity variable in Step 11.
The x velocity and y velocity variables are used together so the fruit is thrown in a curved shape called a parabola. The mathematics of parabolas are used in many science and engineering applications, but you don’t need to learn much about parabolas to use them in your games. Don’t worry if you don’t understand the math in these code blocks. As long as you copy the blocks from this book exactly as shown, your fruit will be thrown correctly.

11. Add the Code for the Fruit Sprite’s Clones
When the original Fruit sprite creates a clone of itself, the clone starts running its own code to throw itself up and detect if it’s sliced.
First, create the missed fruit message by clicking the broadcast block’s black triangle, selecting new message, and entering the name missed fruit. Then add the following code to the Fruit sprite.
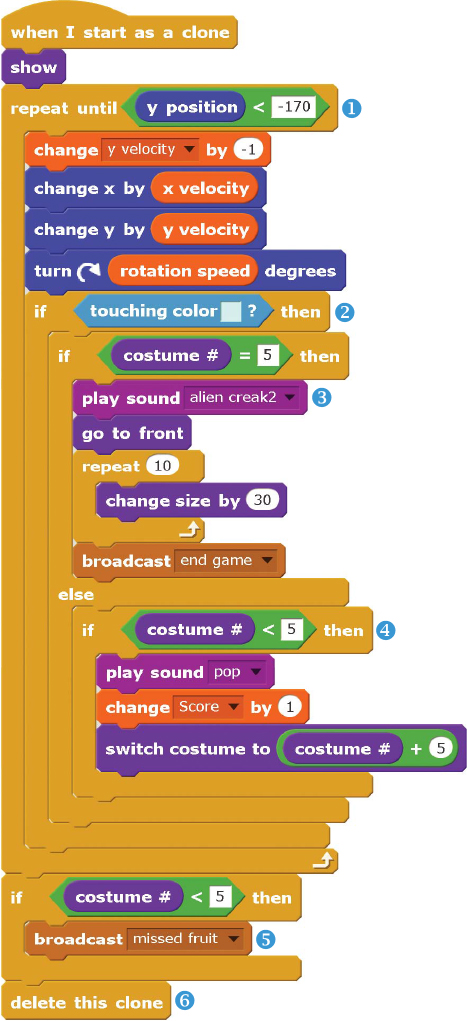
This script controls the Fruit clones, but it looks complicated, so let’s break it down step-by-step. The original Fruit sprite is hidden, so the first thing the clone does is show itself. Next, the code for gravity and slice detection repeats in a loop ➊ as long as the clone is up in the air. When the clone’s y position drops below -170, the clone has fallen to the bottom of the Stage.
The first part of the repeat until block makes the clone fall faster under gravity by changing the y velocity by -1. Then the x position, y position, and direction of the clone are changed by the values in the x velocity, y velocity, and rotation speed variables, respectively, moving the fruit in a parabola-shaped path through the air. A parabola shape is drawn when the horizontal speed (in this case, x velocity) doesn’t change but the vertical speed (in this case, y velocity) decreases over time.
The color in the touching color block should match the color of the Slice sprite ➋. The clone detects whether it has been sliced by checking whether it is touching the color of the Slice sprite’s trail (see Step 6). If it is touching this color, the if then else block does another check for whether the costume number of the clone is set to 5 (which is the costume number of the bomb costume). If the bomb has been sliced, the Fruit clone makes the alien creak2 sound ➌, grows on the screen by running the change size by 30 block, and then broadcasts the end game message.

Otherwise, if the sliced clone isn’t set to costume 5 (that is, if it isn’t the bomb costume), the code in the else part of the if then else block is run ➍. The if then blocks check which of the four fruit costumes the clone is set to, change the costume to the sliced form of that fruit, and add 1 to Score.
After the repeat until y position < -170 block, if the costume is still set to one of the unsliced costumes (that is, costumes 1 to 4), the missed fruit message is broadcast ➎ (we’ll take a look at the code that receives this message in Step 12). No matter if the costume is a sliced or unsliced fruit, the clone is then deleted ➏.
Click the green flag to test the code so far. Try slicing the fruit. Make sure the fruit changes to the sliced costume and the Score variable increases by 1. Then click the red stop sign and save your program.
|
MAKE THE HEALTH SPRITES |
The player doesn’t want to slice all over the screen because they might hit a bomb. But to keep the player from being too cautious, you can end the game if the player misses three fruits.
12. Create the Health Sprite
The Health sprite will indicate how many more fruits the player can miss before losing the game. Each time the player misses a fruit, the sprite will switch to the next costume.
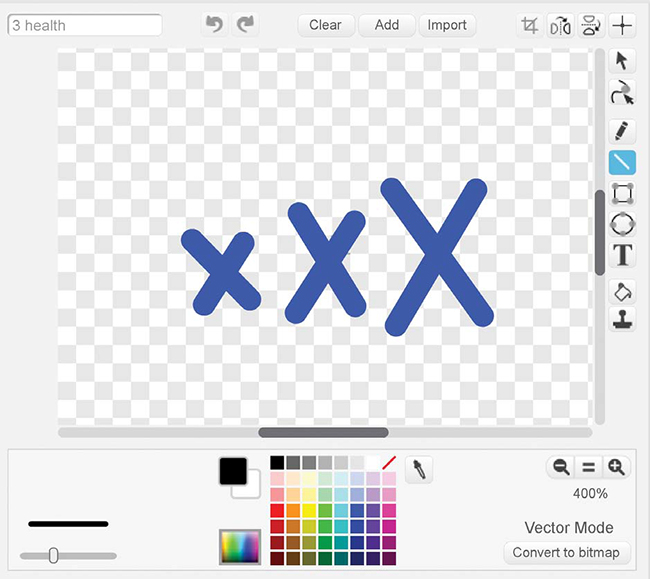
Click the Paint new sprite button next to New sprite. Open the Info Area for this new sprite and rename it Health. In the Paint Editor, use the Line tool to draw three blue Xs and duplicate this costume three more times. I made my Xs increase in size from left to right, but you can style yours any way you like as long as you have three of them.
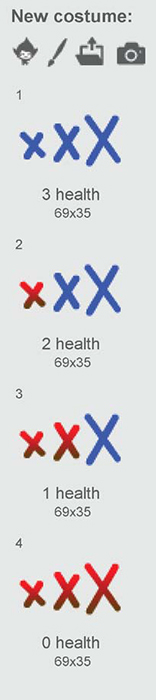
Rename costume1 to 3 health, costume2 to 2 health, costume3 to 1 health, and costume4 to 0 health. Leave all three Xs in 3 health blue. But for the other costumes, use the Fill tool, click the vertical gradient, and select a lighter red and a darker red color to paint the Xs a red gradient. The costume 2 health will have one red X, 1 health will have two red Xs, and 0 health will have three red Xs. Make sure your costumes are in the same order as in the figure shown here:
The Health sprite will switch costumes based on different broadcast messages it receives. Add the following code to the Health sprite. All the messages should already exist by this step, so you shouldn’t need to create them.
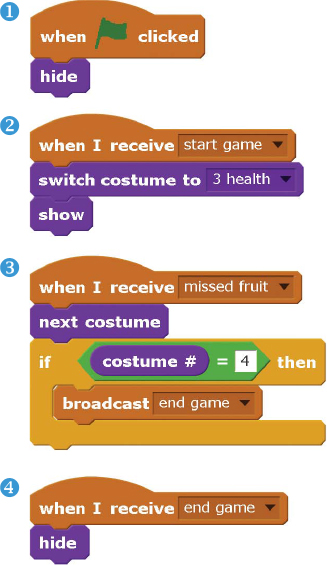
When the player clicks the green flag and is at the start screen, the Health sprite hides itself in script ➊. When the player slices the Begin Button sprite, it broadcasts the start game message, and the Health sprite sets itself to show the 3 health costume in script ➋. Each time an unsliced fruit falls to the bottom of the Stage, that fruit broadcasts a missed fruit message, which makes the Health sprite switch to the next costume in script ➌. This next costume will have one more red X. If the Health sprite switches to 0 health, all three Xs are red and the end game message is broadcast. When the Health sprite receives this message, it hides itself using the very short script ➍.
Click the green flag to test the code so far. Let some of the fruit fall without being sliced. Make sure the Xs turn red for each missed fruit. Start a new game, and make sure the Xs are all blue again. Then click the red stop sign and save your program.
|
MAKE THE GAME’S ENDING |
The player can lose in two different ways: when the player misses three fruits or when they slice a bomb. Either way, the end game message is broadcast, and several things happen as a result. The Fruit sprite’s clones delete themselves, the Health sprite hides itself, and the Stage fades to white. We’ve already added code for the clones and the Health sprite, so let’s add code that makes the Stage fade to white.
13. Create the White Fade Out Sprite
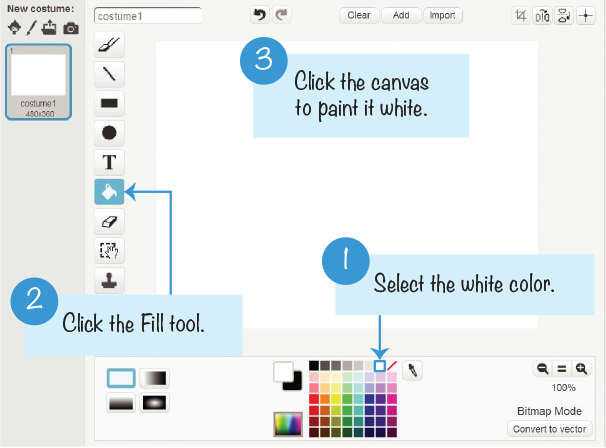
We’ll use a ghost effect trick to make the Stage fade. Click the Paint new sprite button next to New sprite. In the Info Area, rename this sprite White Fade Out. In the Paint Editor, use the Fill tool to fill in the entire canvas with white. None of the white-gray checkered pattern on the canvas should be visible.
The White Fade Out sprite blocks most of the Stage. When the program begins, the White Fade Out sprite will hide itself and become visible only when the end game message is broadcast. Add the following code to the White Fade Out sprite:

When the White Fade Out sprite receives the end game message, it moves itself to the origin at the x- and y-coordinates (0, 0) ➊. Because the sprite is the same size as the Stage (480 pixels wide, 360 pixels tall), putting it at the origin makes it completely cover the Stage. The go to front block also places it in front of every other sprite. This makes sure that all the other sprites are behind it.
Before showing itself, the White Fade Out sprite sets its ghost effect to 100 ➋, making it completely invisible. Then the repeat loop decreases the ghost effect by 10 ten times ➌. The White Fade Out sprite gradually becomes more visible, and the white color slowly covers everything on the Stage.
If the Score variable is higher than the High Score variable, the High Score variable is updated ➍. After a short, 1 second delay, the White Fade Out sprite broadcasts the start screen message. The White Fade Out sprite hides itself, the Stage goes back to the start screen backdrop, and the Begin Button sprite shows itself ➎. The game looks like it did when the player clicked the green flag, but the High Score variable is set to the highest score achieved so far.
Click the green flag to test the code so far. Play the game and make sure that when you slice a bomb or when three fruits fall unsliced, the White Fade Out sprite fades into view and restarts the game. Then click the red stop sign and save your program.
The code for this program is too large to list the complete code in this book. You can view the completed code in the resources ZIP file—the filename is fruitslicer.sb2.
VERSION 2.0: HIGH SCORE
Scratch can store variables on its website using cloud variables. Scratch’s cloud variables act just like regular variables except their value is remembered even after the web browser closes. Cloud variables are shared among every Scratcher using a program. You can make a competition for high scores using cloud variables for everyone who’s played your game!
Because cloud variables use a lot of the Scratch website’s bandwidth, there are some limitations for using them:
![]() Cloud variables store only numbers, not text.
Cloud variables store only numbers, not text.
![]() Cloud variables can’t be used to make chat or multiplayer games.
Cloud variables can’t be used to make chat or multiplayer games.
![]() It takes a second or two for the cloud variable’s value to update for everyone.
It takes a second or two for the cloud variable’s value to update for everyone.
![]() New Scratchers who haven’t used the website much can’t use cloud variables.
New Scratchers who haven’t used the website much can’t use cloud variables.
The High Score variable shows the highest score a player has made. But using a cloud variable, you can make the game show the highest score of every player on the Scratch website! Select the White Fade Out sprite and click the Make a Variable button in the orange Data category. Enter the name Cloud High Score and make it a For all sprites variable (just like High Score). Then check the Cloud variable (stored on server) checkbox.

NOTE
If the Cloud variable checkbox isn’t visible, it means you still have New Scratcher status and won’t be able to use cloud variables until you’ve used the Scratch website more. Create more projects, talk on the discussion forums, and comment on other Scratcher’s projects. Then wait a few days to see if your status has changed and the checkbox is available to you.
When you’ve made the Cloud High Score variable, move its display on the Stage above the regular High Score variable.

Then add the following code to the White Fade Out sprite:

The set Cloud High Score to Score block changes the Cloud High Score variable for the player and also for every other player on the Scratch website. Now you have a high score system for all players ever!
CHEAT MODE: RECOVER HEALTH
You can add a secret button that will let a player recover lost health. This won’t prevent the player from accidentally slicing bombs, but it can help them avoid losing health from dropping too many fruit. Pressing the R key will recover one health after you add the following code to the Health sprite. You can press the R key as often as you like during the game. Add the following code to the Health sprite.

Click the green flag to test the code so far. After dropping some fruit, press the R key and make sure that one health is recovered. You’ll be able to see the red X turn blue. Then click the red stop sign and save your program.
SUMMARY
In this chapter, you built a game that
![]() Has a start screen instead of just beginning the game when the player clicks the green flag
Has a start screen instead of just beginning the game when the player clicks the green flag
![]() Uses gradients to draw backdrops and costumes
Uses gradients to draw backdrops and costumes
![]() Uses lists to track multiple values
Uses lists to track multiple values
![]() Tracks the position of the mouse with the mouse x and mouse y blocks
Tracks the position of the mouse with the mouse x and mouse y blocks
![]() Uses costumes to make clones of one sprite look like different kinds of fruit
Uses costumes to make clones of one sprite look like different kinds of fruit
![]() Returns to the start screen when the game ends instead of just stopping the program
Returns to the start screen when the game ends instead of just stopping the program
![]() Remembers the high score of the player
Remembers the high score of the player
This chapter was much longer than the previous chapters because the Fruit Slicer game is more sophisticated than previous games. But I think it’s the most fun game in this book so far. As you continue to learn more about programming, you’ll be able to make cooler games, so keep at it!
In Chapter 8, you’ll create a space game where you shoot down incoming asteroids. Let’s blast off!