
Chapter 3. Share Meetings with Outlook
SharePoint provides a special type of site called a meeting workspace, which can be created from a meeting request sent from Outlook. Meeting workspaces are meant to prepare attendees by publishing a meeting’s objectives and agenda before the meeting is held. They also help record decisions and related documents after the meeting takes place.
Workspaces are used in the following way to organize the meeting process:
Attendees receive a meeting request in Outlook that links to the SharePoint workspace.
Attendees can click on the link to see details about the meeting and add items as needed.
During the meeting, someone can open the workspace from a laptop and make notes.
Later, the person who called the meeting can go to the workspace to record conclusions, assign follow-up tasks, or add key documents.
Meeting workspaces aren’t meant to be online meeting places, but they can be used in conjunction with Microsoft NetMeeting, Exchange Conferencing, and other online meeting services.
The following sections show you how to create SharePoint meeting workspaces from Outlook.
Creating a Meeting Workspace
To create a meeting workspace from Outlook:
Select the Calendar in the Navigation pane to choose a date and time for the meeting.
Choose Action → New Meeting Request. Outlook displays the Meeting Request dialog box.
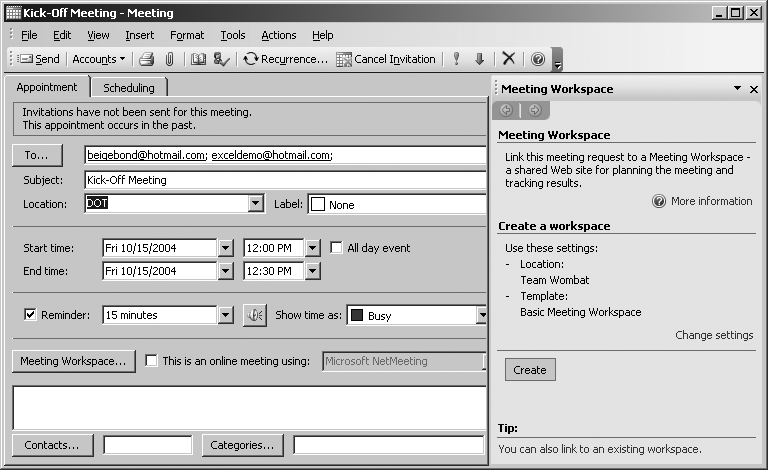
Complete the fields in the dialog box and click Meeting Workspace. Outlook displays a workspace task pane in the dialog box, as shown in Figure 3-1.
Click Create. Outlook creates a Meeting workspace for the meeting and adds a link to the workspace in the dialog box.
Click the link and add objectives and agenda items to the workspace, as shown in Figure 3-2.
Return to Outlook and click Send to close the dialog and send the meeting request. The request includes a link to the meeting workspace, so attendees can review the objectives and agenda and add documents before attending.

The workspace in Figure 3-2 is designed for a meeting that occurs only once. Recurring meetings create a different type of workspace called a meeting series. To create a meeting series from Outlook, choose Action → New Recurring Meeting (not Action → New Meeting Request, as described in step 2 of the preceding procedure).
The meeting series workspace lists recurring meetings by date, as shown in Figure 3-3.

Sharing Contacts
SharePoint provides a way to share names and addresses from your Outlook address book with others. To copy one or more contacts from Outlook to a SharePoint Contacts list:
Display the SharePoint site in your browser and click Contacts on the site’s home page. You’ll see the Contacts list for the site.
Click Import Contacts. You’ll see a list of the contacts from your local address book.
You can import some or all of your contacts. To import some of the contacts, hold down the Ctrl key while clicking on the contacts you want to import. To import all of the contacts, click the first contact, scroll to the end of the list, hold down the Shift key, and click the last contact.
Click OK to import the selected contacts. You’ll see a security warning saying that SharePoint is trying to access your address book. Select “Allow access for 1 minute” and click Yes to allow the import to continue.
When the import is complete, the new contacts appear in the Contacts list.
You can edit contacts in your Outlook address book before you import them into the Contacts list, or you can do it from SharePoint after importing. Perhaps the easiest way to clean up entries is to click “Edit in Datasheet” on the Contacts page after importing. The datasheet view is a lot like a spreadsheet—you can select items to delete, drag names between fields, and do a number of other edits quickly.
Once you’ve cleaned up the Contacts list, you can link the list back to Outlook by following these steps:
Display the contact list in the browser and click “Link to Outlook”.
Outlook displays a security warning. Click Yes to import the SharePoint Contacts list into Outlook.
When the import is finished, Outlook shows the shared list in the Other Contacts section of the Contacts Navigation pane.
The SharePoint Contacts list is stored on the SharePoint server so that all members of the site can use it. This means you can’t edit those contacts directly from Outlook. Instead, you must follow these steps:
Open the contact you want to change in Outlook. Outlook displays the detailed contact information as read- only.
Click the link in the edit area. Outlook opens the SharePoint edit page for the contact.
Make your changes and click “Save and Close” to complete the change.
Return to Outlook and close the Contact dialog box.
If you view the contact in Outlook right away, you won’t see the changes you just made. Outlook updates its shared lists when you start the Outlook application and once every 20 minutes after that.