
Chapter 6. Gather Data with Lists or InfoPath
By now you’re probably familiar with the simple Announcements list. You can enter data there by choosing New Item or “Edit in Datasheet” from the list toolbar. For simple lists, “Edit in Datasheet” often works best because you can create new items easily by tabbing to the next row. For lists that contain long text fields or other types of data, New Item is often a better choice.
When you choose New Item, SharePoint displays the New Item page (NewForm.aspx). New Item displays either a text box, drop-down list, or other kind of control for each field in the list. Red asterisks like those shown in Figure 6-1 indicate which fields are required.
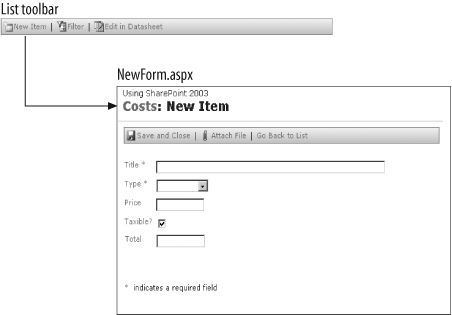
The New Item page is the data-entry form for the list. Complete the fields on the page and choose “Save and Close” to store the data in the list. To exit without saving, choose “Go Back to List” or simply navigate to another page.
SharePoint generates the fields you see on the New Item page based on the types of columns found in the list, as shown in Figure 6-2.
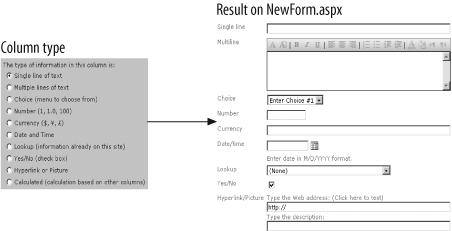
There are a few things that you need to know about the column types:
Multiline text columns can include formatting.
Choice and Lookup column types generate drop-down lists.
Numeric, Currency, and Date and Time columns validate the data entry as that respective type. For example, you can’t enter the word five in a numeric column.
Calculated columns are read-only, they don’t appear on the New Item page, and they can’t be totaled in a standard view.
Even though lists seem very simple, you can do some significant data-entry tasks with them. The following sections walk you through how to create a list for collecting and categorizing expenses. I used it to figure out how much I spent building my boat, but you can modify it for other uses.
Building a Lookup Table
Before creating a data-entry list, you need to consider what types of multiple-choice options members might need to enter. You can provide multiple-choice options on a list by selecting either the Choice or Lookup column type:
Use Choice to display options that aren’t likely to change.
Use Lookup to display a dynamic set of options from another list. Lookup columns can link to data in other lists, so they provide a good way to include details for complex options.
Warning
Lookup tables can’t span web sites. If you are creating a list for use in multiple web sites, use the Choice type rather than Lookup.
The list in this tutorial categorizes expenses for a boat-building project. When I started the list, I wasn’t sure what categories I’d need, so I created a lookup-table list for the main categories I could think of and added new categories as the need arose.
To create the lookup-table list:
From the SharePoint site, choose Create → Lists → Custom List. SharePoint displays the New List page.
Name the list
ExpenseTypes, select No in the Navigation section, and then click Create. SharePoint creates a new, single-column list.
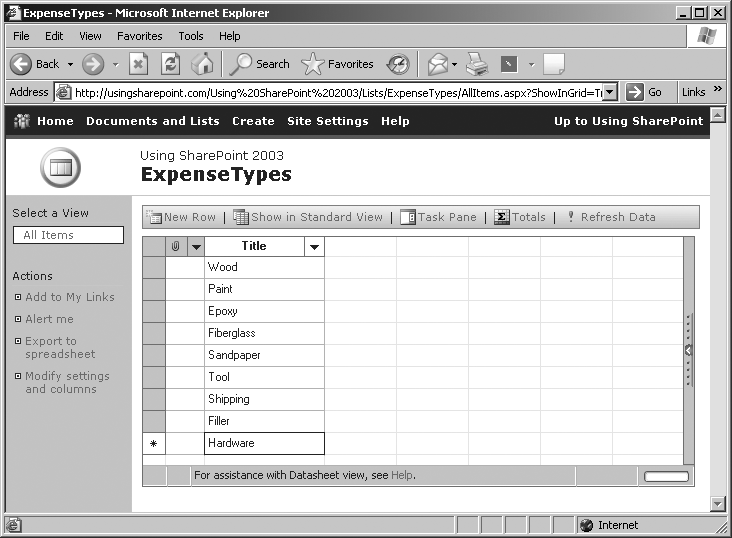
This is a simple lookup table, so you don’t need to add any new columns. The default Title column will work fine. Next, enter your expense categories. To add items to the lookup table:
Choose “Edit in Datasheet” to bring up the datasheet view.
Enter the items, as shown in Figure 6-3.
Choose “Show in Standard View” to commit the changes.
Warning
The datasheet view works only in Internet Explorer and only if Office 2003 Professional Edition is installed.
The great thing about lookup tables is that you don’t have to think of all the categories at once. You can return to this table later on and add new categories as you need them; your changes will automatically appear in the data-entry list.
Creating a Data List
Now that you’ve laid the foundation, you can create the data-entry list itself. To create the list, follow these steps:
From the SharePoint site, choose Create → Lists → Custom List. SharePoint displays the New List page.
Name the list
Expenses, select No in the Navigation section, and then click Create. SharePoint creates a new, single-column list.Choose “Modify settings and columns” to add columns to the list. SharePoint displays the Customize page.
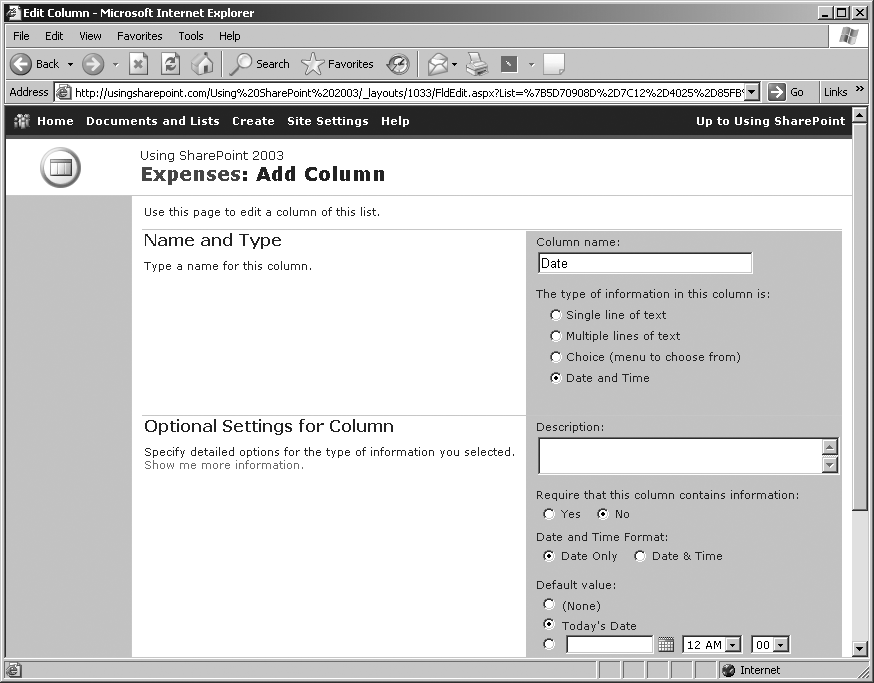
In the Columns section, choose “Add a new column”. SharePoint displays the screen shown in Figure 6-4.
Enter the information for the Date column. Then, using the settings listed in Table 6-1, repeat step 4 for each of the columns.
Name | Column type | Required? | Default value | Other settings |
Date | Date/Time | No | Today’s date | |
Type | Lookup | Yes | Get information from: In this column:
| |
Price | Currency | Yes | ||
Taxable? | Yes/No | N/A | Yes | |
Total | Calculated | N/A | Formula:
|
Note
The sales tax rate in Florida is 6%. Change the .06 in Table 6-1 to your state’s tax rate.
When you’re done, display the list and add a test entry to make sure it works as expected. To do this, follow the steps below:
Choose New Item. SharePoint displays the New Item page for the list. You should see fields for all of the columns except Total, which is read-only.
Enter some data and choose “Save and Close”. SharePoint returns you to the list and displays the new item. If your test entry was taxable, the correct Total should be displayed, as shown in Figure 6-5.
Adding Totals, Groupings, and Filters
As you enter items in the Expenses list, you may want to view the data in certain ways. For example, you may want a running total on what you’ve spent, or you may want to see what you spent on Epoxy. The list can both include totals and filter or group items in various ways.
There are two ways to view totals in a list. The first way, which is described in the following steps, is the easiest and most effective:
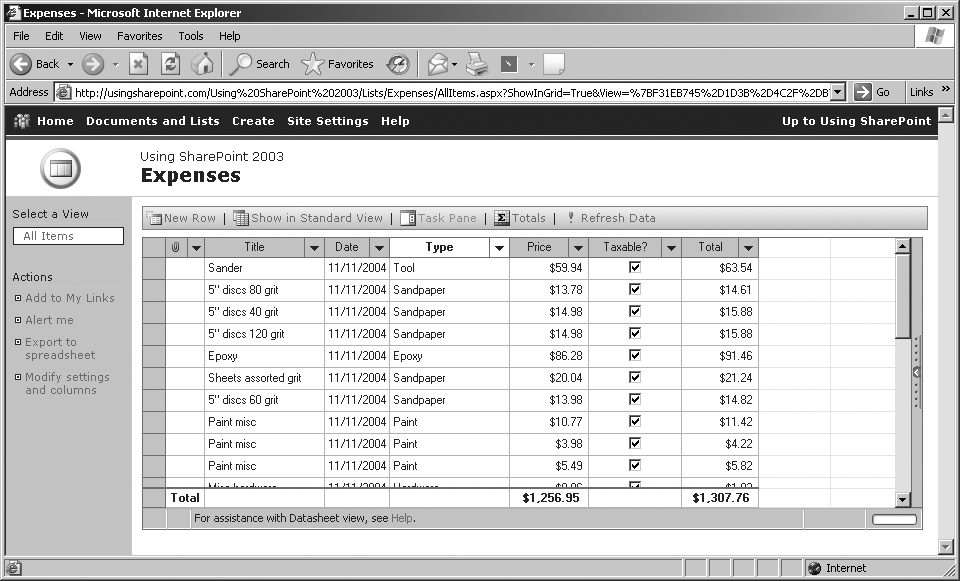
Choose “Edit in Datasheet”.
Choose the Totals button on the list toolbar. SharePoint displays a total for each numeric column, as shown in Figure 6-6.
The second way to view totals is to add them to the standard list view. This approach isn’t as useful as the first, because it doesn’t total calculated columns. To add totals to the standard view:
Choose “Modify settings and columns”.
In the Views section, choose the view you want to modify. The default view is All Items. SharePoint displays the Edit View page.
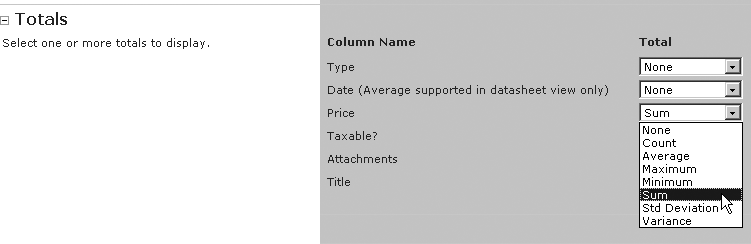
Expand the Totals section and select the type of total you want displayed for each column, as shown in Figure 6-7.
Choose OK when you’re done. SharePoint adds the column total to the top of the standard view.
Note
If you don’t see the choices shown in Figure 6-7, check the data type of the column. Different data types support different choices.
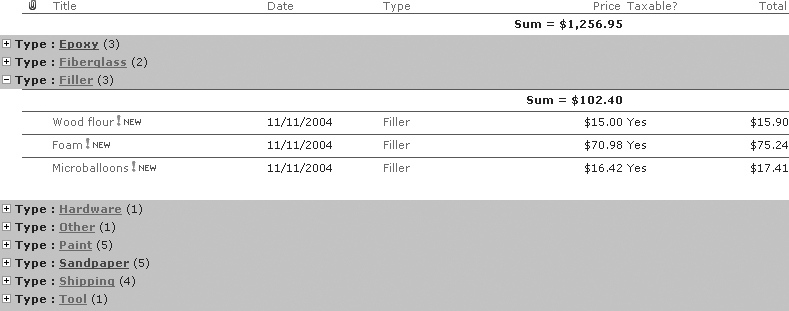
You can also modify the view to group items in interesting ways. For example, repeat the preceding procedure, but for step 3, expand the Group By section instead of the Totals section and make the changes shown in Figure 6-8.

Now when you display the list, you’ll see a categorized list of expenses. You can expand each expense type to view more details (see Figure 6-9).
Note
Use the Group By settings to create hierarchical views of lists. Use these views in web parts to create treeview-type controls.
Building Form Libraries
Form libraries are special document libraries for collecting data gathered through Microsoft InfoPath. Though it’s a separate product, InfoPath is part of the Microsoft Office System and is included in Microsoft Office 2003 Enterprise Edition. (It is not available for Office for Macintosh.)
Warning
The following sections assume you have InfoPath 2003 installed on your computer. Anyone who needs to fill out forms must also have InfoPath installed.
To create a form library in SharePoint from the navigation bar, choose Create → Form Library and complete the New Form Library page.
To add a new item to the library:
Open the library and select Choose Fill Out Form.
SharePoint opens the form in InfoPath, as shown in Figure 6-10.

SharePoint includes the sample form templates listed in Table 6-2.
Form template | Use to |
Absence Request | Request time away from work; calculate remaining absence balances. |
Applicant Rating | Rate job applicants, comment on applicants’ strengths and weaknesses, and provide a hiring recommendation. |
Asset Tracking | Keep a record of your company’s equipment and property. You can track information such as primary user, location, and purchase date for each asset. The form can also be sorted, allowing you to quickly find the information you’re looking for. |
Change Order | Explain and specify changes to existing orders or projects, as well as track total cost and time adjustments. |
Expense Report (Domestic and International) | Create and submit an itemized list of expenses. |
Invoice (Single and Multiple Tax Rates) | Document sales and transactions; bill customers for services rendered or equipment delivered. |
Invoice Request | Request the generation of an invoice for services rendered or equipment delivered. |
Issue Tracking (Simple and Detailed) | Track an important issue, as well as provide details such as the due date, status, and owner for all action items that impact that issue. |
Meeting Agenda | Detail the agenda items, time allotments, guest speakers, attendees, and required materials for a meeting. This form can also be used to record meeting minutes, decisions, and action items. |
Project Plan | Provide the details for a project, such as a schedule, work items, materials, and a budget. |
Purchase Order | List the total items, total amount due, and required delivery dates for an order; authorize the delivery of the specified items. |
Purchase Request | Create a request for items you want to purchase. |
Sales Report | Record and track monthly sales of various items in different categories. |
Status Report | Provide an update on the status of various projects. These reports can then be combined into a single report. |
Service Request | Make requests for services or repairs. |
Time Card (Simple and Detailed) | Track time worked, including times in/out per day, absences, and other payroll information. |
Travel Itinerary | Create a schedule of events while traveling, which can include transportation arrangements, appointments, and various contacts. |
Travel Request | Request the approval of a business trip; provide details such as travel dates, destinations, itinerary information, and preferences so that accommodations can be made. |
Vendor Information | Specify the products and services provided by a particular vendor; allow multiple individuals to rate the vendor according to cost, quality, and delivery. |
When you save an InfoPath form, SharePoint saves the form data as an XML file in the form library. SharePoint also maps elements from that XML file to columns in the SharePoint list. This process is similar to the way SharePoint promotes custom properties in Word and Excel document libraries. The advantage of this mapping functionality is that you can use SharePoint to easily create different summary views of InfoPath data at any time.
Designing a Form
InfoPath is both a form designer and a form viewer. To design a data-entry form in InfoPath, start InfoPath, select one of the sample forms, and choose “Design this form”. InfoPath opens the form in Design mode.
You can modify the form by selecting any of the options in the task pane. To preview the results of changes, choose File → Preview Form → Default. InfoPath displays the form in Preview mode.
Note
In Preview mode, you can view changes and test controls, but you cannot save data entered on the form.
Creating a New Form Library
Once you are satisfied with a form, you can publish it to create a new form library in SharePoint. To publish a completed form:
Choose File → Publish. InfoPath starts the Publish Wizard to walk you through the process.
Choose “Publish to a Form Library”. The wizard asks if you want to create a new form library or update the form in an existing library. Select “Create new form library” and choose Next.
Enter the name of the SharePoint site in which you want to create the form library and choose Next. InfoPath logs on to the site, and you may be prompted for your username and password.
Enter a name and description for the form library and choose Next. The wizard displays the mapping step. This step lets you map elements from the form to columns in the form library.
Choose Add to create, Remove to delete, or Modify to change a mapping. Choose Finish to create the form library. InfoPath displays a success dialog box.
Once you’ve published the form, members can open it for data entry by choosing Fill Out This Form from the form library’s toolbar. When members save the form, InfoPath creates a new item in the form library.
Getting Values from a List
InfoPath forms can retrieve data from various types of data sources, including SharePoint lists. InfoPath’s access to lists is read-only. It refers to this type of access as a secondary data source. In InfoPath, primary data source refers to the location in which the form data is stored.
Secondary data sources can populate controls, such as drop-down lists, and can be used to create reports (or views) of lists from SharePoint. The major steps to populating controls from a SharePoint list are as follows:
Create a data connection to the list.
Add controls and bind their values to list fields.
Add filters to display the appropriate data.
The following sections demonstrate these steps using a list on my site that contains InfoPath coding samples categorized by language.
Creating a data connection
To create a data connection from an InfoPath form to a SharePoint list:
Design a new, blank form and choose Tools → Data Connections → Add. InfoPath starts the Data Connection Wizard.
Enter the settings in Table 6-3 and choose Close when done.
Wizard step | What to do | And choose... |
1 | Select “Receive data” | Next |
2 | Select “SharePoint library list” | Next |
3 | Next | |
4 | Select the InfoPath Code Samples list | Next |
5 | Select ID, Title, Language, Example, and Description fields | Next |
6 | Select “Automatically retrieve data when form is opened” | Finish |
Adding bound controls
To add controls that display items from the data connection:
Display the Controls task pane and create two drop-down lists by dragging and dropping the controls from the task pane onto the form.
Double-click on
field; select “Enter values manually” and add the valuesVBScript,VB .NET,C#,Registry, andOther. Choose OK to close the dialog.Double-click on
field2, select “Look up values in a data connection”, choose Select XPath, select the InfoPath_Code_Samples group, and choose Filter Data.Specify the filter Language → “is equal to” → “Select a field or group” and select the
field1element from theMaindata source. Choose OK four times to return to the main dialog.Choose Set XPath for the Value field and choose ID.
Choose Set XPath for the Display name field and choose Title. Choose OK to close the last dialog.
Step 4 filters the values in field2, so that only the titles for the selected language are displayed. By binding field to InfoPath_Code_Samples you can display Title, but use the unique ID to filter other fields in the next step.
Preventing Changes
InfoPath both designs and displays forms. Only members of the Web Designer or Administrator groups can create form libraries or change the template used by the library. However, templates deployed to clients can be changed. In most cases, you won’t want members opening those templates in Design mode and tinkering with them.
To protect a template from changes:
Open the template in Design mode.
Choose Tools → Form Options, select “Enable protection”, and choose OK.
Protected templates display a warning if the user opens them in Design mode. That’s weak protection at best, but if you sign the protected template with a digital signature, you can both discourage changes and detect changes if they are made (changes overwrite the digital signature, so the template will no longer be trusted).