6. Development

Developer
Development Manager
“Working software over comprehensive documentation”
—The Agile Manifesto1

Figure 6.1 Newton’s Cradle is a common desktop toy. When you apply force from one end, the balls swing in a predictable regular motion. When you add a force from the opposite end, the balls start bouncing chaotically against each other. It’s a metaphor for development practice. Simple, directional force encourages predictability, while contradictory forces can create chaos.
This chapter is not about programming languages or coding techniques. These important topics are well covered in many other books. Rather, this chapter is about the activities that VSTS enables a developer to perform as a complement to writing production code that help to make that code successful.
There’s no religion here. I completely recognize that many readers will think that the practices I describe don’t go far enough. Again, many books cover methodologies or individual practices in considerable depth, whereas I only have space to touch the surface.
Rather, my goal here is to give you enough of the reasoning behind and tooling in VSTS to do a better job right away. I hope it makes you want to dig deeper faster through the other sources, too.
A Value-Up View of Development
The value-up approach measures only deliverables that the customer values. More than anything else, this means working code of quality suitable for customer delivery. For twenty-five years, we’ve known that ensuring quality early is much cheaper than removing bugs late.2 Only in the last ten years, however, have practices shifted from notions like “Code Complete,” which treats bug removal as a deferrable activity, to “Test-Driven Development,” which focuses on bug prevention with 100% of tests passing at the time of check-in.
For purposes of this chapter, I’m going to assume that you are a skilled developer. Also, I’m going to assume that you, like virtually every developer I’ve ever met, want to do quality work and remove the impediments to delivering quality.
Quality from a Developer’s Point of View
In the vast majority of cases, there are five broad process problems that lead (directly or indirectly) to quality problems in a developer’s work:
1. Poorly communicated, misunderstood, or out-of-date requirements. Chapter 3, “Requirements,” discusses how to define and manage scenarios and QoS requirements to contain problems related to requirement misunderstandings. However, as a developer, you can take responsibility for forcing good requirements, as discussed later.
2. Programming errors. People write code, and people make mistakes. In particular, it is often very hard to write code that takes all the necessary qualities of service into account, such as security, performance, localization, and maintainability. This is true for both managed and unmanaged code, although unmanaged C and C++ incur the additional security hazards of buffer overruns, unallocated memory reads, and similar memory violations.
3. Lack of testing feedback. Even developers who know that they should be writing unit tests often find themselves facing too many disincentives. Unit testing takes time; it’s often hard to tell how much code has been tested and under which conditions, and the tests often do not get reused or noticed. Without thorough unit testing and its immediate feedback to a developer, though, it is very easy to change code and not discover undesirable side effects until much too late.
4. Version skews. Even developers who would never consider working without source control often find that their source control does not deal adequately with the many non-source files on which the project depends, such as the build system, tests, and configurations. Differences in these files often lead to those hard-to-diagnose bugs that provoke from the observation, “But it worked on my machine!”
5. Lack of transparency. The development infrastructure, project management system, and bug/change request tracking and metrics (if any) are treated as disconnected black boxes. In this situation, the team has little visibility into the workings of the actual coding activity other than the commonly hated and not always reliable status reports.
Fortunately, VSTS addresses these five broad categories. The first is only partially a development responsibility. The remaining four, however, can’t be solved by improving the requirements gathering process and instead need to be solved by focusing on development and downstream activities. These five are the focus of this chapter.
Using Test-Driven Development to Ensure Requirements Clarity
Test-Driven Development (TDD) is a practice in which you do not write a single line of code until you have written a test that fails in the absence of that code. Next, you write just enough code to pass the test, then write a new test that fails, and keep repeating the tight loop. Advocates of TDD document that the practice forces clear requirements, catches mistakes, enables refactoring, and removes stress.3
The strongest argument in favor of TDD is that it uses tests as technical product requirements. Because you must write a test before writing the code under test, you are forced to understand the requirements and wring out any ambiguity in order to define the test. This process, in turn, makes you think in small increments and in terms of reuse so that you do not write any unnecessary code. In other words, TDD imposes a clear and atomic design, which is easier to grow and maintain. To facilitate TDD, VSTS supports direct test creation and execution, with code coverage, inside the IDE (see Figure 6.2).
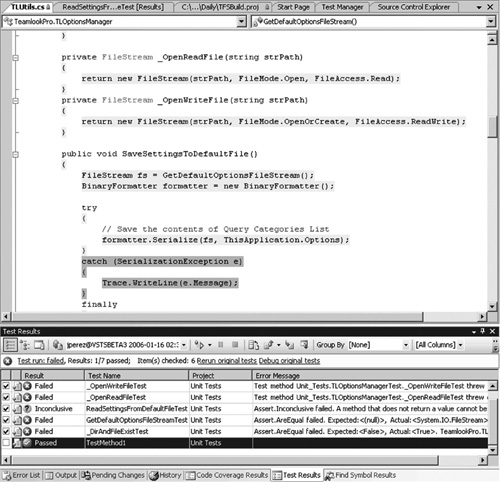
Figure 6.2 VSTS supports unit testing directly in the IDE. This is a view of test run results from the last run with the source code under test in the upper window. The dark shading (red on a color screen) indicates an uncovered exception handler.
The next argument is that TDD enables continual refactoring to keep the code lean (see Figure 6.3). If you have tests that cover 100% of the code and immediately report failing results when there are any side effects from refactoring, you have the safety net to refactor with confidence. Indeed, the experience of TDD is that you do much less debugging of your code because your unit tests pinpoint errors that you would otherwise isolate only by laboriously stepping through the execution with the debugger.

Figure 6.3 Refactoring is also supported directly, making VSTS a powerful IDE for TDD.
Addressing Programming Errors with Code Reviews, Automated and Manual
The most frequent prescription for catching programming errors is the code review. Code review approaches include informal walkthroughs, formal inspections, and pair programming, which is a continuous review as the code is being written. Success with manual code reviews varies according to the experience of the reviewer and the degree of safety created in the review environment.
Automated code analysis, often called static analysis, is a technique that has received less attention because it depends on sophisticated tools that can scan code for subtle errors, such as security risks. Microsoft developed code analysis tools for its own product teams (FXCop for managed code and PreFAST for unmanaged code) that are now included as part of VSTS. They cover coding practices in the areas of design, globalization, interoperability, maintainability, mobility, naming conventions, performance, portability, reliability, and security.
To encourage consistent practices across the team, VSTS enables you to set a check-in policy that ensures that code analysis has been run before every check-in (see Figure 6.4; more on check-in policies later).
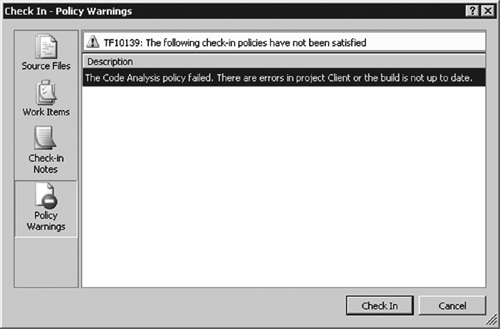
Figure 6.4 Check-in policies warn you when you have skipped steps before checking in your source code. In this example, static code analysis hasn’t been run before the attempted check-in.
Automated Code Analysis
VSTS enables automated code analysis as a set of options on the local build (F5) and presents the code analysis warnings and errors in the same window as the rest of the build output (see Figure 6.5).

Figure 6.5 The warnings from code analysis appear in the IDE in the same way as build warnings. You can click on each warning and jump to the source for viewing and editing.
Manual Code Reviews
To facilitate manual code reviews, VSTS lets you shelve your code changes and share them privately with your reviewers prior to check-in (see Figure 6.6; more on shelving later.) In return, reviewers can give you suggestions and comments on the code in a shelveset, and only when you’re ready do you check it in for the build.
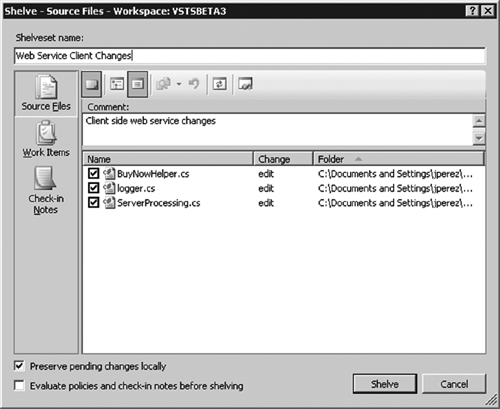
Figure 6.6 In the version control database, a shelveset is a temporary set of changes that may or may not be checked in later. One use of shelving is to make new source code available for a code review before check-in.
Providing Immediate Feedback with Unit Tests and Code Coverage
Unit testing is probably the single most important quality practice for a developer. As a practice, unit testing has been advocated for at least thirty years.4 However, in the last ten years, simple tools, such as NUnit and JUnit, have made the practice much more widespread, often as part of TDD as previously described.
Unit tests support programming, as shown in Figure 6.2. Their purpose is to check that your code does what you intend it to and does not do what you don’t want it to. Except in rare cases, they are not tests from a customer viewpoint, they do not validate scenarios, and they might not have a lot of meaning to users other than the owners of the code under test.
The concept of a unit test is straightforward: It is a test of the unit of functionality in which you write the program, such as a method in C# or a routine in VB. You can have multiple unit tests for each method, such as a positive test, checking that the method behaves as expected with valid input, and a negative test, validating that it does not behave as unexpected with invalid input.
As a developer, you should usually write your own unit tests. You know what you intend your code to do. You know how to validate it. Writing the unit tests ensures that you have thought this subject through, and it provides a necessary safety net for the future when you have to maintain the code.
Generally, whether you practice TDD or not, you should not check in code without having written and run unit tests that exercise all delivered functionality, including any parts of the software that are dependent on any of this functionality. Normally in VSTS, a check-in policy ensures that the newly delivered code passes unit testing prior to check-in.
Test First or Code First?
Everyone I have met who practices TDD finds it a liberating practice. (That’s not surprising; otherwise, they wouldn’t do it.) At the same time, there are accomplished developers who do quality work and achieve similar results by coding first and then writing unit tests. In either case, two principles hold:
1. Unit tests should be written in the same session as the code and checked in to source control at the same time in the same changeset as the code.
2. Unit tests should strive for maximum code coverage.
The result of these two principles is that you do not check in code that does not have unit tests that run and pass with it, and if someone else (or the build system) gets your code and runs your tests, they should pass. In that way, your unit tests become a safety net not just for yourself but also for the whole team.
VSTS makes both approaches easy (test first and code first) while supporting these principles. If you write tests first, you can right-click and refactor to generate the code under test, as shown in Figure 6.3. If you write the code first, you can right-click and generate tests for that code, as shown in Figure 6.7.

Figure 6.7 If you are writing code before tests or want to extend the tests for a particular area of the code (by method, class, or namespace), you can right-click and generate tests from the source.
Code Coverage
Regardless of whether you write the tests or the code first, when you run the tests, VSTS provides code coverage reporting with the test run results (see Figure 6.8). Code coverage choices are stored in the Test Run Configuration settings (more on the rest of these later). You need to choose which assemblies to instrument for coverage because not all might be relevant to the testing at hand.

Figure 6.8 When you create or edit a test run configuration, you choose the assemblies for which you want to collect code coverage. Only select those from the code under test.
At the completion of a test run, you can use the toolbar of the Test Results Viewer to show the coverage in the source that you just exercised. This lets you pinpoint any code that your tests failed to exercise—skipped code is painted red (see Figure 6.9). You can then right-click on this code to generate a new test for it, or you can extend an existing test to cover it.
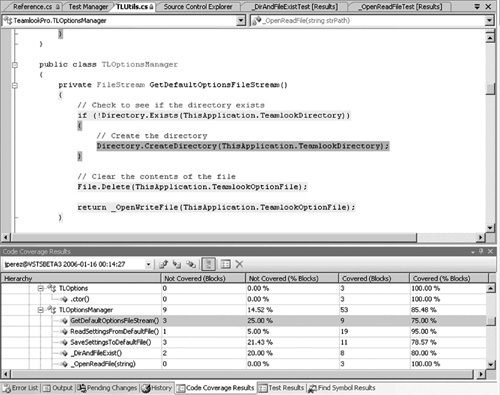
Figure 6.9 At the completion of a test run, you can see the source code under test painted to show code coverage. This lets you identify at a glance blocks of code that are not being tested. In this monochrome rendering, they are darker; in color, they appear red. You can then right-click in the uncovered code to create a new test to exercise this area.
Code coverage is an exquisite tool for showing you which blocks of code have not been exercised by your tests. Use code coverage to identify gaps where you need more unit tests. Do not let good code coverage make you too confident, however. Code coverage tells you neither that your tests are good nor that the customer-visible scenarios and QoS have been met.
How much code coverage is enough? The ideal is obviously 100%, but this is rarely obtainable. Frequently, there is some error-handling or integration code for which it is impractically expensive to write unit tests. In these cases, you need to perform careful code reviews and exercise the code in the debugger. In every case, when you check in code that does not have matching unit tests passing, you should make the choice consciously and document it in the check-in notes.
Making Unit Tests Better
When you’re thinking about unit tests, it’s key that you start with a good test list.5 Consider simultaneously the four variables: output, methods invoked, code path, and error conditions. Make sure that you have inputs that maximize the diversity of those variables. Include negative tests that broadly check for error conditions. You may want a buddy or a tester to help brainstorm possible error conditions that you haven’t thought of handling yet.6
Using Data
Usually when you write a unit test, you start it with a single set of values. One of the best ways to extend a test is to drive the test with broader data, which exercises more paths through the code, including more error conditions. Think about values that force different behavior and throw exceptions. VSTS lets you do this easily, as shown in Figure 6.10.
Figure 6.10 You can drive your unit tests with variable sets of data. Data sets can be maintained in OLEDB providers and specified as properties on the test.
Configurations
If your program needs to run in different configurations, you need to test against those configurations, too. There are usually at least two: one for development and one for production. If you distribute your software commercially, to support diverse datacenters or desktops you will need many more configurations. VSTS lets you manage these as test run configurations, which encapsulate the data needed to run the tests in the right environment (see Figure 6.11).
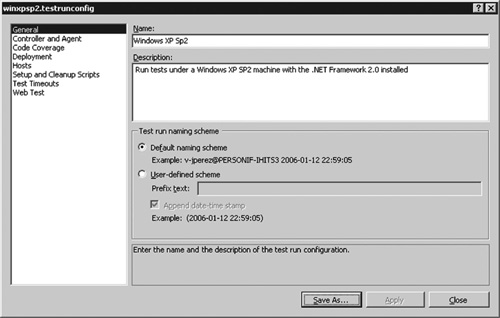
Figure 6.11 Test run configurations let you test multiple deployment configurations and track each test result against the intended deployment target.
Component Integration Tests
Depending on the software project, it might be appropriate to supplement unit tests with component integration tests. The purpose of these tests is to protect against unforeseen impacts on other parts of a system. In service-oriented architectures, for example, each service has many consumers. These consumers can provide component integration tests that act as compliance tests, ensuring that the published service continues to meet the consumers’ requirements and contracts. When available, these component integration tests should be run before check-in as well.
Build Verification Tests
Build verification tests (BVTs) are tests that run as part of the automated build. The purpose of BVTs is to look for unforeseen side effects and errors due to changes in the new code.
Any automated tests that do not require manual setup make good BVTs. This should include the vast majority of unit tests and component integration tests and the majority of scenario tests (see Chapter 7, “Testing”). To achieve this purpose, BVTs need to achieve very high code coverage. If they don’t, you have no idea how many unforeseen issues slipped by the net. To set up BVTs in VSTS, you must create a test list that identities which tests to use (see Figure 6.12) and then refer to the list on the Build Type Creation Wizard, as shown in Figure 6.13.
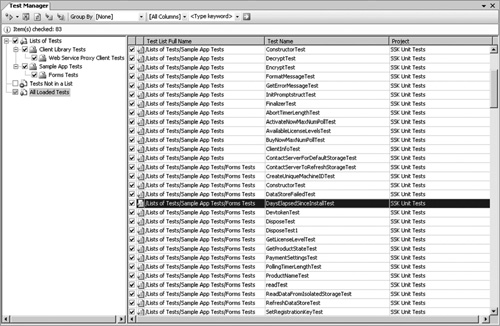
Figure 6.12 VSTS lets you organize your tests into test lists so that you can group them for execution. Typically, you add new tests to these lists as they become available.
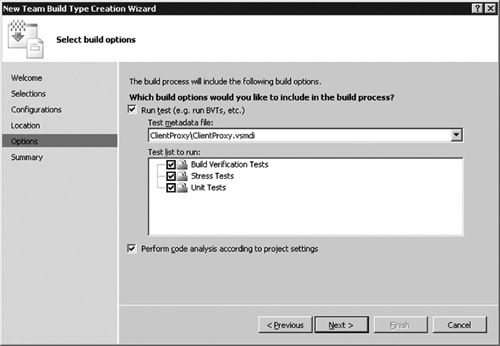
Figure 6.13 VSTS Team Build includes the designation of the test lists that you want to run as the build verification tests.
Tuning Performance
Unit testing and code analysis are techniques that you should apply before every check-in to make sure that your code does the right thing in the right way. Performance profiling is different. When you have performance problems, it is usually a small portion of your code that is culpable, so you should focus your tuning efforts there. Frequently, the problems appear under load tests (discussed in Chapter 7); sometimes, though, you can discover them through routine functional testing or exploratory walkthroughs.
To diagnose performance errors, you launch a profiling session and select from the current solution the code projects on which you want to collect data (see Figure 6.14).
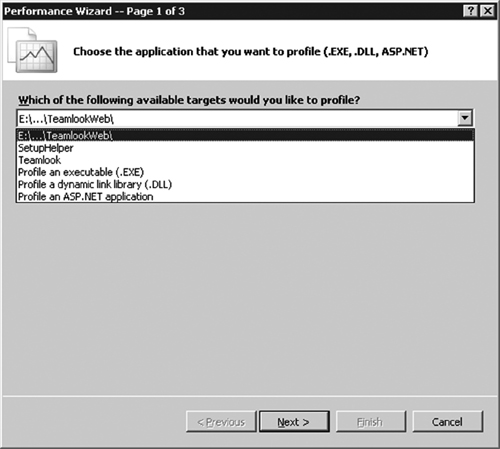
Figure 6.14 VSTS provides a wizard that instruments the code under test for profiling. When you choose the source project to profile, VSTS automatically chooses the instrumentation mechanism for you.
You need to choose between two profiling techniques. Sampling enables you to collect data without perceivable overhead indicating how often a method appears in the call stack, as shown in Figure 6.15. Typically, you start with sampling. Instrumented profiling, on the other hand, lets you walk traced call sequences with much more data, at the cost of some overhead and expanded binary size. Use instrumented profiling to drill into the hot spots that sampling reveals.
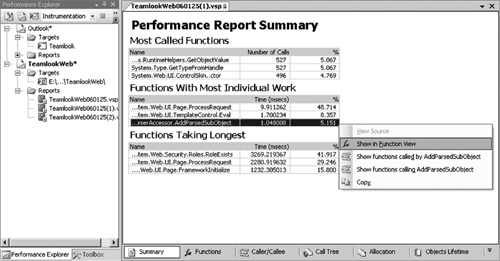
Figure 6.15 Profiling data appears in a pyramid of information, with the most important data on the summary page, as shown here. This might be all you need. From here you can either drill down into further detail or jump to the source of method shown.
After you have selected your target and the technique, you can either drive the application manually or run a test that exercises it. When you stop the profiling session, you’ll see a report that lets you drill down from a high-level summary into the details of the calls.
Preventing Version Skew
Source code control, also called version control or configuration management, has been recognized as a necessary practice for development teams for twenty years or more. It provides a database of record for all source code, an ability to reconstruct historical versions of source, and a place of record for the build system.
Checking In
VSTS has built-in version control that keeps the full history of changes to the team’s source base, all the related files open in your Visual Studio solution, and any others that you include. When you start to edit a file, it is automatically checked out for you, unless someone else has it locked. (By default, only one person can edit a file at a time, but you can enable multiple checkout from the Team menu.)
The primary explicit way that you interact with version control is by checking in files. When you check in, you are in effect saying that your files are ready to be used in the team build (see Figures 6.16, 6.17, and 6.18).
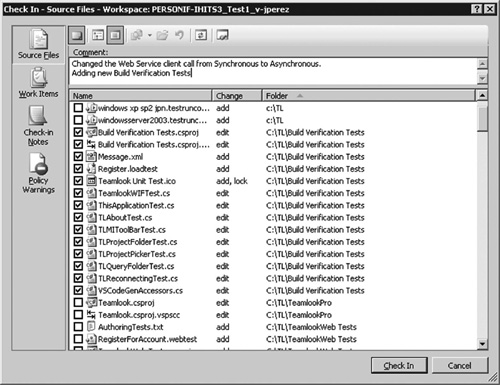
Figure 6.16 The Check In dialog shows you files that have been changed on the first pane so that you can select the ones to check in. Note the four tab icons on the left that let you flip among source files, work items, check-in notes, and policy warnings.
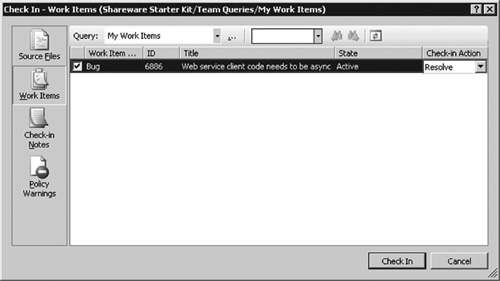
Figure 6.17 The second tab shows the work items that you want to associate with the check-in. If your check-in completes the delivery of the code for a task or other work item, you set the Check-In Action to Resolve. The resolution happens on the next successful team build. If you are making a partial delivery and keeping the work item active, then change the Check-in Action to Associate.
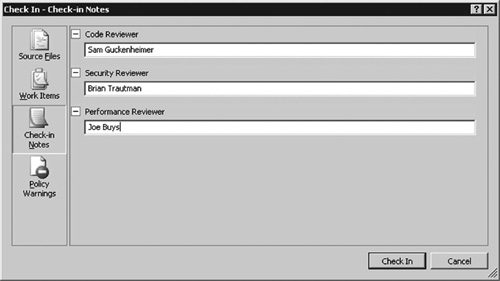
Figure 6.18 On the third pane, enter notes for this check-in. The fields used for the notes are determined by your setting for the team project on the Team Foundation server.
When you check in, VSTS prompts for three things: the list of files, the work items that you are resolving with this check-in, and the check-in notes that you are using to describe the changes. Together, these three items form a changeset, which ties together the data of a check-in. The changeset includes the newly added, modified, or deleted lines of code, the work item state changes associated with that code, and the check-in notes.
A major benefit of changesets in VSTS is that they allow the build system and the metrics warehouse to track fine-grained relationships of work items changes with source code and test changes. The build system can identify all the changesets that have been delivered to the build and thereby identify all the work item transitions and calculate the code churn. Reports—such as the Build Report in Figure 6.21 and the Quality Indicators shown in Figures 4.7, 9.12, 9.15, 9.18, and 9.20 through 9.22—rely on the changeset structure.
Check-In Policies
When you check in, VSTS also verifies that you have complied with the team’s check-in policies, as shown previously in Figure 6.4. Three standard check-in policies make sure that you have associated work items with your changes, have run unit tests, and have performed static code analysis. Your team may choose to write other policies and have these evaluated at check-in, too.
Shelving
Often you want to back up, store, or share your code without submitting it for the next build. Because changesets delivered by check-in automatically feed the build system, you need a different mechanism. In VSTS, you shelve your code in these cases, as shown previously in Figure 6.6. When you shelve your code, it is stored centrally, and others can view your changes (assuming you give them permission), but nothing is submitted for the next build. When you subsequently unshelve your code, there is no record of the shelveset and correspondingly no history to clean up in the source database.
Shelving is very useful for a number of cases. If you need to leave the office when your code isn’t ready for the build, you can back it up. If you need to share your code with someone else prior to check-in, for example for a code review or buddy test, you can shelve your code and let someone review it from the shelveset. When you want to experiment with two solutions to a problem, you can try one, shelve it, try the second, and switch between the shelvesets for local testing.
Branching
If you’ve used other source control systems, you’re probably familiar with the concept of branching. Having branches lets you keep parallel versions of files that evolve separately. Probably the most frequent use of branches is to track multiple released versions of a solution. When releasing version 1, you can branch to start work on version 2. If you subsequently need to fix bugs or issue a service release (perhaps for new environments) for version 1, you can do so in its branch without having to pull in any version 2 code.
Use branches sparingly. Whenever you branch, you may be creating a future need to merge. The bugs you fix for version 1 probably need to be fixed in version 2 as well. If you have multiple branches, then you will have multiple merges to consider.
What to Version
Versioning is not just for source code. You should version all files associated with compiling, configuring, deploying, testing, and running your system (see Figure 6.19). By default, the tests and most of the configuration files are part of your Visual Studio solution and appear as files to check in when you look at the Check In dialog.
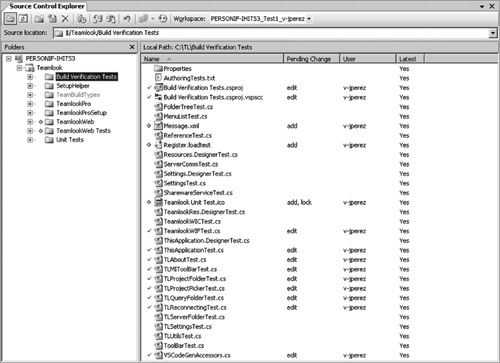
Figure 6.19 “Source control” actually tracks all the files in your workspace, including tests, XML files, icons, and so on. Check in your tests with your source.
If you expect to maintain your solution for a long time, it is worth creating a “tools” team project in which you keep the versions of the compiler and support programs (for example, msbuild and mstest) that you use to recreate and retest the solution. For example, commercial software companies may have contracts to support products for ten years, and in many government situations, contracts are longer. It won’t take ten years for newer projects to retool, so having a record copy of the build and test environment is valuable.
Automating the Build
Version control is incomplete without an automated build system. The build system needs to automate not only compilation but also the tracking and testing of the binaries against the source versions. The build needs to provide as many quality checks as possible so that any errors can be corrected before investment of further testing. This approach ensures that testing time (especially human time) is used appropriately.
In VSTS, you can configure an automated build from the Team Explorer (see Figure 6.20). You can have different named build types, such as a daily build, a continuous integration build, and a branch build, each running separate scripts and tests.
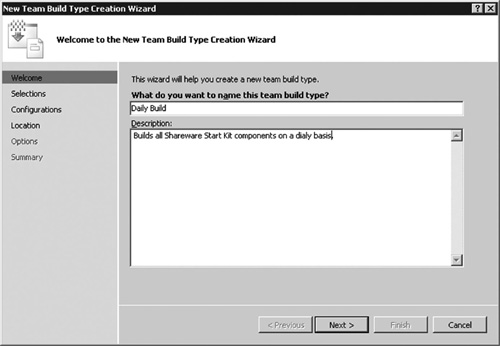
Figure 6.20 VSTS gives you a wizard to create a “team builds,” that is, the daily build and other regular builds that you automate for the full solution.
Daily Build
The heartbeat of your project is the daily build. At a minimum, you should have a build configuration for daily builds that not only creates the binaries that you install but also runs all the code analysis and BVTs and generates the metrics that track the health of your project.
Build Report
On completion of the daily build, you get a build report (see Figure 6.21). This shows you the results of build completion, code analysis, and BVT runs. In the case of a failed build, it gives you a link to the work item that was created to notify the appropriate team member to fix and restart the build.
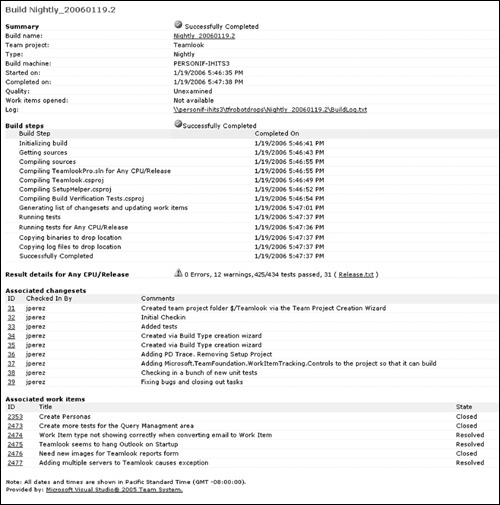
Figure 6.21 The Build Report both monitors the real-time execution of a build and aggregates the details of a build on completion.
Use the Build Report, as shown in Figure 6.21, to monitor the execution of a build and view the details of a completed build and the work item changes documenting what went into the build. Opening the test result details shows you the BVT results and the code coverage from BVTs. Build warnings include the static code analysis results. In the case of a build failure, a work item will have been automatically created to track the failure, and it is shown here, too. From this report you can publish the build quality status.
Note that you can navigate to the changesets that are included, the code analysis warnings, and the test results directly from the build report. The data shown on the build report is fed directly to the metrics warehouse to create historical data for the project.
Build Verification Tests (BVTs)
Every build should go through a consistent series of BVTs, and on many projects, these are the primary regression tests performed. The objectives of the BVTs are to
1. Isolate any errors introduced by check-ins or the build process, including unanticipated integration errors.
2. Determine whether the software is ready for further testing.
BVTs should include all unit tests and component integration tests that are run prior to check-in, plus any other tests that are needed to ensure that it is worth spending time testing the software further. BVTs are automated.
Typically, a tester or designated developer “scouts” a build for the team—that is, he or she installs the software and runs a further series of tests beyond the BVTs, often manually. For example, scenario tests may require using a new GUI that is still rapidly evolving, and automation may not be cost effective yet. For this reason, there is a Build Quality field on the report that can be manually set. Its initial value on build completion is Unexamined. You can set it after that to Rejected, Under Investigation, Ready for Initial Test, Lab Test Passed, Initial Test Passed, UAT Passed, Ready for Deployment, Released, or other values that you have customized.
Continuous Integration
Continuous integration refers to the practice of triggering a build after every check-in.7 It has been proven very successful in eXtreme Programming and other agile practices in that it delivers immediate feedback on integration errors to a developer who has just checked in. With VSTS, you can set up a build type for continuous integration and trigger the build from check-in events (see Figure 6.22). When you do this, use a separate build type from the daily build so that you still have daily metrics from the daily build.
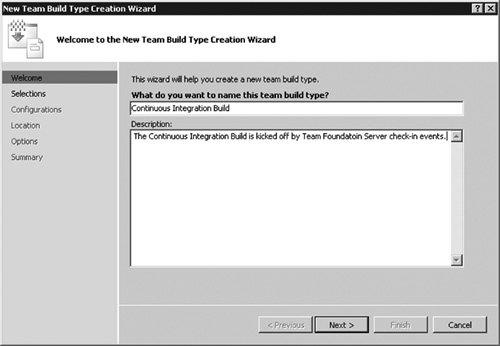
Figure 6.22 Create a separate build type to perform continuous integration. Keeping the daily build as a separate build type will keep metrics tracked to the daily build.
Making Work Transparent
VSTS applies the same transparency to the developer activities that it does to the work item backlog and the rest of the team activities. It treats all team members as part of one integrated workflow. Because all work items of all types are stored in the common database, when you check in you can (and should) identify the tasks and the requirements (for example, scenarios or QoS) that the delivered code and tests implement. This creates a link from those work items that traces their resolution to the corresponding changesets.
This traceability in turn drives reports such as Remaining Work and Velocity, discussed in Chapter 4. When it is time to estimate the next iteration, you have a daily record available of the current and prior iterations’ history. These metrics are collected for you, and they take the guesswork (and grunt work) out of determining the actual baseline trends.
Similarly, this traceability drives the build report so that the whole team (notably testers) can automatically see what work is available in which build with what quality. There’s no mystery of “Did feature X make it in?” or “Did it pass BVTs?” The build report provides a reliable, friction-free view to trigger the testing cycle based on accepted builds.
Summary
A value-up approach development is all about delivering working code of customer-ready quality. In this chapter, I described the major impediments to that delivery and how VSTS addresses them.
The first issue is dealing with requirements that may be inadequate or hard to understand. VSTS supports Test-Driven Development as a practice to force clarification of requirements before you begin implementation. The testing support directly inside VSTS makes it easy to create and run unit tests and to promote these for reuse with every build.
Second is the consideration of qualities of service and the check for programming errors that might not be caught in unit testing. VSTS supports automated code reviews with its static code analysis. Workflow for manual reviews is supported through shelving, a feature of VSTS version control.
Third is the issue of direct feedback from tests and the need to see code execution and performance as a part of testing. VSTS lets you extend unit testing with test data and configurations and supports direct performance profiling from the test runs.
Fourth is the complexity of version control and the tracking of as-built software to the source code. VSTS integrates version control and build automation and provides an audit trail of source and work item changes going into every build. Check-in policies work as reminders to support hygienic practices for the team.
The last issue is the difficulty of keeping track of all the information sources. VSTS supports transparency of the process with its common work item database and metrics warehouse and with the integration of code and test changes with work items and the build system. In this way, VSTS lets you as a developer focus on the substance of the work, not the ceremony.
The next chapter looks at the extended testing process and its contribution to value-up development.
Endnotes
1. http://www.agilemanifesto.org/
2. Barry W. Boehm, Software Engineering Economics (Englewood Cliffs, NJ: Prentice Hall, 1981).
3. For example, K. Beck and E. Gamma, “Test infected: Programmers love writing tests,” Java Report, 3(7):51–56, 1998.
4. Glenford J. Myers, The Art of Software Testing (New York: John Wiley & Sons, 1979).
5. For example, http://www.testing.com/writings/short-catalog.pdf.
6. Brian Marick, “Faults of Omission,” first published in Software Testing and Quality Engineering Magazine, January 2000, available from http://www.testing.com/writings/omissions.html.
7. For example, http://www.martinfowler.com/articles/continuousIntegration.html.