
1. The Solaris Network Environment
Objectives
The following test objectives for Exam CX-310-202 are covered in this chapter:
Control and monitor network interfaces including MAC addresses, IP addresses, network packets, and configure the IPv4 interfaces at boot time.
• This chapter describes the files that are used to configure IPv4 network interfaces, how to start and stop these network interfaces, and how to test whether the interfaces are working correctly. It also discusses two methods of changing the system hostname: editing a number of system files and using the sys-unconfig command.
Explain the client/server model; enable/disable server processes.
• The network services are started and managed by the Service Management Facility (SMF). This chapter describes how to manage network services as well as adding new ones to be managed by SMF. It also describes how the client/server model functions in the Solaris 10 environment.
Outline
Controlling and Monitoring an IPv4 Network Interface
Configuring an IPv4 Network Interface
The /lib/svc/method/net-physical File
The /etc/hostname.<interface> File
Suggested Reading and Resources
Study Strategies
The following study strategies will help you prepare for the test:
• As you study this chapter, it’s important that you practice using each command that is presented on a Solaris system. Practice is very important on these topics, and you should practice until you can repeat the procedure from memory.
• You should understand each command in this chapter and be prepared to match the command to the correct description.
• You should know all the terms listed in the “Key Terms” section near the end of this chapter. You should pay special attention to the section on network services, which has changed with the introduction of Solaris 10, and know how to convert services to use the Service Management Facility (SMF). You should be prepared to match each term presented in this chapter with the correct definition.
Introduction
This chapter covers the basics of the Solaris network environment. It does not go into too much detail because Sun provides a separate certification track for Solaris network administrators, but it does provide you with the fundamental information you need to get started managing a Solaris system in a networked environment. The topics discussed here include an overview of the client/server model, information on setting up IPv4 network interfaces, managing network services, and configuring the services that are started automatically at boot time.
Client/Server Model
Objective
• Explain the client/server model.
The client/server model describes the communication process between computers or programs. When the client makes a service request to the server, the server fulfils that request. Although a system can be both a server and a client, the model is more widely used across a network.
Typical examples of client/server relationships are with DNS and NFS. Both of these topics are described later in this book.
A client is a host or process that uses services from another host or program. A client can also provide services to other client applications.
A server can provide and manage many different services for the client. It is a host or process that provides services to a client. For example, it may provide disk space, windowing, or web services to a client. The later section “RPC Services” describes specifically how the server responds to a client’s request for services.
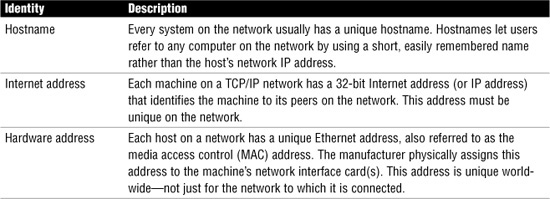
Hosts
If you are an experienced UNIX/Solaris user, you are no doubt familiar with the term host, which is often used as a synonym for computer or machine. A server and client are both hosts on the network, and each has a hostname. From a TCP/IP perspective, only two types of entities exist on a network: routers and hosts. When a host initiates communication, it is called a sending host, or sender. For example, a host initiates communications when the user uses ping or sends an email message to another user. The host that is the target of the communication is called the receiving host, or recipient.
Each host has an Internet address and a hardware address that identify it to its peers on the network, and usually a hostname. These are described in Table 1.1.
Table 1.1 Host Information
IPv4 Addressing
In IPv4, each host on a TCP/IP network has a 32-bit network address—called the IP address—that must be unique for each host on the network. If the host will participate on the Internet, this address must also be unique to the Internet. For this reason, IP addresses are assigned by special organizations known as regional Internet registries (RIRs). The IPv4 address space is the responsibility of Internet Corporation for Assigned Names and Numbers (ICANN, www.icann.org). The overall responsibility for IP addresses, including the responsibility for allocation of IP ranges, belongs to the Internet Assigned Numbers Authority (IANA, www.iana.org).
An IPv4 address is a sequence of 4 bytes and is written in the form of four decimal integers separated by periods (for example, 10.11.12.13). Each integer is 8 bits long and ranges from 0 to 255. An IPv4 address consists of two parts: a network ID, which is assigned by an RIR, and a host ID, which is assigned by the local administrator. The first integer of the address (10.0.0.0) determines the address type and is referred to as its class. Five classes of IPv4 addresses exist: A, B, C, D, and E.
NOTE
IPv6 Due to limited address space and other considerations of the IPv4 scheme, a revised IP protocol is gradually being made available. The protocol, named IPv6, has been designed to overcome the major limitations of the current approach. IPv6 is compatible with IPv4, but IPv6 makes it possible to assign many more unique Internet addresses and offers support for improved security and performance.
Planning for IPv4 Addressing
The first step in planning for IPv4 addressing on a network is to determine how many IP addresses you need and whether the network will be connected to the Internet. If the network won’t be connected to the Internet, you could choose addresses in the 10.x.x.x, or 172.16.x.x to 172.31.x.x, or 192.168.x.x range. For networks that will be connected to the Internet—and hence visible to the rest of the world—you need to obtain legal IP addresses. This is necessary because each host on a network must have a unique IP address.
NOTE
Be careful with IP addresses You should not arbitrarily assign network numbers to a network, even if you do not plan to attach your network to other existing TCP/IP networks. As your network grows, you might decide to connect it to other networks. Changing IP addresses at that time can be a great deal of work and can cause downtime. Instead, you might want to use the specially reserved IPv4 networks 192.168.x.x, or 172.16.x.x to 172.31.x.x, or 10.x.x.x for networks that are not connected to the Internet.
Network Interfaces
A Sun system normally contains at least one network interface, to allow it to participate in a network environment. When you add a network interface to a system, a number of files need to be configured in order to create the connection between the hardware and the software address assigned to the interface. The following sections describe how to monitor, control, and configure an IPv4 network interface.
Controlling and Monitoring an IPv4 Network Interface
Objective
• Control and monitor network interfaces including MAC addresses, IP addresses, network packets, and configure the IPv4 interfaces at boot time.
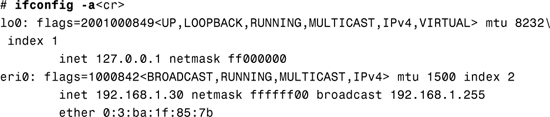
As root, you can use the ifconfig -a command to display both the system’s IP and MAC addresses, as in this example:
# ifconfig -a<cr>
lo0: flags=1000849<UP,LOOPBACK,RUNNING,MULTICAST,IPv4,VIRTUAL> mtu 8232 index 1
inet 127.0.0.1 netmask ff000000
eri0: flags=1000843<UP,BROADCAST,RUNNING,MULTICAST,IPv4> mtu 1500 index 2
inet 192.168.1.106 netmask ffffff00 broadcast 192.168.1.255
ether 0:3:ba:1f:85:7b
You can also retrieve the MAC address from a system by using the banner command at the OpenBoot prompt:

NOTE
Displaying a MAC address If you enter the /sbin/ifconfig -a command as a nonprivileged user, the MAC address is not displayed. To display the MAC address, the root user must enter the ifconfig -a command.
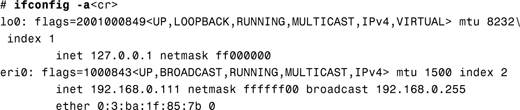
You can mark an Ethernet interface as up or down by using the ifconfig command. Marking an interface as up allows it to communicate with other systems on the network. For example, to mark the eri0 interface as down, you use the following command:
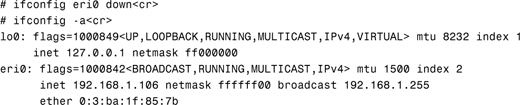
Notice that the up flag is no longer present for the eri0 interface and also that the value of flags has changed to 1000842.
To mark the interface as up, you use the following command:
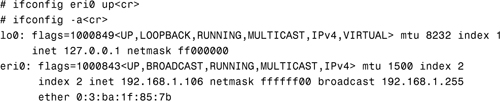
To determine whether another system can be contacted over the network, you use the ping command:
# ping sunfire1<cr>
If host sunfire1 is up, this message is displayed:
sunfire1 is alive
NOTE
Names to addresses The sunfire1 is alive command assumes that the host sunfire1 can be resolved either through an entry in the /etc/hosts file or by using DNS. If you do not know the hostname, you can use the ping command with the IP address instead of the hostname.
The message indicates that sunfire1 responded to the request and can be contacted. However, if sunfire1 is down or cannot receive the request (perhaps the network interface has been configured as down), you receive the following response:
no answer from sunfire1
In order for a ping request to be successful, the following conditions must be met:
• The interface must be plumbed. This is automatically carried out at boot time by the script /lib/svc/method/net-physical, as discussed in the section “Configuring an IPv4 Network Interface,” later in this chapter.
• The interface must be configured. An address must be assigned to a network interface; this is carried out initially when you install the Solaris operating environment. Configuring the interface is discussed in the section “Configuring an IPv4 Network Interface.”
• The interface must be up. The network interface can communicate only when it is marked as up. This is done via the ifconfig command.
• The interface must be physically connected. The network interface must be connected to the network, using the appropriate cable.
• The interface must have valid routes configured. The routing provides the directions to the destination computer when each computer exists on a different network. This is an advanced networking topic that is not covered on the exam, but it is included here for completeness. A separate Solaris certification exam, “Solaris Network Administrator,” deals with routing in detail.
You can also use the /usr/sbin/snoop command to capture and inspect network packets to observe network communication between systems. For example, to view data transmissions between systemA and system, use the following command:
# snoop systemA system<cr>
The system responds with one line of output for each packet on the network:
192.168.1.27 -> sunfire1 TELNET C port=64311
sunfire1 -> 192.168.1.27 TELNET R port=64311 Using device /dev/eri
The snoop command can be run only by the root user. snoop continues to display information until you press Ctrl+C to stop it. Table 1.2 lists some of the more common options used with the snoop command.
EXAM ALERT
Although snoop is more of a networking topic, you should be familiar with its options, because you will see questions on the exam related to the functionality of these options.
Table 1.2 snoop Options

Expressions can also be supplied to the snoop command to filter the information. The following example uses the snoop command to enable audible clicks and to display only DHCP traffic:
# snoop -a dhcp<cr>
The system displays the following:
Using device /dev/eri (promiscuous mode)
192.168.1.250 -> BROADCAST DHCP/BOOTP DHCPDISCOVER
192.168.1.250 -> BROADCAST DHCP/BOOTP DHCPDISCOVER
192.168.1.250 -> BROADCAST DHCP/BOOTP DHCPOFFER
Configuring an IPv4 Network Interface
When you install the Solaris operating environment, you configure a network interface as part of the installation program. You can configure additional interfaces at system boot time, or you can modify the original interface by having an understanding of only three files:
• /lib/svc/method/net-physical
• /etc/hostname.<interface>
• /etc/inet/hosts
Each of these is discussed in the following sections.
The /lib/svc/method/net-physical File
The svc:/network/physical:default service calls the /lib/svc/method/net-physical method script. It is one of the startup scripts that runs each time you boot the system. The /lib/svc/method/net-physical method script uses the ifconfig utility to configure each network interface that has an IP address assigned to it by searching for files named hostname.<interface> in the /etc directory. An example of such a file is /etc/hostname.eri0, which refers to the configuration file for the first eri network interface. (Interface numbering starts with 0, not 1. Hence, eri1 would be the second eri interface on the system.)
For each hostname.<interface> file, the script runs the ifconfig command with the plumb option. This enables the kernel to communicate with the named network interface and sets up the streams needed by IP to use the device.
NOTE
A new startup script The file /lib/svc/method/net-physical is new in the Solaris 10 operating environment. If you’re familiar with releases prior to Solaris 10, you’ll recognize that this script performs the same functions as the file /etc/rcS.d/S30network.sh in previous releases, but it is now part of the Service Management Facility (SMF).
The /etc/hostname.<interface> File
The /etc/hostname.<interface> file defines the network interfaces on the local host. At least one /etc/hostname.<interface> file should exist on the local machine. The Solaris installation program creates this file for you. In the filename, <interface> is replaced by the device name of the primary network interface.
This file contains only one entry: the hostname or IP address associated with the network interface. For example, suppose eri0 is the primary network interface for a machine called system1. The file would be called /etc/hostname.eri0, and the file would contain the entry system1.
The /etc/inet/hosts File
The hosts database contains details of the machines on your network. This file contains the hostnames and IP addresses of the primary network interface and any other network addresses the machine must know about. You can use the /etc/inet/hosts file with other hosts databases, such as DNS, LDAP, NIS, and NIS+. When a user enters a command such as ping xena, the system needs to know how to get to the host named xena. The /etc/inet/hosts file provides a cross-reference to look up and find xena’s network IP address. For compatibility with Berkeley Software Distribution (BSD)-based UNIX operating systems, the file /etc/hosts is a symbolic link to /etc/inet/hosts.
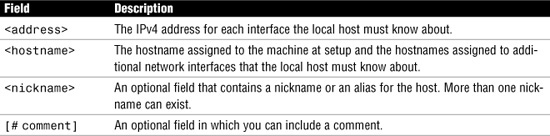
Each line in the /etc/inet/hosts file uses the following format:
<address> <hostname> <nickname> [#comment]
Each field in this syntax is described in Table 1.3.
Table 1.3 The /etc/inet/hosts File Format
When you run the Solaris installation program on a system, it sets up the initial /etc/inet/hosts file. This file contains the minimum entries that the local host requires: its loopback address, its IP address, and its hostname.
For example, the Solaris installation program might create the following entries in the /etc/inet/hosts file for a system called xena:
In the /etc/inet/hosts file for the machine xena, the IP address 127.0.0.1 is the loopback address, the reserved network interface used by the local machine to allow interprocess communication so that it sends packets to itself. The operating system, through the ifconfig command, uses the loopback address for configuration and testing. Every machine on a TCP/IP network must have an entry for the localhost and must use the IP address 127.0.0.1.
The following Step By Step demonstrates how to configure a network interface from the command line. In this exercise, we’ll configure the primary network interface (eri0) to achieve connectivity with other systems on the network. The hostname is set to Achilles, with an IP address of 192.168.0.111 and a network mask of 255.255.255.0, and the interface is made operational as well.
STEP BY STEP
1.1 Configuring an IPv4 Network Interface
1. Take the network interface down using the ifconfig command:
# ifconfig eri0 down<cr>
Display the current network interface configuration using the ifconfig command and make sure the interface is down:
2. Edit the files /etc/inet/hosts and add the following entry:
192.168.0.111 achilles
3. Edit the file /etc/hostname.eri0 to contain the following entry:
achilles
4. Edit the file /etc/inet/netmasks and add the following entry:
192.168.0.0 255.255.255.0
5. The preconfiguration of the interface is now complete. We can now use the ifconfig command to initialize the interface and make it operational:
# ifconfig eri0 achilles netmask + broadcast + up<cr>
6. Verify that the interface is now operational and correctly configured using the ifconfig -a command:
EXAM ALERT
Use the plus (+) Using the + option to the ifconfig command causes a lookup in the /etc/inet/netmasks file to determine the correct values, based on the network mask value that has been inserted for the relevant network. You must make sure the /etc/inet/netmasks file is accurate for this to work correctly. You can always specify the full values to the ifconfig command, but it requires that the broadcast address is calculated manually, which can be difficult when subnetworks are used.
Changing the System Hostname
The system hostname can be changed temporarily or permanently. Use the hostname command with an argument to temporarily change the hostname. For example, the following command changes the system hostname to zeus:
# hostname zeus<cr>
Verify the hostname by typing the hostname command with no argument:
# hostname<cr>
The system responds with the current hostname:
zeus
When the system is rebooted, the system changes back to its original hostname.
There are two methods available for permanently changing the system hostname: The first is to edit the necessary files manually and reboot the system, as described here.
Beginning with Solaris 10 08/07, the system’s hostname is contained within three files on a Solaris system. It is necessary to modify all these files in order to successfully change the hostname of a system manually. These files need to be changed:
• /etc/nodename: This file contains the local source for a system name. In other words, it contains the system’s hostname. The only information contained within this file is the name of the system (for example, sunfire1). This is the location where the system hostname is set. You can change the hostname by running the command uname -S and supplying a new hostname, but if you do so, the change does not persist across reboots. The command uname -n, which prints the system’s node name, looks in this file for the information.
• /etc/hostname.<interface>: This file defines the network interfaces on the local host and is discussed earlier in this chapter, in the section “The /etc/hostname.<interface> File.”
• /etc/inet/hosts: The hosts file contains details of the machines on your network and is discussed earlier in this chapter, in the section “The /etc/inet/hosts File.”
Having changed the contents of the files just listed, the system needs to be rebooted to implement the new hostname.
Before Solaris 10 08/07, you also needed to modify the /etc/inet/ipnodes file when changing the system hostname. This file contained details of the machines on your network and included both IPv4 and IPv6 addresses. Since Solaris 10 08/07, it is not necessary to maintain IPv4 entries in both the /etc/inet/hosts and /etc/inet/ipnodes files. For backward compatibility, the /etc/inet/ipnodes file is replaced with a symbolic link of the same name to /etc/inet/hosts.
The second method for changing the hostname is to use the sys-unconfig command. The result of running this command is the removal of the system identification details, similar to when you initiate a Solaris 10 installation.
When the command completes, the system automatically shuts down. To complete the process, boot the system. You are presented with a number of configuration questions, such as hostname, IP address, subnet mask, default router, time zone, naming service configuration, and the root password—all very similar to when you perform an initial installation of the Solaris 10 Operating Environment.
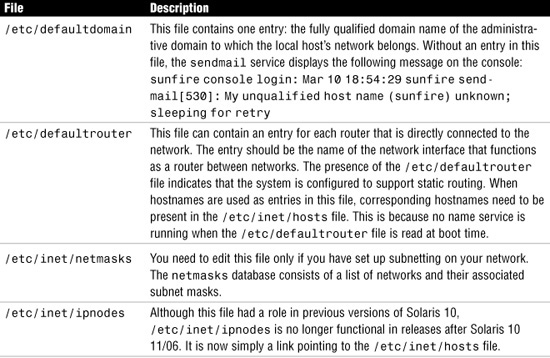
Table 1.4 lists other network-related files that are worth noting but that are not required for configuring the network interface.
Table 1.4 Miscellaneous Network Configuration Files
Network Services
Objective
• Enable/disable server processes.
In previous releases of Solaris, the inetd network daemon was responsible for running network services on demand and was configured by editing the file, /etc/inetd.conf. As of Solaris 10, this has all changed. The services that were previously configured using this file are now configured and managed by the Service Management Facility (SMF). This topic is described fully in Chapter 3 of the Solaris 10 System Administration Exam Prep, Part I book. A new command, inetadm, is used to carry out the management of these network services.
The default /etc/inetd.conf file now contains only a few entries, unlike in previous versions of Solaris where all the network services were listed. The /etc/inetd.conf file may still be used as a mechanism for adding new (third-party additional software) services, but in order to make use of these services, they must be converted to run under SMF. This is carried out using the inetconv command. When you run this command with no options, it automatically reads the /etc/inetd.conf file and converts any entries to services that can run under SMF. The inetd daemon can no longer be run manually from the command line, nor can it be instructed to re-read its configuration file, as in previous releases of Solaris. Changes or modifications to the configuration of network services are done using the inetadm or svccfg commands.
NOTE
The /etc/inetd.conf file You might need to make an entry in the /etc/inetd.conf file. For example, you might have a service that you want to have automatically started by the inetd daemon. Make the entry in /etc/inetd.conf, but make sure that you refresh the inetd daemon after making changes to its configuration file. The following command instructs inetd to reread its configuration data:
svcadm refresh inetd<cr>
If you attempt to run inetd manually, outside of SMF, you receive an error message.
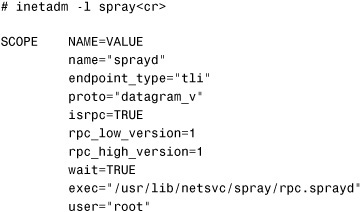
To see the network services being managed by SMF, enter the inetadm command with no options:
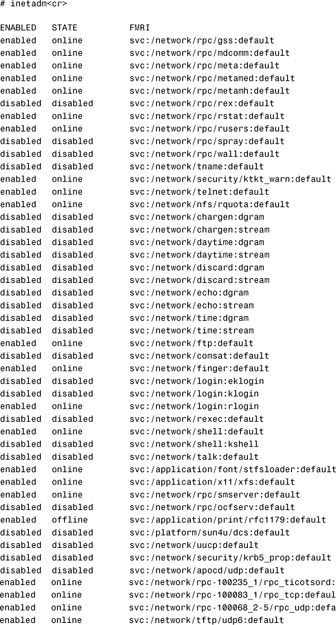
The preceding code shows, for example, that the spray service is in the disabled state. To enable this service, use the inetadm command with the -e option:
# inetadm -e spray<cr>
Now you can see that the service has been enabled and is available for use:
# inetadm | grep spray<cr>
enabled online svc:/network/rpc/spray:default
To disable the spray service, use the inetadm command with the -d option:
# inetadm -d spray<cr>
Check again to verify that the service is now disabled:
# inetadm | grep spray<cr>
disabled disabled svc:/network/rpc/spray:default
NOTE
Other commands work too You are not limited to the inetadm command to view and control legacy network services. The svcs -a command can also be used to view the status, and the svcadm command can control legacy network services as well.
You can also use the svcadm command to disable network services. For example, you could disable spray by typing svcadm disable svc:/network/rpc/spray:default.
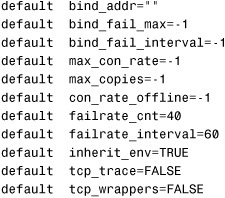
You can also list the properties and values of a selected network service using the -l option to the inetadm command. The following code lists the properties of the spray service:
Each network service uses a port that represents an address space and is reserved for that service. Systems communicate with each other through these ports. Well-known ports are listed in the /etc/services file, which is a symbolic link to /etc/inet/services. The following are a few entries from the /etc/services file:
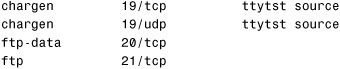
From these entries, you can see that the chargen service uses port 19 and uses both TCP and UDP protocols. It also has aliases assigned.
Each network service uses a well-known port number that is used by all the hosts on the network. Keeping track of these ports can be difficult, especially on a network that supports several network services.
RPC Services
EXAM ALERT
You’ll see several questions related to RPC services on the exam. Make sure that you understand the two types of RPC services and how the client interacts with the server when requesting RPC services. This section summarizes the information you need to know for the exam.
Solaris utilizes a client/server model known as remote procedure calls (RPC). With an RPC service, a client connects to a special server process, rpcbind, which is a “well-known service.” When you boot the Solaris 10 OS, the /lib/svc/method/rpc-bind startup script initializes the rpcbind service. The port number used by the rpcbind daemon is listed in the /etc/inet/services file. After the system starts up, the rpcbind daemon starts listening at port 111.
RPC services are services developed using a set of utilities developed by Sun Microsystems, Inc. The developer assigns them a unique program number when they are written; typically they are not assigned to well-known ports. There are two types of RPC services:
• Services that start by default at system boot time (such as mountd)
• Services that do not start automatically at boot and must start on demand (such as sprayd)
RPC services that are started at bootup are started via their individual startup scripts. An example of an RPC service is the mountd daemon, which is started automatically by the svc:/network/nfs/server service. RPC services are started on available ports above 32768.
Some RPC services are started on demand. When a client requests a service, the rpcbind process returns the port number of the requested service to the client. The client then generates a new request using the port number it just received for the requested service. Here’s how the process takes place:
1. The rpcbind daemon is started via its startup script. The sprayd service is listed in the /etc/rpc file. It registers its current port assignment and program number with the rpcbind process during boot.
2. A user on a remote system, sysA (the client), issues a spray command to sysB (the server). The spray request is initially addressed to port 111 and contains the program number of the sprayd service. When a remote system (client) makes an RPC call to a given program number on a server, it must first contact the rpcbind service on the server to obtain the port address. The client must do this before it can send the RPC requests.
3. The rpcbind daemon on sysB reads the program number and determines that the request is for the sprayd service. The rpcbind daemon returns the current port number of the sprayd service to sysA.
4. sysA sends a second request to the port number of the sprayd service on sysB. The inetd daemon receives the request.
5. This rpc.sprayd daemon takes over the spray session’s communication.
rpcbind registers port numbers associated with each RPC service listed in the /etc/rpc file. The rpcbind process receives all RPC-based client application connection requests and sends the client the appropriate server port number. For example, mountd is listed in the /etc/rpc file as follows:
mountd 100005 mount showmount
The mountd daemon has a program number of 100005 and is also known as mount and showmount.
You use the rpcinfo utility with the -p option to list registered RPC programs running on a system. For example, you can check on processes on another system like this:
# rpcinfo -p 192.168.1.21<cr>
The system responds with a list of all the registered RPC services found running on that system:
The output displays the program number, version, protocol, port, and service name. One of them in this example is the mountd service.
You can also use rpcinfo to unregister an RPC program. When you use rpcinfo with the -d option, you can delete registration for a service. For example, if sprayd is running on the local system, you can unregister and disable it:
# rpcinfo -d sprayd 1<cr>
The sprayd service would be unregistered from RPC. You could restart the sprayd service by issuing a restart command using the svcadm command:
# svcadm restart spray<cr>
This causes the spray service to restart and automatically re-register the RPC program associated with the spray service.
Network Maintenance
Solaris provides several network commands that you can use to check and troubleshoot a network:
• ping: ping stands for packet Internet groper. As described earlier in this chapter, the ping command sends an ICMP packet to another host to test its network status. The remote system sends an ICMP packet back to the originating host if the ping command succeeds. If no packet is received from the remote system, it is deemed to be down, and a message is returned to the calling host. The options to the command allow continuous packets or a specified number of packets to be sent as well as different sizes of packets.
• snoop: As described earlier in this chapter, the snoop command captures and inspects network packets. Captured packets can be displayed as they are received or saved into a file to be analyzed later. snoop can produce large amounts of information, with each entry being displayed in single-line summary form or multiline verbose form.
EXAM ALERT
You’ll see more than one question on the exam about using the snoop command to troubleshoot network connectivity problems.
• netstat: The netstat command displays network status information. You can see the status of the network interface, monitor how many packets are passing through the interface, and monitor how many errors are occurring. This command is used extensively in identifying overloaded networks where the packet collision rate would be much higher than expected.
Each of the commands listed here are demonstrated in Step By Step 1.2.
STEP BY STEP
1.2 Verifying That a Network Is Operational
1. Check the network connection to another system by typing the following:
# ping <options> <ip-address><cr>
For example, to check the network between systemA and systemB, type ping systemB from systemA. If the check is successful, the remote system replies with this:
systemB is alive
If the network is not active, you get this message:
no answer from systemB
If you get this negative response, check your cable and make sure that both the local system and the remote system are configured properly.
It could also be that the network interface is not marked as up. The ifconfig command can be used as described earlier to check the status of the network interface.
2. Use the snoop utility to determine what information is flowing between systems. The snoop utility can show what actually happens when one system sends a ping to another system. The following example shows network traffic being monitored between two hosts, namely 192.168.1.106 and 192.168.1.21:
# snoop 192.168.1.106 192.168.1.21<cr>
The system responds with one line of output for each packet on the network:
Using device /dev/hme (promiscuous mode)
192.168.1.106 -> 192.168.1.21 ICMP Echo request (ID: 2677 Sequence number: 0)
192.168.1.21 -> 192.168.1.106 ICMP Echo reply (ID: 2677 Sequence number: 0)
When you are finished viewing information from snoop, press Ctrl+C to quit.
NOTE
The -d option On a system with multiple network interfaces, use the -d option with snoop to specify the network device you want to watch. For example, to watch the eri0 interface only, type
# snoop -d eri0 192.168.1.106 192.168.1.21<cr>
3. Check for network traffic by typing the following:
# netstat -i 5<cr>
The system responds with this:
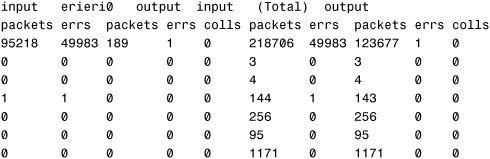
The netstat command is used to monitor the system’s TCP/IP network activity. netstat can provide some basic data about how much and what kind of network activity is happening. You should ignore the first line of output, as this shows the overall activity since the system was last booted. The -i option shows the state of the network interface used for TCP/IP traffic. The last option, 5, reissues the netstat command every 5 seconds to get a good sampling of network activity, with each line showing the activity since the last display, in this case 5 seconds. You can press Ctrl+C to break out of the netstat command.
4. Look in the colls column to see if a large number of collisions occurred. To calculate the network collision rate, divide the number of output collisions (output colls) by the number of output packets. A network-wide collision rate greater than 10% can indicate an overloaded network, a poorly configured network, or hardware problems.
5. Examine the errs column to see if a large number of errors occurred. To calculate the input packet error rate, divide the number of input errors by the total number of input packets. If the input error rate is high—more than 25%—the host might be dropping packets because of transmission problems. Transmission problems can be caused by other hardware on the network and by heavy traffic and low-level hardware problems. Routers can drop packets, forcing retransmissions and causing degraded performance.
6. Type ping -sRv <hostname> from the client to determine how long it takes a packet to make a round-trip on the network. If the round-trip takes more than a few milliseconds, the routers on the network are slow or the network is very busy. Issue the ping command twice, and ignore the first set of results.
The ping -sRv command also displays packet losses. If you suspect a physical problem, you can use ping -sRv to find the response times of several hosts on the network. If the response time (in milliseconds) from one host is not what you expect, you should investigate that host.
Summary
Although networking is a topic that could consume many chapters in this book, the fundamentals that you need to know to be able to manage a Solaris system on the network are described here. All the concepts that you need to know for the Sun Certified System Administrator for the Solaris 10 Operating Environment exam (CX-310-202) are described.
After reading this chapter, you should understand how to configure and manage network services in Solaris 10. Some new commands were introduced—specifically, inetadm and inetconv.
In addition, this chapter discussed some of the network-related commands and utilities that you can use for monitoring and maintaining the network. In a networked environment, system performance depends on how well you’ve maintained your network. An overloaded network can disguise itself as a slow system and can even cause downtime. You should monitor your network continuously. You need to know how the network looks when things are running well so that you know what to look for when the network is performing poorly. The network commands described in this chapter only report numbers. You’re the one who decides whether these numbers are acceptable for your environment. As stated earlier, practice and experience will help you excel at system administration. The same holds true for network administration.
Chapter 2, “Virtual File Systems, Swap Space, and Core Dumps,” describes how to manage swap space, configure core and crash dump files, and use NFS to share file systems across a network. You’ll also learn how to configure the automounter for use with AutoFS.
Key Terms
• Client/server model
• Host
• Hostname
• ICMP
• IP address
• MAC address
• Network interface
• Network mask
• Network service
• Packet
• Router
• Remote Procedure Calls (RPC)
• Service Management Facility (SMF)
Apply Your Knowledge
Exercises
The following exercises require that you have two hosts connected via an Ethernet network, one named hostA and the other named hostB.
1.1 Obtaining Network Information
In this exercise, you’ll use the various network commands and utilities to obtain information about your system and network.
Estimated time: 15 minutes
1. Log in as root on hostA. Make sure you have an entry in your /etc/inet/hosts file for hostB.
2. As root, use the ifconfig command to display information about your network interface:

The ifconfig utility shows that the Ethernet address of the eri0 interface is 0:3:ba:1f:85:7b. The first half of the address is generally specific to the manufacturer. In this case, 0:3:ba is Sun Microsystems. The last half of the address, in this case 1f:85:7b, is unique for every system.
3. Use ping to send ICMP echo requests from hostA to hostB:
# ping hostB<cr>
On hostA, use the rpcinfo utility to list the registered RPC programs:
# rpcinfo<cr>
4. Look for the sprayd service on your system:
# rpcinfo | grep sprayd<cr>
5. Stop the sprayd service on your local system:
# rpcinfo -d sprayd 1<cr>
6. Verify that the sprayd service has been unregistered from RPC:
# rpcinfo | grep sprayd<cr>
7. Restart the sprayd service by issuing the svcadm restart command:
# svcadm restart spray<cr>
8. Verify that the sprayd service is now registered with RPC:
# rpcinfo | grep sprayd<cr>
1.2 Using snoop to Display Network Information
In this exercise, you’ll use the snoop, spray, and ping commands to obtain information from your network.
Estimated time: 10 minutes
1. On hostA, log in to an X Window session (CDE, Gnome, or Java Desktop System [JDS]) as root. In one window, start up the snoop utility:
# snoop hostA hostB<cr>
snoop shows what actually happens when hostA uses the ping command to communicate with hostB.
2. In a second window on hostA, type the following:
# ping hostB<cr>
3. Watch the information that is displayed in the first window that is running snoop.
4. Issue the spray command to send a one-way stream of packets to hostB:
# spray hostB<cr>
5. Watch the information that is displayed in the first window that is running snoop.
Exam Questions
1. What is a name for a unique Ethernet address?
• A. IP address
• B. MAC address
• C. Internet address
• D. Hostname
2. When you are setting up at least one network interface, which of the following network configuration files does the Solaris installation program always set up? (Choose three.)
• A. /etc/hostname.interface
• B. /etc/nodename
• C. /etc/inet/hosts
• D. /etc/defaultdomain
• E. /etc/inet/ipnodes
3. Which command lists the network services and their current state?
• A. inetadm
• B. inetd
• C. rpcinfo
• D. nfsd
4. Which of the following statements about IPv4 addresses are true? (Choose all that apply.)
• A. IP addresses are written as four sets of numbers separated by periods.
• B. IP addresses provide a means of identifying and locating network resources.
• C. IP addresses are divided into three unique numbers: network, class, and host.
• D. The IP address identifies the machine to its peers on the network.
5. Which of the following statements is true about the /etc/hostname.xxy file?
• A. It is a system script file.
• B. It is a Sparc executable file.
• C. It contains the hostname of the local host.
• D. It identifies a network interface on the local host.
6. Which of the following contains the IP addresses and hostnames of machines on a network?
• A. /etc/inet/hosts
• B. /etc/hostname.xxy
• C. /etc/defaultdomain
• D. /etc/nodename
7. Which of the following are files that have to be edited when you manually change the hostname on a Solaris system? (Choose two.)
• A. /etc/nodename
• B. /etc/defaultdomain
• C. /etc/networks
• D. /etc/inet/hosts
• E. /etc/inet/ipnodes
8. Which of the following commands is used to monitor the system’s TCP/IP network activity?
• A. iostat
• B. vmstat
• C. netstat
• D. ping
9. Which command is used to determine the information that is flowing between systems across a network?
• A. netstat
• B. snoop
• C. iostat
• D. ping
10. Which of the following statements are true of the snoop command? (Choose two.)
• A. You press Ctrl+D to stop the command.
• B. You press Ctrl+C to stop the command.
• C. Each packet on the network produces one line of output.
• D. snoop displays the network statistics for the physical interfaces.
11. Which methods can you use to determine the MAC address of a Solaris-based system? (Choose two.)
• A. Use the banner command at the ok prompt.
• B. ifconfig <interfacename> -m
• C. uname -a
• D. ifconfig -a
• E. netstat -a
• F. eeprom
12. Which of the following are correct entries in the /etc/hostname.eri0 file? (Choose two.)
• A. 192.168.1.100
• B. example.com
• C. systemA
• D. eri0 192.168.1.100
• E. ifconfig 192.168.1.100
13. Your system has four network interfaces: qfe0, qfe1, qfe2, qfe3. When you issue the netstat -i command, you see only information for qfe0 displayed. What is the problem?
• A. You must use netstat -a to see all the network interfaces.
• B. The interface is not plumbed.
• C. The interface is not configured with an IP address.
• D. You need to create a file named /etc/hostname.<interfacename> for each network interface.
Answers to Exam Questions
1. B. A host’s unique Ethernet address is also referred to as the MAC address. Answers A and C are wrong because these names refer to the unique Internet address that is assigned to a network interface by the system administrator. Answer D is wrong because the hostname is the alphanumeric system name that is assigned to a system. For more information, see the section “Hosts.”
2. A, B, C. The network configuration files /etc/hostname.interface, /etc/nodename, and /etc/inet/hosts are initially set up by the Solaris installation program. The /etc/defaultdomain file is an optional file and is not set up by the installation program. For more information, see the section “Configuring an IPv4 Network Interface.”
3. A. The inetadm command lists the network services and their current state. This is a new feature in Solaris 10. inetd and nfsd are daemons and do not list anything when they are executed. rpcinfo reports RPC information. For more information, see the section “Network Services” for a full description of the inetadm command.
4. A, B, D. The following are true of IP addresses: IP addresses are written as four sets of numbers separated by periods, IP addresses provide a means of identifying and locating network resources, and IP addresses identify the machines to their peers on the network. Answer C is wrong because IP addresses are not divided into three numbers. For more information, see the section “IPv4 Addressing.”
5. D. The /etc/hostname.xxy file identifies the network interface on the local host. Answers A and B are wrong because this file is neither a script nor an executable file. Answer C is wrong because the /etc/nodename file contains the hostname. For more information, see the section “Configuring an IPv4 Network Interface.”
6. A. The /etc/inet/hosts file contains the IP addresses and hostnames of machines on a network. The /etc/hostname.xxy file contains either an IP address or a hostname, but not both. The /etc/defaultdomain file contains the domain name. The /etc/nodename file contains only the hostname, not an IP address. For more information, see the section “Configuring an IPv4 Network Interface.”
7. A, D. The file /etc/defaultdomain sets the domain name and /etc/networks identifies the different networks. For more information, see the section “Changing the System Hostname.”
8. C. The netstat command is used to monitor the system’s TCP/IP network activity. netstat can provide some basic data about how much and what kind of network activity is happening. You use the iostat command to monitor disk I/O. vmstat is used to monitor virtual memory statistics. ping is used to send ICMP packets to another network host. For more information, see the section “Network Maintenance.”
9. B. The snoop command is used to determine what information is flowing between systems across a network. You use the iostat command to monitor disk I/O. netstat is used to monitor network statistics. ping is used to send ICMP packets to another network host. For more information, see the section “Network Maintenance.”
10. B, C. The snoop command continues to generate output until you press Ctrl+C to exit the command. snoop generates one line of output for each packet on the network. Answer A is wrong because Ctrl+D does not exit the snoop command. Answer D is wrong because snoop does not display the network statistics of a physical interface. Use the netstat -i command. For more information, see the section “Network Maintenance.”
11. A, D. Two methods can be used to obtain the MAC address on a SPARC-based system: The banner command and the ifconfig -a command. For more information, see the section “Controlling and Monitoring an IPv4 Network Interface.”
12. A, C. The /etc/hostname.<interface> file contains one entry: the hostname or IPv4 address that is associated with the network interface. The IPv4 address can be expressed in traditional dotted-decimal format or in CIDR notation. If you use a hostname as the entry for the /etc/hostname.<interface> file, that hostname must also exist in the /etc/inet/hosts file. For more information, see the section “The /etc/hostname.<interface> File.”
13. B. If the network interface is not plumbed, it does not show up with the netstat command. Answer A is wrong because the -a command does not display the interface if it is not plumbed. Answer C is wrong because the netstat command displays information about a network interface even if it does not have an IP address assigned to it. Answer D is wrong because simply creating this file for the interface does not plumb the interface unless the system is also rebooted or the network services restarted. For more information, see the section “Configuring an IPv4 Network Interface.”
Suggested Reading and Resources
Internetworking with TCP/IP: Principles, Protocols and Architecture. Douglas Comer. Prentice Hall, March 2000.
“IP Services” guide in the Solaris 10 documentation CD.
“IP Services” guide in the System Administration Collection of the Solaris 10 documentation set. See http://docs.sun.com.
“Managing Services” section in the “Basic System Administration” guide in the System Administration Collection of the Solaris 10 documentation set. See http://docs.sun.com.
“Managing Services” section in the “Basic System Administration” guide in the Solaris 10 documentation CD.