
Tracing, or instrumentation, is an important part of debugging. You can track events, display variable values, dump objects, and more.
Tracing a desktop application, as shown in Chapter 2, is different from instrumenting a Web application. For example, you may not want to display trace information to a remote user. Trace information for a Web application may contain data inappropriate for a remote user to view. Also, the execution path of a Web application tends to be more complex than a desktop application. The ASP.NET pipeline of a Web application, which controls if and when a module is executed, makes the execution sequence less transparent. The page handler may not even be called. This can happen when requesting a cached page. When problems occur, tracing can add some clarity to this complexity. Here are other differences between tracing in Web applications and desktop applications.
Tracing is configured in a web.config file instead of the application configuration file.
Tracing is page-centric versus document-centric. This includes tracking page events, such as page load, page error, page unload, and so on.
The Web application may be running on a local or remote server, which can affect tracing in a variety of ways.
A TraceContext object is used to trace in Web applications. This is different from desktop applications, which use a TraceSource object. TraceContext is exposed as the Trace property of the Page object (Page.Trace) and provides server-side tracing. The most relevant methods are the TraceContext.Write and TraceContext.Warn methods. The Warn method displays trace information in red, while the Write method outputs in black. Otherwise, the commands are identical.
You can enable or disable tracing per Web directory using a web.config file. All Web pages in the same directory or sub-directory (without a separate web.config file) as the current web.config file. You can always confirm that tracing is enabled with the TraceContext .IsEnabled property. If the property is true, tracing is enabled for that Web page.
Control tracing for a page using the trace attribute of the @page directive. If true, page level tracing is enabled. You can also use the TraceMode attribute to sort the tracing output. By default, trace information is rendered with the page and displayed at the bottom. The following is an example of the @page directive for a Web application. Page level tracing is enabled.
<%@ Page Language="C#" Trace="true" AutoEventWireup="true" CodeFile="Default.aspx.cs"
Inherits="_Default" %>
This is the server-side code that traces in a Web application.
    protected void Page_Load(object sender, EventArgs e)
    {
        Trace.Write("page load trace");
    }
    protected void Button1_Click(object sender, EventArgs e)
    {
        Trace.Write("button trace");
}Page directive enables trace for a specific page. Alternatively, you can enable tracing in a web.config file. The trace attribute of the page directive takes precedent over the web.config file setting. Therefore, if the page directive enables tracing, tracing will occur regardless of the configuration for tracing in the web.config file.
In the web config file, the Trace element enables or disables tracing for relevant Web pages. The Trace element has several attributes:
enable. The enable attribute enables or disables tracing. By default, tracing is sent to the trace.axd page.
pageOutput. The pageOutput attribute redirects tracing to a Web page and not trace. axd.
requestLimit. The requestLimit attribute is the number of traces that can be cached.
traceMode The traceMode attribute stipulates the sort order of the trace information.
localOnly. The localOnly attribute controls where trace information is displayed. If true, trace information is displayable on the local machine only. This prevents remote users from viewing trace information, which may include sensitive data. For example, trace information includes server variables and cookies collection. Tracing for a Web application typically occurs on the Web server only. This means you must browse to the Web application from the local server to see trace messages.
This is an example of the Trace element in a web.config file.
<configuration>
 <system.web>
  <trace enabled="true" pageOutput="true" requestLimit="40" localOnly="true"/>
 </system.web>
</configuration>
An unhandled exception is often the event that prompts debugging. There are a variety of system exceptions, including access violations, divide by zero exceptions, and data access exceptions. You can also receive a user-defined exception that was created for a specific application.
There is a concept of a first and second chance exception. When an exception is thrown, it is called a first chance exception. If an application (debuggee) is being debugged, the exception is first sent to the debugger. Most debuggers will not handle the first chance exception and simply forward the exception to the application being debugged. This provides the application an opportunity to handle the exception. If the application does not handle the first chance exception, it is returned to the debugger as a second chance exception because the application is crashing. Debuggers will usually handle a second chance exception and interrupt the application at the location of the exception. If no debugger is attached to the application, the first chance exception is immediately sent to the application. A second chance exception might become an unhandled exception and crash the application. 9-6 shows the sequence of events for handling an exception.
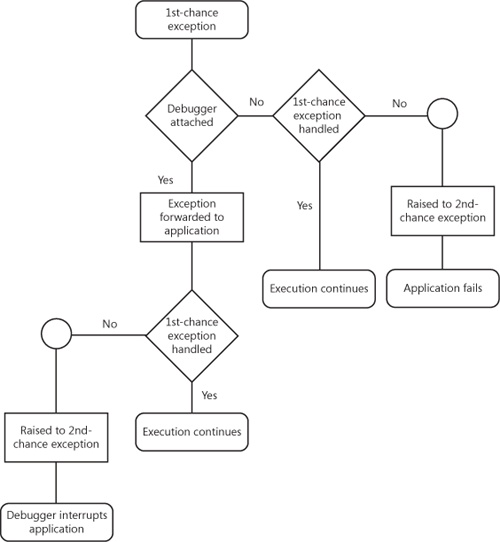
As diagramed, the Visual Studio debugger forwards first chance exceptions to the application. This is different from Windbg. Windbg will interrupt on the first chance exception. Both debuggers can be configured to handle exceptions differently. In Visual Studio, you can configure exceptions to be handled on a first chance. Catching first chance exceptions can help preserve the state of the call stack. This can be helpful when debugging. In addition, the application will be interrupted at the origin of the exception. Designate that exceptions be handled as first chance exceptions in the Exceptions dialog box. From the Debug menu, select Exceptions. There are two columns of options in the Exceptions dialog box. Set the Thrown option to handle an exception as a first chance exception.
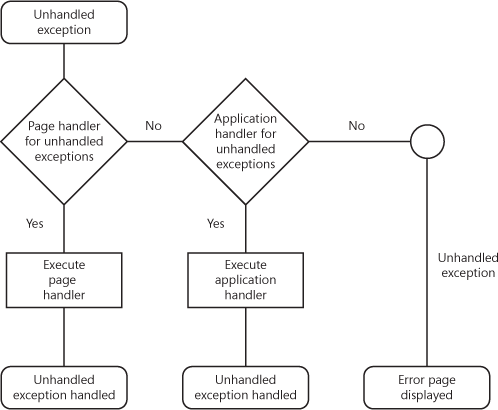
When an exception occurs, the correct handler must be found. If an appropriate handler is not found, the exception becomes an unhandled exception. Normally, this would crash your application. However, you can trap unhandled exceptions at the page or application level. At the page level, handle unhandled exceptions with the Page_Event event. Page.Page_Error is a handler for that event. Implement Application_Error in global.asax to handle unhandled exceptions at the application level. Page-level handling of an unhandled exception takes precedence over application-level handling.
For an unhandled exception, a user is automatically transferred to an error page. This occurs when an unhandled exception is not handled at the page or application level. 9-7 shows the routing of an unhandled exception. The error page displays details of the exception, which may include information that is inappropriate to display to the user. You can control how the error page is displayed in the web.config file, with the customErrors element. Mode is the most important attribute of the customErrors element. Here are the possible values for the mode attribute:
RemoteOnly. The RemoteOnly mode will display full exception information for an unhandled exception on the local server. Remote users are provided limited information.
On. The On mode prevents the error page for an unhandled exception from being shown. If set, the custom error page will be shown instead.
Off. The Off mode will display the error page for an unhandled exception—even if the custom error page is set.
The defaultRedirect attribute of the customErrors element identifies the custom error page. In the advent of an unhandled exception, this page will be presented in lieu of the default error page. Of course, you need to create the custom error page beforehand. The following is an example of the customErrors element.
<customErrors defaultRedirect="customerror.aspx" mode="On">
In addition to exceptions, the custom error page can be used with HTTP status codes. Identify the specific HTTP status code with an error element. Identify the pertinent HTTP status code with the statusCode attribute of the error element. The redirect attribute names the error page. When the HTTP status code event occurs, you are transferred to the error page. This is an example of the error element.
<customErrors mode="remoteOnly">
    <error statusCode="404" redirect="error.aspx"/>
</customErrors>