
The best way to ensure quality within your application is to invest in developing automated methods for validating the logic and algorithms within your application code. This investment not only helps to find application bugs in new features early in the development cycle but also helps to prevent regression bugs in the quality of older code. Within Visual Studio Team System (VSTS), there are multiple features available for incorporating automated code analysis into your team’s development life cycle. These features include tools for analyzing code based on predefined rule sets, a framework for developing unit tests, as well as tools for generating code metrics. When combined with some of the process management features in VSTF that were previously mentioned, these tools enable development teams to improve the efficiency and effectiveness of their overall application testing. Let’s consider the various code analysis methods that we recommend incorporating into your development process.
Static code analysis is a technique for analyzing software application code without actually executing the code. This type of analysis is used to evaluate code against a specific set of rules or guidelines for which the code analysis engine has been preconfigured to use. There are free and commercially available static code analysis tools for almost any programming language, including all flavors of managed code, of course. The most common example for managed code analyzers is FxCop, from Microsoft.
FxCop is used to check .NET managed code assemblies against the Microsoft .NET Framework design guidelines to ensure that the code in question conforms to the set of pre-selected rules. Each of the rules present within FxCop are grouped into the following categories.
Design. Rules that evaluate your code for proper library design as specified by the .NET Framework Design Guidelines
Globalization. Rules that evaluate your code for determining world readiness
Interoperability. Rules that evaluate your code for ensuring proper interoperability with COM clients
Mobility. Rules evaluate mobile application code for efficient power usage. These should generally be applied to smart device applications
Naming. Rules that check for adherence to the naming conventions of the .NET Framework Design Guidelines
Performance. Rules that evaluate code to ensure high performance
Portability. Rules that evaluate your application code’s portability across processor architectures
Security. Rules that promote safer libraries and applications
Usage. Rules that ensure proper usage of the .NET Framework
From a process perspective, FxCop is designed to be an integrated part of the software development life cycle, specifically during the coding phase of the project. The tool can either be downloaded for free and run as a stand-alone application or leveraged directly through Visual Studio 2008. By default, the rule set within Visual Studio 2008 is extended to include the following categories.
Maintainability. Rules that ensure library and application maintenance guidelines are followed.
Reliability. Rules that evaluate code to ensure correct designs for library and application reliability, such as correct memory and thread usage.
FxCop users are able to configure the tool to run individual rules, all rules within a category, or all categories. The tool parses Microsoft Intermediate Language (MSIL) and performs call-graph analysis to compare your application assemblies against rules within the previously described categories. Upon completion of the analysis, the tool generates a report containing the various rule violations it encountered. When running within Visual Studio, the results are displayed within the Error List window.
Static code analysis is one of the best ways to find code issues early in the project life cycle. It helps to ensure that all project developers adhere to the common set of accepted coding guidelines provided in the default rule set. Additionally, the tools also support extending the default rules to include custom rules built by individual development teams. When these tools are incorporated directly into the build process, either through Visual Studio or the command-line interface of the stand-alone FxCop application, the overall quality of the application builds as well as the consistency of the application code can be improved. It is important, however, to follow some basic usage guidelines to help select and manage the appropriate analysis rules for your application. Let’s review some basic guidelines.
Note
For more information on creating custom FxCop or Code Analysis rules for integration into Visual Studio, I recommend reading the Code Analysis team blog at http://blogs.msdn.com/fxcop/archive/2004/01/09/49287.aspx.
If you are incorporating code analysis for the first time on an existing application, you may get quickly overwhelmed by the number of rules and number of warnings being generated by the analysis tool. In this scenario, it is best to follow these guidelines.
First, enable all rules and run the analysis tool on the existing code.
Evaluate the results generated by the analysis tool and determine which warnings are most effective to enable on your existing code base.
Enable the subset of rules that you believe are most applicable and re-run the analysis.
File work items or bugs to track the warnings generated by the analysis tools and assign them appropriately to be addressed.
By contrast, if you are including code analysis within your application development cycle for the first time on a new application, it is best to adhere to these practices.
Enable all rules and run the analysis tools during the development process, preferably prior to each application build on local developer workstations.
Address all issues identified by the code analysis tools before checking code into the source repository.
Configure Visual Studio Team Foundation to enforce code analysis as check-in criteria.
If possible, do not wait until the end of the development cycle to run static code analysis rules. Running static code analysis late in the development cycle could potentially destabilize the product or introduce a large number of small changes into the code base that could be difficult to review and verify. This would put a large burden on the development and test team during a critical juncture in the project cycle. It is certainly more ideal to incorporate code analysis during the phase of the project where code is actively being written. This will allow the team to enforce rules on application code that has not been checked in and thus ensure better quality of code earlier in the development cycle. Sometimes, however, this is not always possible. In the event your application code base is pre-existing, it is best to follow the aforementioned guidelines, triage the issues that get uncovered, and prioritize fixing them whenever possible.
As mentioned, static code analysis does an excellent job uncovering a certain class of bugs within your application code. These issues, while very important, often have more to do with the structure of the code, API usage, and/or usage patterns. Static code analysis does not evaluate the logic of your application for conformity with the design specifications or to ensure it functions properly. The only way to examine these facets of your application is to develop test code that evaluates application code using the automated testing framework provided by Visual Studio 2008. Let’s explore this in greater detail.
In addition to leveraging static code analysis to drive higher levels of quality, application development teams should also invest in writing automated application test code. This generally means developing a corpus of different unit, functional, and integration tests across the application. The goal of this effort is to build out a set of tests that can be leveraged to examine and exercise individual features or broad portions of the application. Earlier in this chapter, we discussed the differences between the different types of testing, and we suggested how each should be applied within the testing life cycle. In this section, we will evaluate the specifics of the most common form of automated test—the unit test.
Unit tests are intended for examining code at the method and property level of a class, to ensure that the application functionality has been implemented as specified and is working correctly. Therefore, as a best practice, application developers should write unit tests when developing features to ensure that the code they are writing works as intended. To accomplish this, developers should consider following these guidelines. First, they should build a broad scope of tests to ensure that all possible conditions are examined before checking in the code. This should include test cases that cover the following scenarios.
Positive tests. These tests exercise the code in accordance with the specified rules and ensure that a positive result is returned.
Negative tests. This type of test is designed to exercise the code in a way that was not intended to ensure that it handles error conditions appropriately.
In addition to choosing the appropriate scope of testing, application developers should also ensure that their unit tests adhere to a set of principles that will drive continued efficiency and effectiveness of the testing. These principles include the following.
Tests should be well structured. For maintainability, it is important to ensure that tests are structured appropriately. Much like application code, test logic should be organized and written using standard .NET Framework design guidelines and object-oriented principles.
Tests should be self-documenting. Unit tests should be specific about what test case is being applied, what inputs are being utilized, and what the expected result should be. Additionally, tests should be named appropriately so that there is a clear understanding about the goal of that test.
Keep unit tests simple and fast. Unit tests should be run against application prior to being checked into the source repository. Therefore, the tests you design should be optimized for fast, repeated use.
Unit tests should be automatic and repeatable. Tests should not require human interaction to either manually execute or evaluate results. They should be 100 percent repeatable and reliable in their outcome.
Unit tests should be simple to execute. For tests to be effective, they need to be able to execute on multiple machines by either command line or button click.
Tests should be independent. Tests should not depend on other tests to complete successfully. They should be self-contained and able to be run independently or as part of a larger group. This will keep them robust and maintainable.
Adhering to this set of guidelines and principles will help developers remain focused on the goals of unit testing, which is to build an automated, repeatable, robust, and reliable set of tests that can be used throughout the life of the application code to ensure quality. Let’s look at the anatomy of a unit test in greater depth and discuss the application of these guidelines and principles.
Unit tests begin as Test projects within Visual Studio. Similar to other projects, Test projects can be stand-alone or incorporated as part of a larger solution. They generally include standard project artifacts such as *.cs files, and they will include references to the application assemblies being tested and the Visual Studio unit testing framework. In addition to these files, you will also notice a *.vsmdi file, which is a test metadata file. This file maintains the data for test lists, which can be used to group a specific set of tests together for execution.
All test classes within the test project are adorned with the [TestClass()] attribute, which signifies that the class contains test methods. Furthermore, each method within the class that is a test should be adorned with the [TestMethod()] attribute. Certainly other methods and properties can exist within the test class and be leveraged by the tests themselves. Developers should write tests with the same object-oriented design principles that they would apply to their applications. This includes practices such as incorporating code reuse and not duplicating logic. The important thing is to apply the above principles within the test method itself.
In addition to the [TestMethod()] and [TestClass()] attributes we just discussed, the unit test framework also provides other attributes for enabling specific unit-test functionality. These attributes include [TestInitialize()] and [TestCleanup()], which are used to designate methods that will perform initialization and cleanup logic for all tests within the test class. Designating a method with the [TestInitialize()] attribute is a great way to establish a specific runtime state for your test. By contrast, designating a method with the [TestCleanup()] attribute is the recommended best practice for incorporating logic that returns the test environment to the pre-test state. While both of these attributes are useful for maintaining the test environment, to verify that the specific state of the test has been reached, developers must incorporate the use of Asserts.
Asserts are methods within the VSTS unit test framework that developers should use within their test code to affirm a certain action or condition has been met within the test. By nature, unit tests result in either a passing or failing condition. In fact, unit tests are assumed by the test engine to be in a passing state until an assert triggers a failed or inconclusive state, or a unit test throws an exception that is not specified in the ExpectedExceptionAttribute attribute. Therefore, it is important to use Asserts appropriately and handle exceptions properly in order to confirm the intended conditions are achieved and thus avoid any false positives. Fortunately, there are a number of options for using asserts and handling exceptions within the tests that afford developers the flexibility to evaluate several types of conditions. These classes include the following, all of which are available from the Microsoft.VisualStudio. TestTools.UnitTesting namespace.
Assert. This class provides methods for verifying true or false conditions within tests. It includes several methods for comparing values.
StringAssert. This class contains a number of useful methods for comparing strings such as Contains() or StartsWith().
CollectionAssert. This class provides methods for comparing collections of objects and verifying the state of one or more collections.
AssertFailedException. This is an exception that is thrown when a test fails either because of an unexpected exception or the failed result of a particular Assert statement within the test.
AssertInconclusiveException. This is an exception that is thrown when a test returns a result of inconclusive. Typically, developers will add an Assert.Inconclusive() to their test method to indicate that it has not been completed yet. Visual Studio adds this automatically when you generate tests from your project.
UnitTestAssertException. This class is primarily used as a base class for custom Assert exceptions that application developers wish to build for their specific purposes. Inheriting from this class makes it easier for developers to detect the exception as an Assert exception rather than an unexpected exception.
ExpectedExceptionAttribute. This attribute is used to decorate test methods when developers want to test that a specific exception within their application code is being thrown appropriately.
Developers and testers should decide how best to leverage any of the above Asserts in their test code to measure the outcome of the test. Regardless of what logic they choose to include within the test, the Assert statements dictate the results of the test. Even tests that incorporate multiple Asserts are assumed to be in a passing state until one of those asserts encounters a failing or inconclusive state. Let’s take a look at a code sample that demonstrates a simple unit test with multiple asserts. First, let’s review the method that we will be testing.
/// <summary>
/// Simple method for returning a greeting.
/// </summary>

public static String BuildGreeting(String name)
{
    return String.Format("Hello{0}",name);
}
As you may have noticed, this method is very simple. It accepts a name as an input string and returns a concatenated string with a greeting and the input parameter. Now, let’s review the code for testing this method. We appropriately named this test method BuildGreetingTest() to indicate that it is a test for the BuildGreeting() method.
/// <summary>
/// A test for the BuildGreeting method.
/// This test ensures the proper string is returned.
///</summary>

[TestMethod()]
[DeploymentItem("SolidCode_Chapter_10.exe")]
public void BuildGreetingTest()
{
    string name = "John Doe";
    string expected = "Hello" + name;
    string actual;
    actual = Program_Accessor.BuildGreeting(name);
    StringAssert.Contains(actual, "Hello");
    Assert.AreEqual(expected, actual);
}
This test method accomplishes two objectives. First, it ensures that the actual string being returned from the BuildGreeting() method contains the word "Hello." Additionally, it examines the entire string being returned to ensure that the actual result matches the expected result. This is of course a redundant check and not necessarily required. However, the point of this code example is to demonstrate that the test actually fails on the second Assert and not the first. A bug has been intentionally inserted in the BuildGreeting() method to cause the Assert to fail. Notice that the actual result was "HelloJohn Doe" as opposed to "Hello John Doe," which was what we expected. Running this test in Visual Studio provides us with the feedback we are expecting, which is shown in 10-3.
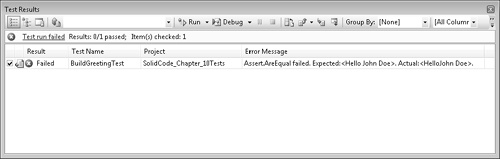
In addition to making this visually available through Visual Studio, the test results are also available in an XML format within the TestResults folder of your Visual Studio project as a *.trx file. The file contains some extensive information about the test results, for which a sample has been provided below.
<Results>
<UnitTestResult executionId="b9005e6f-d1da-4ec6-b06d-4c073353c5b9"
testId="d904ee09-1da5-dae8-1540-8fd41331ef42" testName="BuildGreetingTest"
computerName="DevComputer" duration="00:00:00.3799795"
startTime="2008-10-25T16:22:11.6950000-07:00" endTime="2008-10-25T16:22:12.5320000-07:00"
testType="13cdc9d9-ddb5-4fa4-a97d-d965ccfc6d4b" outcome="Failed"
testListId="8c84fa94-04c1-424b-9868-57a2d4851a1d">
<Output>
<ErrorInfo>
<Message>Assert.AreEqual failed. Expected:<Hello John Doe>. Actual:<HelloJohn
Doe>
</Message>
<StackTrace> at SolidCode_Chapter_10Tests.ProgramTest.BuildGreetingTest()
in C:Visual Studio 2008ProjectsSolidCode_Chapter_10SolidCode_Chapter_10Tests
ProgramTest.cs:line 78
</StackTrace>
</ErrorInfo>
</Output>
</UnitTestResult>
</Results>Now that the test code is complete, running, and producing results, any new changes to the application logic can be checked very quickly for bugs. This allows us to continually measure the quality of this code for as long as it is being used within the application. Although this gives us a certain level of confidence in the feature being developed, it does not validate the quality of the entire scenario in which this method is a participant. As we move beyond testing at the unit level to testing at more of the functional or scenario level, we will need more than just single unit tests to validate quality. Fortunately, Visual Studio provides some options for testing beyond the BuildGreeting() method. Let’s take a look at some of those options.
Scenario-based testing or functional testing, as described previously, allows developers and testers to evaluate the application or feature of an application in the context of specific functional requirements. For example, if we consider the hypothetical console application that accepts the input of a person’s name and outputs a greeting, there may be multiple specific requirements of this feature that should be tested. This requires that feature testing include a list or series of tests to validate each of the distinct attributes of the feature. In this elementary example, there are likely only a few distinct tests, but imagine a more complex feature that may require dozens of tests to validate the end-to-end quality. Visual Studio offers some options for how to approach this challenge.
Test lists. Visual Studio allows the creation of test lists, which represent a collection of specific tests that are organized into groups. Test lists can be built from the set of available tests within your Visual Studio solution, as well as tests that were built outside the solution. They are created with the Test List Editor by selecting from the Test menu on the Visual Studio toolbar and choosing Create New Test List. Once created, the tests within the list can be run manually, as part of the build process, or through Visual Studio Team Foundation as part of a check-in policy. Test lists can help development teams organize their individual unit tests in a number of different ways and subsequently be used to execute sets of tests for feature-level validation, or perhaps even build validation.
Ordered tests. Although test lists are very useful and can be used to group tests together, ordered tests actually can be used to ensure that tests are executed in a particular sequence. Ordered tests can be executed stand-alone, whereby all tests within the ordered test will be executed in the specified order, or they can run as part of test lists. This makes ordered tests a great solution for conducting scenario-based testing where developers or testers may be required to follow certain sequences of events to validate that the feature is functioning properly.
In addition to scenario-based or functional testing, there are other types of testing for which Visual Studio provides support. Scenario and functional validation are obviously very important for validating the quality of the feature or application. However, there are other facets of quality, such as load testing, that require analysis at the individual feature level or across the application. Let’s review Visual Studio’s support for load testing.
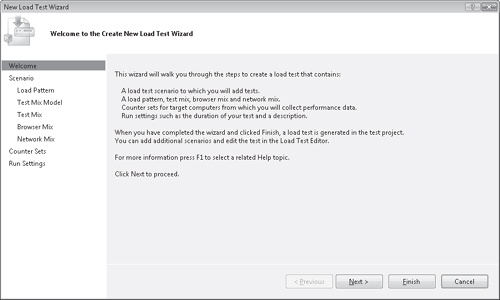
Load tests. In Chapter 5, we discussed the importance of building applications that can scale properly to large numbers of users. One way to measure how your application performs under high usage is to leverage load testing. Load tests allow application developers and testers to execute automated tests simultaneously using virtual users. Load tests can be configured in a variety of ways using the Load Test Wizard pictured in 10-4. These configurations allow adjustments to parameters like load patterns, network settings, and which performance counters should be monitored. Additionally, tests can be run using a single computer or multiple computers. The test results are subsequently provided in a set of tables and graphs once the test run is complete. In general, load tests are an incredibly useful feature for both developers and testers to apply stress testing to their features or applications.
Note
As with many of the topics throughout this book, load testing requires a much deeper evaluation before jumping right into using the available tools. Although we have established here that it is an important facet to testing, we hardly scratched the surface of what is possible. I recommend taking a deeper look at load testing in Visual Studio at MSDN: http://msdn.microsoft.com/en-us/library/ms182561.aspx.