
Now that we have the media clips on the timeline, let's have a look at the ways we can manipulate these events:
- Cropping tool
The mouse cursor in Vegas Pro 11 acts as a smart tool when on the timeline. If you hover the mouse near the centre of Take 1 at the leading edge, you will see the cursor change to a square with a double-headed arrow pointing left and right. This is the Cropping tool.
This tool allows you to slide the leading edge (or tail edge if you choose that end) of the clip along the media clip. In effect you are shortening or lengthening the clip to start or end at a new location within the clip.
You will also note that the preview window updates your selected video to show you the actual location you are selecting or moving to. Go ahead and try this tool remembering to stop playback and return the clip back to its original fully extended position when you are finished. You could also use the Windows standard CTRL + Z undo function repeatedly until it moves back to its original state.
If you go to the end of the clip and slide the cropping tool past this point, you will see that the clip creates an indent at the top edge to show you where the end is, but the clip extends itself and starts to play from the beginning again, creating a loop. This can be useful for bringing a small media clip or still image into the timeline and then looping it for as long as you like.
- Fade Offset tool
If you now hover your mouse over the top-left or top-right corner of your media clip, you will see a quadrant appear with a double-headed arrow pointing left and right. This is the Fade Offset tool. By clicking and sliding this tool you will create a fade in (or fade out if you chose the end of clip). Create a fade in (top-left corner of Take 1). Once done press the CTRL + HOME keys to take the cursor back to beginning and then press the space bar to play the clip. You will see Take 1 fade in over Take 2. This fade can be as long or as short as you like. If you right-click the mouse in the middle of the fade, a list of options will appear. Select the first option Fade Type and you will see that you can choose from a variety of fade curve types that may suit your creative choices. Once done, stop playback and bring the clip back to its original state without a fade. Do this by clicking the highest point of the Fade Curve and sliding it back to the edge of the clip again. You could also use the Windows standard CTRL + Z undo function repeatedly until it moves back to its original state:
- Opacity tool
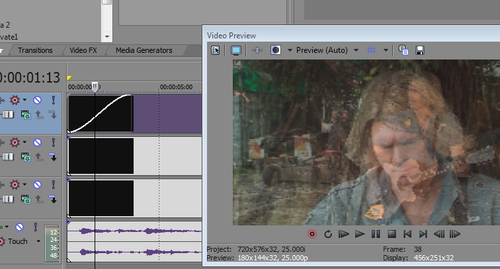
Moving your mouse to the top edge of Take 1, you will see a pointed hand appear. This tool will allow you to pull down the Opacity (or transparency) of the take. If you pull the opacity down to around 50 % you will notice that you can see both Take 1 and Take 2 playing together if you push play again. This can be a useful tool for creating overlay effects or any creative idea you can think of. Once again return the clip to its original state once you have finished trying out the tool.
- Splitting or cutting media clips
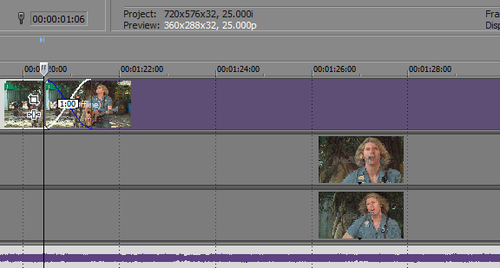
First, let's position our mouse about halfway along the Take 1 clip in the middle of the clip and left-click. This will move the timeline cursor to this location. Now if we press the S key on our keyboard, you will see that Take 1 media clip has been cut into two separate pieces, each with their own FX and Event Crop icon on them. You can click and hold the right-hand clip and slide it on the timeline to see that it is now a separate clip. As you bring it back into place, you will notice the join of the two clips turns into a blue highlight to let you know they are now touching each other. If you continue to slide the clip to the left, the two clips will overlap each other and create a crossfade, with a purple highlight appearing once the cross fade is exactly 1 second long:
Just like in Fade Types, if you right-click in the middle of the crossfade you just created, options will appear and if you select the Fade Type menu a whole new list of cross fade types will appear for your selection. Let's return the clip to its original position but keep the split active. Slide the right-hand clip to the right until the blue line appears at the join. Once the blue line appears, then you know the two clips are touching at the split point.
- Event Pan/Crop tool
You may have noticed at the right-hand end of the Video media clip there are two icons sitting on the clips. The bottom one is the standard Sony FX icon for Event FX, which we will deal with in the effects section of this book, and the top one is the Event Pan/Crop tool. Let's click on the Event Pan/Crop tool icon on the right-hand clip of the split clip of Take 1. The Event Pan/Crop window will open showing us the very first frame of the media clip we have selected. This window will have a list of parameters on the left, and the scene will have a bounding box around it with the letter F overlaid in the middle of it. You will also find a small timeline and cursor along the bottom. For those wondering about the overlay F, it allows us to know if an abstract picture is inverted or not:

Position and resize the Event Pan/Crop and Preview Monitor windows so you can see them both, which will allow you to see the changes you are making with this tool. If you are using the External Monitor Preview function, this won't be an issue for you.
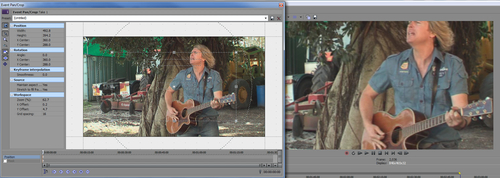
In the Event Pan/Crop window, you will notice there are eight little squares on the bounding box around the frame. With your mouse, grab the top-left corner box and drag it towards the centre of the picture. Watch the Preview monitor as you do this and you will see that it acts like a zoom. If you then move the box out past the frame, it zooms out making the picture smaller than the frame. This can be a useful tool to remove unwanted objects that were included during filming or to make the take look like it was shot from another camera pass closer to the subject:
As this zooming in is actually spreading less pixels over the same area of the frame, there is a limit to the amount of resizing you can do before the picture begins to look grainy or pixeled. If we were using HD footage with a resolution of 1920 x 1080, then there would be a lot more pixels covering the frame, so it would allow for greater resizing before the artefacts became apparent. Now let's zoom the picture in a fair way. Once the zoom is where you like it, click the mouse on the main timeline on Take 1 just to the left of the split point. Press the space bar and watch the preview window as the cursor travels forward through the split point. You will see that the preview jumps to the newly-zoomed scene and will stay there right through to the end of the clip. You can create multiple splits on a clip and resize or zoom each of the clips you create to their own individual setting.
To bring the frame back to normal size, from the Preset drop-down window at the top of the Event Crop/Pan window, select Default.
Now, if you move the mouse just above or beside the Bounding Box a circular rotation icon will appear. This tool allows us to rotate the frame just like we had filmed the scene with the camera rotated to one side or the other:

Once again give this tool a try by clicking and holding the mouse and moving it up or down. Your changes will appear in the preview window. Return the image back to its default setting by selecting it in the Preset drop-down once you have finished looking at this tool.
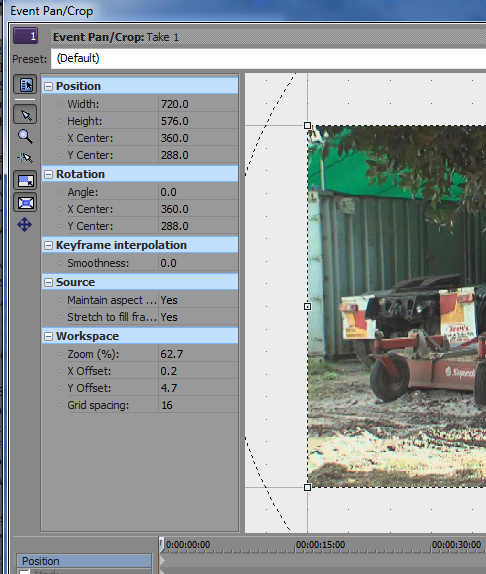
As you make these changes, you will notice that all the parameters to the left of the frame will change to represent your moves numerically. You can also enter numbers into the parameters to make the changes. When you click on a parameter a drop-down slider will appear to allow you to modify the settings in this manner. If you notice the parameters under the Position heading, you will see that the Width and Height are represented as 720 and 576, accordingly. So this tells us that the unit of this parameter is pixels as the clip we are using is a PAL DV Clip which has the exact same width and height:
Also a handy function is to save the settings you have made as a preset. Once you have the scene looking as you like it, you can save it for use with other clips by clicking on the little Floppy Disk icon on the right-hand side of the Preset drop-down window after naming your preset. The next time you look into the drop-down preset list you will see your newly-saved preset available to apply to any clip using the Event Pan/Crop window.
I would advise you to name your presets with a name that will help you to remember what the preset represents. By doing this, over time you will have a great list of presets that you can utilize on your future projects to help speed up your editing process.