
Let's use the compression plugin on our audio to see and hear how this plugin works:
- Getting back to our audio tutorial project, let's select the Track Compressor plugin that is already on our Track FX of the Acoustic Guitar track by clicking on its tab.
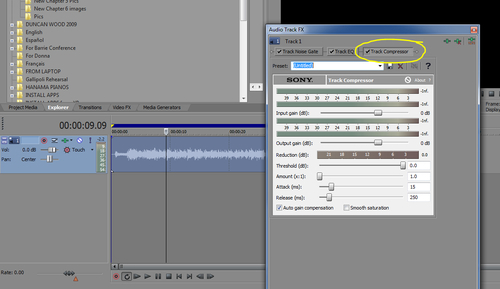
- The Track Compressor plugin has several parameters, so let's apply some presets to our Acoustic guitar and point out what is happening.
- From the Preset drop-down menu select [Sys] 6:1 compression starting at -12 dB.
- Set up our playback loop once again and play the Acc Guit track, and while playing, select and de-select the Track Compressor plugin to hear the difference. Also watch the different VU meters on the plugin itself too.
- Next to most of the parameters and the VU meters you will notice the symbol dB, which stands for decibel and is a measurement of volume. In a similar way that a millimeter is a measurement of length, a decibel is a measurement of volume.
- While the track is playing click on the threshold slider and slide to the left. You will see that the Reduction VU will increase from the right. This is showing us how much the level is being reduced. The Threshold is basically telling the compressor to only start affecting the audio once it reaches a certain preset volume. So if the volume of the audio at any given point in time doesn't reach that volume, the compressor doesn't affect the audio.
- Once the audio reaches the threshold, it starts to compress the audio or reduce the volume. The amount of reduction is determined by the Amount (x:1) parameter and is expressed as the ratio of input level above the threshold, is to level at the output of the compressor. So if the amount is set to 2.0 it is reducing the volume by 2 dB for every dB the level goes above the threshold. For example, if the level is 6 dB above the threshold then the output of the compressor would only increase by 3 dB. If the amount was set to 6.0 or 6.1 then a 6 dB increase would result in a 1 dB increase at the output so it starts to really compress the audio. Sometimes the reduction is so great that it actually makes the output a little too quiet so you have to increase the output level. To help make this easier, there is an Auto gain compensation function, which can be turned on or off by selecting the function at the bottom left of the plugin. This will automatically increase the output volume of the compressor if needed. Even though the Auto gain compensation is switched on you can still fine tune the output level with the output slider.
- The Smooth Saturation switch lowers the amount of distortion created by applying heavy compression. When this parameter is turned on it reduces the "pumping" and "breathing" effect that often happens with heavy compression.
- The last two parameters are Attack and Release. They define the speed at which the compression begins once the audio has reached its threshold and the speed at which it stops compressing once the level drops below the threshold again. For audio, such as drums, or percussive sounds, the Attack and Release would be set to faster/lower amounts.
- While the track is playing, manipulate the parameters and try different presets to see how they affect the acoustic guitar sound. If you are unsure what setting you like, I would use the [Sys] 6:1 compression starting at -12 dB preset but lower the Threshold to around -16.1 dB.
We just applied the Track Compressor FX to the acoustic guitar audio track and discussed the Noise Gate plugin to discover how their parameters effect what we are hearing. A good understanding of the Track Compressor plugin is essential to achieve great audio for your projects. Please read this section again a few times and play with the parameters to help you to gain a better understanding of this powerful tool.
The Track Noise Gate plugin is a close cousin to the Track Compressor in that it has three of the same parameters in Threshold, Attack, and Release. The difference being that instead of compressing the tracks, audio is either muted or allowed to play depending on the volume of the track. So if the volume is loud enough it will push the gate open and the audio can be heard, but if it isn't louder than the threshold, then the gate is closed and you can't hear the audio. This is a very useful plugin if you are dealing with things, such as a reporter or dialogue that is being spoken in a noisy environment, so that when the person stops speaking the gate shuts and stops the background noise spilling into the main mix of the sound. To hear the effects of the plugin select the Preset [Sys] Noise gate 1 and adjust the Threshold to around -14.6 dB. You will hear the gate opening and shutting around the guitar as it reaches different levels.
We won't be needing this plugin on the guitar, so once you have finished playing with it, just uncheck it in the Audio Track FX window.
Don't forget to save our project as we go once you are happy with your settings.
- Which of the 3 pre inserted plug-ins on the Audio Track FX is best used to get rid of High Frequencies from an Audio Clip?
a. The Track Noise Gate
b. The Track Compressor
c. The Track EQ
d. The Screech remover
- If the Ratio of a Track Compressor is set to 10:1, and the level increases 20 dB above the threshold, what would the increased volume at the output be?
a. -20 dB
b. 2 dB
c. 0.5 dB
d. doobee doobee dB
Go ahead and import all of the audio clips for our audio tutorial onto their own track in the timeline. Make sure they are all hard to the left against the track header and you will be able to apply the EQ, Compression, and Gate if needed, onto the variety of sounds. Remember you can also mute each track on the track header as well as adjust the volume and pan parameters. Once you have them all imported to the timeline, play the track and you will hear that the files are playing back the last chorus of the song from our video tutorial project. Have some fun with creating a mix of the different sounds and make sure you use the Compressor, EQ volume and Pan of each track. It will be one of the best ways to learn how to apply the Track FX plugins. Remember one thing that I always say—There are really no rules, just results.