
After ensuring that we have our Video Tutorial project open, we can start the media import process:
- Click and hold Take 1 and drag it down to the timeline. You will see the outline box of the clip appear showing you the leading edge of the clip. Drag the clip so it is hard against the left of the timeline and let it go.
- Click your mouse in the grey area below the Take 1 clip and then while holding the Alt key, scroll your mouse wheel (if you have one) to zoom out so you can see the complete length of the clip. If you don't have a mouse wheel, never fear as there are always at least a few ways to do pretty much every function in Vegas Pro 11. In the bottom right corner of the timeline window you will see a + and - button on the horizontal bar. Continue to click the - button to zoom out and see the whole clip.
- If the clip isn't hard against the left-hand wall of the timeline, left click and hold and drag the clip to the left till it can't move anymore and let it go. You will notice that once the clip is in place, the track header to the left of the clip now contains controller buttons and a level slider which all pertain to that clip.
- There is a gray box on the track header just above the Level 100 % text. Double click in this gray box and type the name Take 1 and hit enter. You have now named the track.
- Now repeat the process with the remaining two video files and place them underneath the first track, remembering to name the tracks as well.
- Once that is complete you can now do the same process to the master audio clip. Everything will be exactly the same as the video clips except that it will create an audio track instead of a video track with its own set of buttons, volume control, and pan control sliders. It will also contain a VU meter to show you the level of the audio on playback.
- Once you have all of the media in place, rewind the project by using the Rewind to start button at the bottom of the screen on the transport controls or press the CTRL + HOME keys. Your preview window will now be black as the first frame of the clips, are black. Ensuring your speakers aren't turned up too loud, press the space bar and watch and listen to the project.
- What you are seeing is the top track, Take 1 playing. Even though Take 2 and 3 are also playing they cannot be seen, as the highest video track takes preference. While the track is still playing, on the track header of Take 1 click on the white circle with a gray line through it. That is the mute button. It will mute the first track and what you now see on the Preview screen is Take 2.
- Alternatively, select the exclamation symbol on Take 2. This is the Solo button which will mute the other two video tracks and only show the track you have selected Solo for. Note that the video Solo buttons don't interfere with the audio track playback.
- Lastly, select from the menu bar File | Save or press CTRL + S to save your project. Always a good habit to get into is to press CTRL + S after you do something or make a change. After a while it will become second nature. If for some reason your system loses power or locks up, Vegas Pro 11 has an automatic function that saves the session. Then the next time you open Vegas Pro 11, it will ask if you want to restore this last automatically saved version. I still like to make my own saved copies as I work. I guess it is just a good habit I have acquired working with computers over the years. Occasionally the auto saved version isn't as up-to-date as my personally-saved version, so I have found it very helpful. As with any project you work with over an extended period of time, it is advisable to make a backup copies of the Vegas Pro 11 session and all of its associated media files on a backup drive in case of hard drive failure. There is nothing worse than losing two months of hard work and edits because a hard drive fails.
- Your Vegas Project should look something like the following screenshot:
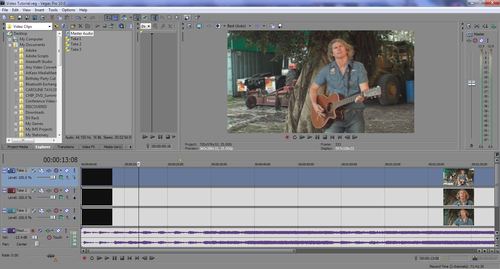
You have just successfully imported the required media files for our project. As you watch and listen to the video tracks by using the Solo buttons on each track, ensure that the vocals audio and the lip movement of the singer are in sync. If not, ensure that all four of the clips are as far to the left of the timeline against the left wall as possible. This will ensure the lipsync of the music video is correct.
Moving on...
Although this tutorial has the media supplied in a digital format that makes importing an easy process, from time to time you will need to bring your media into your project from a variety of sources. This will be dependent upon things such as what kind of camera you are using, or even media formats the media is supplied to you in, such as XDCAM. Here we will discuss some of these options.
If you have a client that supplies you with media that needs to be edited on an external hard drive, you may wish to import that media into the session. Although it is okay to drag and drop media clips onto the timeline, this isn't necessarily a good idea with a lot of clips, especially if they are in a different kind of format or even a variety of formats. Under the File menu you will find an Import menu that gives you four choices: Media, Broadcast Wave Format, DVD Camcorder Disc, and Closed Captioning. Although the last three are of a particular media type, the Import Media menu will open up the Import Media window, which allows you to point the system to an external hard drive, or other device depending on where the files are stored:
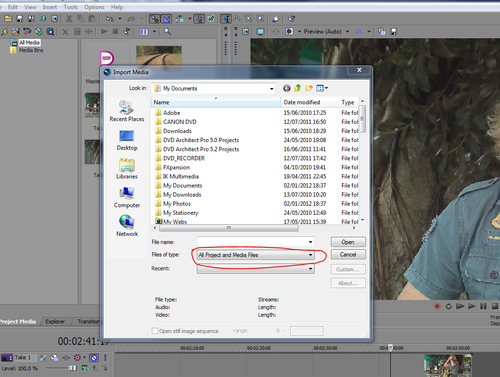
Inside the Files of type drop-down menu circled in the previous image, you will find pretty much every media type available from Vegas Project Files to XDCAM EX MP4 files, and everything in between. Here you can select multiple files and import them into our Project Media bin. If the client can't leave the hard drive or device with you, then first copy all of the files onto your editing hard drive before importing them into the project. If you import them from the client's drive and they take it away after the session, the next time you open the session the project won't be able to find the files and will leave them offline and unviewable.
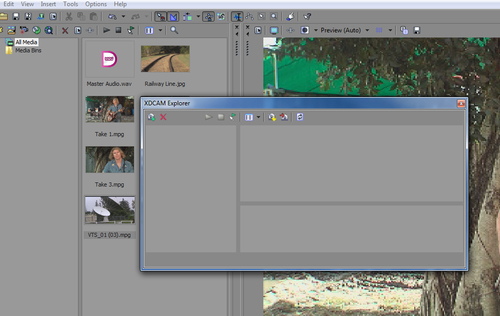
Another special file format is the XDCAM format. Usually if you are dealing with XDCAM files you will be looking at them directly on the SONY XDCAM camera's hard drive or removable drive disk. Vegas Pro 11 has a XDCAM Explorer window specifically for importing these files. With the XDCAM device connected to your system you can open XDCAM Explorer. Here, the files can be selected and imported into both your session and onto your system's editing hard drive:
If you have a camera that records to digital tape in DV or HDV format or are presented with one, then the footage needs to be imported into the system and into the project. Once again Sony Vegas Pro 11 provides a dedicated Capture Video window. Under the File menu select Capture Video. You will be presented with the option window to select if your tape format is DV or HDV/SDI.
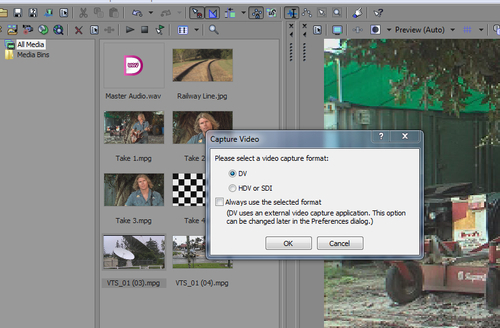
Select the format appropriate to your camera and the appropriate Sony Video Capture application will open. This will allow you to take control of your camera to select and import the footage to your system and project. As this is a real-time process, you can watch the importing footage on the in-built monitoring window. The following screenshot shows the HDV/SDI Capture window:
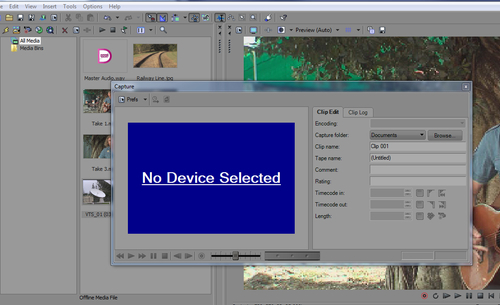
This window allows you to select the footage you wish to capture as the video plays, as well as defining where you wish the files to be stored on your system and to allocate a name for that particular set of captured files.
As you can see, Sony Vegas Pro 11 has allowed for pretty much every file type available to you for importing into your project. One of the beauties of this editing software is that it allows you to have different formats on the timeline that can all be edited and rendered out to a final format easily.
We have just touched on some of the main methods for importing media and footage into your project. As you do more editing and projects, you may be presented with a variety of different formats to contend with, but you will have the confidence to know that Vegas Pro 11 can deal with pretty much anything that is thrown at you. The Sony Vegas help centre is a great place to go (it can be found under the Help menu) to cover these and other methods in more detail.