
The best way to get to know how EQ effects audio is to apply it to specific sounds. Here we shall do just that with the sounds in our project:
- Make sure our new audio tutorial project is open. If the Tones clip is still on the timeline then delete it from the timeline and let's use the Explorer tab to drag the Acc Guit clip from our audio tutorial files onto the timeline.
- Once on the time line, slide the media clip all the way to the left so it is hard against the track header. Double-click onto the Acc Guit media clip, which represents the acoustic guitar track and select the loop function below the timeline, circled in yellow in the following screenshot:

- This loop function is very handy when replaying a section of a project over and over so we don't have to keep restarting the playback. In this example, as soon as the cursor reaches the end of the Acc Guit clip it will jump back to the start of the clip and keep playing from there.
- Now just like our video tracks, there are a couple of ways to apply effects to this clip. We can either add it in the Track FX Insert or on the Event FX Insert. Here we will use the Track FX.
- Click on the Track FX icon on the track header and our Audio Track FX box will open to reveal the pre-inserted plugins discussed previously. Select the Track EQ tab:
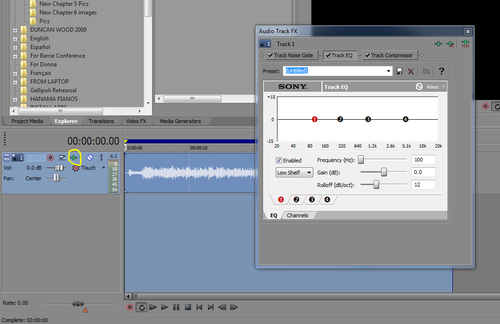
- You will notice that the Track EQ has four dots representing the four EQ bands that can be adjusted. The red dot is the currently active band that changing parameters will affect. You will also notice the four tabs that represent each band and allow you to select the four different EQ bands. You can select which EQ band by clicking on the dots on the EQ line.
- Parameters can be changed by moving the three sliders under the EQ graphic, or an even easier method is to click and hold the numbered dot and move it around. Let's click the number 4 dot and slide it up and a little to the left.

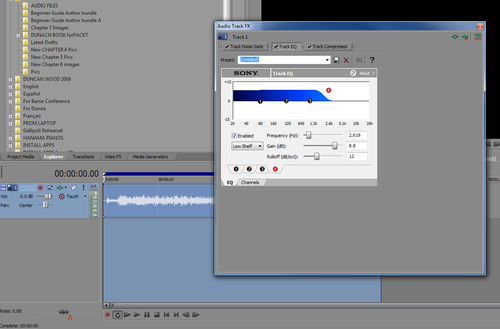
- While you were moving the dot, you must have noticed that the Frequency and Gain parameters moved to correspond with the changes you made to the number 4 dot. As the drop box to the left of the Gain parameter suggests, this EQ band is currently a High Shelf EQ, which means that it affects the frequencies above the frequency selected.
- If we now slide the Roll Off parameter, you will notice that the steepness of the curve going up to the shelf increases or decreases. The High Shelf EQ is similar to the Treble EQ setting on your home/car stereo or music device.
- If we now change the drop-down menu from High Shelf to Band you will see that the Band EQ only affects a particular frequency with either more or less frequencies on either side of the selected frequency, dependent upon the bandwidth parameter.

- If you want to slide the dot and only change the Gain more accurately, hold the Ctrl button while moving the dot and it will lock the mouse vertically. To move only the Frequency, hold Ctrl + Shift to lock the mouse horizontally. The band type of EQ is similar to the mid EQ on your home/car stereo or music device.
- The third type of EQ is Low Shelf, which is the same as the High Shelf except that it changes the frequencies below the selected frequency. This EQ is similar to the bass EQ on your home/car stereo or music device.
- All four of the bands in our Track EQ can be changed to any of these three types of EQ. The choice is yours to suit your creative taste. One good rule of thumb to use is that subtractive EQ is often a better way to go than additive EQ, which means there are two ways to make a sound brighter. One is to add high frequencies and the second is to remove lower frequencies and turn the overall volume up. This second method is called subtractive EQ, although adding a touch of top end can suit certain sounds better. Also, if you aren't using a particular band in your EQ, it can help your system resources to uncheck the Enabled box to turn that particular band off.
- Just like our video plugins, there are preset settings in the Preset drop-down menu where you can also save your favorite EQ settings.
- One of the main things to be aware of is that certain sounds don't contain all the available frequencies, so if you had a low bass sound and you were adjusting the high shelf EQ around 15 kHz, then you probably are not going to hear any difference to the sound as the bass sound won't have much in it above 10 kHz.
We have now studied and made ourselves familiar with the available settings of the Track EQ plugin. So let's now try out these settings on our Acc Guit Media Clip.
Now that we have the acoustic guitar (Acc Guit) audio clip on the timeline, let's double click the clip to create a loop section. Turn on the loop playback by selecting Ctrl+Shift+L and hit the space bar to play back our selection. While it is playing, manipulate the EQ parameters to listen to what they do and try to adjust the acoustic guitar's Track EQ to a sound that you like. Once you have a setting you like, don't forget to save the project and also save the EQ setting into a new preset called Acc Guit. While you are making changes, a good way to hear the difference between the raw guitar and your new EQ setting is to un check the Track EQ to hear it raw and then re check it to hear the new EQ.
There is an old saying in the music business and that is "Compression Is Your Friend!" Having said that, you have to be careful not to use too much compression and the best way to do that is to truly understand what it does.
In the early days of recording audio, the only way one could adjust the levels of a recorded track was to move the microphone closer on the quiet moments and further back on the louder ones. Much in the same way a live singer will move his microphone closer to his mouth when singing quietly and pulling it away from his mouth when hitting the big notes. Of course this is handy as the singer knows when he is getting loud or quiet. As a recording engineer, it is almost impossible to know when sounds will be loud or quiet, so a tool was needed that could adjust those levels automatically, thus the birth of the audio compressor.
As its name suggests, it squashes the signal down so that it isn't as dynamically loud as before, but there is also a selection of parameters to help make the compressor work in a way that doesn't overly affect the sound, unless of course that is what you want it to do.