
In this chapter
Early computer hobbyists used everything from discarded paper tape drives to cassette tapes to store files. For a while, Radio Shack sold cassette tapes that didn't have the normal plastic leader at the head of the tape so that computer users didn't have to wind tapes past the leader by hand.
Fortunately, the fastest advances in computer science have revolved around memory and storage. The original IBM PC had two single-sided 5 1/4-inch (160KB) floppy disk drives, period. Hard drives weren't supported by the IBM PC BIOS until the 10MB hard disk became the standard in the early XTs.
Floppy disks have evolved to the point where four standard formats are in common use. A fifth format—Extra High Density—is available, but few manufacturers support it yet. You learn more about these sizes later in this chapter.
Hard disks have changed the most. A number of technology standards have come and gone as hard disks have steadily grown larger and faster. Drives that are capable of storing more than twenty gigabytes (approximately two billion bytes) now cost less than $200.
CD-ROM drives, which can hold more than 640MB of data, are widely available in today's systems and have become the standard for software. Also, with the advent of both write-once (CD-R) and rewritable (CD-RW) CD-ROM media, CDs now have many more uses, such as backups and custom software distribution. Another format that has recently come on the scene is DVD-ROM, which is a new CD-style format that can hold more than 17GB of information. The main drawback of DVD-ROM drives at this time is their relatively slow speed. Although some CD-ROM drives are as fast as 72x speed, the best DVD-ROM drive is currently around 16x speed. With regard to creating your own DVD-ROMs, DVD-ROM recorders are—at the time of this writing— expensive (more than $800 a drive) compared to CD-R and CD-RW; eventually, this format will probably surpass the current CD-R standard.
Magnetic media come in two basic flavors: floppy and hard. The following sections give you the technical background on how disks work.
Although this material doesn't make using the COPY or FORMAT commands any more or less effective, knowing this information can save your data. Magnetic disks, like humans, are mortal; they sometimes suddenly drop dead. Usually, users make mistakes that wreck disks, but sometimes disks just give up the ghost unexpectedly or get trapped in a lightning zap. Disks are generally prone to hazard. This, of course, is why backups are so important. Highly specialized disk-editing software such as Norton Disk Doctor and others of its ilk can help you to revive and resurrect lost data, but only if you know how disks are formatted and how data is stored.
Almost everyone is familiar with the way audio tape recorders work. Because tape recorders and computer disks use similar technologies, take a moment to review the form of the technology you are probably most familiar with.
In a cassette tape, a long thin ribbon of plastic is coated with an emulsion of ferrous oxides (magnetic coatings), enclosed in a protective plastic case, and passed through a tape transport. The transport mechanism pulls the ribbon of tape through at a controlled speed and brings the tape into contact with three magnetic tape heads.
Most tape recorders use an erase head, a record head, and a playback head. On some inexpensive tape recorders, a single head is used for both playback and recording. This setup doesn't, by itself, lower sound quality; it means only that you can't listen to the tape as it is recorded.
When you're recording a tape, the erase head randomizes the magnetic particles in the oxide emulsion, effectively erasing any previously stored information (sound).
The stereo record head actually has two heads: one for the left channel and one for the right. Sounds are converted into electrical fields. As the tape passes across the record head, it passes through these fields, and the random magnetic particles align into replicas of the field through which it passes.
When the tape passes over the playback head, the magnetic patterns on the tape are picked up much like a microphone's diaphragm picks up sound waves. The magnetic images create electrical fields that then can be turned back into sound waves with a speaker.
A standard stereo cassette tape has four tracks of sound information, two in each playback direction. The ribbon of tape has four discrete stripes of magnetic information.
Now imagine that you make a cassette tape several inches in width. Cut circular discs out of the tape, enclose them in a plastic casing, and build a machine that locks onto the center of the disc and rotates it like a potter's wheel. To the machine, add a magnetic tape head mounted on an arm that can float over the surface of the disc. As the magnetic disc rotates, the head can be positioned to create magnetic stripes in concentric rings, just like the rings in a tree trunk, except that they are symmetrical and evenly spaced.
Voilà! You have just invented the floppy disk!
Actually, you must complete a few steps before you have a floppy disk drive. First, discard the record head. Because you are recording only the ones and zeros of binary numbers (the bits in a byte), you can simply record over previously recorded information. Because there are only two possible signals rather than varying shades of musical nuance, when you write a one or a zero, it effectively overwrites the previous character. You need only a single read/write head for each side of the disk, so your floppy disk needs two head assembly units to be double-sided.
You also need to record a formatting track to parallel or interweave with the data tracks so that a computer can say, “Record this group of bytes in this location and then read the bytes on that other location.” Provide internal programming on a ROM chip so that DOS only needs to send instructions to the disk drive to read and write data from any location at any time. Oh, yes, and hide all this complexity from computer users. Now you have invented the usable floppy disk!
Take it one step further. Coat a stack of ceramic or metal disks with a much denser magnetic material, mount them on a spindle, and spin them much faster than before. Then, mount multiple high-density read/write heads, one for each platter side. Beef up the response times and speeds for all the moving components. Seal all these components into a dust-free can; now you have invented the hard disk, also called a fixed disk because the platters cannot be removed without the user damaging them.
The mechanical parts and electrical circuits of disk drives are complex. Although a disk drive is part of a PC system, the drive is a machine in its own right. DOS relies on the driver programs of the BIOS (the basic input/output system, found on ROMs inside your computer) and on ROMs within the drive to handle the low-level control of the drive's mechanical components.
All disk drives have certain common components: read/write heads, head-positioner mechanisms, and disk-spinning motors. All disk drives record on disks. Some disks are removable, and some are built into the drive. Both fixed disks and removable disks spin on a center spindle within the disk drive.
Today, most PCs incorporate both fixed disks and removable disks. The BIOS extensions of DOS make provisions for both types of drives. Even with their common features, fixed and floppy disk drives have some important differences, which are described in the following sections. Knowing these distinctions can help you understand how each type of drive operates in your system.
Drives with built-in disks are called fixed disk drives or, because their disks are made of rigid material, hard disk drives. You can shorten these terms to fixed disk and hard disk.
A hard disk drive can contain more than one hard disk, or platter. Multiple platters are arranged in a stack, with space between the individual platters. Hard disk drives have great storage capacity; these drives can hold anywhere from a few million to a few billion bytes of data.
Figure 6.1 shows a cutaway view of a typical older hard disk. The platters are the drive's magnetic disks. A head-positioner arm holds the read/write heads above and below each surface of each platter. When the drive leaves the factory, the components are not exposed, as they are in this figure; the drive is sealed to keep dust, hair, dirt, smoke, and other contaminants out of the delicate mechanical parts.
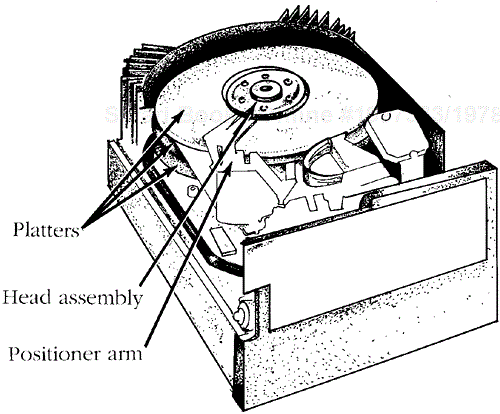
These parts are delicate because the read/write heads must float very close to the surface of the platter without actually touching them. A single hair on the surface produces a reaction similar to driving the family car over a fallen tree trunk.
Hard disks have the advantages of quick operation, high reliability, and large storage capacity. Hard disks have the disadvantage of tying the data stored on the disk to the PC in which the drive is installed. Because the hard disk's platters cannot be removed, the data is tied to the drive. Moving an entire hard disk to another computer simply to use the hard disk's data is impractical.
One way of sharing files among many computers is to run wire or fiber-optic cables between machines and allow a single computer to offer file services for all the connected workstations. Within this idea, you find the genesis of computer networking.
In a PC system, the disadvantage of tying data to the hard disk is counterbalanced by the PC's floppy disk drive. Floppy disks are protected by a permanent jacket, which encloses the flexible disk. The flexible disk inside the jacket is made of Mylar and is coated with sensitive magnetic film.
The first floppy disks were eight inches in diameter. By today's standards, the early 8-inch floppy disks didn't store much data.
A smaller version of the 8-inch floppy—the 5 1/4-inch mini-floppy—quickly became the floppy of choice for PC designers because of its smaller size. The 3 1/2-inch microfloppy is yet another departure from its larger, older cousins because it incorporates a rigid plastic case (its jacket) as a protective cover. The 3 1/2-inch Mylar disk inside the microfloppy disk is flexible, like the media in 8-inch and 5 1/4-inch floppies.
Not surprisingly, given the history of computer development, each new generation of floppy has gotten smaller in physical size. What does surprise many new users is that the physically smaller disks each have greater storage capacity than did their larger ancestors. If some hardware manufacturers have their way, a very high-capacity 2-inch floppy disk is in your future.
The original IBM PCs used a single-sided 5 1/4-inch floppy disk that stored only 160KB of data. Later drive mechanisms in PCs, XTs, and their clones added a second read/write head assembly to access the other side, and the double-sided, double-density 5 1/4-inch floppy disk that had the capacity to store 360KB was born. Further advances in drive technology enabled IBM to introduce the double-sided, high-density 5 1/4-inch floppy with the AT generation of computers. These new disks had the capacity to store 1.2MB, almost quadruple the storage of the double-sided variety.
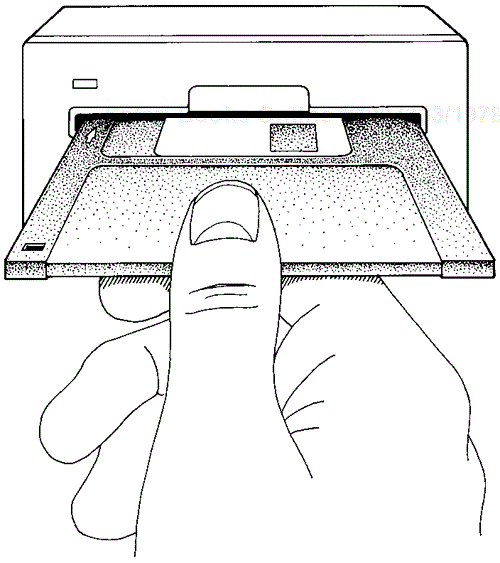
When IBM introduced the PS/2 computer models, it used a disk drive type that had been pioneered on the Apple Macintosh. A 3 1/2-inch floppy disk that was capable of storing 720KB of data was the standard drive on early PS/2s. Because 720KB was a step down from the 1.2MB available on 5 1/4-inch disks, the development of a 3 1/2-inch high-density format was accelerated. Most of today's 3 1/2-inch drives are high density but, like their 5 1/4-inch cousins, they also can read and write double-density disks. Figure 6.2 shows the 3 1/2-inch disk drive.
You often store data on floppy disks that should not be erased. To ensure that the files on a floppy disk do not get erased accidentally, you can write-protect the disk.
To write-protect a 3 1/2-inch disk, locate the plastic write-protect shutter and slide it so that the window is open (see Figure 6.3).
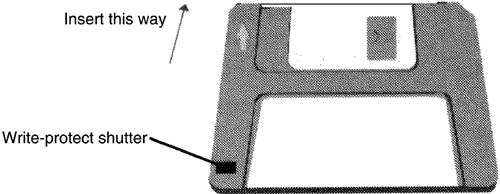
When a disk is write-protected, the drive cannot write new information on the disk, even if you inadvertently issue a command that attempts to write data to the disk.
Thus far, the discussion of the mechanics of magnetic disk technology has centered on the physical. The following sections of this chapter introduce you to the logical aspects of how drives are constructed and used.
The read/write heads used in magnetic disk drives bear little resemblance to the heads in a tape recorder because they must be mounted in such a way that they can cover the entire radius of a disk. Figure 6.4 shows the hardware for read/write heads.
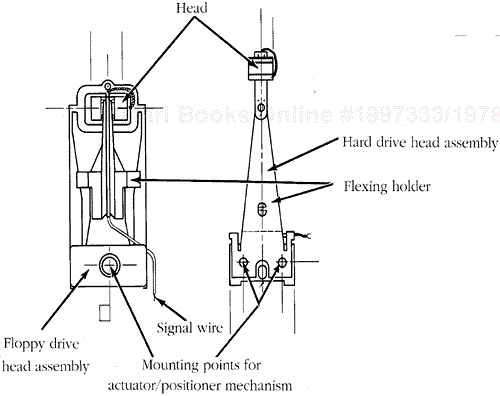
As you can see, the heads are held in place on flexible metal assemblies. Wires that carry electrical signals connect to a flexible ribbon cable. The ribbon cable absorbs wire movements when the head assembly moves back and forth from track to track.
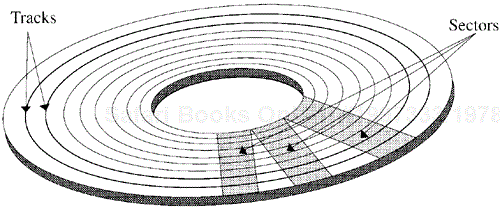
Regardless of the type of disk drive, all disks spin on a center axis, just like a CD spins in your stereo system. A floppy disk spins at 360 revolutions per minute; the rotational speed of a hard disk is 10 times greater (approximately 3,600rpm). The heads, which are positioned above the spinning surface of the disk, are held and moved in distinct steps by an actuator arm and head positioner.
The actuator arm and positioner move the heads over the tracks, which are thin stripes of magnetically recorded information. Magnetic disk tracks are concentric circles, not a spiraling groove. Each track is broken up into areas called sectors. As you can see in Figure 6.5, sectors are all the same size physically. At the inside track, the sectors are very close together, but at the outermost track, the edges of the sectors are farther apart.
A disk drive's multiple heads are affixed to a single positioner mechanism, which can move only in a straight line. When one head moves one track in or out on its side of a platter (or floppy), the other heads all move one track on their respective sides of their respective platters.
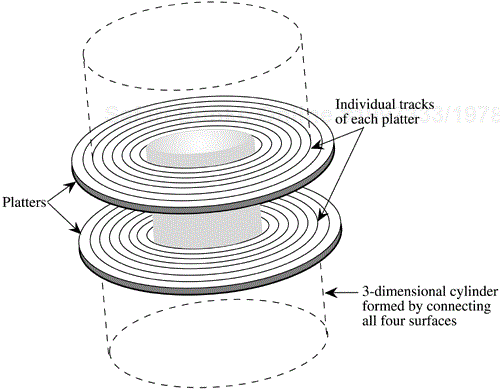
If the disk has more than one platter—and most hard disks do—all the heads are positioned on the same track on each of the platters. This alignment of heads on the same track position on different sides of the platters is called a cylinder, a term derived from the imaginary shape of the stacked circular tracks at any one stopping point of the positioner mechanism (see Figure 6.6).
On most drives, only one head can be active at one time; the drive must activate all its heads in sequence to write (or read) all tracks across the platters at a particular cylinder position. To fill a cylinder, a four-head drive writes a track with Head 1, Head 2, Head 3, and finally Head 4. The head positioner moves one cylinder, and the sequence repeats. Processing all tracks of a cylinder before moving to the next cylinder is efficient because all the heads are already in new track positions. As you can see, the data for a file is spread across all the platters of a hard disk and on both sides of a floppy.
Another factor that spreads files across disks is sector interleaving. Hard disks spin quickly—so quickly that some hard disk mechanisms cannot write a sector and be ready to write the next sector as it spins under the head. If the drive waits for a full revolution of the platter, however, too much time is wasted. For this reason, hard disks use an interleave; that is, they write a sector and then skip two before writing to the third. Interleaves are expressed in ratios, so a hard disk that writes one and skips two has a 1:3 interleave. Some fast drives do not have to wait; they can easily write to the next sector, giving the drive a 1:1 ratio.
When you create files, DOS writes to all the empty sectors on a cylinder and then moves to the closest cylinder with empty sectors. As you use a disk over a period of time, you naturally create and destroy many files.
DOS creates, on the outer tracks of a disk, a table called the file allocation table (FAT). When you delete a file, DOS simply changes the FAT to mark as vacant the tracks and sectors that the file occupied; the file's directory information is similarly voided. Remember, drives do not have an erase head, so even “erased” files are still present on the disk until you write over them. If you erase a file accidentally, you can use the UNDELETE command or a commercial program such as PC Tools or the Norton Utilities to get it back. Just make sure that nothing writes to the drive before you unerase the file; otherwise, the empty sectors can be used for another file.
→ For more information on UNDELETE, see Chapter 8, “Managing Your Files,” p. 191.
Imagine for a moment that you create a bunch of files on a disk; some are small and some are large. Use the DOS DEL command to delete only the smallest files, and you can free up enough room to store another large file. The empty spaces on the disk are distributed across the disk much like the holes in a slice of Swiss cheese. When you tell DOS to create a new large file, the first cylinder to be written to is the one closest to the head position that currently has available sectors.
When all the sectors on that cylinder are full, the drive moves the heads to another track and fills all the available space on that cylinder. The process continues until all the data in a file is written. The FAT is updated to show the locations of the data. This process of writing data on widely dispersed cylinders is called file fragmentation.
File fragmentation is not a dangerous condition, but the constant repositioning of the heads slows the operations of the drive and puts extra strain on the actuator mechanism. For these reasons, DOS offers the DEFRAG command, which rearranges files on the disk so that they are contiguous.
→ For more information on improving your system's performance with DEFRAG, see “Defragmenting Your Disk,” p. 177.
When a disk is blank, as it is when it comes from the factory, the disk contains no tracks and, therefore, no information. DOS has to prepare the disk to accept data. This preparation process is known as formatting.
As its name implies, formatting places a uniform pattern of format information in all tracks of the disk. The format information in each track enables DOS to slice each track into smaller, more manageable components of fixed size. These components are called sectors.
Figure 6.7 shows the sectors of a floppy disk, represented as slices of a disk's surface. The figure shows the boundaries for every other sector. The concentric arcs between the indicated sectors are the disk's tracks. Notice that each track has the same number of sector boundaries (and, therefore, sectors).
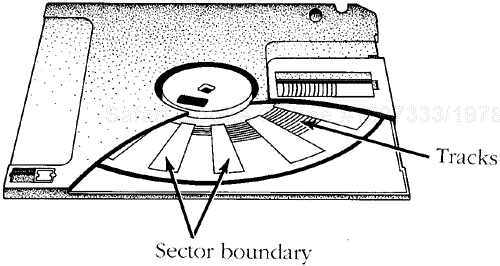
As you can see in Figure 6.7 and previously in Figure 6.5, the arrangement of sectors creates V-shaped areas of the disk that remain unused; these areas are sector boundaries. Although you might think that this construction is a waste, it makes the mechanics of drives easier to work with because the sectors are all a uniform size. Having a uniform size for sectors provides DOS with a standard unit of data transmission.
DOS reads and writes disk data one sector at a time. Some of DOS's internal file-system bookkeeping is performed by sectors. To DOS, a sector is the disk's most manageable block of data. By default, DOS uses 512-byte sectors.
The number of sectors formatted into each track is tied to the data density the drive uses when reading or writing data. The more dense the recording in a track and the more tracks on a disk, the more sectors DOS can format. Designers keep reliability in mind when selecting the number of tracks and number of sectors per track. Floppy disk drives are designed with more margin for error than are hard disk drives. You can easily see why some margin for error is desirable for a drive that must ensure the mechanical alignment of disks that users simply shove into the drive door. Floppy disk drives must also be able to read disks that might have been stored in a place where magnetic fields weakened the disk's magnetic imprint.
Despite the protective disk jacket, the magnetic-coated surfaces of many floppy disks can be contaminated by smoke, dust, or fingerprints. A drive must be able to tolerate some disk contamination and still perform without errors. Clearly, no disk drive can avoid errors if the disks it uses are abused. Drive heads cannot read through liquid spills, for example, or through dents made by a ballpoint pen.
Hard disk drives have greater data-storage capacity than do their floppy cousins. This capacity is due in large part to the precision with which the drive's critical components work with the special oxides that magnetically coat the platters. In addition, the working parts of the drive are sealed at the factory in a way that protects the platters, positioners, and heads from contamination. With outside influence on these critical components sealed out, a hard disk drive can offer more tracks and sectors in the same space that a floppy drive occupies. When you consider the fact that most hard disks have more than one platter, each of which is capable of two-sided operation and each of which provides more tracks than a floppy disk can, you begin to understand how hard disks have such large storage capacities.
Disk drives have a universal way of dividing a disk's available physical space: The number of platters, number of sides, number of tracks, number of bytes per sector, and number of sectors per track are the specific details that factor into this logical division of disk space. The specification for a disk's use of its physical space is called the disk's format.
PCs use a variety of disk drive sizes and formats. Some older PCs, for example, have both 5 1/4-inch and 3 1/2-inch floppy drives that can handle both double-density and high-density disks, while newer PCs only have a 3 1/2-inch floppy.
Most PC users and software manuals differentiate one format from other formats by using the byte-capacity figure for the desired format. Each new version of DOS has maintained support for the disk formats that were supported by its predecessors. This support ensures that disks made with older drive formats can be used with current versions of DOS.
The first DOS-supported disk drives allowed for twice as many tracks on a 5 1/4-inch floppy disk as the standard 5 1/4-inch disk formats of the time could accommodate. These DOS formats were called double-density formats. The original PC disk size and format was 5 1/4-inch, single-sided, 40 tracks, with eight sectors per track and 512 bytes per sector. These disks are called single-sided, double-density (SSDD) disks. The capacity of this 8-sector, single-sided format is 160KB (KB equals 1,024 bytes).
Note
Computers generally store data in groups of eight bits. An 8-bit group of data is called a byte. By design, digital computers are most efficient when working with numbers as some power of 2. Numbers that are powers of 2 can be represented directly in binary notation.
Computer programmers and designers apply this power-of-2 convention to the expression of a quantity of bytes. A kilobyte, for example, is 1,024 bytes; 2 kilobytes is 2,048 bytes, or 2KB. A megabyte, or 1MB, equals 1,024KB. A gigabyte, or 1GB, is 1,024MB.
You don't have to know about the use of numbers in the power of 2, except to note that capacity expressed in kilobytes, megabytes, or gigabytes uses 1,024 as the multiplier rather than 1,000 because a byte has eight bits, and 1,000 is not evenly divisible by eight. For scaling purposes, however, you can think of 1KB as representing approximately 1,000 bytes.
The capacity of disk drives is stated in kilobytes, megabytes, or gigabytes. The storage capacity of a modern hard disk drive is usually anywhere from 2GB to 80GB. The typical capacity of floppies ranges from hundreds of thousands of bytes to more than 2MB, so a floppy drive's capacity can be described in either kilobytes or megabytes.
As you learned earlier, the two types of 5 1/4-inch floppies have different storage capacities (either 360KB or 1.2MB). Similarly, a 3 1/2-inch disk can store either 720KB or 1.44MB. Still another standard format for 3 1/2-inch disks was introduced a few years ago, offering 2.88MB of storage. To date, this format has not widely caught on because you must have a floppy disk drive and disks manufactured specifically to achieve 2.88MB storage capacity.
Table 6.1 summarizes the common floppy disk formats.
Table 6.1. DOS Floppy Disk Formats
| Format | Tracks | Sectors/Track | Total Sectors | Usable Capacity |
|---|---|---|---|---|
| SSDD | 40 | 8 | 320 | 160KB |
| DSDD | 40 | 8 | 640 | 320KB |
| SSDD-9 | 40 | 9 | 360 | 180KB |
| DSDD-9 | 40 | 9 | 720 | 360KB |
| DSDD-9 | 80 | 9 | 1420 | 720KB[*] |
| DSHD-15 | 80 | 15 | 2400 | 1.2MB |
| DSHD-18 | 80 | 18 | 2880 | 1.44MB[*] |
| HD-36 | 80 | 36 | 5760 | 2.88MB[**] |
[*] 3 1/2-inch formats [**] Requires special disk and disk drive | ||||
The process of formatting a blank disk places on the disk some data that is not part of the disk's total capacity. A 1.44MB disk, for example, actually holds more than 1.44MB of information. You cannot use this extra space, however; the space is reserved for sector- identification and error-checking information. If you buy disks for a 1.44MB drive, the identification label might say that the disks have 2MB capacity; disks for a 720KB drive might indicate 1MB capacity. To understand this apparent discrepancy, you need to understand the difference between total, or raw, capacity and usable, or formatted, capacity. The larger of the two numbers for the same disk is considered to be the raw capacity of the disk.
Raw capacity includes the space that the formatting information occupies. The smaller of the two numbers for the same disk is the usable capacity of the disk. This number of bytes is available for storing files after the formatting information has been put on the disk.
Hard disk manufacturers sometimes advertise the raw capacity of their drives instead of the usable capacity. Your 80MB drive, therefore, might give you only 78MB when formatted. Fortunately, most manufacturers of hard disks state the capacity of their drives as formatted capacity. Hard disks also lose some overhead space. If you have any doubt as to the meaning of a hard disk's stated capacity, ask the dealer whether the capacity is determined before or after formatting. In this book, disk capacity refers to usable capacity after formatting.
Formats for hard disks nearly always employ 512-byte sectors, usually with 17 sectors per track. There is an alphabet soup of hard drive types: MFM, IDE, RLL, ESDI, SCSI, and so on. Each type of hard disk uses different numbers of sectors per track. You have to worry about these differences only when you are installing a hard disk drive. The manufacturer of the drive provides you with head, sector, and track information specific to your drive.
You can understand the concept of hard disk capacity by remembering the concept of cylinders. Hard disks, you might recall, have two or more heads. Remember that a cylinder is the alignment of all the heads on the same track on both sides of each platter. A disk with 306 tracks on one side of one platter has 306 cylinders. The total number of tracks on the disk is the number of cylinders times the number of heads. The disk's capacity in bytes is the number of tracks times the number of sectors per track times the number of bytes per sector. To obtain the capacity in kilobytes, divide the result by 1,024. To obtain the capacity in megabytes, divide the kilobyte total by 1,024. For approximations of capacity in megabytes, you can divide by a rounded 1,000.
DOS does not provide low-level format data for a hard disk as it does for a floppy disk. Hard disks normally are given a low-level format at the factory, so you seldom need to initiate a low-level format on a hard disk. DOS uses the low-level format as a base upon which to perform its high-level format.
In a discussion of hard disk formatting, the term format refers to the high-level format initiated by the DOS FORMAT command. During the formatting of a hard disk, DOS initializes its bookkeeping tables and then writes dummy data into the disk's tracks. From your point of view, formatting a hard disk is the same basic operation as formatting a floppy. DOS keeps the details of the low-level format hidden and out of your way.
Beginning with DOS 6.0, Microsoft decided to include a disk-compression program called DoubleSpace. The decision to include it was apparently prompted by the popularity and success of third-party disk compression programs such as Stacker. Microsoft refined and improved DoubleSpace in DOS 6.2.
DoubleSpace enables DOS to compress data automatically when you store the data on disk and to uncompress the data when you use it. DoubleSpace works transparently; you have no indication that the program is compressing your files, except that your disk can hold more data than before. You can select which drives use compression and which do not. You might decide, for example, to compress drive C, but not drive D, which contains OS/2.
Caution
Only if the DoubleSpace driver is loaded can you read a compressed drive. If you use another operating system in addition to DOS—such as OS/2, Unix, Xenix, or Windows NT—you cannot access a compressed drive while you are running that other system.
Using DoubleSpace provides one major advantage: The amount of data you can store on your hard disk is roughly doubled because DoubleSpace is analyzing your data and squeezing more information into less space. DoubleSpace uses a compression algorithm similar to that used in compression programs such as WinZip. The exact amount of additional data you can store varies, depending on the characteristics of the data itself, because different data can be compressed different amounts. Text files and some graphics files (such as TIF files), for instance, can be compressed quite a bit. Other files, such as WAV files (used for sound) or GIF files (used for graphics), are already compressed and do not benefit from DoubleSpace.
Using DoubleSpace also has the following minor disadvantages:
DoubleSpace must perform extra work to compress and uncompress data each time you access your disk. This extra work takes time and slows your computer slightly. If you have a 386 or 486 computer, for example, the slowdown is so insignificant that you almost certainly will never notice the difference. On slower computers, however, you might notice that operations involving a lot of disk access seem to run a bit more slowly than before.
DoubleSpace requires some conventional memory—about 50KB if you load DoubleSpace high (into upper memory) by using
DEVICEHIGH.Without the DoubleSpace device driver, a system cannot access a hard disk on which the files are compressed with DoubleSpace. This restriction is not likely to cause problems, but if your computer breaks, you cannot remove your hard disk and use it in a computer that has an earlier version of DOS.
You cannot use DoubleSpace with some disk-intensive programs. This is primarily evident with some game programs that swap screens and sound between memory and disk.
Caution
A drive might contain files that cannot or should not be compressed. The Windows swap file, for example, must remain uncompressed.
When you apply compression to a drive, DoubleSpace makes the drive appear as though it were two drives, with two distinct drive letters. DoubleSpace divides the disk into a compressed drive and an uncompressed drive so that you still can store some of your files in an uncompressed format.
You can decide how much of the disk to allocate for each area. If you don't expect to store any files in an uncompressed format, make the uncompressed drive small (a fraction of a megabyte) and allocate the rest to the compressed drive. Conversely, if you expect to store the Windows swap file on the uncompressed drive, allocate several megabytes to that drive.
DOS assigns a new drive letter to one of the areas so that you can access either area by using the appropriate drive letter. If you apply compression to drive C, for example, DoubleSpace might tell you that from now on C refers to the uncompressed portion of the disk and J refers to the compressed portion.
To install DoubleSpace, type the following command at the DOS prompt:
DBLSPACE
You must not have any other programs running when you first issue this command. In particular, you must not be running Windows or the DOS Shell.
DoubleSpace first asks whether you want an Express or Custom Setup; the default is Express. If you choose Express, DoubleSpace compresses the existing files on drive C. Choose Custom Setup if you want to select the drive to compress. DBLSPACE then installs the DoubleSpace driver in the DOS kernel and reboots your machine.
DoubleSpace also might add a line to your CONFIG.SYS file, such as the following:
DEVICEHIGH=C:DOSDBLSPACE.SYS /MOVE
This line does not load the DoubleSpace device driver; the DOS kernel loads the driver automatically when you install DoubleSpace. Instead, the line moves the driver into upper memory (if you have upper memory blocks available). If you remove this line from CONFIG.SYS, you still load the DoubleSpace driver, just not into upper memory.
You can run DoubleSpace at any time to get information about compression on your disks or to control various facets of DoubleSpace's operation. You run DoubleSpace simply by typing the following command:
DBLSPACE
When DoubleSpace starts, it lists all the available drives that employ compression. For each drive, DoubleSpace shows the total amount of space and current free space available.
Many DoubleSpace operations require you to select a drive, either by using the arrow keys to position the selection bar on one of the drives or by clicking a drive.
To display information about a compressed drive, select the compressed drive, choose Drive from the menu bar, and then choose Info from the resulting menu. (If you do not have a mouse, press Alt+D, and then position the cursor on Info and press Enter.) For a shortcut, you can also double-click or simply press Enter when the drive is first selected.
Figure 6.8 shows the information display for a small compressed drive. In this example, notice that most of the disk is allocated for compressed files and is accessed as drive I; about 2MB is uncompressed and is accessed as drive D.
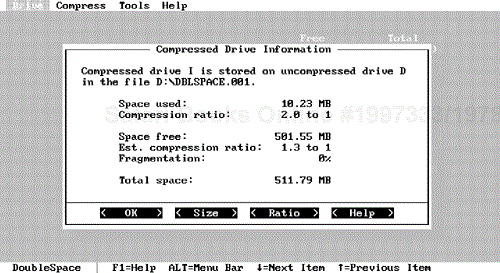
Figure 6.8. DoubleSpace can provide an estimate of free space on a drive based on the current compression ratio of the files.
This figure also tells you that the estimate of 501.55MB free is based on a compression ratio of 1.3 to 1, but the compression ratio that DoubleSpace actually has achieved on the data stored so far is 2 to 1. Therefore, if the rest of the drive is used for the same type of data, you actually are capable of storing more data than DoubleSpace's estimate of 501MB leads you to expect.
Clicking the Size and Ratio buttons enables you to change the size of the compressed area and the estimating ratio, respectively. The following sections discuss both methods.
On each compressed disk, DoubleSpace reserves some room for uncompressed files. To change the size of the uncompressed area (thereby changing the size of the compressed area correspondingly), perform one of the following actions:
When you perform either action, the Change Size dialog box appears (see Figure 6.9).
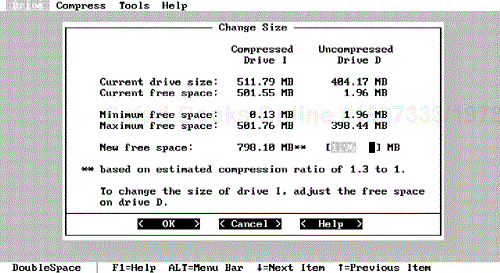
Figure 6.9. The Change Size dialog box will appear whenever you modify the size settings of the DoubleSpace drive.
In this dialog box, you can change the amount of space that DoubleSpace reserves for the uncompressed area.
After you use a compressed drive for a time, you might discover that the actual compression ratio achieved by DoubleSpace is different from the ratio it uses to predict free space. You can ask DoubleSpace to use a different ratio to estimate free space by performing one of the following:
DoubleSpace displays the current ratio that it is using for estimates and the actual ratio that it has been able to achieve in compressing your files so far. If the files you previously stored in this drive are typical of the files that you expect to store in the future, you should change the new ratio to match the ratio for stored files.
In the Change Compression Ratio dialog box shown in Figure 6.10, DoubleSpace is using a 1.3-to-1 ratio to estimate free space but has achieved a 2-to-1 ratio for existing files.
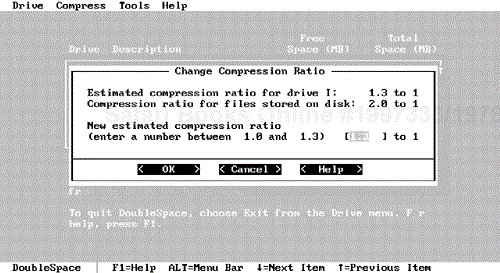
The amounts of total space and free space that DoubleSpace displays are estimates that depend on the type of data you store on the disk. In predicting free space, DoubleSpace takes into account the size and actual free space of the compressed volume and then determines an estimated compression ratio. The general rule is that the larger the amount of free space on your compressed volume, the lower the compression ratio used by DoubleSpace. Thus, the large compressed volume used as an example in this chapter has a low 1.3-to-1 compression ratio.
If you have a smaller compressed volume, DoubleSpace uses a higher compression ratio, closer to 2 to 1. In other words, if DoubleSpace has 10MB of physical disk space free, the program predicts that it can compress 20MB of your data into that space.
The estimates used by DoubleSpace are necessarily off—sometimes way off. As you work with your compressed volume, you can adjust the compression ratio used by DoubleSpace for its estimates.
You do not need to format a compressed drive in the same sense that you format other drives to prepare them for use. When you use DoubleSpace to create a compressed drive, you must have already formatted that drive in the usual way. On the other hand, people often format an existing drive as a simple way of erasing all data on a drive, and you can format a compressed drive if you want to erase all the data stored on that drive. However, you cannot use the standard DOS format on a compressed drive.
To format a compressed drive, select the drive you want to format from the list of compressed drives, and then choose Drive and Format. DoubleSpace displays an alert box that asks whether you're sure you want to format the drive. If you click OK, DoubleSpace erases all data stored in that drive.
If you no longer want to use a compressed drive, you can delete that drive. To do so, select the drive that you want to delete from the list of compressed drives. Next, choose Drive and then Delete. DoubleSpace displays a dialog box warning that you will permanently destroy the contents of the compressed drive and asks you for confirmation. If you click OK, DoubleSpace deletes the drive and all the data in the drive. The space that was allocated to the compressed drive returns to the corresponding uncompressed drive.
You can create a new compressed drive by choosing an option from the Compress menu. DoubleSpace displays a menu from which you can select either of two ways to compress the disk.
To compress an existing disk and all the data stored on it, follow this procedure:
From the Compress menu, choose Existing Drive. DoubleSpace displays a dialog box listing existing uncompressed drives, along with their current and projected free space.
Select the drive you want to compress. DoubleSpace displays a dialog box showing the drive letter that it assigns to the uncompressed drive and the amount of space it allocates to that drive. DoubleSpace allocates the rest of the space to the compressed drive.
You must allocate at least 0.14MB to the uncompressed drive; use this value if you do not expect to need any uncompressed space. If you want to change either of these values, select the value that you want to change.
When you are ready to proceed, choose Continue or press Enter.
DoubleSpace displays a screen informing you that it is ready to compress the drive. DoubleSpace then prompts you to press C. If you press C, the program creates the compressed drive and compresses existing files in that drive. The new compressed drive uses the original drive letter, and the uncompressed drive receives the new drive letter.
If you want to leave existing files in the uncompressed drive and create a new compressed drive from the free portion of the existing drive, follow this procedure:
From the Compress menu, choose Create New Drive. DoubleSpace displays a dialog box listing existing uncompressed drives, along with their current and projected free space.
Select the drive to which you want to apply compression. DoubleSpace displays the drive letter it will assign to the compressed drive, the compression ratio it will use to estimate free space, and the amount of free space it will leave in the uncompressed drive, in addition to the space already used by existing files. The program allocates the rest of the space to the compressed drive.
You must leave at least 0.14MB of free space in the uncompressed drive; use this value if you do not expect to need any more uncompressed space. If you want to change any of these values, click the value you want to change.
When you are ready to proceed, click Continue or press Enter.
DoubleSpace tells you how much time the program requires to create the drive and prompts you to press C to continue. The program then creates the compressed drive, which is empty. All existing files remain in the uncompressed drive. The uncompressed drive retains the original drive letter, and the compressed drive receives the new drive letter.
You can choose two other useful features from the Tools menu: Defragment and Uncompress. A Chkdsk option also is available from the Tools menu, but it just displays information indicating that the Chkdsk function has been replaced by the SCANDISK command.
→ To find out more about SCANDISK, see “Analyzing a Disk with the SCANDISK Utility,” p. 188.
The Defragment option enables you to defragment a compressed volume. You can use either this option or the standard DEFRAG command (from the DOS prompt). If you choose to use this option, DoubleSpace displays a dialog box asking whether you want to defragment the disk. If you choose Yes, DoubleSpace performs the defragmentation. Note that defragmenting a compressed disk does not significantly increase the speed with which you can access the disk (as DEFRAG does for a regular disk), but it sometimes does enable you to store a bit more data on the compressed disk.
Beginning with DOS 6.2, DoubleSpace enables you to uncompress a previously compressed drive. You do so by copying the data on a compressed portion of a drive to the uncompressed portion. Before you choose this option, do the following:
Make sure you reduce the size of the compressed drive as far as possible by using the Size feature previously discussed. Conversely, this action increases the size of the uncompressed portion of the disk.
Make a backup of your compressed volume.
→ For more information about the MSBACKUP program, see “Issuing the MSBACKUP Command,” p. 239.
Caution
Uncompressing a DoubleSpace volume can take up to several hours. Make sure you allocate enough free time to complete the procedure.
After you reduce the size of the compressed drive and back it up, choose Uncompress from the Tools menu. DoubleSpace displays a dialog box indicating that it is going to uncompress files and copy them to the uncompressed portion of the hard drive; it also reminds you to make a backup of your compressed data. When you choose Yes, the drive uncompression begins. DoubleSpace then performs the following steps:
It performs a surface scan using
SCANDISKto determine the reliability of the destination (uncompressed) disk drive.It performs other
SCANDISKtests to verify the integrity of the compressed volume.It performs another surface scan, this time on the source (compressed) disk drive.
It uncompresses the files on the source drive, moving them to the destination drive.
It deletes the compressed drive.
If the compressed drive being deleted is the last one in your system, DoubleSpace removes all references to DoubleSpace from
CONFIG.SYSand marks the DoubleSpace kernel so that it doesn't load when DOS is booted.It reboots the computer.
After the computer reboots, the uncompression is complete. Check your data to make sure that it all appears intact; then, you can use your system as normal.
Tip
If you have programs that do not work with DoubleSpace, but you still want to enjoy the benefits of disk compression, place the programs on an uncompressed volume. Then, when you need to use those programs, reboot your computer and use the Ctrl+F5 or Ctrl+F8 keys to control whether DoubleSpace capability is loaded.
→ For information on using multiple boot configurations, see “Creating Multiple Configurations,” p. 32.
Drift occurs when the alignment of a hard drive's read/write heads drift slightly after continual use of the drive. Drift also can be detected when you remount the drive or stand the computer on its side like a tower. This drifting does not affect the information that has been written to the disk, but the heads might have difficulty locating the information because the low-level format identification information, which is needed to find the data, is no longer aligned beneath the heads. You can eliminate this problem by performing a low-level format of the disk to align the low-level disk tracks with the current location of the heads. Also, magnetic signals that are recorded on disks lose strength over the years, so the manufacturer's low-level format might fade to a point where the heads cannot reliably read format information.
Normally, a low-level format of your hard disk erases all existing data. Certain types of third-party software, however, can perform a low-level format without data loss.