
In this chapter
In Chapter 1, “DOS and the Personal Computer,” you read a description of the steps taken when you boot up your computer. In fact, two types of booting are available. The first is known as a cold boot. This term comes from the fact that the computer's power is off and the unit is not yet warm. As you might guess, the second type of boot is the warm boot.
A cold boot occurs when you turn on the power switch to your system. Some systems also have a reset button. Pressing this button also triggers a cold boot. The difference between a cold and warm boot is simple. A cold boot begins at the absolute beginning, using the Power On Self Test (POST) to check the condition of the system's major components and RAM.
A warm boot, on the other hand, bypasses the preliminary self test, moving directly to the loading of the operating system. A warm boot is triggered when you press the Ctrl+Alt+Del keys all at the same time. This combination of keys was chosen because on most keyboards it is almost impossible to press these three keys simultaneously by accident.
Note
Although the general population might believe differently, computer users have a tremendous sense of humor. This sense of humor has introduced two slang terms to distinguish between cold and warm boots. Because early PCs had a large red power switch on the side of the case, cold booting has been dubbed “Big Red Button Time,” or BRB for short. A BRB is usually necessary only when your system is so thoroughly hung up and confused that it fails to respond to the Ctrl+Alt+Del key combination. Pressing these three keys normally triggers a warm boot, so some anonymous wag named a warm boot “the three-finger salute.”
Note
Using the Ctrl+Alt+Del combination for a warm reboot works only when you are booted straight into DOS. If you are using Windows 9x, using Ctrl+Alt+Del first brings up a task list. From there, you have the option of shutting down or canceling. Microsoft provided this extra step to encourage users to shut down Windows instead of just warm-booting the machine.
The net effect of either a cold or warm boot is to wipe the slate clean and start the computer out fresh. Being the sophisticated computer user that you are, of course, you should realize that rebooting the computer on a whim could be a dangerous proposition. Triggering a boot when a file is open and you're in the process of editing can cause you to lose valuable data because you don't have an opportunity to save the file to disk before the boot takes place.
In the preceding chapter, you learned that during the booting process three files are loaded into memory: IO.SYS, MSDOS.SYS, and COMMAND.COM. You also learned that two other files—CONFIG.SYS and AUTOEXEC.BAT—are used in the boot process as well. The reason for calling this information to your attention again is to point out that DOS is not a monolithic creation. Rather, DOS is composed of many modular components working together.
DOS is not, however, a mind reader, so you are required to specially prepare bootable disks capable of starting your computer. You can create bootable disks in two ways: You can use the FORMAT command, with the /S switch, or you can use the SYS command.
When you use the FORMAT command to create a bootable disk, using the /S switch causes the newly formatted disk to contain the disk portion of the bootstrap loader in the boot sector, IO.SYS, MSDOS.SYS, and COMMAND.COM. If any of these four conditions is not satisfied, you cannot use the disk to start DOS.
Using the SYS command to make a disk bootable requires you to know a few undocumented facts about the way boot disks are constructed. For a disk to be bootable, the following conditions must be met:
IO.SYSmust be the first directory entry in the root directory of the disk.MSDOS.SYSmust be the second entry in the root directory.IO.SYSmust be the first physical file on the disk.
Knowing these three rules, you now can understand more readily why the SYS command so often reports the No Room for System on Destination Disk error message even though the disk has plenty of free space. If files already are written on the disk, chances are that the first directory entry in the root is taken.
Many years ago, when DOS was well on the way to becoming the number one bootlegged software of all time, the DOS development team came up with the /B switch to the FORMAT command. Sending someone a bootable disk is a violation of your DOS software license because that disk enables the person to start up a computer with software for which he or she hasn't paid. The idea behind the /B switch is to reserve space on the disk so that you can use the SYS command later to make the disk bootable.
In practice, the /B switch of the FORMAT command simply copies IO.SYS and MSDOS.SYS to the newly formatted disk, leaving off COMMAND.COM and the bootstrap loader. This restriction ensures that the SYS command can come along later and finish the job of making the disk bootable. You might need the /B switch only once every five years, but it can come in handy.
These days, finding a computer system lacking a hard drive is unusual, if not impossible. The single major exception to this rule is a network workstation where the file server provides all the hard drive storage needed (at one time this was very common in Novell-based networks). Because the boot process must be local to the workstation on a standard PC, booting from a floppy in this case is a no-brainer.
Booting from the computer's hard drive is, in general, more efficient. Hard drives are faster than floppy drives, so booting from the hard drive gets you to a DOS prompt more quickly.
In some cases, though, you need to have a floppy disk to boot from. One scenario would be where COMMAND.COM on the hard drive has been damaged. To recover from this damage, you would need to boot from a floppy and copy the system files back to your hard drive using the SYS.COM command.
Follow these steps to create a boot floppy:
Format a floppy disk in drive A using the
/S(System) switch to make it a bootable disk. If you have compressed your drive with DoubleSpace,FORMATautomatically copiesDBLSPACE.BINto the new floppy as a hidden system file.Copy
AUTOEXEC.BATandCONFIG.SYSto the new boot disk.Copy all the files you need for a clean boot to the floppy. Include
DBLSPACE.SYSif you have compressed disks. If you are going to be using the disk as an emergency backup to repair system files on a hard drive, you should also copy theSYS.COMfile over.
Note
I have found it is also very useful to use a DOS boot disk along with a DOS CD-ROM driver to load new systems where I want to copy the source files without adding CONFIG.SYS or AUTOEXEC.BAT to the hard drive. You can do the same by creating a boot disk with all the files that are necessary to prepare a hard drive, such as FDISK, FORMAT, and SYS, along with the MCSDEX command for the CD-ROM. Using driver device files is discussed further in Chapter 13, “Controlling Devices.”
→ For a detailed description of the boot process, see “What Happens When the Power Is Turned On” in Chapter 1, “DOS and the Personal Computer,” p. 15.
If you are not a long-time computer user, or if you have always had someone else maintain your system configurations for you, you might not be familiar with the roles played by two important files during startup. The CONFIG.SYS and AUTOEXEC.BAT files customize the way your computer is configured. These files load drivers, set options, and tweak the DOS environment.
Note
The DOS environment is a space in memory reserved for creating variables that can be looked at by programs running on your system. The default size of the DOS environment is only 256 bytes in length. Some programs make extensive use of the DOS environment to store customization settings. You can use the SHELL command to increase the size of the environment.
→ For a detailed description of the syntax and usage of the SHELL command, see Appendix F,“Command Reference,” p. 583.
During the boot process, as soon as IO.SYS and MSDOS.SYS are loaded into memory and before COMMAND.COM is loaded, a search is made of the root directory of the boot disk to see whether the CONFIG.SYS file exists. On 99% of the computers in use today, the file is available.
When CONFIG.SYS is found, its contents are read into memory, and the file is acted on line by line. Each line in CONFIG.SYS contains a DOS command that tells DOS to enhance the DOS configuration.
A number of DOS commands are valid in CONFIG.SYS. Table 2.1 gives a quick rundown of those commands. For detailed information, refer to Appendix F,“Command Reference.”
Table 2.1. Commands Often Used in CONFIG.SYS
Figure 2.1 shows the contents of a typical CONFIG.SYS file. In all likelihood, the DOS installation program either created or modified your CONFIG.SYS file.
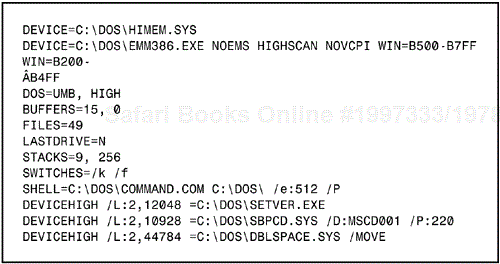
As you can see in this figure, a great deal is going on. Table 2.2 provides a quick play-by-play of each line of the CONFIG.SYS file shown in Figure 2.1. If you want more in-depth information about one of the commands discussed here, see the “Command Reference.”
Table 2.2. Play-by-Play of a Typical CONFIG.SYS File
If upper memory is not available when you use the DEVICEHIGH command, DOS loads drivers into conventional memory as though the DEVICE command were used.
You easily can customize your CONFIG.SYS file by using the EDIT command. Exercise caution, however, because you accidentally can alter commands that screw up your configuration. Using the following command to make a backup of the file before editing is always a good idea:
COPY CONFIG.SYS CONFIG.OLD
That way, you can restore the old settings if something goes wrong.
After COMMAND.COM is loaded into memory during the boot process, the system is ready for you to use. The last task the boot process performs is to look in the boot directory for the AUTOEXEC.BAT file. If an AUTOEXEC.BAT file is found, it is then fed to COMMAND.COM's batch-file processor.
AUTOEXEC.BAT can contain almost any legal DOS command, except those commands such as DEVICE and SHELL, which are reserved for use in CONFIG.SYS. AUTOEXEC.BAT is used mostly to run commands that further configure the DOS session and to run those commands that need to be run only once when the computer is started up.
Although DOS now enables you to use the SET command in either CONFIG.SYS or AUTOEXEC.BAT, traditionally you found these SET commands exclusively in AUTOEXEC.BAT or in batch files run later for special purposes. There is one good reason to continue this practice. If you have your initial SET commands split between CONFIG.SYS and AUTOEXEC.BAT, you possibly can create the same variable twice by using different values. If CONFIG.SYS contains the line SET TEMP=C:TEMP and AUTOEXEC.BAT contains the line SET TEMP=C:MYTEMP, for example, the value of the TEMP variable is MYTEMP after AUTOEXEC.BAT is run.
In effect, AUTOEXEC.BAT is nothing but a regular batch file. Two things make it special, however. The first (and most important item) is that it is executed automatically each time your computer is booted. The second is that because AUTOEXEC.BAT is considered part of the booting process, DOS 6.2 enables you to step interactively through each command in AUTOEXEC.BAT, just as you can through CONFIG.SYS. This capability is discussed in more detail in the next section.
→ For a better understanding of batch files, see Chapter 16, “Understanding Batch Files,” p. 389.
To better understand your AUTOEXEC.BAT file, check out Figure 2.2. It lists the contents of a typical AUTOEXEC.BAT file.
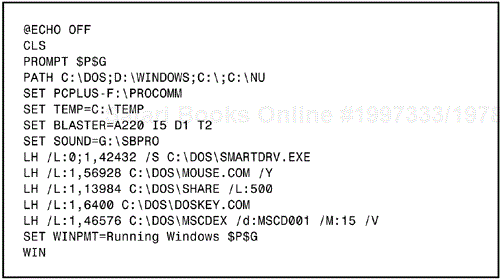
Table 2.3 provides a quick play-by-play of each line of the AUTOEXEC.BAT file shown in Figure 2.2.
Table 2.3. Play-by-Play of a Typical AUTOEXEC.BAT File
| Command | Meaning |
|---|---|
@ECHO OFF
| Suppresses the display of the commands as they are processed. (The @ symbol at the beginning of the line suppresses display of the command line.)
|
CLS
| Clears the screen. |
PROMPT $P$G
| Alters the way the DOS prompt is displayed. The To learn how to change the look of the command prompt, see “Changing the Command Prompt with PROMPT” in Chapter 11, p. 295, and “Issuing |
PATH C:DOS;D:WINDOWS;C:;C:NU
| Specifies where and in what order DOS should search directories when a command is entered at the DOS prompt or in a batch file. DOS looks in these directories for a For detailed information about error and other messages, see Appendix C,“DOS Messages.” |
SET PCPLUS=F:PROCOMM SET TEMP=C:TEMP SET BLASTER=A220 I5 D1 T2 SET SOUND=G:SOUNDPRO | These four lines use the Environment variables can contain character strings, which programs can use to determine parameters. The |
LH /L:0;1,42432 /S C:DOSSMARTDRV.EXE
| Loads the SMARTDRV.EXE utility into upper memory.
|
LH /L:1,56928 C:DOSMOUSE.COM /Y
| Loads the DOS mouse driver into upper memory. |
LH /L:1,13984 C:DOSSHARE /L:500
| Loads the SHARE.EXE utility into upper memory.
|
LH /L:1,6400 C:DOSDOSKEY.COM
| Loads the DOSKEY utility into upper memory.
|
LH /L:1,46576 C:DOSMSCDEX /d:MSCD001 /M:15 /V
| Loads the MSCDEX utility, which assigns a drive letter to a CD-ROM drive that has been loaded in CONFIG.SYS. The /d switch specifies the drive name that was provided in CONFIG.SYS.
|
SET WINPMT=Running Windows $P$G
| Creates an environment variable that specifies how the DOS prompt should be displayed when you're running a DOS session under Windows. |
WIN
| Automatically launches Windows every time the computer boots. |
Remember, nothing is sacred or untouchable about AUTOEXEC.BAT; it's simply another batch file. Use the EDIT command to add and delete entries to create the exact startup configuration you want to have each time you use your computer. Creating a backup of the file before you edit it is always a good idea, of course. Use the following:
COPY AUTOEXEC.BAT AUTOEXEC.OLD
By creating a backup, you can restore the previous version if you accidentally mess up your configuration.
→ For more information about the EDIT command, see Chapter 15, “Using the DOS Editor,” p. 361.
→ For more detailed information, see “Fine-Tuning Your Computer with CONFIG.SYS and AUTOEXEC.BAT” in Chapter 19, “Configuring Your Computer,” p. 463.
Being able to boot your computer into one of several configurations is often handy. You might run a DOS program that requires expanded memory, for example, but nothing else you do requires EMS. If you run Windows and Windows programs most of the time, the 64KB page frame in expanded memory (EMS), also called upper memory, can be a drag on performance, so doing without the EMS is better. Maybe you have reason to log in to a network several times a day, but some of your programs object to having the network shell take up memory that they want to use. You might have any number of reasons to want different configurations at different times.
With earlier versions of DOS, you had to jump through hoops if you needed to have more than one standard configuration. A common trick was to have two or more versions of CONFIG.SYS tucked away in subdirectories or written in the boot directory with alternative names. When you needed a configuration different from your normal working environment, you had to copy one of these alternative CONFIG.SYS files into the boot directory and reboot. Changing back to your normal configuration was just as complex. No more!
A new DOS feature enables you to create multiple configurations within your CONFIG.SYS file and display a menu of the available options. To create a boot menu, all you have to do is divide your CONFIG.SYS files into sections by naming each section. A section name consists of a word inside brackets, as in [menu]. Two section names have special meanings.
The [menu] creates the menu of options displayed at boot time. Each menu item is created with a line similar to the following:
menuitem=Normal,Everyday Configuration
The word to the right of the equal sign is the name of the section you want to use for your configuration, and the words following the comma make up the menu prompt. If you omit the description, the section name is used as the menu prompt.
The [common] section enters lines that should be used in all your various configurations. You can have more than one section named [common]. DOS executes these sections in the order in which they appear in the file.
Microsoft recommends that multiple configuration CONFIG.SYS files end with a [common] section, even if it is empty. You end the file with a [common] section to accommodate programs that create entries in CONFIG.SYS. Usually, programs append their entries to the end of CONFIG.SYS. By having a [common] section at the end of your file, you ensure that new entries are always executed.
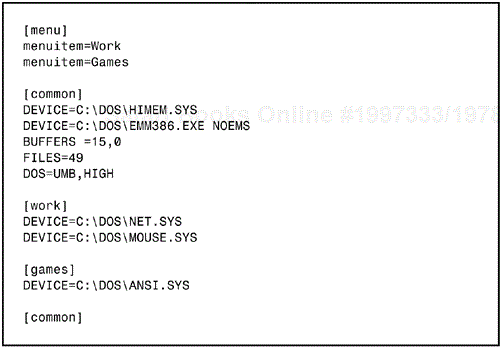
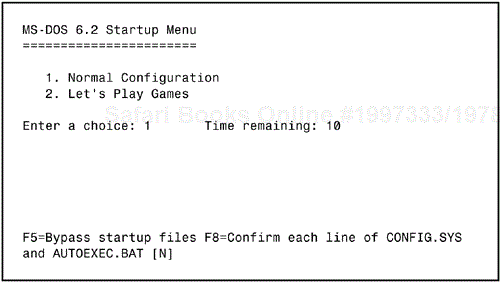
Figure 2.3 shows a multiple configuration CONFIG.SYS file. When the computer on which this CONFIG.SYS file resides boots up, a menu appears offering you two different configurations. If you select Work, the network and mouse drivers are loaded. If you select Games, no network or mouse driver is loaded. Instead, the ANSI.SYS driver is loaded. In all other respects, the configurations are the same because those aspects of the DOS session are controlled by the entries in the [common] sections.
You can include a line in the [menu] section of CONFIG.SYS to create a default configuration that is used if a selection is not made from the menu within a specified number of seconds. Here's an example:
menudefault=work,5
Placing this line in the [menu] section causes DOS to default to the work configuration if a menu selection is not made within five seconds after the menu is displayed.
Another command enables you to specify screen colors for displaying the boot menu. Here's an example:
menucolor=15,1
Placing this line in the [menu] section of CONFIG.SYS causes DOS to display the menu using bright white letters on a blue background. The first parameter supplies the color code for the foreground color; the second parameter, which is optional, specifies the background color. If you do not specify the background color, the default value of 0 (black) is used. Table 2.4 shows the valid color codes you can use.
Table 2.4. CONFIG.SYS Menu Colors
| Number | Color |
|---|---|
| 0 | Black |
| 1 | Blue |
| 2 | Green |
| 3 | Cyan |
| 4 | Red |
| 5 | Magenta |
| 6 | Brown |
| 7 | White |
| 8 | Gray |
| 9 | Bright Blue |
| 10 | Bright Green |
| 11 | Bright Cyan |
| 12 | Bright Red |
| 13 | Bright Magenta |
| 14 | Yellow |
| 15 | Bright White |
Tip
You can pull an undocumented trick when you're specifying menu colors. Most video cards are not capable of displaying bright colors (9 through 15) as the background color. If you specify a bright background color on most video cards, the foreground color is set to blink. Thus, the following line produces a blinking yellow foreground on a standard blue background:
menucolor=14,9
Figure 2.4 shows how you can edit the sample CONFIG.SYS file in Figure 2.3 to display a menu in color. The foreground is yellow and the background is blue. Descriptive menu prompts and a default configuration also have been added.
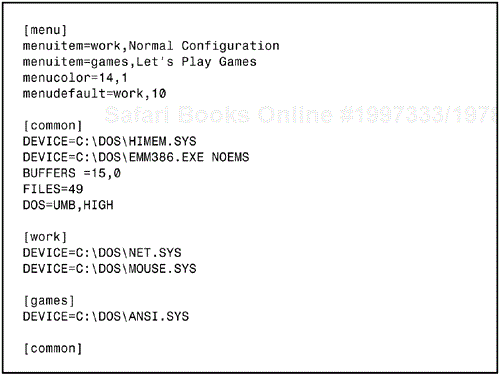
Figure 2.4. Displaying a configuration menu in color with descriptive prompts and a default configuration.
The CONFIG.SYS file shown in Figure 2.4 renders the menu shown in Figure 2.5. Notice that DOS precedes each menu choice with a number. You can select a menu prompt in one of two ways. The first method is to press the number key corresponding to the prompt you want to select. The second method is to highlight the desired prompt and press Enter.
Almost everyone who is computer literate knows someone who just will never get the hang of working with computers. These same people are the ones you give the exact syntax of the COPY command letter by letter every time they call you with a problem. These users figure out just enough about one or two programs to get their work done and to be dangerous. Sadly, even DOSSHELL is a mystery to them.
You can employ a trick using DOS environment variables to turn the CONFIG.SYS configuration menu into a system menu that runs a particular program each time the computer is booted. When a particular configuration is chosen, DOS automatically creates an environment variable named CONFIG. As its value, this variable is given the name of the configuration section chosen. If you choose to have a section called [net] as your configuration, for example, the value of CONFIG is net.
You can use the value of CONFIG to branch off within the AUTOEXEC.BAT file to run commands specific to that configuration. Assume that CONFIG.SYS contains three sections that offer you a choice in the configuration menu between Windows, WordPerfect, and Lotus 1-2-3. Also, assume that these sections are named WINDOWS, WP, and LOTUS.
In batch files, you can create sections similar to the sections that you can create in CONFIG.SYS. In batch files, however, you name sections by using the colon (:), as in the following:
:labelname
You can execute a specific section of commands by using the GOTO command inside the batch file. Because AUTOEXEC.BAT is a batch file like any other, you can use the value of the CONFIG variable to branch off in AUTOEXEC.BAT. Figure 2.6 shows how you might construct such an AUTOEXEC.BAT file.
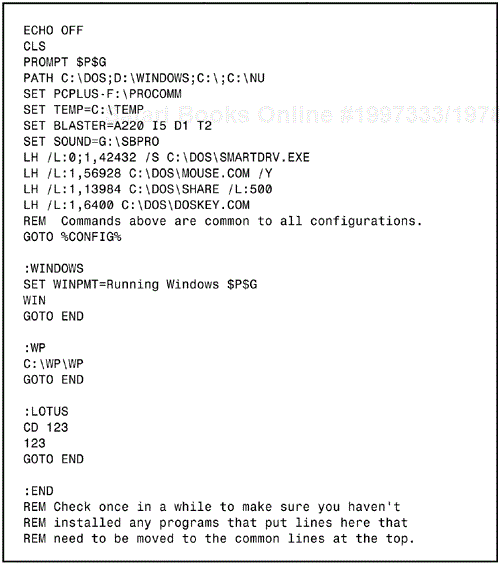
As you can see in the figure, AUTOEXEC.BAT is divided into five sections. The first section contains all the commands common to all configurations. This section isn't named because DOS begins executing lines at the top. The last line of this section uses GOTO to branch directly to one of the three choices on the CONFIG.SYS menu.
Three named sections occupy the middle of the file. Because they each finish with a GOTO command that directs the batch file to the :END section, only those commands in the chosen section execute.
The :END section is necessary to let DOS skip over the sections that haven't been chosen and to let any commands added by software installation take effect. The problem is that commands in the :END section do not take effect until you exit from whatever program is called by one of the named sections above :END. When you install new software, always check AUTOEXEC.BAT if you use this technique because you might have to move entries up into the first section of commands common to all configurations.
A drawback to using this technique is that when you exit the program, you don't have any way to loop back into the menu except to reboot the computer. Also, the startup menu always advertises the availability of the F5 and F8 keys.
Make sure not to simply reboot the computer while you're still in an application program; otherwise, you lose data. Similarly, avoid using the F5 or F8 keys, or you might think the menu is broken.
Users who practice safe computing should make sure that they have a floppy-based boot disk before messing with either CONFIG.SYS or AUTOEXEC.BAT. Fortunately, the DOS development team has made this practice less necessary. A new feature introduced in DOS 6.0 enables you to use function keys to exercise control over the boot.
Imagine, for example, that you have just edited AUTOEXEC.BAT to load a program during bootup. For whatever reason, this program is incompatible with your system, and the computer simply freezes each time the command is run. You can never get to a DOS prompt to edit the file because the machine hangs every time. You can boot off your floppy boot disk, of course, but now you have an easier way.
When the Starting MS-DOS... message appears onscreen during the boot process, you know that IO.SYS and MSDOS.SYS are about to be loaded. At this point, you can press two keys or key combinations that modify the boot process. If you use DOS 6.0, you can use the F5 and F8 keys; with DOS 6.2, you can use these two keys or Ctrl+F5 or Ctrl+F8.
If you press the F5 key when the message appears, DOS bypasses loading and processing both CONFIG.SYS and AUTOEXEC.BAT. You boot up as if you had a floppy boot disk that didn't contain these files.
If you have installed DoubleSpace, you also can press Ctrl+F5. This key combination not only skips CONFIG.SYS and AUTOEXEC.BAT, but also skips the loading of DoubleSpace. This practice is great if you have programs (such as the latest high-performance games) that do not work with disk-compression programs such as DoubleSpace.
If you press the F8 key when the Starting MS-DOS... message appears, DOS displays the following message:
MS-DOS will prompt you to confirm each CONFIG.SYS command.
Each line in CONFIG.SYS then is displayed along with a [Y,N] prompt. To execute the displayed command, press either Y or Enter (not both). To bypass the command, press N.
After you have dealt with all the lines in CONFIG.SYS, you see the following message:
Process AUTOEXEC.BAT [Y,N]?
DOS is giving you the option of bypassing the execution of AUTOEXEC.BAT. Answer this query as you did the earlier ones. If you press N, the AUTOEXEC.BAT file is skipped entirely. If you are using DOS 6.2 and you press Y, each line in your AUTOEXEC.BAT file is displayed, in turn, and you can choose whether you want it executed.
The final key combination you can use to modify the boot process is Ctrl+F8. If you press this combination, you can process CONFIG.SYS and AUTOEXEC.BAT interactively, but DoubleSpace is not loaded. Understand that if you choose this option, drivers or programs that you attempt to load (which are normally stored on a compressed drive) are not accessible.
After you have broken through to the DOS prompt, you then can use the EDIT command to rectify whatever problem keeps your system from successfully booting.
By default, who a two-second delay occurs between the time the Starting MS-DOS... message appears and the loading of DOS system files begins. If you eliminate this delay by using the SWITCHES=/F command in CONFIG.SYS, DOS still can recognize the F5, Ctrl+F5, F8, or Ctrl+F8 keystrokes. Even on a fast hard drive, IO.SYS and MSDOS.SYS take a second or two to load. You should be able to break in with a keystroke before CONFIG.SYS is processed.