In this chapter
The DOS Shell program is a visually oriented user interface that replaces the DOS command line with easy-to-use and easy-to-understand menus. It enables you to use a mouse (or other pointing device) to perform many common DOS tasks.
Introduced with DOS 4.0, the DOS Shell is no longer a primary part of DOS. With the advent of DOS 6.2, it has been relegated to the status of a supplemental program and is thus included on the Supplemental Disk. If you are upgrading from an earlier version of DOS, however, the earlier version of the DOS Shell will remain on your disk.
The DOS Shell is a mildly controversial feature of DOS. Although it is praised by some as a kinder and gentler way of using DOS, others deride it as a crutch and a crippled imitation of Windows. In fact, there is truth to both opinions.
The DOS Shell has features that are strikingly familiar to Windows users. The point-and-click interface, disks and directories displayed in tree format, the capability to associate filename extensions with the program that produced them so that selecting a file also starts the program—these features are all hallmarks of the popular Windows operating environment. In fact, if your video card permits (EGA and higher), you can run the Shell in graphics mode.
Still, to perform complex tasks, you often are required to enter command lines using the Run option of the File menu. For anything but the most rudimentary tasks, you still are required to know the syntax of DOS commands.
Unlike Windows, which was built from the ground up to be used as a graphical interface, the DOS Shell is mostly text based. Using the extended ASCII drawing characters, the DOS Shell simulates a graphical user interface (GUI). Even when it's run in graphics mode, the interface changes only slightly.
Many longtime DOS users find the DOS Shell to be restrictive, even though many tasks are easier and quicker when you use the Shell. On the other side of the coin, many new computer users, especially those with less than one year's experience, find the Shell easier to work with than the bare DOS prompt.
Most users who begin their computer careers working with the DOS Shell usually end up doing one of two things. They either discard the Shell, like a worn-out pair of training wheels, or they move on to the Windows environment.
In practice, the DOS Shell has become a tool used by PC support specialists when training newer users. Many MIS departments and support consultants find that if they teach new users the ins and outs of the DOS Shell, they end up fielding fewer support calls from inexperienced users.
It is assumed that many of the readers of this book fall into the category of support specialist or office computer guru. Although you might not want to use the DOS Shell in your own work, you might want to use it as training wheels for users that you must support.
With the DOS Shell, you can select many commands from a menu instead of typing the commands on the DOS command line. More significantly, with the DOS Shell, many tasks are greatly simplified. You can search quickly through directories or an entire hard disk for files or groups of files. Using a mouse, you can select and copy files between directories or between disks using a Windows-like drag-and-drop feature.
The DOS Shell also provides features not available at the DOS prompt. You can start one applications program, for example, and then switch to a second application without exiting from the first. Unlike other environments, such as those provided by Windows, QEMM, or 386MAX, however, programs in the background cannot remain active.
The DOS Shell enables you to view the contents of files in ASCII or hexadecimal formats without opening applications programs. Another feature associates specific filename extensions with a particular applications program so that selecting a file causes DOS to start the associated program.
Note
To use the DOS Shell effectively, you must have a mouse and mouse driver present on the system. Although you can stumble through the Shell using keystrokes, using a mouse can reduce frustration and save time.
For the mouse to be available, the mouse device driver must be loaded into memory before you run the DOS Shell. DOS 6.0 and later include a generic mouse device driver called MOUSE.COM, which can usually be found in the DOS directory. The mouse driver usually is loaded with a line in the AUTOEXEC.BAT file using the LOAD or LOADHIGH command.
Remember that some mouse devices are not Microsoft mouse–compatible and might not work properly with the generic DOS mouse driver. Manufacturers of such mouse devices normally include a special mouse driver for you to use. See the mouse manual for details.
After installing the DOS Shell from the Supplemental Programs disk, you can start it by typing the following at the DOS prompt to load the DOS Shell into memory:
DOSSHELL
The DOS Shell first displays a copyright notice and then displays the full-screen DOS Shell window.
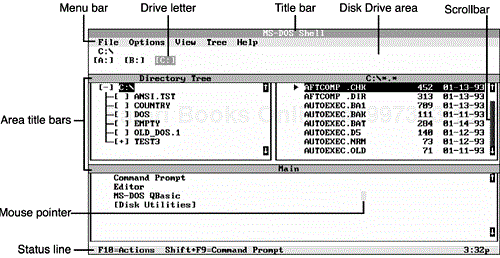
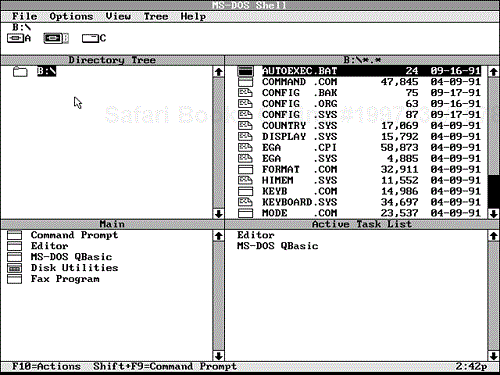
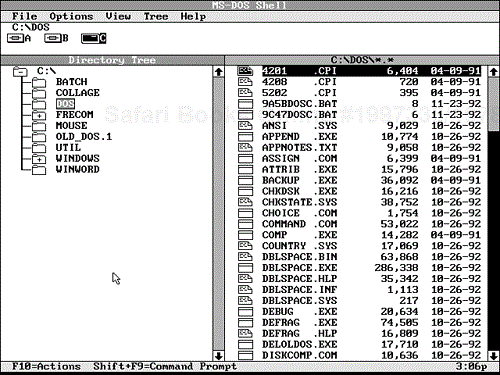
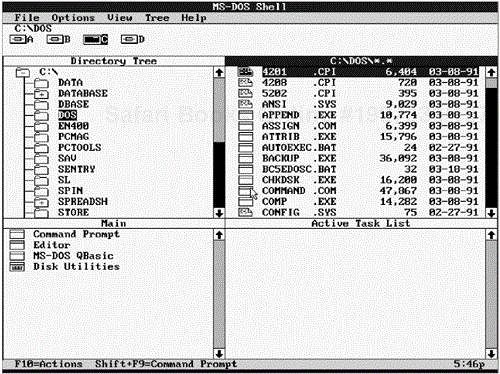
When the Shell first loads, it also displays a message box in the center of the screen containing the message Reading Disk Information. The Shell scans the currently logged drive for the directory structure and file information. After the drive is scanned, the Shell creates a display similar to the one shown in Figure 4.1.
When you start the DOS Shell, the top line of the screen, the title bar, displays the program name, MS-DOS Shell. The second line of the screen, the menu bar, lists the names of available menus. You can choose all DOS Shell commands from menus that pull down from the menu bar.
Just below the menu bar, the available disk drives are listed, along with a prompt showing the current drive and directory. All types of drives, including CD-ROMs and DoubleSpace drives, are listed.
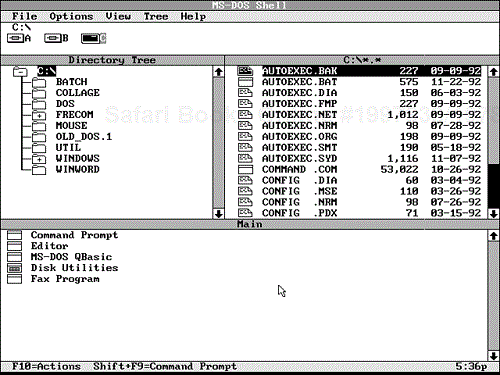
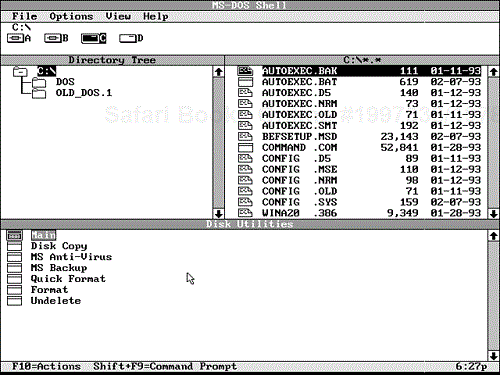
Initially, the DOS Shell window appears in text mode, as shown in Figure 4.1. See “Using the Shell Screen Modes,” later in this chapter, for information on switching to graphics mode. Figure 4.2 shows the 34-line graphics mode available for VGA displays.
Note that the bitmap icons used to indicate drives also indicate drive types. The icons for a hard disk differ from the icons used to indicate a floppy disk or CD-ROM.
The last line of the DOS Shell window is the status line. The status line usually displays two messages: F10=Actions and Shift+F9=Command Prompt. At the right side of the status line, the Shell displays the current time. Occasionally, the status line also displays other messages related to the command you are executing.
Caution
Using Shift+F9 to get a DOS prompt is completely safe when you are working only in DOS. If, however, you want to run the DOS Shell in a DOS session launched under Windows, do not use Shift+F9 to get to a command prompt; otherwise, you can corrupt memory.
The terminology can be confusing, but many programs enable you to “shell out to DOS” or “launch a DOS Shell.” These terms have been in use since early versions of DOS that did not include the DOSSHELL program. DOSSHELL uses different terminology, but the effect is the same.
Programs that shell out to a DOS prompt do so by launching COMMAND.COM as a second application. Launching COMMAND.COM in this fashion is dangerous under Windows because the normal safeguards Windows uses to ensure memory integrity are bypassed.
Programs that are run under this second COMMAND.COM in a Windows DOS session can allocate memory that is never reclaimed after the program terminates. Worse, programs might try to use memory already in use by Windows or a Windows application. These conditions can cause the computer to hang and unsaved data to be lost.
If you need a DOS prompt while you're working in Windows, always launch a separate DOS session from the Windows Program Manager.
Between the drive area and status line, the DOS Shell divides the screen into rectangular windows, each of which is headed by an area title bar. When there is more information than can be displayed in the window, you can scroll up and down using either the keyboard or mouse.
When a window is active, at least one item is highlighted for selection. At the right edge of these windows you find scrollbars. If you press the arrow keys or the PgUp/PgDn keys to move the active highlight bar, the scrollbars are relegated simply to showing you the relative position (top to bottom) of the currently highlighted area. Using the mouse is quicker and more efficient. See the section “Moving Around an Area,” later in this chapter, for details about using the mouse interface.
Drive informationis displayed in a pair of windows. The left window displays the directory structure of the disk, and the right window displays the files found in the currently highlighted directory.
Using the View menu, you can choose to view two disk drive windows, or you can choose to view Program/File Lists. In this view, the bottom window of the display serves as a menu for starting DOS applications and for accessing DOS utility programs. This arealists a group of programs, called a program group. The name of the currently listed program group appears in the area title bar. In text mode, group names are shown enclosed in brackets (refer to Figure 4.1). In graphics mode, icons indicate single programs and groups. Notice how the icon for Disk Utilities differs from the other icons shown in Figure 4.2. To switch to a group, double-click its icon or highlight the group using the arrow keys and press Enter.
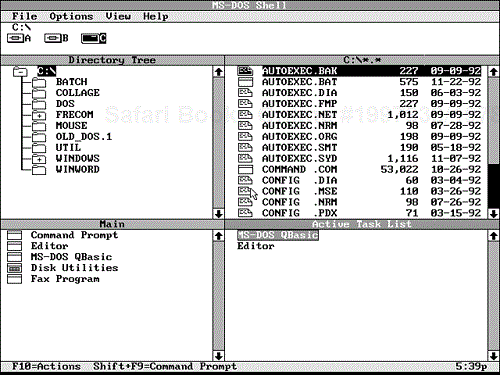
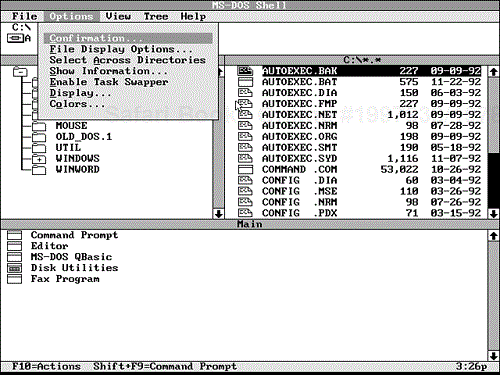
When you choose Enable Task Swapper from the Options menu, a fourth area, the task list area, is displayed in the DOS Shell window. The active task list area displays the names of DOS applications you have activated through the DOS 6.0 task swapper. Figure 4.3 shows the DOS Shell window with the active task list displayed.
Although several windows can be displayed in the DOS Shell, at any given moment only one area is selected (active) at a time. The selected area is indicated by a highlighted area title bar. An area must be selected before you can perform any operation in that area.
You can use either of the following methods to select an area in the Shell window:
After you select an area, the Shell highlights one of the items listed in the area. This highlight is called the selection cursor. To move the selection cursor within the selected area, use one of the following methods:
Use the cursor-movement keys on the keyboard. Press the up- or down-arrow key to move up or down one item at a time. Press PgUp or PgDn to move up or down one page at a time. Press Home or End to go to the beginning or end of the list.
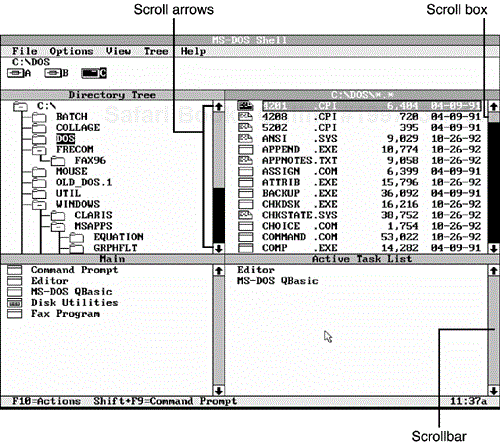
Use the mouse and scrollbar to scroll up or down (see Figure 4.4). You learn how to use the scrollbars in the following paragraphs.
The scrollbar has the following components:
A scroll arrow is located at the top and bottom of the bar. By clicking the scroll arrow, you scroll text up or down one line at a time. Click the scroll arrow and hold down the mouse button to scroll continuously in the direction of the arrow.
A scroll box, sometimes called a thumb, is located on the scrollbar between the up-scroll arrow and the down-scroll arrow. The position of the box on the scrollbar indicates the relative position of the selection cursor with respect to the entire list of items in the selected area.
Click the scrollbar above the scroll box to move the selection cursor up one page at a time. Click below the scroll box to move down one page at a time.
You can scroll quickly through the list in either direction by clicking the scroll box, holding down the left mouse button, and dragging the box in the direction you want the selection cursor to move.
You can initiate virtually every DOS Shell operation by choosing options from menus. These DOS Shell menus fall into two categories: the menu bar and pull-down menus.
When the disk drive area, directory tree area, or file list area is active, the menu bar lists five menu names: File, Options, View, Tree, and Help. The Tree menu name does not appear when the program list or active task list is the active area. Choosing a menu name displays a pull-down menu.
You can choose a menu option from the menu bar in one of three ways:
Move the mouse pointer to an option and click the left button.
Press the F10 key or Alt key to activate the menu bar. The Shell underlines one letter in each menu name and places a selection cursor on the menu name File at the left end of the menu bar. Press the key that corresponds to the underlined letter in the menu name you want to choose. To choose View from the menu bar, for example, press F10 or Alt and then press V.
Press F10 or Alt to activate the menu bar, use the right- or left-arrow key to move the selection cursor to your choice, and press Enter. This method is sometimes called the point-and-shoot method.
Even after you choose a menu name, you still can choose another menu name by clicking the name or by using the right- or left-arrow key.
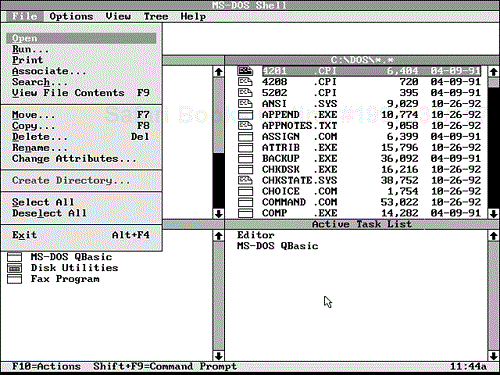
When you choose a menu name from the menu bar, the Shell displays a pull-down menu, which displays a list of items below the menu bar. If you choose File, for example, while the file list is the active area, the Shell displays the File pull-down menu shown in Figure 4.5. The items listed in the menu depend on which area is active.
To choose an item from a pull-down menu, use one of the following methods:
Move the mouse pointer to a menu item and click the left button.
The Shell underlines one letter in each menu item. Press the key that corresponds to the underlined letter in the item you want to choose. To choose View File Contents from the File menu in Figure 4.5, for example, press V.
The Shell places the selection cursor on the first item at the top of the pull-down menu. Use the up- or down-arrow keys to move the selection cursor to your choice and then press Enter.
When a menu is pulled down, you can display an adjacent menu by pressing the left- or right-arrow key. To cancel a pull-down menu without making a selection, click the menu name, click an area outside the menu, or press Esc. The Shell returns to the preceding window display. You also can press Alt or F10 to cancel a pull-down menu while maintaining an active menu bar so that you can choose another menu name. The DOS Shell uses the following conventions when it lists menu items:
A menu item that displays a dialog box, which is discussed later in this chapter, ends with an ellipsis (…).
A menu item that is dimmed, such as the Create Directory item shown in Figure 4.5, is not a valid option in the current context.
Some menu items toggle between two states—on or off. A menu item that is toggled on displays a small diamond to the left of the item name. The diamond is absent when the item is turned off.
Some commands that you can select through menu items have shortcuts in the form of key combinations or keystroke commands. When a keystroke command shortcut is available for a command, the Shell lists the keystroke in the menu, to the right of the command. Five of the commands in the File menu, for example, list shortcut keystroke commands (refer to Figure 4.5).
The DOS Shell provides many hotkeys. Many of these commands are listed in pull-down menus. Two such commands, F10 and Shift+F9, are listed in the Shell window status line.
Table 4.1 lists all DOS Shell hotkey commands for DOS 6. After you learn these keystroke commands, you might find them quicker to use than any equivalent menu items. Using menus requires that you use multiple keystrokes or that you take one hand from the keyboard to use the mouse. To perform a command by using the hotkeys, you press a single keystroke or keystroke combination. Windows users will find many of these hotkeys familiar.
Table 4.1. DOS Shell Shortcut Commands
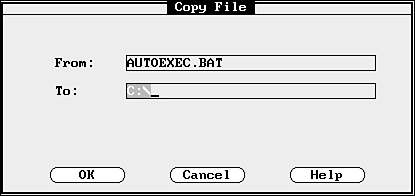
As you work with the DOS Shell, the program routinely displays messages and prompts in pop-up boxes, called dialog boxes, onscreen. Any menu item that ends with an ellipsis displays a dialog box when you choose the item. When you choose Copy from the File menu, for example, the Copy File dialog box appears (see Figure 4.6).
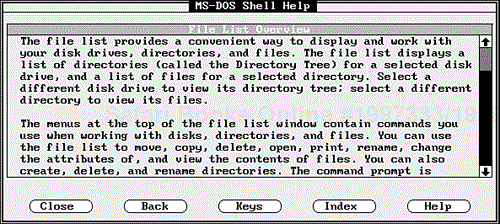
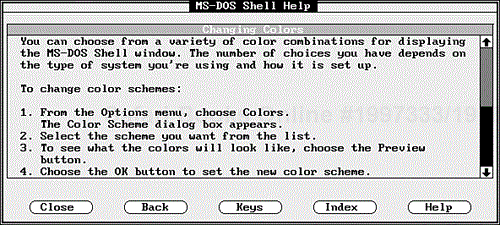
Dialog boxes fall into two general categories: those that request information and those that provide information. The Copy File dialog box in Figure 4.6 is an example of a dialog box that requests information. Pressing F1, by contrast, displays a dialog box that provides information and is titled MS-DOS Shell Help (see Figure 4.7). This help screen assists you in learning the Shell.
All dialog boxes are built from a standard set of elements: text boxes, list boxes, option buttons, option check boxes, and command buttons. The following sections explain how to use each element.
When you need to type information in a dialog box, the Shell includes one or more rectangular fields known as text boxes. The Copy File dialog box shown in Figure 4.6 contains two text boxes, one labeled From and one labeled To.
To make an entry in a text box, you first highlight the box. Using the mouse, move the mouse pointer to the box and click the left button. Alternatively, you can press Tab or Shift+Tab repeatedly until the text box is highlighted.
Often, the Shell provides a default value in each text box. The text boxes in Figure 4.6, for example, include the default values AUTOEXEC.BAT and C:. When you select a text box, the Shell highlights any default contained in that text box. Typing new text in the text box replaces the default value.
Sometimes you don't want to replace the entire default value in a text box. When you want to edit the value, press the right- or left-arrow key to cause the Shell to remove the highlighting. You then can edit the existing entry.
After you make the desired entry or change the value in the text box, press Enter to accept the value that is displayed in the text box. When you press Enter, the Shell also closes the dialog box and executes the command, if any, with which the dialog box is associated.
Some dialog boxes contain information or a list of choices displayed in a rectangular area, referred to in this book as a list box. A title bar appears at the top of each list box, as well as a scrollbar on the right side of the list box. Refer to Figure 4.7, which shows a help dialog box containing a list box titled File List Overview.
Often the text or list is too long to fit in the list box, so the Shell enables you to scroll vertically through the contents of the box. To scroll through a list box, use your mouse and the scrollbar, or use the cursor-movement keys.
Some dialog boxes require that you use option buttons (also called radio buttons) to select command settings. Each option button is a circle (a pair of parentheses if your screen is in text mode) followed by a command setting. Option buttons always occur in groups—never alone. The buttons in each group are mutually exclusive; only one button can be selected at a time.
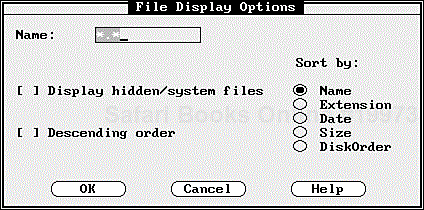
The File Display Options dialog box shown in Figure 4.8, for example, contains option buttons listed on the right side of the dialog box, beneath the label Sort By. Displayed filenames can be sorted by name, extension, date, size, or disk order, but the Shell does not sort files by more than one of these parameters at a time.
Tip
You can execute the command associated with a dialog box by pressing Enter, even though the cursor is not in the OK command button (as long as the cursor is not on one of the other command buttons).
To select a different option button, use the mouse to click the desired option button. Alternatively, press Tab or Shift+Tab to move the underscore (cursor) to the group of option buttons. Then, use the up- or down-arrow key to move the dot to the desired button. Press the spacebar to select the new option. Press Enter to close the dialog box and execute the command, if any, with which the dialog box is associated.
Some Shell dialog boxes enable you to select the desired command settings by “checking” the appropriate option check boxes. An option check box is a pair of brackets followed by a command setting. The File Display Options dialog box in Figure 4.8, for example, contains the following check boxes:
Display Hidden/System Files
Descending Order
An option check box turns a command setting on or off. The setting is checked (or on) when an X appears between the brackets. The setting is off when the space between the brackets is blank. To toggle the setting on or off, use the mouse to click between the brackets. Alternatively, press Tab or Shift+Tab to move the cursor to the option check box and then press the spacebar. Each time you click the box or press the spacebar, the option toggles on or off.
After you make any desired entries in text boxes, select appropriate option buttons, and check the correct check boxes, you are ready to execute the DOS Shell command. To do so, choose one of the command buttons. Most dialog boxes in the DOS Shell contain three command buttons: OK, Cancel, and Help (refer to Figure 4.8). The OK command button activates the choices you made in the dialog box and executes the command, if any, with which the dialog box is associated. The Cancel command button aborts any changes you made in the dialog box and returns to the DOS Shell window. The Help command button accesses the Shell's online help facility.
To execute a command button, use one of the following methods:
The DOS Shell is quite flexible. In the directory tree area and file list area, you can display directories and filenames from any of your computer's disk drives, including directories and filenames from two disks at one time. You also can display just the program list, change the entire screen to a graphics mode, and show as many as 60 lines of information on a single screen (depending on the capability of your computer's monitor).
The following sections describe how to modify the display to list directories and files from other disks, to display files from two disks at one time, and to change the amount of information displayed about each file. In addition, the following sections show you how to display the program list full-screen and how to change the number of lines that appear onscreen.
As you learned in Chapter 2, “Starting DOS,” each time you turn on your computer, the operating system (DOS) is loaded from one of your computer's disks. This disk is the boot disk. If your system is configured to start the DOS Shell immediately after your computer boots up, the Shell window lists directories and filenames found on the boot disk. Often, you might need to display the directories and filenames on a disk other than the boot disk. Figure 4.2, for example, shows three drive letters: A, B, and C. Drive C is the boot disk; therefore, the directories found in drive C are shown in the directory tree. Drive C's icon is highlighted, indicating that C is the currently selected disk drive.
To display the directories found on another disk, move the mouse pointer to the drive icon of the desired disk and click the left mouse button. Alternatively, press the left- or right-arrow key until the Shell highlights the drive letter you want and then press Enter.
The Shell displays a message that it is reading the disk information and then displays in the directory tree and file list areas of the DOS Shell window the directories and filenames from the target disk. Figure 4.9, for example, shows filenames from a disk in drive B.
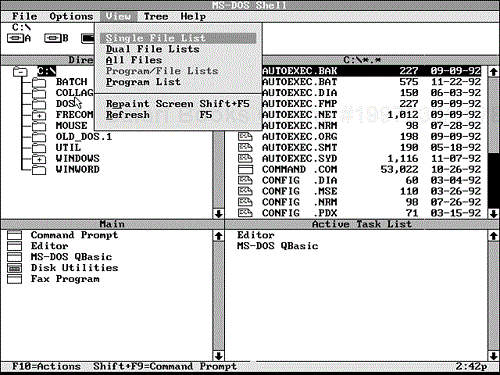
Because the DOS Shell enables you to start other programs that can create, modify, or delete files on your disk, the list of files in the DOS Shell window might at times be inaccurate. If you suspect that the directory tree area or file list area does not reflect the actual contents of the disk, use the Shell's Refresh command. To refresh the file list, press F5 or choose Refresh from the View menu (see Figure 4.10).
Note
When DOS Shell is run in text mode, there is no visual differentiation between file types. Running the Shell using one of the graphics modes, however, causes file lists to show icons to the left of the listed files. These icons differentiate between executable files and document files. If you look closely at the icons in Figure 4.9, you see that document files are represented as dog-eared pages and that executable files (.EXE, .COM, and .BAT) have a rectangular icon that represents a running program.
The Shell displays the message Reading Disk Information and then returns to the DOS Shell window and displays the updated list of directories and files in the directory tree and file list areas.
From time to time, you might want the convenience of seeing lists of directories and files from two disks simultaneously. Perhaps you want to copy a file from one disk to another, or maybe you want to compare the list of files on one disk to the list of files on another disk.
The DOS Shell enables you to display two file lists on the same screen. To do so, choose Dual File Lists from the View menu (refer to Figure 4.10).
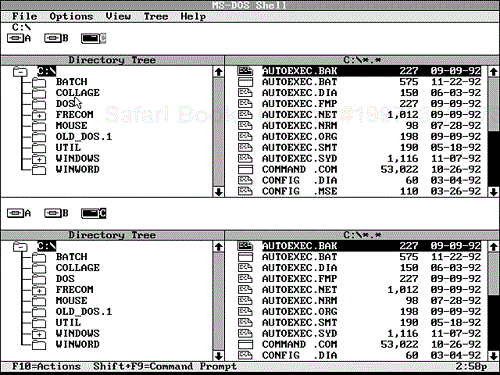
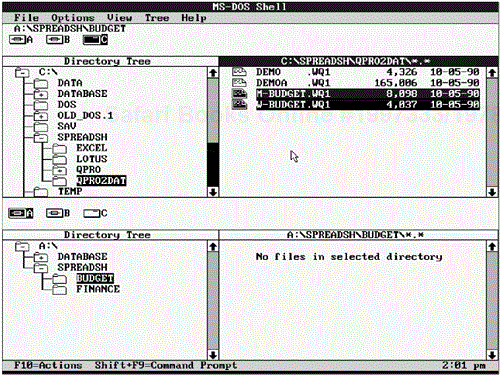
The Shell replaces the program list area, at the bottom of the window, with a second disk drive area, directory tree area, and file list area showing the directory tree and file list from the current disk drive (see Figure 4.11). This view is called a dual file list.
Even though the initial display of the second file list is a duplicate of the top window, each file list is independent of the other. Note that each file list has its own set of disk drive icons. To select a second disk drive in the bottom portion of the window, click the icon in the bottom disk drive area for the drive for which you want to list directories and files.
Alternatively, press Tab or Alt+Tab to cycle the selection cursor until it highlights the drive icon of the currently selected drive in the bottom disk drive area. Then use the left- or right-arrow key to highlight the desired drive icon and press Enter.
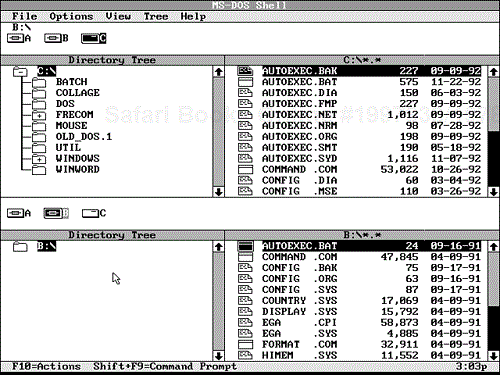
The Shell lists directories and filenames from the second disk in the lower set of directory tree and file list areas (see Figure 4.12). You can switch between the two lists by using the mouse or the Tab key.
At times, especially when a directory contains many files, you need a single full-screen file list. Choose Single File List from the View menu to see a list, called a single file list, similar to the one shown in Figure 4.13.
Occasionally, you might want the Shell window to display all files on a disk, regardless of the directory. To display all files in a single list, choose All Files from the View menu.
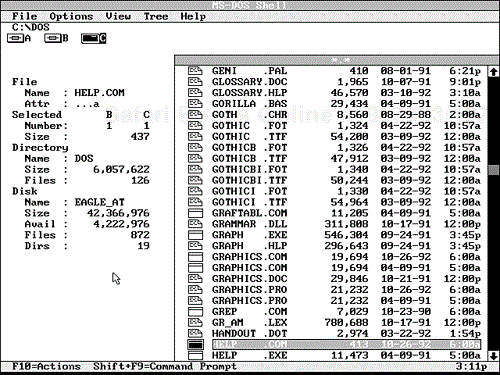
In the All Files view, the Shell displays a window on the right side of the screen listing the names of all files on the disk in alphabetical order (see Figure 4.14). To the left of this window is an area that displays information about the currently highlighted file.
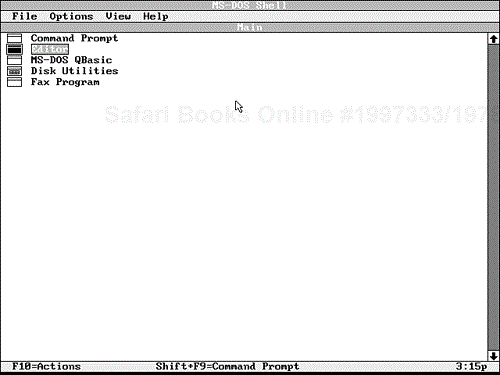
The first time you start the DOS Shell, the DOS Shell window displays the directory tree area, file list area, and program list area. Some users prefer to use the DOS Shell primarily as a menu for starting applications programs and thus don't want to view the directory tree and file list every time. The DOS Shell, therefore, provides a view that displays only the program list. To select this view, shown in Figure 4.15, choose Program List from the View menu.
If you decide later that you want to display the directory tree and file list areas onscreen along with the program list area, you need only choose Program/File Lists from the View menu. The DOS Shell then returns to the original view, with the disk drive area, directory tree area, and file list area in the top half of the screen and program list area in the bottom half of the screen.
As you learned previously in this chapter, the DOS Shell window can be displayed as a text representation of a GUI (graphical user interface) or in graphics mode. The number of available screen modes depends on the type of display adapter and monitor you have.
When you launch DOSSHELL the first time, the Shell window appears in the default 25-line low-resolution text mode. If your video card permits, and most modern ones do, you can choose Display from the Options menu to select from a variety of modes.
If you have a system with video cards that can support more text and graphic modes, you can choose from an array of modes ranging from the default 25-line text mode up to high-resolution graphics modes that display 60 lines of information onscreen. Table 4.2 shows the full list of display modes available.
Table 4.2. Available Video Modes in the DOS Shell
| Text | 25 lines | Low Resolution |
| Text | 43 lines | High Resolution 1 |
| Text | 50 lines | High Resolution 2 |
| Graphics | 25 lines | Low Resolution |
| Graphics | 30 lines | Medium Resolution 1 |
| Graphics | 34 lines | Medium Resolution 2 |
| Graphics | 43 lines | High Resolution 1 |
| Graphics | 60 lines | High Resolution 2 |
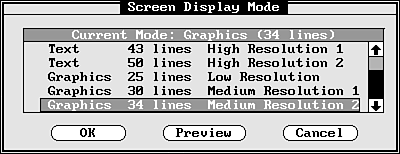
To change the screen mode, first select the Options menu (see Figure 4.16) and then choose Display. The Screen Display Mode dialog box appears (see Figure 4.17). Next, highlight a choice in the dialog box, and click OK or press Enter. If you are unsure about your video card's support for a particular mode, you can choose the Preview button to see what results from that choice.
In addition to providing an alternative DOS interface to the command line, the DOS Shell also provides a convenient method for running all the other programs stored in your computer. A program that performs this function is sometimes called a menuing program. The Shell's program list area provides menuing capability.
Items listed in the program area of the DOS Shell window fall into two categories: program items and program groups. A program item starts a specific software application on your hard disk; a program group is a collection of program items or other program groups.
Program groups enable you to group your applications programs by category. You can create a Word Processing group, a Database group, and a Spreadsheet group, for example. By default, the initial list of program items, which you see when you first start the DOS Shell, are in the Main program group. The Main group includes another program group named Disk Utilities, which includes program items that perform disk-related DOS commands.
You can easily tell whether an option listed in the program list area is a program item or a program group. When the DOS Shell window is in text screen mode, program group names are enclosed in brackets. For example, the Disk Utilities program group appears as [Disk Utilities] when the screen is in text mode.
In graphics mode, the Shell uses special icons to distinguish between program items and program groups. The following icon appears to the left of program item names:
The following icon appears to the left of program group names:
When you first install the DOS Shell, the program list area lists the program group Main. This group includes the program items Command Prompt, Editor, and MS-DOS QBasic. Selecting a program item starts the selected program. Also included in the Main program group is the program group Disk Utilities. Selecting Disk Utilities causes the Shell to display another group of program items, the Disk Utilities group, which consists of DOS utility programs that enable you to copy, back up, restore, format, and undelete disks (see Figure 4.18). You can press Esc to return to the preceding program group or select the Main program group, which appears at the top of the program list.
To run a program item or select an alternative program group, highlight your choice and press Enter, or simply double-click your choice. If you choose to run a program, you are returned to the DOS Shell when that program terminates.
Now that you know what program groups are, you need to learn how you can work with them. The following sections teach you how to add, modify, and delete program groups.
To add a new program group, make the program list area the active area of the DOS Shell window and display the program group to which the new group is to be added. If you want to add a new program group to the Main program group, for example, press Esc until the title bar of the program list area displays the title Main. When you want to add a program group to a different program group, use the mouse or cursor-movement keys to select the intended “parent” group in the program list area.
When the program group you want is displayed, complete the following steps:
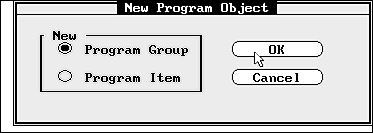
Choose New from the File menu. The New Program Object dialog box appears (see Figure 4.19). This dialog box contains two option buttons: Program Group and Program Item.
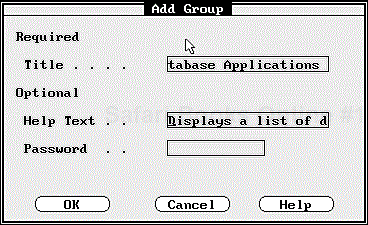
Click the Program Group option button, and then click the OK command button or press Enter. The Add Group dialog box appears (see Figure 4.20). This dialog box contains three text boxes: Title, Help Text, and Password. You must type an entry in the Title text box to supply the group name. Entries in the Help Text and Password text boxes are optional.
Type a program group title in the Title text box. (You can use up to 23 characters, including spaces.) This title will be the name, or menu option, that appears in the program list area when the parent program group is displayed.
If you are creating a program group for your database applications, for example, you might type
Database Applicationsin the Title text box. This title appears not only in the program list area, but also in that area's title bar when a program group is activated.Type a help message, if you choose, in the Help Text text box. (The message can be up to 255 characters long, even though the Shell can display only 20 characters at a time in the text box; the text in the text box scrolls to the left as you type past the 20th character.)
For a Database Applications group, for example, you might type the help message
Displays list of database applications. Afterward, whenever you press F1 while the Database Applications item is highlighted, the help message appears.The Shell displays help messages in the Shell Help dialog box and formats the help message to fit in the dialog box. If you want a line to break at a particular point, type the characters
^m(or^M) at that point. Any following text starts on the next line when the help message is displayed in the Help dialog box.Type a password, if you choose, in the Password text box. (The password can be up to 20 characters long, including spaces.)
Click the OK command button or press Enter. The Shell adds the new program group to the selected program group. Now, if you select the new program group, the Shell opens an empty file list area so that you can add program items.
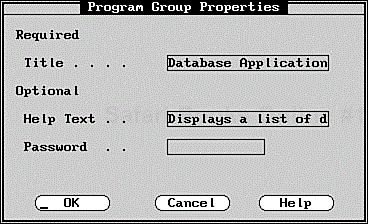
After you create a program group, you can change the parameters that define it—its properties—through the Shell File menu. To change a program group's properties, highlight the group's name in the file list area and choose Properties from the File menu. The Program Group Properties dialog box appears (see Figure 4.21).
This dialog box essentially is a copy of the Add Group dialog box, except that the title, help message, and password (if you supplied one) for the selected group already appear in the text boxes. Make any changes you want, and then click OK or press Enter. Clicking Cancel returns you to the Shell window without changing any of the program group's properties.
Through the File menu, you also can remove a program group. Before you delete a program group, make sure that all items in the group are deleted (see the section “Deleting a Program Item” later in this chapter).
To delete a program group, select the group name and choose Delete from the File menu or press the Del key. The Delete Item dialog box appears (see Figure 4.22). Select Delete This Item, and click OK or press Enter.
Placing the groups that you use most frequently near the top of the group listing is convenient, enabling you to find these groups quickly. You can place groups in any order you want. To move a group from one place to another in the menu list, follow these steps:
Move the selection bar to the group that you want to move.
Choose Reorder from the File menu. The Shell displays the following message in the status line:
Select location to move to, then press Enter. Esc to cancel.
Use the cursor-movement keys to move the selection bar to the desired new location for the selected group and then press Enter. The Shell moves the group to the new position.
You can repeat these steps as often as necessary to produce the order you want for your groups.
After you create program groups, you next will want to add program items. The following sections describe how to add program items, as well as how to modify and delete existing program items in the program group. (To reorder program items, follow the procedure described in the preceding section.)
Adding a program item is similar to adding a program group. When you want to add a program item to a particular group, make the program list area the active area of the DOS Shell window and then display the program group to which you want to add the program item. If you want to add a program item to the Database Applications program group, for example, press Esc until Main appears in the title bar of the program list area and then use the mouse or cursor-movement keys to highlight Database Applications.
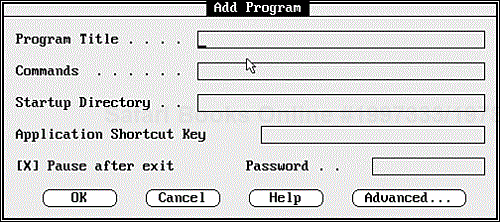
After you've selected the program group, choose New from the File menu and select Program Item from the dialog box. The Add Program dialog box appears (see Figure 4.23).
This dialog box contains five text boxes: Program Title, Commands, Startup Directory, Application Shortcut Key, and Password. You must type entries in the Program Title and Commands text boxes, but entries in the Startup Directory, Application Shortcut Key, and Password text boxes are optional. All entries in the Add Program dialog box are referred to collectively as the program item's properties.
You also can click the Advanced command button to add a help message, specify special memory or video requirements, or select other advanced options.
Modifying the properties of a program item is fairly easy and straightforward. To modify properties, follow these steps:
Activate the program list area. If the group that contains the program item that you want to modify is not included in the selected group, select the program group that includes the item.
Use the mouse or cursor-movement keys to move the selection bar to the name of the program item that contains the properties you want to modify.
Choose Properties from the File menu. The Program Item Properties dialog box appears.
Make the desired changes in the values in the text boxes. Then click OK or press Enter to confirm your choices.
You might want to delete a program item that you no longer use. The program itself is not deleted—only the program item. To remove a program from your computer, you must delete that program's files from the disk.
To delete a program item, follow these steps:
You can specify shortcut keys to start applications. When you specify these key combinations, the Shell displays them in the Application Shortcut Key text box in the Add Program dialog box. If you press and hold down Ctrl and Alt simultaneously and then press P, for example, the Shell displays ALT+CTRL+P in the text box.
A specified shortcut-key combination starts the program only if the following three conditions are met:
The DOS 6.0 task swapper is enabled.
You started the program through the DOS Shell's program list area.
You used one of the task-swapper keystrokes (Alt+Tab, Alt+Esc, or Ctrl+Esc) to switch to another program or back to the Shell.
Suppose that you first enable the DOS Shell task swapper and then start Paradox from the program item in the Database Applications program group. You then switch back to the Shell by pressing Alt+Tab and start WordStar. To return to Paradox quickly, you simply press the shortcut key you defined (for example, Ctrl+Alt+P). The task swapper quickly swaps WordStar to disk and displays the Paradox screen.
Caution
When creating shortcut keys, make sure that you are not using key combinations that are already used by DOS Shell.
When you return to the DOS Shell window while the program you were using earlier is swapped out to disk, the Shell lists the shortcut in parentheses to the right of the program item title in the active task list area.
DOS manages files on your disks by maintaining file information in a hierarchical directory structure. The directory tree area, in the upper-left quadrant of the window, graphically depicts this directory structure. At the top of this area, the root directory of the logged disk is shown as a folder-shaped icon or as a pair of brackets ([]) if the DOS Shell is in text mode. All other directories are shown as folder-shaped icons (or pairs of brackets). These other directories are listed below the root icon and connected to the root icon by a vertical line. The name of each directory is listed to the right of its icon.
At any time during a session with the DOS Shell, one directory name is highlighted. This highlighted directory is referred to as the selected directory. When you first start the Shell, the directory that is current when you start the program is the selected directory (usually the root directory of the boot disk). The file list area of the DOS Shell window, in the upper-right quadrant of the screen, lists the filenames in the selected directory.
As you know, the DOS directory structure is treelike. The root directory is like the trunk of a tree, with all other directories growing out like branches of a tree. The DOS Shell graphically represents this treelike nature in the directory tree area of the DOS Shell window as an upside-down tree.
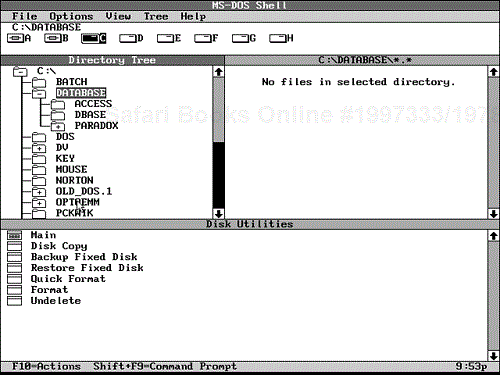
The DOS directory structure can have multiple levels, but initially the Shell shows only the first level of the tree. Each first-level directory—a directory attached directly to the root—is depicted as a branch of the tree. Just as branches of a real tree can have offshoot branches, each DOS directory can contain offshoot directories. The Shell indicates that a directory contains other directories by placing a plus sign (+) in the directory icon. Figure 4.24 shows plus signs in the directory icon for the following first-level directories:
DVOLD_DOS.1OPTQEMM
To expand (show the directories subordinate to) by one level a directory tree branch that shows a + in its directory icon, click the + in the directory icon or do the following:
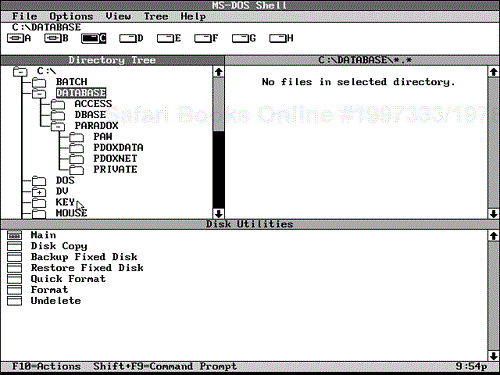
The Shell then shows the next level of directories beneath the selected directory. Figure 4.25, for example, shows the expanded DATABASE directory containing three second-level directories: ACCESS, DBASE, and PARADOX.
Offshoot directories can contain more offshoots. The relationship among directory levels is analogous to a family tree—child, parent, grandparent, and so on. When a second-level directory contains one or more third-level directories, the Shell shows a plus sign (+) in the second-level directory icon. The directory icon of the PARADOX directory shown in Figure 4.25, for example, indicates that this branch of the DATABASE directory also contains at least one directory. To expand one level of the PARADOX branch, follow the procedure you used to expand one level of the DATABASE branch.
If you do not remember precisely where a directory is located in the directory tree, expanding branches one level at a time can become tedious. When you want to expand all levels beneath a particular directory branch, use the following procedure:
Use the mouse to click the directory name or use the arrow keys to move the selection cursor to the directory name.
Press the * key, or choose Expand All from the Tree menu.
The Shell expands all levels of the tree below the currently selected directory. Figure 4.25, for example, shows the fully expanded DATABASE branch of drive C's directory tree.
The opposite of expanding a directory branch in the directory tree area is collapsing a branch. When you first start the DOS Shell, you might notice that a root directory's icon contains a minus sign (–). After you expand a directory branch, the icon for the expanded branch also contains a minus sign. These minus signs are a reminder that you can collapse the branch. To collapse a branch whose icon contains a minus sign, click the directory icon with your mouse or use the following procedure:
To collapse the entire tree, click the root directory icon or do the following:
Select the root directory name at the top of the directory tree.
Press the – (hyphen) key or choose Collapse Branch from the Tree menu.
The Shell collapses the entire tree down to the root level and places a + in the root directory icon.
Because the only automatically available directory on a DOS disk is the root, you must add any additional directories. Even after you establish a workable directory structure for your computer, you occasionally need to create new directories on your disks. DOS enables you to add directories to a disk through the DOS Shell, instead of having to exit to a command prompt to add directories.
To create a new directory using the DOS Shell, do the following:
Select the directory tree area of the DOS Shell window.
Select the directory to be the parent of the new directory.
Select File from the menu bar to display the File menu.
Choose Create Directory from the File menu.
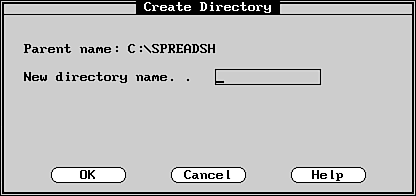
The Shell displays the Create Directory dialog box shown in Figure 4.26. This dialog box indicates the name of the parent directory,
C:SPREADSH.Type the name of the new directory, and press Enter or click OK.
The Shell creates the new directory and returns to the directory tree area of the DOS Shell window. The Shell also adds to the tree an icon for the new directory.
In the DOS Shell, you perform file-management operations primarily through the File menu. The active menu options displayed in the File menu, however, vary according to which area of the window is active. Although the menu options displayed when the directory tree is active are the same as the options displayed when the file list is active, many of these menu options are dimmed (not valid) when the directory tree is active.
The DOS Shell's file-management commands operate on all selected files. At any time, you can select any number of files. The Shell displays both the name and file-list icon of each selected file in reverse video. Selected files need not be from the same directory.
To select a single file, follow these steps:
Activate the directory tree area.
Use the mouse and scrollbar or the cursor-movement keys to scroll through the directory tree until the name of the directory containing the files you want to select appears.
Use the mouse or arrow keys to move the selection cursor to the target directory.
Activate the file list area.
Use the mouse and scrollbar or the cursor-movement keys to scroll the file list until the name of the file you want to select appears.
Click the name of the file to be selected (the target file). Alternatively, use the cursor-movement keys to move the selection cursor to the target file and then press the spacebar.
To indicate that a file is selected, DOS displays the filename and file list icon in reverse video.
If you want to apply a DOS Shell command to several files, applying the command simultaneously to all the files is more efficient than applying it to one file at a time. After you select the first file, you can select the other files in either of the following ways (this procedure is referred to in the DOS Shell as extending the selection):
Hold down the Ctrl key and click the name of the file that you want to select.
Press Shift+F8. When the message
ADDappears in the status bar, move the selection cursor to the name of the file you want to select and then press the spacebar. Press Shift+F8 again to turn off theADDmessage.
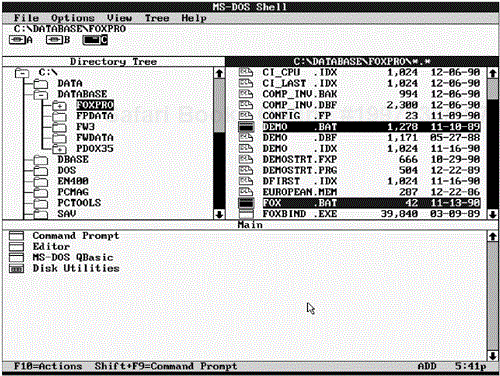
The icon and filename of each selected file appear in reverse video (see Figure 4.27).
Frequently, you might want the Shell to work on several files that are listed one after the other in the list area. To select contiguous files, you can select each file individually, using the previously discussed method. But the Shell provides an easier way to select files as a group.
To select contiguous files in the DOS Shell, follow these steps:
Select the first file.
Use one of the following procedures to select the remaining files:
Use the mouse to position the pointer on the last file you want to select, press the Shift key, and click the left mouse button.
While holding the Shift key, use the cursor-movement keys to move the selection bar to the last file.
The Shell selects all the files. To indicate that these files are selected, the Shell displays the filenames and their icons in reverse video.
After you select files, you might decide that you don't want to perform a DOS Shell operation on that group of files. Perhaps you want to start a fresh selection process by deselecting all selected files. Normally, selecting a different directory also deselects all selected files.
You also can deselect all selected files in one procedure. Use the mouse to click anywhere in the file area or press the spacebar. Alternatively, choose Deselect All from the File menu.
By default, the DOS Shell enables you to select files in only one directory at a time. By selecting a different directory, you deselect all selected files. Occasionally, however, you might want to perform a file-management operation on files from several directories. You might want to copy to a floppy disk, for example, one file from each of three directories on your hard disk.
Before you can select files in several directories, you must choose Select Across Directories in the Options menu.
To copy files from three directories to a floppy disk in one procedure, you must first select the directories and then the files, one at a time. Then, choose the Copy command from the File menu to copy all the selected files to the floppy disk.
With the DOS Shell, you can copy one or more files in a directory, between directories, or between disks, using any of several approaches. The approach described in this section—the dual file list method—is the quickest and easiest to learn and use.
To perform the copy operation using the dual file list method, you first must select the source and target drive and directory and create a dual file list. Complete the following steps:
Select the source drive and directory (those that contain the files you want to copy).
Choose Dual File Lists from the View menu to switch to the dual file list.
Use the mouse or the cursor-movement keys to select the target drive and directory in the second directory tree.
Use the mouse or keyboard to select, in the first (upper) file list, the files that you want to copy.
The remaining steps for completing the copy operation differ, depending on whether you want to use the mouse or the keyboard. If you use a mouse, complete the following steps:
Position the mouse pointer on a selected file in the upper file list. Hold down the Ctrl key while you press and hold the left mouse button. While holding down both the Ctrl key and the mouse button, drag the mouse pointer to the target drive letter in the lower drive area or, alternatively, to the target directory's name in the lower directory tree.
When you begin to drag the mouse, the pointer changes from an arrow (or a block, in text mode) to a circle (or two exclamation-point symbols, in text mode). When the pointer enters the second directory tree, the circle becomes a file icon (or a diamond, in text mode). If you are copying several files, the file icon resembles a stack of three papers. Figure 4.28 shows how you should have the dual file lists set up before dragging the filenames to copy them to the target disk.
Note
When you are copying files to a different disk, you don't have to hold down the Ctrl key; holding down the mouse button is enough. If you drag files to another directory on the same disk without holding down the Ctrl key, however, the Shell assumes that you want to move the files rather than copy them.
Depending on the selections you have made in the Confirmations Item dialog box, which can be accessed from the Options menu, you might be asked to confirm the copy operation.
To confirm that the copy should take place, click Yes.
To copy files using the keyboard only, complete the copy procedure by following these steps:
Choose Copy from the File menu or press F8. The Shell displays the Copy File dialog box. This dialog box contains the From and To text boxes. The Shell lists the source files in the From text box and the source directory in the To text box.
Type the target drive and directory name in the To text box and then press Enter. The Shell copies the files to the target directory and displays a message to that effect in the center of the screen.
When the DOS Shell moves a file, the program copies the file from one storage location to another and then deletes the file from its original location. Therefore, the steps for moving one or more files with the DOS Shell are nearly the same as those for copying files. When you want to move one or more files, select the files to be moved just as you do if you are going to copy them.
If you are using a mouse, position the mouse pointer on one of the selected files in the upper file list. Hold down the Alt key while you press and hold down the left mouse button. While holding both the Alt key and the mouse button, drag the mouse pointer to the target drive letter in the lower drive area or to the target directory's name in the lower directory tree.
To move files using only the keyboard, follow these steps:
Choose Move from the File menu or press F7. The Shell displays the Move File dialog box. This dialog box contains the From and To text boxes. The Shell lists the source files in the From text box and the source directory in the To text box.
Type the target drive and directory name in the To text box, and then click OK or press Enter. The Shell moves the files to the target directory and displays a message to that effect in the center of the screen.
When you want to view the contents of a file from within the DOS Shell, follow these steps:
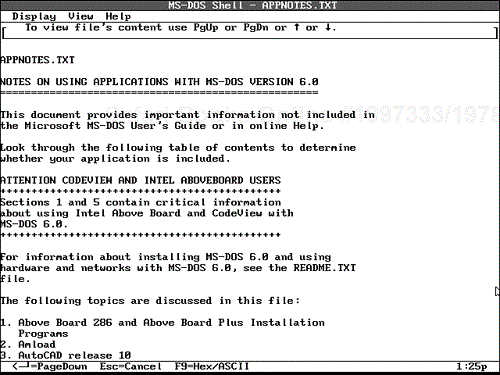
When the file you want to view contains only ASCII characters, the Shell displays the ASCII file viewer. One of the files distributed with DOS 6.0, for example, is named APPNOTES.TXT and contains only ASCII text. To view the contents of APPNOTES.TXT, select its name in the file list area and then choose View File Contents from the File menu. The Shell displays the file in the ASCII viewer (see Figure 4.29).
To scroll through the file, use the cursor-movement keys or use the mouse to click the labels PgUp, PgDn, ↑, or ↓, which are displayed near the top of the window.
When the file you want to view contains data other than ASCII characters, the DOS Shell uses the hexadecimal (base 16, often referred to as hex) viewer. If you select the DOS command processor file, COMMAND.COM, and press F9, for example, it displays the contents of the file as four columns of hexadecimal codes and one column of ASCII characters. (This information normally has meaning only to programmers and to the computer.) As in the ASCII viewer, you can scroll through the file by using the cursor-movement keys or the mouse.
Many programs create and work with files that have distinctive filename extensions. The DOS Shell enables you to associate particular extensions with a specific program so that you can start the program and load a file with an associated extension in one step.
The easiest method of associating a file extension with a program is to follow these steps:
In the file list area, select a file whose extension you want the Shell to associate with a specific program.
Choose Associate from the File menu. The Shell displays the Associate File dialog box, containing a text box in which you can type the program's directory path and filename. If the current file extension already is associated with a program, the Shell displays the program's path and filename in the text box.
In the text box, type the program's complete filename, including the extension. If the file is in a directory that's not included in the
PATHstatement, type the directory path as well as the filename.Click OK or press Enter.
The DOS Shell also has the capability to load more than one program at a time. DOS accomplishes this feat through a technique called task swapping. To activate this feature, choose Enable Task Swapper from the Options menu. The Shell adds an active task list area to the window (see Figure 4.30). Initially, nothing is listed in this area because no program (other than the Shell) is active.
With the task swapper enabled, you still start programs by using any of the methods described earlier in this chapter. But after you start a program, you can jump back to the DOS Shell instantly without exiting the program. Simply press Alt+Esc or Alt+Tab, and the screen returns to the DOS Shell window, where the program (or associated data file) is listed in the active task list area. DOS has swapped the contents of memory (RAM) to disk, freeing space in memory so that you can run another program.
The fastest way to switch between active tasks is to hold down the Alt key and tap the Tab key. Do not release the Alt key. The Shell displays the name of the task at the top of the screen. Still holding down the Alt key, press the Tab key again to see the name of the next task. Repeat this keystroke until the target task name appears. Finally, release the Alt key. The Shell switches to the target task.
At any time during a DOS Shell session, pressing the F1 key causes a help window to appear. Online help assists you with the current selection or action so that you can make an informed selection.
The help system is contextual, meaning that DOS looks at the menu item currently highlighted and provides information about that selection. You can go from that help screen to other help screens to get help on additional topics. Figure 4.31 shows a typical help screen.
Five command buttons appear at the bottom of a help screen:
Close returns you to the screen from which you pressed F1.
Back returns to the preceding help screen.
Keys displays an index of help information on keystroke commands.
Index displays the DOS Shell help index, a list of topics on which you can receive help.
Help displays information on how to use the help system. Use the mouse and scrollbar or the cursor-movement keys to display the information in which you are interested.
Additional related topics are listed in a different color on the help screen. Use the Tab key to highlight the related topic and press Enter, or click the topic. The Shell displays another help screen.
Choose the Close command button or press Esc to return to the screen from which you pressed F1.
Operating techniques are fairly consistent throughout the DOS Shell, and because the Help information is quite thorough, you should be able to learn what isn't covered by selecting the menu items and using the Help feature to guide you.

