In this chapter
When you want your computer to perform an action, you communicate this request for service by entering commands at the DOS prompt. All DOS commands begin with a word, sometimes called a keyword, that identifies the action you want to take. Most DOS commands can accept parameters that refine the scope of the command. The DIR command, for example, tells DOS to show you a list of files written on a disk. Adding parameters to this command enables you to specify exactly the files you want listed.
DOS recognizes and responds to more than 80 commands. The programming to provide the most commonly used commands is contained within the DOS command interpreter, COMMAND.COM. You use commands such as DIR and COPY so frequently that making them available on demand whenever the computer is displaying a DOS prompt saves time. Because DOS does not have to launch (start) any program to provide the service, the commands provided by COMMAND.COM are called internal commands. You can tell which commands are internal by looking in the directory where DOS is installed. You never find COPY.COM or COPY.EXE, so you know that the COPY command is internal.
Other commands are stored as utility programs in a directory on your hard disk. Because these commands are not built into the command processor, they are called external commands. When you type a command that COMMAND.COM does not recognize as one of its internal commands, COMMAND.COM responds by looking on disk for a program file having the same name as the command. The FORMAT command, for example, is provided by programming found in the file FORMAT.COM, which is located in the DOS directory.
Whether internal or external, all DOS commands conform to rules that provide a grammar or syntax that is consistent throughout DOS. As a user, you need to make sure only that DOS can find the program files for external commands.
To begin to understand DOS commands, you first need to know a few fundamental facts:
DOS requires that you use a specific set of rules, or syntax, when you issue commands.
All DOS commands begin with a keyword that identifies the action you want performed.
Parameters, which are a part of a command's syntax, refine the way a command is executed.
Syntax is the order in which you type the elements of the DOS command—its grammar. If you say, “Ball red the choose I,” people probably will not understand that you are trying to say, “I choose the red ball.” Some people might understand what you are trying to say, but not many. A computer, on the other hand, has no intelligence or imagination; it can interpret commands only according to its programming. Programming several optional syntaxes for commands requires using a great deal of extra memory and disk space, which cuts down on the resources available to do real work. That's why you have to supply the intelligence and imagination and why you must enter DOS commands precisely according to the rules of command syntax.
You can think of the command keyword as the action part, or verb, of a DOS command. In addition to the keyword, many commands require or allow further directions. You supply these directions as parameters and switches. Parameters tell DOS what action to take or how to apply the action. Using DOS commands is easy as long as you follow the rules of order and use the correct parameters. After you know the basic rules, you often can figure out parameters for commands that you don't use on a regular basis.
Note
You run applications software—such as word processors or drawing programs—by entering a command at the DOS prompt. The command you use to start an application is the name of the program file (COM or EXE) in which the programming for the software is stored.
Most applications software incorporates the issuing of commands as part of the software's operation. The commands discussed in this book are DOS commands. Be sure that you know the difference between DOS commands, which you issue at the DOS command line, and the commands you learn to use with your applications software.
If you are unsure whether a command you have been taught to use is part of DOS, look in Appendix F,“Command Reference.” If that command is not listed, it is an application program command, not a DOS command.
The syntax for most DOS commands can be boiled down to one of the following two simple formats:
KEYWORD DriveFiles Switches

KEYWORD SourceFiles TargetFiles Switches
A DOS command always begins with the keyword, which is the name of the command, followed by a space. If you use the language metaphor, the keyword is the verb that specifies the action to be taken.
The first example shows the common form for DOS commands that don't change files in some way. The DriveFiles portion of the example is a parameter that specifies what drive or files on which the command is supposed to act. This parameter is analogous to a noun in English. In other words, the parameter is the thing on which the verb acts. This portion of the syntax is in italic to show that the parameter is optional. The parameter also can be followed by command-line switches. To extend the language metaphor, switches are like adverbs; they modify the verb. They change the action to be done.
The second example here is typical of the syntax for most DOS commands that operate on groups of files. The keyword, of course, specifies the action, followed by two parameters that indicate the disk or files that provide the data source for the action. The second parameter indicates the target disk or files. To copy a group of files from one disk or directory to another, for example, you can use the following command:
COPY A:Myfile.TXT B:Yourfile.TXT
This command copies a file having the name MYFILE.TXT on drive A into the memory of your computer and then writes the contents of the file onto drive B using the name YOURFILE.TXT.
Note
Some parameters or switches are optional, meaning that some parts of the command syntax, such as the keyword, are mandatory. When you enter only the mandatory command elements, DOS (in most cases) uses default parameters for other elements.
A good example is the COPY command. If the following is the command, the default target is the currently logged disk and directory:
COPY A:MyFile.TXT
If you're in C:TEMP, the file is copied to that directory, and the current filename, MYFILE.TXT, is the target filename as well.
As you can see, having defaults makes commands easier to use and shorter, and gives you fewer opportunities to make mistakes.
Because many DOS commands have several parameters, switches, and defaults, different forms of these commands might be correct. You seldom, if ever, use all the optional syntax for any command. Some switches actually are mutually exclusive. You cannot format a floppy disk as both high density and low density, for example.
To find out what options are available for any given command, you should look up the command in the “Command Reference” later in this book. The first time you look up a complex command, don't let the sheer volume of optional parameters and switches throw you for a loop. Even the simplest of DOS commands has several options.
The way the syntax is presented often is called the paradigm. Even the simple DOS commands have an imposing paradigm. A good example is the DIR command, a real workhorse of a command. Its paradigm looks something like the following:
DIR filespec /P /W /S /B /L /C /CH /O:sortorder /A:attributes
You use the DIR command to display a directory of one or more files stored on a disk. This command might look formidable, but it is much easier to understand if you break down the individual components.
→ For a description of the DIR command and its options, see “Listing Files with the DIR Command” in Chapter 8, “Managing Your Files”, p. 193.
In addition to the command's name, a DOS command contains syntax elements known as parameters. Parameters (sometimes called arguments) are the parts of a command line that provide DOS with the objects of the command's action. The objects might be files, system settings, or hardware devices.
In the DIR example in the preceding section, filespec is the complete filename, including any drive, path, and wildcards that you want the DIR command to use. In some commands, you might see the filespec spelled out, as in the following:
d:pathfilename.ext
Don't be confused by this formal rendering of the filespec; it simply states that the filespec can contain a drive letter, a pathname, a filename, and an extension.
Note
Many new users are confused about the way slashes and backslashes are used in commands. In actuality, their uses are stated simply in two rules:
Backslashes () are used as separators (delimiters) when specifying directory and file information.
Slashes (/), sometimes called forward slashes, are used as signals to DOS that the next character is a command-line switch.
A good memory association to use is that a backslash connects one name back to the name that comes before it, whereas a slash connects to the character in front of it.
A switch is a parameter that turns on an optional function of a command. Switches are special parameters because they usually are not the objects of a command's action; rather, switches modify the command's action. You can use the /W switch with the DIR command, for example, to display a wide directory of files instead of the usual single-column list. Switches can make a basic command more versatile and powerful. In the DIR example, /P, /W, /S, /B, /L, /O, /C, /CH, and /A are switches.
Usually, you can use a command's switches in any order or any combination. Not all DOS commands have switches, however. Also, the letter used for a switch in one DOS command might have a different meaning in another DOS command. In addition, some switches require a parameter. You usually attach switch parameters to the switch by using a colon (:), as in the following example:
FORMAT A: /F:360 /S
In this example, the /F switch specifies that a 360KB floppy disk be formatted in a disk drive that normally uses high-density (1.2MB) disks.
These days, the manuals supplied with DOS don't provide all the information they did in previous versions. They no longer contain a complete printed reference for all the DOS commands. To get the official Microsoft syntax for every DOS command, you have to pony up extra dollars to buy the MS-DOS Technical Reference. Because you already have this book, you probably don't want or need the Technical Reference. Appendix F,“Command Reference,” contains a wealth of information about undocumented switches and parameters.
In place of the printed manual that used to come with DOS, Microsoft has opted instead to supply an online command reference. It falls short of the reference in the back of this book, of course, because it doesn't include the undocumented information; but most of the time, you will find the online reference to be adequate and handy.
To access online help for the use of a particular command, use one of the following procedures from the DOS prompt:
Type the DOS command, followed by the switch
/?.Type
HELP, followed by the DOS command.
The following sections describe each method in detail.
One DOS command-line switch is never documented in the syntax examples, but you can use this switch with any DOS command. The /? switch is universal to all DOS commands.
After you enter a DOS command followed by the /? switch, DOS prints to the screen a summary of the command syntax. In some cases, the sample syntax is simplified by omitting options not available to you at the command line. A good example is the EMM386 command. Usually, EMM386 is loaded via CONFIG.SYS. After DOS is running, only those parts of the command that are accessible during a DOS session are displayed, omitting the parameters that can be given only at boot time.
The handy thing about using the /? switch is that it gives you a short summary of the command, leaving enough room onscreen for a DOS prompt. This way, you can refer to the syntax and type the command without taking your attention away from the screen.
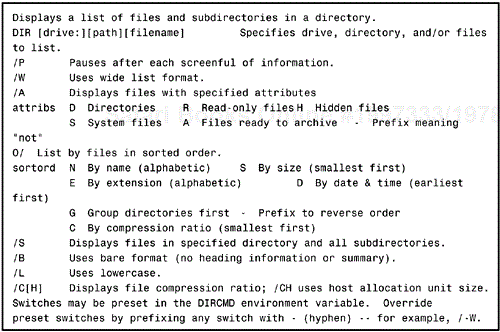
To get a command summary of the DIR command, for example, type the following command and then press Enter:
DIR /?
DOS displays the command summary help screen shown in Figure 3.1.
The second method for obtaining help is to use HELP, followed by the keyword you want information about. If you don't know the keyword you are looking for, just type HELP and you are presented with a list of command keywords from which to choose.
The online help system displays a detailed description of the command's function, correct syntax, available switches, and a detailed explanation of the effect of each switch.
The online help system also contains special notes and examples related to each command, which enables you to view information on related commands or topics by using only a few keystrokes. If you have a mouse, using the online help system is a snap. You even can print information on selected commands.
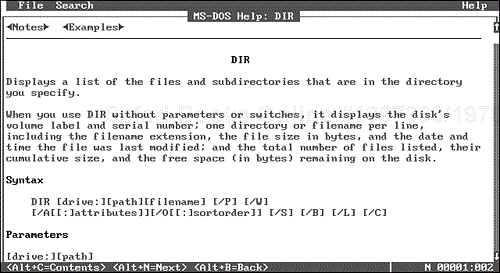
To get the complete online help for the DIR command, for example, type the following and then press Enter:
HELP DIR
DOS displays the online help screen shown in Figure 3.2.
The online help system contains a great deal of information and provides several ways for you to locate, view, and print topics of interest to you. You can use either a mouse or the keyboard to issue commands in the online help system; this section describes both methods. Most of the keystrokes and mouse movements are the same for the help system as they are for the DOS Shell program.
→ For more detailed information about moving around a window, see Chapter 4, “Using the DOS Shell,” p. 57.
Because the HELP command provides such complete information, information about a topic or command usually requires more than one screen. To view all the information about a topic, you must scroll the display forward and backward.
To scroll through the text one line at a time, use one of the following methods:
Click the downward-pointing scroll arrow in the scrollbar at the right edge of the screen to move forward one line. To move backward, click the upward-pointing scroll arrow.
Press the Ctrl+down arrow key combination to move forward; press the Ctrl+up arrow key combination to move backward.
To scroll through the text one screen at a time, use one of these methods:
Click the scrollbar below the scroll box to move forward one screen; click above the scroll box to move backward.
Press the PgDn key to move forward one whole screen; press the PgUp key to move backward.
In Figure 3.2, notice the words Notes and Examples near the top-left corner of the screen. Each word is enclosed within solid, triangular characters. Each of these specially marked words is a jump. A jump provides a link to additional information on the currently selected topic or to related topics.
Jumps in the body of the help system's text are marked with angle brackets (<>). The brackets are colored to help you more easily see them if your video card and monitor support color. Although not shown in Figure 3.2, the word <TREE> at the end of the DIR help text is another example of a jump.
When you select a jump, the online help system displays the text related to the topic named by the jump word. To select a jump, use one of the following methods:
If you select the <Examples> jump shown in Figure 3.2, the help system displays a screen containing examples of the DIR command and explanations of each example. Selecting a jump such as <TREE> causes the help system to display the help for the TREE command.
In Figure 3.2, the solid bar across the top of the screen with the words File and Search is the help system's menu bar. You use the help system's pull-down menus in the same way you use the pull-down menus in the DOS Shell.
→ If you are unfamiliar with using pull-down menus, see Chapter 4, “Using the DOS Shell,” p. 57.
The choices on the File menu enable you to print a topic or exit the online help system. The choices on the Search menu enable you to search for a topic, word, or phrase and repeat the last search.
Another solid bar appears at the bottom of the screen (refer again to Figure 3.2). The bottom-right corner of this area of the help screen displays numbers indicating the current line and column number of the cursor. In Figure 3.2, the cursor is at line 1, column 2 of the help text for the DIR command.
At the left edge of this area, three keystroke combinations and their functions are displayed:
<Alt+C=Contents> <Alt+N=Next> <Alt+B=Back>
Each label enclosed in brackets also doubles as a command button if you have a mouse. You can click the command button or press the key command, Alt+C, causes the online help system to display its table of contents. Each item in the table of contents is a jump. The Next command, Alt+N, causes the online help system to display the next topic. The Back command, Alt+B, causes the online help system to display the last topic you looked at.
Table 3.1 summarizes the command keys, and their actions, available in the online help system.
Table 3.1. Online Help Command Keys
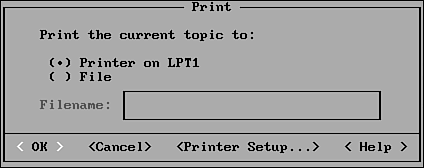
The online help system enables you to print the text for the currently displayed topic. You may optionally send the output to a file on your disk instead of to the printer. The Print command is located on the File menu.
When the help system displays the File menu, click the Print command. The help system opens the Print dialog box shown in Figure 3.3.
→ For information on using dialog boxes, option buttons, text boxes, and command buttons, see Chapter 4, “Using the DOS Shell,” p. 57.
To print the current topic on your printer, simply press Enter or click the OK command button. To send the text for the current topic to a disk file, select the File option button; then, in the text box, enter the name of the file to which you want to send the output. Finally, press Enter or click the OK command button.
You use the Find command to search for a specific topic, word, or phrase. The Find command is located on the Search menu.
When the help system opens the Find dialog box, you see a screen similar to the one shown in Figure 3.4.
When the Find dialog box first opens, the Find What text box contains the word that the cursor was on when you selected the Find command. In Figure 3.4, the cursor was on the word Notes when the Find command was selected, so the Find What text box contains the word Notes.
Enter the topic, word, or phrase that you want to search for in the Find What text box, or use the word already in the text box. Then, select which of the two Find options you want to use. You can use one, both, or neither of these options.
If you check the Match Upper/Lowercase option check box, the search is case sensitive. If you check the Whole Word option check box, it is assumed that you are searching for a whole word; partial word matches will be ignored.
You can repeat any search by selecting the Repeat Last Find command on the Search menu or by pressing F3.
When you enter a DOS command, two sets of parameters determine how the command is carried out. Any parameters or switches that you explicitly type take precedence, of course, but unless you override them, the default values for a command are used.
Throughout this chapter, you've seen the DIR command used as an example. Here's one more:
DIR /P
When you issue the DIR command to see the files on a disk, the currently logged directory is used unless you specify otherwise. Also, all the files in the directory are shown unless you somehow override the default by explicitly specifying a file or group of files. By default, the display of files scrolls to the end without stopping. In the preceding example, the display of all files in the current directory (the default) is used, but the /P switch, which makes the listing pause after each page of filenames, overrides the default behavior of scrolling to the end of the list without stopping.
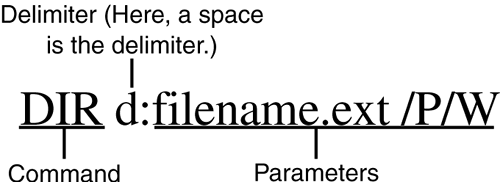
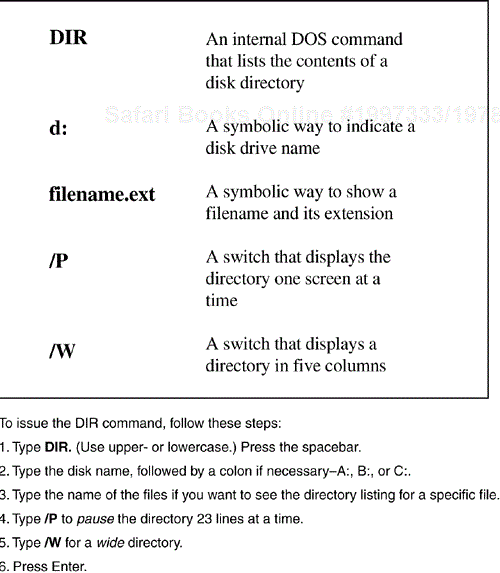
Figure 3.5 breaks down the different elements that make up the DIR command. As you can see, only two of the switches (/P and /W) are illustrated.
Figure 3.6 is a diagram of the DIR command as you might use it. If you are unfamiliar with the anatomy of a command, the following sections explain each of the different parts.
You occasionally might make a mistake when you are entering a command. Because DOS does not act on the command until you press Enter, you can correct a mistake by using the arrow keys or the Backspace key to reposition the cursor and type over your entry. If you need to insert characters into the command line, press the Ins key to turn on the insert mode. After you press Enter, DOS automatically returns to the overtype mode.
If, however, you have gotten way off track and want to cancel what you have and start over, you can press the Esc key, Ctrl+C, or Ctrl+Break.
DOS stores keystrokes that have not yet been displayed in a type-ahead buffer. The idea of the type-ahead buffer is to keep keystrokes from being lost when entered by fast typists, or when a prolonged operation takes the computer's focus away from the keyboard for a moment. If the type-ahead buffer gets filled with keystrokes, your PC beeps when you press an additional keystroke, warning you that you are losing keystrokes. The buffer storage areas also give DOS some special editing capabilities.
Each time you complete a command by pressing Enter, the command is stored in another buffer, the last command buffer. Using the DOS editing keystrokes, you can recall the last command, or you can pull the preceding command line from the buffer and use it again. This feature is helpful when you want to issue a command that is similar to the last command you used or when you mistyped a parameter. Table 3.2 lists the keys you use to edit the input buffer.
Table 3.2. DOS Command-Line Editing Keys
| Key | Action |
|---|---|
| Tab | Moves the cursor to the next tab stop |
| Esc | Cancels the current line and does not change the last command buffer |
| Ins | Enables you to insert characters into the line |
| Del | Deletes a character from the line |
| F1 or right arrow | Copies the next single character from the last command buffer |
| F2 | Copies all characters from the last command buffer up to, but not including, the next character you type |
| F3 | Copies all remaining characters from the preceding command line |
| F4 | Deletes all characters from the last command buffer up to and including the next character typed (opposite of F2) |
| F5 | Moves the current line into the buffer but does not allow DOS to execute the line |
| F6 | Produces an end-of-file marker (^Z) when you copy from the console to a disk file |
These editing keystrokes come from the earliest versions of DOS. Beginning with version 5.0, there is a better way. The DOSKEY command, usually entered via AUTOEXEC.BAT, loads into memory a program that creates a much larger buffer to store previous command lines. (Refer to the “Command Reference” for the DOSKEY listing.) You can recall these commands by pressing the up-arrow key. The DOSKEY buffer is 512 bytes by default, which is enough on average to store the last 20 commands executed.
→ For a complete reference source for DOS editing keystrokes, see Appendix D,“DOS and DOS Utility Programs' Keyboard Commands,” p. 563.
The term scrolling describes what happens as a DOS screen fills with information. When DOS displays text in response to your typing or as a result of a DOS command, the text fills the screen from left to right and top to bottom. As the screen fills, information scrolls off the top of the display. To stop a scrolling screen, press Ctrl+S (hold down the Ctrl key and then press S). Press any key to restart the scrolling. On enhanced keyboards, press the Pause key to stop scrolling.
Almost everyone has at one time played a game, such as poker, that employs wildcards. If you hear the dealer say “Deuces are wild!” you know that cards having the number 2 printed on the face can be substituted for any other card in the deck.
DOS uses wildcards, too. When you're entering DOS commands, you can use wildcards to specify groups of files. DOS recognizes two wildcard characters: the question mark (?) and the asterisk (*), also called star (“star dot star” means *.*).
In DOS commands, the ? represents any single character. The following command produces a directory listing of any files in the currently logged directory that have a filename beginning with the letters LTR followed by up to three characters:
DIR LTR???.TXT
Also, only those files bearing the extension .TXT match and are listed. Thus, LTR.TXT, LTR0.TXT, LTR01.TXT, LTR001.TXT, LTRMOM.TXT, LTR_32.TXT, and LTR999.TXT are listed, but LTRPOPS.TXT or LTR1001.TXT are not.
The * represents any string of characters. For example, *.* represents all filenames with any extension, the default scope of the DIR command. The following command lists all files in the currently logged directory having the extension .DOC:
DIR *.DOC
The following command lists all the files listed by the DIR LTR???.TXT example, as well as filenames not matched by that form of the command:
DIR LTR*.TXT
You should look out for one thing when you're using the * wildcard, however. The following command does not produce the result you might expect:
DIR *LTR.TXT
This example does not list all the .TXT files whose names end in LTR. Rather, it lists all the files having the extension .TXT. The reason is deceptively simple. Because the * can represent up to eight characters in a filename, any string of characters matches *LTR.
After you get the hang of using wildcards to refine the scope of command parameters that supply filenames, you will find that you are well on your way to becoming a DOS power user.
My program won't run from the C:prompt!
When you install DOS on your system, by default, the program files for external commands are written to a directory named DOS on the drive letter that your computer boots from. Because most systems boot from drive C, most of the time you'll find that the DOS directory is called C:DOS.
If you look into the AUTOEXEC.BAT file, you'll probably find a command line that begins with PATH, followed by a list of directories. This command tells DOS where to search for program files when it is trying to run a command. If your DOS directory is listed in the PATH command line, COMMAND.COM can find the program files for external commands no matter what disk drive or directory you are logged on to. A PATH statement looks like this:
Path=c:; c:DOS; c:windows
If you install a program to a new directory without adding that directory to the PATH statement, that program will run only if you change directories to where it resides. When you add the program's home directory to the PATH statement, you can execute any file in that directory, no matter what directory you are currently in.

