
In this chapter
You might commonly connect a DOS-based computer to two different networks: Novell NetWare and Microsoft Windows NT Server. Both network operating systems (NOSs) provide client software for DOS that enables you to participate in many of the services offered by both networks, such as file sharing, printer sharing, network security for stored files, and so forth. Installing the client software for each network operating system is relatively straightforward. In this chapter, you learn about installing both the NetWare and Microsoft clients.
Before installing either NOS client, you need to perform a few steps. Primarily, they consist of installing an appropriate network card into the PC and making sure that you have the appropriate DOS driver program for that network card for the NOS client you are installing.
Network cards come in many different varieties. You need to have one that is compatible with the following:
The computer you are installing it in. It should fit in an available slot (ISA, EISA, MCA, or PCI), and should be selectable to an available combination of IRQ, memory port address, and (sometimes) DMA channels. See Chapter 12, “Using Peripherals,” for more information on these subjects.
The network client you are installing. Often, NetWare and Microsoft clients have separate driver files. To make things trickier, both companies offer different versions of their client software, and the driver must be compatible with the client you are using. For example, Novell has supplied both ODI and VLM clients, whereas Microsoft has supplied both LanManager and Windows NT clients. If in doubt, check the NOS company's Web site for a list of compatible hardware.
The network type you have. Cards are available for Ethernet, Token Ring, and ARCnet, and you need one compatible with the type of network you are accessing.
The cabling type you use. All the different network types can use different types of cabling, and network cards might not have all the available choices built into them. For instance, Ethernet can be cabled with 10BASE-5 cable (Thick Ethernet), 10BASE-2 cable (Thin Ethernet), or Category 3 or 5 twisted-pair cable (10BASE-T and 10BASE-100). Although adapters might be available to make a particular card work with a dissimilar network, it is better to have a card that supports the network cabling directly.
What frame type the network uses. For example, Ethernet networks might use 802.2, 802.3, Ethernet SNAP, or Ethernet II frame types.
You also need to know some details about the network server you are connecting to. You need to know answers to the following questions:
What protocol is the server using? Novell networks predominantly use IPX/SPX but sometimes can use TCP/IP. Microsoft networks might use NetBEUI, TCP/IP, IPX/SPX, or any combination thereof.
If you are using TCP/IP, you need to know a host of additional information:
The IP address you are to use for the machine
The IP mask you are to use for the machine
At least one DNS server address you can use (two are better, but only one is required)
The address of the gateway through which the network connects to the Internet, if one exists
What is the username and password of a valid account with which you can log in to the network?
If using a Novell network, are you going to use a bindery login or a Novell Network Directory Service (NDS) login? Note that even though both usually work, it's also true that only one might work on any given network, depending on how it was set up.
After collecting all the preceding information, you can proceed to install the network client software and make your initial network connection.
The latest Novell NetWare client for DOS is amazingly large: about 22MB before being installed. It is available on a CD-ROM that comes with the NOS or can be downloaded from Novell's Web site (in a self-extracting zip file). When you download the compressed file, you then execute the file to extract all the installation files. You can then run the INSTALL program, as follows, to begin the actual installation of the client software:
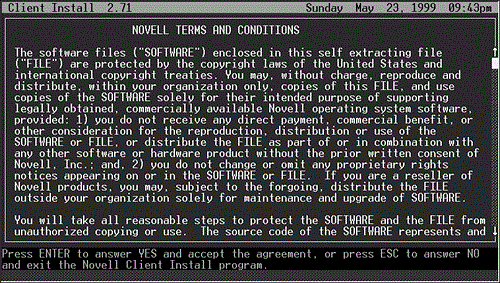
When you begin the installation, you first see a license screen (see Figure 20.1). If you agree to the license, press Enter to continue.
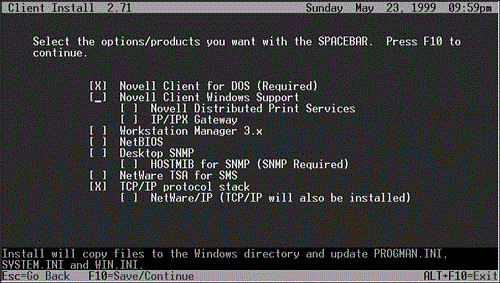
You then see a selection screen in which you choose which client options you want to install. This selection screen is shown in Figure 20.2. The choices are detailed in Table 20.1.
Table 20.1. Novell Client Installation Options
For this example, Novell Client for DOS and TCP/IP Protocol Stack have been chosen. After you select the appropriate check boxes, press F10 to proceed.
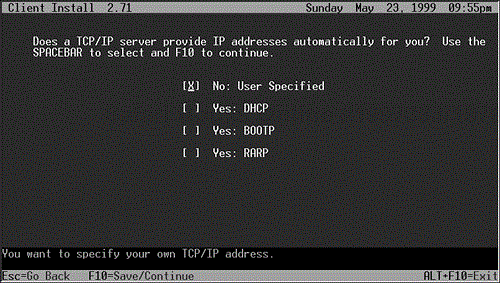
If you selected TCP/IP, you are asked specific information about your TCP/IP network configuration. The first question prompts you about any DHCP, BOOTP, or RARP hosts on the network, as shown in Figure 20.3. For this example, it is assumed that these hosts do not exist.
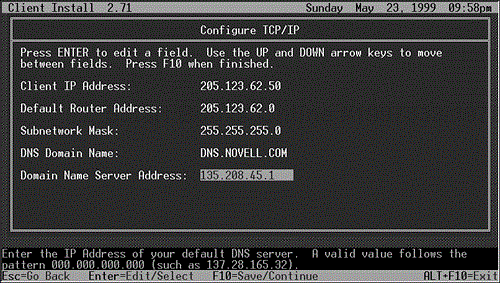
Assuming you have chosen to enter your TCP/IP information manually, provide the IP address, router address, subnetwork mask, DNS domain name, and DNS addresses to the configuration. Figure 20.4 shows this screen with some sample values entered.
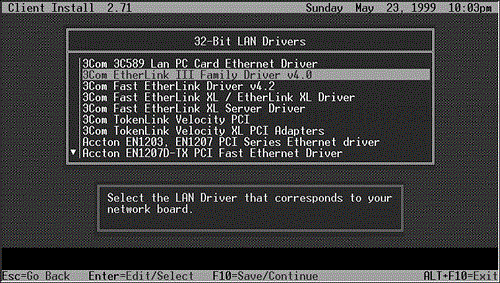
You are then prompted for whether you are using a 16- or 32-bit network interface. You have to check the driver files available for your network card. If they have the
LANfile extension, they support a 32-bit interface, whereas if they have aCOMorEXEextension, they support only a 16-bit interface.You are shown a list of drivers that are included with the Novell client software, as shown in Figure 20.5. Choose your adapter from the list and press F10 to continue.
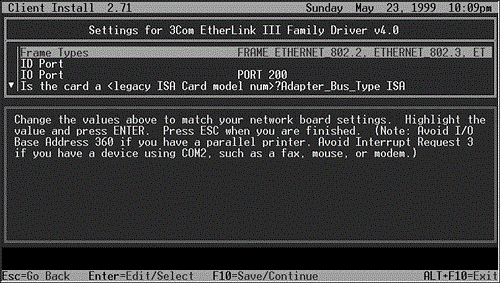
You now choose some additional configuration information for your network and network card. Complete the requested information (check with your network administrator if you don't have the answers yet to any of the questions because you must supply the correct answers to all the questions so that the network connection can function). Figure 20.6 shows this additional configuration screen.
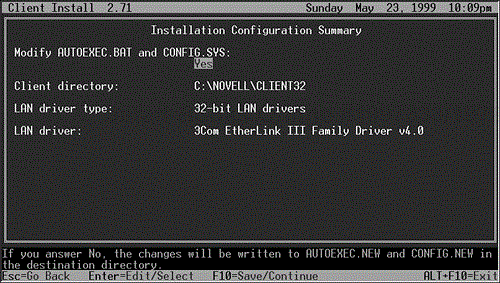
After pressing F10, you see the screen shown in Figure 20.7. Here, you choose whether the installation program is to modify your
AUTOEXEC.BATandCONFIG.SYSfiles (it should), the directory into which the client software is to be installed (accept the default), and you have a chance to confirm the network interface type and card type you plan to use.After you press F10 a final time, the client software is installed into the computer. As part of this installation, a number of changes take place on the computer's C: drive, including adding two lines to the
AUTOEXEC.BATfile. First, the path to the Novell client is added. Second, a reference to another batch file, called (typically)C:NOVELLCLIENT32STARTNET.BAT, is added. TheSTARTNET.BATfile contains the following lines that actually start the network client when the computer is restarted:
SET NWLANGUAGE=ENGLISH
C:NOVELLCLIENT32NIOS.EXE
LOAD C:NOVELLCLIENT32NBIC32.NLM
LOAD C:NOVELLCLIENT32LSLC32.NLM
LOAD C:NOVELLCLIENT32CMSM.NLM
LOAD C:NOVELLCLIENT32ETHERTSM.NLM
LOAD C:NOVELLCLIENT323C5X9.LAN FRAME=ETHERNET_802.2 PORT=200 ISA RXEARLY=NO
LOAD C:NOVELLCLIENT323C5X9.LAN FRAME=ETHERNET_802.3 PORT=200 ISA RXEARLY=NO
LOAD C:NOVELLCLIENT323C5X9.LAN FRAME=ETHERNET_II PORT=200 ISA RXEARLY=NO
LOAD C:NOVELLCLIENT323C5X9.LAN FRAME=ETHERNET_SNAP PORT=200 ISA RXEARLY=NO
LOAD C:NOVELLCLIENT32TCPIP.NLM
LOAD C:NOVELLCLIENT32TRANNTA.NLM
LOAD C:NOVELLCLIENT32IPX.NLM
LOAD C:NOVELLCLIENT32SPX_SKTS.NLM
LOAD C:NOVELLCLIENT32CLIENT32.NLM
For TCP/IP installations, a file called RESOLVE.CFG is created in the C:NOVELLCLIENT32TCP directory; it contains the information about the domain name and DNS server you plan to use.
After you restart the computer, the Novell client starts, and you can log in to a Novell server normally. At this point, if any difficulties arise, consult with a network administrator for your network.
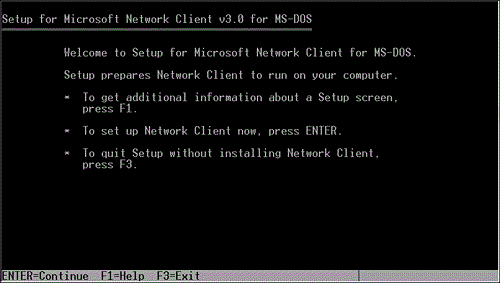
Installing the Microsoft network client for MS-DOS is somewhat easier than installing the NetWare client:
After you procure the client software (it is available on the Windows NT Server 4.0 CD-ROM or by download from ftp.microsoft.com), extract the component parts into an installation directory. Then, from that directory, use the
SETUPprogram to begin the installation. The introductory screen to the setup program is shown in Figure 20.8.Press Enter to be prompted for the directory to which you want to install the Microsoft client. The default is
C:NET. Accept the default and press Enter to continue.You are now prompted for your username on the network. You should have acquired this information from your network administrator. Enter the correct username and press Enter.
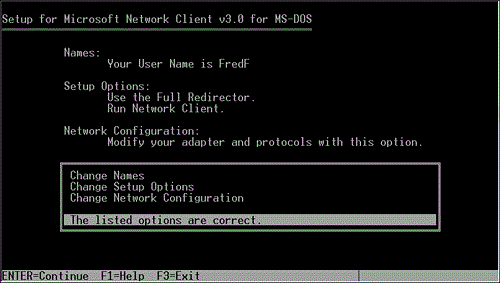
You now see the master setup screen, as shown in Figure 20.9. Here, you can change your username, change setup options, and set important protocol information.
Choose Change Setup Options to see the screen shown in Figure 20.10. You can then set the following options:
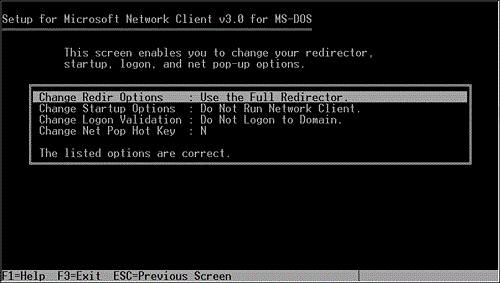
Figure 20.10. You can modify setup options for the Microsoft Network Client during installation using the Change Setup Options screen.
Change Redir Options—. Do you use basic or full redirector? The basic redirector supports most functions and uses less memory than the full redirector but cannot log in to a Windows NT domain. Usually, you have to use the full redirector.
Change Startup Options—. You can load the redirector, load the redirector and pop-up, or not load anything. This setting controls which features are started automatically when you boot the computer. Choosing to automatically load the pop-up consumes an additional 29KB of conventional memory but provides you with more network information than otherwise. Usually, you should just choose Load Network Client.
Change Logon Validation—. If your network uses a domain security model, you need to change this option so that you can log in to the domain.
Change Net Pop Hot Key—. Allows you to specify which key to use with Ctrl+Alt to view the pop-up interface.
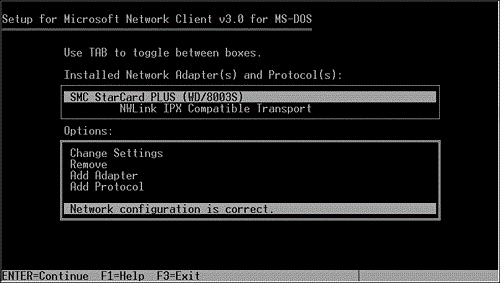
Choose the Change Network Configuration option from the master setup screen; you see the screen shown in Figure 20.11. The Change Network Configuration screen is complex and has many possible layers, depending on what networking options you need (and rarely do you need just the default options).
The good news is that the installation program detects (if it can) your network card and displays its choice, along with a default protocol selection. If either is incorrect, you can change it by choosing the Change Settings option or the Remove and Add Protocol options. You can also use the Tab key to move between the two boxes and can then choose a different option to change. For example, you can tab to the top box and then choose the IPX/SPX protocol to change any options there. When you choose Change Settings for the network card, you see the detailed settings for your network card, as shown in Figure 20.12. You can select the appropriate IRQ, DMA, and other options for your network card. (You might need to run the setup program for the card itself to get some of these values; you need to do so before you install the network client, if possible.)
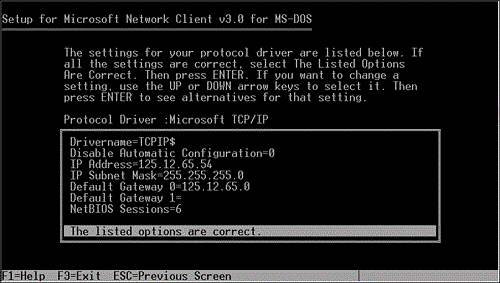
If you want to use TCP/IP, use the Add Protocol option and then choose TCP/IP from the following screen. After you return to the Change Network Configuration screen, you can choose the TCP/IP protocol from the list and change its settings. Here, you can set your IP address, subnet mask, and other TCP/IP options gathered at the beginning of this chapter (see Figure 20.13).
After you add the necessary protocols and set all options, choose The Listed Options Are Correct to return to the master setup screen. From there, choose The Listed Options Are Correct to begin the installation, which proceeds without further input from you.

At the completion of the installation, you need to restart the computer to load the appropriate drivers and access the network.
After you have installed the appropriate DOS client software for your network, you can proceed to use the network. Using the network can be a complex topic; it includes a number of different commands and utilities all unique to the network you are using. For Novell networks, peruse the user manuals that came with the NOS. You will use commands such as LOGIN, MAP, NPRINT, and FILER to accomplish many network tasks, although you should be sure to review the complete list because you might find many commands useful.
For Microsoft networks, you can accomplish most tasks by using the NET command, which is a sort of hydra (multiheaded) command that can do many different things, from logging you in to the network to mapping network drives to assigning file permissions to others. Typing NET ? gets you started with these commands (although you need to read the documentation on using the NET command for proper details).
Setting up a DOS network client can be difficult if you're not the network administrator and are trying to reinvent the wheel. To make the job go smoothly, make sure you find out any information specific to your network from the network administrator or person who set up the network. If that doesn't work and you're having trouble connecting to the network, you can “dissect” another user's functioning network connection to see what settings might be wrong on your system. Looking at a working computer's setup can be an invaluable aid in quickly spotting the problem with your own connection.
If, for some reason, the preceding two resources don't help you find a quick answer to your connection problem, try the following tips:
Make sure that the network interface card (NIC) is functioning. Most NICs come with diagnostic software that can perform basic tests. Often, you also can run more comprehensive diagnostic software that sends data between the computer being tested and another running the diagnostic software to confirm that it is fully functioning.
If you're having a problem with the NIC working properly, the problem is almost certainly the result of a conflict with another device. Chapter 12 provides information on resolving device conflicts.
Make sure that you have the correct protocol chosen for your network. For Ethernet networks, make sure you've also chosen the correct frame type, which is 802.3, 802.2, Ethernet II, or Ethernet SNAP.
If your network uses TCP/IP, make sure that you have the correct addresses for your TCP/IP configuration. Also, make sure that you're using a unique address that is not conflicting with another computer. (You might have to rely on a network administrator to help ensure this address because all networks track these things differently.)
For Novell network clients, watch carefully as the different programs that make up the client load on the screen after the computer is booted. Often, you can see an error message (it might be fleeting) that leads you to the solution.
Try removing the network startup commands from the
AUTOEXEC.BATfile. Boot the system without them and then issue those same commands manually at the DOS prompt. This approach enables you to see error messages or problems more clearly.
The nice thing about networks is that you usually have to solve problems only once, and you then can apply that knowledge to successive installations of the client software. For this reason, I can't emphasize strongly enough that your first course of action if a network client installation isn't working right is to talk to people who have made it work properly and to the administrator of the system who probably will be familiar with whatever problem you are having. In most networks, after the bugs are worked out with a sample client installation or two (or three!), getting the remaining systems up and running then becomes easy.