Parsing XML Files
XML, which stands for eXtensible Markup Language, is a core technology in Visual Basic .NET. For example, the XML format is used in VB Project files and Web services. As we learned in Chapter 22, XML is also a fundamental technology behind ADO.NET datasets. Although XML is capable of storing structured data, it also can be used in just about any other circumstance where you need to store data in a text format. The advantage of using XML over another format (such as comma-delimited) is that there are several classes included with the .NET framework that allow you to parse XML files. Because XML is an industry-standard technology, XML files should be easy to exchange with other companies or individuals. In this section we will discuss basic parsing of an XML file. To learn more about how data is stored in an XML file, see Chapter 22, “Using ADO.NET (ADO).”
→ For more on the XML in ADO .NET, see Chapter 22, “Using ADO.NET (ADO),” p. 599
One example use of the XML file format is maintaining session variables on a Web farm. All the session variables can be condensed into a single string using XML and saved in a database file or files.
Saving Data in XML Format
As an example, let’s suppose we are storing information about customers using the following classes:
Private Class OrderItem
Public ItemName As String
Public UnitPrice As Decimal
Public Quantity As Integer
End Class
Private Class Customer
Public Name As String
Public ID As Integer
Public OrderItems As ArrayList
Sub New()
OrderItems = New ArrayList()
End Sub
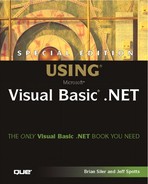
End Class The Customer class describes each customer as having a name, customer id, and arraylist of order items. Each order item has a name, price, and quantity. Assume we have an array of customer objects in memory and want to create an XML file to store the information. Listing 24.6 shows how we can accomplish this with two classes: the XMLDocument class, which manipulates XML in memory, and the XMLWriter, which writes XML to disk. Figure 24.5. shows what the resulting XML file looks like.
Figure 24.5. Although XML files can be displayed in Notepad or Visual Studio .NET, Internet Explorer provides a colorful and collapsible view.

Listing 24.6. BasicXML.ZIP—Using the XMLDocument Class
Dim cusTemp As Customer
Dim xmlDoc As New XmlDocument()
Dim RootNode As XmlNode
Dim TempCustomer, TempCustomerNode As XmlNode
Dim TempOrder, TempOrderNode As XmlNode
Dim ItemListNode As XmlNode
Dim i, j As Integer

'Create an empty customer node for use later
TempCustomer = xmlDoc.CreateNode(XmlNodeType.Element, "Customer", "")
TempCustomer.Attributes.Append(xmlDoc.CreateAttribute("ID"))

'Create an empty order item node for use later
TempOrder = xmlDoc.CreateNode(XmlNodeType.Element, "OrderItem", "")
TempOrder.Attributes.Append(xmlDoc.CreateAttribute("UnitPrice"))
TempOrder.Attributes.Append(xmlDoc.CreateAttribute("Quantity"))
TempOrder.Attributes.Append(xmlDoc.CreateAttribute("ItemName"))

'Create the root node of the XML document
RootNode = xmlDoc.CreateNode(XmlNodeType.Element, "Customers", "")
xmlDoc.AppendChild(RootNode)

For i = 0 To 39
    cusTemp = Customers(i)

    'Create a customer node, set ID and name
    TempCustomerNode = TempCustomer.Clone()
    TempCustomerNode.InnerText = cusTemp.Name
    TempCustomerNode.Attributes("ID").Value = cusTemp.ID.ToString

    'Add order items to customer node, if any
    If cusTemp.OrderItems.Count > 0 Then
        ItemListNode = xmlDoc.CreateNode(XmlNodeType.Element, "OrderItems", "")
        For j = 0 To cusTemp.OrderItems.Count - 1
            TempOrderNode = TempOrder.Clone()
            TempOrderNode.Attributes("Quantity").Value =_
             CType(cusTemp.OrderItems(j), OrderItem).Quantity.ToString
            TempOrderNode.Attributes("UnitPrice").Value =_
             CType(cusTemp.OrderItems(j), OrderItem).UnitPrice.ToString
            TempOrderNode.Attributes("ItemName").Value =_
             CType(cusTemp.OrderItems(j), OrderItem).ItemName
            ItemListNode.AppendChild(TempOrderNode)
        Next j
        TempCustomerNode.AppendChild(ItemListNode)
    End If

    'Add customer node to XML Document
    xmlDoc.DocumentElement.AppendChild(TempCustomerNode)
Next

'Write XML document object to file
Dim writer As New XmlTextWriter("output.xml", System.Text.ASCIIEncoding.ASCII)
writer.Formatting = Formatting.Indented
xmlDoc.WriteContentTo(writer)
writer.Close()
MessageBox.Show("XML File has been created. ") |
As you can see from the code, each XML document is made up of nodes, each of which has a parent and a child. We called the root node of our XML document Customers to represent the highest level of data, the array of customers. Within the Customers node, a new node was added with each customer’s information.
Reading an XML Document
From Figure 24.5 you can see that each XML node object is represented as a tagged element in the resulting file. In creating our XML document we used both attributes, which are contained within a tag element, and the InnerText property that specifies what is contained within a tag. The tags used to delimit XML data are very similar to the tags used to describe HTML formatting. Notice that if no text is present (for example the orders use only attributes) the tag is ended with /> rather than the element name.
The XMLDocument class provides built-in functions to enumerate and manipulate XML nodes, so it is very easy to read our document back into memory:
Dim xmlDoc As New XmlDocument()
Dim tempnode As XmlNode
xmldoc.Load("c:	empoutput.xml")
For Each tempnode In xmlDoc.DocumentElement.ChildNodes
  Debug.WriteLine("Customer " & tempnode.InnerText &_
  " has " & TempNode.LastChild.ChildNodes.Count & " orders.")
Next
The previous For Each loop visits every child node of the root node (represented by the DocumentElement property), printing the number of order items and the customer name.