Using the Dialog Controls
In earlier sections, you learned what a dialog box is and how to use two simple dialog boxes. Visual Basic .NET provides a series of Dialog controls that let your applications leverage the dialog box functionality built in to Windows. One of the goals of Windows-based programming is to make your applications easy to learn and use. By utilizing the Dialog controls, your users will be able to invoke some of your programs’ functionality by using dialog boxes with which they are already familiar.
Although the ease of setup of the Dialog controls is a great benefit, an even bigger bonus is that the resulting dialog boxes are already familiar to the user because they are the same dialog boxes used by Windows itself.
The Dialog controls are exposed through the CommonDialog class, which is used for displaying dialog boxes on the screen. As you will learn in this section, each Dialog control performs a specialized function.
The FileDialog Controls
The CommonDialog class provides a FileDialog class that, in turn, provides two dialog controls—the OpenFileDialog control and the SaveFileDialog control—that allow your program’s users to specify the name and location a file to be opened or saved, respectively. The techniques involved in using these two controls are quite similar.
The OpenFileDialog control and the SaveFileDialog control share the common properties presented in Table 13.2.
The two dialog controls exposed by the FileDialog class are discussed in the remainder of this section.
Note
The Open and Save dialog boxes don’t actually open or save files; they simply get information from the user as to the names and locations of the files to be opened or saved. Your program must take whatever steps are necessary to complete the operation.
Setting Up an OpenFileDialog Control
Let’s demonstrate how the FileDialog controls work by adding to this chapter’s sample application. First, let’s add an OpenFileDialog control:
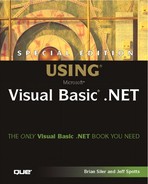
Save and run the program, then click the button labeled Open File Dialog. You will be presented with a standard Windows file dialog box, as depicted in Figure 13.7. If you select a file and click Open, a message box shows you the name of the file you selected; if, however, you click the Cancel button or do not select a file before clicking Open, you are told that you did not select a file.
Figure 13.7. The OpenFileDialog control displays a standard Windows dialog box.

This code works by calling the ShowDialog method of the OpenFileDialog control, which displays the dialog box to the user and pauses execution of the program until the user closes the dialog box. The user browses until he finds the file he is looking for, then clicks the Open button; execution of the program then continues. We examine the FileName property of the OpenFileDialog control to determine whether the user picked a file or not; an appropriate message is constructed and displayed in a message box. Notice that the FileName property provides a fully qualified path and filename combination so you know exactly where the file resides.
Setting Up a SaveFileDialog Control
Using the same techniques you used in the previous section, add a SaveFileDialog control and a button to test it. Name the button cmdSaveFileDialog, and set its Text property to Save File Dialog. Use the following code for cmdSaveFileDialog’s Click event handler (you can copy the code from cmdOpenFileDialog and make slight modifications to save some typing):
Dim sMsg As String
SaveFileDialog1.ShowDialog()
If SaveFileDialog1.FileName > "" Then
    sMsg = "The filename you chose was " & SaveFileDialog1.FileName
Else
    sMsg = "You did not choose a file."
End If
MessageBox.Show(sMsg)
When you run the sample application and click the Save File Dialog button, you are presented with a standard Save As dialog box (shown in Figure 13.8), which is virtually identical to the Open dialog box you saw earlier.
Figure 13.8. The dialog box displayed by the SaveFileDialog control is familiar to your users.
Processing a FileDialogBox’s Return Value
When you use either an OpenFileDialog control or a SaveFileDialog control, your ultimate goal is to get the name and location of the file that the user wants to open or save. As you have seen, that information is contained in the control’s FileName property. It should be noted that the dialog box does nothing more than get a filename from the user and provide that filename to your program. It does not actually open or save a file. The responsibility for that task lies with your program code, based upon the type of file you are working with, what you intend for your program to do with it, and so on.
Specifying File Types with the Filter Property
You may have noticed when you tested the FileDialog controls that all files in the current folder were listed. When using the FileDialog controls, you will probably want to specify that only certain file types are listed. If your program reads Microsoft Excel (.XLS) files, for example, you would not want the user to attempt to open batch (.BAT) files. You can restrict (or “filter”) the files shown in the dialog box by using the Filter property.
You set the Filter property at design time in the Properties window, or at runtime with an assignment statement in code. The Filter property is a string value that includes a file type description followed by the file extension. It requires a special format, as shown here:
cldTest.Filter = "Word Documents (*.doc)|*.doc"
The vertical line in the preceding code is known as the pipe symbol, and is usually found on a standard keyboard by shifting the Backslash key.This symbol must be present in the filter. Preceding the pipe symbol is a short description of the file type, in this case Word Documents (*.doc). Following the pipe symbol is the actual filter for the files. You typically express the filter as an asterisk followed by a period and the extension of the files that you want to display. Some examples are *.txt, *.doc, and *.*.
If you specify the Filter property with an assignment statement, you must enclose the filter in double quotation marks, as with any string. The quotes are omitted if you specify the filter from the Properties dialog box.
You can specify multiple description|filter pairs within the Filter property. Each pair must be separated from the other pairs by an intermediate pipe symbol, as shown in the following example:
controlname.Filter = "Text Files|*.txt|All Files|*.*"
To see the Filter property in action, add the following line of code to the OpenFileDialog_Click event handler, just above the call to the ShowDialog method:
OpenFileDialog1.Filter = "Text Files (*.txt)|*.txt|All Files (*.*)|*.*"
Save and run the program, then click the Open File Dialog button. Note that the common dialog control’s Filter property causes only text files to be displayed (as shown in Figure 13.9), unless the user selects another filter by dropping down the Files of type drop-down list.
Figure 13.9. The Filter property limits the files displayed in the dialog box.

Customizing the FileDialog Controls
You can experiment with the properties presented in Table 13.2 to see how they can customize the FileDialog controls. Here are a few suggestions for you to try:
Use the InitialDirectory property to control which folder appears when the dialog box is first displayed. By default, the system’s current directory is displayed; however, you may want to have the dialog box start up in a specific folder (your application’s default data directory, for example).
The Title property lets you specify the text that appears in the dialog box’s title bar.
The CheckFileExists property is set to True by default; this causes the dialog box to warn the user if he specifies a filenames that does not exist. Try entering nonexistent filenames to see its behavior.
The FontDialog Control
From time to time, you may want to give your users a way to specify a font to be used for a report, label, and so on. The FontDialog control gives you an easy way to present a Windows-standard font dialog box from which the users may make their selection.
To use a FontDialog control, you simply call its ShowDialog method. After the user makes his selection and clicks OK, the font he chose is stored in the control’s Font property. If the user clicks Cancel, then the changes he made to the font displayed in the FontDialog control are discarded.
If you want the FontDialog control to display a specific font on startup, you can set its Font property before calling it. For example, you could use the following line of code to set the FontDialog control’s Font property to be the same as the Label control lblTest:
FontDialog1.Font = lblTest.Font
As with the Save and Open dialog boxes, the Font dialog box doesn’t actually change the font. It simply reports—through its Font property—the font that the user has selected.
Let’s enhance this chapter’s test application to show how the FontDialog control works. Follow these steps:
1. |
With the sample program’s main form displayed, open up the Toolbox and scroll down to the FontDialog control. Double-click its tool in the Toolbox to add an instance to the tray area of frmDialogBoxes. |
2. | |
3. |
Add a Label control near the cmdFontDialog button. Set its Name property to lblTest and its Text property to This is sample text. |
4. |
Add the following code to cmdFontDialog’s Click event handler:
FontDialog1.Font = lblTest.Font FontDialog1.ShowColor = True FontDialog1.ShowDialog() lblTest.Font = FontDialog1.Font |
This code causes the dialog box’s initial font selection to match lblTest’s Font property. The second line of code specifies that the dialog box should allow the user to choose the font’s color as well.
Save and run the test application, then click the Font Dialog button. The Font dialog box appears, as shown in Figure 13.10.
Figure 13.10. The Font dialog box gives your users an easy way to specify a font.

After you select a different font and click OK, the code changes the Font property of the Label control to match the font provided via the dialog box. An example of this is depicted in Figure 13.11.
Figure 13.11. The information obtained from the Font dialog box can be used to modify the Font property of other controls.

Table 13.3 lists commonly used properties that are specific to the FontDialog control.
The ColorDialog Control
Much like the FontDialog control, the ColorDialog control presents a standard Windows “color picker” dialog box to the user. After he selects a color and clicks OK, the program has access to his chosen color through the control’s Color property. The user has the option of choosing one of the standard colors, or creating and selecting a custom color.
Let’s get right into an example. Follow these steps to add a ColorDialog control test to our test program:
1. |
With the sample program’s main form displayed, open up the Toolbox and scroll down to the ColorDialog control. Double-click its tool in the Toolbox to add an instance to the tray area of frmDialogBoxes. |
2. |
Add yet another Button control to frmDialogBoxes. Name this button cmdColorDialog and set its Text property to Color Dialog. |
3. |
Add the following code to cmdColorDialog’s Click event handler:
ColorDialog1.Color = lblTest.BackColor ColorDialog1.ShowDialog() lblTest.BackColor = ColorDialog1.Color |
This code sets the initial value of the ColorDialog control to the background color of lblTest and shows the dialog box. When the user has made his selection and clicked OK, the background color of the lblTest Label control is set to whatever color the user has selected.
Save and run the test application, then click the Color Dialog button. You will see the standard Color dialog box, as shown in Figure 13.12.
Figure 13.12. The user can select a color from the Windows Color dialog box.

After clicking OK, the background color of the Label control is set to your selection.
Table 13.4 lists commonly used properties that are specific to the ColorDialog control.
Other CommonDialog Controls
The CommonDialog class provides two other dialog boxes—the PrintDialog control and the PageSetupDialog control. These two controls are discussed in detail in Chapter 23, “Creating and Using Reports.”