lighting still life
essential skills
~ A knowledge and understanding of the application of studio lighting to still life subjects.
~ An understanding of the practical use of light to create contrast, dimension and mood.
~ Through study, observation and pre-production an understanding of the resources and skills required to produce photographic images.
~ To develop ideas and produce references containing visual information gathered in completing the assignments.
~ To produce colour images to the highest standard fulfilling the assignment information.
Charanjeet Wadhwa

Introduction
The assignments are written with the assumption the aspiring photographer has a limited knowledge of the practical application of studio lighting. It is important the assignments are completed in the order in which they are written. Each lesson learnt from one applies to the assignment that follows. To attempt to produce the assignments out of sequence will mean certain information relating to lighting development and metering techniques will be missed. The criteria set out in each assignment should be followed as closely as possible as it forms a major part of the practical learning process. Where possible it is advisable each assignment be workshopped at a group level with guidance and direction. Individuals should then attempt to complete their own interpretation of the brief within a specified period. The assignment brief is itemised into specific requirements. These requirements must be successfully completed as a basis for any assessment of the completed image. Interpretation of the brief beyond these requirements should be encouraged but not at the expense of the basic criteria. All information relevant to the completion of each assignment should be compiled in the Record Book.
CRITERIA
| Lighting | This is a description of the minimum lighting requirements to complete the assignment. The recommended light source is indicated (floodlight, spotlight, fill, etc.) along with its purpose and effect (e.g. to create tonal difference). If using studio flash substitute open flash for spotlight and diffuse flash (soft box, umbrella, etc.) for floodlight. |
| Props | This is a recommendation of other objects that could be used within the image area to enhance the composition and design of the photograph. The use of props is a personal choice dependent upon previsualisation of the image in the Visual Diary. |
| Background | In the first two assignments the background colour is specifically related to the criteria of the brief. It is difficult to create a foreground shadow of the box on a black background. With the ball assignment it is difficult at this stage of the learning process to control strong backlighting on a white background. In the other assignments the choice of background is limited only by your imagination. |
| Exposure | To develop an understanding of metering techniques follow the method specified in the brief. In the earlier assignments lighting ratios between lights will be asked for (ratio of 2:1 between key light and fill). Lighting ratios are measured with your light meter. See ‘Exposure’. |
| Technique | Technique is the use of all the elements the photographer controls in order to produce the specific requirements laid down in the assignments. This covers the use of the camera, lighting, exposure and composition to create an image that fulfils the brief and complements the photographer’s previsualisation of the image. |
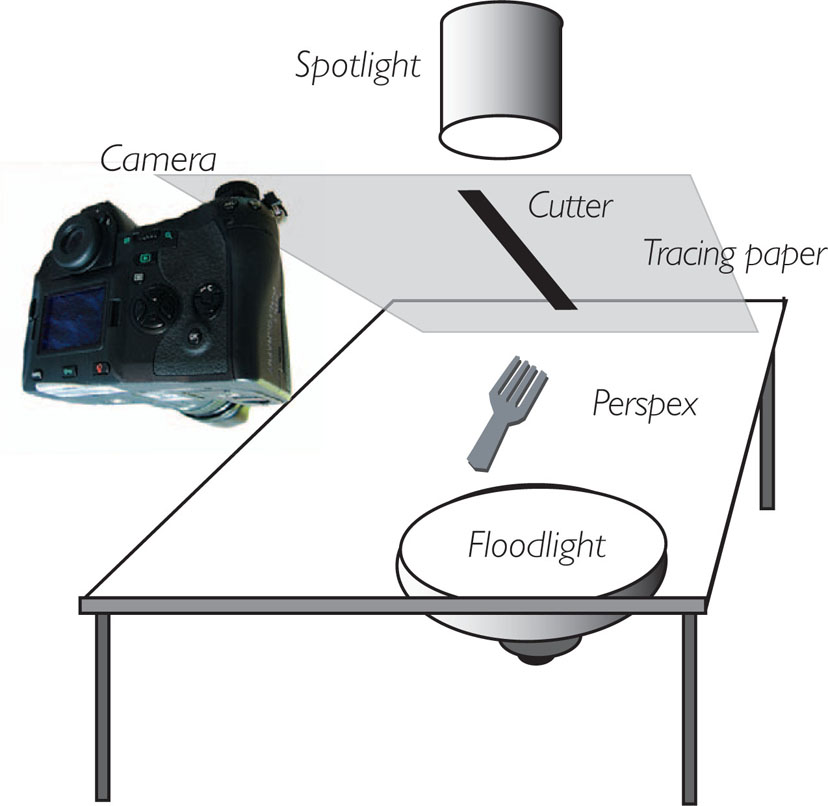
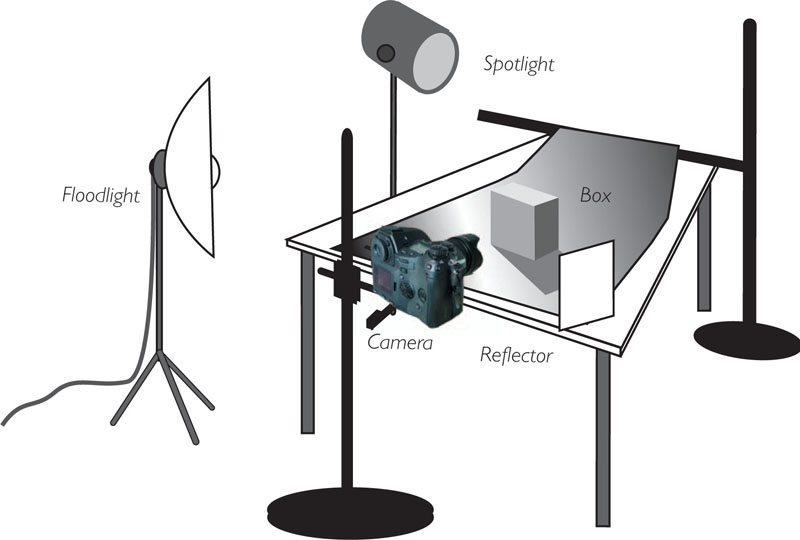
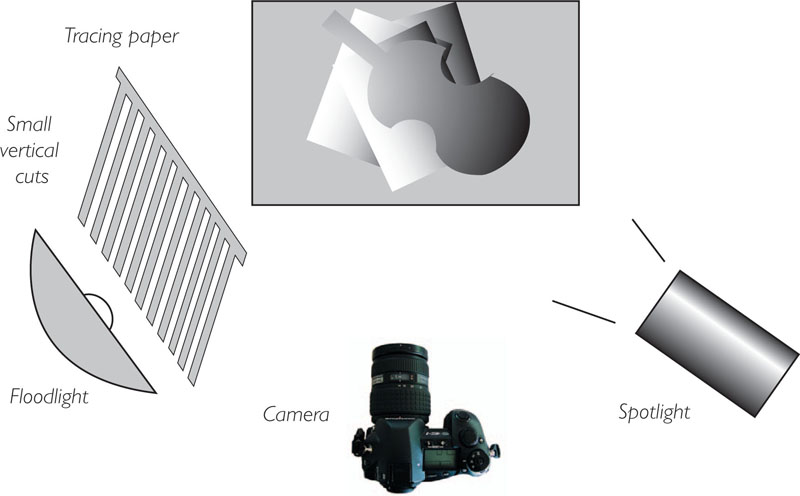
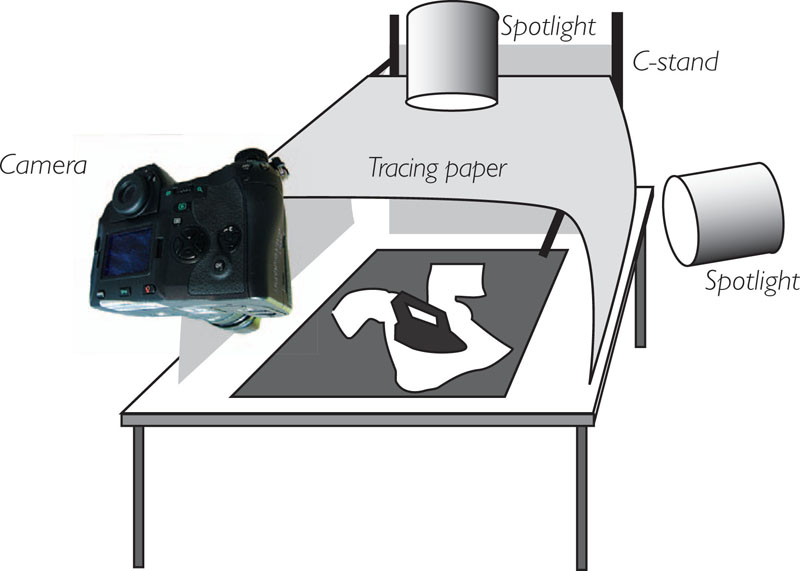
Lighting diagrams
A lighting diagram is a graphic means of illustrating the lighting and camera position in relation to the subject. Measurements are not shown as these will vary according to the output of the lights being used and the size of your subject. It is important however, to attempt to reproduce the direction and quality of the light. The diagrams are therefore a starting point from which to experiment and build your knowledge. Lighting diagrams should form a major component of your Record Book.

Progress
A series of progressive images will show the way in which an answer to the individual lighting solutions posed by each assignment is solved. Cost is always a factor in photography, no more so than when a student, so the choice of whether to shoot progressive images as a way of judging exposure and composition is left to the individual. The cost can however be far less than having to reshoot the assignment due to an error that may have been obvious on a progress image.
Assignment 1 ‘Box’
CRITERIA
| Lighting | Direct spotlight and floodlight, plus reflector to create tonal difference between the three sides of the box. |
| Props | Optional. |
| Background | White. |
| Exposure | Incident light meter reading. Lighting ratio of 2:1 between spotlight and floodlight and 2:1 between floodlight and reflector. |
| Technique | Create an image of a single coloured box with a foreground shadow and three sides with separate tonal ranges. |
Image 1
Place a single coloured box on a white background. Place the camera on a tripod in front of and 30 degrees above the subject. Fit a lens hood to the camera. Using a normal lens at maximum aperture focus 1/3 of the way into the top of the box. From behind the subject aim a spotlight on full spot into the centre of the top of the box. With the light correctly centred turn the spotlight to full flood and move the light so the shadow falls directly in front of the subject. Ensure only the top of the box is lit by the spotlight. Check for lens flare (direct light into the lens). Take an incident reading of the light source from the subject. Set ISO and note the aperture.
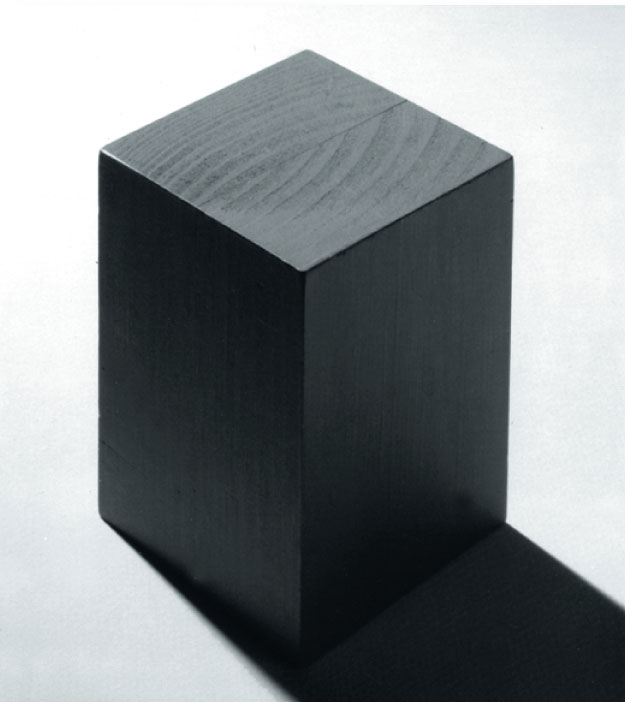
Image 2
Turn off the spotlight. As viewed from the camera, place a floodlight on the left of the box and at the same distance from the box as the spotlight. Turn on the light and ensure light from the floodlight only lights the camera left side of the box. Take an incident reading of the light from the subject. Note the aperture and adjust the floodlight by moving it closer to or further away from the subject until an aperture of exactly one stop less light than the spotlight is achieved. This will be a lighting ratio of 2:1 between the spotlight and the floodlight.
Image 3
Turn on both lights. As viewed from the camera place a reflector (piece of white card) on the right-hand side of the box approximately half the distance of the floodlight from the subject. Whilst shielding the invercone with your hand take an incident reading from the subject of the light being reflected from the white card. Move the card closer to or further away from the subject until a reading one stop less than the floodlight is achieved. This will be a lighting ratio of 2:1 between the left and right sides of the box. After checking the lighting ratios take an incident reading from the front of the box directly back to the camera. This will be an average of all the readings and ‘correct’ exposure. Check focus and select an f-stop (using preview mechanism) giving sharp focus from the front to the back of the box (depth of field). Make a final check for lens flare before making an exposure.
Michael Wennrich
LIGHTING DIAGRAM
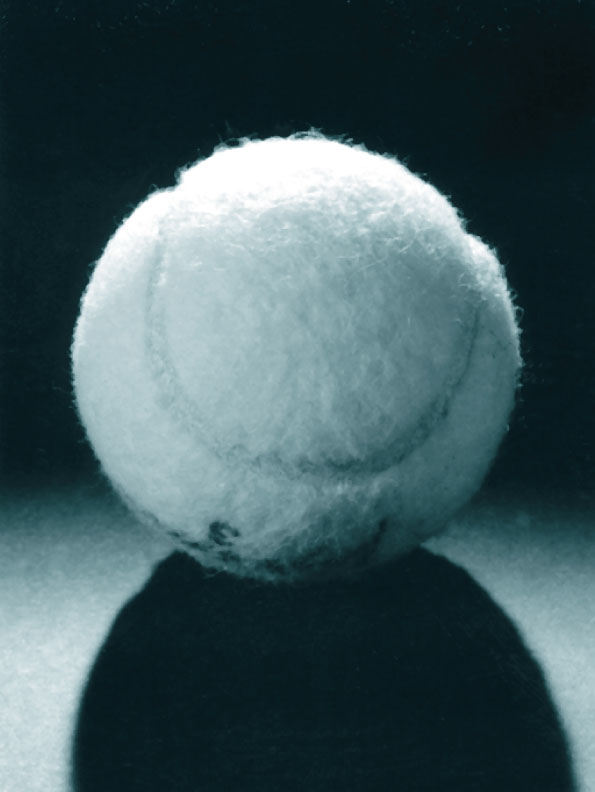
Assignment 2 ‘Ball’
CRITERIA
| Lighting | Direct spotlight and floodlight, plus fill. |
| Props | Optional. |
| Background | Black. |
| Exposure | Incident light meter reading. Measured lighting ratio of 3:1 between backlight and fill light and 2:1 between fill light and reflector. |
| Technique | Using light to create dimension and ‘roundness’ across the surface of the ball. |
Image 1
Place a non-reflective ball on a black background. Place camera on a tripod in front of and slightly above the ball. Fit a lens hood to the camera. Using a long lens at maximum aperture focus 1/3 of the way into the ball. From behind and above the subject aim a spotlight on full spot at the centre of the back of the ball. This will give a rim of back light around the edge of the ball. Move the spotlight so the shadow falls forward of the ball. Ensure only the edges of the ball are lit by the backlight. Reposition the light if lens flare becomes a problem. Take an incident reading of the light source from the subject. Set ISO and note the aperture.
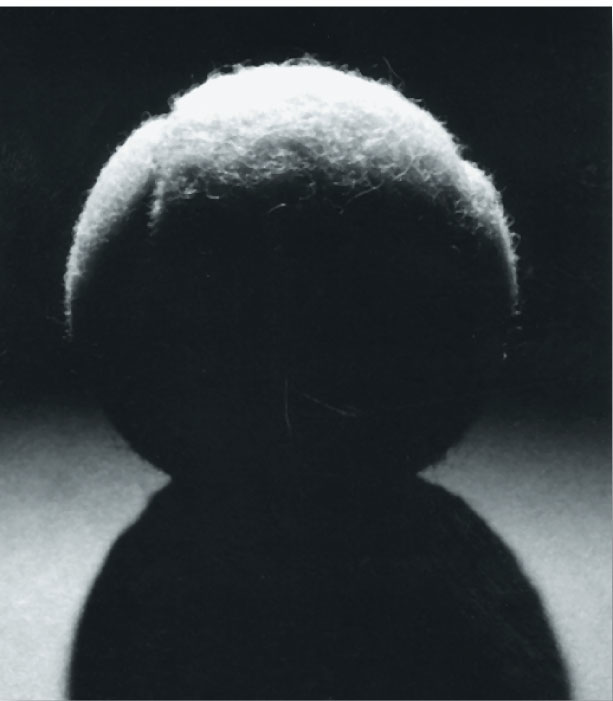
Image 2
Observe the left side of the ball where the front of the ball falls into shadow. Leave the back light on. Place a floodlight on the left of the ball at the same distance from the ball as the back light. Turn on the light and aim the centre of the light at the line that denotes the change from light to shadow. Pan the light to the right. Observe how the light begins to creep across the front of the ball creating visual curvature. Turn off the backlight. Take an incident reading of the fill light. Move the light until an aperture one and a half stops less light than the back light is achieved. This will be a lighting ratio of 3:1.
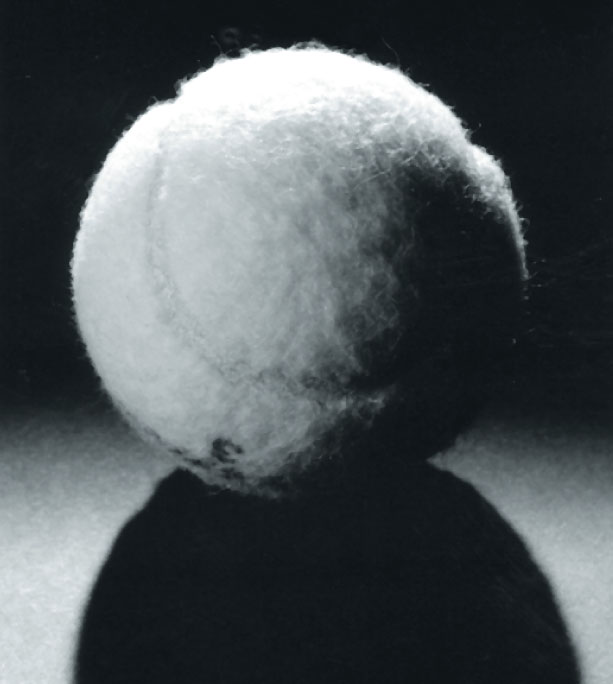
Image 3
Turn on both lights. As viewed from the camera place a reflector (piece of white card) on the right-hand side of the ball approximately half the distance of the fill light from the subject. Whilst shielding the invercone with your hand take an incident reading from the subject of the light being reflected from the white card. Move the card closer to or further away from the subject until a reading one stop less than the floodlight is achieved. This will be a lighting ratio of 2:1 between the left and right sides of the ball. After checking the lighting ratios take an incident reading from the front of the ball directly back to the camera. This will be an average of all the readings and ‘correct’ exposure. Check focus and select an f-stop (using preview mechanism) giving sharp focus from the front to the back of the ball. Make a final check for lens flare before making an exposure.
Michael Wennrich
LIGHTING DIAGRAM

Assignment 3 ‘Texture’
CRITERIA
| Lighting | Direct spotlight at low angle to subject plus fill. Diffused back light. |
| Props | Minimal. |
| Background | Predominantly the subject or an unobtrusive colour or tone. |
| Exposure | Incident light meter reading. Subjective choice of lighting ratio. |
| Technique | Using lighting contrast to emphasise subject texture and to retain detail in the shadows. |
Image 1
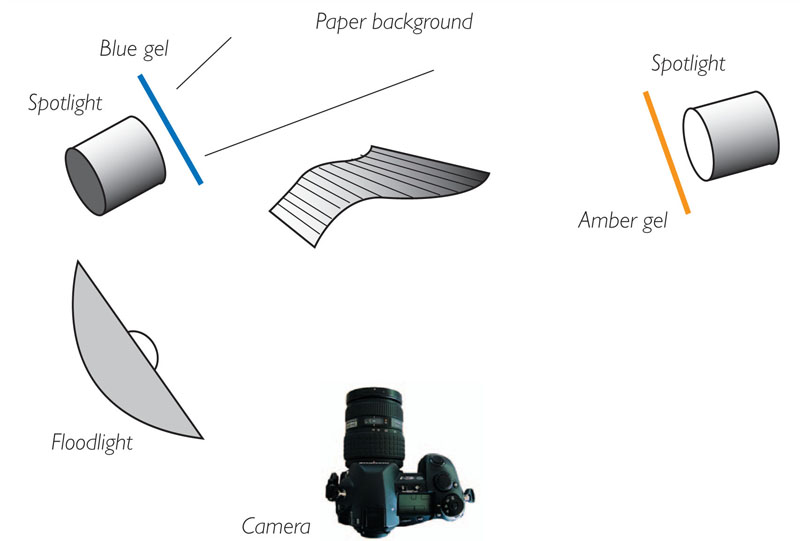
Support corrugated cardboard in front of a dark background to form multiple ‘S’ shapes. Place a spotlight above, behind and to the right side of the cardboard with the centre of the light at the centre of the ‘S’ shapes to create strong shadows falling forward from the top to the bottom of the image. Place an amber heat resistant gel in front of the light. Position suitable support material to form an acceptable composition. Take an incident light meter reading of the light falling on the corrugated cardboard. Note this exposure.
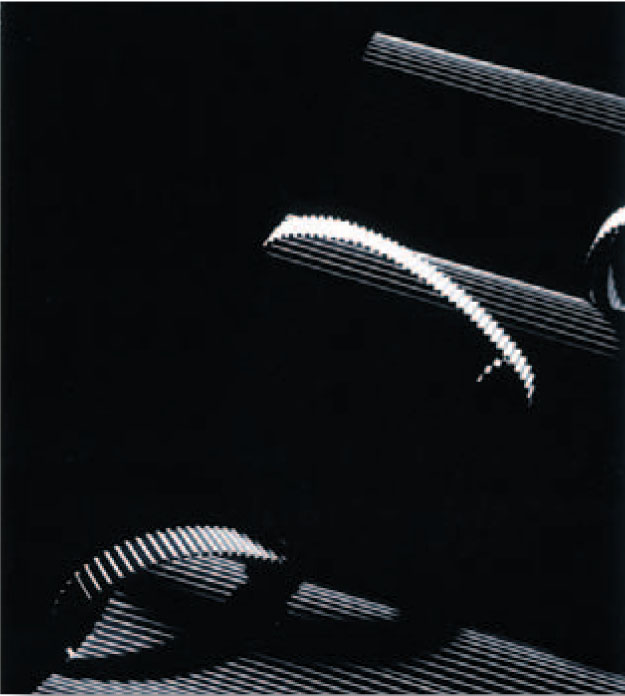
Image 2
From the camera position place a diffuse light above and to the left of the subject. Aim the light at the corrugated cardboard to fill the shadows created by the spotlight. Vary the amount of diffusion and distance of the light from the subject to achieve the desired effect. Turn off the backlight (spotlight) and take an incident reading of the diffuse light falling on the subject. Adjust the light to achieve a lighting intensity one stop less than the exposure calculated for the backlight. This will give a ratio of 2:1 between the back light and the front light.
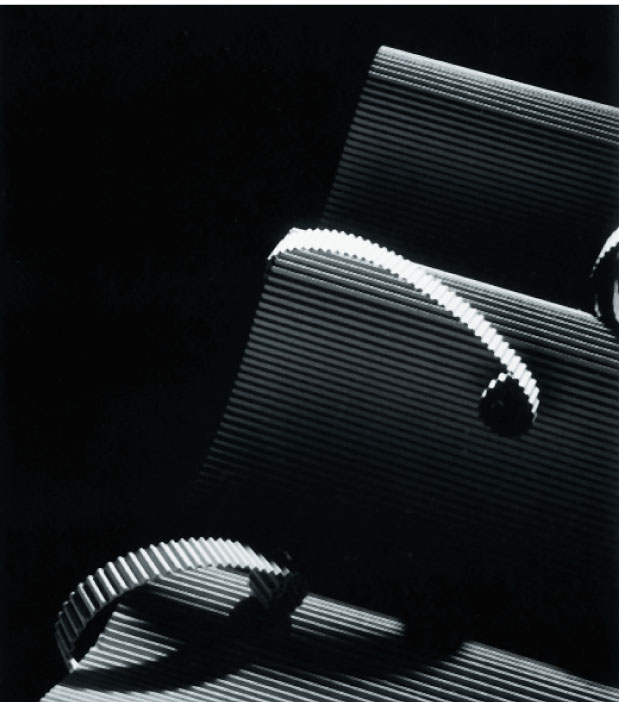
Image 3
Turn off both front and back lights. Aim a second spotlight from left of frame at the background. Position the light to achieve a circle of light directly behind the cardboard. Place a blue heat resistant gel in front of the light. Alternate between full spot and full flood to achieve the desired degree of graduation. Take an incident light meter reading of the light falling on the background. Adjust light to match the calculated exposure for the front light. Turn on the front and back lights. Make final adjustments to composition, lighting and exposure. Reduce any extreme highlights. To maintain maximum density in the shadows this is best achieved by repositioning the subject and not by diffusing the light. Check for lens flare.
Michael Wennrich

LIGHTING DIAGRAM
Assignment 4 ‘Flowers’
CRITERIA
| Lighting | Diffuse key light plus back light to separate subject from background. |
| Props | Minimal and complementary to subject matter. |
| Background | Unobtrusive colour or tone, lit separately to subject. |
| Exposure | Incident light meter reading. Lighting ratio sympathetic to subject. |
| Technique | Subject in focus. Background out of focus and back lit separately to foreground subject matter. |
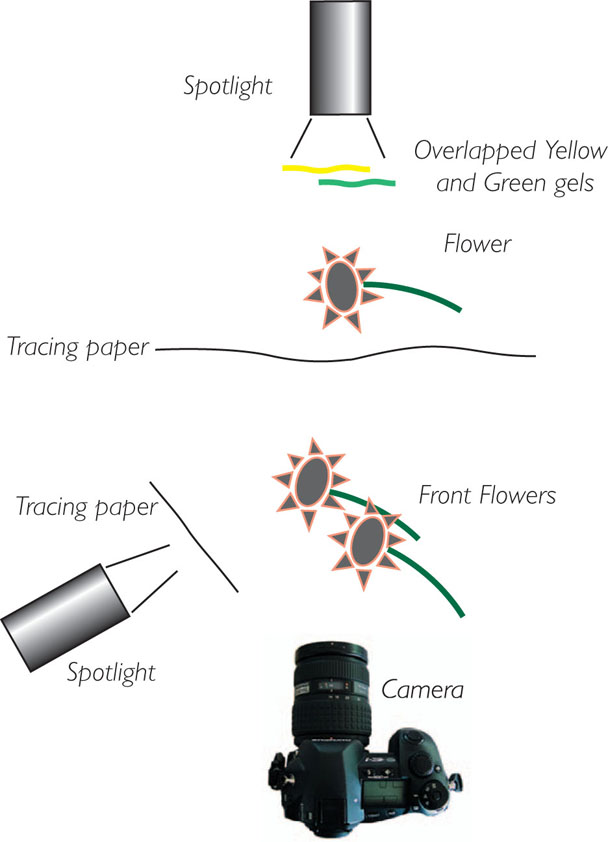
Image 1
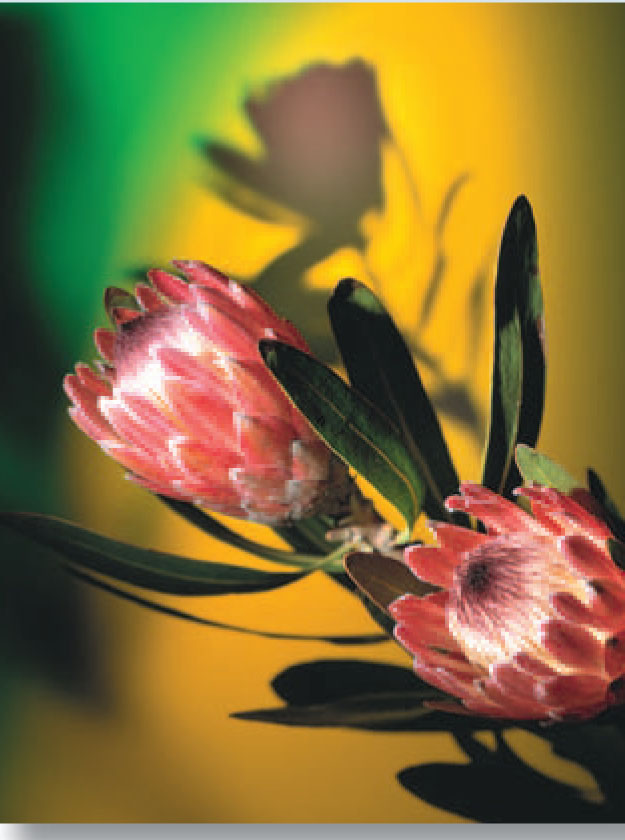
Place one flower behind a sheet of white tracing paper. Place two flowers in front of the tracing paper (these remain unlit). Using a spotlight light the single flower from behind to cast a shadow onto the front surface of the tracing paper. Centre the light behind the head of the flower. Place overlapped green and yellow heat resistant gels in front of the light. Adjust the light until the desired spread of light around the flower is achieved. The background will appear white at the centre graduating to various shades of green and yellow towards the edges. Take a reflected reading of the centre of the light. Increase this exposure by two stops to give a tone that is almost white (e.g. f22 to f11).

Image 2
Turn off the background light. As viewed from the camera place a spotlight slightly above and to the left of the two front flowers. Between the spotlight and the flower hang a large sheet of tracing paper. Move the tracing paper closer to or further away from the flower until the desired effect is achieved (the light on the subject will be more diffuse the further the tracing paper is from light source). Take an incident reading from the flower of the light falling on the subject. Move the spotlight until a reading the same as the calculated exposure for the background is achieved. This will render the flower as an average mid-tone and the centre of the background almost white.
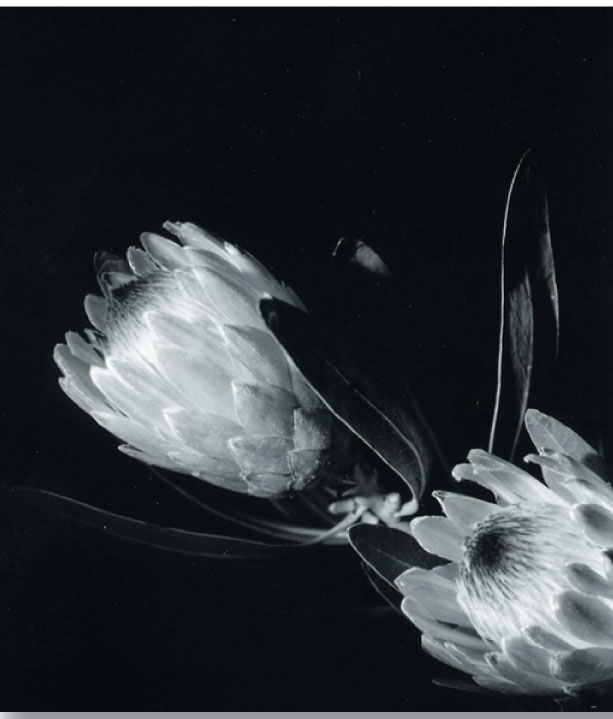
Image 3
Turn on the background light. Check the lighting ratio between the background and subject has not changed. Take an incident reading from the flower, back to the camera, of the light falling on the subject. If the flower is of an average mid-tone this will be correct exposure. If the flower is lighter or darker adjust the exposure accordingly, but remember to retain the same lighting ratio between subject and background, two stops or 4:1. Choose an exposure aperture with sufficient depth of field to retain focus on the flower but not on the background.
Michael Wennrich
LIGHTING DIAGRAM
Assignment 5 ‘Metal’
CRITERIA
| Lighting | Diffuse/reflected lighting, plus selective fill. |
| Props | Subject related. |
| Background | Coarse and heavily textured. |
| Exposure | Adjusted incident or reflected meter reading of the highlights. |
| Technique | Using light and contrast to enforce the harshness of the subject, whilst retaining maximum detail in the highlights and some detail in the shadows. |
Image 1
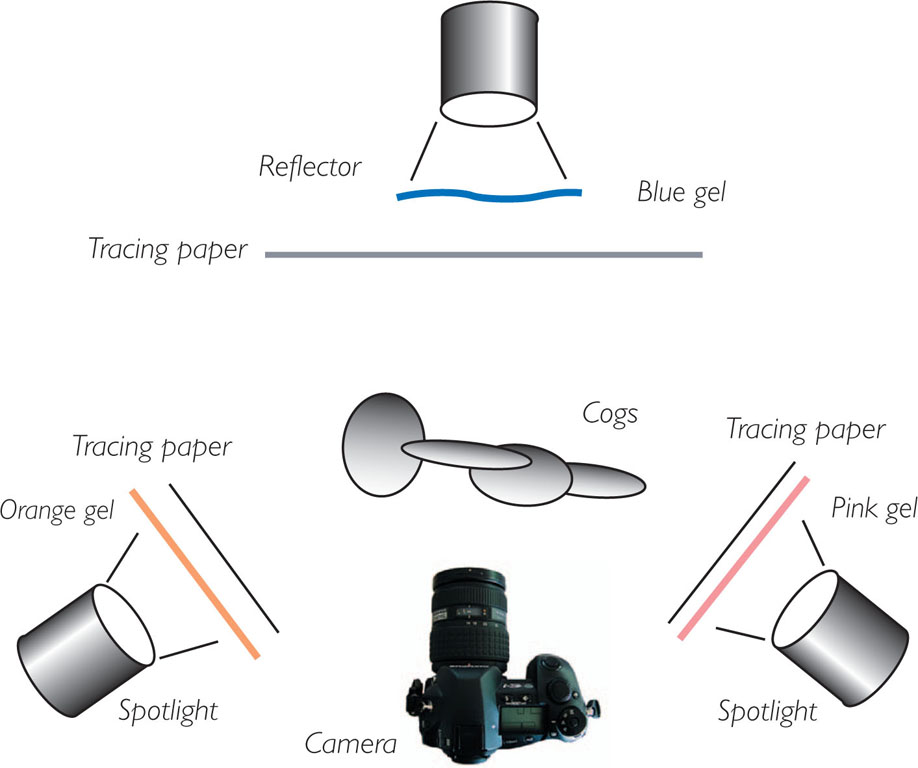
Suspend various cogs and chains approximately two metres in front of a tracing paper background. From behind aim a spotlight on full spot into the tracing paper. Position the centre of the spot directly behind the cogs and chains to achieve the desired composition and effect. Turn the light to full flood. This will graduate the light over the background. Place a blue heat resistant gel in front of the light.
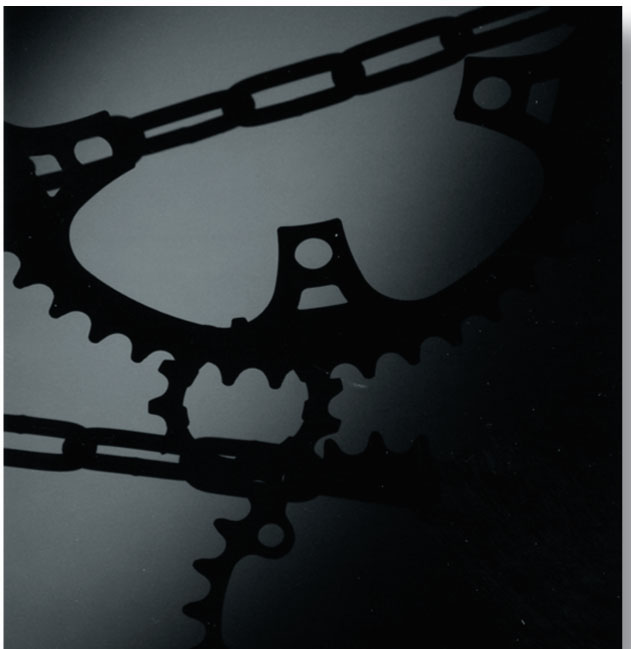
Image 2
Turn off the back light. As viewed from the camera position aim a second spotlight, on full spot, from the left side towards the metal cogs. Adjust the direction of the light until the maximum reflectance of the light appears as extreme highlights on the metal surfaces. Ensure no light falls on the background. Place a sheet of tracing paper between this light and the subject. Adjust the angle to and distance between the light and the trace to the subject until the desired reflectance level in the cogs and chains is achieved. Place an orange heat resistant gel in front of the light.
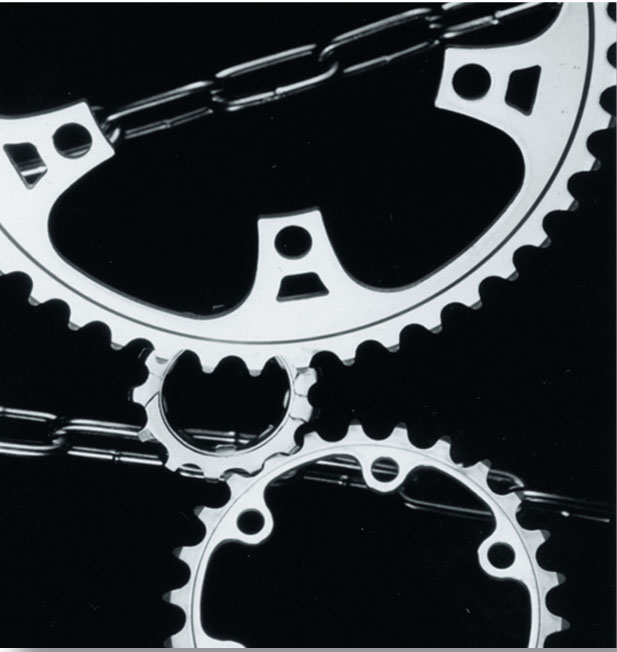
Image 3
As viewed from the camera position aim a third spotlight from the right side at the teeth of the cogs. Place a sheet of tracing paper or other suitable diffusion material close to the light. Move the tracing paper closer to or further away from the subject to reduce the extreme highlights on the metal surfaces. Place a pink heat resistant gel in front of the light. Experiment until the desired effect is achieved. Turn on the back light. To check the subject brightness range take a reflected reading of the highlights and the shadows. If the ratio is less than 32:1 (five stops) some detail will be recorded in both. For exposure take either an incident reading of an area of average illumination or take a reflected reading of an area reflecting approximately 18% grey. Adjust this reading within the 32:1 ratio to achieve the desired result (expose for either the shadows or the highlights).
Michael Wennrich

LIGHTING DIAGRAM
Assignment 6 ‘Desk’
CRITERIA
| Lighting | Interpretive use of light as observed in ‘real life’, e.g. late afternoon sunlight mixed with ambient room light. |
| Props | Self-explanatory. |
| Background | The subject matter itself. |
| Exposure | Incident light meter reading of keylight area. |
| Technique | Related to your vision of your desk ‘correct’ subjective exposure of the keylight and detail in the ambient areas. The selective use of aperture and focus together with filtration of the light source or camera to complement image composition and quality of light. |
Image 1
Place subject on an appropriate surface. Position the camera to achieve an approximate composition. As viewed from the camera, position a spotlight in front, above and to the right of the subject. Turn on the light and centre the light on full spot on the focal point of the composition (e.g. bridge of the violin). Flood and move the light until the desired shadow effect and direction is obtained. Record an incident reading of the light from the subject.
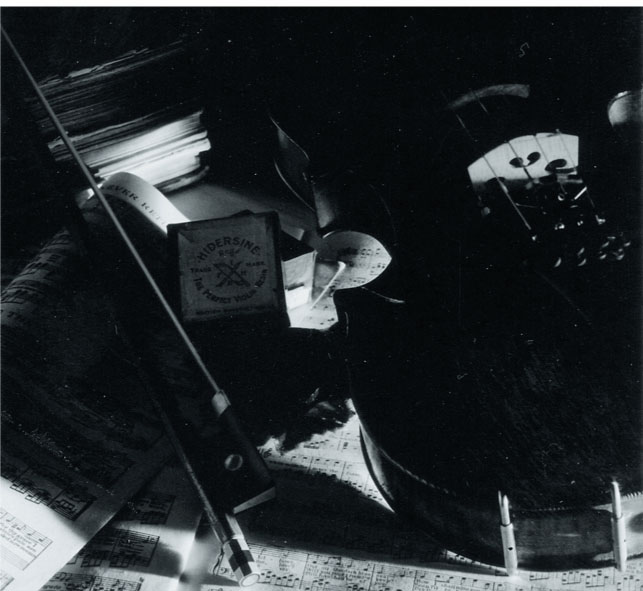
Image 2
Turn off spotlight. As viewed from the camera, position a floodlight to the left of the subject. Place a large sheet of tracing paper between the light source and the subject. Make vertical cuts in the tracing paper so small highlights of direct light appear across the surface of the subject. The intensity of the highlights can be controlled by moving the tracing paper closer to or further away from the light source or increasing the width of the cuts. Experiment until the desired effect is achieved.
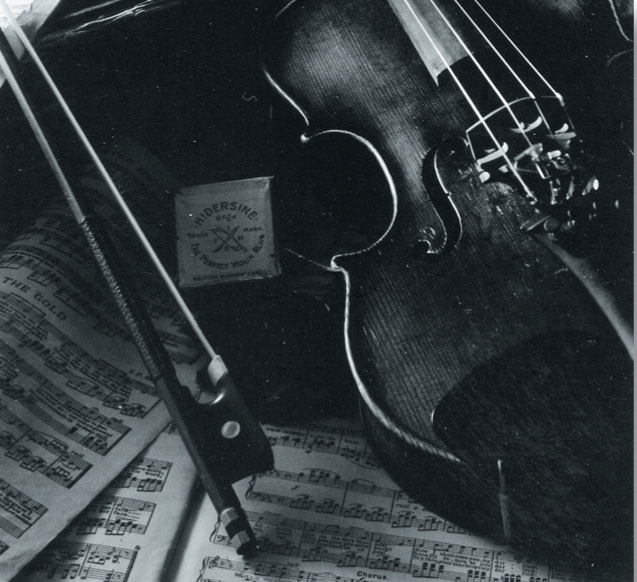
Image 3
Turn on the right hand spotlight. Observe the difference in the intensity of the light falling on the subject between the diffuse (traced) and direct (non-traced) areas. Adjust camera and subject matter for final composition. Take an incident meter reading of the direct and diffuse areas. Adjust the exposure dependent upon how the highlights and shadows would best enhance the design and balance of the image. Exposure for the direct light will produce underexposed shadows. Exposure of the diffuse light will produce overexposed highlights. Start with an average of the two readings and bracket the exposure. Choose an exposure aperture that will concentrate the viewers’ interest on the focal point of the image. Interpret results to gain a better understanding of exposure and latitude.
Felicity O’Mara
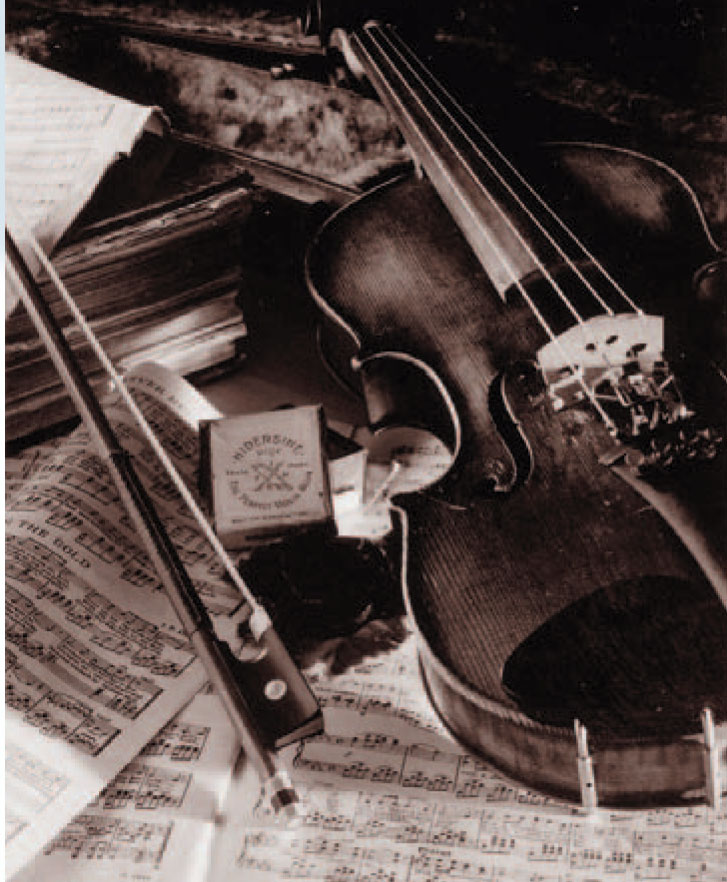
LIGHTING DIAGRAM
Assignment 7 ‘Rust’
CRITERIA
| Lighting | Direct spotlights plus selective fill. |
| Props | Weathered, well worn and textured. |
| Background | Use of light to create interest and separation of the subject from the background. |
| Exposure | Adjusted reflected light meter reading of key light area. |
| Technique | To enhance the degradation and degeneration of the subject by the use of sharp focus and lighting/subject contrast to create texture and age. |
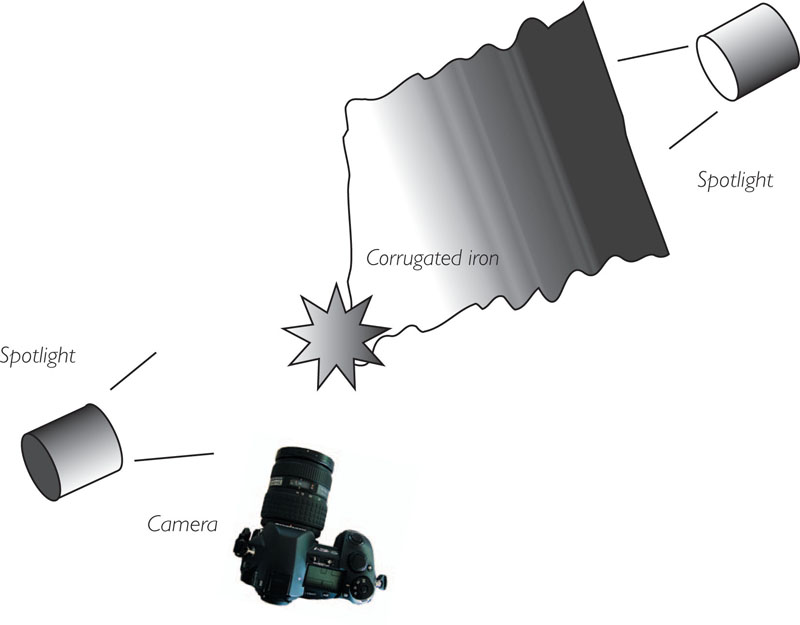
Image 1
Place weathered and rusty textured items next to a sheet of old corrugated iron. From behind and to the right side aim a spotlight at low angle across the surface of the rusty items. Adjust the angle and intensity of the light to achieve maximum texture. Ensure light falls only on the back edges of the subject matter and not across the surface of the corrugated iron. Take a reflected light meter reading of the light falling on an area reflecting almost the same amount of light as an 18% grey card.
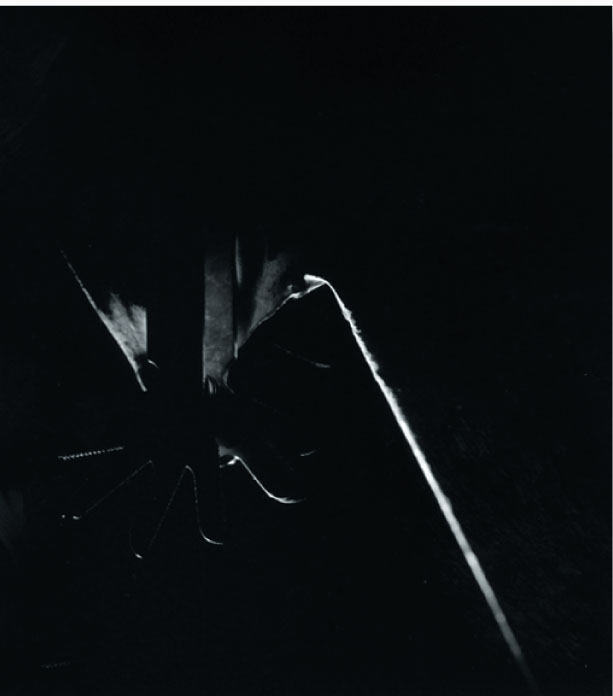
Image 2
Turn off the first spotlight. Using a second spotlight from the front left side, also at a low angle, light the surface of the corrugated iron and the rusty items in such a way as to create long shadows and detailed texture. Adjust the angle, direction and intensity to achieve the most effective design and composition. Take a reflected light meter reading from an area reflecting approximately the same amount of light as an 18% grey card. Compare this reading with Image 1.
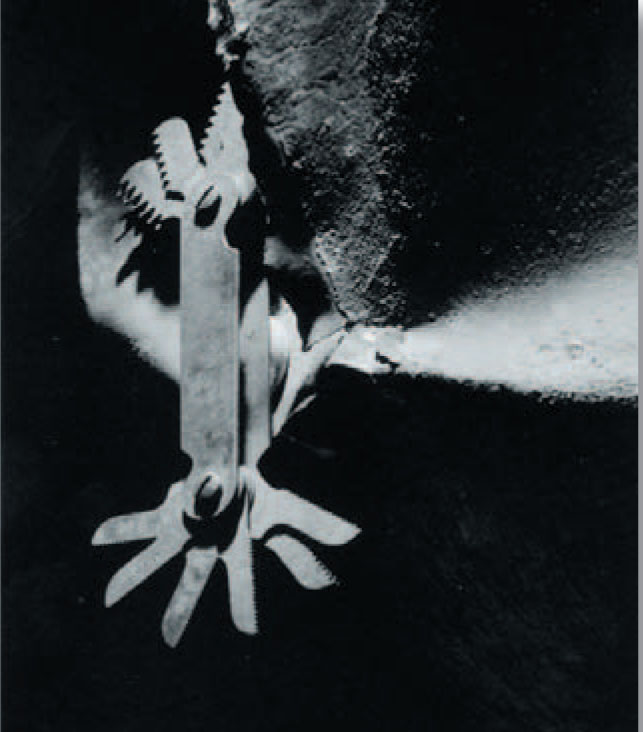
Image 3
Turn on the first spotlight. To increase the illusion of contrast and depth within the image adjust the amount of light from the back light to approximately half to one stop more light than the front light. Making ‘correct’ exposure for the front light will record the backlit areas as highlights with minimal detail in the shadows and a full range of tones in the areas lit by the front light.
Emily Abay
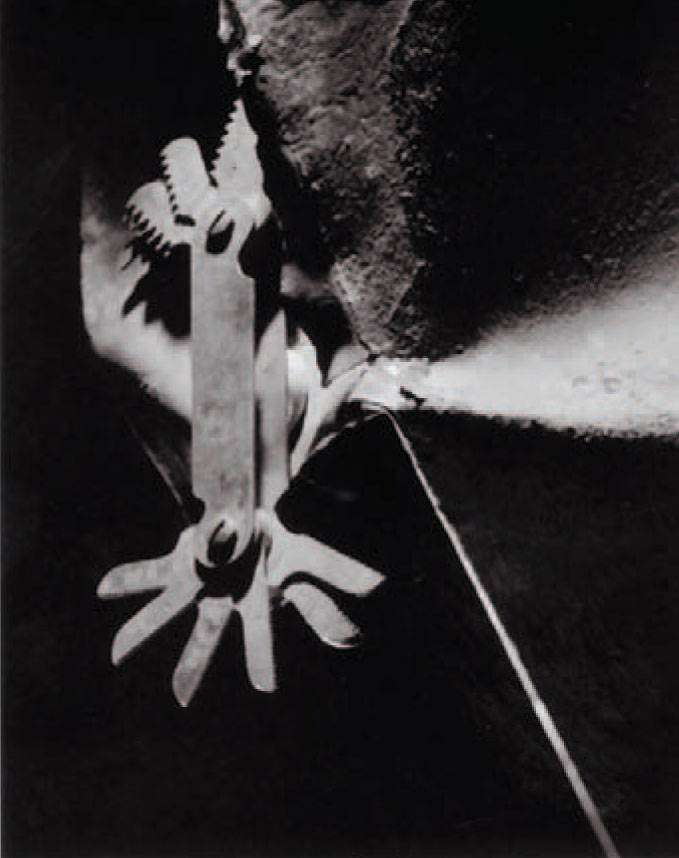
LIGHTING DIAGRAM
Assignment 8 ‘Black and White’
CRITERIA
| Lighting | Diffuse or reflected light with minimal shadows. Direct spotlight with some degree of diffusion for detail in black subject matter. |
| Props | Black and white. |
| Background | Black and/or white, possibly created by the use of light. |
| Exposure | Interpretation of reflected meter reading from black and white subject. |
| Technique | To render true black and white on colour emulsion, with maximum detail in both. |
Image 1
Place selected props on a flat table top surface. Position to form an acceptable composition. As viewed from the camera place a spotlight behind and to the right of the subject. Centre the light on full spot on the top surface of the iron. Adjust the direction and intensity (flood or spot) to achieve maximum texture across the surface of the shirt and shadows with almost no detail forward of the iron. This will give detail across the top surface of the iron but make the shirt look very coarse.
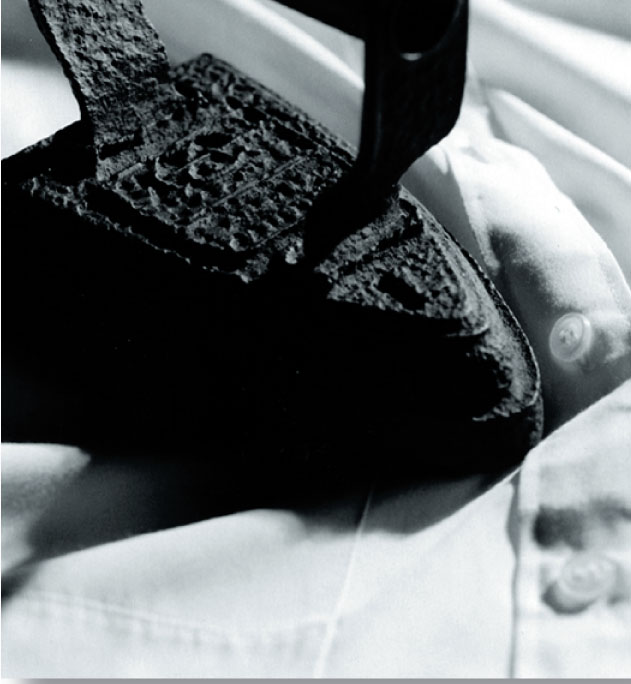
Image 2
Support a piece of tracing paper or other suitable diffusion material between the spotlight and the subject from just above the camera to the back edge of the framed area as seen in the viewfinder. This will reduce the intensity of the shadow forward of the iron and create a ‘softer’ look to the shirt material. Experiment with moving the tracing paper closer to or further away from the subject to achieve the desired degree of texture and shadow detail. This will have the effect of creating the quality of light suitable for the shirt but at the cost of losing some detail across the top of the iron. Turn off the first spotlight.
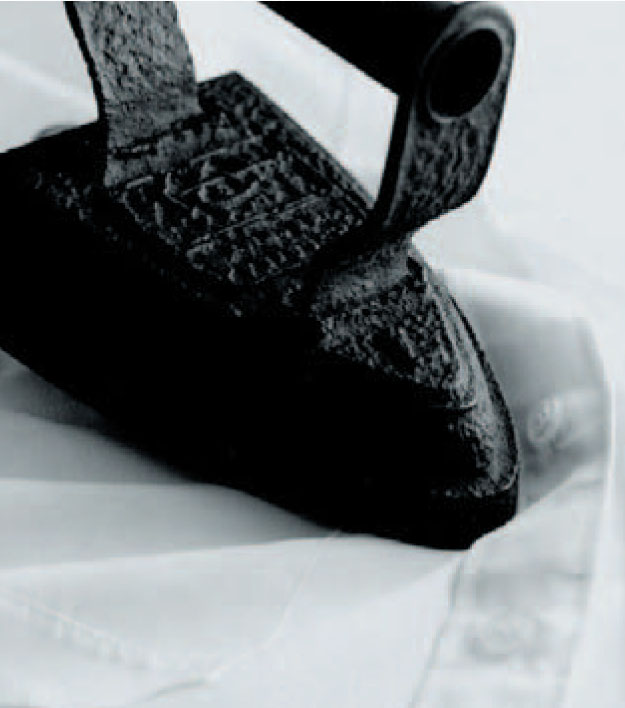
Image 3
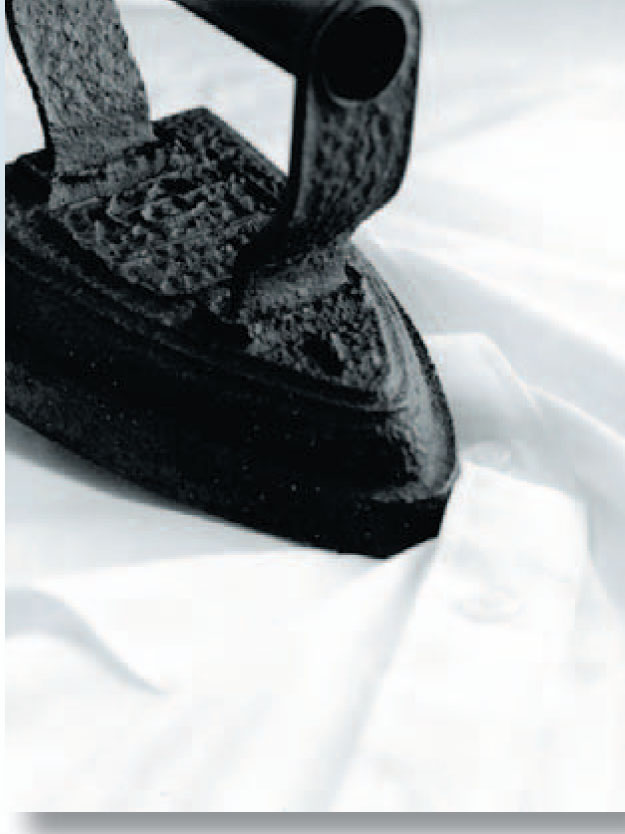
Place a second spotlight slightly forward and directly above the iron. Position as close as possible to the tracing paper, switch on and turn to full spot. Reduce the amount of light spreading across the shirt by closing the barn doors until the concentration of light is falling on the top surface and leading side of the iron. This increases detail in the iron without greatly affecting the shirt. Take and note an incident reading, from the subject, of the second spotlight. Turn off the second light and turn on the first. Take an incident reading, from the subject, of the first light. Adjust so the first light is one stop less than the second. Turn on the second light and take a reflected reading of the shirt. Depending on the actual shade of white increase the exposure by two stops to render the shirt white.
Sophie Takach
LIGHTING DIAGRAM
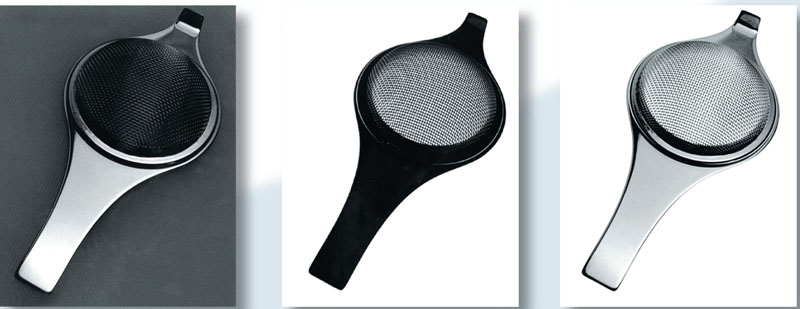
Assignment 9 ‘Cutlery’
CRITERIA
| Lighting | Graduated diffuse lighting. |
| Props | Reflective and metallic. |
| Background | Complementary tonal range. |
| Exposure | Incident or reflected light meter reading of 18% grey card. |
| Technique | To reflect graduated light into the subject to form shape, and to reduce imperfections in reflective metal surfaces. |
Image 1
Place cutlery on a piece of translucent white Perspex. Position subject and camera to obtain a satisfactory composition. Attach a large piece of tracing paper to the back edge of the Perspex and to a C-stand above the front of the camera. This will create a ‘tent’ of tracing paper completely covering the subject. Place a spotlight from behind and above the tracing paper. Centre the light on full spot in the centre of the paper. Moving the centre of the spot towards the front of the trace will create a graduation of light reflecting in the subject from white in the foreground through grey to almost black in the background. Moving the centre of the spot towards the back of the trace will achieve the opposite effect. Experiment with position and intensity (full spot through to full flood) until the desired effect is achieved.

Image 2
Turn off the top light. Place a floodlight underneath the Perspex. Position the light so the Perspex is evenly lit. Take a reflected meter reading of the surface and increase the aperture by three stops (e.g. f22 to f8) to render the surface white. Record this calculated exposure.
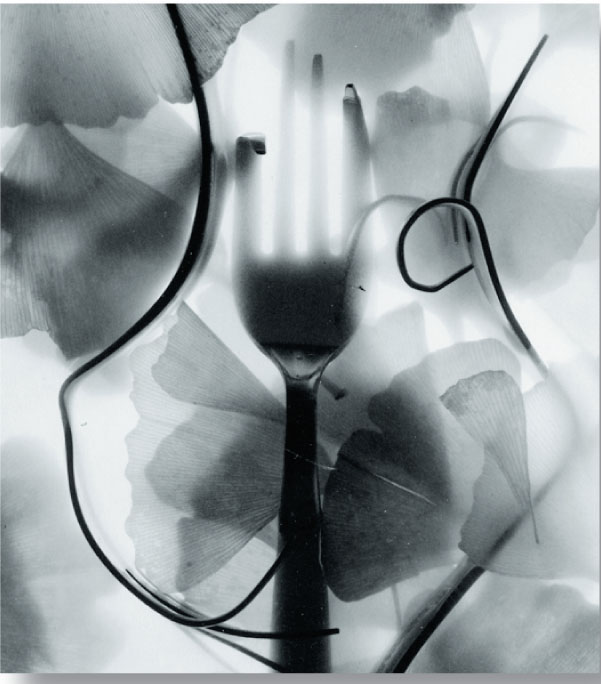
Image 3
Turn on the top light. Place a strip of black paper approximately 3cm wide by the length of the tracing paper on top of the tracing paper from front to back. Position the black paper to create a reflective black edge along one side of the cutlery. Place an 18% grey card on top of the cutlery and take a reflected reading of its surface. Depending upon the reflective values of the subject adjust your exposure accordingly. Choose an aperture giving sharp focus over the cutlery and ensure the lighting ratio between the top light and the back light remains at 8:1. This can be achieved by increasing the lights in relation to each other or by the separate exposure of each light source at different exposure times.
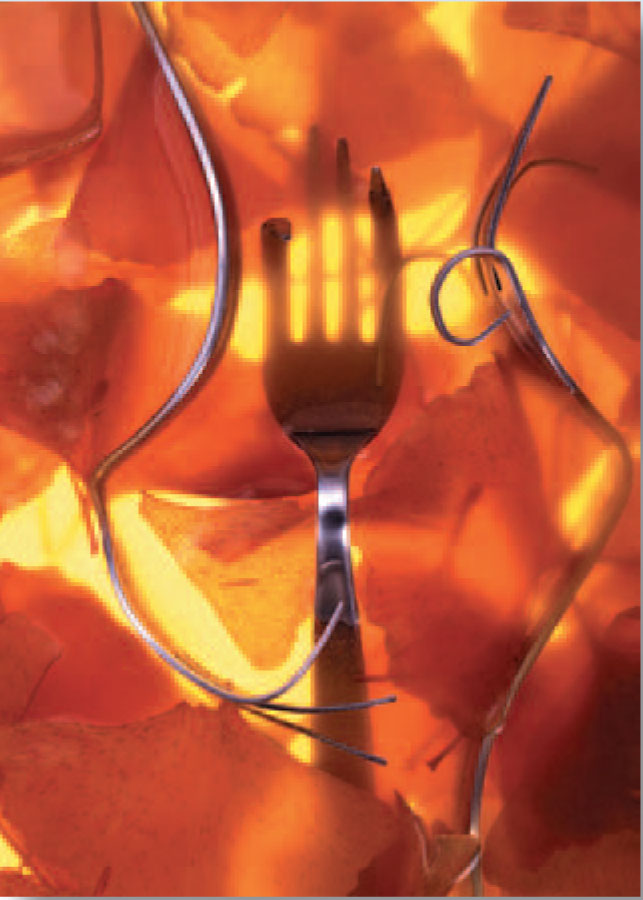
LIGHTING DIAGRAM