
On two occasions I have been asked, “Pray, Mr. Babbage, if you put into the machine wrong figures, will the right answers come out?” I am not able rightly to apprehend the kind of confusion of ideas that could provoke such a question.
—Charles Babbage, Computer Pioneer
Going Off the Rails
Railway Oriented Programming (ROP) is an analogy invented by F#’s premier educator, Scott Wlaschin. It describes a programming philosophy in which we embrace errors as a core part of program flow, rather than exiling them to the separate domain of exception handling. Scott didn’t invent the technique, but he did invent the analogy, which has helped many F# developers understand this initially daunting but powerful technique. Although I’ve titled this chapter according to Scott’s analogy, I’m going to use a slightly different way to describe what is going on. Rest assured, I am still talking about ROP. I just thought it might be interesting to look at it using an alternative mental image. You may want to treat this chapter as a companion piece to Scott’s own description of ROP, which you can find (among a cornucopia of other invaluable material) at https://fsharpforfunandprofit.com.
On the Factory Floor
You’ve decided to get into the widget business! You are going to build your very own highly automated widget factory. You’ll make them so cheaply the entire widget industry will be disrupted. Investors and admirers will flock to your door!

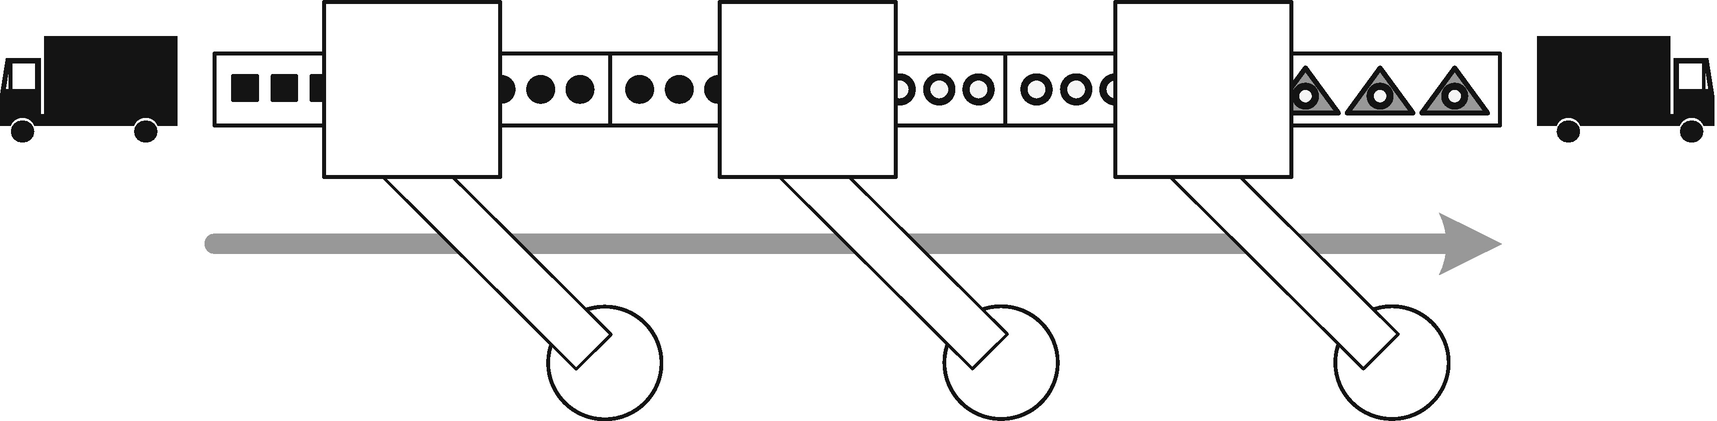
Naive layout for a widget factory
Each box represents a machine tool performing one of the manufacturing processes. Leading into each box is a conveyor for taking items into the machine, and leading out of each box is another conveyor that takes items on to the next process. The conveyor coming out of a machine will not be the same as the one going in because work items that come out will be a different shape from what goes in. Luckily, numerous styles of conveyors are available, so you just pick (or even build) the conveyor style to suit each stage. Laying out the machines is pretty straightforward: you place them in a line, in the order the processes must be performed. This way the conveyors with matching styles naturally link up. You can hardly go wrong.
You show your production line design to an experienced manufacturing engineer. But she isn’t impressed.
“What about quality control?” she asks. “Is the whole production line going to stop every time a single step goes wrong for one widget?”
Simple handling for rejects
You show the engineer your new layout.
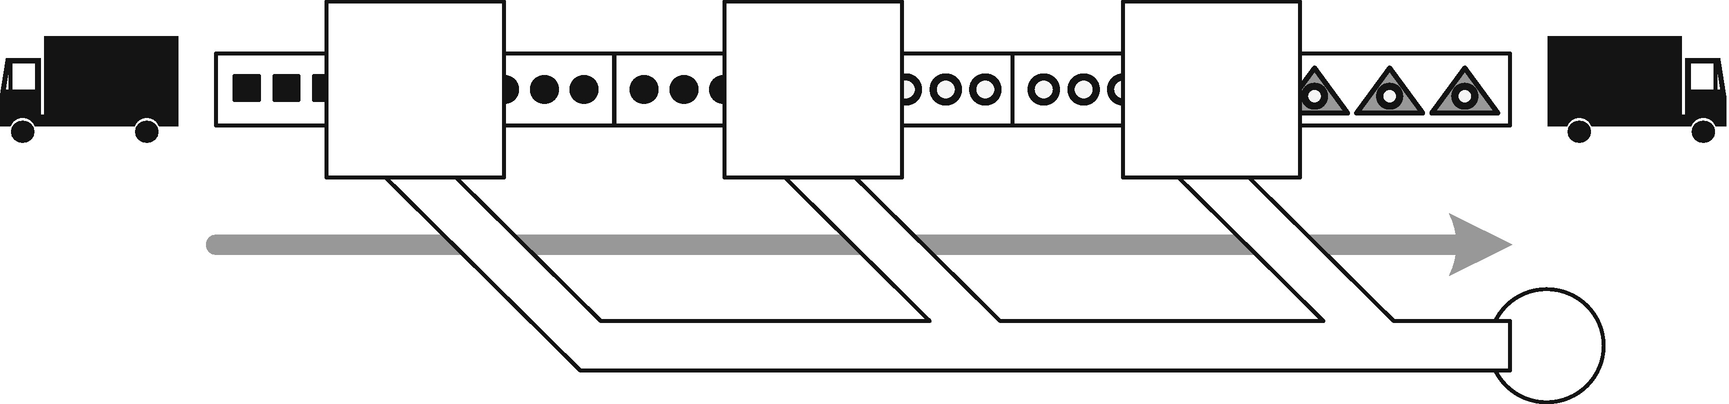
Combining rejects
This solves the multiple-rejects-hoppers problem, but it’s messy in other ways. It’s going to be fiddly linking up both sets of conveyors, especially with the rejects conveyors sticking out of the side like that. It feels repetitive somehow.
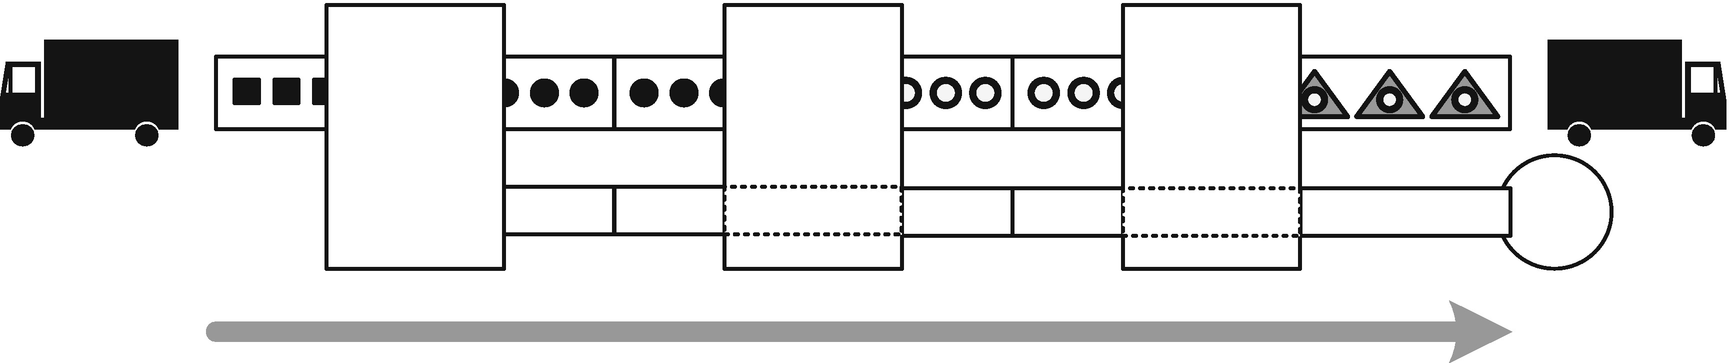
Adapter housings for easier process linkage
This is getting exciting, but you need to check your understanding.
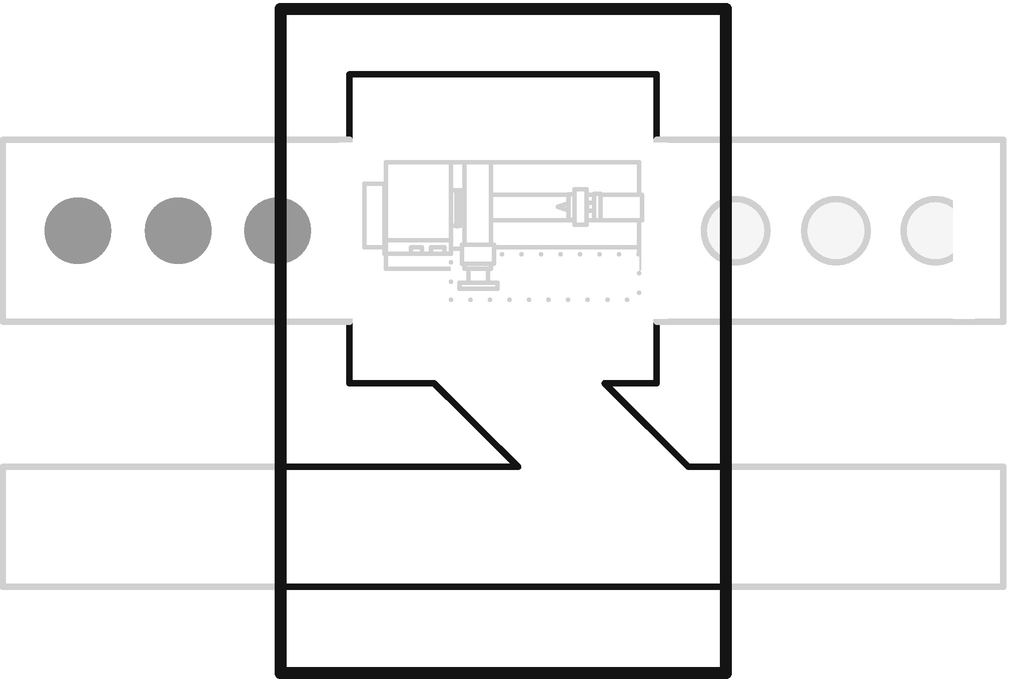
Adapter housing detail
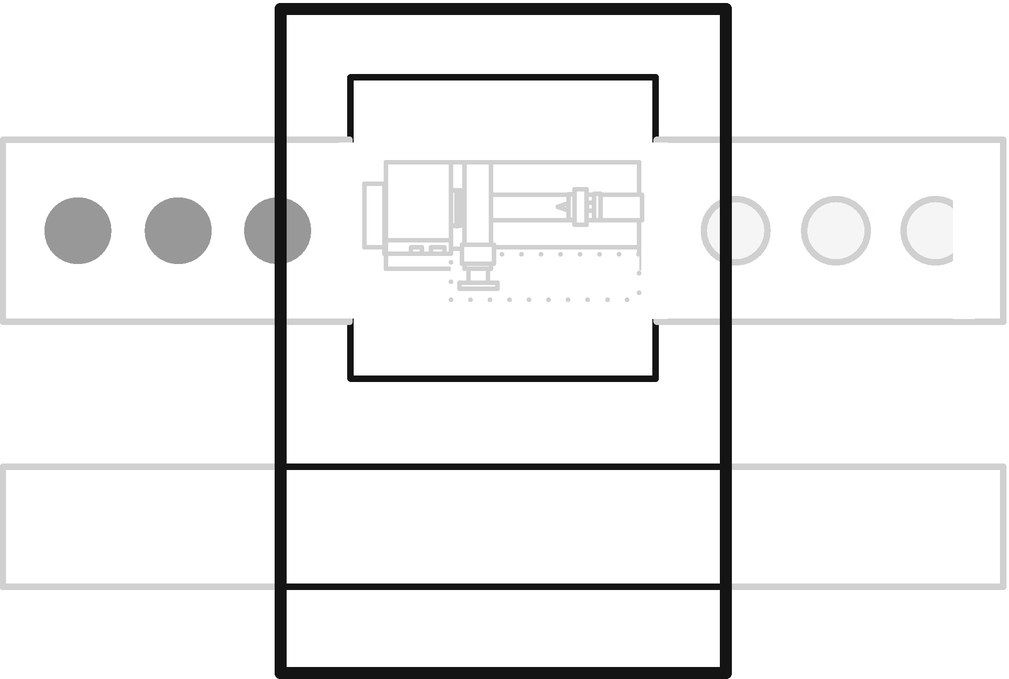
Adapter housing detail for processes that never fail
Reject adapter housing detail
“You can put in any machine you like to handle incoming rejects. It might pass them on in some form, it might report them, or it might just destroy them. Good inputs just pass straight through the adapter untouched.”
“What about the first machine on the line?” you ask. “Won’t that need a special type of adapter?”
“Nope,” replies the engineer. “If it’s a typical machine that takes a good input and produces a good output or a failure, it can just sit at the front of the line, because its good/bad outputs will fit into the second machine’s adapted inputs.”
This makes so much sense, and you’re keen to get on with the details.
“Can you hook me up with the folks who make these magic housings?” you ask.
“Sure!” replies the engineer. “There’s just the small matter of my fee.”
“Will you accept stock options?” you ask….
Adapting Functions for Failure
Raising an exception. Where she stops, nobody knows!
This makes the type signature of the function a lie: the function can really either return its official result type or an exception. This is, arguably, a violation of the principle of semantic focus. You can’t tell from the outside (by its signature) what kinds of things a function will do under all circumstances; and you can’t tell from the inside (looking at the body of the function) whether the function’s callers have any strategy at all for handling errors. The aim of ROP is to get away from this by making failures part of the signature of a function and by providing a bypass mechanism so that, as in Figure 11-4, functions can be joined together in such a way that failures whizz past any later functions in the production line.
Writing a Bypass Adapter
Although the “adapters” you’ll need do exist in F#, it’s worth trying to write a couple of them from scratch, as this makes it much easier to understand how the whole concept works. Let’s start with the adapter from Figure 11-5. It needs to take a function (the equivalent to the machine tool hidden within the adapter housing) and an input (the equivalent of an incoming, partially made widget). If the input is currently valid, it needs to be processed using the supplied function. If the input is already a failure, it needs to be passed through untouched.
An Outcome Discriminated Union
In Listing 11-2, there’s a Success case and a Failure case. We keep the payload types of the DU generic using 'TSuccess and 'TFailure because we don’t want to commit to a specific payload type for either the success or the failure path.
Take a function and an input (which might already be a success or a failure).
If the input is valid so far, pass it to the supplied function.
If the input is already an error, pass it through untouched.
The basic adapter in code
Writing a Pass-Through Adapter
The pass-through adapter in code
Listing 11-4 is almost laughably similar to Listing 11-3; I have highlighted the only difference. Whereas the func of Listing 11-3 is itself capable of returning Success or Failure, the func of Listing 11-4 is (by definition) one which can’t fail. Therefore, to let it participate in the pipeline, its result has to be wrapped in a Success case. So we simply say func x |> Success.
Building the Production Line
The password string can’t be null, empty, or just whitespace.
It must contain mixed case alphabetic characters.
It must contain at least one of these characters: - _ ! ?
Any leading/trailing whitespace must be trimmed.
The password should be saved to a database if valid; if not, there needs to be an error message.
Some password validation code
The exact details of the code in Listing 11-5 are less important than the general pattern of these functions: if validation succeeds, they return a value wrapped in a Success case. If validation fails, they return an error message wrapped in a Failure case. The save() function is slightly more complicated: it handles any exceptions that come back from writing to the (imaginary) database and returns a message wrapped in a Failure case if an exception occurred. It just happens that the result of a successful database save operation is just unit, but unit can still be returned wrapped in a Success like any other type. The tidy() function is an example of a “can’t fail” process (assuming the string isn’t null, which is tackled in an earlier step).
Lining the machines up on the factory floor
In Listing 11-6, we take each of the validation functions (apart from the first) and partially apply adapt or passThrough by providing the validation function as an argument. This is the precise equivalent, in our analogy, to putting the machine tool inside its adapter. In each case, I’ve just added a single quote (') to the name of the adapted version, just so you can tell which functions have been adapted. Items such as mixedCase' are now functions that require their input value to be wrapped in Outcome and which will just pass on Failure cases untouched.
Why didn’t we have to adapt the first function (notEmpty)? Well, exactly as the manufacturing engineer said, the very first machine tool doesn’t need an adapter because it already takes nonwrapped input and returns an Outcome case, and so it can be plugged into the second (adapted) machine without change.
At this point, we can do a sanity check by looking at the signature of the validateAndSave function . We see that the signature is password:string -> Outcome<unit, string>. This makes sense because we want to accept a string password and get back either an Outcome.Success with a payload of unit (because the database save operation returns unit) or an Outcome.Failure with a payload of string, which will be the validation or saving error message.
Exercising the validateAndSave function
Results of an exception during saving
Composing adapted functions
We’ve moved the “adapting” of the various functions into the body of the pipeline and joined the adapted functions with the >> operator. We get rid of the password parameter because a string input is expected anyway by notEmpty, and this requirement of a parameter “bubbles out” to the validateAndSave function . The type signature of validateAndSave is unchanged (although the password string is now unlabeled), and if we run it again using the code from Listing 11-7, it works exactly the same. Amazing!
Making It Official
Using the official Result DU
Using bind and map
Incidentally, you may notice a close resemblance between Result.bind/Result.map and Option.bind/Option.map, which we discussed way back in Chapter 3. These two names, map and bind, are pretty standard in functional programming and theory. You eventually get used to them.
Love Your Errors
Remember when the engineer said you were going to need an adapter for the rejects? Well it’s time to tackle that. At the moment, we have cheated a little, by making all the functions return Error cases that have strings as payloads. It’s as if we assume that on the production line, rejects at every stage would fit on the same rejects conveyor – which might well not be the case if the rejects from different stages were different shapes. Luckily in F# world, we can force all the kinds of rejects into the same wrapper by (say it aloud with me) creating another Discriminated Union!
An error-types Discriminated Union
Listing 11-12 starts with the new DU. Most of the cases have no payload because they just need to convey the fact that a certain kind of thing went wrong. The MustContainOne has a payload that lets you say what characters were expected. The ErrorSaving case has a slot to carry the exception that was raised, which a later step may choose to inspect if it needs to. See how we also had to change most of the validation functions so that their Error results wrap a ValidationError case – for example, Error MustNotBeNull. Here, to be clear, we have a DU wrapped up in another DU. Another small change in Listing 11-12 is that I’ve removed the log function from the save() function , for reasons that will become clear in a moment.

Comparing map and mapError
The map function takes an input, and if it is good, it processes it using a supplied function (which cannot fail) and returns a good output. It passes through preexisting bad inputs untouched. mapError is like a vertical flip of the same thing. It takes an input, and if it is good, it passes it through untouched. If the input is bad, it processes it using a supplied function, which itself returns a bad result.
Using mapError
See in Listing 11-13 how the signature of validateAndSave has changed to string -> Result<unit, ValidationError>, because we made all the validation functions return ValidationError cases when there was a problem. Then in the savePassword function, we composed validateAndSave with Result.mapError. We gave mapError a lambda function that matches on the ValidationError cases to generate suitable messages and in one case to log an exception.
This approach has the interesting consequence that it forces you to enumerate every kind of thing that could go wrong with your process, all in a single DU. This certainly takes some getting used to, but it is potentially a very useful discipline. It helps you avoid wishful thinking or an inconsistent approach to errors.
Recommendations
Identify processes that involve several steps, each of which might fail in predictable ways.
Write a DU that enumerates the kinds of errors that can occur. (You can obviously add cases to this as you go along.) Some cases might just identify the kind of error; others might have a payload with more information, such as an exception instance, or more details about the input that triggered the failure.
Write a function for each step in your process. Each should take a nonwrapped input (or inputs) and return either a good output in the form of a Result.Ok that wraps the step’s successful output or a Result.Error that wraps a case from your error-types DU.
Compose the steps into a single pipeline. To do this, wrap each function but the first using Result.bind (or Result.map for operations that need to fit into the pipeline but which can’t fail). Compose the wrapped functions with the function composition operator >>.
Use Result.mapError at the end of the pipeline to process failure cases, for example, by attaching error messages or writing to a log.
Summary
I hope you now understand enough about ROP to make an informed decision about whether to use it. You’re also equipped to dive in and maintain existing code bases that use ROP or some variation of it.
Types such as Result<‘Success, ‘Error> are appropriate for basic operations where they aren’t nested, and F# optional types are perfect for representing when something could either return something or nothing. They are not a replacement for exceptions, though, and should not be used in an attempt to replace exceptions. Rather, they should be applied judiciously to address specific aspects of exception and error management policy in targeted ways.
—F# Style Guide, Microsoft and contributors
In my opinion, ROP works rather nicely in the same sorts of places where function composition works nicely: constrained pipelines of operations, where the pipeline has limited scope, such as our password validation example. Using it at an architectural level works less well in my experience, tending to blur motivational transparency, at least for ordinary mortals.
In the next chapter, we’ll look at performance – how to measure the speed of F# functions and how to make them faster.
Exercises
Can you implement a passThroughRejects function, with the same behavior as the built-in mapError function?
Hint: Look carefully at Figure 11-8 and the surrounding text.
You are working on a project to handle some incoming messages, each containing a file name and some data. The file name is a string representation of a DateTimeOffset when the data was captured. The data is an array of floating-point values. The process should attempt to parse the file name as a DateTimeOffset (some might fail due to spurious messages) and should also reject any messages where the data array contains any NaN (“not-a-number”) values. Any rejects need to be logged.