
This chapter focuses on agents and their use in System Center Operations Manager (OpsMgr) 2007. However, there is a lot more to agents in OpsMgr 2007 than just installing and configuring them. We will start with understanding the core concepts, such as how the discovery and approval processes work. We will explain the differences between agent-managed systems, agentless monitored systems, unknown states, and network devices. We will discuss different methods available for deploying and configuring the OpsMgr agent; these methods include using Active Directory Integration, Systems Management Server, the Deployment Wizard, and manual installation. We will then discuss the features, limitations, and procedures associated with agentless monitoring in OpsMgr.
Next, we will discuss the various configurations available when you are also using other management software, such as Microsoft Operations Manager (MOM 2005), or have other OpsMgr 2007 management groups. In the last part of this chapter, we will discuss managing agents and the relationship between Agentless Exception Monitoring (AEM) and agents, and we will present some troubleshooting tips associated with agents in Operations Manager 2007.
Several core concepts, such as the discovery process and the approval process, are relevant to understanding how agents function within OpsMgr 2007. In addition, a monitored server can exist in one of three management states: agent-managed, agentless managed, and unmanaged.
The discovery process identifies systems to which you can install agents or systems you can configure for agentless monitoring. This discovery process queries the Active Directory directory service for computer information matching the requirements you defined for discovery.
The Microsoft MOM team provides an excellent graphical representation of how the discovery process works. It is available at http://blogs.technet.com/momteam/archive/2007/12/10/how-does-computer-discovery-work-in-opsmgr-2007.aspx/. Figure 9.1 is based on that graphic, with the specific steps for discovery listed next.

To follow along with the steps in Figure 9.1, the process for computer discovery is as follows:
The discovery wizard process is initiated from the Operations console.
Discovery can be automatic or advanced:
The automatic computer discovery option is chosen, or
The advanced computer discovery option is selected, and search criteria options are available to provide the computer and device type, specify the management server, and whether to verify if discovered computers can be contacted
Additional options are to either scan Active Directory or browse for computer names.
The administrator specifies if the Management Server Action account or another account with administrator-level privileges will be used.
Two tasks are created:
A task is created to write computer names to the Operations database
The task is submitted to the discovery engine
The discovery process reads credentials from the database using the SDK.
The current list of computers is read from the Operations database.
The discovery engine contacts a Domain Controller for resources, including Active Directory computer account information.
If the option to verify discovered computers is checked (step 2b), each of the clients is contacted through ports 135, 137, 139, 445, and 5723.
Results of the computer discovery are passed to the SDK from the discovery engine.
The computer discovery results are written from the SDK to the Operations database.
The discovery engine checks for the management mode and reports the discovery results.
The Action account uses either the Local System or the specified domain account to create tasks to deploy the agents.
The tasks are created to deploy the agents and to return the results.
The discovery engine deploys agents and returns the results.
The results are gathered from deploying all of the agents and displayed at the Operations console.
The Discovery Wizard has been enhanced since MOM 2005, with capabilities for automatic discovery of all Windows-based computers, and can scan computers in a specific Organizational Unit (OU). You can discover machines residing in nontrusted domains and workgroups if you provide the computer name in the format DomainComputerName or WorkgroupComputerName.
Tip: Failed Discovery Same Computer Name
During an OpsMgr deployment, we found that if you have the same computer name existing in multiple domains, discovery fails on the second system if OpsMgr is already monitoring the first system. Although this is not a common scenario for servers, it is an important consideration when deploying OpsMgr into workstation configurations with multiple domains, because the same workstation name can easily exist in different domains.
MOM 2005 included the capability to schedule computer discovery. This functionality was replaced in OpsMgr 2007 with Active Directory Integration (discussed in the “Active Directory Integration” section of this chapter), which applies the OpsMgr settings to systems with the agent deployed.
Because not all environments use Active Directory Integration, how can you schedule computer discovery in OpsMgr? You can use PowerShell with a scheduled task; an example of which is provided by Tarek Ismail at http://tarek-online.blogspot.com/2007/07/how-to-schedule-discover-and-install.html:
param ($OpsMgrservername,$Domainname)
#Initialize the OpsMgr Provider
Add-PSSnapin Microsoft.EnterpriseManagement.OperationsManager.Client
#Set the location to the root of the provider namespace
cd OperationsManagerMonitoring::
#create a connection to the Management Group
New-ManagementGroupConnection $OpsMgrservername
#change the path
cd $OpsMgrservername
#configure query setting
$ldap_query = new-ldapquerydiscoverycriteria -domain $Domainname -ldapquery "(sAMAccountType=805306369)(name=*ABC*)"
#configure discovery setting
$windows_discovery_cfg = new-windowsdiscoveryconfiguration -ldapquery $ldap_query #discoveryresults
$discovery_results = start-discovery -managementserver (get-managementserver) -windowsdiscoveryconfiguration $windows_discovery_cfg
#install Agent
install-agent -managementserver (get-managementserver) -agentmanagedcomputer $discovery_results.custommonitoringobjects
Save this script using a name such as Agentdiscoverinstall.ps1 and configure it to run periodically from the Windows scheduler on the RMS using the following syntax:
Powershell.exe Agentdiscoverinstall.ps1 -OpsMgrservername: localhost-Domainname:<domain>When this script runs, it will discover the computers that match the Lightweight Directory Access Protocol (LDAP) query defined in the script.
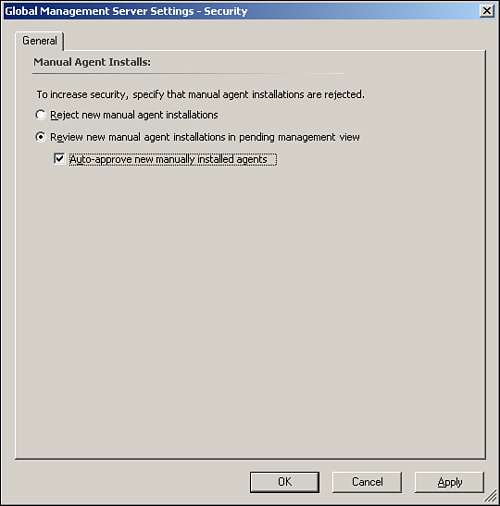
OpsMgr’s default configuration rejects manually installed agents. You can change this configuration in the Administration node of the Operations console. Perform the following steps:
Navigate to Administration -> Settings -> Security. Right-click Security and then select Properties.
The General tab shows that the default configuration is Reject new manual agent installations. If your environment will use manual agent installation, check the option that says Review new manual agent installations in pending management view, as shown in Figure 9.2.
If you choose the option to review new manual agent installations, a check box is available that reads Auto-approve new manually installed agents. If you select the second option, new manual agents automatically approved.
If you do not choose the second option, manually installed agents display in the Operations console in the Administration -> Device Management -> Pending Management folder (where you can approve or reject their installation).
An agent-managed system runs a software component called the OpsMgr agent, which runs as a local service on each computer it is installed on. The agent monitors the computer using management pack objects, which apply to that agent. The management server will update these objects as changes are applied to the management packs used by that management group. Updates are received by the agents at the next configuration request interval (5 minutes by default) after changes are applied. Typically, OpsMgr configurations use agent-managed systems.
Installing OpsMgr 2007 and the Reporting capability automatically imports approximately 40 management packs, listed in Table 9.1. The majority of these management packs are libraries, which provide a foundation of object types and settings that other management packs depend on. The other installed management packs monitor the health and availability of Operations Manager and the OpsMgr agent.
Table 9.1. Default Management Packs in OpsMgr 2007
MP Friendly Name | Internal Name | Description |
|---|---|---|
Application Log Library | System.Application.Log.Library | Contains the definitions specific to application log monitoring. |
Baselining Tasks Library | System.BaseliningTasks.Library | Contains definitions of baselining tasks. |
Client Monitoring Internal Library | Microsoft.SystemCenter.ClientMonitoring.Internal | Contains primarily workflows for System Center Client Monitoring and CEIP features. |
Client Monitoring Library | Microsoft.SystemCenter.ClientMonitoring.Library | Contains primarily various types for System Center AEM (Agentless Exception Monitoring) and CEIP features. |
Client Monitoring Views Library | Microsoft.SystemCenter.ClientMonitoring.Views.Internal | Contains primarily views for System Center AEM (Agentless Error Monitoring) and CEIP features. |
Data Warehouse Internal Library | Microsoft.SystemCenter.DataWarehouse.Internal | Contains definitions and workflows for Operations Manager Data Warehousing features used internally. |
Data Warehouse Library | Microsoft.SystemCenter.DataWarehouse.Library | Contains definitions and workflows for Operations Manager Data Warehousing features. |
Default Management Pack | Microsoft.SystemCenter.OperationsManager.DefaultUser | Default location for storing all custom management pack objects such as rules, tasks, and monitors. It also stores all defined overrides and notifications. |
Distributed Application Designer Library | Microsoft.SystemCenter.ServiceDesigner.Library | Contains the various Distributed Application types that show up in the Distributed Application Designer. |
Health Internal Library | System.Health.Internal | Contains definitions for the System Health types that are not visible via the console user interface or the SDK client. |
Health Library | System.Health.Library | Contains definitions for the core System Health types. |
Image Library (System Center) | Microsoft.SystemCenter.Image.Library | Contains icons for System Center types. |
Image Library (System) | System.Image.Library | Contains icons for System types. |
Image Library (Windows) | Microsoft.Windows.Image.Library | Contains icons for Windows types. |
Instance Group Library | Microsoft.SystemCenter.Instance Group.Library | Contains the definitions and components needed for the Group Wizard. |
Microsoft Generic Report Library | Microsoft.SystemCenter.DataWarehouse.Report.Library | Generic Data Warehouse reports. |
Microsoft ODR Report Library | ODR | Microsoft ODR Report Library. |
MOM 2005 Backward Compatibility | System.Mom.Backward Compatibility.Library | Contains the definitions necessary for MOM 2005 backward compatibility. |
Network Device Library | Microsoft.SystemCenter.NetworkDevice.Library | Contains the definitions specific to network devices. |
Notifications Internal Library | Microsoft.SystemCenter.Notifications.Internal | Used to hide notifications-related management pack objects exposed directly via the API for Operations Manager. |
Notifications Library | Microsoft.SystemCenter.Notifications.Library | Contains definitions and workflows for Notifications features. |
Operations Manager 2007 | Microsoft.SystemCenter.OperationsManager.2007 | Contains the monitoring for the System Center Operations Manager 2007. |
Operations Manager Agent Management Library | Microsoft.SystemCenter.OperationsManager.AM.DR.2007 | Contains the agent remediation recoveries that must be initiated by the user. |
Operations Manager Internal Library | Microsoft.SystemCenter.OperationsManager.Internal | Contains internal components (views, discovery, and so on) that are specific to System Center Operations Manager. |
Performance Library | System.Performance.Library | Contains definitions for core System Performance. |
SNMP Library | System.Snmp.Library | Contains SNMP definitions. |
Synthetic Transactions Library | Microsoft.SystemCenter.Synthetic Transactions.Library | Contains the components needed to create monitored objects for lightweight Synthetic Transactions. A lightweight Synthetic Transaction is typically a single action such as “Check a specific port” or a short set of actions such as “Log in to this database and check for the existence of a table.” These transactions are run from one or more agents. They remotely check a target that may or may not have a Health Service. |
System Center Core Library | Microsoft.SystemCenter.Library | Contains type definitions for System Center. |
System Center Core Monitoring | Microsoft.SystemCenter.2007 | Contains the core monitoring for the System Center 2007 core platform and its services. |
System Center Internal Library | Microsoft.SystemCenter.Internal | Contains definitions and components internal to System Center. |
System Center Rule Templates | Microsoft.SystemCenter.RuleTemplates | Templates for rules. |
System Center Task Templates | Microsoft.SystemCenter.TaskTemplates | Templates for tasks. |
System Center UI Executed Tasks | Microsoft.SystemCenter.Internal.UI.Tasks | Contains tasks that are called and executed by the UI. |
System Hardware Library | System.Hardware.Library | Contains the definitions that are specific to physical hardware. |
System Library | System.Library | Root for all management packs. Contains platform independent definitions. |
Web Application Monitoring Library | Microsoft.SystemCenter.WebApplication.Library | Contains the components needed to monitor Web Applications and record browser sessions. Recording a browser session allows you to create a rich Synthetic Transaction to imitate exactly how users interact with the application you need to monitor. |
Windows Client Operating Systems Library | Microsoft.Windows.Client.Library | This management pack is the library management pack that defines all the features and components common to all versions of Windows client operating systems. |
Windows Cluster Library | Microsoft.Windows.Cluster.Library | Contains the definitions specific to Windows Clustering. |
Windows Core Library | Microsoft.Windows.Library | Contains the definitions specific to the Windows platform. |
Windows Service Library | Microsoft.SystemCenter.NTService.Library | Contains the definitions for monitoring a Windows Service. |
As you integrate other management packs into OpsMgr 2007, additional items will be monitored depending on the functionthe server provides.
You can deploy OpsMgr 2007 agents to the following operating systems:
Microsoft Windows Server 2003 SP 1 or later
Microsoft Windows 2000 Server SP 4
Microsoft Windows 2000 Professional SP 4
Microsoft Windows XP Professional (no service pack required)
Microsoft Windows Vista Business, Enterprise, and Ultimate editions
Tip: Monitoring Client Operating Systems with OpsMgr
Although you can use OpsMgr to monitor client operating systems, most organizations typically only monitor servers. An exception to this rule might be a batch-processing system that runs business-critical functions that has not been migrated to a server platform. For example, many manufacturing companies use workstation-class computers to monitor machines that produce their products.
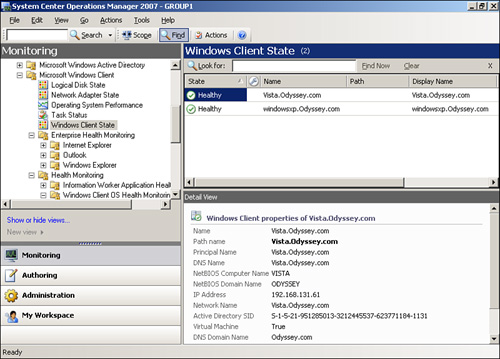
The Windows Client/2000 XP management pack monitors Windows 2000 and XP systems. The new Windows Vista Client Monitoring management pack provides the ability to monitor the availability, configuration, and performance of Windows Vista operating systems. You can download these from the System Center Pack Catalog site at http://go.microsoft.com/fwlink/?linkid=71124. For an example of how client monitoring works in Operations Manager 2007, see Figure 9.3, which displays Windows XP and Windows Vista monitored systems within the Windows Client State view. We discuss client monitoring in Chapter 16, “Client Monitoring.”
Microsoft does not support Microsoft Windows NT 4.0 in an agent-managed configuration (or support any other operating systems that do not match the configurations listed previously). If there is a requirement to manage unsupported systems such as this, consider either agentless management or review third-party supplemental software for OpsMgr 2007.
An agentless managed system does not run the OpsMgr agent. The Agent Component on the management server (or Root Management Server) collects data from the agentless managed computer through remote calls to that system. OpsMgr 2007 does not have a documented limit on the number of agentless managed systems that can report to a management server, but in MOM 2005 Microsoft limited support for agentless systems to 10. This limit was a supportability limit, not a physical limit (that is, 11 or more agentless systems would still function). The limit was rather a recommendation, based on the impact on the performance of the management server providing the agentless monitoring functionality.
There are restrictions to using agentless monitoring. It is not supported on several management packs and provides a reduced set of functionality for others. We discuss these topics in more detail in the “Integrating Agentless Managed Systems into OpsMgr 2007” section of this chapter.
Application owners are sometimes concerned about installing agent software onto their application servers and the potential impact on the operations of that computer. The resource load on an agent-managed computer is low and does not generally pose a problem.???
Table 9.2. Agent Impact During Installation
Component | Impact |
|---|---|
Processor | 29%–37% increase during installation |
Disk | 18–19 additional pages per second |
Disk storage | 154MB data (%ProgramFiles%System Center Operations Manager 2007) |
Network | 11MB data sent to the system during installation |
Memory | 22MB less available memory |
For some environments, any change to the configuration or installed software base may lead to complications. A good example of this is a validated system where specific testing processes must occur for any changes to the configuration, including deploying agents. (A validated system is one that has a strict process to validate the functionality of the system anytime software is installed on it.) In these cases, the Information Technology (IT) group responsible for server management wants to avoid even the appearance of affecting an application server, thus avoiding potential liability. If you are in this situation, you can use the agentless management mode to manage servers that might otherwise be unmanaged. As discussed earlier (in the “Agent-Managed State” section), legacy systems such as NT 4.0 or operating systems that are not current on patching are also common reasons for at least temporarily using an agentless configuration.
Agentless managed computers have a more limited set of features than do agent-based managed computers. Similar to agent-based managed computers, agentless managed computers include the following capabilities:
State monitoring
Heartbeat
Service discovery
Performance collection
Script execution
Event collection
However, there are some significant limitations to agentless managed systems. The primary limitation is the management packs that will not run agentless. This list includes the following:
Active Directory
Exchange 2003
IIS
SharePoint Portal Server
Agentless monitoring also increases the resource load on the management server that is monitoring the system.
Table 9.6. Comparing Agent to Agentless Monitoring Impacts (per System Monitored)
Component | Impact |
|---|---|
Processor | 7% increase on the management server. |
Disk | Decreased paging by .5 pages per second on the agentless monitored system. |
Disk storage | Disk free space increased by 156MB on the agentless monitored system (because the agent is not deployed). |
Network | Network traffic increased by .8 MB/minute on the agentless monitored system and 1.3MB/minute on the management server. |
Memory | Decreased memory requirements by 11MB on the system being monitored agentless and a 9MB decrease in available memory on the management server. |
Unknown systems are unmanaged systems, either identified for potential management in the future (the systems are discovered but they are not managed) or that have had the agent removed from them. OpsMgr does not collect information from unmanaged systems. Computers in an unknown state display in the right-side pane in the Operations console at the root of the Monitoring node. (In Figure 9.4, see the empty circle on the right side of the screen.)

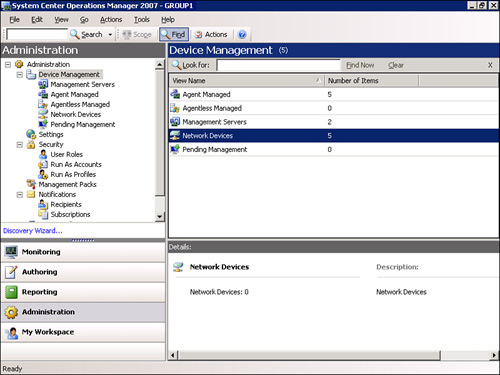
Operations Manager 2007 has additional functionality to provide a seamless integration for monitoring network devices. Microsoft designed the network device functionality in OpsMgr to monitor devices by providing information from the Simple Network Management Protocol (SNMP) to OpsMgr. You can view network devices through the Operations console in the Administration node, as shown in Figure 9.5. To add a network device, on the left side of the screen, right-click Device Management and start the Discovery Wizard, selecting the option for an Advanced Discovery.
Chapter 17, “Monitoring Network Devices,” includes information on how to discover and use network devices with OpsMgr.
A number of approaches are available for deploying agents. Operations Manager 2007 continues to provide the capability available in previous versions to perform push installations from the Operations console. While the ability to deploy agents from the console is quite beneficial, it uses a proprietary approach. OpsMgr 2007 is a monitoring product; push installations to deploy the OpsMgr agent rely on OpsMgr itself for the software deployment, which was not the core focus Operations Manager was designed to perform.
Tip: Remote Agent Prerequisite Check
The OpsMgr agent, like many other software packages, has a number of required prerequisites before you can install the agent. Satya Vel of the MOM team provides information about an updated tool from the MOM 2005 Resource Kit that remotely checks these prerequisites for a group of computers. Information on this tool (MOMNetCheckCmd) and a zip file for download are available at http://blogs.technet.com/momteam/archive/2007/11/20/remote-agent-prerequisite-checker-tool-for-opsmgr-2007.aspx. (For your convenience, we provide this URL as a live link in Appendix E, “Reference URLs.”)
MOMNetCheckCmd.exe is a command-line version of the MOMNetCheck tool shipped with the MOM 2005 Resource Kit.
Along with the functionality included in Operations Manager 2007 to deploy agents (which works extremely well for most environments), additional methods are available to discover and deploy the agent that were not available in the previous version.
You can install the agent in a variety of ways:
Active Directory Integration (provides agent configuration information, but does not actually install the agent)
Group Policy
Systems Management Server (SMS) and Configuration Manager (ConfigMgr)
Imaged systems
Operations Manager Discovery Wizard
Manual installation
Installation from PowerShell
For small and mid-sized organizations, the recommended deployment approach is from the Operations console using the Discovery Wizard. Larger organizations may want to evaluate using Active Directory Integration coupled with other deployment methods such as SMS, Group Policy, and PowerShell. We discuss each of these techniques in the following sections.
Note: Active Directory Management Pack and Discovery
The Active Directory management pack (ADMP) requires enabling the proxy setting on domain controllers managed by OpsMgr. The ADMP uses this configuration to discover all the domain controllers in the environment.
This does not mean that all domain controllers have the OpsMgr agent automatically deployed to them, but it can be surprising—particularly when you are planning to phase deployment of OpsMgr agents to your domain controllers and those systems already appear in the console! Those domain controllers that are discovered but do not have the OpsMgr agent deployed are listed as “Not Monitored.”
Operations Manager 2007 adds new functionality that provides the ability to configure agents through Active Directory (AD). This takes place by publishing the OpsMgr agent configuration details to Active Directory. An OpsMgr agent performs an LDAP query to the authenticating domain controller at startup, determining the management group it belongs to and the management server with which it will communicate. Note that Active Directory Integration does not actually deploy the agent.
Tip: Active Directory Integration and Domain Functional Level
To use Active Directory Integration in OpsMgr 2007, the domain functional level needs to be either Windows 2000 or Windows 2003 Native mode.
To check the functional level of your domain, open Active Directory Users and Computers, right-click your domain, and select Properties. To change the domain functional level, right-click the domain and then select Raise Domain Functional level. You should only make this change with prior planning and within the change control windows in your environment.
Although the AD Integration approach simplifies deploying OpsMgr 2007 agents, it increases the complexity of your OpsMgr configuration. We do not recommend AD Integration except for organizations with a very large number of agents deployed.
Three steps are involved in configuring Active Directory Integration with OpsMgr:
Creating Active Directory objects
Configuring the Operations console
Modifying the AD Integration Registry key
The first step is to run the MomADAdmin utility on a domain controller with an account that is a member of the Domain Admin security group. This utility is located under the SupportTools folder in the OpsMgr installation media and creates the required Active Directory objects. The syntax to run this command is as follows:
MomADAdmin.exe <management group name> <OpsMgr Admins Security Group> <RMS name> <AD Domain>
We can look at our Odyssey environment as an example. We have a single management group named GROUP1. The RMS is Hydra, and we are monitoring systems in the Odyssey.com domain.
We created a computer group named OpsMgr Admins as a global security group on the domain. This step is important because the MomADAdmin utility tool does not create the specified group; it assumes that the group already exists. To configure Active Directory Integration in our domain, we logged in to the domain controller (Pantheon) as a domain administrator and ran the following command:
MomADAdmin.exe GROUP1 "OpsMgr Admins" Hydra Odyssey.com
The MomADAdmin utility creates the Operations Manager -> (Management Group name) -> HealthServiceSCP container and contents in Active Directory, as shown in Figure 9.6. This container includes a security group <Management Group Name>_HSvcSCP_SG (for our example, this is GROUP1_HSvcSCP_SG) that is used to determine who can read the HealthServiceSCP container. In addition, the utility adds the RMS computer account to the security group the utility creates. The container also stores special objects called service connection points, used to publish information about desired agent settings that the agent queries at initial system startup.

Tip: How to Tell If an Agent Is Using Settings from the SCP
The Registry key HKLMSYSTEMCurrentControlSetServicesHealthServiceParametersmanagement groups<Management Group name>IsSourcedFromAD has a value of “1” on agent-managed machines. This indicates the agent will gather settings from the SCP (service connection point). The key is only on AD-integrated systems.
The Windows NT Operations Manager Event log on the agent-managed machine records successful access to the SCP information from the agent, with event IDs 20062 and 20013 of type Information from the event source OpsMgr Connector.
After we finish creating objects, the next step is configuring the Operations console for AD Integration. In the Operations console, navigate to Administration -> Device Management -> Management Servers.
Select the management server you will configure AD integration for, right-click the management server, and choose Properties. (You can also initiate this from the Administration screen by clicking the Configure Active Directory (AD) Integration optional configuration and choosing the management server to configure.) Click Add on the Auto Agent Assignment tab. This starts the Agent Assignment and Failover Wizard. To configure agent assignment with this wizard, perform the following steps:
Click Next to continue on the Introduction page.
On the Domain screen, choose the domain to configure AD Integration on (this defaults to the domain the management server is within) and choose the account to perform the issue (which defaults to the Active Directory Based Agent Assignment account). Click Next to continue.
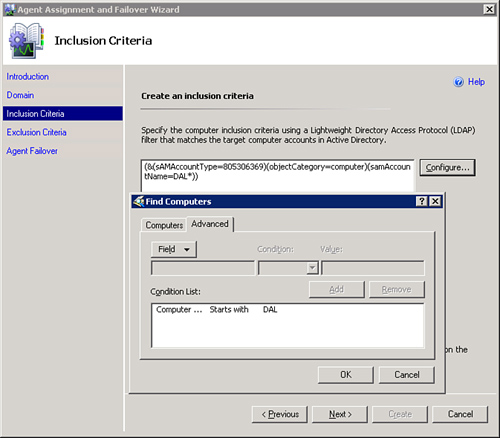
On the Inclusion Criteria screen, click Configure to define an LDAP query to target the computer accounts.
On the Find Computer screen, we define how to create the LDAP query. As an example, choosing the wildcard “*” will define an LDAP query that chooses all computers in the domain. Click OK to leave the Find Computers screen. You can create LDAP queries that are more complicated by selecting the Advanced tab and defining the criteria. The fields available include Computer name, Description, Managed By, Name, Operating System, and Operating System Version. Conditions available consist of Starts with, Ends with, Is, Is Not, Present, and Not present. Figure 9.7 shows a LDAP query defined to apply to computers that start with DAL.
On the Exclusion Criteria screen, specify any systems to exclude from auto-assignment. Add the Fully Qualified Domain Names (FQDNs) on this screen, delineating using a semicolon, comma, or newline. You can cut and paste text into this screen, providing a method to add large numbers of systems for exclusion. Click Next to continue.
The Agent Failover screen specifies how to handle agent failover. Here are the options available:
Automatically manage failover—. Agents will report to the other management servers in the management group.
Manually configure failover—. Allows you to define which management server(s) the agents should fail over to.
We recommend using automatic failover, unless you have a requirement to fail to a specific management server in your environment. This might be when you have management servers in different physical locations and do not wish to fail over the agents to the management server in the remote location.
Click Create to finish the Agent Assignment and Failover Wizard.
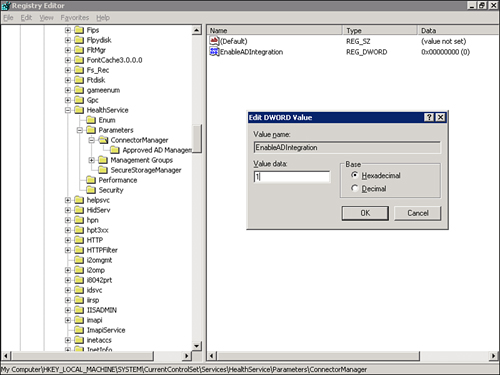
To complete the process of activating OpsMgr integration with AD, the final step is to make a Registry change on each management server. Use the Registry editor to edit the Registry (select Start -> Run and then type regedit). Follow these steps:
Open HKEY_LOCAL_MACHINESYSTEMCurrentControlSetServicesHealthServiceParametersConnectorManager.
Right-click the EnableADIntegration key and set the value to 1, as we show in Figure 9.8.
Click OK and close the Registry editor.
Tip: Active Directory Integration and Domain Controllers
You cannot configure domain controllers to use Active Directory Integration. To understand why, you need to understand how AD Integration works in more detail. To control which agents go to which management groups, an Access Control List (ACL) is used on the object. This ACL, created in Active Directory, represents the management group.
The computers allowed to join the management group have rights to read the SCP object created for the management group. When an agent using AD Integration starts up, the OpsMgr Health service (running as Local System) goes to AD, does a lookup to find what SCPs it has access to, and from that determines which management groups it should be a member of.
For a domain controller, the built-in Local System account has full access to read each of these folders for the SCP, so it would attempt to join every management group. To work around this issue, OpsMgr disables AD Integration for domain controllers.
How do we remove Active Directory Integration after configuring it? The MomADAdmin utility accepts a -d parameter, which removes this configuration. So for our configuration, to remove Active Directory Integration, we would type the following (the parameters for -d are the management group name and the domain):
MomADAdmin.exe -d GROUP1 Odyssey.com
Group Policy can deploy software, both through software deployment and running the installation using a startup script. Group Policy software deployment cannot run setup switches with an MSI package as part of a GPO, so using this method requires creating a transform (MST) file for the Operations Manager 2007 agent. Currently no transform files exist, so we will instead focus on how to deploy the agent through using a startup script, which requires the following steps:
Create a file share named OpsMgrAgent on a computer (we will use Hydra for our example). Copy over the agent folder structure under the new share name so that the folder structure has the amd64, i386, and ia64 folders within it. Make sure that everyone in the domain has at least read-level access to the share so they can access the scripts to run the OpsMgr agent installation.
Rename the i386 folder to x86, because this is how the Processor_Architecture environment variable is defined on the i386 platform. You can also provide this share via DFS so that the files are accessible from a locally available server in the site.
Create a cmd file and save it in the newly shared directory. Name the file InstallOpsMgrAgent.cmd and include the following content (thanks to the folks at SystemCenterForum for the original version of this script from which we started our development!):
<LINELENGTH>90</LINELENGTH>CD CD %ProgramFiles% IF EXIST "System Center Operations Manager 2007HealthService.exe" goto end Net use X: \hydraOpsMgrAgent X: CD %Processor_Architecture% Call MOMAgent.msi /qn USE_SETTINGS_FROM_AD=1 USE_MANUALLY_SPECIFIED_SETTINGS=0 REM *** The two lines directly above this should exist REM *** on a single line when this script is typed. REM *** REM USE_SETTINGS_FROM_AD=1 SETS THE AGENT INSTALL TO REM LOOK TO AD INTEGRATION FOR THE MANAGEMENT GROUP AND REM SERVER CONFIGURATION REM USE_MANUALLY_SPECIFIED_SETTINGS=0 SETS THE AGENT REM INSTALL TO NOT REQUEST MANUAL CONFIGURATION FOR THE REM AGENTS C: Net use X: /delete :end
Use the Group Policy Management console (GPMC; Start -> All Programs –> then type gpedit.msc) to create a new GPO and browse to Computer Configuration -> Windows Settings -> Scripts (Startup/Shutdown). Right-click Startup and then choose Properties.
At the Startup Properties screen, click Add and browse to the file share that we created in step 1 to select the InstallOpsMgrAgent.cmd file. No script parameters are required, so click OK. Then click OK at the startup properties screen. Close out the GPMC.
You can use SMS or ConfigMgr to deploy the OpsMgr 2007 agent. For the purposes of this section, we will refer to both products as SMS—this being the most familiar name to most IT professionals. The primary benefits to using these products to deploy the OpsMgr 2007 agent include the following:
Strong targeting mechanisms are available through collections, including the ability to target to a group, a site, or a subnet as an example
Increased reporting information on agent deployments, provided with the standard software deployment reports in SMS and ConfigMgr
The negatives to using SMS to deploy the OpsMgr 2007 agent include
You must create the package and configure Active Directory Integration to provide this method to deploy the agent.
You will need to define collections for whatever targeting will be required.
Individual or small group agent deployments require more time than if you use the Install Wizard for deployment.
SMS uses packages that you create. These packages are deployed to collections of systems by creating an advertisement. Creating the package for OpsMgr is simple and requires only a few steps.
Within the SMS Administrator console, create the package from a definition file by pointing it to MOMAgent.msi. For this example, we will package the i386 version of the OpsMgr agent. Take the defaults except for the source files option, which should specify Always obtain files from a source folder, and point the folder to the path of the agent (as an example, d:agenti386).
The MSI file creates a set of installation options that are not relevant for our deployment. Delete the per-user installs and the per-system attended install because they are not required and may cause confusion.
Right-click the package and select Properties. On the General tab, change the properties on the per-system attended command line to:
<LINELENGTH>90</LINELENGTH>MSIEXEC.exe /i MOMAgent.msi /qn /l*v MOMinstall.log USE_MANUALLY_SPECIFIED_SETTINGS=0
These parameters will install MOMAgent.msi in quiet mode. Save the MSI log file to a log named MOMinstall.log and do not provide configuration information to the client (because the agent configuration is discovered from Active Directory).
Change the properties on the Requirements tab to set the maximum time allowed to 10 minutes and to specify only the x86 platforms to run this agent on, as shown in Figure 9.9.
After creating the package, assign it to a distribution point in your SMS environment. SMS uses distribution points to deploy software packages.
Create a collection that will represent the systems you want to deploy the agent to and restrict it to the particular software platform the package supports. As an example, you could create a collection for all servers in the environment that are running on the i386 platform.
Create an advertisement to push the agent out to a collection that will require the OpsMgr agent and make the deployment mandatory.
If you will be deploying agents to different platforms (such as ia64 or amd64), you will want to create separate packages for each of these platforms, which means going back through steps 1–7 for each different platform.

You can use various imaging technologies to install or deploy operating systems, including Norton Ghost and Systems Management Server Operating System Deployment (OSD). Imaging can deploy preconfigured operating systems that may already have applications deployed on them. Imaging provides a rapid way to install identical operating systems and software configurations on multiple systems very quickly and efficiently.
Imaged systems can integrate the OpsMgr agent as part of the image. When the system starts, it looks up its configuration in Active Directory (see the “Active Directory Integration” section earlier in this chapter), and the agent is able to report to the specified Operations Manager management server.
Integrating the OpsMgr agent into the image and using the Active Directory Integration technologies provides a deployment method that is easy to maintain after implementation. For smaller organizations that do not frequently add systems for monitoring by OpsMgr, this approach is most likely overkill.
The Operations Manager 2007 Discovery Wizard provides an easy-to-use process to discover and deploy agents for OpsMgr. The Discovery Wizard can easily scan an entire Active Directory domain for Windows-based systems, limit its scan to specific OU structures, browse for computers, or even deploy to specific systems you enter that you can cut and paste into the wizard. You have several things to consider when using the Discovery Wizard to deploy agents, including the following:
Agents deployed using the Discovery Wizard do not pull their information from Active Directory, even if Active Directory Integration is in place.
Agents deployed through the Discovery Wizard are defined to report to a specific management server. We define agent failover using the Agent Assignment and Failover Wizard, which we will discuss in the “Changing Agent Failover” section of this chapter.
Tip: Permitting the Audit Collection Services Driver
Installing the OpsMgr 2007 agent on a computer actually installs two services.
The primary service is the OpsMgr Health Service, which is the agent component. A second service is the Operations Manager Audit Forwarding Service, which is the agent component of the Audit Collection Services (ACS) feature of OpsMgr. This service is installed by OpsMgr during agent installation but it is not enabled.
Even if you have not installed the ACS server components into your management group, every agent-managed computer still has this service (though it is disabled). If your computer runs an antimalware application such as Microsoft Forefront Client Security, you may need to “permit” the AdtAgent.exe driver to allow it to load properly.
The Discovery Wizard first discovers the system(s); after discovery, you can choose the specific system(s) to receive the OpsMgr agent. You can see deployment successes and failures displayed within both the Deployment Wizard results and the Tasks section (Monitoring -> Tasks). We recommend using the Discovery Wizard to discover and deploy agents in all but the largest of OpsMgr environments.
MOM 2005 had a process to create discovery rules that identified what agents would report to what management server. These were auto-created with the Install/Uninstall Agents Wizard, or created manually and viewable within a Computer Discovery Rules folder in the Administrator console.
With Operations Manager 2007, the discovery process occurs as part of the Discovery Wizard, and there is no direct interaction with the discovery rules. This simplifies the process for deploying agents because the discovery rules often became complex to manage over time.
Using the wizard is the easiest method to deploy OpsMgr agents. To launch the Discovery Wizard, perform the following steps:
Open the Operations console -> Administration. Right-click Administration and choose the Discovery Wizard (right-clicking any item listed in the left pane provides this option).
On the Introduction page, click Next. You can configure this page not to appear when running on the wizard if you select the option Do not show this page again.
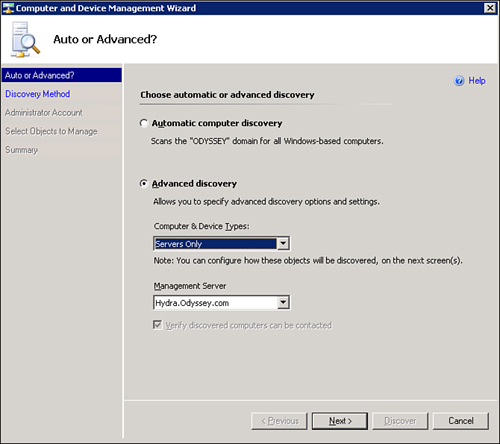
The next screen (shown in Figure 9.10) asks you to select either automatic or advanced discovery. Automatic computer discovery performs a scan for all Windows-based computers within the domain where the Root Management Server (RMS) is a member. Automatic discovery is useful in smaller organizations and is very effective when selecting large numbers of systems to which to deploy the OpsMgr agent. For most agent deployments, the preferred option will be to take the default, Advanced discovery. The following describes the Advanced discovery process:
If you are deploying agents only to servers, select the Servers Only option from the Computer & Device Types dropdown list (available options include Servers & Clients, Servers Only, Clients Only, and Network Devices).
If you will be deploying agents onto workstations, take the default configuration (Servers & Clients). We recommend checking the option Verify discovered computers can be contacted. This often increases the success rates of the deployment because only systems that can be communicated with on the network are listed for selection.
If you select the Servers Only option, the option Verify discovered computers can be contacted is grayed out and checked.
The discovery can return approximately 4000 computers if the Verify option is selected, and approximately 10,000 computers if it is not selected.
Finally, select the management server the agent will communicate with from the dropdown list. Figure 9.10 shows an Advanced discovery for Servers Only using the Hydra management server; this was the most common configuration we used with the Discovery Wizard. Continue by clicking Next.
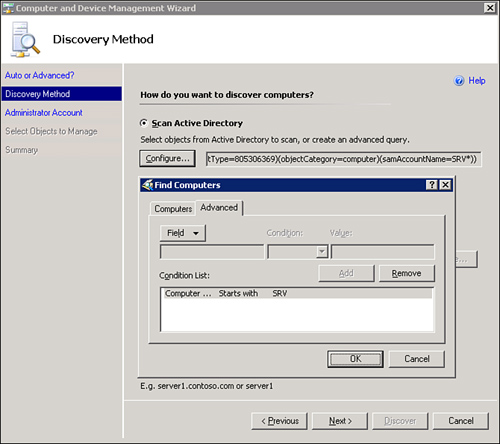
The Discovery Method page provides two options. The first option is Scan Active Directory to discover computers, the other is Browse for, or type-in computer names. The scan option searches Active Directory based on the criteria you specify. Click Configure to choose this option, which opens a Find Computers window you can use to create a custom LDAP query. Examples of this would include searching for all computers (by adding “*” to the Computer name field) or selecting all computers starting with SRV, as shown in Figure 9.11.
The Browse for or type-in computer names option includes an additional option: Browse Active Directory for computer information. Selecting the Browse... option opens a window where you can select computers by searching for computer names (or descriptions) as well as restrict your search to a specific Organizational Unit. Figure 9.12 shows a browse of Active Directory in the Computers OU for names starting with the letter T. The selected systems are then transferred to the Browse for or type-in computer names text box. Here are some points to keep in mind:
The type-in option is used to receive the results from clicking the Browse button, or it can provide a location to cut and paste server names into the discovery.
The cut-and-paste approach is useful when you have documented ahead of time what systems will be part of your proof of concept (POC) or pilot groups because you can cut and paste them into this field for agent deployment. This is also useful when migrating from MOM 2005 to OpsMgr 2007 because the Migration Wizard creates a managed computer export file, which you can actually paste into this screen. You can enter computer names here separated by either a semicolon, comma, or newline. This field works with either NetBIOS or Fully Qualified Domain Names.
Enter the systems you want to configure through either the scan, browse, or type-in method and click Next to continue.
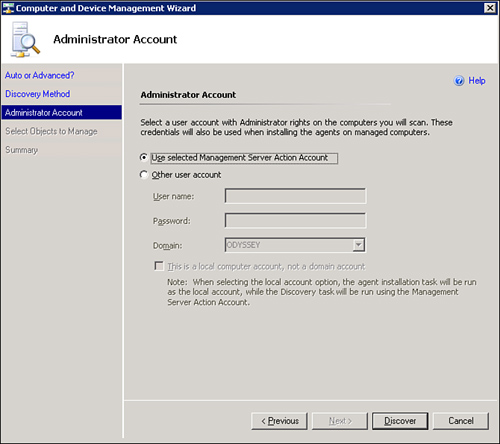
The Administrator Account screen provides the option to choose the default account or specify another user account when installing the OpsMgr agent. The default is Use Selected Management Server Action Account (also referred to as the MSAA), as shown in Figure 9.13, which is the recommended option as long as the account has at least local administrative rights to the systems you will deploy to (Domain Admin user accounts are members of the Local Administrators group by default). Refer to Chapter 11, “Securing Operations Manager 2007,” for best-practice approaches on this account. If your MSAA does not have this permission level, specify an account using the Other user account option, as shown in Figure 9.13. Click Discover to continue.
Note: Discovery Wizard Stuck on “Discovery Is in Progress”
In some circumstances, the Discovery Wizard can get stuck and not go past the stage where it displays “Discovery is in progress” (shown in Figure 9.14). Although the wizard may take several minutes to run, it should not run for several hours. One likely cause for this is that the SQL Service Broker is disabled. To determine if this is causing the situation in your environment, open the SQL Server Management Studio and execute the following query against the master database. The query assumes the default name for the Operations Manager database. If you are not using the default name, change the query appropriately.
<LINELENGTH>90</LINELENGTH>SELECT is_broker_enabled FROM sys.databases WHERE name = 'OperationsManager'
If this query returns 0, the Broker Service is disabled. To enable the service, stop the SDK, Config, and Health services on the RMS as well as the Heath service on any secondary management server. Then execute the following statement from the query window in SQL Server Management Studio:
<LINELENGTH>90</LINELENGTH>ALTER DATABASE OperationsManager SET ENABLE_BROKER
Now restart the services on the RMS and the Health service on your secondary management servers. To test this, reopen the Operations console and retry the Discovery Wizard.
Microsoft documents this situation at http://support.microsoft.com/kb/941409.
With Service Pack 1, Microsoft added some instrumentation around SQL Service Broker errors by adding checks to determine if the Broker was running or not. In test environments, often there are issues where the database is too busy and SQL Server is unable to process the query to determine if the Broker is running.
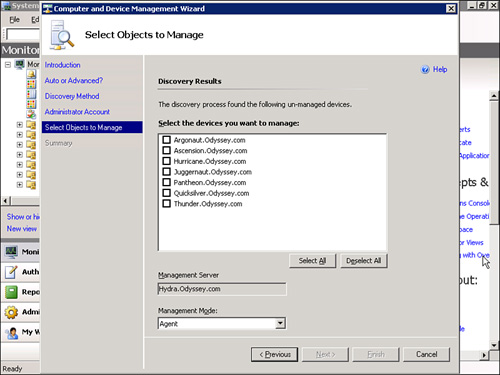
The next screen (shown in Figure 9.15) provides the list of systems available for agent installation (any systems that already have the OpsMgr agent are not displayed). Select the appropriate server (or servers), validate that the Management Mode is Agent, and click Next to continue.
You can also use this screen to install agentless systems; but for this section of the chapter, we are focusing on agent-based installations.
Take the defaults on the summary screen for the agent installation directory (%ProgramFiles%System Center Operations Manager 2007) and for the Agent Action account to use the credentials of the Local System account. See Chapter 11 for additional information on the Agent Action account.
Click Finish to start installing the OpsMgr agents.
The status of each agent deployment displays on the Agent Management Task Status screen. The status starts at Queued, then Started, and moves to either Success or Failure. If the agent deployment failed, click the targeted computer. The task output box will show the details on why it failed. Click Close when this deployment is completed (deployments will continue even if the Agent Management Task Status screen is closed).
Tip: Trust Requirements to Deploy Agents
Agent authentication in OpsMgr requires either Kerberos or certificate-based authorization to provide mutual authentication. Use certificate-based authorization for gateway configurations where agents are in untrusted domains or workgroups. Within a forest, transitive two-way trusts are automatically created that support Kerberos. There are four other types of trusts in Windows: External, Realm, Forest, and Shortcut. Shortcut trusts improve logon time and should not apply in this scenario. Realm trusts pertain to non-Windows environments, so they should not apply when deploying agents.
Forest trusts do support Kerberos, but Realm trusts do not. So agents in domains connected to the management server’s domain via an External trust will not deploy successfully unless they are deployed using a gateway server configuration.


In general, manual agent installation should be the method of last resort for deploying OpsMgr agents. This deployment requires you to log in to the system that you will be installing, make configuration changes to OpsMgr, and approve the agent installation. Typically, you will use manual agent installations when specific servers are not installing the agent using the more automated methods. Take the following steps to perform a manual installation:
Change the default settings to Allow Manual installations within the Operations console, under Administration -> Settings -> Security -> Review new manual agent installations in the Pending Management view.
Log on to the server where the agent will not install and install the agent on the system. The recommend way to install the agent is by running the SetupOM.exe program on the root of the installation media and choosing the Install Operations Manager 2007 Agent option. This runs the MOMAgent.msi file for the appropriate platform and turns on logging during the installation.
Check the Operations console under Administration -> Device Management -> Pending Management. The manually installed system should be listed in this folder. Approve the manual installation(s).
Tip: Another Way to Manually Install
If you have issues installing with the SetupOM.exe program, you can also run MOMAgent.msi directly. To do this, map to the agents folder on the CD and run MOMAgent.msi for the platform you are using. This approach may fail due to a Microsoft Core XML Service issue. You can resolve this by downloading MSXML 6.0 from http://go.microsoft.com/fwlink/?LinkId=76343.
PowerShell also provides a method to deploy agents for Operations Manager 2007. Installations through PowerShell are considered manual installations and need to be approved (or your OpsMgr environment must be configured to auto-approve new manually installed agents through the Operations console -> Administration -> Settings -> Security). The following is a sample script (provided by the “PowerShell guy” and is available at http://blogs.msdn.com/scshell/archive/2007/02/09/discovering-windows-computers.aspx).
# ScriptName: InstallAgents.ps1
# Get the Root Management Server.
$managementServer = Get-ManagementServer -Root: $true
# Create the discovery configuration for computer2 and computer3. $discoConfig = New-WindowsDiscoveryConfiguration -ComputerName: Computer1, Computer2
# Discover the computers.
$discoResult = Start-Discovery -ManagementServer: $managementServer -WindowsDiscoveryConfiguration: $discoConfig
# Install an agent on each computer.
Install-Agent -ManagementServer: $managementServer-AgentManagedComputer: $discoResult.CustomMonitoringObjects
Save this script as InstallAgents.ps1. For the following example, we stored it in the D:Scripts folder. To run the script, select Start -> Run and type the following:
%windir%system32windowsPowerShellv1.0PowerShell.exe -noexit D:ScriptsInstallAgents.ps1Note that the command assumes you saved the script to the D:scripts folder. The -noexit parameter stops the window from closing, which makes it possible to debug the script.
You can also run this script by opening the Command Shell (Start -> All Programs -> System Center Operations Manager 2007 -> Command Shell). To run the script from the Command Shell, change to the folder where the script is (d:, cd , cd scripts) and then run the script by typing .InstallAgents.ps1.
As discussed in the “Agentless Managed State” section of this chapter, OpsMgr 2007 provides support to monitor systems without deploying an agent. Significant limitations exist for the agentless managed state. There is no support for either the Exchange or Active Directory management packs when running in an agentless configuration. Also, strain is increased on the proxy agent, which performs the monitoring of the agentless managed system. Our recommendation is to use agentless monitoring only when an agent-managed configuration is not possible.
You can deploy agentless systems using the Discovery Wizard, similar to the way you deploy agent-managed systems. The wizard screens discussed in the “Using the Discovery Wizard” section of this chapter work in a similar fashion as when deploying an agent-managed system. The differences occur after the Discovery Wizard has run when choosing the devices to manage and the management mode they will use. The default on the screen is agent-managed mode, but the agentless mode is also available in the Management Mode dropdown box, as shown in Figure 9.16.
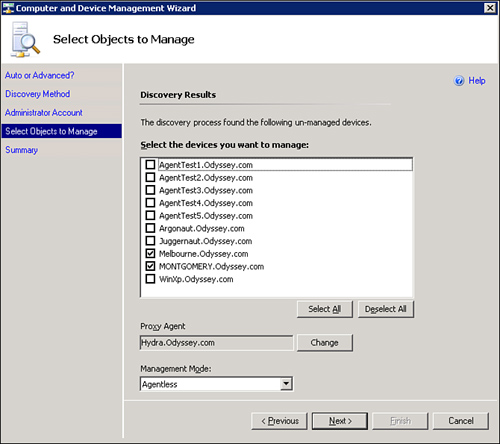
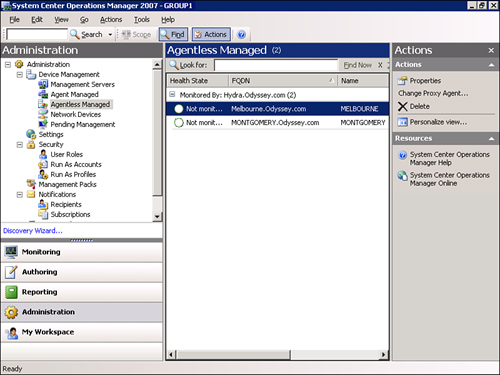
When you select the agentless management mode, the screen also changes the Management Server field to Proxy Agent. This changes the available servers from the management servers in the environment to agent-deployed systems, allowing non-management servers to provide the agent proxy functionality to monitor your agentless systems. We will explain agent proxying in more detail in the next section of this chapter. Agentless managed systems display in the Administration -> Device Management -> Agentless Managed section of the Operations console, as shown in Figure 9.17.
You can remove agentless systems in the Administration -> Device Management -> Agentless Managed section of the Operations console by right-clicking the computer name, selecting Delete, and choosing Yes to stop agentless monitoring of the system.
Operations Manager 2007 supports agent proxying. When you manage an agentless managed computer, it must be assigned to a management server or agent-managed computer to provide remote (proxy) agent functionality. As we previously discussed in the “Agentless Managed State” section of this chapter, computers are managed as agentless when you either cannot or do not want to install an agent on them.
Not all management packs work in agentless mode, and agentless management itself will not work if the agentless computer and its proxy are communicating through a firewall. Proxying is the capability for an agent to relay or forward information from other computers or network devices to the management server. Disabling agent proxying prevents spoofing by an attacker pretending to an agent, because the management server matches information sent from the agent to a known agent name before accepting the data. Agent proxying is disabled by default.
The proxy agent can be any agent-managed computer in the management group configured to be a proxy, including a management server.
Perform the following steps to configure agent proxying on an agent-managed computer:
In the Operations console, navigate to Administration -> Device Management -> Agent Managed.
Right-click the agent-managed computer you want to act as a proxy agent and select Properties. Click the Security tab, check the box labeled Allow this agent to act as a proxy and discover managed objects on other computers, and then click OK.
If you want to configure a management server as a proxy for agentless managed computers, perform the following steps:
Navigate to Administration -> Device Management -> Management Servers.
Right-click the management server you want to act as a proxy and select Properties. Click the Security tab, check the box labeled Allow this server to act as a proxy and discover managed objects on other computers, and then click OK.
You will need to perform this procedure for each agent or management server for which you want to allow agent proxying. Enabling agent proxying allows the system to provide information for objects that do not have an agent installed on them. One of the most common examples for proxy agent configurations is monitoring network devices.
A number of management packs use agent proxying. For example, the Active Directory management pack requires that you configure all agents on a domain controller to allow proxying. For the Active Directory management pack, this setting allows the domain controller to discover its connection object between other domain controllers from information hosted by the forest, not the domain controller itself. Other examples of management packs using agent proxying include the Exchange management pack and the SharePoint management pack.
To change an agentless system to an agent-managed system, the process is to first delete the agentless managed system and then deploy the agent to the system. To delete an agentless managed system, follow these steps:
Navigate to Device Management -> Agentless Managed.
Right-click the agentless managed system and then choose Delete.
After deleting the agentless managed system, you can deploy an agent to the system using one of the standard methods of deploying agents discussed in the “Discovering and Deploying Agents” sections of this chapter.
Caution: Situations Where You Cannot Delete Agentless Managed Systems
We ran into a situation where we could not delete an agentless managed system from Operations Manager 2007. The deletion failed and generated an error in the Operations Manager Event log stating that the Data Access Layer rejected the retry on a SQLError. This event occurred with each attempt to delete the record.
The error was caused because a domain controller was configured agentless managed (it could not have an agent installed because it was running Windows 2003 without Service Pack 1), and then an agent was manually installed on the machine. To resolve this issue, we updated the row in the BaseManagedEntity table in the OperationsManager database for the agentless system that would not delete, giving IsDeleted a value of 1. Then we deleted rows from the DiscoverySourcetoTypedManagedEntity table for the system that would not delete, and approved the manual installation.
The system reappears as agentless in the Operations console, but now you can delete it and redeploy the agent. Additional information on this is available at our blog (see the article “Unable to delete Agentless Systems”) in the June 2007 archive at http://ops-mgr.spaces.live.com/blog/cns!3D3B8489FCAA9B51!163.entry.
Operations Manager 2007 supports configurations where an agent will report either to multiple OpsMgr environments or to an OpsMgr environment as well as a MOM 2005 environment.
In Chapter 7, “Migrating to Operations Manager 2007,” we discuss different methods available to migrate from MOM 2005 to Operations Manager 2007. This is actually very easy to accomplish due to how the OpsMgr agent differs from the MOM 2005 agent. The MOM 2005 agent service is called “MOM,” whereas the Operations Manager 2007 service is the “OpsMgr Health service.” The two agents run different programs under different service names, which separates them from each other when they are on the same machine.
However, the agents perform similar tasks. Each agent collects information such as performance counters and events and runs scripts. There is potential for crosstalk between the two agents, where actions performed by the MOM 2005 agent create an event interpreted by OpsMgr 2007, and vice versa.
In some situations, the two agents may collide, but the only restriction identified at this time concerns monitoring domain controllers in a 64-bit environment. Both the MOM 2005 Active Directory management pack and the OpsMgr Active Directory management pack depend on the Active Directory Helper object, but MOM 2005 requires the 32-bit version and OpsMgr 2007 requires the 64-bit version! The Active Directory management pack guide discusses this in more detail (available for download from the OpsMgr documentation link available at http://technet.microsoft.com/en-us/opsmgr/bb498235.aspx).
Although there are some potential challenges with coexisting MOM 2005 and OpsMgr 2007 agents, with the new OpsMgr agent these should be minimal.
Agents in Operations Manager 2007 can report to multiple management groups. These types of agents are multihomed agents. Multihomed agents typically are used for the following:
Providing horizontal support silos
Transitioning from MOM 2005 to OpsMgr
Supporting test or preproduction environments
For more information on planning a multihomed environment, see Chapter 5, “Planning Complex Configurations.”
In MOM 2005, there was a limit restricting a multihomed agent to a maximum of four management groups. This restriction does not exist in OpsMgr 2007 because the agent software was almost completely rewritten.
We would, however, suggest limiting the management groups to four or less, and definitely less than 30. Also, be aware that there is an increase in the memory requirements of the agent when an OpsMgr 2007 agent reports to multiple management servers.
You can deploy multihomed agents using the Discovery Wizard for each management group, or you can do so manually by running the OpsMgr Agent Setup Wizard on the managed computer.
A number of tasks are associated with managing either the agents or the systems that you will monitor in your environment. The next sections describe Windows NT Event log considerations, disk performance configurations, pending actions, changing agent configurations, and removing or renaming agents.
Event logs of a monitored system are one of Operations Manager’s major data sources. If the Event log on a managed computer fills completely, event logging either stops or events are overwritten, depending on the configuration of the Windows NT Event log. A full Security log can even stop the computer from functioning! If the Event log is not able to gather information, OpsMgr cannot provide information effectively about the status of the monitored system.
Caution: Security Alert
If the Windows NT Security log on a managed computer fills up, the managed computer can lock up. For details on this issue, refer to knowledge base article 232564 on the Microsoft Help and Support website. This article can be located at http://support.microsoft.com/kb/232564.
The recommended log file configuration for managed systems is to increase the size to a minimum of 25 megabytes (MB) and to configure the logs to overwrite events as needed for all Event logs. The logs include the Windows NT Event logs (application, security, and system) and other Event logs (such as the Directory Service, File Replication, DNS, and Operations Manager logs).
You will want to configure your Event logs such that you can capture all the events sent to the management server. Keep the following points in mind:
Configure your Event logs to overwrite events as needed. This ensures that even if the Event log fills, it will continue to log new events by overwriting older ones, and prevent the logs on managed systems from filling up and stop logging event information.
Caution: Setting a Security log to overwrite events as needed may result in loss of security event information. Refer to your company’s security policy regarding event logging before changing this configuration.
Increase the size of the log files on monitored computers to enable OpsMgr to gather Event log information successfully. If additional disk space is available, we recommend you further increase the size of the logs, especially if the system generates large amounts of data in a particular log. (This typically occurs on domain controllers or for applications that log large amounts of data.)
You can modify the log file settings for a system by clicking Start, pointing to Programs (or All Programs, depending on the version of Windows you are running), clicking Administrative Tools, and then clicking Event Viewer (or you can click Start -> Run, type eventvwr.msc in the Open box, and click OK). Right-click the first Event log you want to modify and then select Properties. On the General tab, modify the Maximum Log Size and Overwrite Events As Needed options. Each log must be set individually using this method.
A couple other techniques are available for changing the settings for the Event logs:
Using the ConfigureEventLogs utility
Using a Group Policy Object (GPO)
The ConfigureEventLogs utility from the MOM 2000 Resource Kit enables you to automate the process of setting the Event log configurations based on an input file listing the server names. Microsoft does not support this tool, which is available only as part of the MOM 2000 Resource Kit, and is no longer available on the Microsoft website.
Tip: On the CD
As a convenience, we include the package to install the ConfigureEventLogs utility (configurelogs.exe) on the CD accompanying this book.
If you have integrated the majority of your systems with Active Directory, a more effective approach to changing these configurations might be by creating a GPO that maintains these settings. The recommended approach is to move all servers (do not move the domain controllers) into an Organizational Unit (OU) and apply the GPO to that OU. See Figure 9.18 for an example.

Using a Group Policy Object can save you work by automating the configuration of the application, security, and system log settings for all servers in that OU. You can apply a similar GPO to the Domain Controllers OU to change domain controller settings. Note that these GPO examples configure only the application, security, and system logs settings. You must manually modify any additional logs.
To gather disk performance information, ensure that each system with an installed OpsMgr agent has its disk performance counters activated. Activate the performance counters as necessary by using the command diskperf -YV; this takes effect after a reboot. In Windows 2000, the physical disk counters are on by default, but the logical disk counters are off by default. For Windows Server 2003, both the physical and logical counters are permanently enabled.
By default, the global setting for Operations Manager 2007 does not accept manual agent installations. You can change this configuration by performing the following steps:
In the Operations console, navigate to Administration -> Settings.
Select the Server pane, right-click Security, and select Properties.
On the General tab, the default configuration is Reject new manual agent installations. You can change this to Review new agent installations in pending management view.
You can also configure this on a per–management server basis. Perform the following steps:
In the Operations console, navigate to Administration -> Device Management -> Management Servers.
Right-click the management server name and select Properties.
Select the Security tab, which allows you to configure the management server to override global management server settings and allow the installation of manually installed agents.
With both of these configurations, a check box is available when you select the Review new manual agent installations in pending management view setting. This check box is labeled Auto-approve new manually installed agents. If this is not checked, manually installed agents are placed into a pending actions folder for approval.
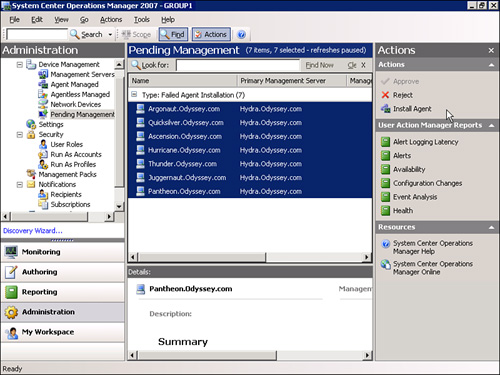
You can navigate to the Pending Management folder at Administration -> Device Management -> Pending Management. Agents that fail installation are also added to this folder, where you can re-run the agent installation process. Figure 9.19 shows an example where agents have failed installation.
Configure agent settings in the Operations console, under Administration -> Device Management -> Agent Managed. Right-click an agent and choose Properties. The Heartbeat tab provides a method to override the global settings for the agent’s heartbeat frequency (which is 60 seconds by default).
Tip: Heartbeat Frequency
There have been discussions in the OpsMgr newsgroups about problems when the agent heartbeat frequency is set to less than the default of 60 seconds. If your environment’s requirements need this to be less than 60 seconds, test it thoroughly in your environment prior to deploying the setting.
The Security tab has a check box labeled Allow this agent to act as a proxy and discover managed objects on other computers. This is an important setting if your environment will use either the Exchange management pack or the Active Directory management pack. You will need to enable this option for all domain controllers in your environment if you are using the Active Directory management pack. You will also need to check the Agent Proxy option for all Exchange servers in your environment if you are using the Exchange management pack.
You define agent failover using the Agent Assignment and Failover Wizard (Administration -> Device Management -> Management Servers). Select a management server and right-click Properties. At the Auto Agent Assignment tab, click Add to specify agent assignment settings. The Agent Assignment and Failover Wizard provides a way to define inclusion and exclusion criteria for the management servers in the management group. Figure 9.20 shows an example of how to configure failover as either automatic or manual.

An Operations Manager agent uses a queue file to store data that needs to be sent to the management server. These queue files prevent the loss of data when a management server is not available (such as when it is rebooted to apply patches and other maintenance). If multiple management servers are configured for failover, the agent fails over to another management server.
The agent queue file is used as part of the normal communication between an agent and a management server, but it only becomes important from a sizing perspective if the agent is unable to communicate with any available management servers.
These queue files default to 15MB in size (15360KB). For most systems, this queue file size should be sufficient to hold the OpsMgr data for several hours. There may be times, however, when the size of this queue may be insufficient, such as for servers that send a large amount of data to the management server (very intensive applications such as Active Directory or Exchange), or if there will be longer periods of time when the management server will be unavailable. The size of this queue is changed on a per-agent basis from the Registry within HKLMSYSTEMCurrentControlSetServicesHealthServiceParametersManagement Groups<Management Group Name>MaximumQueueSizeKb.
The recommended method to remove agents involves using the Operations console. Perform the following steps:
Open the Operations console and navigate to Administration -> Device Management -> Agent Managed.
Right-click an agent and choose the Uninstall option. (Uninstall removes the agent from the system, versus the Delete option, which only deletes the agent from OpsMgr and does not actually remove the agent from the system.)
Selecting Uninstall launches the Uninstall Agents wizard, which prompts for credentials (the default is to use the MSAA) to uninstall the agent with.
Specify an account that has the permissions required (at least local administrator) to remove the agent and then click Uninstall.
You can also manually uninstall the agent on the system and then delete the agent from the Operations console.
Systems monitored by Operations Manager that have their name changed will need to have their agent removed and reinstalled. If the renamed system does not have its agent uninstalled and reinstalled, the original system name will still appear in the console, but it no longer reports information back correctly to OpsMgr.
An area that often causes confusion is what the relationship is between agentless monitoring and Agentless Exception Monitoring (AEM). In short, there really isn’t a relationship between them! The issue here is that they both are called “agentless” but do different things, which can make the terminology confusing. For simplicity, remember that agentless managed systems are systems monitored by a proxy agent that performs the actual monitoring rather than deploying an agent to the system you are monitoring.
Agentless Exception Monitoring (AEM) captures aggregates and reports on application crashes (Dr. Watson errors) within the enterprise. Details on AEM are available in Chapter 16.
The majority of agents will deploy from the OpsMgr 2007 console without issues. The following are some of the common failures that may occur when deploying OpsMgr agents from the Operations console and their recommended resolutions:
System is offline or cannot be contacted via RPC or Computer Browser Service is not running: “The MOM Server failed to open service control manager on computer 123.odyssey.com. Therefore, the MOM Server cannot complete configuration of the agent on the computer. Operation: Agent Install. Install account: Odysseymsaa Error Code: 800706BA Error Description: The RPC server is unavailable.”
Solution: Bring the server online or make it able to be reached via RPC. This can occur if the Computer Browser Service is turned off or a firewall is enabled on the system where the agent is being installed.
Agent does not have the required service pack level: “The Agent Management Operation Agent Install failed for remote computer 456.Odyssey. com. Install account: Odysseymsaa Error Code: 80070643 Error Description: Fatal error during installation. Microsoft Installer Error Description: For more information see Windows Installer Log file ‘C:Program FilesSystem Center Operations Manager 2007AgentManagementAgentLogs(ServerName)MOMAgentMgmt.log’ on the Management Server.” When reviewing the application log, an Event ID of 10005 is created for the source of MsiInstaller. This indicates that the system does not match the required service pack version.
Solution: Agent requires Windows 2000 SP 4 (or higher) or Windows 2003 SP 1 (or higher). Patch the server to SP 4 if it is on Windows 2000 or SP 1 if it is on Windows 2003. A temporary solution would be to monitor the system agentless until you can apply the required service pack.
Windows Installer 3.1 is required: “The MOM Server detected that remote computer 789.Odyssey.com has older version of Windows Installer installed. Please update to Windows Installer 3.1 version. Please refer to release notes for more details. Operation: Agent Install account: Odysseymsaa Error code: 8007064D Error Description: The installation package cannot be installed by the Windows Installer service. You must install a Windows service pack that contains a newer version of the Windows Installer service.”
Solution: Apply critical updates to the system. A temporary solution would be to monitor the system agentless until you can apply the required service pack.
Needs permissions to install: “The MOM Server failed to open service control manager on computer 789.Odyssey.com. Therefore, the MOM Server cannot complete the configuration of agent on the computer. Operation: Agent Install account: Odysseymsaa Error Code: 80070005 Error Description: Access is denied.”
Solution: Install with an account that is at least a local administrator on the system targeted for deploying the agent.
Free disk space: “The MOM Server failed to perform specified action on computer 908.Odyssey.com. Operation: Agent Install account: Odysseymsaa Error Code: 80070070 Error Description: There is not enough space on the disk.” This failed on installation when there was less than 2048KB of free disk space. If the installation runs with more than 2048KB of free space but less than 21,998KB of free space, it will log an event on the system (application log, MsiInstaller, 11601) where you are deploying the agent, saying that at least 21,998KB of free space is required. The files for OpsMgr require at least 154MB of disk space.
Solution: Free up more disk space on the System drive for the system to which you are deploying the agent; at least 200MB should be the minimum starting point.
Requires Windows Update/Automatic Update: “The MOM Server failed to perform specified action on computer 908.Odyssey.com. Operation: Agent Install account: Odysseymsaa Error Code: 80070643.” This problem is the result of a bug within the installation code where the MSI custom action tries to register the agent for receiving updates via Microsoft Update. If the Windows Update/Automatic Update service is disabled, the agent installation will fail.
Solution: We discuss this issue in Table 9.7 with KB article number 938993.
Table 9.7. Potential Processing Errors and Their Resolutions
Process Erroring
Error Message
Potential Cause
KB Article #
Computer and Device Management Wizard
Logged in the %ProgramFiles%/System Center Operations Manager 2007AgentManagementAgent_NameAgentInstall.log file: CanRegisterMU: get_Services() failed. Error Code: 0x80070422.
You cannot deploy an agent using this wizard if the Automatic Updates service is disabled on the computer where you try to deploy the agent.
938993.
There is also a hotfix (937456) for this issue.
Fixed in SP 1.
Computer and Device Management Wizard
Discovery process does not find computers that are in your domain.
Computers are not found or appear in the queue as incomplete. The following error may also be logged to the SQL Server error log: Msg 15404, Level 16, State 19 – Could not obtain information about Windows NT group/user ‘NTGROUPAccountName’, error code 0x5. The statement has been terminated.
938994.
Computer and Device Management Wizard
Discovery Wizard may stop responding during the discovery process. You may see Event ID 11553 in the Operations Manager event log.
The SQL Server Service Broker is disabled.
941409.
Agent Data is not Processed
An agent running a prerelease version of SP 1 reports to management servers running the release version of System Center Operations Manager 2007. The management servers do not process the agent event data. The data is rejected as malformed data.
Service Pack 1 includes some changes to the event data types. The release version of Operations Manager 2007 considers the event data to be malformed. A hotfix is currently available: see http://support.microsoft.com/kb/941557 for further instructions.
941557.
Fixed in SP 1.
Agent Removal
Some OpsMgr 2007 files and folders remain after removing the agent from a client computer.
OpsMgr 2007 does not remove helper files installed using an ASP.NET Web application template or an ASP.NET Web Service Management Pack template.
938996.
Agent Restart
The agent is unable to restart the Health Service after its monitored thresholds are breached. Event ID 6024, 6025, or 6026 appears as a warning in the event log.
The agent monitors its processes to ensure they do not consume too many system resources. If a process does consume too many resources, the agent tries to restart itself. The problem occurs if the Health Service or Monitoring Host processes are monitored on the agent with these performance counters monitored: ProcessPrivate Bytes or ProcessHandle Count.
A hotfix is available. See 939799.
Fixed in SP 1.
Multihomed agent
After an OpsMgr 2007 agent sends discovery data to a management group, no rules are deployed for monitoring in later management groups.
This problem occurs if an agent reports to multiple management groups.
A hotfix is available. See 936838.
Fixed in SP 1.
Maintenance Mode
Heartbeats are still generated after the computer is put into maintenance mode.
Functioning as designed. To put a system into maintenance mode without receiving any alerts, the computer, Health Service, and Health Service Watcher all need to be put into maintenance mode.
942866.
Unknown error 0x80072971 in the Agent Management Task Status dialog box when you try to install an agent.
Solution: See http://support.microsoft.com/kb/934760. The problem occurs if the LockFileTime.txt file is located in the following folder on the remote computer: %windir%422C3AB1-32E0-4411-BF66-A84FEEFCC8E2. This file prevents concurrent agent installations from multiple management servers, and it is normally deleted after an agent is installed. If an agent installation is not currently queued, delete LocktimeFile.txt.
Unable to deploy the agent remotely.
Solution: The C$ share does not exist, or was renamed. To resolve this either put the C$ share back or do not use the Discovery Wizard to push out the agent.
Error 25218. Failed to uninstall SDK MOF. Error Code: -2147217407.
Solution: WMI may be corrupted. WMI can be repaired using the WMI Diagnosis Utility available at http://go.microsoft.com/fwlink/?LinkId=62562.
Error message when you try to enable AD Integration for OpsMgr 2007: “The binary form of an ACE object is invalid.” The MomADAdmin tool may create the OperationsManager directory in the Active Directory Users and Computers console, but the nested container for the management group is not created as expected. This error occurs because of an issue in .NET Framework 2.0.
Solution: See http://support.microsoft.com/kb/938992 for information about this problem. To fix the problem, install hotfix 928569 for .NET Framework 2.0. See http://support.microsoft.com/kb/928569 for details regarding this hotfix.
For other installation errors, review the log files on the management server and the event logs on the system to which you are pushing the agent. If those do not provide a resolution, the next step is to try a manual agent installation, which we discussed in the “Manual Installation” section of this chapter.
Table 9.7 describes some additional errors that might occur when you work with agents in OpsMgr 2007. You can use the knowledge base article number to get additional information in the Microsoft knowledge database at http://support.microsoft.com.
This chapter discussed both agent-managed and agentless-managed configurations. We discussed how both configurations are deployed and provided some troubleshooting tips for common agent deployment failures. In the next chapter, we discuss complex configurations within Operations Manager 2007.