
Search and Organize Your 1Password Items
Over time, you’ll store hundreds—maybe thousands—of things in 1Password. But they’re useful to you there only if you can find them quickly and easily when you need them. So in this chapter, I review many of the ways in which you can search, organize, and view your 1Password items. I also tell you how to work with multiple vaults.
But, before I get into any of this, I want to share my Professional Opinion, which is that you should ignore most of the features discussed in this chapter. I’m going to emphasize this point by putting it in a nice bold heading:
Make Your Life Simpler
In the next several pages, I tell you about tags, favorites, searches, collections, and other tools that you could use to manage your 1Password data. But you don’t have to use any of them, and most people—even power users—will merely waste time and effort in the care and feeding of information that can take care of itself.
I have about 2,000 items in my copy of 1Password (including more than 1,000 logins), accumulated over 16 years. I don’t use tags or favorites—a simple search virtually always turns up exactly what I’m looking for. I choose not to make extra work for myself.
So, before you do any organizing at all, try using 1Password for a while by merely searching (see Perform a Search) for what you need. If you find that searching isn’t cutting it for you, then start using the other tools—slowly. Don’t overdo it just because you can.
Nevertheless, even if you take no action now, you should be aware of what 1Password can do—especially how it sorts and displays your data—so you’re never confused about where something may be.
Understand the Sidebar Sections
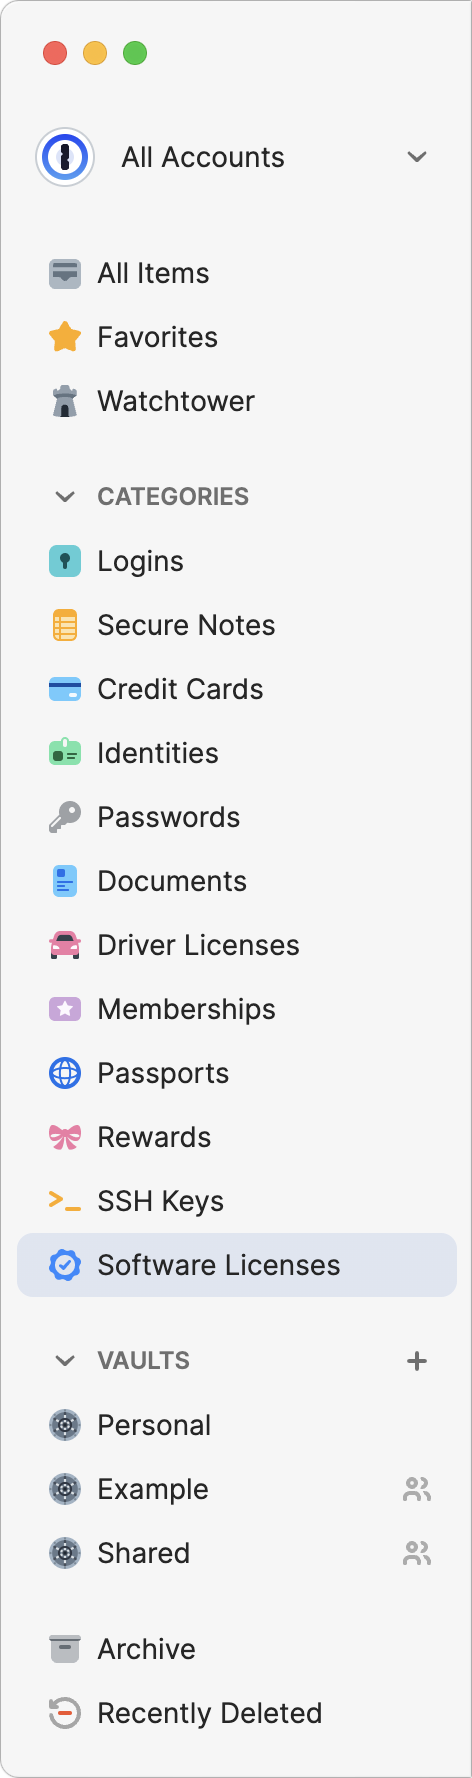
The sidebar (Figure 25) lets you filter the display of your stored items in the main list. Click a header (denoted by a tiny arrow to its left) to expand ![]() or collapse
or collapse ![]() it. Click a non-header item in the sidebar, and only the matching items appear in the list.
it. Click a non-header item in the sidebar, and only the matching items appear in the list.
In addition, you can filter your item list to show just a particular category by clicking the All Categories pop-up menu above the item list and then choosing a category. 1Password in Your Browser takes this concept even further: it has no sidebar at all, but the pop-up menu above the item list lets you display most of the sidebar sections I discuss here as well as filter by category.
Here’s what you’ll find in the sidebar:
All Accounts, an account name, or a collection: This pop-up menu at the top lets you filter the display to show items from all accounts you’re currently signed in to, only a particular account, or any collection (a group of one or more vaults; see Use Collections). It also offers commands to manage collections and accounts, among other things.
All Items: Click here to see all items, from all categories, except those in the Archive.
Suggestions: In 1Password in Your Browser (only), the Suggestions option shows items likely to be of use to you in your current location.
Favorites: You can manually mark your most important 1Password items (of any sort) with a star to designate them as favorites. See Use Favorites.
Watchtower: Click Watchtower to display a dashboard that helps you identify logins that may be insecure or in need of changing for one reason or another. I cover all these in detail later, in Perform a Password Security Audit.
Categories: For each type of item you’ve stored in 1Password (such as logins, secure notes, credit cards, and standalone passwords) you’ll see the corresponding category in the sidebar or the pop-up menu above the item list. 1Password shows several common categories by default, even if you don’t have any items yet, but less-used categories (such as Memberships and Outdoor Licenses) appear only after you add items in those categories.
You can’t add your own categories, rename or reorder categories, or change which category an item belongs to. That’s because each category corresponds to one of 1Password’s built-in templates; they’re not merely arbitrary labels. (That’s what tags are for, as I explain in a moment.)
Tags: Tags are words or phrases you create to describe items that share some characteristic (see Use Tags, ahead in this chapter). An item may have multiple tags (such as Work, Important, and Marketing), and tags can be nested inside one another.
Archive: This item was formerly called Trash. Just as in the macOS Finder’s Trash or the Windows Explorer Recycle Bin, the Archive holds items you think you’re done with until you’re sure you’ll never need them again. Read Use the Archive, later in this chapter, for details.
Use Favorites
If you have a few 1Password items that you use frequently and want to be able to find as quickly as possible, you can mark them as favorites. This feature identifies important items with a star and displays them in the Favorites category, which appears at the top of your sidebar and in a prominent spot in 1Password in Your Browser as well as 1Password for iOS/iPadOS and Android.
To mark an item as a favorite, select it in the main 1Password app or in 1Password in Your Browser. Click the “More options” ![]() pop-up menu and choose Add to Favorites; repeat the procedure but choose Remove from Favorites to remove it from your favorites list.
pop-up menu and choose Add to Favorites; repeat the procedure but choose Remove from Favorites to remove it from your favorites list.
There’s nothing more to say about favorites, but I’ll give you one piece of advice: use this feature sparingly. If you have more than a handful of favorites, they’ll get lost in the list, defeating the purpose. If you need to identify a larger number of frequently used items, tags are a better choice.
Use Tags
Tags let you identify items that share certain characteristics, but they don’t impose a rigid structure—a tag can contain one or more words; an item can have multiple tags at once; and tags may be nested (to create “families” of related tags) if you like.
To make a new tag, select an item and click Edit. Click “+ Add tag” at the bottom and type a word or phrase, followed by Tab, Return, or a comma. (To indicate nested tags, type a slash—for instance, Personal/Health means a Health tag will be created underneath a Personal tag.) Then click Save. Newly created tags appear under the Tags heading in the sidebar.
When you begin typing a tag’s name, 1Password displays any matching tags in a pop-up list; select a tag with the arrow keys or pointer to apply it to the item. Alternatively, you can apply a tag by dragging any item in your list to a tag in the sidebar.
You can also tag a newly created or updated item from the Save dialog—type the tag(s) in the tags field before clicking Save or Update.
To delete or rename a tag, right-click (or Control-click) the tag in the sidebar and choose either Delete Tag or Rename Tag from the contextual menu. Deleting a tag removes it from all items that used it. Tags can’t be reordered in the sidebar; they’re always in alphabetical order.
Adjust the Sort Order
To change the order in which items appear in the main list, click the unlabeled sort ![]() icon above the item list and choose your desired sort criterion and order from the pop-up menu.
icon above the item list and choose your desired sort criterion and order from the pop-up menu.
Perform a Search
Most of the time, you can find any item in 1Password by typing a few letters of the item you’re seeking in the search field. Matching results are displayed instantly. However, the details of searching vary depending on which 1Password component you’re using.
Set the Search Scope
Before you do a search, you should be aware that 1Password searches only the currently selected account, vault, or collection (a user-defined selection of one or more vaults). That is, it searches only in the items you can currently see if you scrolled through the entire list. 1Password reminds you of this by way of an inline label in the search field that indicates the search scope—for example, “Search in Personal” or “Search in Family Name” or “Search in All Accounts.”
If you want to either narrow down or broaden the scope, you must select different parameters as follows:
In the 1Password app: Make sure the sidebar is visible (refer back to The 1Password App for details). Then use the pop-up menu at the very top of the sidebar to choose All Accounts (if you’re signed in to more than one), a specific account, or a collection (see Use Collections).
In Quick Access: Click the icon on the right side of the search field and choose All Accounts, an account, or a collection from the pop-up menu.
In 1Password in Your Browser: Click the icon to the left of the search field and then select All Accounts, an account, or a single vault within a particular account. (With All Accounts selected, the search field says “Search 1Password.”)
Search in the 1Password App
To search in the app, either press ⌘/Ctrl-F or click in the search field, and then type what you’re looking for. The 1Password app searches everything within the current scope (see above)—item names and contents, as well as tags. (Unlike in some previous versions of 1Password, 1Password 8 offers no way to constrain a search to, say, just the “website” field or just titles; searches in the 1Password app always search everywhere.)
Up to eight suggested matches appear automatically in the pop-up menu as you type. If you don’t see what you’re looking for or there are more matches than what the menu can display, press ⌘/Ctrl-Enter to display all matching items in the item list.
On a Mac, if you want to search only within the current list—meaning the currently selected category, vault, tag, or other item in the sidebar—choose Edit > Find or press ⌘-Option-F and then type your search term. On any platform, you can also restrict a search to a particular list when you Filter a Search, as described ahead.
Search in Quick Access
To search in Quick Access, simply start typing—the insertion point is in the search field already when the window appears. A scrolling list of possible matches appears, and that list might be very long (unlike the eight-item limit in the 1Password app). On the other hand, searches in Quick Access match only item names, usernames, and websites; they don’t match the contents of secure notes, password fields, note fields, custom fields, categories, tags, and so on. To filter a search in Quick Access, see Filter a Search, ahead.
Search in 1Password in Your Browser
To search in 1Password in Your Browser, click the 1Password ![]() icon on your toolbar and type your search term in the big search field at the top. Like Quick Access, 1Password in Your Browser searches only item titles, usernames, and websites, not other content.
icon on your toolbar and type your search term in the big search field at the top. Like Quick Access, 1Password in Your Browser searches only item titles, usernames, and websites, not other content.
Filter a Search
If a search returns too many potential matches, you can filter it, which means restricting it to just a subset of your 1Password items.
The easiest way to filter a search is to first select a sidebar item (such as a category or tag) and then press the keyboard shortcut for searching (⌘/Ctrl-F); this adds the relevant filter to your search field automatically. Alternatively, you can type the filter text yourself. After the filter text, type a space and then whatever string you’re searching for.
Available filters are:
Category: Use
=category:followed by a category name—for example, use=category:Identitiesworkto search for items in the Identities category that contain the text stringwork.Favorite: Use
=favorite(without a trailing colon)—for example,=favorite apple.Tag: Use
=tag:followed by a tag—for example,=tag:Money bank. (To search only untagged items, use=untaggedwithout a trailing colon.)Vault: Use
=vault:followed by a vault name—for example, use=vault:Personalgoogto search for items in your Personal vault that contain the stringgoog.
After entering (or allowing 1Password to enter) the filter and whatever search term you want to use, press Enter or Return.
Use Previously Generated Passwords
Merely generating a password in 1Password doesn’t necessarily save it. (That can be a pretty big problem if you use your freshly created password on a website or elsewhere but then have no record of what it was!) If you generate the password using the 1Password in Your Browser extension, then yes, 1Password keeps a record of it even if you don’t explicitly save it. But if you use the 1Password app, it actually stores a generated password only when you click Save. Depending on the circumstances, then, you may be able to find a previously generated password after the fact…even if you didn’t name it properly, or if you’ve changed a password since initially saving it.
You can find previously generated passwords in these places:
1Password in Your Browser: In your browser, click the 1Password
 icon on the toolbar, click Settings
  > Password Generator, and then click Password Generator History at the bottom. You can scroll through (or search) the list of passwords generated by 1Password in Your Browser, which are listed by date (in reverse-chronological order) along with the website on which they were created.
Passwords category: This category, found both in the 1Password app and in 1Password in Your Browser, lists every standalone (non-login) password that you’ve saved in 1Password. Each password appears as a separate (and editable) item. If you’re unable to find a saved password by its name or website, you can try sorting by date, which is especially useful for finding recently created passwords. To do this, open the 1Password app, select Passwords in the sidebar, click the unlabeled sort
 icon above the item list, and choose Date Created (or Date Modified). Remember that you can also use this menu to show Newest First or Oldest First.
Password History: If you save a login item (or other item that includes a password, such as an email account), and later change its password in 1Password (see Update Old Passwords), you can view the passwords previously used for that login. To do this, select the item in the 1Password app, hover over the password, click the unlabeled
 pop-up menu on the right, and choose View Password History. (This capability does not currently exist in 1Password in Your Browser.)
1Password.com: If you sign in to your account at
1password.com,1password.ca, or1password.eu, you can locate and select an item for which a password was changed, and then click View Item History to display a list of previously saved states. Click View to see the contents of any previous version of the item, and click Restore to restore an older version.
Use the Archive
If you want to delete something from 1Password, you can (as I explain in a moment), but you probably shouldn’t! No matter how careful you are, you might accidentally delete something you later need, and when that item is a password you didn’t store anywhere else, that can be more than a little inconvenient. Therefore, rather than deleting items outright, I suggest moving them (at least temporarily) to 1Password’s Archive, where they’ll be out of the way—they won’t appear in item lists, autofill suggestions, or searches—but available for retrieval later if need be.
To archive an item, do any of the following:
1Password app: Right-click (or Control-click) the item and choose Archive from the contextual menu. Or drag the item to the Archive icon in the sidebar.
1Password in Your Browser: Select the item, click the “More options”
 pop-up menu, and choose Archive.
If you discover that you’ve archived something you want to retrieve, no problem: just select it in the Archive list, right-click or Control-click, and choose Restore Item.
And what if you really do want to delete an item rather than archive it? Or you want to permanently delete something in your Archive? Follow the steps above, but click Delete instead of Archive. After a warning, the item will disappear forever.
Work with Multiple Vaults
1Password accounts include support for multiple vaults. Although most users should find a single vault adequate for their needs, some people may want to compartmentalize their data. For example, you might want to have separate home and work vaults, a vault for each client you work with, or vaults that contain different sets of credentials to share with different people. Users of family or business accounts automatically get both a personal vault and at least one shared vault. You can also create collections of one or more vaults, potentially across accounts, for more granular access to what items are available at any given time. And, those who travel internationally may want to segregate certain information into a travel-safe vault; see Use Travel Mode.
Use Multiple Vaults
To create a new vault, use the 1Password app. (You can also create a new vault at your personal 1password.com, 1password.ca, or 1password.eu domain, but not in 1Password in Your Browser.) On a Mac, choose Accounts > Account Name > New Vault. On a Windows or Linux computer, first make sure only one account (and not All Accounts) is selected in the sidebar, then click the More ![]() icon and choose New Vault. Enter a name and an optional description, select a different icon if you like, and click Create.
icon and choose New Vault. Enter a name and an optional description, select a different icon if you like, and click Create.
To switch among vaults:
In the 1Password app: Select a vault in the sidebar. Unless a particular vault is selected, the app uses all vaults within the currently active account(s).
In 1Password in Your Browser: Click the 1Password
icon to the left of the search field and choose a vault (or All Vaults within a given account) from the pop-up menu.
To choose a default vault for saving new items in the 1Password app, go to 1Password > Settings > General. From the “Save new items in” pop-up menu, choose a specific vault or “Suggest a vault” if you want 1Password to preselect the vault it thinks is the most likely destination.
Use Collections
You can organize one or more vaults (even across multiple accounts) into sets called collections. If you want 1Password to work with just a single vault, or only specific vaults, on a given occasion, using collections ensures that you won’t accidentally grab items from a vault that’s inappropriate for your current usage. While writing this book, I had a collection called Example that included just one vault (full of fake data) from one account, and switching to that collection when taking screenshots or doing searches made it simple to avoid accidentally including any personal data in the book. You might also use collections to switch between work and family contexts, or between clients.
To create a collection:
Open the 1Password app.
Go to the pop-up menu at the top of the sidebar, and choose Manage Collections (or Create a Collection, if it’s your first one).
In the window that appears, click New Collection on the left.
Enter a name for the collection and select which vault(s) you want it to include. (If you want any newly created vaults within a given account to appear in this collection, also turn on “Add new vaults automatically” or Include New Vaults—the wording varies depending on your account type.)
Click Save.
You can then switch to a collection as follows:
In the 1Password app: Choose it from the pop-up menu at the top of the sidebar in the 1Password app.
In Quick Access: Click the 1Password
icon on the right side of the search field and choose a collection from the pop-up menu.
Use Travel Mode
Another reason to have multiple vaults involves Travel Mode. If you’re going to be crossing an international border and are concerned that customs officials could confiscate your devices and force you to unlock them—revealing sensitive passwords and other secret data—you can create a special vault that contains only “safe” information, which is to say data that wouldn’t be harmful to you if revealed to a government official.
Mark that vault, and only that vault, as safe for travel by signing in to your account at 1password.com, 1password.ca, or 1password.eu, clicking Vaults in the sidebar, selecting the vault, and turning on Safe for Travel. (You can mark multiple vaults as safe for travel, but my advice is to keep things simple and mark only one that way.)
Then, before you leave for your trip, return to your 1Password account online, click your name at the top of the sidebar, and choose My Profile. In the sidebar on the left, click the switch to turn on Travel Mode. 1Password then removes all other vaults, except any marked as safe for travel, from all your devices. That way, even if the device is examined with 1Password unlocked, all the other passwords and secret data will be missing—there’ll be nothing to see but what you previously designated as safe.
Once you reach your destination, you can log in, return to the same spot, and turn off Travel Mode to restore your other vaults to all your devices.