
Edit 1Password Items
If you’ve been reading in linear order, you’ve already encountered numerous situations where you may need to edit 1Password items, which requires nothing more than clicking the Edit button, making your changes, and clicking Save. However, in this chapter, I address a variety of changes that may not be obvious at first glance—including modifying labels, using custom fields, tweaking URLs for better results, and dealing with icons and thumbnails.
I also explain exactly what to do when you need to change a password and how to audit passwords that have accumulated over time to make sure they’re unique—and as strong as they should be. In Share Individual 1Password Items, I tell you about how to share credentials with other people. I close the chapter with brief pointers on how to Import and Export Data.
Edit Saved Items
1Password’s automatic login saving feature usually captures all the information it needs to log you in on future visits to the site. However, in certain situations it can get confused, and even if it doesn’t, you may want to modify its behavior. For example, you may want to change the URL so it points to the sign-in page rather than the sign-up page (if they’re different). And, if 1Password fails to fill in your credentials, identity, or credit card information correctly, some minor tweaks may be needed.
Modify URLs
The URL in a login item’s website field is the one for the page on which 1Password’s automatic login saving feature was used. If that’s the site’s regular sign-in page, you shouldn’t need to modify it. But if it points to a page used only for registration, then clicking the URL (or accessing it in any of the other ways discussed in Log In) could produce an error, since you’re already signed up!
The easiest way to handle this is to navigate manually to the page on the site where you normally sign in, copy its URL from your browser’s address bar, and paste it into the website field, overwriting the one that’s there.
You can also add more URLs to tell 1Password that there are other pages, domains, or subdomains on which you can log in with the same credentials (see Add Multiple URLs to a Login). If you have multiple login items for a given site—one for each page or subdomain where you log in with the same credentials—you can simplify things by entering all those URLs in a single login item.
Use Custom Fields
You can add extra fields to an item and call them anything you like. This should rarely be necessary, since 1Password provides the most commonly needed fields, plus a generic Notes field. However, it could come in handy if, for example, you want a single software license item to contain license keys for multiple versions of the software, or if you want a login item to include both an email address and a separate username.
When editing an item in 1Password, you’ll see a “+ add more” control like the one in Figure 26. Click it to display a pop-up menu with a variety of additional field types.

Choose a field type to add it to the item; repeat as desired. I want to call out just a few of the options for special mention:
Security Questions: To have 1Password keep track of your security questions and their answers (or even generate fake answers for you), use this option, which I covered earlier in Security Questions.
Text: This is an all-purpose field you can use for storing just about any random information; use it when whatever you want to add to the item doesn’t fall into one of the other, more specific categories (such as Email, Address, or Date).
One-Time Password: Use this option to have 1Password generate a numeric code, just for the current site, that changes every 30 seconds. I explained this process earlier in One-Time Passwords.
Password: If you want the contents of a field to be hidden with bullets, be sure to choose the Password field type.
Sign in with: As I mentioned back in Store “Sign In with…” Credentials, 1Password can store and enter credentials for third-party sites such as Google or Twitter when those credentials are used to log into other sites and services. If 1Password didn’t store this information automatically, you can add it manually here.
Attach a File, Link to a related item: Use these when storing files in 1Password; refer back to Documents and Attachments for details.
Once you’ve added a field, you may see something like Figure 27. The top shows a text field that I’ve typed some text into. The bottom shows a second text field that I gave a more descriptive label to; to do this, double-click the existing label and type over it.

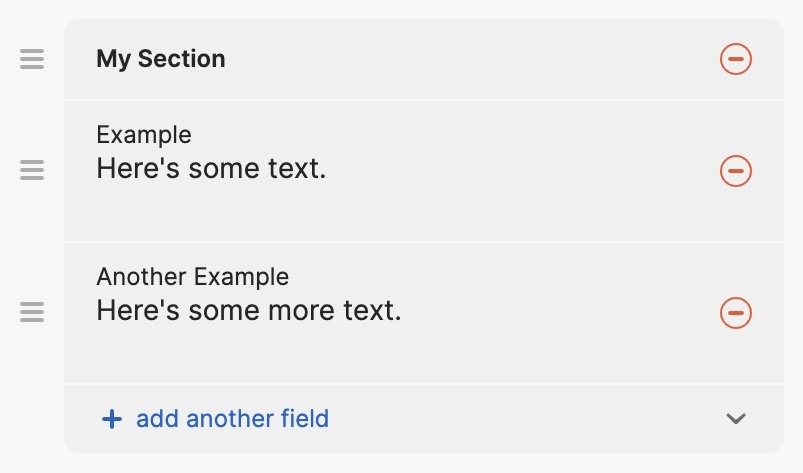
If you plan to add more than a few custom fields to an item, you might want to group them into sections, each of which has its own bold heading. To make a section, choose Section from the “+ add more” pop-up menu (Figure 28) and fill in a section heading.

Then use the “+ add a field” pop-up menu at the bottom of your new section to populate it; once you’ve added one or more items, that becomes “+ add another field” (Figure 29).
Although early versions of 1Password 8 lacked this feature, as of late January 2023, you can reorder custom fields and sections by dragging the handle ![]() control up or down. You can drag an existing field into a new section, reorder fields within a section, or reorder sections.
control up or down. You can drag an existing field into a new section, reorder fields within a section, or reorder sections.
It was possible in 1Password 7 to change a field type after the fact. For example, if you wanted to change a text field to be a password field (so that its contents would be obscured), you could do that with a pop-up menu. Similarly, if 1Password recorded both a username and an email address while saving a form but you later want to change which of those is filled into the Username field when signing in, you could do so. That feature disappeared in 1Password 8, so you’re stuck with whatever field type you initially created. There is some hope that in the future it may once again be possible to change a field’s type after you’ve created it.
You can remove a custom field by clicking its delete ![]() icon.
icon.
Change Web Form Details
When 1Password automatically saves your credentials, it records all the fields on that page’s form, along with their values—not just your username and password. You can later see what all those fields are, edit their names or contents, or correct any mistakes.
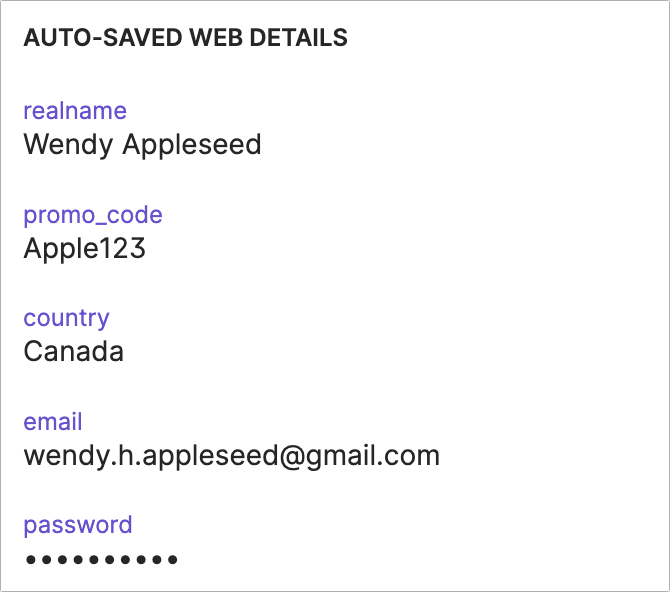
Form contents are saved in a section labeled Auto-Saved Web Details (Figure 30) or, in some cases, Saved on URL. You can edit the labels or contents of these items, or delete them if you prefer, in exactly the same way as custom fields (described just above).
Let me offer two quick notes about editing web form details:
The field names shown here are what the form uses behind the scenes, not necessarily the way the fields were labeled on the page. Although you can edit field names, you normally should not, because sometimes these values are used later when autofilling forms, and if the field names don’t match what the form uses, they may not fill in properly.
You can edit any field’s contents by clicking in the field and typing, but bear in mind that this changes only 1Password’s record, not what the site stores. If you change your username or password, for example, you won’t be able to log in automatically until you make the corresponding changes on the site, too.
Work with Icons and Thumbnails
In Software Licenses, I said that 1Password can store and display an icon for each app that you use. I also mentioned that you can add a custom photo to each of your identities in Fill Web Forms Using Identities. In fact, each item in 1Password can have a unique icon. However, it may not be obvious where these images come from or how to manipulate them.
By default, 1Password displays generic icons—for example, a generic application icon for all software licenses, a Visa logo for Visa credit cards, and a name badge icon for identities. If you want specific, unique icons, you can get them in either of two ways (which you can mix and match): enable rich icons or add custom icons.
Enable Rich Icons
When rich icons are enabled (as they are by default), 1Password consults an image server that holds icons and thumbnails for a large number of apps and websites, and downloads any that match items in your vault. (If the image server doesn’t happen to have a matching image, the item retains its generic icon.)
To enable or disable rich icons, go to Settings > Privacy and select or deselect “Show app and website icons.” When this feature is first enabled, 1Password downloads the icons, which may take a few minutes. Unchecking this box removes all existing rich icons (though not custom icons) from your 1Password items.
For logins, the image server delivers the site’s favicon—the tiny icon that appears next to the URL in your browser’s address bar. Often these are quite small, so when 1Password scales them up they may look fuzzy. As more websites update their favicons for Retina/HiDPI displays, they should get sharper.
For apps, the image server delivers the actual app icon, if available, although icons sometimes change from one version of an app to the next, so it may not always match the version you have installed.
If 1Password’s image server doesn’t have an icon for a login or app, if you dislike the icon it delivers, or if you want to add an image for another item type, you can override any 1Password icon with a custom icon of your own—an app icon, a photograph, or pretty much any other graphic. You can do this even if rich icons are disabled.
Add Custom Icons
To add a custom icon or change the existing icon:
Select the item in the 1Password app and click Edit.
Click the existing icon and choose “Choose new icon” from the pop-up menu.
Navigate to the app (or an image file) you want to use as the icon, select it, and click Open.
When you’re finished adding the icon, click Done followed by Save.
Update Old Passwords
When you decide to change a login’s password for any reason—such as realizing that your old password is too weak, or because of a site’s requirement to change your password every 90 days—you need to do so both on the site itself and within 1Password (possibly using 1Password’s password generator). This common process seems to trip people up frequently, so I want to walk you through it. Once you go through the steps a couple of times, you’ll get the hang of it.
Here’s the process:
On the site whose password you want to change, log in as usual and locate the “Change Password” page, which is usually part of your account settings or profile.
If the form asks for your existing password, navigate to your password for the site in 1Password and copy it—don’t use a keyboard shortcut to fill it in. Then paste the password into the website’s Current Password field.
Click the 1Password
 icon in the Password (or New Password) field and click Use Suggested Password. (If you’re unsatisfied with the suggested password, refer back to Generate Random Passwords for alternatives.)
The 1Password Save dialog appears. In most cases, it should look like Figure 31, with “Updating existing item in 1Password” at the top. If so, click Update.

Figure 31: In this example, 1Password has correctly identified the login item you want to update after generating a new password. However, if 1Password has not correctly identified the site as being one you’ve already stored credentials for, you’ll instead see the regular Save dialog (Figure 32). If this happens, don’t click Save! Instead, go to the “Save new item” pop-up menu at the top and select the login you want to update (shown under the name of the vault where it’s stored). Then the dialog changes to look like Figure 31 and you can click Update.
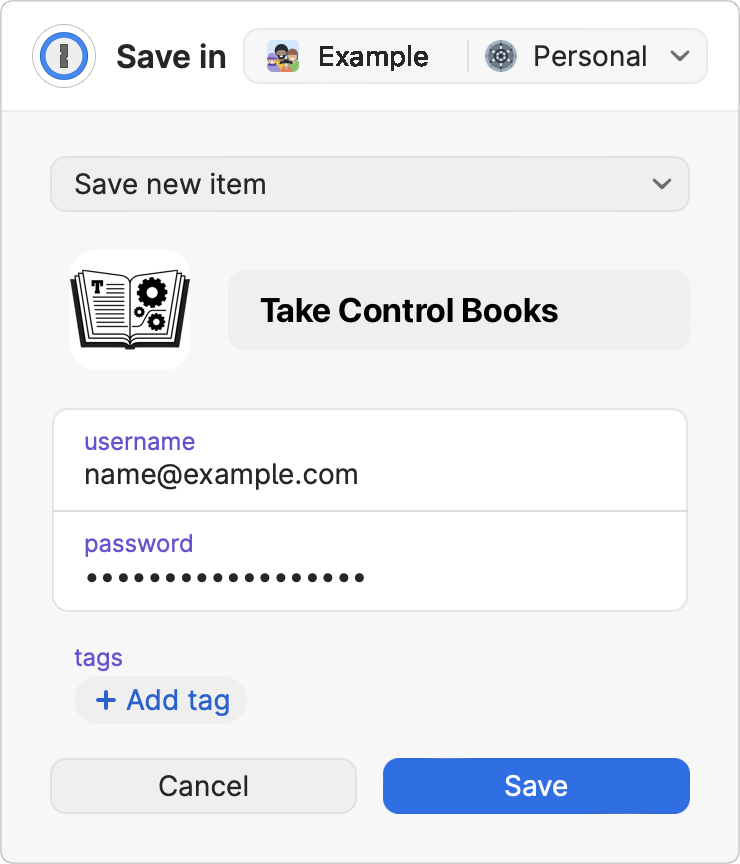
Figure 32: If you’re trying to update a login and you see this instead of the “Updating” version of the dialog, choose the login you want to update from the “Save new item” pop-up menu. Click the button to submit the form, so the site now knows your new password.
Your new password is recorded in 1Password, ready for you to autofill on your next visit. (The previous password is saved, too, in case you ever need it—see Use Previously Generated Passwords.)
Perform a Password Security Audit
The fact that 1Password can create super-strong passwords doesn’t mean all your passwords are automatically great. After all, you may have imported lots of existing weak passwords, and even if you use 1Password’s password generator, you may have opted for shorter or less-complex passwords than you should. You may also have reused passwords, failed to enable two-factor authentication, or have other less-than-ideal settings. In addition, security breaches, bugs, and other external factors having nothing to do with 1Password could result in one or more of your passwords being compromised.
So, once you’ve stored all your most important passwords in 1Password, it’s a good idea to perform a security audit—that is, make sure all your passwords are as strong as they need to be and not subject to any known vulnerability. You can do this as often as you like, but I recommend carefully following all these steps at least every six months. Fortunately, 1Password makes this process quite painless, thanks to a set of features called Watchtower.
One of 1Password’s Watchtower features is optional and may be disabled by default. I recommend enabling it, so start by going to Settings > Privacy and selecting “Check for vulnerable passwords.” (While you’re there, confirm that “Check for compromised websites” and “Check for two-factor authentication” are selected too, as they are by default.)
Now you can look for potentially problematic logins in each of up to seven categories. (A category appears only if at least one of your items is affected.) Click Watchtower in the sidebar of the 1Password app to display a graphical dashboard with each of the monitored criteria. Under any given criterion, click “Show items” to view the affected items. If you then select an individual item, a banner at the top explains the problem. Click Change Password on Website to go to the site and change your password, or Ignore to suppress the warning.
Compromised Websites
AgileBits tracks websites that have publicly revealed security breaches. If you have a login for one of these sites whose password hasn’t been changed (at least, as far as 1Password knows) since the date of the breach, 1Password lists the login in this section.
Although a security breach doesn’t necessarily mean your password was leaked, the prudent action is to change your password for any such site just to be on the safe side.
Vulnerable Passwords
When a list of passwords exposed in a security breach is made public, 1Password can check it against your passwords and see if there are any matches. Well, that’s not exactly correct. As described in this support article, if you enable this feature, 1Password uses the haveibeenpwned.com service to check just the first five characters of a 40-character encrypted hash of each of your passwords against the first five characters of the hashes for the exposed passwords. The items shown in the Vulnerable Passwords category are those for which that one-eighth of the encrypted hash matches.
In other words, mathematically, there’s a reasonable chance that a password shown in this category was not in fact part of a data leak, but this feature errs on the side of caution. Once again, the safest course of action is to change each of these passwords.
Reused Passwords
As I explained in Learn Password Security Basics, reusing the same password in multiple places puts you at unnecessary risk. In the Reused Passwords category, 1Password displays any items with passwords that are used by other items, with entries grouped by password. Change one or more of the passwords so that each one is unique.
Weak Passwords
1Password has an internal strength ranking scale, which runs from Terrible through Weak, Fair, Good, Very Good, and Excellent all the way up to Fantastic. (The app doesn’t indicate precisely how it calculates those scores.)
The Weak Passwords category shows everything that 1Password ranks as “Terrible” or “Weak.” Work your way through these and change them to be longer and/or to contain more character types.
Note that you may have a different idea of what constitutes an acceptably strong password than 1Password does. For example, my personal standard is that all passwords should be in at least the Excellent category, assuming the site or service allows that level of complexity. If you want to sort passwords by strength, click Weak Passwords at the top of the item list, and then choose Password Strength from the pop-up menu.
Unsecured Websites
These days, most websites—especially those that require you to enter a password—use TLS or SSL encryption (as indicated by a URL that starts with https://). Those sites encrypt data as it travels between your browser and the server, reducing the risk that a password could be intercepted in transit. If you’ve stored any sites whose URLs begin with http:// instead of https://, they’re listed in the Unsecured Websites category as a way of warning you that your credentials could potentially be sniffed when you log in.
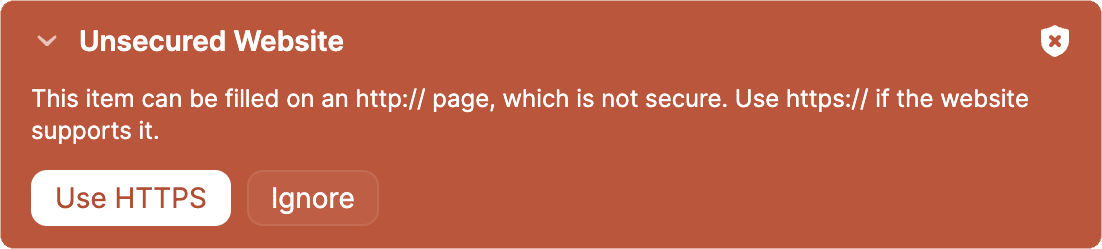
In almost every case I’ve seen, the websites in question have in fact been upgraded to use TLS or SSL since the time I stored my login, so the problem wasn’t the site, but simply the fact that my record of it in 1Password was old. What you should do in each of these cases is visit the site in question and see if you’re automatically redirected to a secure, https:// version of the site, usually indicated by a lock icon in your browser’s address bar. If you are, you can expand the Unsecured Website banner that appears at the top of the login, as shown in Figure 33, and then click Use HTTPS. The first time you do so, 1Password prompts you to confirm that it can check with the site to see if it supports HTTPS; click either “Always allow for all sites” to enable this check globally, or “Allow once for this site” to enable the check just once.
Inactive Two-Factor Authentication
If a site offers two-factor authentication (or two-step verification) using the One-Time Passwords 1Password can generate—but you haven’t set up that site’s TOTP in 1Password yet—the site appears in the Inactive 2FA category. Select an item and click the “Learn how to turn on two-factor authentication” link at the top for details on how to enable two-factor authentication on that site, and then click Scan QR Code once you’re on the page that displays the code.
Expiring
If you have items in 1Password with expiration dates—things like credit cards, driver licenses, and passports—and they’re near or beyond those expiration dates, they appear in this category. Renew the item if necessary, or update the expiration date if you’ve already renewed it.
Share Individual 1Password Items
1Password offers several ways of sharing data. One approach, which I cover later on, in Manage a Family or Team Account, is to share an entire vault with another family member, team member, or guest using a 1Password Families or Teams account.
However, sometimes you don’t need to share an entire vault, but want to give someone else access to a single login, note, document, or other item. 1Password 8 now offers a secure way to do so—even if the other person doesn’t use 1Password at all!
To share an item using the 1Password app:
Select the item you want to share.
Click the “More options”
 pop-up menu and choose Share. A dialog (Figure 34) appears.
Figure 34: Use this dialog to share a 1Password item. All links to shared items expire, but you can choose how soon that happens. From the “Link expires after” pop-up menu, choose 1 hour, 1 day, 7 days (the default), 14 days, or 30 days.
From the “Available to” pop-up menu, choose one of these:
Anyone with the link: With this option, which is the default, anyone who has the link you’re about to generate can view the item. Use this if you want to share something publicly or with a large group.
Only some people: To restrict the link to only the person or people you specify, choose this option. When you do so, another field appears. Click the “+ add email” button, type the email address of the intended recipient, and press Return or Tab. Repeat as needed to add more recipients.
If you want the password to be viewable only once, after which it becomes unusable, select “Can be viewed only 1 time.” If you are sharing it with one or more specific people, that option becomes “Can be viewed only 1 time per person.”
Click Get Link to Share. 1Password puts a special link on your clipboard.
Paste the link into an email, text message, or other means of messaging the recipient(s).
The recipient then clicks the link to view the shared item on a secure webpage. (If you restricted access to only certain people in step 4, each recipient must first enter their email address. They receive a numeric code at that address, which they must enter to view the shared item.)
When you share a 1Password item in this way, what you’re actually sharing is not the live item in your vault but rather a copy of that item’s contents at the time it was shared. So, if you modify anything about that item (such as changing your password), the new information will not be available to anyone with the existing link; if you want them to have the new information, you’ll have to create a new link.
Import and Export Data
You might want to import passwords from an older version of 1Password or another browser or password manager. You might export to move to a different password manager (perish the thought!) or as an extra backup. 1Password offers support for either task.
Import
Before you can import data from another browser or password manager, you must export the data in an unencrypted form that 1Password can read.
The 1Password app can import data in the following formats:
1Password Unencrypted Export (1PUX)—see Export, ahead
Comma-separated values (
.csv) exported from either 1Password or Apple iCloud Keychain
In addition, only if you log in to your 1Password account on the web, you can import files exported from:
Brave, Chrome, Dashlane, Edge, Firefox, KeePassX, LastPass, RoboForm, or Safari (in
.csvformat only)KeePass or Thycotic Secret Server (in
.xmlformat only)Comma-separated values (
.csv) files from other sources
To import supported formats in the 1Password app:
Choose File > Import (macOS) or click the More
 icon and choose Import from the pop-up menu (Windows or Linux).
Drag the
.csvfile to the window; or click + Add File, navigate to the file, and click Open.Click Import and follow the onscreen instructions.
1Password merges the new data with what’s already in the vault you select.
Read the 1Password support article Move your data from other applications to 1Password for more detailed instructions, including how to import formats that are supported only when using the 1Password website.
Export
You can export 1Password data in the JSON-based 1Password Unencrypted Export (.1pux) format (which includes all your data), or as a comma-separated values (.csv) file (which includes only logins and passwords).
To export your data:
Choose File > Export > Account Name (macOS) or click the More
icon and choose Export > Account Name (Windows or Linux).Enter the master password for the account.
Select an export format (1PUX or CSV) and click Export Data.
Navigate to where you want to save the exported file and click Save.
1Password saves your exported data—unencrypted—to the file you specified.